

Page 1

™
Anaconda Switcher
8 channel remote controlled wired-camera switcher
The VK68A includes an 8 channel camera switcher (VS10A), a plug-in power supply (PR30A), and an 8 button RF remote control
(KR28A). You can connect up to eight X10 Anaconda cameras to the VS10A using the 15 ft., or 60 ft. cables that come with the
Anacondas. You can then turn any of these cameras on by remote control from up to 100 ft. away. When you turn any camera on, the
others in the group turn off. Y ou can control any group of cameras between 1 and 8, e.g. 1 thru 4, 1 thru 6, etc. You can scan through your
group of cameras (at a rate of about once every 5 seconds) by pressing scan forward or backward on the VS10A or on the KR28A remote.
You stop the scan by pressing any number on the remote control (which displays that numbered camera). You can also connect the
VS10A to your PC and control your cameras via software that you download from www.x10.com/software.
Model VK68A
Includes VS1 0A +
KR28A + PR30A
CAUTION: DO NOT CONNECT THE JACKS ON THE
BACK OF THE VS10A TO YOUR PHONE LINE!
Connect as many Anacondas as you want (up to 8) to the
sockets on the back of the VS10A. If you have less than 8
cameras, start with number one on the right (looking at the
back of the unit) and work sequentially to the left. Follow the
setup instructions that come with the Anacondas to set each
one up.
Connect to PC’s serial port
for computer control.
If your TV does not have a Video IN jack you might be able to
connect the VS10A to the Video IN jack on your VCR, or you
might need to purchase an external TV modulator .
Lift the antenna on the VS10A to
the upright position.
Connect the Video Out jack on
the VS10A to the Video IN jack
on your TV.
Plug the PR30A power
supply into the jack on the
side of the VS10A, plug
the power supply into any
convenient AC outlet, and
turn the switch on the
VS10A ON.
Operation
Press any button (1-8) on the KR28A remote control (included)
to turn on the camera attached to that channel on the VS10A.
When you turn on any camera the others in the group turn off.
Scanning your cameras
Momentarily press the VS10A ’ s Scan Forward button (Up
arrow) to scan cameras 1 to 8, or Scan Backward button (down
arrow) to scan cameras 8 to 1. Each time you press the button,
the VS10A steps to the next camera in the group and
illuminates its corresponding channel LED.
Auto-Scan
Press and hold the VS10A ’ s Scan Forward button (Up arrow) or
Scan Backward button (down arrow), hold the button pressed
for a couple of seconds, or press the Scan Forward or Scan
Backward button on the KR28A remote. The LED for the last
camera in the group blinks twice then stays on. Release the
Scan button. The VS10A then automatically scans around the
cameras in your group (backwards, or forward) at the rate of
about once every 5 seconds. To stop the scan, press either the
Scan Forward or Scan Backward button on the VS10A, or press
any number button on the remote. The camera who’s number
you pressed will be displayed on your TV.
Changing the group of cameras you want to scan:
In the default state the VS10A scans around all 8 channels. If
you have installed less than 8 cameras you can set it to scan
around a lower number:
1. Press the VS10A’ s Scan Forward AND Scan Backward
buttons at the same time. Hold the buttons until the LED for
channel number 1 starts to flash slowly.
2. On the KR28A remote, press the button for the max. number
of cameras you have connected to the VS10A. E.G., if you
connected cameras to jacks 1 thru 4, press button 4 on the
remote. The LED for channel number 1 now flashes faster
and then goes out. Now when you press any of the scan
buttons, the VS10A scans thru cameras 1 thru 4 (instead of
1 thru 8).
VK68A-11/01
Page 1 of 2
Page 2
The KR28A Remote Control sends Wireless Radio
Frequency (RF) signals to the VS10A. It is normally set to
Housecode A and controls cameras connected to channels
1 thru 8. You can however change the Housecode:
To change the Housecode for the KR28A remote
1. Press and hold the number 1 button. The red LED blinks
once. 3 seconds later, the LED blinks the current setting:
1 blink for Housecode A, 2 blinks for B....... 16 blinks
for P.
2. Release the number 1 button.
3. Press and release the number 1 button the appropriate
number of times for the Housecode you want to set.
Once for A, twice for B, etc. The LED blinks for each
press. IMPORTANT: Hold the button on your last press.
3 seconds later, the red LED blinks back the new setting,
e.g. 3 blinks for Housecode C. If you do not follow this
programming sequence, the LED will stay on for 1 second
and your existing setting will not be changed.
Note: if you change the Housecode setting for the remote
you must reprogram the VS10A to recognize it. T o do this
just set the group of cameras that the VS10A will scan as
described in “Changing the group of cameras you want to
scan” earlier. When you press a button on the KR28A to
set the group, the VS10A will automatically be set to
recognize the new housecode setting for the KR28A.
To change the batteries: Pry the unit apart and fit two
CR2016 Lithium 3V batteries. Observe polarity .
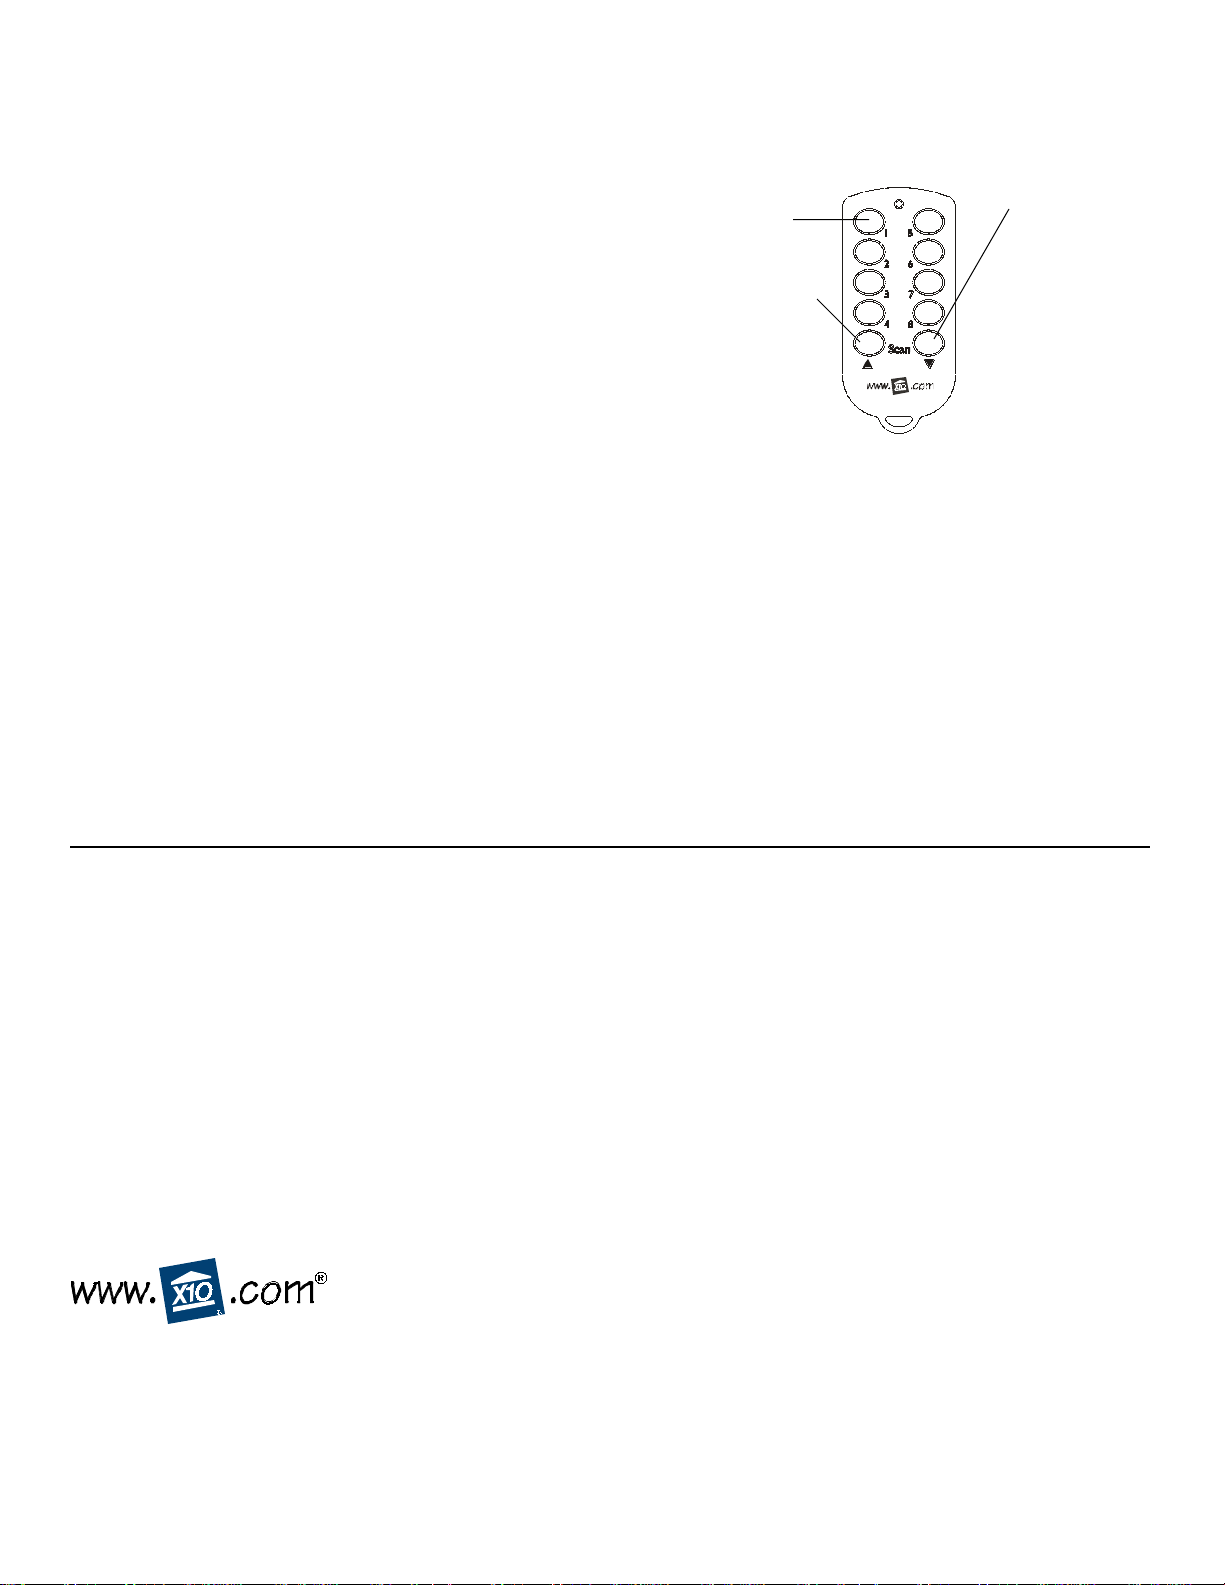
Press to turn on
cameras 1 thru 8
Press and release to
scan forward (short
delay between
images displayed).
Press and
release to scan
backward (short
delay between
images displayed). Press
any # to stop
scan and display
that camera.
Computer Control
Connect the VS10A’s Serial IN RCA jack to your PC’s
serial port using the RS-232 to RCA cable (supplied). Install
the software from the link you received in the e-mail you
got confirming your order. You need to be connected to
the Internet while you install it. Follow the installation
instructions and refer to the software’s Help section. Set
the COM port setting for the serial port you connected the
VS10A to. You will now be able to control your Anaconda
cameras from your PC.
The PC software also lets you disable the RF control
section of the VS10A if you desire, to prevent anyone from
being able to control your cameras by remote control.
FCC CAUTION: THIS DEVICE COMPLIES WITH P AR T 15
OF THE FCC RULES. OPERA TION IS SUBJECT TO THE
FOLLOWING TWO CONDITIONS:
(1) THIS DEVICE MA Y NOT CAUSE HARMFUL
INTERFERENCE, AND
(2) THIS DEVICE MUST ACCEPT ANY INTERFERENCE
RECEIVED, INCLUDING INTERFERENCE THA T MA Y
CAUSE UNDESIRED OPERA TION.
NOTE: Modifications to any of the components in this kit will
void the user’s authority to operate this equipment.
X10.com, a division of X10 Wireless Technology, Inc.
For more info please visit: www.x10.com/support
LIMITED 1-YEAR WARRANTY
X10.com, a division of X10 Wireless Technology, Inc. (X10)
warrants X10 products to be free from defective material and
workmanship for a period of one (1) year from the original date of
purchase at retail. X10 agrees to repair or replace, at it’s sole
discretion, a defective X10 product if returned to X10 within the
warranty period and with proof of purchase.
If service is required under this warranty:
1. Call 1-800-675-3044 or visit www.x10.com, or e-mail
sales@x10.com to obtain a return merchandise authorization (RMA) number.
2. Return the defective unit postage prepaid to X10 (see
address on back).
3. Enclose a check for $4.00 to cover postage and handling.
4. Enclose a dated proof of purchase.
5. X10 is not responsible for shipping damage. Units to be
returned should be packed carefully.
Please visit www.x10.com/warranty
to complete your on-line warranty registration. Thank you.
VK68A-11/01
Page 2 of 2
 Loading...