

Page 1
The Telephone Responder
turns on up to
10 lights
or appliances
from
any telephone
in
the
world!
So
you
can tum on
your
centrai
heating
or air conditioning before
you
leave
work. Or
you
can
warm up or cool down
your
vacation home
when
you
arrive
at ilre
airport. You'll never have
to come
home
to a dark
home
again.
It's
also a
remote
control
so
you
can control up to 8
lights
and appli-
ances
from
anywhere inside
your
home. You
can turn on
ALL
lights
connected to
Lamp Modules
and
Wall
Switch
Modules with
the
push
of a
single button
if
you
hear
a noise
at
night. You
can
even
turn off
everything
in
the system with
one button when
you
go
to
bed.
It will flash
a selected light or lights
anywhere
in
the
house when
the
phone
rings
(useful
for
the
hearing impaired).
CAUTION
Be very
careful when
you
use
your
Telephone Responder
with
any
kind
of appliance. If
you
use
it
to turn on an
empty coffee
pot,
for
example,
you
could
burn up the coffee
pot's
heating
element, and even create a
fire hazard.
It would
be even
more
dangerous if
you
used
remote
control to turn
on an elertric
heatcr
that
had
clothing draped on it.
USE
YOUR TEEEPHONE
RESPONDER
CAREFULLY
The Telephone Responder
activates lights
and appliances through-
out
your
home from
any convenient. location. It
transmits signals
to
plug-in
Modules
over
your
existing house wiring. You
plug
lamps into Lamp
Modules,
plug
appliances
into Appliance Mod-
ulcs and
replace
wall
light
switches with Wall Switch Modules.
You
can then control
virtually
everything electrical in
your
home.
The X-10 POWERHOUSE*
Telephone Responder
Model TR551
O
Turns
on or offup to
10 lights/appliances
over rhe telephone.
O
Controls
heating/air
conditioning.
You'll never have
!o come
home
to a cold
or dark
house
again.
O
lets
you
remotely
control up
[o 8
X-10 Modules from
any-
where inside your
home. You
plug
lamps
and appliances into
the
Modules. You
can replace
your
wall
switches
with
Wall
Switch
Modules
to control important
outside
security
lights.
O Sends signals to Modules
over
your
existing house wiring
(no
additional wiring necessary).
O
Keep
the
Telephone Responder
by the bedside
and tum off the
TV
without
getting
out of bed.
O
Turn
on
ALL lights
connected to
Lamp
and Wall
Switch
Mod-
des
with
the touch
of a button
if
you
hear a noise
at
night.
O
Turn
off
everything
in
the system witr one button.
USA X-10
(USA)
Inc.,
9l
Ruckman
Rd., Box
420.
Closer NJ07624-0420
Canada
X-10 Home
Controls
Inc.,
120U Aerowood Drive,
Unit
20, Mississauga,
Ontario,
Canada
LAW 257
TR551-490
The Telephone Responder
tells
the
Modules
what
to do. Com-
mand
signals are sent
over
your
existing
house
wiring
to the
Mod-
ule(s) of
your
choice.
The Modules respond
to the
command sig-
nals. The
Lamp Module
turns on and
off, dims and brightens
(from
other
controllers) any
incandescent
lamp
up to
300 wats.
The Appliance
Module
turns on and
off appliances such
as a
win-
dow
fan,
window
air conditioner, stereo
or
TV
(not
"instant
on"
TVs). It
can
also be used
for
a
lamp -
but cannot dim it. The
Wall
Switch
Module
turns on and off, dims
and brightens
(from
other
controllers)
any
incandescent light
up to 500 watts.
TELEPHONE
RESPONDER
Model TR551
Sef Up
lnstructions
Printed in Hong Kong
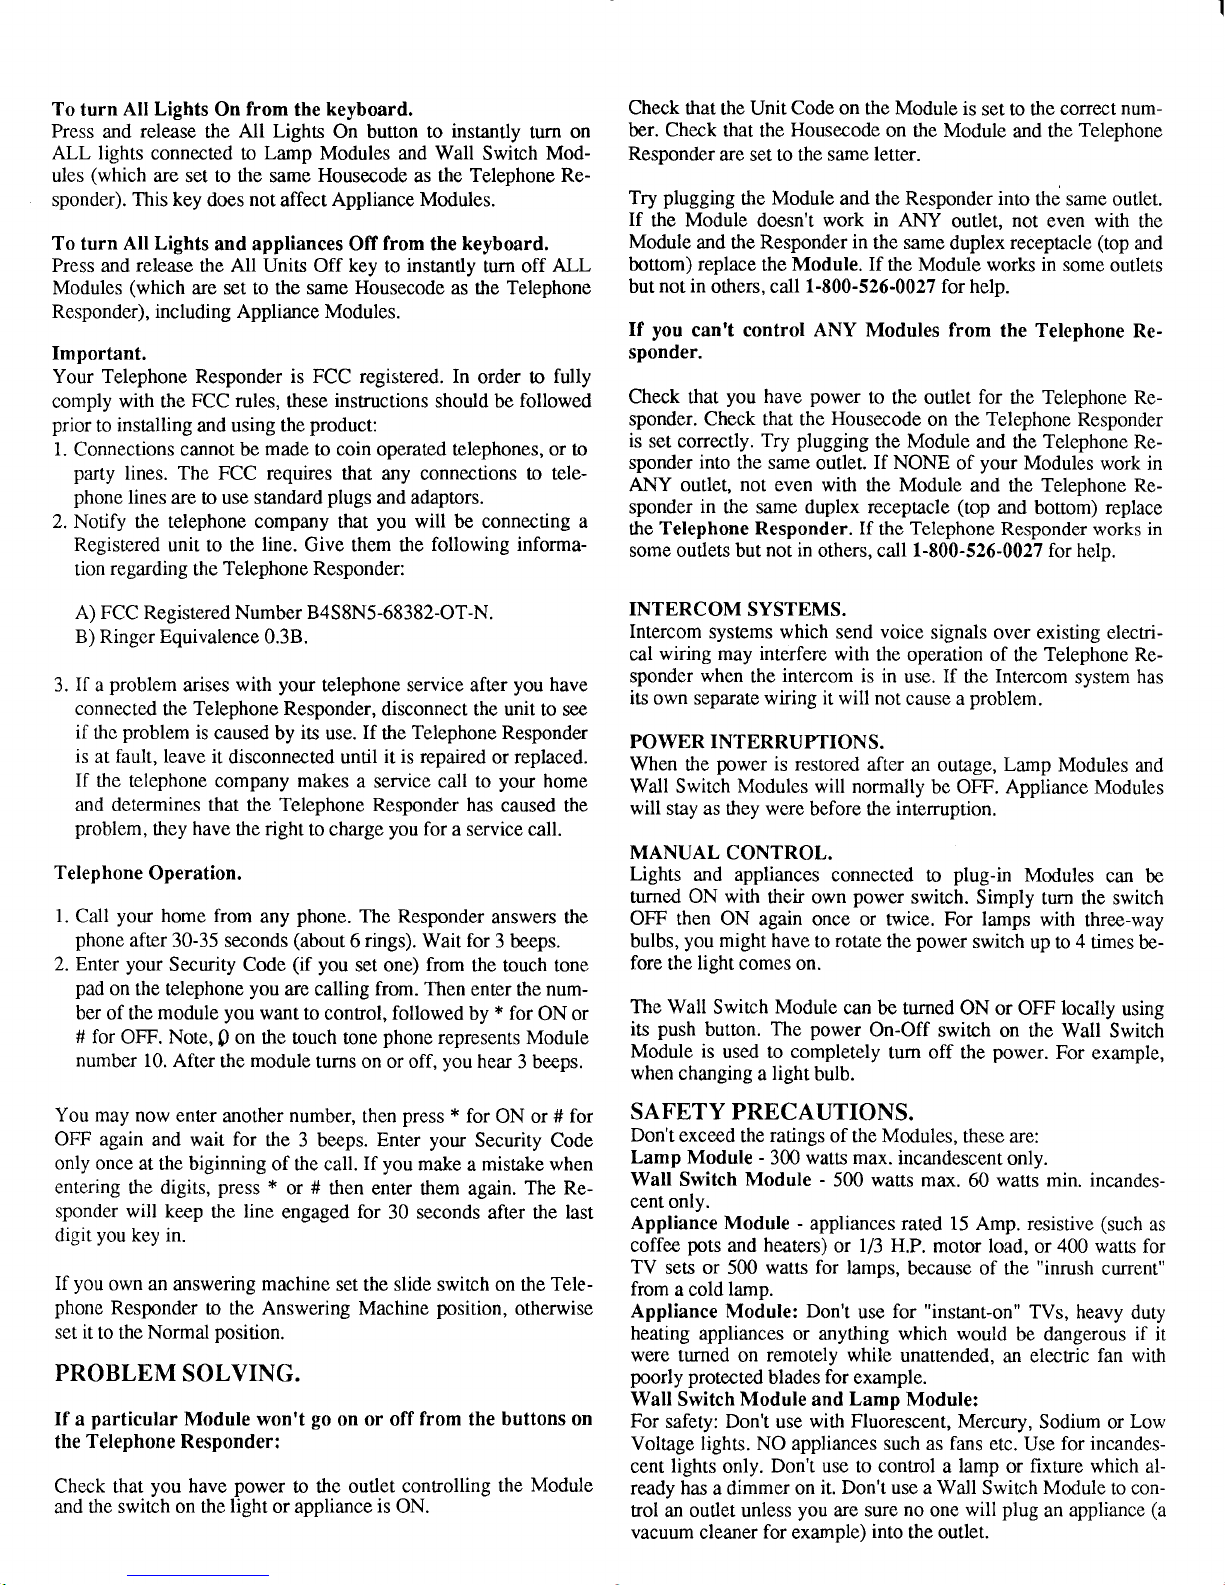
Sllde Switch.
Set to Normal
or Answering
Machine mode.
Security Code
Choose a
number
000 ro
999.
Lasr
digit
sets code for
"flashing
light."
Telephone
Responder
Mini Timer
(optional)
Num'oer keys
Housecode
Set
all of
your
Modules to the
sameletter
"On/Off
keys All Lights On
key AII Units
Off key
INSTALLATION
1.
Plug
power
cord
into
any
functioning
120V
outlet and
plug
phone
cord
into
an
RJll
phonejack.
2.
Using a
small
screwdriver,
set
Telephone Responder's House-
code dial to
one
of the letters
(
A
through
P).
3. Set Security Code
(0
to
999). Use one, two
or
three
digits as
desired,
Set
all dials
to OFF
for no
security
code.
4. Install
and set
up Modules
(sold
separately) refening
to the
in-
structions
included with
them. Turn
off the
power
at
the circuit.
breaker
panel
when installing
Wall Switch
Modules.
5. Set all of
your
Modules
to
the same
Flousecode
as
you
set on
the
Telephone Responder.
6. Set
each
Module
to a
Unit Code between I
and 8.
Any Mod-
ule(s) set to the same
number
as the third digit of the security
code
(on
right)
will
flash
on
and off
when
the
phone
rings.
To turn a
light
or
appliance
ON or
OFF
from
the
keyboard.
Press dnd
release
the
number
button corresponding
to the Unit
Code
you
set
on the Module to be controlled.
Then
press
and
re-
lease the ON or
OFF button.
Walt
Switch
Module
Page 2
To
turn
AII Lights
On
from
the
keyboard.
Press
and
release
the
All Lights
On button to
instantly
turn
on
ALL lights
connected to
Lamp
Modules and Wall
Switch
Mod-
ules
(which
are
set
to the
same
Housecode
as
the Telephone Re-
sponder).
This key
does
not
affect
Appliance Modules.
To turn All Lights
and appliances Off
from
the
keyboard.
Press and
release
the All Unis Off key
to
instantly
turn off
ALL
Modules
(which
are set to the same Housecode as the Telephone
Responder), including Appliance Modules.
Important.
Your Telephone Responder is FCC registered. In
order !o
fully
comply
with the
FCC
rules, these
instructions
should be
followed
prior
to
installing
and using
the
product:
l.
Connections cannot be
made
to
coin operated telephones, or to
party
lines. The FCC requires
that any connections to
tele-
phone
lines
are to use standard
plugs
and adaptors.
2. Notify
the
telephone company
that
you
will be connecting a
Registered
unit to the
line.
Give them the
following informa-
tion
regarding
the
Telephone Responder:
A) FCC Registered Number B4S8N5-68382-OT-N.
B) Ringcr Equivalence
0.3B.
3.
If
a
problem
arises
with
your
telephone service after
you
have
connected
the
Telephone Responder,
disconnect. the
unit to see
if
thc
problem
is
caused by
its
use.
If
the
Telephone Responder
is
at fault, leave it
disconnected until
it is repaired
or
replaced.
If
the telephone
company
makes
a service call to
your
home
and determines that the Telephone Responder has
caused the
problem,
they
have
the right
to charge
you
for
a service call.
Telephone
Operation.
1.
Call
your
home from
any
phone.
The Responder
answers the
phone
after 30-35 seconds
(about
6
rings).
Wait
for
3 beeps.
2. Enter your
Security Code
(if
you
set one)
from
the
touch
tone
pad
on the telephone
you
are calling
from. Then
enter the
num-
ber of the
module
you
want to
control,
followed
by * for
ON or
#
for
OFF.
Note,
p
on the touch
tone
phone
represents Module
number
10. After
the
module
turns on or off,
you
hear
3 beeps.
You may now
enter
another
number,
then
press
*
for
ON or
# for
OFF again
and wait for
the 3 beeps. Enter
your
Security Code
only once
at the biginning
of tie call.
If
you
make a mistake when
entering
the digits,
press
*
or
#
then
enter them again.
The Re-
sponder will keep
the
line
engaged
for
30
seconds
after the
last
digit
you
key in.
If
you
own
an
answering
machine
set the slide switch on the
Tele-
phone
Responder
!o the Answering Machine
position,
otherwise
set
it
to the Normal
position.
PROBLEM
SOLVING.
If
a
particular
Module
won't
go
on or off
from
the
buttons on
the
Telephone Responder:
Check that
you
have
power
to the outlet
controlling
the
Module
and
the switch on the
light
or appliance
is
ON.
Check that
the Unit
Code on the Module
is
set to the
correct
num-
ber. Check that
the
Housecode
on the Module
and the
Telephone
Responder
are set to the same
letter.
Try
plugging
the
Module
and the Responder into
the same outlet.
If
the
Module
doesn't
work in ANY
outlet,
not
even with the
Module
and the
Responder in
the same
duplex
receptacle
(top
and
bottom) replace
the
Module. If
the Module works in some
outlets
but
not in
others, call
1-800-526-0027
for help.
If
you
canrt control ANY Modules from
the Telephone
Re-
sponder.
Check that
you
have
power
to
the outlet
for
the Telephone Re-
sponder. Check that the
Housecode
on the Telephone Responder
is set correctly.
Try
plugging
the
Module
and
the
Telephone
Re-
sponder
into
the same
outlet.
If NONE
of
your
Modules
work in
ANY outlet,
not
even with
the
Module
and
ttre
Telephone
Re-
sponder
in
the same duplex receptacle
(top
and
bottom)
replace
the
Telephone Responder. If
the
Telephone
Responder
works
in
some outlets but
not in
others, call 1-800-526-0027 for help.
INTERCOM
SYSTEMS.
Intercom
systems which
send
voice
signals
over existing electri-
cal
wiring
may
interfere
with
the operation
of the
Telephone
Re-
sponder
when
the
intercom
is in
use.
If
t}te
Intercom
system
has
its own separate wiring it will not
cause a
problem.
POWER INTERRUPTIONS.
When
the
power
is restored
after
an outage,
Lamp
Modules
and
Wall Switch
Modules
will normally
be OFF. Appliance Modules
will
stay as they were
before the
intemrption.
MANUAL
CONTROL.
Lights
and appliances
connected
to
plug-in
Modules
can be
turned ON with
their own
power
switch. Simply
turn the switch
OFF then
ON again once or twice. For lamps
with
three-way
bulbs,
you
might have
to
rotate
the
power
switch
up to 4 times
be-
fore
the
light
comes on.
The Wall
Switch
Module
can be turned
ON or OFF
locally
using
its
push
butlon.
The
power
On-Off
switch on the Wall
Switch
Module is
used to completely
tum off the
power.
For
example,
when
changing
a
light
bulb.
SAFETY PRECAUTIONS.
Don't
exceed
the
ratings
of the Modules,
these are:
Lamp Module -
300
watts max.
incandescent
only.
Wall
Switch
Module
-
500 watts max.
60
watts min. incandes-
cent only.
Appliance Module -
appliances rated 15 Amp. resistive
(such
as
coffee
pots
and heaters)
or
l/3
H.P. motor load,
or
400
waus for
TV
sets or 500 watts for lamps,
because
of the
"inrush
current"
from
a cold
lamp.
Appliance Module: Don't
use
for
"instant-on"
TVs, heavy
duty
heating
appliances or anything which would
be dangerous if it
were turned
on
remotely while
unattended,
an electric
fan with
poorly protected
blades
for
example.
Wall
Switch
Module
and
Lamp Module:
For
safety: Don't use
with Fluorescent,
Mercury,
Sodium or
Low
Voltage lights. NO appliances such as
fans
etc.
Use
for incandes-
cent
lights
only.
Don't use to control a lamp
or
fixture
which al-
ready has
a dimmer
on
it. Don't use
a
Wall
Switch
Module
to con-
rol an outlet unless
you
are sure
no
one
will
plug
an
appliance
(a
vacuum
cleaner
for
example)
into
the outlet.
 Loading...