

Page 1
ActiveHome Pro
USB 2-Way
Home Automation System
MODEL CM15A
OWNER’S MANUAL
(Please keep for future reference)
1
Page 2
INTRODUCTION
Introduction
Welcome to the world of Home Automation.
You now have the power to control your whole home from your
computer! With ActiveHome Pro and your X10 Modules you can
create schedules for your lights and appliances, set up groups of
commands for your daily life, and keep lights and appliances off
when they’re not in use. Use ActiveHome Pro to make your home
more comfortable, and more secure.
The X10 ActiveHome Pro software, in conjunction with the
Interface, lets you control lights and appliances around your home
when used with X10 Modules.
When you purchased the X10 ActiveHome Pro Computer Interface
you received an e-mail containing a link entitled “New Software
Download Link.”
Important: Please download and install the X10 ActiveHome Pro
software from the link in the e-mail you received before you plug in the
Interface.
This Owner’s Manual shows you how to get started with ActiveHome Pro,
get the most out of its advanced features, and see what X10 Home
Automation products can do. Because ActiveHome Pro is frequently
updated, you might be notified that new versions are available when you
run it (if you’re connected to the Internet). Use this Owner’s Manual as a
guide to get you started, but be sure to read the new help information after
you install updates, since it will always be more up to date.
Controllers and Modules
The first thing you need to understand is that there are two different
devices you need to control your home - Controllers and Modules. Any
light or appliance that you want to control is plugged into a Module and
that Module is then plugged into a standard AC wall outlet.
Modules receive commands from Controllers. Examples of Modules are
the Lamp Module, Appliance Module, and Wall Switch Module.
The ActiveHome Pro Interface is a Controller: Controllers are also plugged
into standard AC wall outlets and send commands to Modules over your
existing electrical wiring in your home, without affecting your electricity in
any way.
The ActiveHome Pro Interface is also a Transceiver: When it receives a
command from a wireless remote control it sends digital signals over your
existing house wiring to Modules that receive the signals and execute the
command.
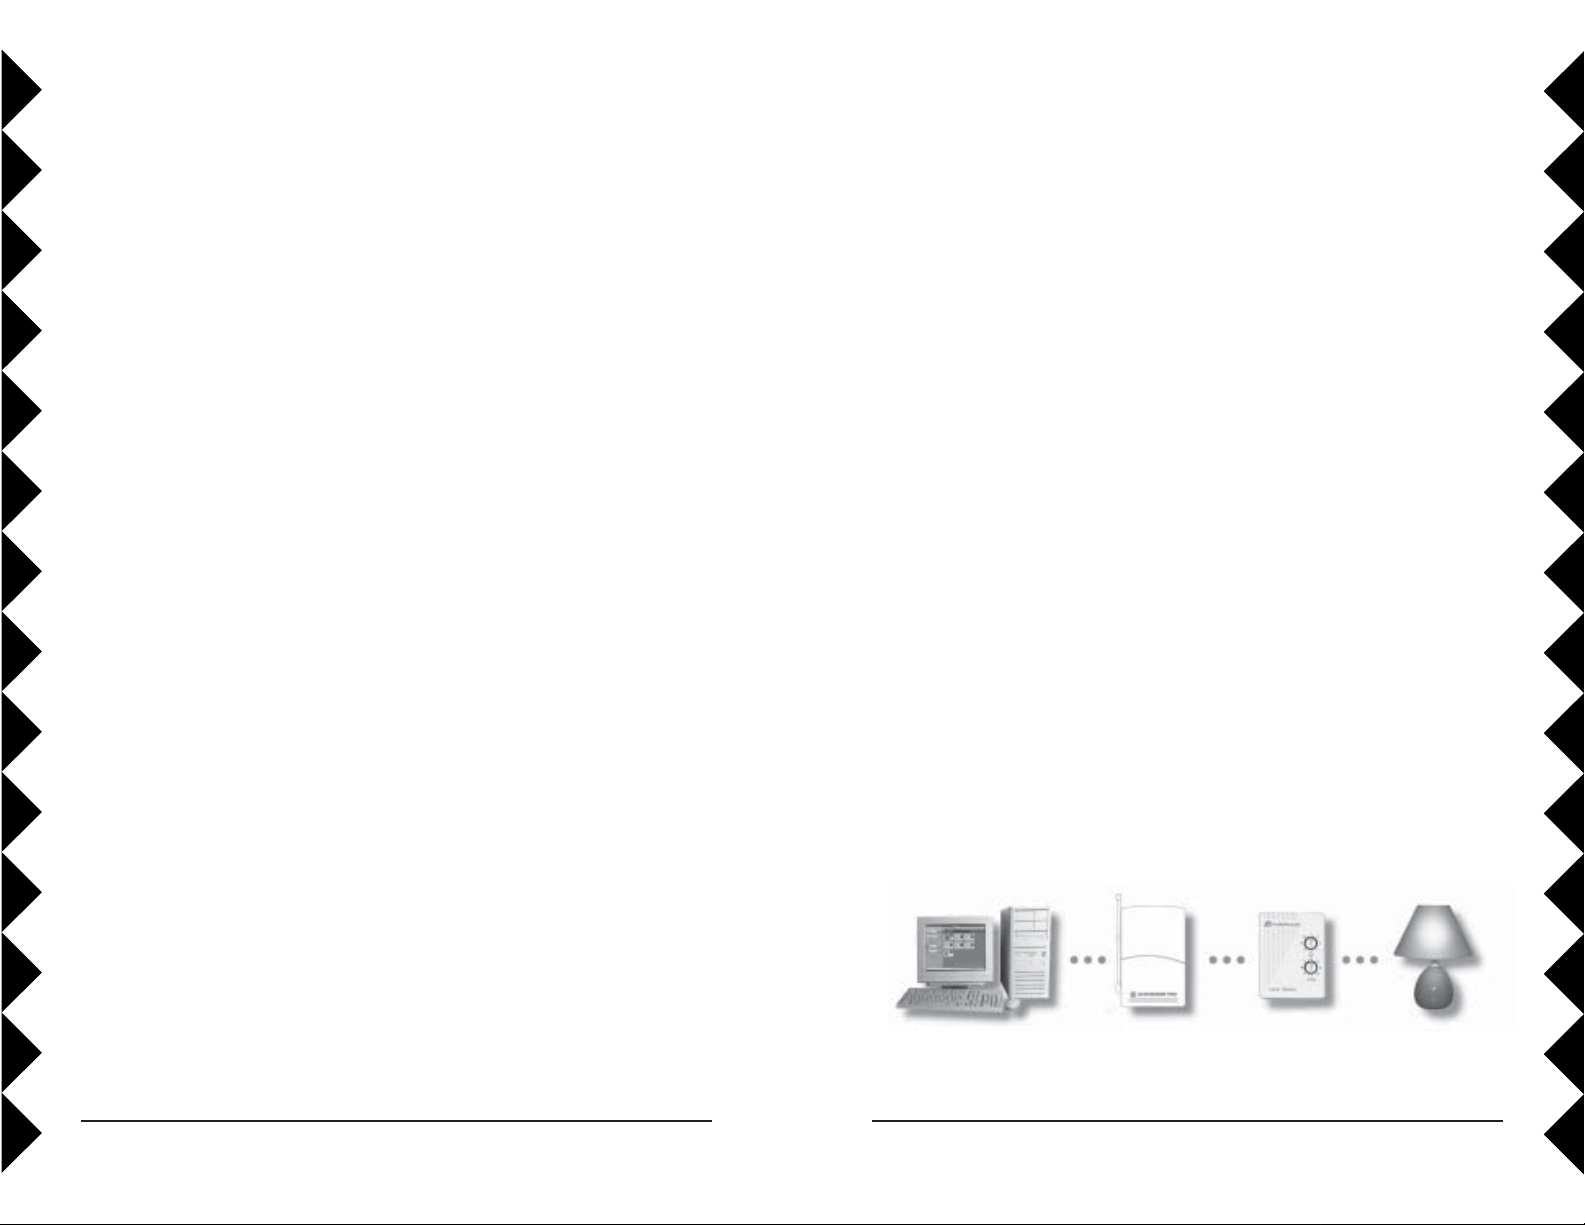
The ActiveHome Pro Interface connects to your PC’s USB port and then
plugs into a standard AC wall outlet. The ActiveHome Pro software tells
the Interface what to do. The Interface then sends digital signals over your
existing house wiring to Modules that receive the signals and execute the
commands sent by the Interface.
With your ActiveHome Pro Home Automation Interface and software,
your PC becomes a very intelligent Controller for all of your home
automation tasks.
32
Page 3

CONTENTS
Contents
Introduction to ActiveHome Pro ........................................2
Setting Up ActiveHome Pro...............................................6
Installing the ActiveHome Pro Interface ...........................6
Operation ..........................................................................10
Using ActiveHome Pro................................................10
Creating & Editing Rooms ...............................................11
Editing Rooms .............................................................11
Adding Modules ...............................................................12
Add Module Dialog .....................................................12
Using Module Panes....................................................13
Module Types ..............................................................14
Lamp Modules.............................................................14
Appliance Modules......................................................15
Motion Sensors............................................................15
Other Modules .............................................................15
Configuration....................................................................16
Getting Data from Previous Versions ..............................16
Opening a File from the Original ActiveHome ...............16
Using ActiveHome Pro ....................................................17
Parts of ActiveHome Pro.............................................17
Controlling Lights & Appliances .....................................18
Lamps and Other Dimmable Modules ........................18
Appliance Modules......................................................18
Macros .........................................................................18
Special Modules ..........................................................19
Two-Way Modules ......................................................19
Creating Timed Events .....................................................20
Opening the Timer Designer .......................................20
Creating a New Timer .................................................20
Setting Up Timers........................................................21
Timer List ....................................................................24
Saving Timers ..............................................................25
Timer Summary View .................................................25
Using Macro Events .........................................................26
The Macro Designer ....................................................26
Module List..................................................................28
Macro Timeline ...........................................................29
Running Macros with Your Computer Off .................31
Making a Macro Step by Step .....................................31
Create the Macro .........................................................31
Step 1: Macro Information ..........................................32
Step 2: Add the First Command ..................................32
Step 3: Use a Delay .....................................................33
Step 4: Dim and Bright................................................33
Step 5: Extending Over Time ......................................34
Step 6: Room Controls ................................................34
Finishing Up ................................................................35
Macro Summary View.................................................36
Storing Timers and Macros in the Interface.....................37
Lifestyle Mode .................................................................38
Turning On Lifestyle Mode.........................................38
Using Lifestyle Mode ..................................................38
Miscellaneous...................................................................39
Troubleshooting ...............................................................44
Expanding Your System...................................................46
54
Page 4
HARDWARE SETUP
Hardware Setup
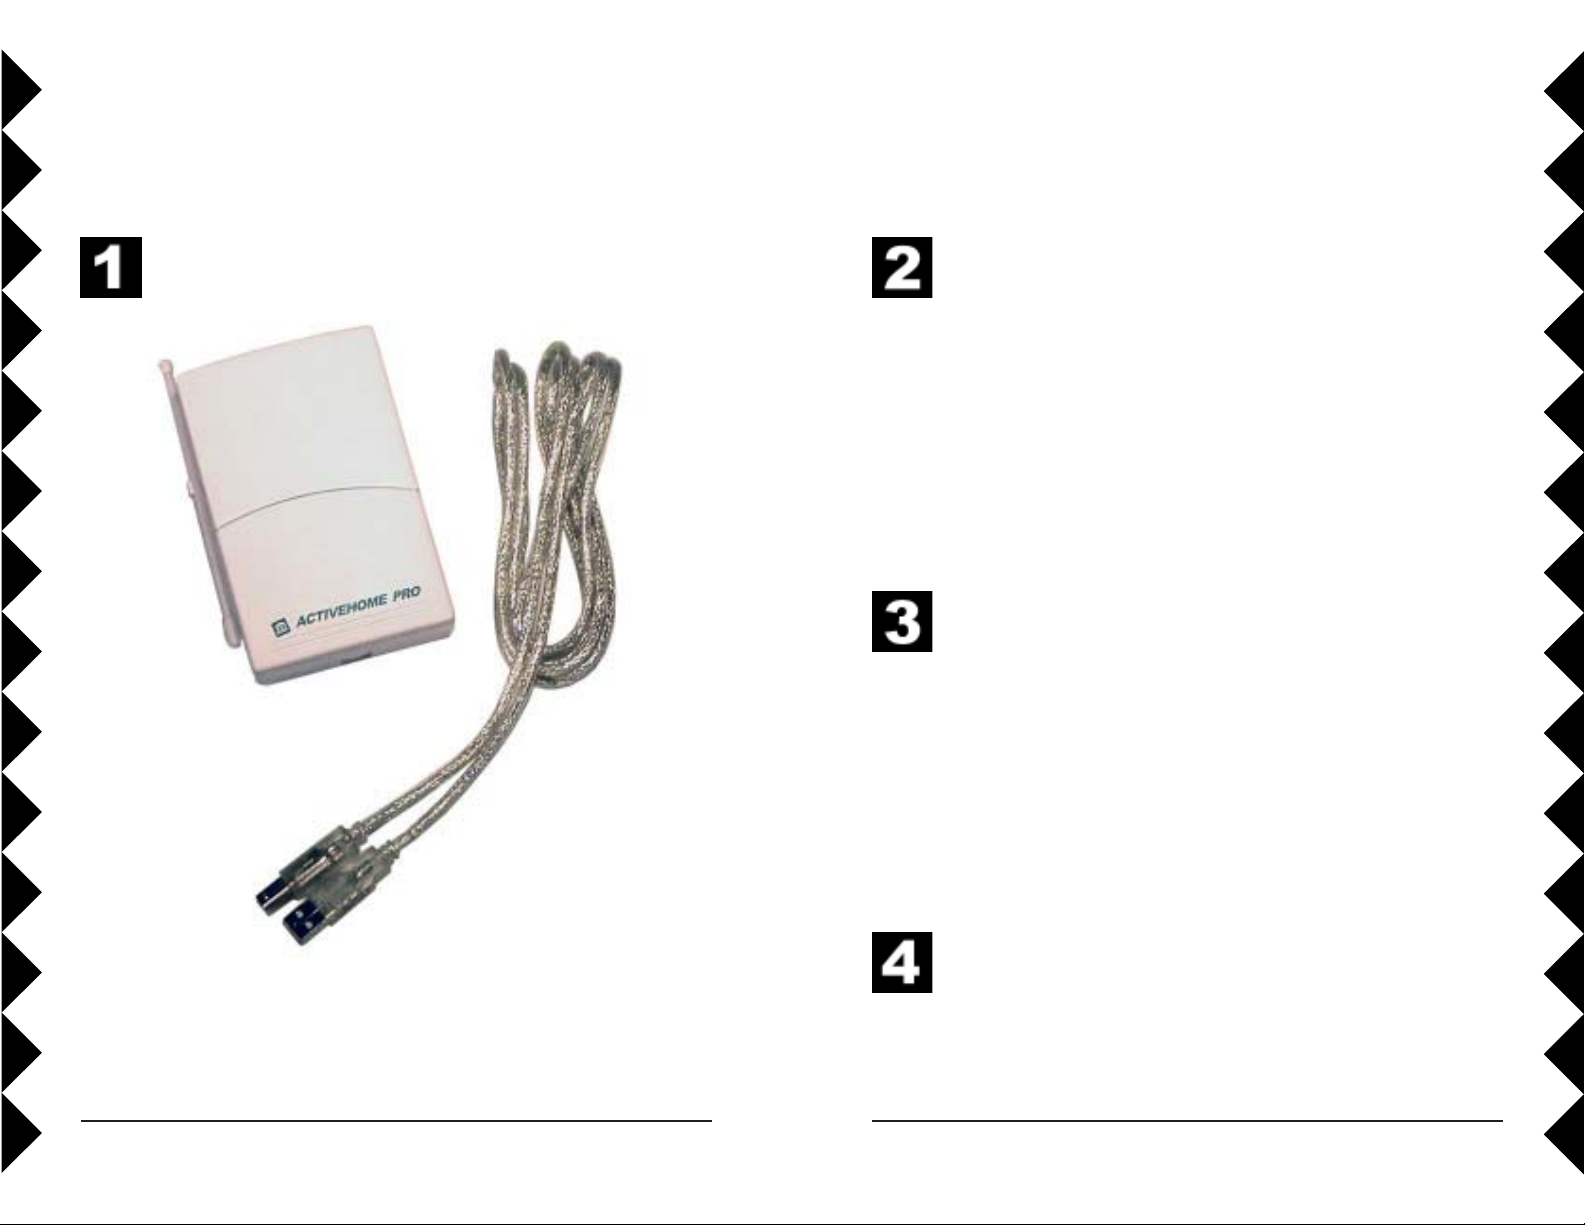
Unpack these items.
Download the X10 Software. Click on the software link in the email you received titled “New Software Download Link.” Before
you download the software, choose the option to save the file, and
save it onto your desktop so you can more easily access it later.
Disable or turn off your anti-virus software before you install the
software as some anti-virus programs interfere with the
installation. Remember to turn on your anti-virus program when
you finish these steps.
You should have: the interface, and a USB cable.
Install the Software. Go to your desktop and double click the
installation program you just downloaded. The software
installation process will install the driver for your CM15A
Interface and the main ActiveHome Pro Application.
76
Page 5
Hardware SetupHardware Setup
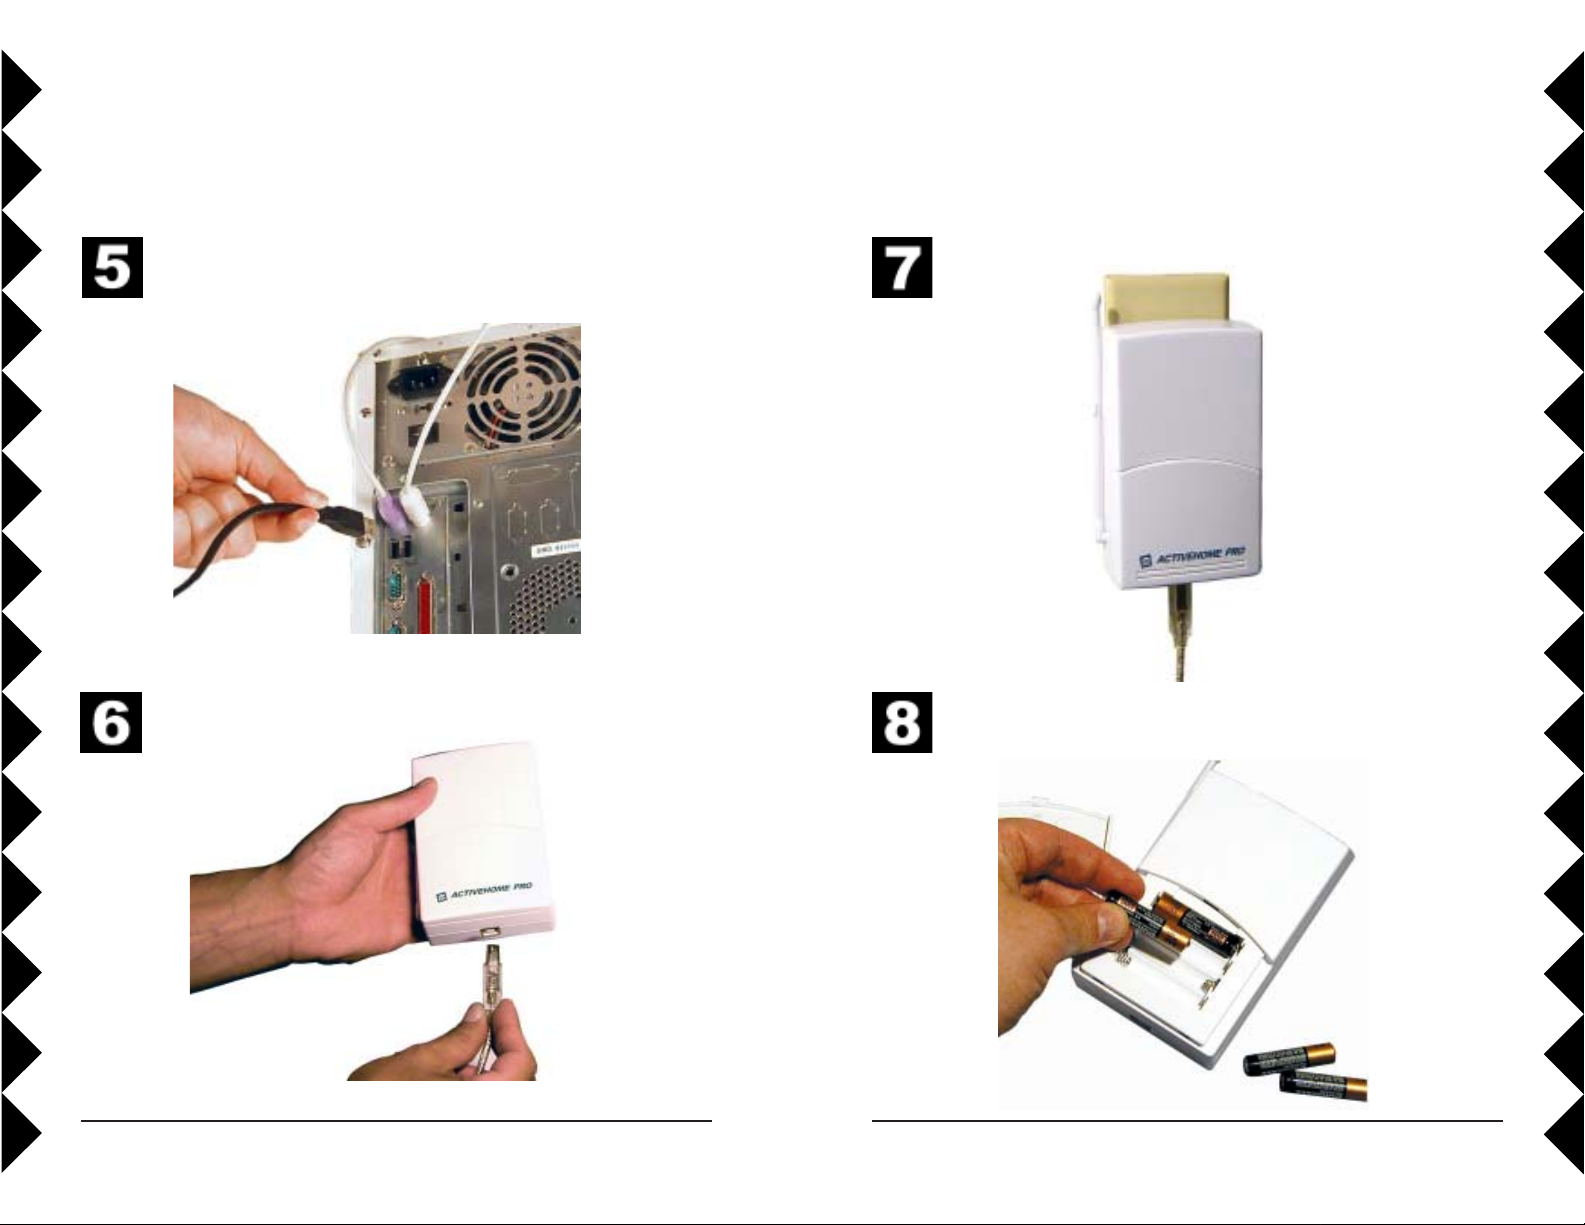
Plug in the CM15A Interface (wait until the installation program
asks you to connect it).
Connect the other end of the USB cable to the CM15A Interface.
Plug the Interface into an AC outlet near your PC.
Insert four AAA alkaline batteries in the battery compartment (for
retaining the time of day if there’s a power outage).
98
Page 6
OPERATION
CREATING & EDITING ROOMS
Using ActiveHome Pro
All you need to do is run your X10 ActiveHome Pro software — your
software controls the Interface. Use the entry in your Windows Start Menu,
or double-click the icon on your desktop to open the program. When the
program opens click on help for information on how to use ActiveHome
Pro.
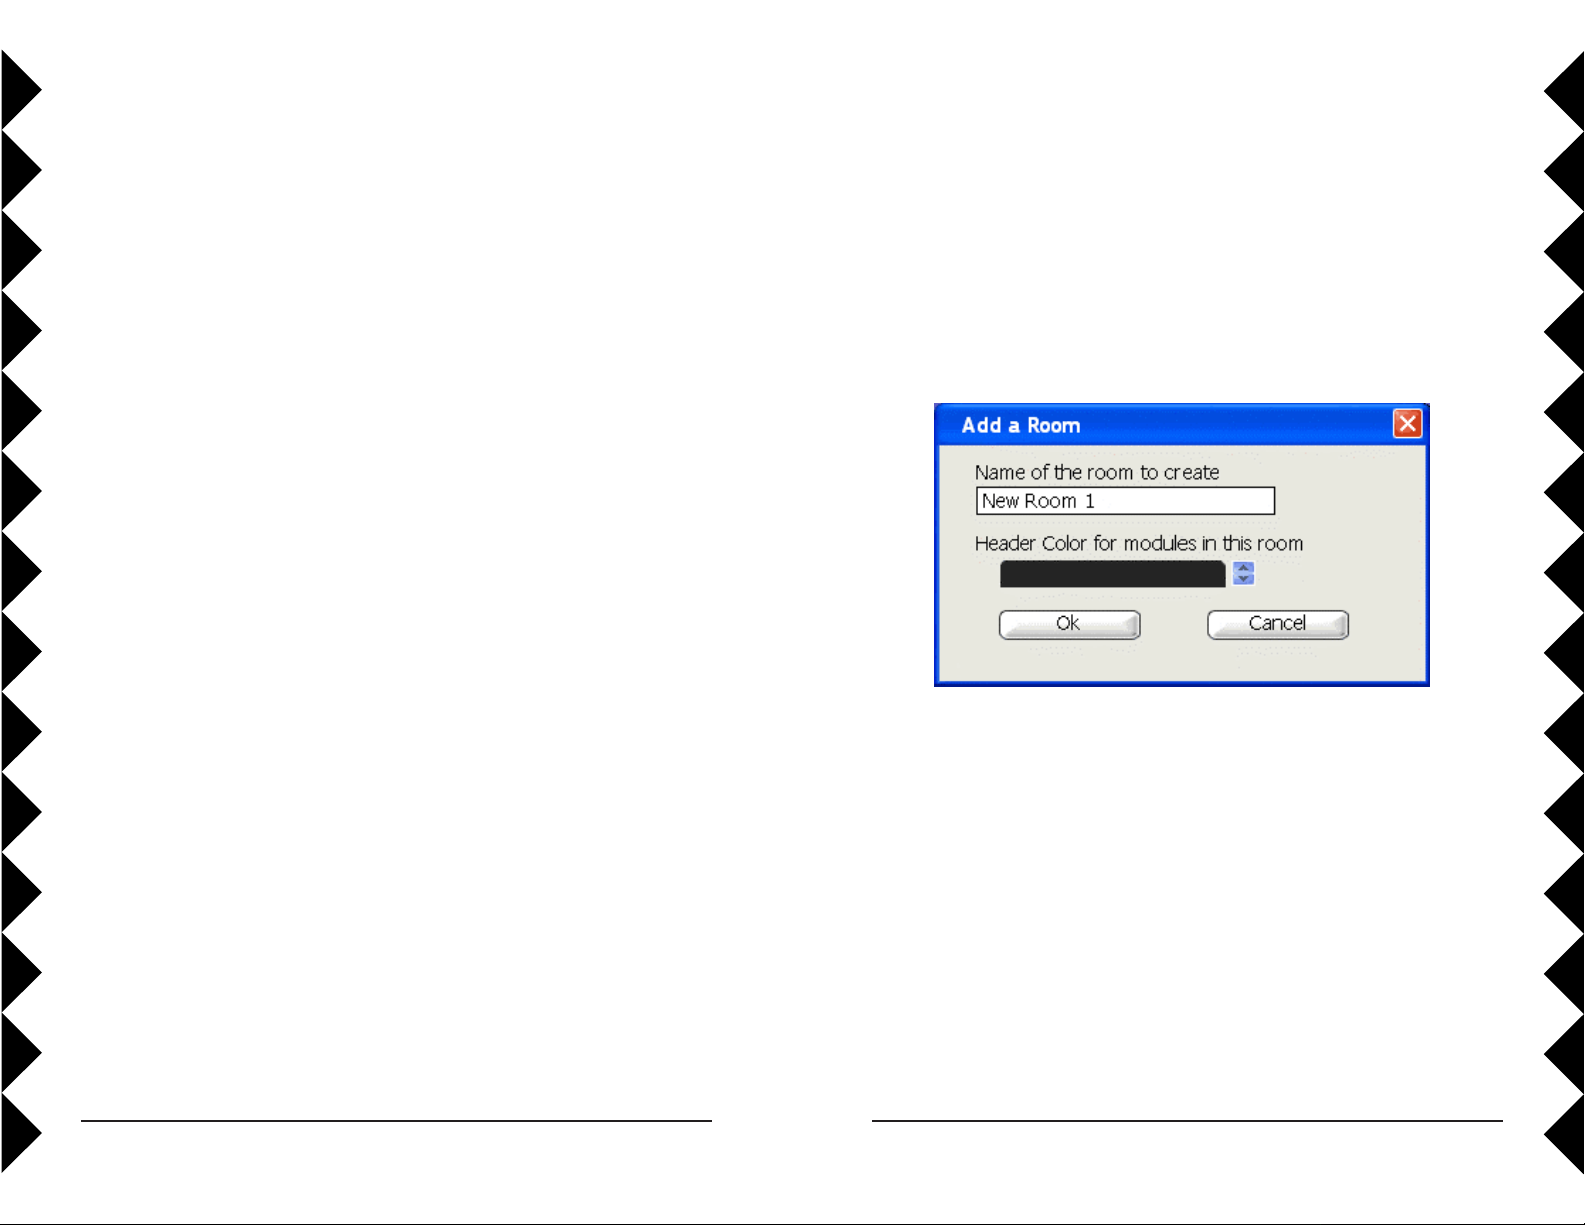
When you create a new file, you’ll automatically be taken to the room
creation window.
Type the name of the room in the box, then choose a color for the modules
in that room. Each room can have its own color, so it’s easier to tell
modules apart in the Room View.
To create additional rooms, click on the (+) button on the Rooms bar in the
Tree Pane. This will open the room dialog again.
Editing Rooms
If you want to make changes to rooms you’ve already created, select the
room you want to change and then use the Edit Menu to choose “Edit
Room” or right-click on a room name and choose Edit Room. The Edit
Room window looks and works just like the Add a Room window.
1110
Page 7
ADDING MODULES
Adding Modules
There are two ways to add modules to ActiveHome Pro: using the Add
Module dialog, and using the Module Panes.
Add Module Dialog
To open the Add Module window, select “Add Module” from the Edit
Menu or choose “New Module” from the Pop-Up Menu.
Using Module Panes
If you open one of the Module Panes from the Tree Pane , you can drag
new modules of the desired type directly into your room.
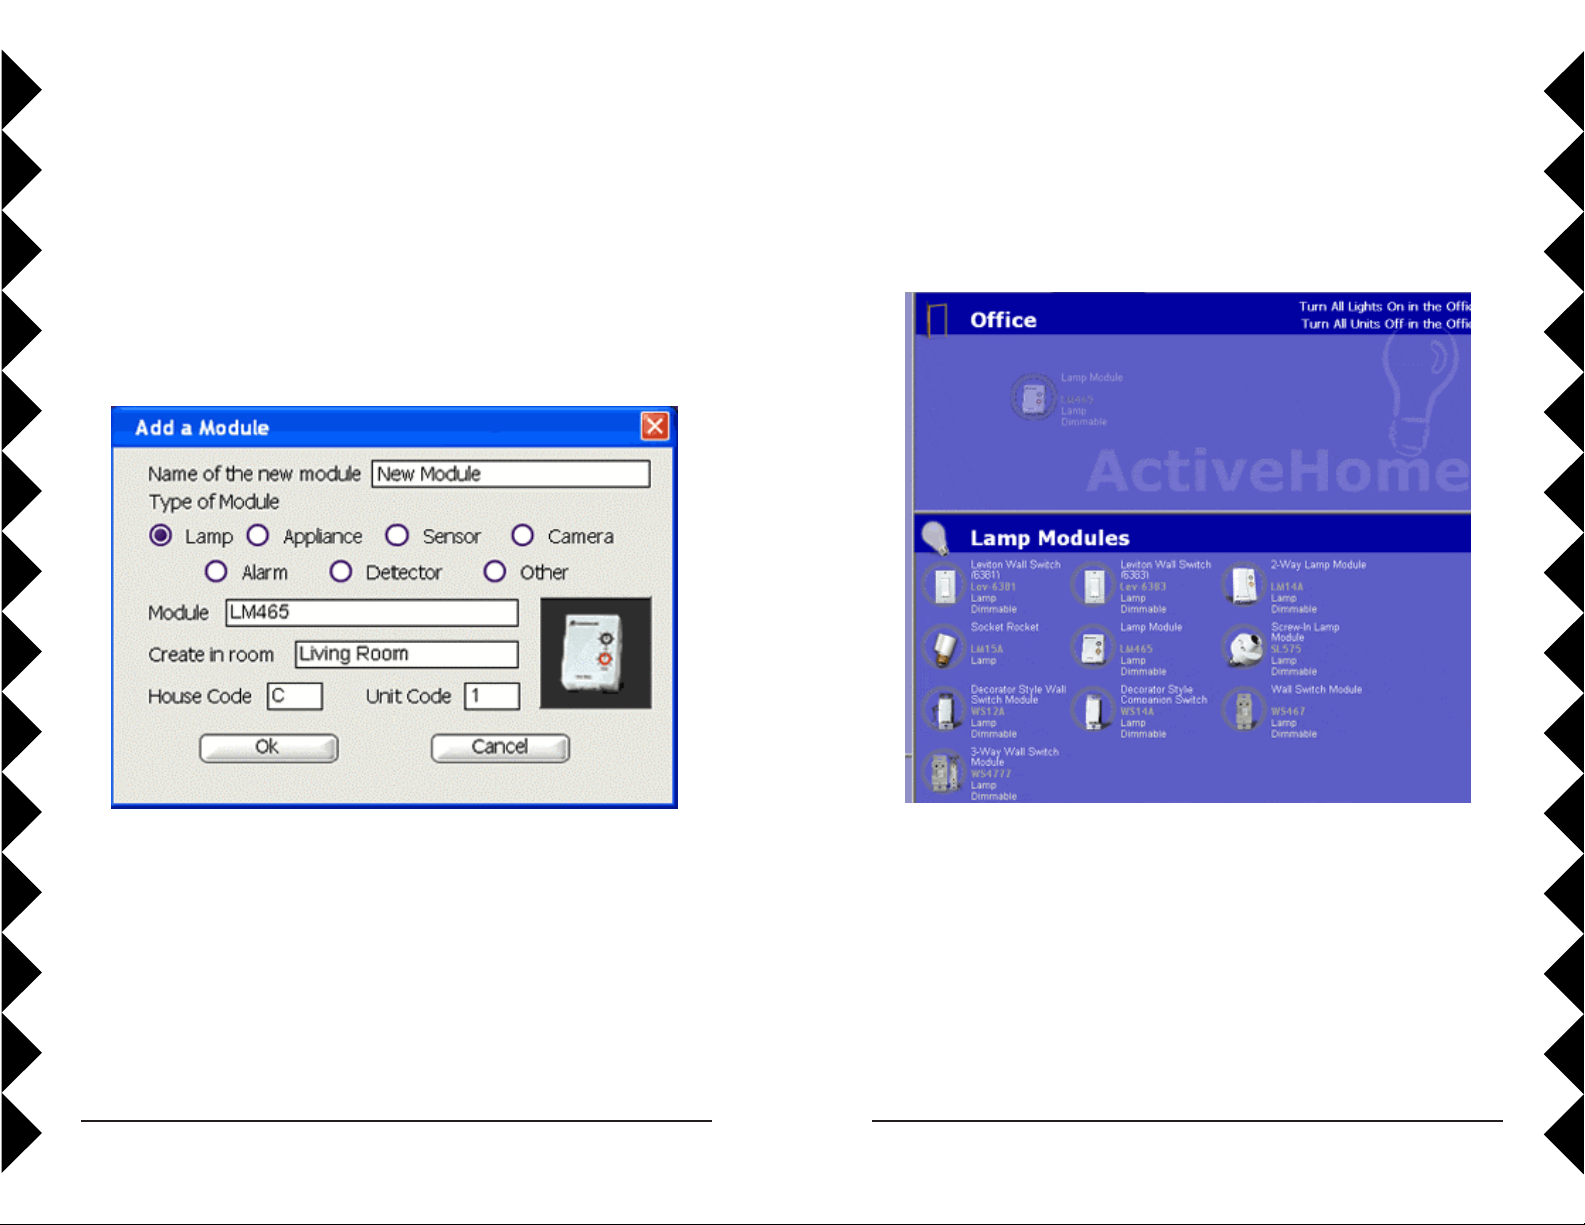
Enter the name you want to use for this module. It’s helpful to describe a
module’s location or how you normally use it. Choose the category of
module to add (Lamp, Appliance, etc.) and then use the drop down menu to
select the exact model number of the module you’re using. Select the room
you want the module to represented in using the drop down menu.
The House and Unit Code settings will be selected for you automatically,
but if you need to change them, use the drop down menus to do so. Click
OK to create the module.
When you drop the module, all the important information is filled in
automatically. If you want to change the name of the module or its address,
click into the module and enter the new information.
1312
Page 8

Adding Modules
Adding Modules
Module Types
In ActiveHome Pro, X10 modules are classified into four different
categories:
Lamps: dimmable modules and those designed only for incandescent
lighting control.
Appliances: modules with only On/Off control that are designed to
be used with higher wattage loads, small motors, and more.
Sensors: battery-powered wireless motion sensors. You can’t control
sensors with ActiveHome Pro, but you can see when they have been
triggered.
Other: Modules with special features or uses, and with functions
different from lamps and appliances.
Lamp Modules
Model Name
Lev-6381 Leviton Wall Switch Module
Lev-6383 Leviton 3-way Wall Switch Module
LM14A 2-Way Lamp Module
LM15A Socket Rocket
LM465 Lamp Module
SL575 Screw-in Lamp Module
WS12A Decorator-style Wall Switch Module
WS14A Decorator-style Companion Switch
WS467 Wall Switch Module
Appliance Modules
Model Name
AM14A 2-Way Appliance Module (2-pin)
AM15A 2-Way Appliance Module (3-pin)
AM486 Appliance Module (2-pin)
AM466 Appliance Module (3-pin)
HD243 220V Heavy Duty Appliance Module (15 amp)
HD245 220V Heavy Duty Appliance Module (20 amp)
Lev-6291 Leviton Fluorescent Wall Switch Module
SR227 Split Receptacle Module
RR501 2-Way Transceiver Module
TM751 Mini-Transceiver Module
Motion Sensors
Model Name
MS12A HawkEye Motion Sensor
MS13A HawkEye 2 Motion Sensor
MS14A EagleEye Motion Sensor
MS16A ActiveEye Motion Sensor
Other Modules
Model Name
PR511 Floodlight Motion Sensor
SC546A Remote Chime Module
UM506 Universal Module
1514
Page 9

CONFIGURATION
USING ACTIVEHOME PRO
Getting Data from Previous Versions
If you used the original version of ActiveHome, you can use your files in
the ActiveHome Pro. There are two ways to get your existing ActiveHome
data into ActiveHome Pro.
Opening a File from the Original ActiveHome
To open your previous ActiveHome files in ActiveHome Pro, open the File
Menu and choose “Open.” In the Open File window, use the drop down
menu to change “Files of type” select to “ActiveHome” (from
“ActiveHome Pro”).
Then, change the “Look In” selection to your ActiveHome data directory.
In most cases, ActiveHome should be in Program Files, in the “Home
Control” folder, and your data files inside there in the “Data” folder. When
you select the right folder, your list of ActiveHome files will appear.
ActiveHome Pro puts everything you need to control your lights and
appliances in panes that are easy to access. You can configure which
pieces you want to see, so that you get exactly what you want.
Parts of ActiveHome Pro
The main ActiveHome Pro window has five main elements:
Room View. The Room View is the main ActiveHome Pro window.
All your lights, appliances, sensors, and Macros will appear here for
you to control and set up.
Menu Bar. The menu bar provides access to all the features and
configuration of the ActiveHome Pro program itself, in addition to
giving you different ways to set up and use your modules.
Select the file that you want to use, and click the “Open” button.
ActiveHome Pro will convert all of your original ActiveHome data and you
can start controlling your home immediately.
ActiveHome Pro cannot read room names from the original ActiveHome,
so when you open your file you’ll have to change the room names. See
Creating & Editing Rooms.
Tree Pane. The Tree Pane is a fast way to switch between views.
You also use it to open different functions in the Active Pane,
including the Macro Designer .
Active Pane. The Active Pane opens different configuration options
in the Room View. There are two main Active Panes: the Timer
Designer and the Module List .
Recycle Bin. When you delete something in ActiveHome Pro, it goes
to the Recycle Bin . When you click on the Recycle Bin, it opens its
contents in the Room View, where you can then restore deleted items
or remove them permanently from ActiveHome Pro.
1716
Page 10

CONTROLLING LIGHTS & APPLIANCES
CONTROLLING LIGHTS & APPLIANCES
When you are in the Room View, you have direct control of the
lamps, appliances, and other modules in your ActiveHome Pro
configuration. These controls are in the on screen representation of
the module. Modules of different types have different controls.
Lamps and Other Dimmable Modules
A lamp has two sets of controls. Use the
switch to turn it on and off, and the
slider to control the level of brightness.
If you brighten a lamp that’s off,
ActiveHome Pro will turn the module
on. If you dim a lamp to 0% brightness,
ActiveHome Pro will turn it off.
Appliance Modules
Appliance modules (including the
SuperSocket Wall Outlet Module) can be
turned on and off using the switch.
Special Modules
Some modules don’t turn on and off, but
have different functions.
To make a chime module sound, just click
the speaker.
Motion sensors don’t have any control
buttons. Since they send commands and
don’t receive them, ActiveHome Pro only
shows you when they are active.
Two-Way Modules
In addition to receiving commands and turning on and off, some X10
modules can send information back to ActiveHome Pro. These Two-Way
modules (model LM14A Lamp Module and AM14A and AM15A
appliance modules, plus some models from other manufacturers), will have
a Poll button on them. When you click Poll, ActiveHome Pro asks the
module its status, and updates the screen with the new information.
Macros
When you click the Run Macro button, the
Macro’s events will start. If the Macro is
running from the computer (not stored in the
ActiveHome Pro interface), you can press
the button again to stop the rest of the
Macro’s events from occurring. For more
information about Macros see Making
Macro Events.
1918
Page 11
CREATING TIMED EVENTS
CREATING TIMED EVENTS
Scheduling events for specific times and dates is one of the most powerful
features in ActiveHome Pro. Each module or Macro in your system can
have multiple timers for different times of day, days of the week, and dates
during the year. You can schedule events around sunrise and sunset, and
even make it so that your events don’t happen at the exact same times each
day.
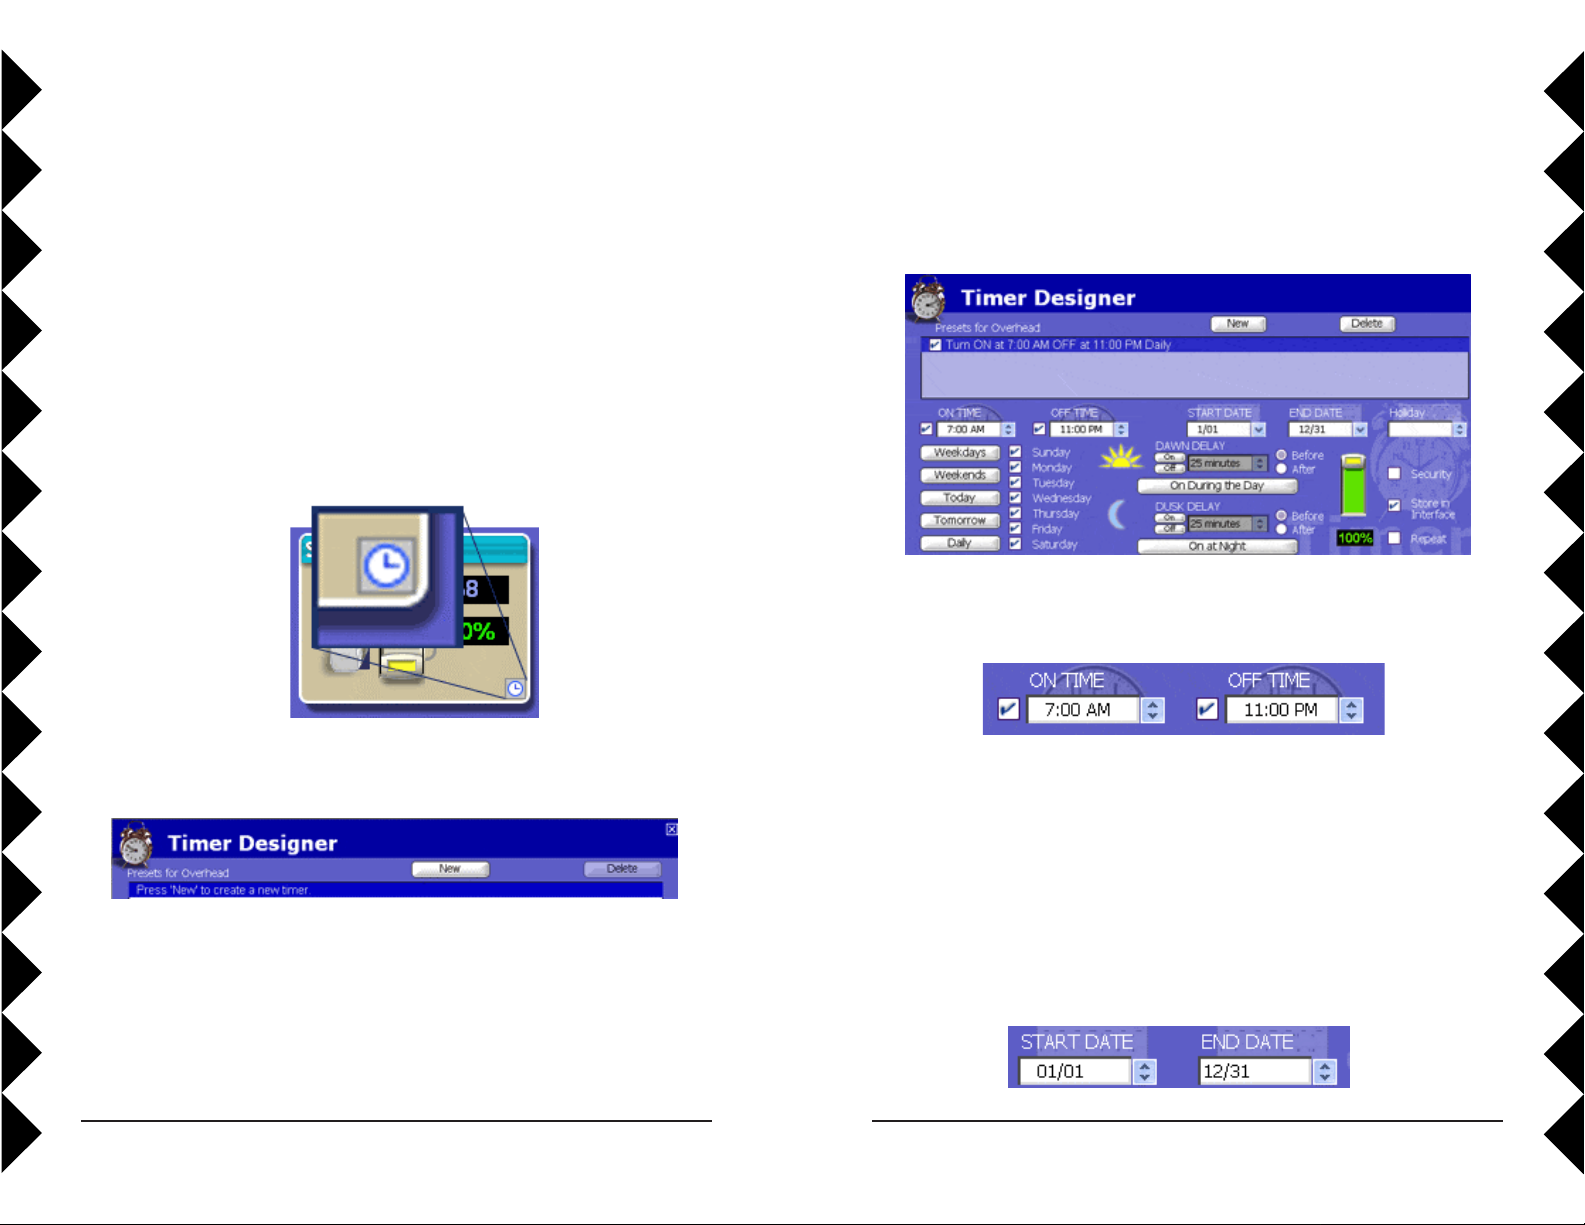
Opening the Timer Designer
You create timers for your modules in the Timer Designer pane. To
open the Timer Designer, you can click on the clock face icon on a
module in the Room View.
You can also access the Timer Designer using the Timers section of
the Tree Pane.
Setting Up Timers
There are a number of options in the Timer Designer, but you only have to
use the ones you need.
On and Off Times
When you first create a timer, the On Time will be set to the current time,
and the off time will be set to 30 minutes later.
Use the arrows to select a new time (in 5 minute increments), or type the
new time in directly. A timer doesn’t have to have both an On and an Off
time. You can make a timer to only turn something on by unchecking the
box next to the Off Time. Likewise, you can uncheck the “On Time” box
and only use the timer to turn a light off.
Creating a New Timer
When the Timer Designer first opens, you’ll need to create a timer.
Click the New button to add a timer to the list. This will open up the
timer controls, and add a new line describing the timer to the text list.
Active Dates
ActiveHome Pro timers are active throughout the year by default, but you
can set your timers to operate only between certain dates. Use the arrows to
scroll through dates, or type the month and day in directly.
2120
Page 12
CREATING TIMED EVENTS
CREATING TIMED EVENTS
You may want to have certain settings only during the summer, for
example, or perhaps only on during the two weeks you’re on vacation.
When you set a date, ActiveHome Pro still checks against the days of the
week (see below), so it’s possible to have something only active on
Sundays in November.
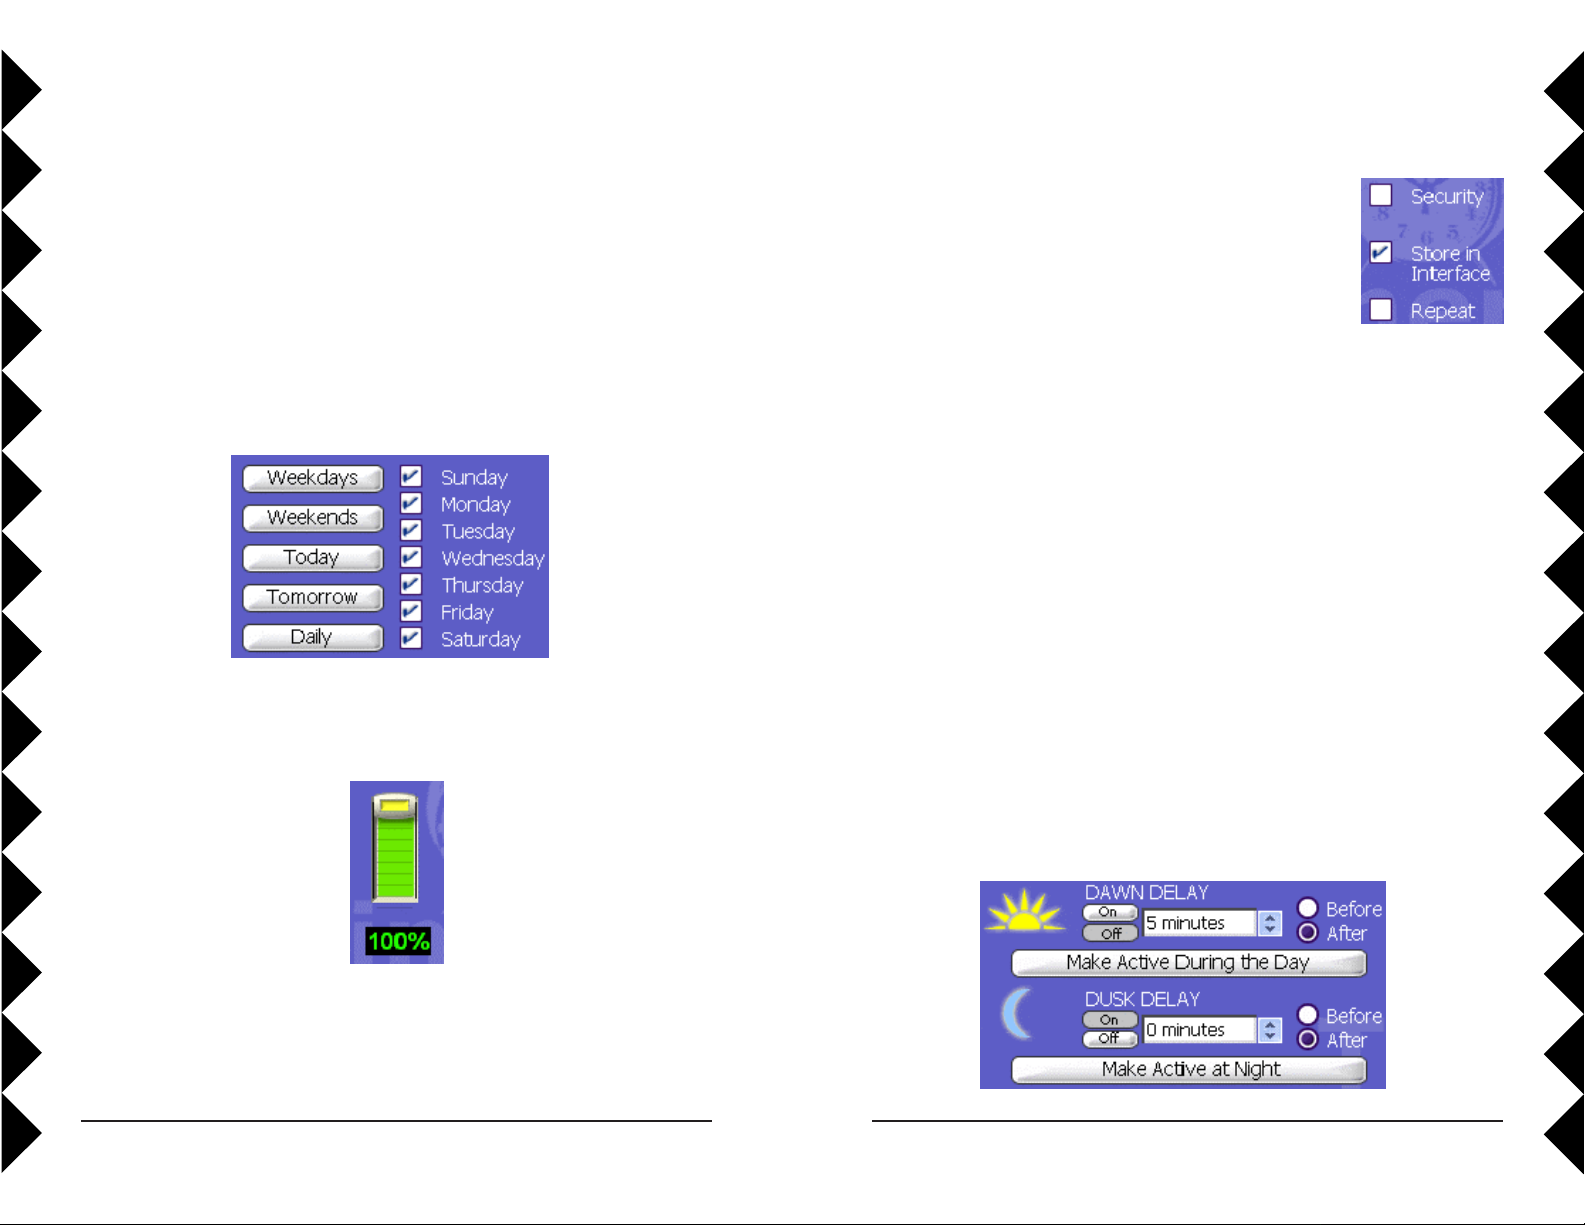
Days of the Week
You don’t use your house the same way every day of the week, and
ActiveHome Pro is designed to reflect that. It’s easy to set timers that are
only active on certain days, or only on Weekends.
Use the checkboxes to select individual days of the week, or click on one
of the buttons to pick one of the preset selections. If you click “Today” or
“Tomorrow” the date (see above) will also be changed.
Special Options
When you create a timer, you have three options for
how it runs:
Security tells ActiveHome Pro to randomly adjust
the timer so that it runs up to 30 minutes before or
30 minutes after the scheduled time. Use this setting to make your
automatic lights look more natural when you’re away from home, so
that they deter criminals.
Store in Interface will make ActiveHome Pro save the timer’s
schedule in the ActiveHome Pro Interface memory, so that it runs
even when your computer is turned off. This option is selected by
default.
Repeat indicates to ActiveHome Pro that the command for this timer
should be sent multiple times when it runs. Use this option if you
know that sometimes X10 command signals don’t get through to
your models.
Dusk and Dawn
ActiveHome Pro contains information about the rising and setting of
the sun all over the world. You can use that information to set lights
that automatically adjust to later sunset times in the summer, and
shorter days in the winter.
Brightness Level
If you are setting a timer for a module that can be dimmed, then
you’ll also have the option to choose its brightness. This slider works
just like the slider in the Room View.
In order to use Dusk and Dawn settings you should set your city or latitude
and longitude information in the Configuration menu.
2322
Page 13
CREATING TIMED EVENTS
CREATING TIMED EVENTS
You can choose to use both Dusk and Dawn settings, or just one, but you
can only have one On command active at a time. When you use a Dusk or
Dawn setting, you don’t have to use the exact time; you can enter a time
into the box, and then choose to have your timer happen before or after
Dusk or Dawn.
The two “Make Active...” buttons are a quick way to have a module only
on during the day or night. A light that’s active during the day will turn on
at Dawn and turn off at Dusk. One that’s active at night will do the
opposite.
When you use Dusk and Dawn times and store your timers in the
ActiveHome Pro interface, you can end up using a lot of space. If you don’t
have too many modules, it won’t be a problem. If you use a lot of timers or
have a lot of modules in your home, it may be helpful to group your Dusk
and Dawn activities in a Macro, and then schedule the Macro at the
appropriate time.
Timer List
When you’re in the Timer Designer, all of the timers for that module are
listed in the text box at the top of the pane.
Saving Timers
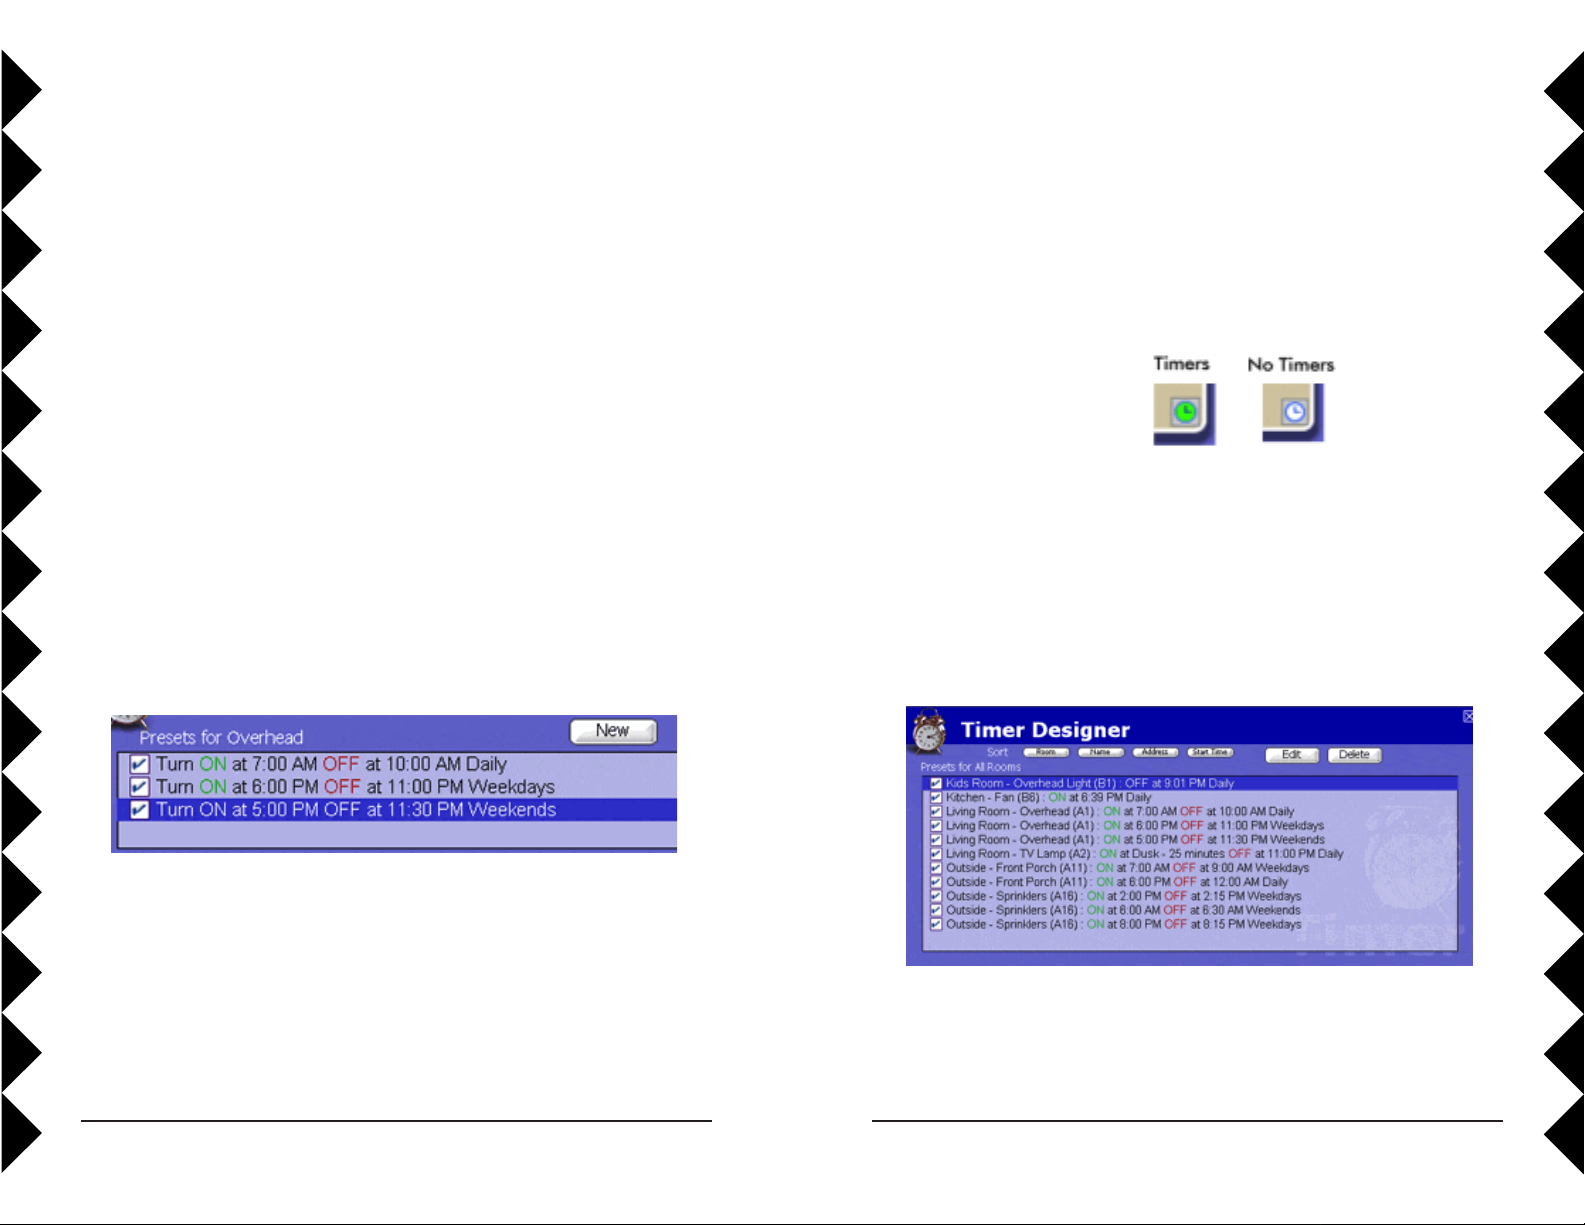
When you adjust the setting for your timers, the changes are saved
automatically. You can tell which modules have timers saved by
looking at the clock icon on the module: a green clock faces indicates
that module has timer settings; a white clock face means that module
has no timers scheduled.
Timer Summary View
The Timer Summary View is a way to look at all of your scheduled
timers, either room by room, or all rooms at once. To open the Timer
Summary, click on the Timers bar in the Tree Pane, when you have
no module selected. This will open the summary for the current
room. If you have the summary open and click the Rooms bar in the
Tree Pane, you’ll open a summary for all of your rooms, as seen
below.
The list describes each timer, and when it occurs. If you don’t want a
timer to be active, just uncheck the check box in front of it. To delete
a timer, highlight it and click the Delete button.
In the Summary View you can check or uncheck timers to turn them
on or off, and delete timers as well. Use the Room, Module,
Address, and Start Time buttons to change the sort order of the
timer listing.
2524
Page 14

USING MACRO EVENTS
USING MACRO EVENTS
Using Macro Events
Macros are a useful way to group commands for your X10 modules.
If you have lights and appliance that you frequently use in similar
ways, you can easily turn them into a macro.
The Macro Designer
The Macro Designer window is used to create and edit all of your
macros. You can access the Macro Designer in several ways: by
clicking on an existing macro in the Macros list in the Tree View, by
clicking the (+) button to create a new macro, using the “Edit” button
on a Macro in the Room View, and more.
There are three parts to the Macro Designer: the Macro Information
bar, the Module and Command List, and the Macro timeline.
Macro Designer
You can access and change information about your Macro in the
Information Bar at the top of the Macro Designer window.
The Trigger information tells ActiveHome Pro what command you
want to use to start the Macro with an X10 remote or other controller.
The command always has an X10 Address, plus an On or Off. In this
example, the trigger for the Macro is B13 On. You could set another
Macro to be triggered by B13 Off, too.
Unlike regular modules, two Macros can share the same address, as
long as one uses the On trigger and the other uses the Off trigger. The
On/Off part of the trigger is separate from the actual operation of the
Macro — any Macro can turn modules both on and off.
When you create a Macro, it gets put into one of the rooms in
ActiveHome Pro. You can change which room it appears in using the
“Macro Operates In” selection. This setting doesn’t affect the
commands the Macro can use. Any Macro can control any module in
any room in the house.
Triggering Macros
You can trigger a Macro is several different ways:
1. You can click on the “Run Macro” button in the Room View.
2. You can schedule a Timer to send the Macro trigger code so that
the Macro runs at a particular time.
Use the Macro Name to describe what a Macro does, or how you
want to use it. You can name a Macro anything you want; the name
doesn’t affect how it works.
3. You can press a button on any X10 Controller, or remote control
to trigger the Macro.
4. You can set an X10 motion detector to send the Macro trigger
command to trigger the Macro when someone walks into a room,
or near you home where you’ve placed the Motion Detector.
Make sure you download your Macros into the Interface. See page
37.
2726
Page 15

USING MACRO EVENTS
USING MACRO EVENTS
Module List
To add commands to a Macro, you drag the module you want to control
from the Module List on the right into the Macro Timeline. At the top of
the list are modules in the selected room. Change rooms using the dropdown list, and the modules will change.
In the room list, dimmable modules
(lamps) are shown with a light blue
title bar. Appliance Modules are shown
in black. Each room also has a special
module listed that you can use to
control all of the modules in that room.
It’s an easy way to turn on or off all of
the lights in the room at once.
Below the list of modules in the room, there is a special list of commands.
The “Delay” command is always
listed. Drag a Delay into the Timeline
to add time between the commands
in your Macro.
Macro Timeline
The Macro Timeline is where you build your Macro. To add events
to the Macro, drag a module or special command into the Timeline
from the Module List on the right of the screen. When you drop the
module into the timeline, you can select what you want to do with
that module.
Lamp modules and other dimmable modules have several options. To
turn a module On, simply select “Set Absolute” and adjust the level
to On (all the way to the right). Off works the same way.
This list also has shortcuts for
controlling large groups of modules.
The “All Modules” command.
There’s a command module for each
house code you’re currently using in
ActiveHome Pro as well.
You can also use the “Set to” command to set the module to a
specific level of brightness.
2928
Page 16

USING MACRO EVENTS
USING MACRO EVENTS
The “Dim” and “Brighten” settings work differently. If you have a
module that’s already on, use “Dim” or “Brighten” to tell it to dim or
brighten by a certain amount. Use the slider to select the amount you
want to the light to change.
When you drag an appliance module to the Timeline, you have fewer
options — just On or Off. The other special modules (Rooms, House
Code controls, see above) work the same way.
Delays are an important part of Macros. When you drag a Delay to
the Timeline, you are telling the Macro to pause before doing the
next step in the Macro.
To make the delay work, adjust the time in the box. Delays are
especially important when you want to automate more complex
activities in your home.
Running Macros with Your Computer Off
Below the text description in the Macro Timeline, there’s a checkbox
labeled “Run while computer is OFF.” When you check this box,
your Macro is stored in the ActiveHome Pro computer interface, in
addition to being saved on your computer. When a Macro is stored in
the Interface, you can run it on a timer, or trigger it using a remote
control even when your computer is turned off.
Making a Macro Step by Step
You can follow this example yourself by opening the “Samples” file
using the File Menu. This Macro is designed to start the coffee pot
and turn on the lights in the kitchen to get ready for breakfast. When
you make a macro like this, you can activate it using a remote
control, or set a timer so the events happen exactly when you want
them to — even before you get out of bed!
Create the Macro
To create a new macro, click on the (+) button on the Macros bar in
the Folder pane. You can also add a macro from the Edit menu, or by
right-clicking in a room and choosing “Add Macro” from the pop-up
menu. When you create a new Macro, you start in a blank Macro
Editor window.
As you create your Macro, ActiveHome Pro automatically fills in the
text description of the commands into the box below the timeline. It’s
another way for you to tell what your Macro is going to do when you
run it.
3130
Page 17
USING MACRO EVENTS
USING MACRO EVENTS
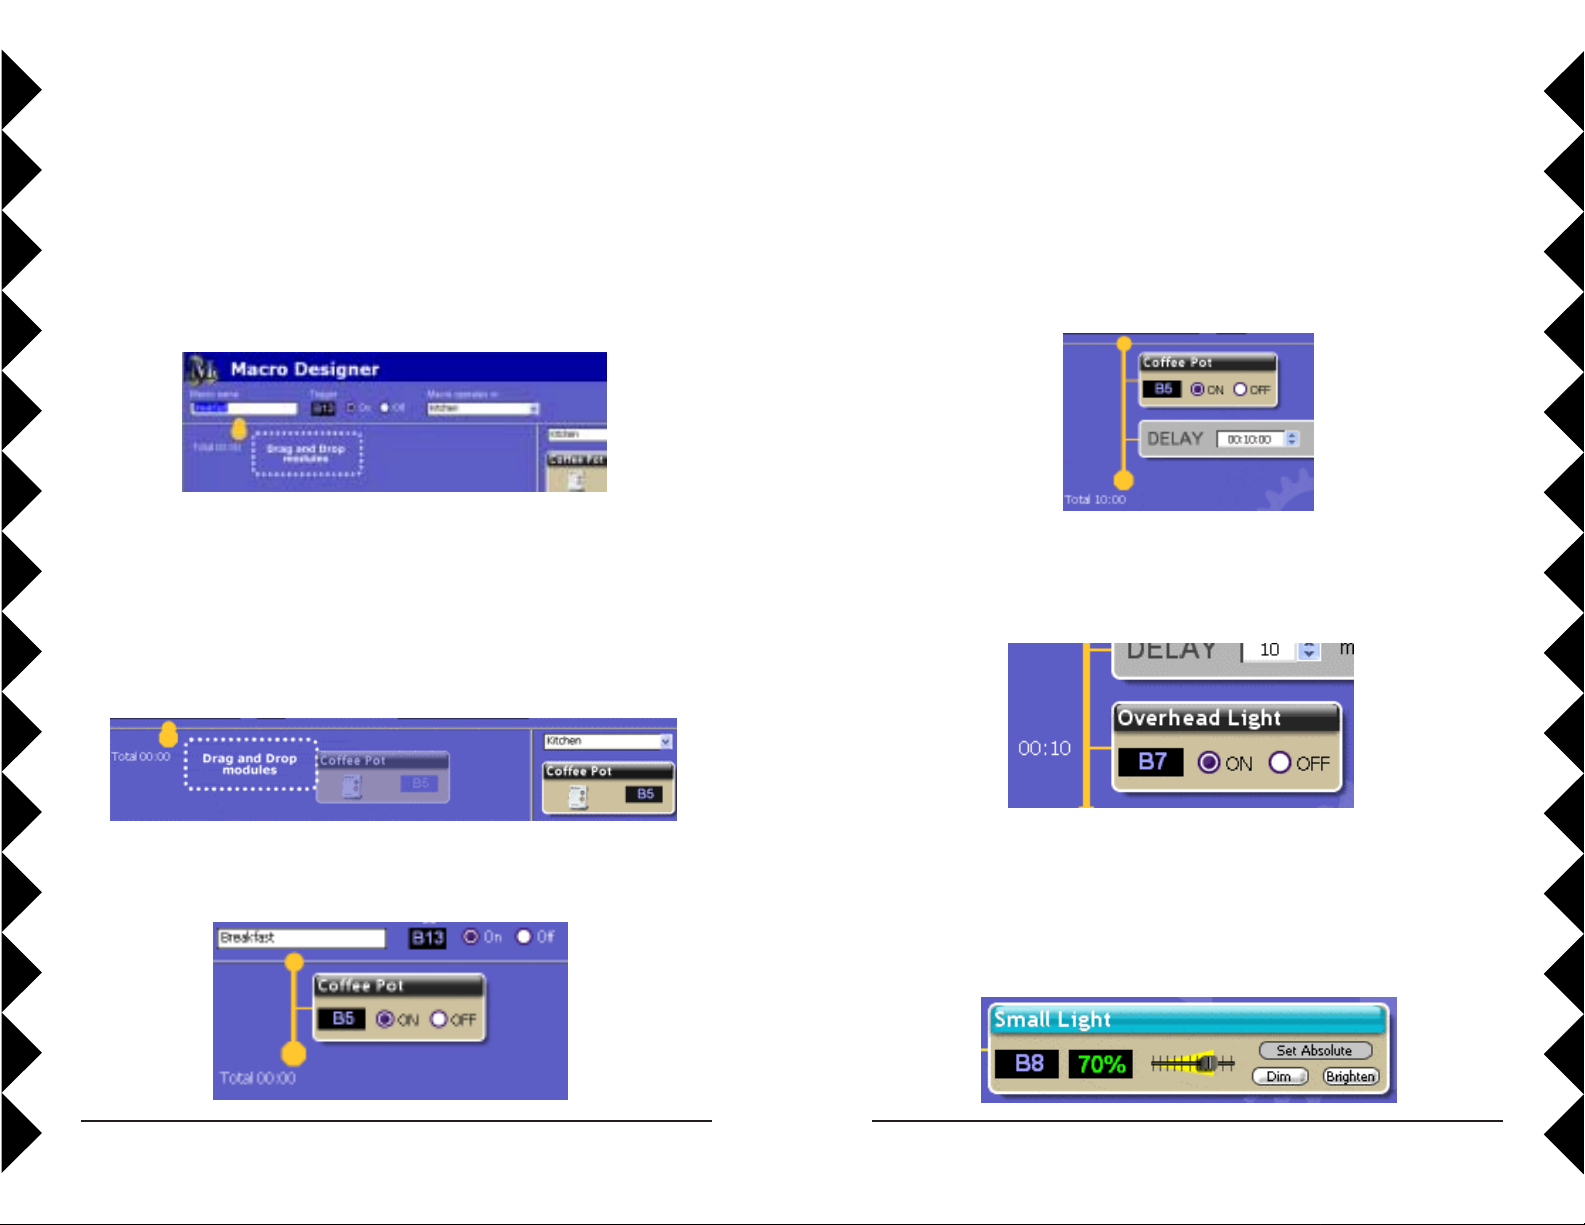
Step 1: Macro Information
First, name your macro. Click into the Macro Name box, and type a
new name. In this example, the Macro will be called “Breakfast.” At
this point you can also select the Macro’s Trigger (remote command
you use to start it), but ActiveHome will assign one automatically,
which will usually be fine.
Next, select the room you want this macro to appear in. A macro can
operate modules in more than one room, but it will appear in the
Room View for only one room. Our Breakfast macro will be in the
kitchen. Now we can start adding modules.
Step 2: Add the First Command
To add a command to a macro, drag the module you want to use from
the available modules on the right hand side of the screen.
Step 3: Use a Delay
When you use macros, not everything has to happen at the same time. You
can use delays to spread out the events of your macro.
To make the next event happen 10 minutes after the coffee pot turns on,
we’ll drag a delay into the macro, and change its time.
Step 4: Dim and Bright
Different kinds of modules use different types of commands in macros. If
you add an appliance module, SuperSocket, or other module that can’t be
dimmed, then you only have the option of turning it On or Off.
You can view modules from any or all of the rooms by using the drop
down menu to select them. By dragging the Coffee Pot module to the
macro, we’ll make turning it on the first event to happen.
If you add a lamp module or other dimmable module to your macro, you
have two different options. If you use “Set to” ActiveHome Pro will turn
your module on to full brightness, then dim it to the selected level. If you
use “Adjust by” ActiveHome Pro will just tell your module to dim or
brighten, which only works if the module is already on.
Here we’ll set the Small Light to turn on to 70 percent.
3332
Page 18

USING MACRO EVENTS
USING MACRO EVENTS
Step 5: Extending Over Time
One useful thing you can do with macros is use them to turn a set of lights
on for you to use them, then turn them off automatically at a time when
you’ll be done. If we add another time delay to the macro we can wait an
hour before turning everything off.
Step 6: Room Controls
In addition to individual modules, you can use room modules and
House Code modules in your macros to make it easy to turn on or off
more than one module.
Finishing Up
Now we have a working macro! Your macro is automatically saved. The
Macro Timeline shows you all of the commands in your macro, and tells
you how long it will take to complete.
In our example, we can use the Kitchen module to turn off everything
at once.
If you’re done with your macro, you can go back to the room view, or
make a new macro. In addition to following the visual timeline, you can
read the text box at the bottom of the Editor window to see what’s
happening in your macros.
3534
Page 19

USING MACRO EVENTS
STORING TIMERS AND MACROS
Macro Summary View
The Macro Summary view lets you easily review your Macros.
Each Macro is shown with its text description, its trigger information, the
total time it runs, and what room it’s in. To edit a specific Macro, click its
Edit button. There are also two indicators of a Macro’s status:
Storing Events in the ActiveHome Interface
ActiveHome Pro is designed so that you can set up timed events and
macros that will run when your computer is off, or if the ActiveHome Pro
interface is disconnected from it. By storing your timers and macros in the
ActiveHome Pro interface’s memory, you can set up a schedule and have it
run without needing any attention from you. You can also set up a schedule
for another location, and move the interface where you need it — even if
there’s no computer there. The Timers and Macros will be stored in the
Interface’s memory while it’s unplugged, even if you unplug it and don’t
have any batteries installed. The batteries (see page 9) are just to retain the
time of day for the clock if there is a power outage.
Marking Stored Items
When you create timers and macros, they are set to be stored in the
interface automatically. You can change this option using the “Store in
interface” checkbox in the Timer Designer , or “Run while computer is
off” check box in the Macro Designer.
Downloading Data
ActiveHome Pro will automatically ask you if you want to save your data
to the interface when you’ve made changes, before you close the program.
If you want to save your changes to the interface immediately, use the
Tools menu and choose “Download Timers and Macros.” This will tell
ActiveHome Pro to save your data in the interface.
The module icon indicates that a Macro is being stored in the ActiveHome
Pro interface memory. The clock icon is green when timers have been set
for the Macro, or white when the Macro has no timers.
3736
Page 20
LIFESTYLE MODE
MISCELLANEOUS
Lifestyle Mode
Lifestyle Mode gives you an easy way to automate all of your X10
controlled lights and appliances. ActiveHome Pro’s Lifestyle Mode learns
from you! Instead of programming timers and macros, Lifestyle mode
watches the things you do (the commands you send to your X10 modules)
and repeats them automatically.
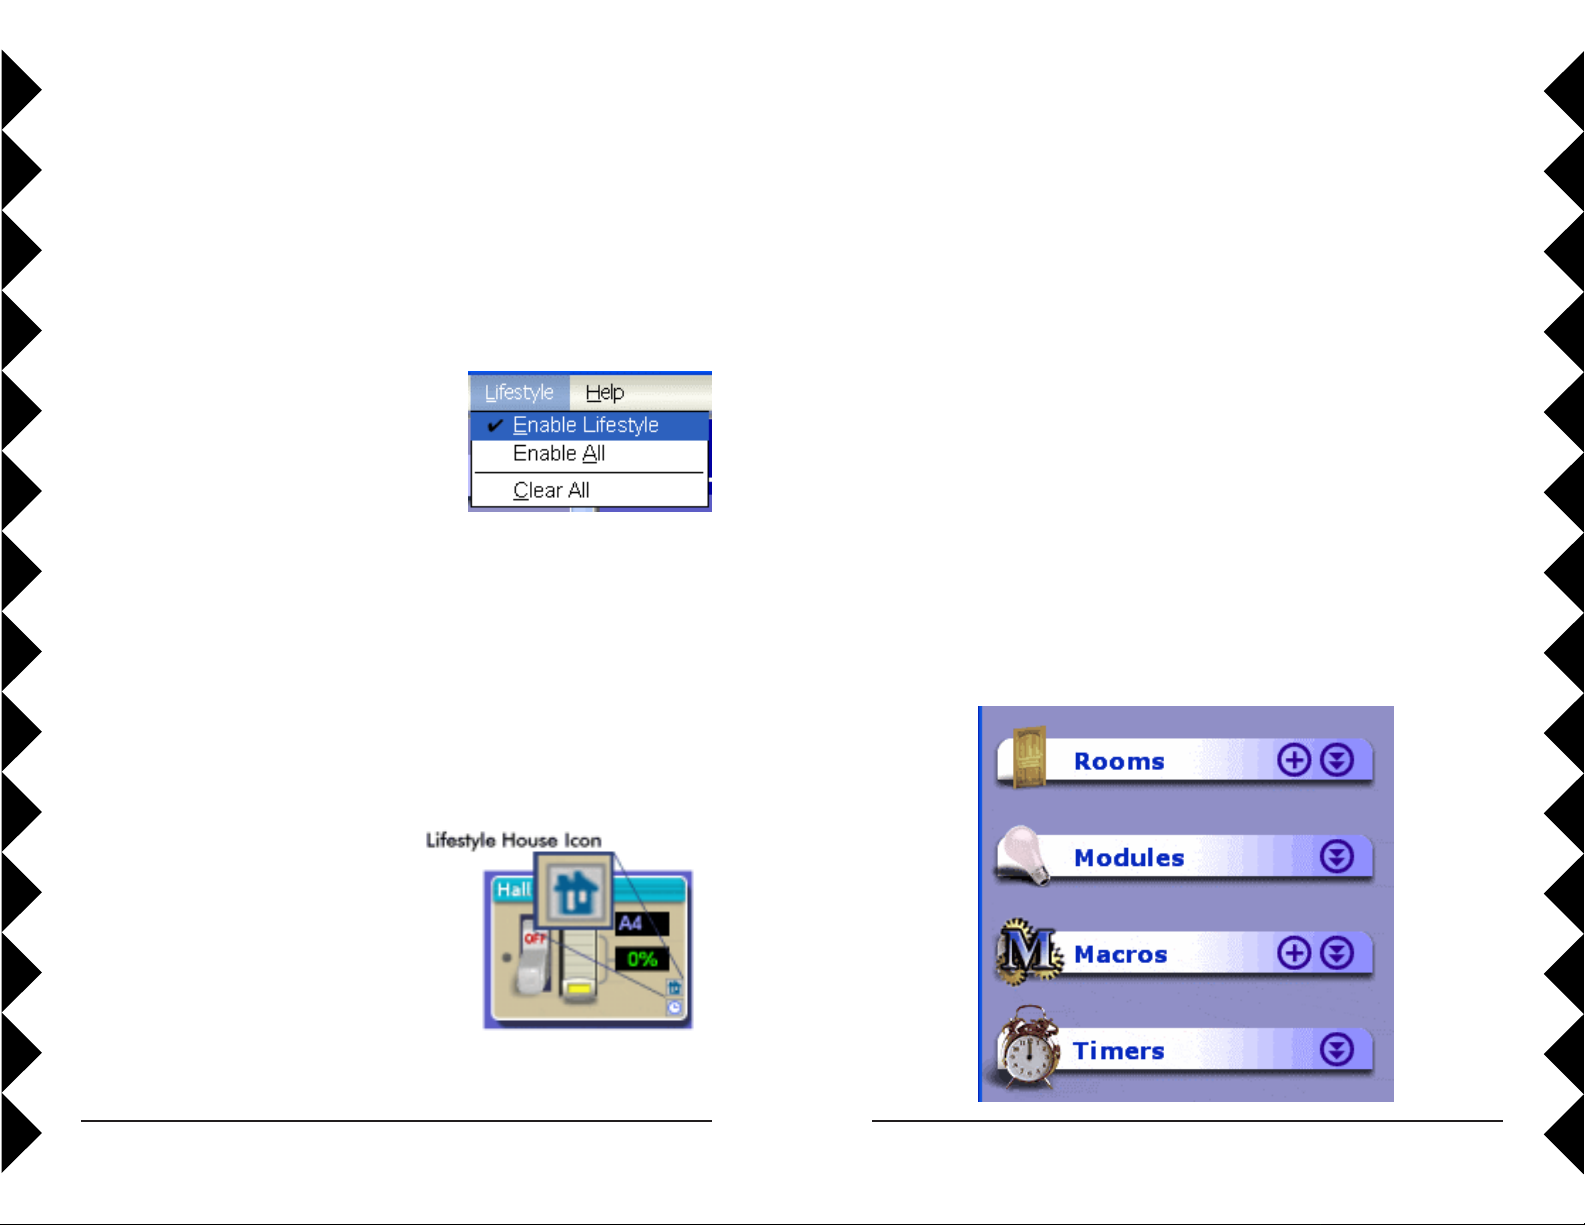
Turning On Lifestyle Mode
Lifestyle Mode is turned off when you first
run ActiveHome Pro. To turn on the
Lifestyle Mode, click Lifestyle on the Menu
Bar, and then click “Enable Lifestyle.”
Using Lifestyle Mode
When you turn Lifestyle Mode on, it will automatically begin to repeat the
home control activity from the last 24 hours. The things you do around the
house will automatically be incorporated into the new Lifestyle schedule as
you do them. For example: if you turn on lights with an X10 remote when
you get up in the morning, Lifestyle will do it for you automatically the
next day.
The House Icon tells you that Lifestyle is enabled in your home, and also is
used to turn Lifestyle learning off on that specific module. If you click the
blue House Icon, it will turn red, excluding that module from Lifestyle
learning.
Moving Modules Between Rooms
If you accidentally create a module in the wrong room, or want to move a
module to a different room, it’s easy to make a change. You can move the
module in either of two ways:
Select the module you want to use, then choose “Edit Module” from the
Edit Menu, or right-click and choose “Edit Module” from the pop-up
menu. This opens the Edit Module window, where you can select which
room the module appears in.
Make sure the Tree Pane is open, and drag the module you want to move
onto the name of the room you want to move it to.
Using the Tree Pane
The Tree Pane has four sections: Rooms, Modules, Macros, and Timers.
Each one has its own function, but they are accessed in the same way.
Turning Off Lifestyle Learning for
Specific Modules
If there are modules that you don’t
want Lifestyle to learn events for, you
can tell ActiveHome Pro not to
include that module in Lifestyle
learning. When you turn on Lifestyle,
a new icon appears on all your
modules (except Motion Sensors and
Macros) in ActiveHome Pro.
3938
Page 21
MISCELLANEOUS
MISCELLANEOUS
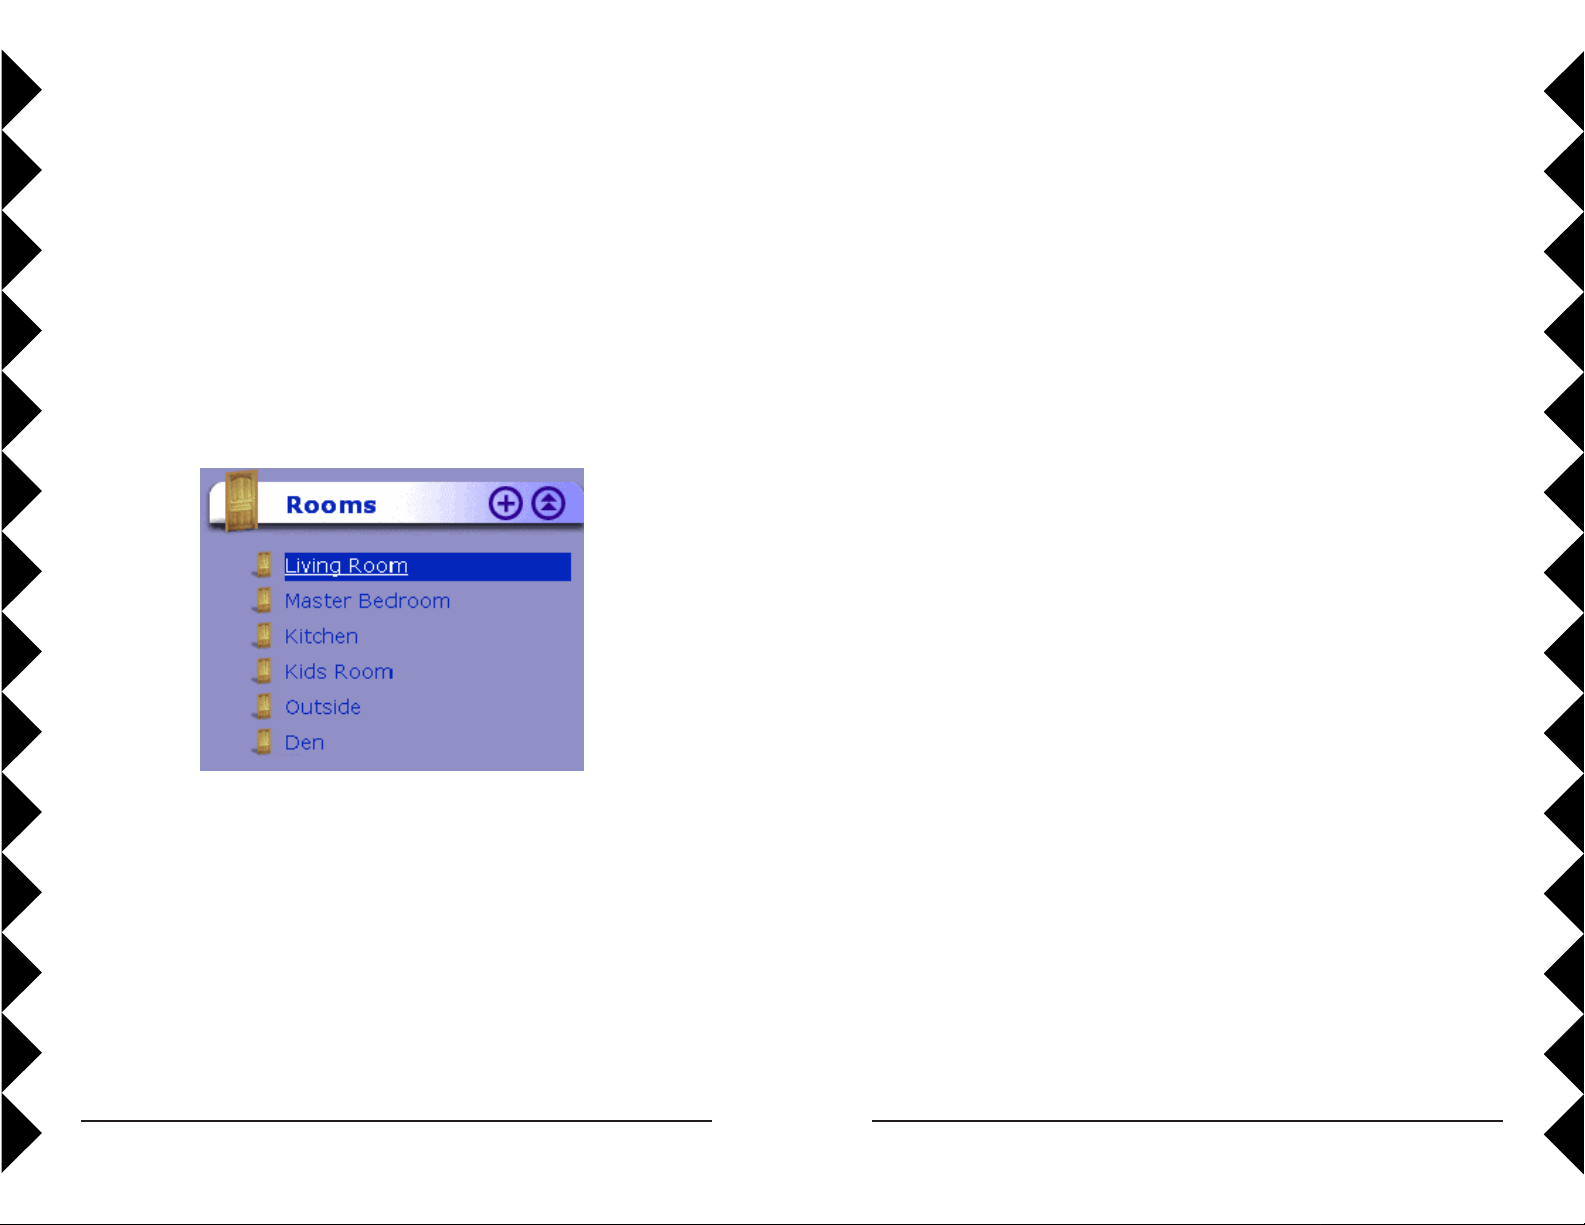
Click the title of one of the sections to switch the main window to that
view:
Rooms opens the Room View with all rooms selected.
Modules opens that Modules List in the Active Pane.
Macros opens the Macro Summary.
Timers opens the Timer Summary for the current room.
Click the double down-arrow button to expand an item in the Tree, giving
you a list of the items of that type: rooms, Macros, timers, etc.
Using the Recycle Bin
When you delete a module from ActiveHome, it is stored in the Recycle
Bin until you delete it permanently. This gives you the chance to review
the things you delete, and put them back if you need to.
Deleting Modules & Macros
There are two ways to delete modules and Macros:
Drag the module or Macro to the Recycle Bin from the Room View.
Select the module or Macro and choose “Delete Module” from the Edit
Menu.
Recycle Bin View
When you click on the Recycle Bin, ActiveHome Pro displays the modules
and Macros you’ve deleted. In the Recycle Bin View, you can drag a
deleted item to a room to remove it from the Recycle Bin, or you can rightclick a module and choose “Restore” to put it back in to its original place.
If you want to permanently remove a single item, right-click on it and
choose “Delete Module” from the pop-up menu.
When you select an item in the list, ActiveHome Pro will switch to the
appropriate view for that item. Clicking on a room name will open that
room in the Room View; clicking on a Macro will open that Macro in the
Macro Designer; and so on.
You can create new rooms and Macros from the tree pane. Click the (+)
button next to the title to create a new item and edit it.
If you don’t want to use the Tree Pane, you can turn it off using the “View”
menu in the menu bar — just uncheck the “Show Folders” option.
Emptying the Recycle Bin
If you want to get rid of all of the items in the Recycle Bin, you can rightclick the Recycle Bin and choose “Empty Recycle Bin” from the pop-up
menu. You can also use the Tools Menu to perform the same action.
4140
Page 22

MISCELLANEOUS
MISCELLANEOUS
Find Other Computers
The Find Other Computers feature shows which X10 addresses you are
using, and which ones are being used by another system.
The window shows you a grid of all the X10 addresses, and marks
the ones that have activity. Green marks indicate addresses used by
the current ActiveHome Pro file. Red boxes show you other
addresses where command activity has happened. Yellow boxes are
places where there might be activity that’s not part of your
ActiveHome Pro setup.
If you hover your mouse over a green spot, you’ll see the module
name and the last time a command was sent or received for that
module.
You can also hover over read boxes to see when commands were
received for those addresses.
Understanding House and Unit Codes
All X10 modules use an address system to allow you to control each
module separately. An X10 address consists of two parts: the House Code
and the Unit Code.
House Codes
A House Code is the part of the X10 address the assigns a module to a
group. While ActiveHome Pro can control modules set to any House Code,
other X10 remotes and controllers can only send commands to one House
Code at a time. You set the House Code of a module using the letter dial on
the module, with settings from A to P.
You can use House Codes in many different ways. If you have a number of
modules, you might want to use one House Code per room. You could also
assign House Codes based on the way you use modules. In ActiveHome
Pro in can be useful to set aside a particular House Code (M, for example)
to use only for Macro Triggers.
Unit Codes
The Unit Code of a module makes it possible to control it separately from
other modules. When you set the number dial on a module (from 1 to 16),
you should make sure you use a different number than others set to the
same House Code.
4342
Page 23

TROUBLESHOOTING
Troubleshooting
If you can’t find your link to download the software:
You can fill out a form to have the link sent to you again. Go to:
http://www.x10.com/support
and click on the link for Secure Software Download Link, under Technical
Support. Enter your e-mail address and order number to be sent the
download link again.
X10 software installation on Windows 98 asks for a disk:
If your X10 software asks you to insert an X10 disk when you connect the
Interface, follow these steps:
1. Click OK in this window.
2. In the “Insert Disk” window, click the “Browse” button to look for the
driver files.
3. Go to your C: drive in the browse list and then open “Program Files,”
“Common Files,” “X10,” “DriverInstall,” “Wireless Transceivers,” and
finally “CM15A ActiveHome Pro.”
4. Click the OK button to use the driver files in that folder. Follow the
instructions on your screen after that.
If asked for the Windows 98 disk, click “OK.” Insert your Windows 98 CD
and browse to the “Win98” folder. Click “OK.”
Windows 98 or Windows Me says it has found an Unknown Device:
If you plug in the Interface and get an “Unknown Device” message, you
will have to update the drivers in Windows manually:
1. Go to Device Manager by right-clicking on “My Computer” and
selecting “Properties.” Then click on the Device Manager tab.
2. Double click on “Universal Serial Bus Controllers” in the device list,
and find the item called “Unknown Device.”
3. Double-click on it and select the “Driver” tab. Select “Update Driver.”
4. Select “Display a list of all the drivers in a specific location so you can
select the driver you want.” Press the “Next” button.
5. Select the “Show all hardware” selection at the bottom of the screen.
Choose X10 as the manufacturer and then “X10 USB ActiveHome”
Press the “Next” button.
6. Press “Next” to continue. Windows will install the X10 ActiveHome
Pro driver.
7. At this point your PC should be copying files for the driver. You may
need to insert your Windows CD.
When all these steps are done, the driver will be updated and the screen
will say you’re finished.
For more help with setup please visit: http://www.x10.com/support
4544
Page 24
1
9
513
A
I
EM
CONTINUOUS
MOMENTARY
U
N
IV
E
R
S
A
L
M
O
D
U
L
E
ON OFF
SOUNDER & RELAY
RELAY ONLY
SOUNDER ONLY
A
I
EM
•
•
••
1
9
513
•
•
••
Heavy Duty
Appliance Module
U
N
I
T
H
O
U
S
E
P
ow
er
A
da
pte
r
OFF
T
h
e
r
m
o
s
t
a
t
S
e
t
-
B
a
c
k
C
o
n
t
r
o
l
l
e
r
LO M HI
1
9
51
3
A
I
EM
A
I
EM
•
•
••
1
9
51
3
•
•
••
C
O
N
T
R
O
L
L
E
D
EXPANDING YOUR SYSTEM
1
9
513
A
I
EM
AB 123
INPUT MODE
P
O
W
E
R
F
L
A
S
H
IN
T
E
R
F
A
C
E
TEST ALL UNITS OFF
A
I
EM
O
C
GK
•
•
•
•
•
•
•
•
1
9
51
3
1
5
3
71
1
•
•
•
•
•
•
•
UNIT
HOUSE
P
o
w
e
r
H
o
r
n
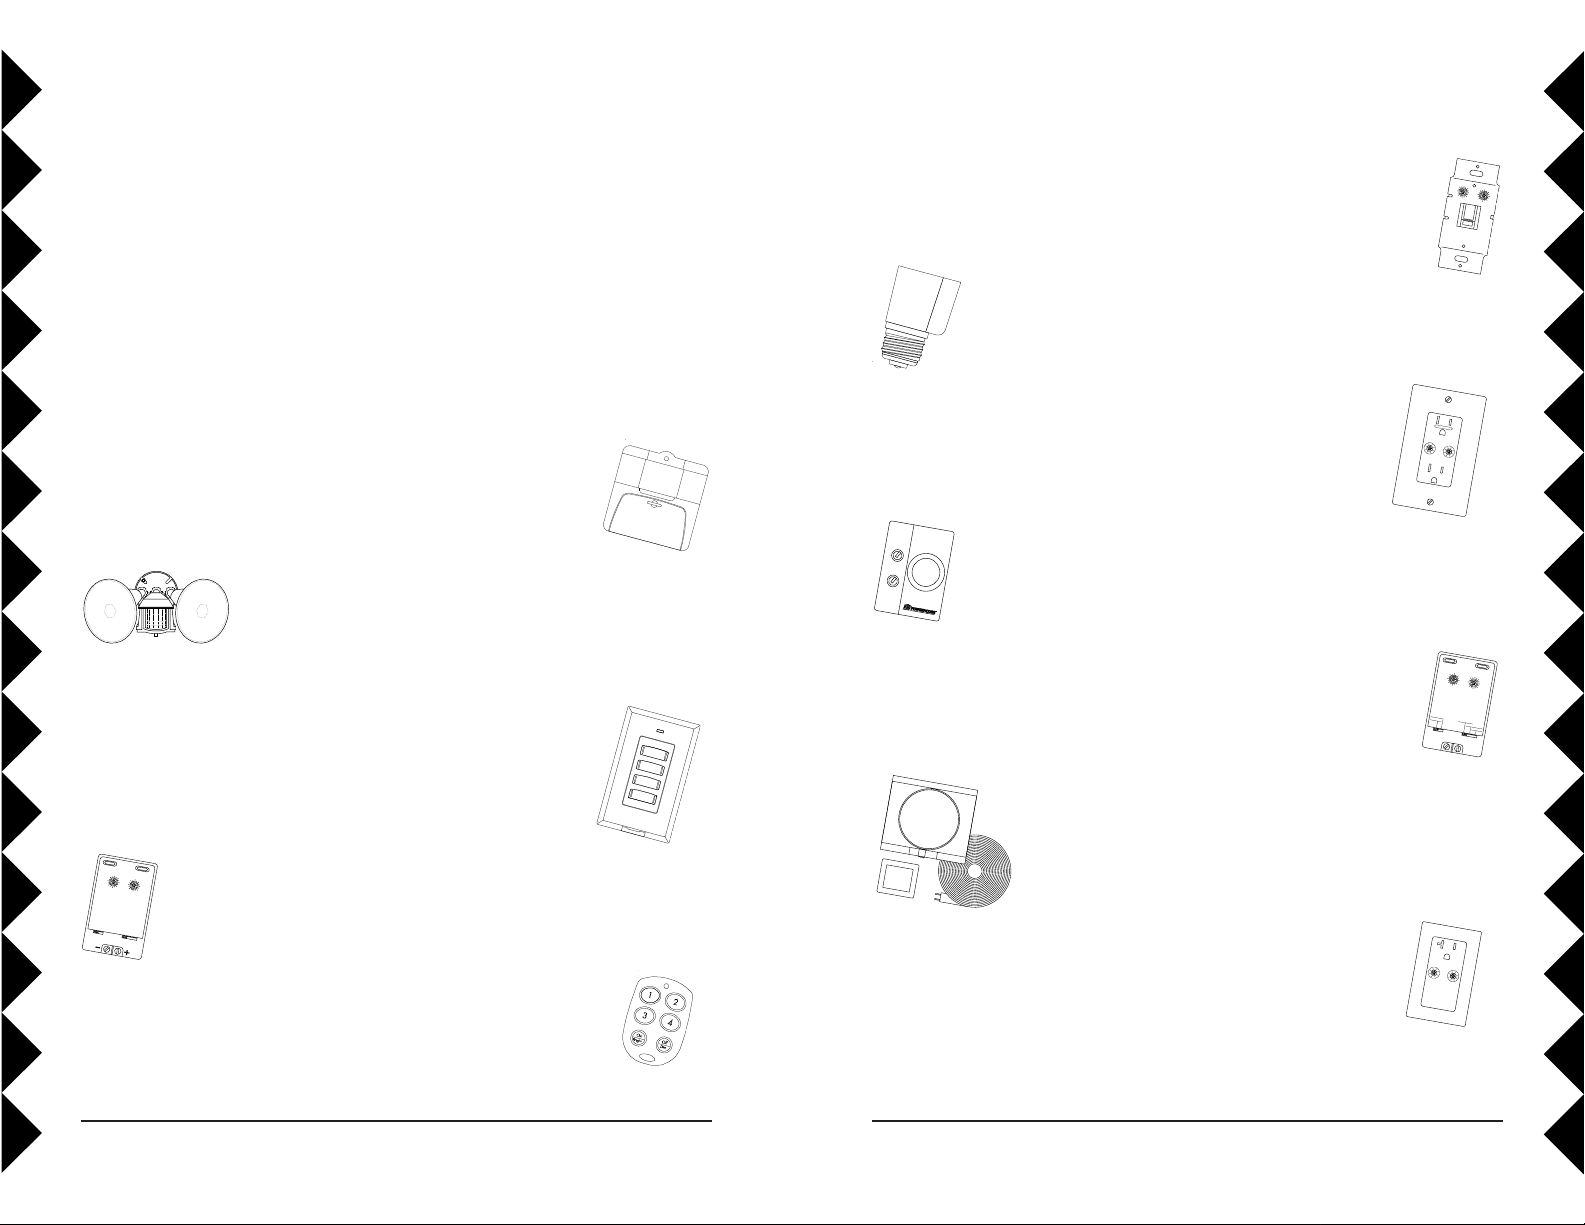
Expanding Your System
In addition to regular Lamp Modules and Appliance Modules, etc., the
modules illustrated below represent just a few of the wide range of X10
modules you can choose from to expand your Home Automation system.
X10 Home Automation products also integrate with X10 security systems,
so you can use the security remotes that come with them to control macros
and flash lights when the security system is tripped.
Check out our Web Site at:
WWW.X10.COM
for more information on these and many other X10 products.
The HawkEye and ActiveEye Motion Sensors MS15A and MS16A can trigger a
macro when someone enters a room or approaches your home.
The Dual Floodlight Motion Detector PR511 turns on at dusk and/or
when it detects movement, and sends X10 signals to control other
modules, or trigger ActiveHome Pro macros.
Fit a Wireless Wall Switch SS13A/ SS15A anywhere you need an extra switch with no wires. Sends commands to the Transceiver Module just like a remote.
Replace your existing wall switches with the Wall Switch Module WS467. Installs
like a regular dimmer. On/Off and Bright/Dim functions. Other models available for
3-way and fluorescent lighting.
Control a ceiling light, closet light, etc. with the convenient Screw-in Lamp Module
LM15A.
Replace existing AC wall outlets with the Receptacle Module SR227. Has one
15A/1800W controlled outlet and one outlet which is always on.
Use a controller to trigger the Remote Chime Module SC546 to call Dad up for
dinner, or warn people you’re about to turn on the sprinklers.
Use the isolated contacts on the Universal Module UM506 to control pool pumps,
sprinklers, drapes and other low voltage equipment. Includes built in warning beeper.
The PowerFlash Module PF284 connects to dry contact or low voltage alarm
terminals on your burglar alarm system and flashes X10 controlled lights when it is
triggered.
Switch entrance or garage lights on from your car with the convenient Keychain
Remote KR21A.
The Thermostat Setback Controller TH2807 mounts below your
thermostat to reduce the room temperature at night or at the times you set
to save energy. No wiring needed to your existing thermostat.
Plug in a Heavy Duty Module HD245 to control 220V appliances such as air
conditioners and water heaters.
Also compatible with FireCracker Computer Interface. See
www.x10.com for details.
4746
Page 25

FCC Caution
THIS DEVICE COMPLIES WITH PART 15 OF THE FCC RULES.
OPERATION IS SUBJECT TO THE FOLLOWING TWO CONDITIONS:
(1) THIS DEVICE MAY NOT CAUSE HARMFUL INTERFERENCE, AND
(2)THIS DEVICE MUST ACCEPT ANY INTERFERENCE RECEIVED,
INCLUDING INTERFERENCE THAT MAY CAUSE UNDESIRED
OPERATION.
This equipment generates and uses radio frequency energy, and if not installed and
used properly, that is, in strict accordance with the manufacturers instructions, it may
cause interference to radio and television reception. It has been type tested and found
to comply with the limits for remote control devices in accordance with the
specifications in Sub-Parts B and C of Part 15 of FCC Rules, which are designed to
provide reasonable protection against such interference in a residential installation.
However, there is no guarantee that interference will not occur in a particular
installation. If this equipment does cause interference to radio or television reception,
which can be determined by unplugging the equipment, try to correct the interference
by one or more of the following measures.
• Reorient the antenna of the radio/TV experiencing the interference.
• Relocate the equipment with respect to the radio/TV.
• Move the equipment away from the radio/TV.
• Plug the equipment into an outlet on a different electrical circuit from the radio/
TV experiencing the interference.
• If necessary, consult your local dealer for additional suggestions.
NOTE: Modifications to this product will void the user’s authority to operate this
equipment.
X10 Wireless Technology, Inc. Limited One Year Warranty
X10.com, a division of X10 Wireless Technology, Inc. (X10) warrants X10 products
to be free from defective material and workmanship for a period of one (1) year from
the original date of purchase at retail. X10 agrees to repair or replace, at its sole
discretion, a defective X10 product if returned to X10 within the warranty period and
with proof of purchase.
Call 1-800-442-5065, visit www.x10.com, or e-mail support@x10.com.
If service is required under this warranty:
For help or more information on setup, please visit:
http://www.x10.com/support
X10.com, a division of X10 Wireless Technology, Inc.
3824 North 5th St., Suite C,
North Las Vegas, NV 89032
48
CM15A-8/04
 Loading...