


Technical Data
Safety Instructions
Product Description
Display
Control Panel
Assembly
• Free Standing Option
• Wall Mounting
Use and Operation
• Switching Your Wärme Designer Heater On/O
• Child Lock Function
• Setting The Temperature
• Timer Function
• Setting The Time
• Memory
• Open Window Function
Heating Mode
• Instant Heating Mode
• Programmed Weekly Heating Mode
Connecting to WiFi
• Using The Smart Life App
Controlling Your Wärme Designer Heater
• The Control Interface
• Instant Heat Mode
• Programmed Weekly Heating Mode
Other Features
• Sharing
• Voice Intergration
• FAQ’s
Cleaning And Care
• Maintenance
• Storage
• Hints On Disposal
• Declaration Of Conformity
03
03
04
05
05
06
07
09
11
14
17
18
For more information visit: www.designerheater.com
TABLE OF
CONTENTS
01

For more information visit: www.designerheater.com
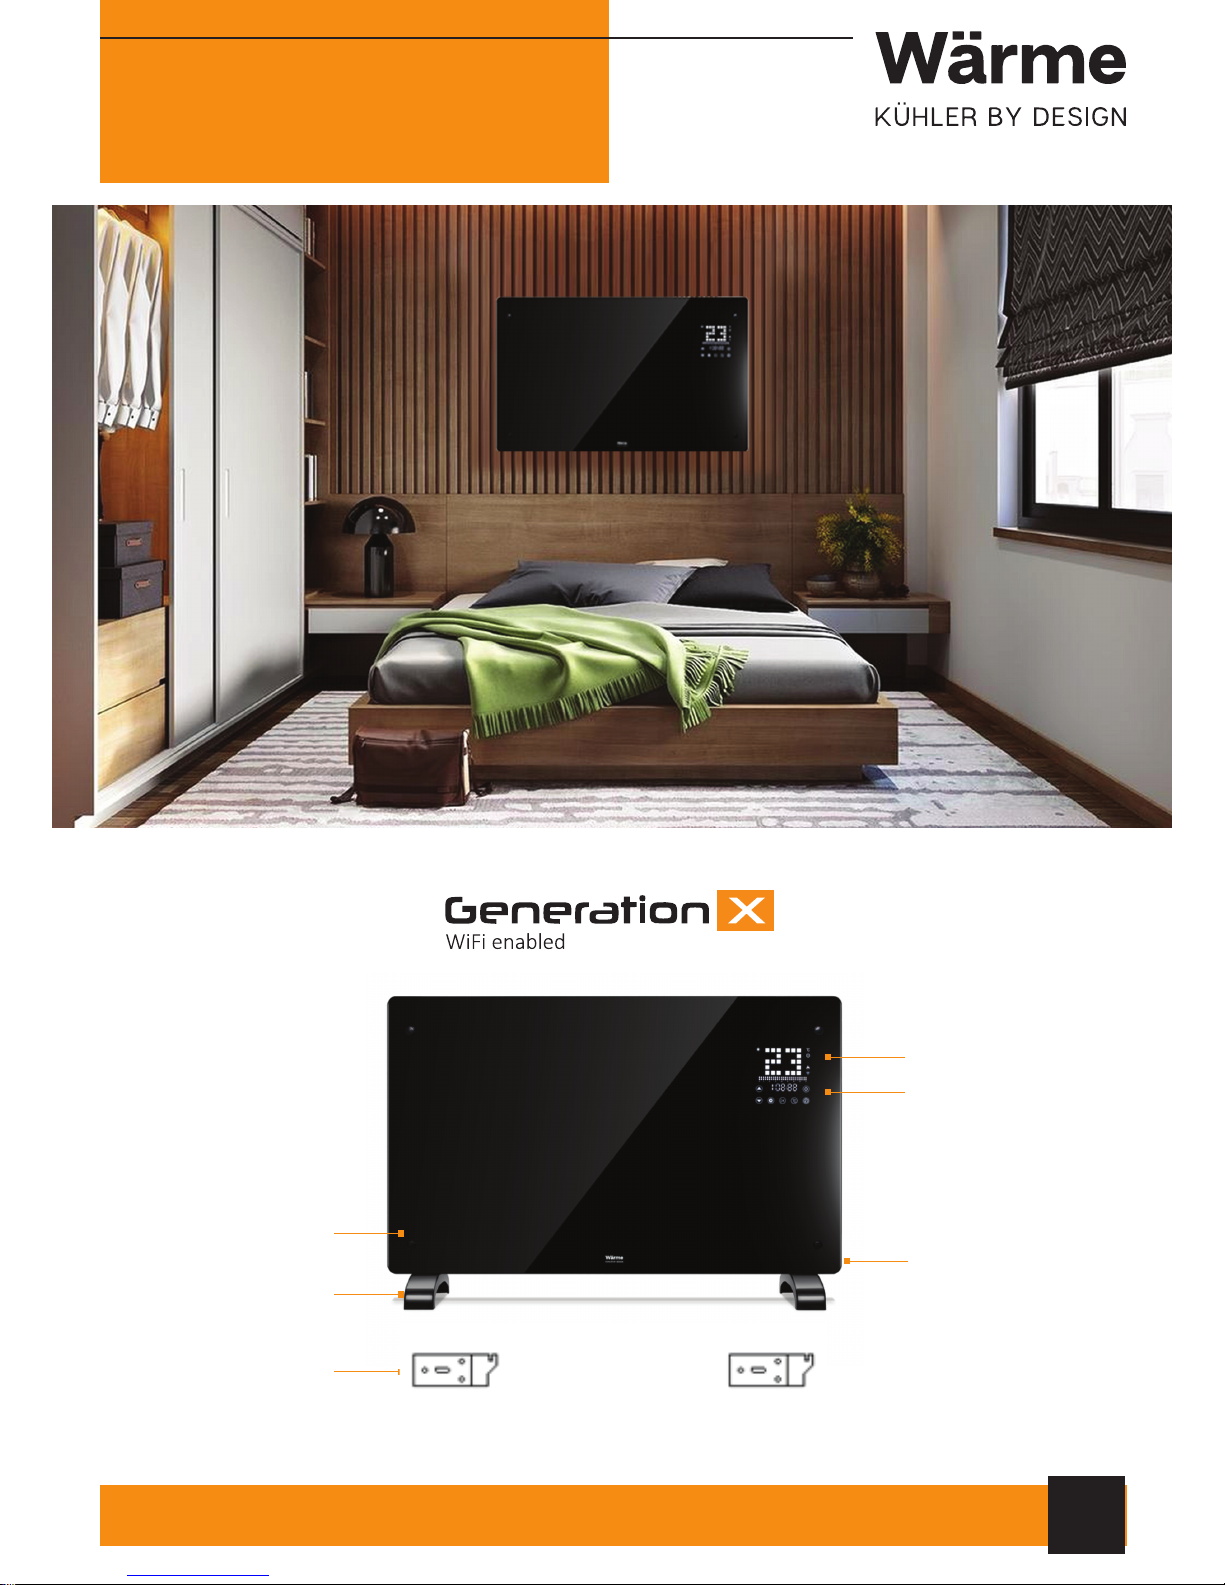
PRODUCT
DESCRIPTION
02
03
Dear Customer,
Thank you for purchasing a Wärme Designer Heater. Please read this user manual carefully and take care of the following hints to avoid damages. Any failure caused by ignoring the items and cautions mentioned in this user manual are not
covered by our warranty.
TECHNICAL DATA
Item number WH-24P
Power supply 230 V ~ 50 Hz
Power consumption 2000 W
Safety Instructions
• Read all instructions carefully before use.
• Make sure the voltage is the same as that indicated on the rating plate of the appliance.
• Do not operate this appliance if the cable or plug becomes damaged.
• Keep the appliance and cable away from sources of heat, sharp objects or anything that may cause damage.
• If the power cord is damaged it must be replaced by the manufacturer, its service agent or similarly qualified person
in order to avoid a hazard.
• Ensure the appliance is switched o before connecting to the mains power supply.
• Switch o the power supply and disconnect from mains supply when not in use, before cleaning or during any maintenance.
• To disconnect the appliance, switch it “OFF”, and then remove the plug from outlet. Do not pull the cord to disconnect
the plug. The heater must not be located immediately below a power socket.
• Do not operate in areas where gasoline, paint or other flammable liquids are used or stored.
• Indoor use only. In order to avoid overheating, do not cover the heater.
• To prevent a possible fire, do not block or cover air intakes or exhaust.
• Do not touch the hot surfaces.
• Do not insert or allow foreign objects to enter any ventilation or exhaust opening, as this may cause an electric shock,
fire or damage to the appliance.
• Always ensure that hands are dry before operating or adjusting any switch on the product or touching the plug and
socket-outlet.
• This appliance is not intended for use by persons (including children) with reduced physical, sensory or mental capabilities, or lack of experience and knowledge, unless they have been given supervision or instruction concerning use of
the appliance by a person responsible for their safety.
• Children should be supervised to ensure that they do not play with the appliance.
• Do not leave this appliance unattended when it’s in use.
• The most common cause of overheating is deposits of dust or flu in the appliance. Ensure these deposits are
removed regularly by disconnecting the appliance and vacuum cleaning air vents and grilles.
• Do not place the cable under carpets. Arrange cord away from traic areas so that it will not be tripped over.
• Do not use this heater in the immediate surroundings of a bath, shower or a swimming pool.
For more information visit: www.designerheater.com
PRODUCT
DESCRIPTION
02
04
Glass Screen
LCD Screen
Foot
Wall Bracket
Control Panel
Power ON/OFF Switch

Standby key: Switching
the appliance on/off.
Seng the
temperature.
Adjusng value up.
Seng the me.
Confirming an input
/
entering menu.
Adjusng value down.
Seng the program
mode.
Display
Control Panel
For more information visit: www.designerheater.com
PRODUCT
DESCRIPTION
02
05
c
OK

For more information visit: www.designerheater.com
Assembly
03
06
Free Standing Option
Wall Mounting
1. Attach the two plastic feet to the bottom of the appliance with the
delivered screws.
2. Be sure to place your Wärme Designer Heater on a flat surface.
Finding a suitable location:
Your Wärme Designer Heater must be installed so that
airflow is not obstructed. The installation must be done by
a qualified person in order to avoid a hazard. Respect the
minimal distances between your heater and the walls, the
ground, the furniture etc. (as requested in the picture):
• To the ceiling min. 30cm
• Left, right and in front of the appliance min. 30cm
Installing and fixing the device:
1. Position and fix 2 x brackets to
the wall 450mm apart.
2. Position and fix the remaining
2 x brackets on to the bottom
of the heater.
3. Slide the heater on to the wall
bracket and installation is
complete.

Switching Your Wärme Designer Heater On/Off
For more information visit: www.designerheater.com
Use and
Operation
04
07
1. Set the red I/O switch on the side of your Wärme Designer Heater to the “I” position.
2. Press the key to activate the menu.
3. The LCD display will show the current temperature and the set time (default 12:00).
(Please note: When the I/O Button is switched to the O position, only the time is deleted and all other settings stay the same. Once turned
back on the clock will need to be reset).
Child Lock Function
1. To set the heater to a standby mode and apply the child lock, press the key and hold for 5 seconds.
2. To unlock the heater, press the key for 3 seconds.
3. The heater will automatically lock if no button is pressed for one minute.
Setting The Temperature
1. To set the temperature press the key.
2. The temperature will start to flash on the LCD display.
3. Use the UP and DOWN arrows to select the desired target temperature.
4. Press the key again to confirm.
Timer Function
1. In the instant heating mode, the digital clock is a countdown timer, which can be set in hours and minutes to keep
the heater on, for example, whilst you go to sleep for as long as you desire (maybe 1 hour before bed).
2. In weekly heating mode, the same digital display is a 24 hour clock and can be set as a clock (see setting the time).
c
c

Setting The Time
Use and
Operation
04
For more information visit: www.designerheater.com
08
1. To set the time press the key.
2. The hour will flash on the LCD display.
3. Set the hour using the UP and DOWN arrows.
4. Confirm by pressing the key again.
5. Now the minutes will flash on the LCD display.
6. Set the minutes using the UP and DOWN arrows.
7. Confirm by pressing the key again.
Open Window Function
Memory
1. Your Wärme Designer Heater has an in-built memory to protect your weekly heating schedule in the event of a
power cut or power loss.
2. To activate your settings once the power has been lost you MUST set the clock and the temperature manually.
3. Your weekly heating schedule will be saved.
1. Your Wärme Designer Heater is fitted with state-of-the-art energy saving technology such as the ‘open window
function’
2. To activate the ‘open window function’, press and hold the key for 5 seconds. The open window icon will appear
on the LCD display.
3. When activated, your Wärme Designer Heater will automatically stop heating when the room temperature drops by
4°c in 20 minutes.
4. To deactivate, press and hold the key for 5 seconds and the icon will then disappear.
5. To resume heating, you must first unlock the heater (if locked) and then press the key twice to restore to the
heating mode selected before the window was open.
c
c

Heating Modes
Instant Heat Mode
For more information visit: www.designerheater.com
Heating
Modes
05
09
Your Wärme Designer Heater has two dierent heating modes:
• Instant Heat Mode
• Programmed Weekly Heating Mode
Instant heating mode provides three additional heating functions:
Press the key and use the UP and DOWN arrows to select the desired mode. The icon of the selected mode will
flash on the LCD display.
Comfort
Comfort funcon is intended to heat the room at the set
temperature. To acvate or deacvate the comfort funcon, press
the up or down key. When acvated icon appears on the LCD
display. Default heang temperature is set to 25°c.
The mode display icon is
Economy
Economy funcon is intended to maintain an average room
temperature. When the room temperature drops to 3°C below the
target temperature, the heater will automacally switch back on.
The mode display icon is
Frost-free
Frost-free funcon is intended to keep the minimum temperature of
5°C inside the room (this temperature cannot be adjusted).
The mode display icon is
1. To enter Instant heat mode unlock the heater, press the key and use the UP and DOWN arrows until the
key is lit.
2. Once the key is lit, press the key and then use the UP and DOWN arrows to select the desired heat function
(Comfort, Economy, Frost-free).
3. You will see the icons on the left hand side change between the heat settings.
4. Press on the desired heat function setting (Comfort, Economy, Frost-free)
5. Your heater will now heat to the target temperature you have set.
OK
OK

1. When programming the heater, you can replicate the
previous day’s settings to save time.
2. Using the example above, if you want to program Tuesday
to be the same as Monday, simply bring up 2=Tuesday and
hold down the key for 5 seconds.
3. The settings from Monday will then duplicate to Tuesday
and so on for any other days you want to copy. (Please note:
it will only copy the previous day’s settings).
Heating
Modes
05
For more information visit: www.designerheater.com
10
Programmed Weekly Heating Mode
Copy Function
Please note: Your Wärme Designer Heater can be programmed using our state-of-the-art WiFi app instead if preferred
– please see “Connecting to WiFi”
Days of the week
1. Monday
2. Tuesday
3. Wednesday
4. Thursday
5. Friday
6. Saturday
7. Sunday
24 hour clock
Minutes
Example of a popular
programme choice
Monday
12am – 6am: Frost free mode
6am – 9am: Comfort mode
9am – 5pm: Frost free mode
5pm – 12am: Economy mode
1. To enter the weekly heating mode press the key and use the UP and DOWN arrows until the key is flashing.
2. Then press the key again until the 1 is flashing.
3. When the 1 is flashing, use the UP and DOWN keys to select the day to be programmed (Each number corresponds
to the respective day of the week – see above).
4. When the 1 is flashing for Monday, press the key again.
5. Then keep pressing the key until the correct desired heating function is lit (Comfort, Economy, Frost-free).
6. Now using the UP and DOWN keys and the 24 hour clock, set the time at which you wish the heater to come on/o
at (i.e. Frost free at 12am). Press the UP and DOWN arrows to set the time at which you wish the heater to come on/o
at(i.e. Frost free finish at 6am).
7. Press the key and again choose the desired heating function (Comfort, Economy, Frost-free) for the next time
(i.e. Comfort from 6am). Press the UP and DOWN arrows to set the time at which you wish the heater to come on/o
at (i.e. Comfort finish at 9am).
8. Once you have finished programming the whole day wait for 10 seconds to save the settings.
9. Repeat the same steps as above for the rest of the week.
OK
OK
0 3 6 9 12 15 18 21 24
1 16:56

Your Wärme Designer Heater has a state-of-the-art WiFi function so you can
control your heater via WiFi on your smart phone or tablet.
(Please note: images vary depending on phone, tablet and software installed).
1. To connect your heater to the WiFi, firstly download the “Smart Life” app on to
your smart phone or tablet. You can find the app by searching “Smart Life” in the
Google Play or Apple app store.
2. Download and install the app. If you already have a Smart Life account, please
sign in. If you don’t, you will need to create a new account by selecting Register.
3. The device will automatically determine your country, although you can change
this if necessary. Enter your phone number or email address. If you enter a phone
number, a verification number will be sent to your phone. Enter this number to
verify and create a password. If you enter your email address, a verification
number will be sent to your email address. Enter this number to verify and create
a password.
4. To add your heater to the app, first put the heater in WiFi mode. The heater is in WiFi connection mode when the
WiFi icon is flashing.
**If the WiFi icon is not flashing, go to standby mode and hold down the key for three seconds. Repeat until
flashing. This is very important**
Connecting To WiFi
For more information visit: www.designerheater.com
Connecting
to WiFi
06
11

Connecting
to WiFi
06
For more information visit: www.designerheater.com
12
5. Once the WiFi icon is flashing on your heater, go to the app and select “Add a Device”.
6. Select the device type (home appliances - heater). Power on the heater and confirm the WiFi indicator on your Wärme
Designer Heater rapidly blinks.

Connecting
to WiFi
06
For more information visit: www.designerheater.com
13
7. Once you have confirmed, you will then be prompted to select your WiFi network and enter your WiFi password. This
allows the app to find your heater using your WiFi network.
9. The heater will beep and display a solid icon once connected. The app will confirm your heater has been added. You
can now name the device (i.e. lounge, kitchen) , share it with family members or proceed to scheduling your heating.
(Please note: Only supports 2.4 GHZ WiFi network. You can select this from your router. If the heater is failing to connect,
press and hold the key for three seconds. It will then switch to the secondary connection mode. The heater has two
connection modes
1. The icon flashes slowly.
2. The icon flashes fast. Most devices will connect on the fast flashing mode).
8. The app will then connect to the WiFi and heater.

Target
temperature
Adjust temperature
up/down
LCD display on/o
1. You can use the Smart Life app to control your Wärme Designer Heater. The status of your heater is shown on the
device list:
• Oline (device is turned o at the wall / I/0 switch)
• Turned o (device is in standby mode)
• Turned on (device is in heating mode)
When the heater is online, tap the device name to go to the control interface.
(Please note: When the heater is oline you will not be able to control it with the app).
Using The Smart Life App
Controlling Your Wärme Designer Heater
For more information visit: www.designerheater.com
Controlling
Your Heater
07
14
Current room temperature
24 hour clock
(for weekly programming)
Power on/o Countdown timer
Select day or weekly
programming
Heating modes
(Comfort, economy, anti frost)
The Control Interface

1. To enter the instant heat mode select the heater you wish to turn on. This will take you to the control
interface. Press the program button.
3. Use the – and + buttons on the control interface to adjust the temperature up and down.
2. Select ‘Day program’.
4. Press the heating mode button to select which heating mode you wish to use.
Instant Heat Mode
Controlling
Your Heater
07
For more information visit: www.designerheater.com
15
5. Turn the heater on/o as and when you wish.

Controlling
Your Heater
07
For more information visit: www.designerheater.com
16
1. To enter the weekly heating mode select the heater you wish to program. This will take you to the
control interface. Press the program button.
4. Use the start time and end time to select which time you wish the heater to come on/o at and select
the heating mode type (i.e. 12am – 6am anti frost mode).
5. Select done and continue to program for the day.
6. Repeat for each day. Leave in ‘Weekly program mode’ or revert back to ‘Day program’ for instant heat mode.
2. Select ‘Weekly program’.
Programmed Weekly Heating Mode
The example shows a popular programme choice:
Monday
12am – 6am Anti frost mode
6am – 9am Comfort mode
9am – 5pm Anti frost mode
5pm – 12am Economy mode
3. Once you have entered the weekly program mode, select the day you wish to program along the top.

You can share control of your devices with family members. Go to “device sharing”, select which devices you want to
share, and tap “Share with New Member”. You can then add their email address or phone number. If they have the app,
the device will appear on their device list. If they don’t have the app, they will be sent a link to download the app.
(Please note: You can only share to email addresses and phone numbers that are connected to the app and compatible devices, smartphones or tablets).
Sharing
Smart Life is compatible with both Amazon Echo and Google Home.
Voice Integration
Find the answer to any troubleshooting questions in the app’s FAQ section.
FAQs
For more information visit: www.designerheater.com
Other
Features
08
17

Maintenance
Always disconnect your Wärme Designer Heater and let it completely cool before any maintenance. Use a vacuum
cleaner to remove dust on the grilles. Clean the outside of the unit with glass cleaner. Never immerse the unit in water
nor let water drip into the unit.
Storage
Always disconnect your Wärme Designer Heater and let it completely cool before storing. If you do not use it for a long
period of time store it in the original carton in a dry and ventilated place. Do not place any heavy items on top of your
heater as this may cause damage.
According to the European waste regulation 2002/96/EC this symbol on the product or on
its packaging indicates that this product may not be treated as household waste. Instead
it should be taken to the appropriate collection point for the recycling of electrical and
electronic equipment. By ensuring this product is disposed of correctly, you will help prevent potential negative consequences for the environment and human health, which
could otherwise be caused by inappropriate waste handling of this product. For more
detailed information about recycling of this product, please contact your local council or
your household waste disposal service.
Cleaning and Care
Hints on Disposal
Declaration of Conformity
Cleaning
And Care
08
For more information visit: www.designerheater.com
18
Producer: Wärme Limited, Leicestershire, LE7 4UW, UK
This product is conform to the following European Directives:
2004/108/EC (EMC)
2011/65/EU (RoHS)
2006/95/EC (LVD)
 Loading...