

Page 1

User Manual
WYTRON BD-02
For Optical Disc Duplicator
V 3.6.0
Copyright © 2013 All Rights Reserved
Page 2

WARNING!
THIS CD/DVD/BLU-RAY DUPLICATOR IS MEANT FOR BACK UP AND
DISTRIBUTION OF ORIGINAL DATA AUTHORED OR OWNED BY THE USER. ANY
DUPLICATED DISCS MADE FROM A THIS CD/DVD/BLU-RAY DUPLICATOR IS THE
COPYRIGHT OWNERSHIP OF THE AUTHOR OR COMPANY WHICH OWNS THE
SOURCE DISC. ANY UNAUTHORIZED COPYING, EDITING, OR ANY PART
THEREOF OF A COPYRIGHT DISC IS STRICTLY PROHIBITED. WE DISCOURAGE
THE USE OF ANY SUCH ACTION THAT GIVES RISE TO CRIMINAL INTENT AND
PROSECUTION.
THE SELLER OF THIS PRODUCT IS NOT RESPONSIBLE FOR ANY POTENTIAL
ILLEGAL ACTIONS OF THE USER DUE TO ACTIVITIES BEYOND THE SCOPE OF
THE PRODUCTS INTENDED USE.
Copyrights and Trademarks
ALL RIGHTS RESERVED. NO PART OF THIS PUBLICATION MAY BE
REPRODUCED IN ANY MEDIUM PRINTED OR ELECTRONIC WITHOUT THE PRIOR
WRITTEN PERMISSION FROM THE MANUFACTURER. COPYRIGHT©2000-2013.
ALL RIGHTS RESERVED.
Page 3

Table of Contents
Chapter 1: Introduction & Manual Overview ................................................................................. 1
Before you start ........................................................................................................................... 1
Package Contents ........................................................................................................................ 3
Chapter Overview ....................................................................................................................... 3
Chapter 2: Getting to know your system ........................................................................................ 4
System Overview ........................................................................................................................ 4
LCD Front Panel ......................................................................................................................... 5
Input Characters/Numbers .......................................................................................................... 6
Chapter 3: Basic Operations ........................................................................................................... 7
Make Disc-to-Disc Copies .......................................................................................................... 7
Section 1: Selecting the Copy Source. .................................................................................... 7
Section 2: Making Copies from the Reader ............................................................................ 8
Making Hard Drive-to-Disc Copies .......................................................................................... 12
Section 1: Loading Master Disc content into the Hard Drive as a partition/image. ............. 12
Section 2: Selecting the Copy Source to the Hard Drive. ..................................................... 15
Section 3: Making Copies from an existing partition/image of the Hard Drive. .................. 16
Select the Duplication Speed .................................................................................................... 19
Mix Audio Tracks ..................................................................................................................... 21
Change the Setup settings ......................................................................................................... 27
Chapter 4: Menu Overview ........................................................................................................... 29
Appendix A: External Device (USB/eSATA/Network) Setup Guide (Optional) ......................... 36
Appendix B: Troubleshooting ....................................................................................................... 37
Frequently Asked Questions ..................................................................................................... 37
Error Code ................................................................................................................................. 39
Appendix C: Safety & Regulatory information ............................................................................ 44
Page 4

Chapter 1: Introduction & Manual Overview
This system is a reliable, high performance, high speed, standalone manual tower system. With
its professional industrial design and simple beginner user interface, it will make your duplicating
experience easier than ever.
Before you start
Before you start using this system, please read the following to ensure proper operation:
1. Important Notice:
The type of system you purchase will determine the type of discs you are able to copy. For
example, if you purchased a CD only system, then you will only be able to copy onto
recordable CD formats. If you purchased a DVD system, then you can copy on to
recordable DVD and CD formats. If you purchased a Blu-ray system, then you can copy
onto recordable Blu-ray, DVD, and CD formats.
If you have a Blu-ray capable system, the terms CD or DVD can be substituted for Blu-ray
within the text of this user manual.
2. System Limitations:
The system will not copy any CD, DVD, or Blu-ray discs that have Copy Protection encoded
inside. Typically, the movies you purchase or rent from the store will contain copy protection.
In addition to the copy protection limitation, the system cannot copy across formats. This
means that you cannot copy a DVD master onto a recordable CD or vice versa. In addition,
you cannot copy the same formats if the discs have different maximum capacity limitations.
This means that you cannot copy a single layer DVD or Blu-ray Disc onto a double/dual
layer DVD or Blu-ray Disc or vice versa. The recordable blanks must be the same format
and maximum capacity as the master disc you intend to duplicate.
3. Temperature Warning:
If the system was stored in a location where the temperature dropped below 32⁰F (0⁰C)
within the past 24 hours, please leave the system in a warm room with temperatures at least
65⁰F (19⁰C) for 4 hours prior to powering it on for the first time. Failure to do so may cause
irreparable harm and prevent the system from functioning.
4. External Connection Warning:
If you have an external connection installed in your system, (USB sticker(s) should appear
on your writer front drive panel(s) as an indicator). In order to operate the system solely as a
standalone unit (no connection to the computer), you have to make sure all of the external
connection(s) are off. If by any chance, the external connection(s) are on, please refer to
“Appendix A: External Device (USB/eSATA/Network) Setup Guide (Optional)”.
- 1 -
Page 5

5. Maintenance:
It is very important to operate and keep the system in a dust free, clean environment since
dust is the number 1 killer for optical recording devices. Failure to do so may severely
damage your system. We strongly suggest you place an Air Cleaner next to the system and
constantly use the Air Duster (Can Air) to clear off any dust on the surface of the system.
Do not try to use the Air Duster to clean the system while the reader/writer trays
are open. In doing so, you may inadvertently blow dust into the recording device
and damage the recording device.
6. Proper Shutdown:
To avoid possible system failures, you need to shut down the system properly. To shut down
the system, you need to press the Up or Down button to Shutdown menu, then press
ENT/Enter and follow instructions on the screen to shut down the system properly. Turning
off your system without performing this function will increase the risk of damaging your
system.
- 2 -
Page 6
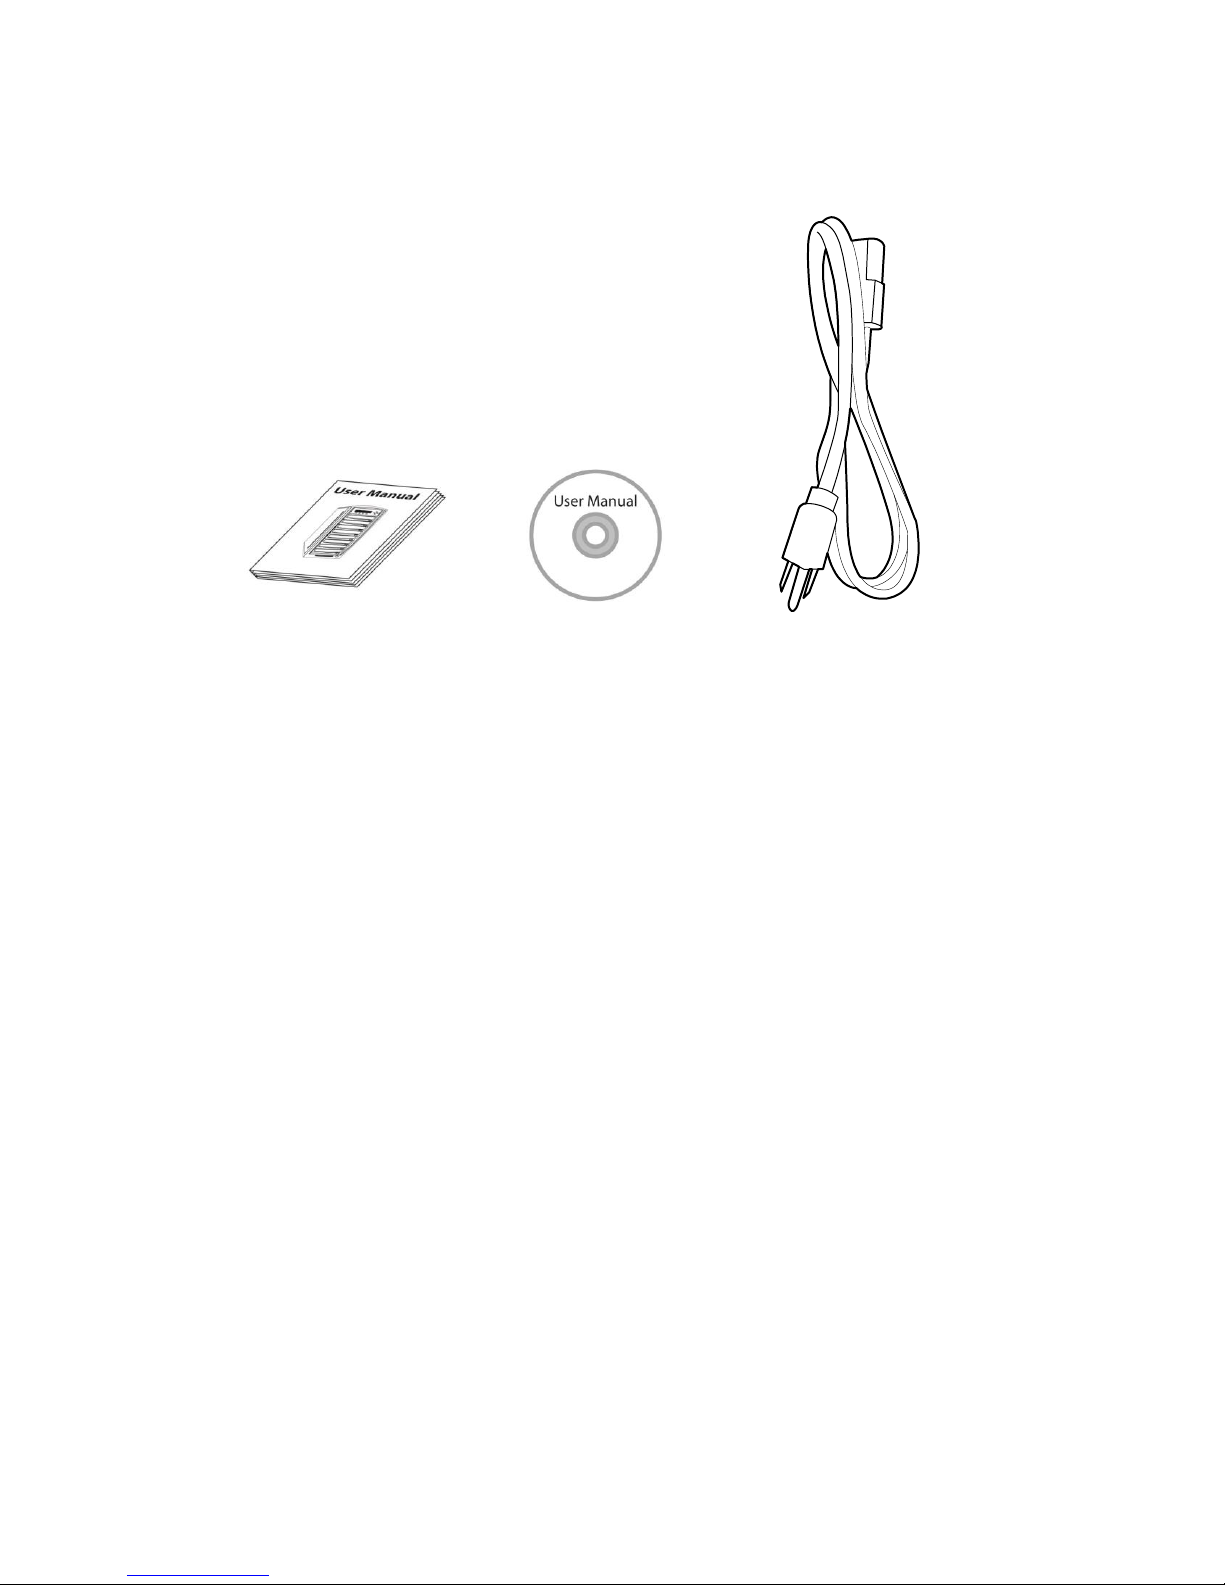
Package Contents
Power Cord Cable
OR
Standard Operation User Manual Booklet or CD
or download www.wytron.com.br
Chapter Overview
Chapter 2: Getting to know your system
This chapter describes the physical features and instructions on how to operate your
system
Chapter 3: Basic Operations Guide
Chapter 4: Menu Overview
This chapter describes what every function/setting does.
Appendix A: External Device (USB/eSATA/Network) Setup Guide
This section describes how to enables one of many writers of your system as an external
Appendix B: Troubleshooting
Appendix C: Safety & Regulatory information
This chapter describes how to perform basic operations like Making Copies, Changing
Speed, etc.
writer for your PC via system’s USB interface.
This section provides many solutions on frequently asked questions and provides
insights on system error codes.
This section provides environment, health, safety and other regulatory information.
- 3 -
Page 7
Chapter 2: Getting to know your system
System Overview
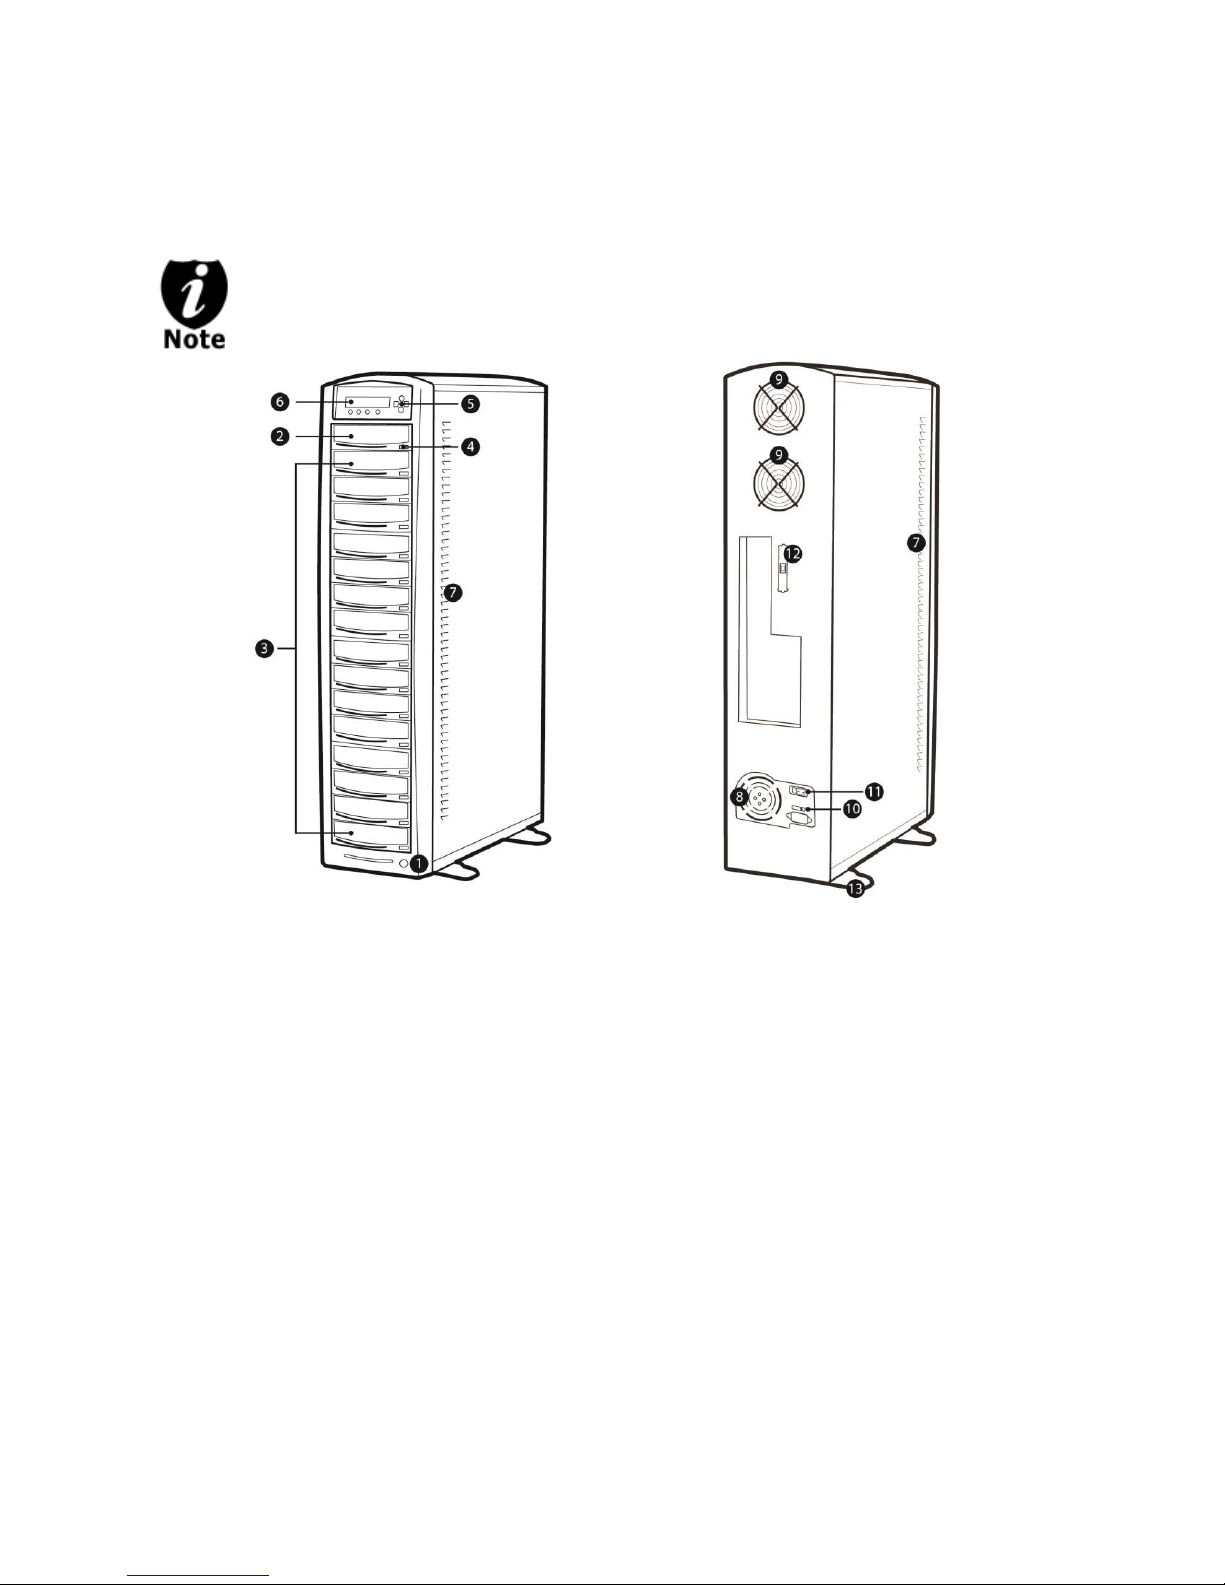
The below image is one representation of the duplicator casing. Your case’s
outlook may vary but will have similar principles.
Figure 1-1 System Controls and Display
The components shown in Figure 1-1 are:
1. System Power On/Off Button
2. Optical Disc Reader
(Referred to as “Reader” throughout this manual)
3. Optical Disc Writers
(Referred to as “Writer” throughout this manual)
4. Eject Button
5. Keypad
6. LCD Screen
7. System Ventilation Vents
8. Power Supply Fan
9. Ventilation Fans
10. Power Voltage Switch (110v/220v) (not available on all models)
11. Power Supply On/Off Switch (not available on all models)
12. External Connection (not available on all models)
13. Stability Feet (not available on all models)
- 4 -
Page 8
LCD Front Panel
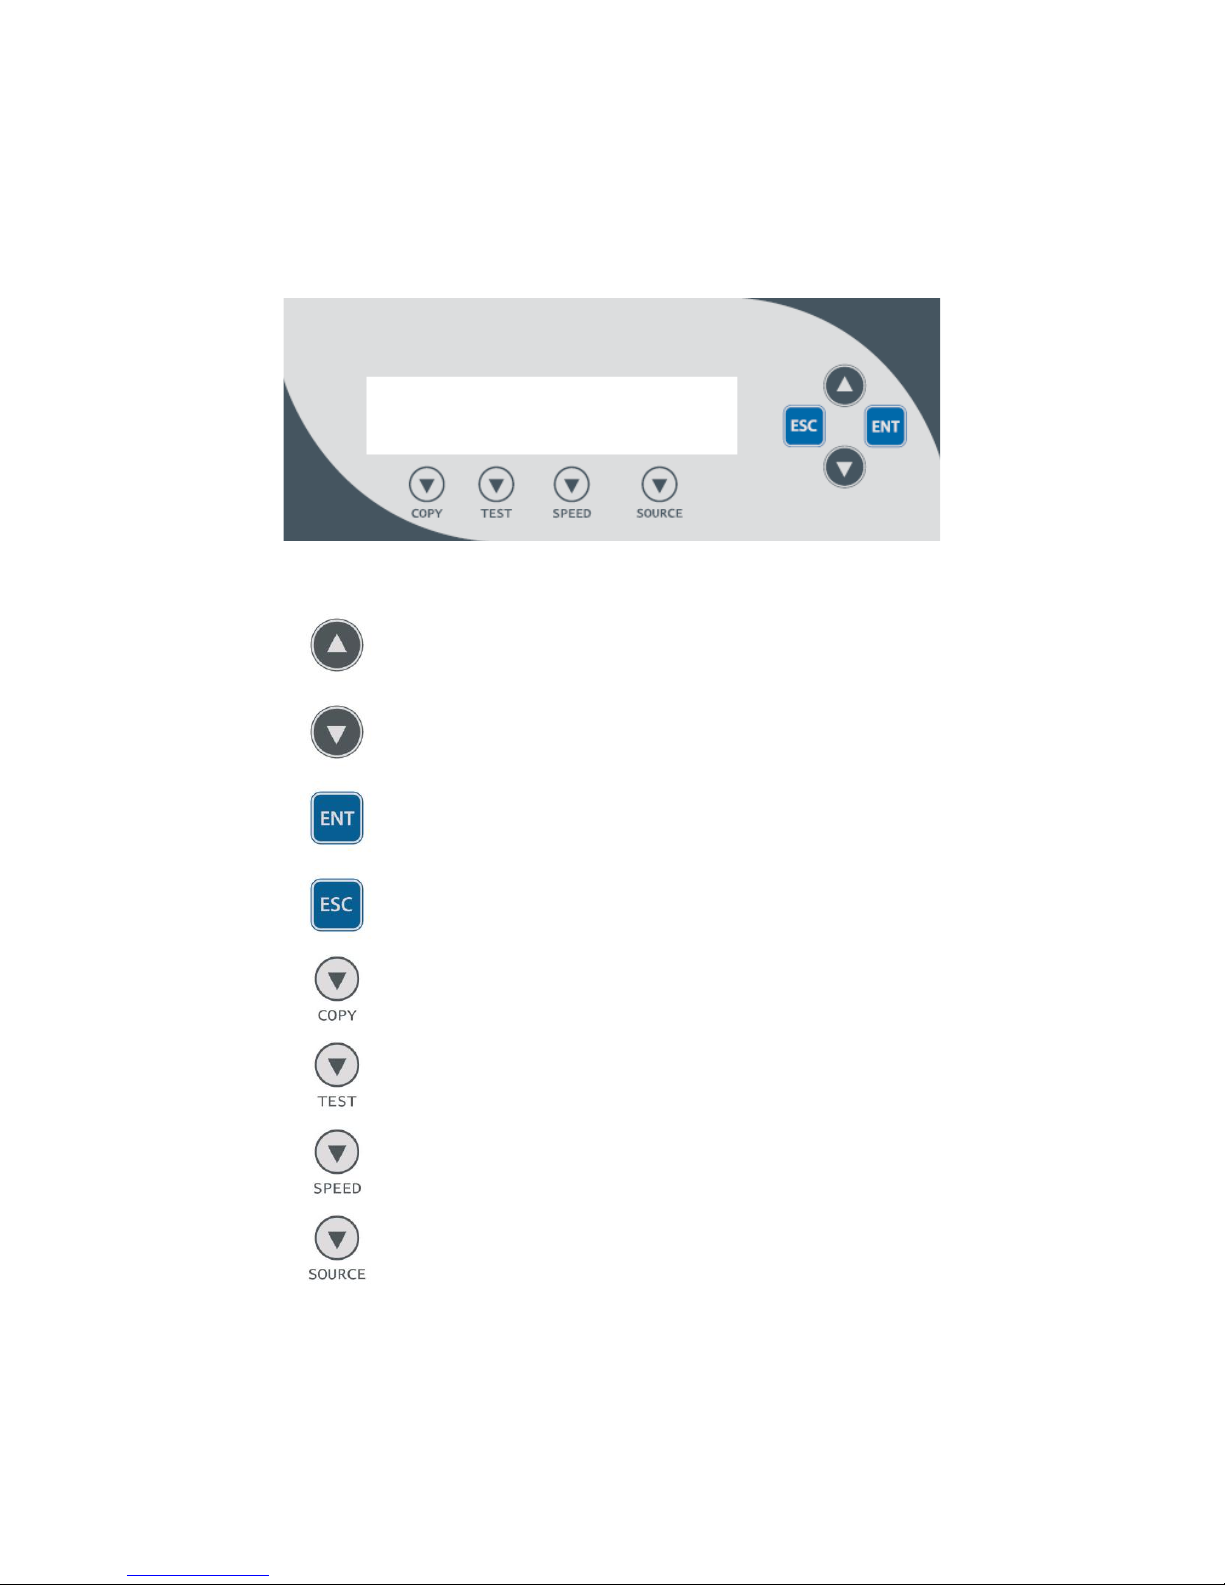
: Up (Menu/Option Scroll Up)
: Down (Menu/Option Scroll Down)
: Forward; Enter; OK; Execute the function
: Backward; Escape; go back to the previous function
: Shortcut to make a copy
: Shortcut to make simulation of copying process
: Shortcut to change the duplication speed
: Shortcut to change your master reading source
*The below image is for reference only. Your key assignment and appearance may differ.
- 5 -
Page 9
Input Characters/Numbers
Edit Partition Name:
[ ],OK?
When you operate this system, there are cases when a number or a name is required to be
entered by you. Such cases could be entering the Counter quantity or a Hard Drive
Partition/Image name.
To enter an alpha numeric character, you need to use the Up or Down button to scroll
through varies numbers or letters then use the ENT/Enter or ESC/Escape button to move the
cursor position right or left. Once you’ve finished, move the cursor to OK and press the
ENT/Escape button.
The below example is meant to illustrate how to enter a partition/image name. For
detail procedures on how to create a new partition/image or rename an existing
partition/image, please refer to; Section 1: Loading Master Disc content into the Hard
Drive as a partition/image on page 12.
For example, if you want to enter a partition name of “FUN1”, do the following:
a) Press the Down button repeatedly until “F” is displayed.
b) Press the ENT/Enter button once to move the cursor to the next position.
c) Press the Down button repeatedly until “U” is displayed.
d) Press the ENT/Enter button once to move the cursor to the next position.
e) Press the Down button repeatedly until “N” is displayed.
f) Press the ENT/Enter button once to move the cursor to the next position.
g) Press the Down button repeatedly until “1” is displayed.
h) Press the ENT/Enter button repeatedly to move the cursor to OK. Then, press the
ENT/Enter button once to submit your selection and proceed to next step.
When you enter a number, normally it asks for a 4 digit number. If your number is
less than 4 digits, you need to fill the leading spaces with 0s (any leading zeros will
be skipped). An example of that would be 0234 (Two hundred and thirty four) or
0010(ten).
- 6 -
Page 10
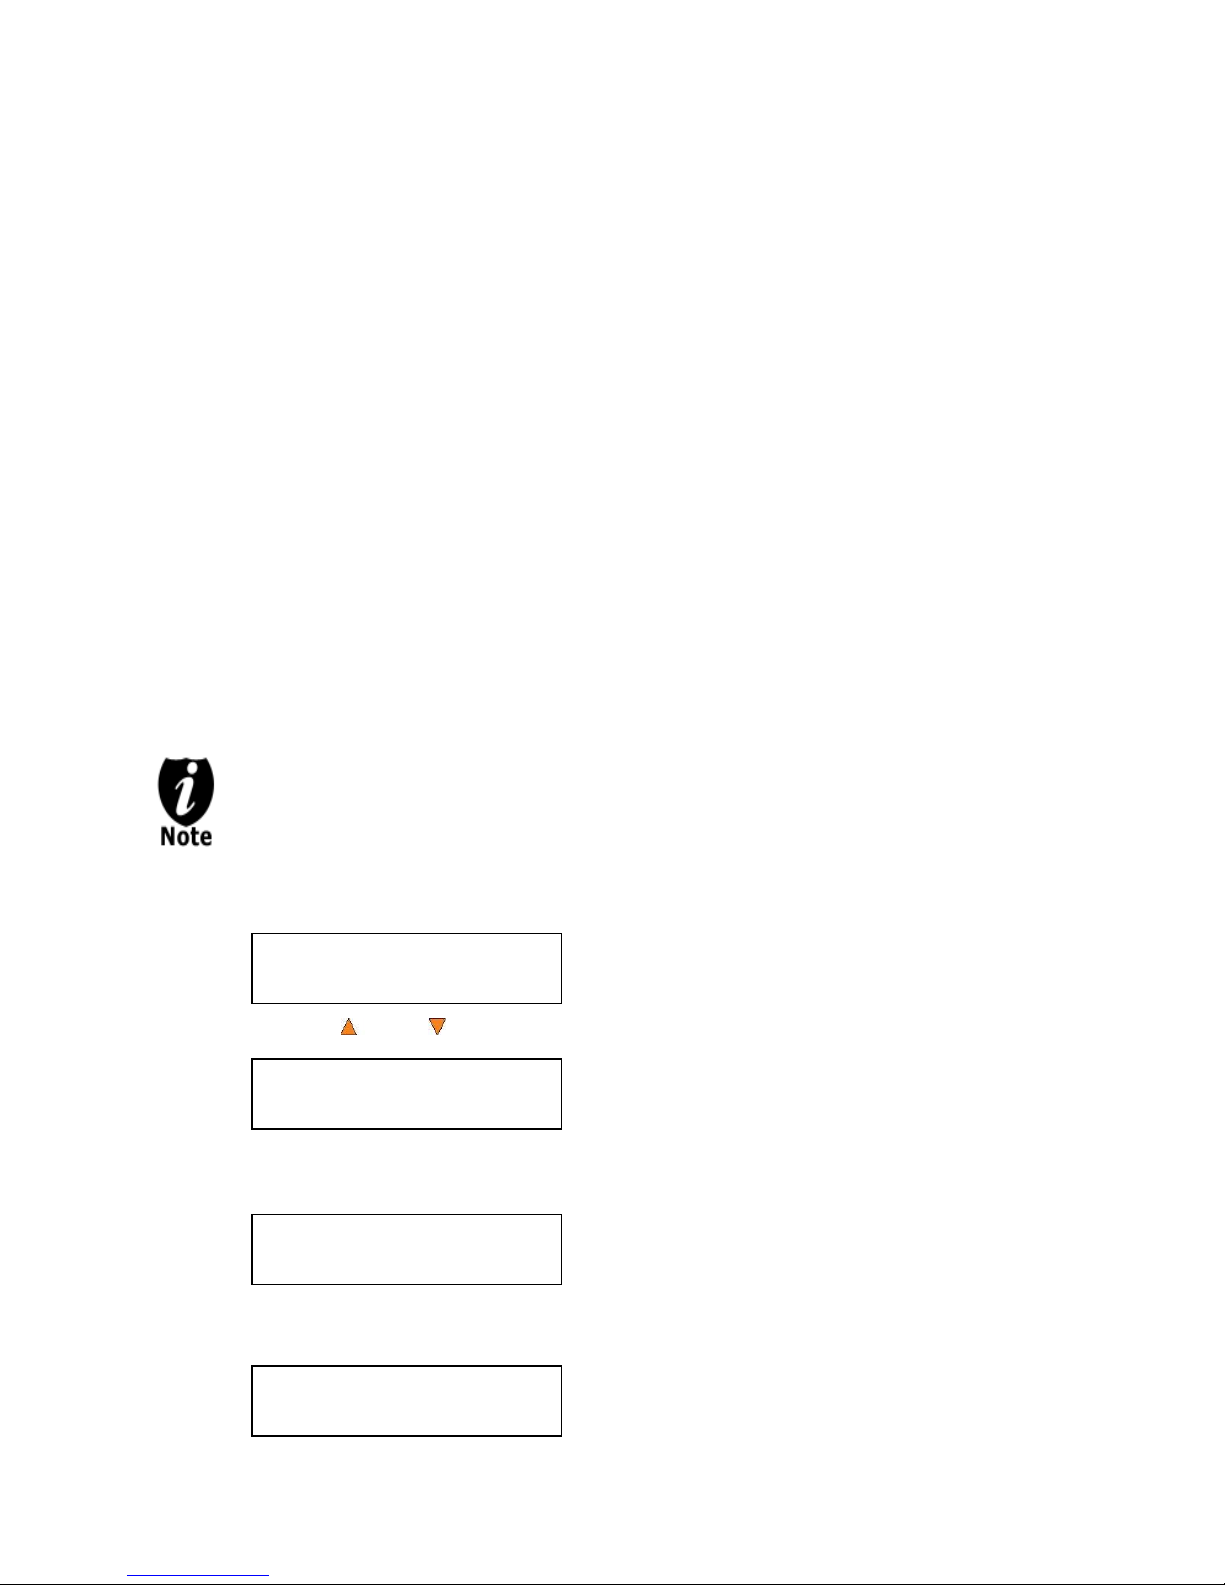
Chapter 3: Basic Operations
DUPLICATOR 3.37
1.Copy
DUPLICATOR 3.37
8.Select Source
Drive 0 Port x.x
ASUS DVD-E818A
Drive 0 Port x.x
ASUS DVD-E818A
Make Disc-to-Disc Copies
This process will copy your master disc onto one or multiple blank discs simultaneously.
However, due to its simultaneous nature, a good conditioned master disc and a lower recording
speed is recommended for higher success rates and better quality duplications.
For a disc-to-disc copy, the copy source can be either of these devices:
The reader: The reader normally is the 1st drive from the top of the system and is most often
the source typically used when making disc-to-disc copies.
Any of the writers: One of the writers can also be used as the copy source when making
disc-to-disc copies. This option is typically only used when the reader is either bad or unable
to read the master disc.
If your system has a hard drive installed, it will simultaneously load the master disc image into
the hard drive while copying from the reader drive to the writer drives during the first round of
the copy process; Then starting from the 2nd round, all copies will be made from the hard drive
for enhanced performance and reliability. If you prefer not to utilize this feature, please change
the “Duplication Mode” setting to “On the Fly” under Setup menu. Please refer to page 32 for
more details.
Section 1: Selecting the Copy Source.
Ignore this section and proceed to Section 2 if your system does NOT have a Hard
Drive installed.
When you turn on your system, after it has booted up, you should see the following
signifying your system is ready.
Step 1: Use the Up or Down button to navigate to the Select Source menu.
Step 2: Press ENT/Enter button to enter the Select Source menu and you shall see a
screen similar to below:
Step 3: If you plan to use the Reader as the source, use the up or down button to locate
Drive 0 (1st drive) and press ENT/Enter button to select it.
- 7 -
Page 11
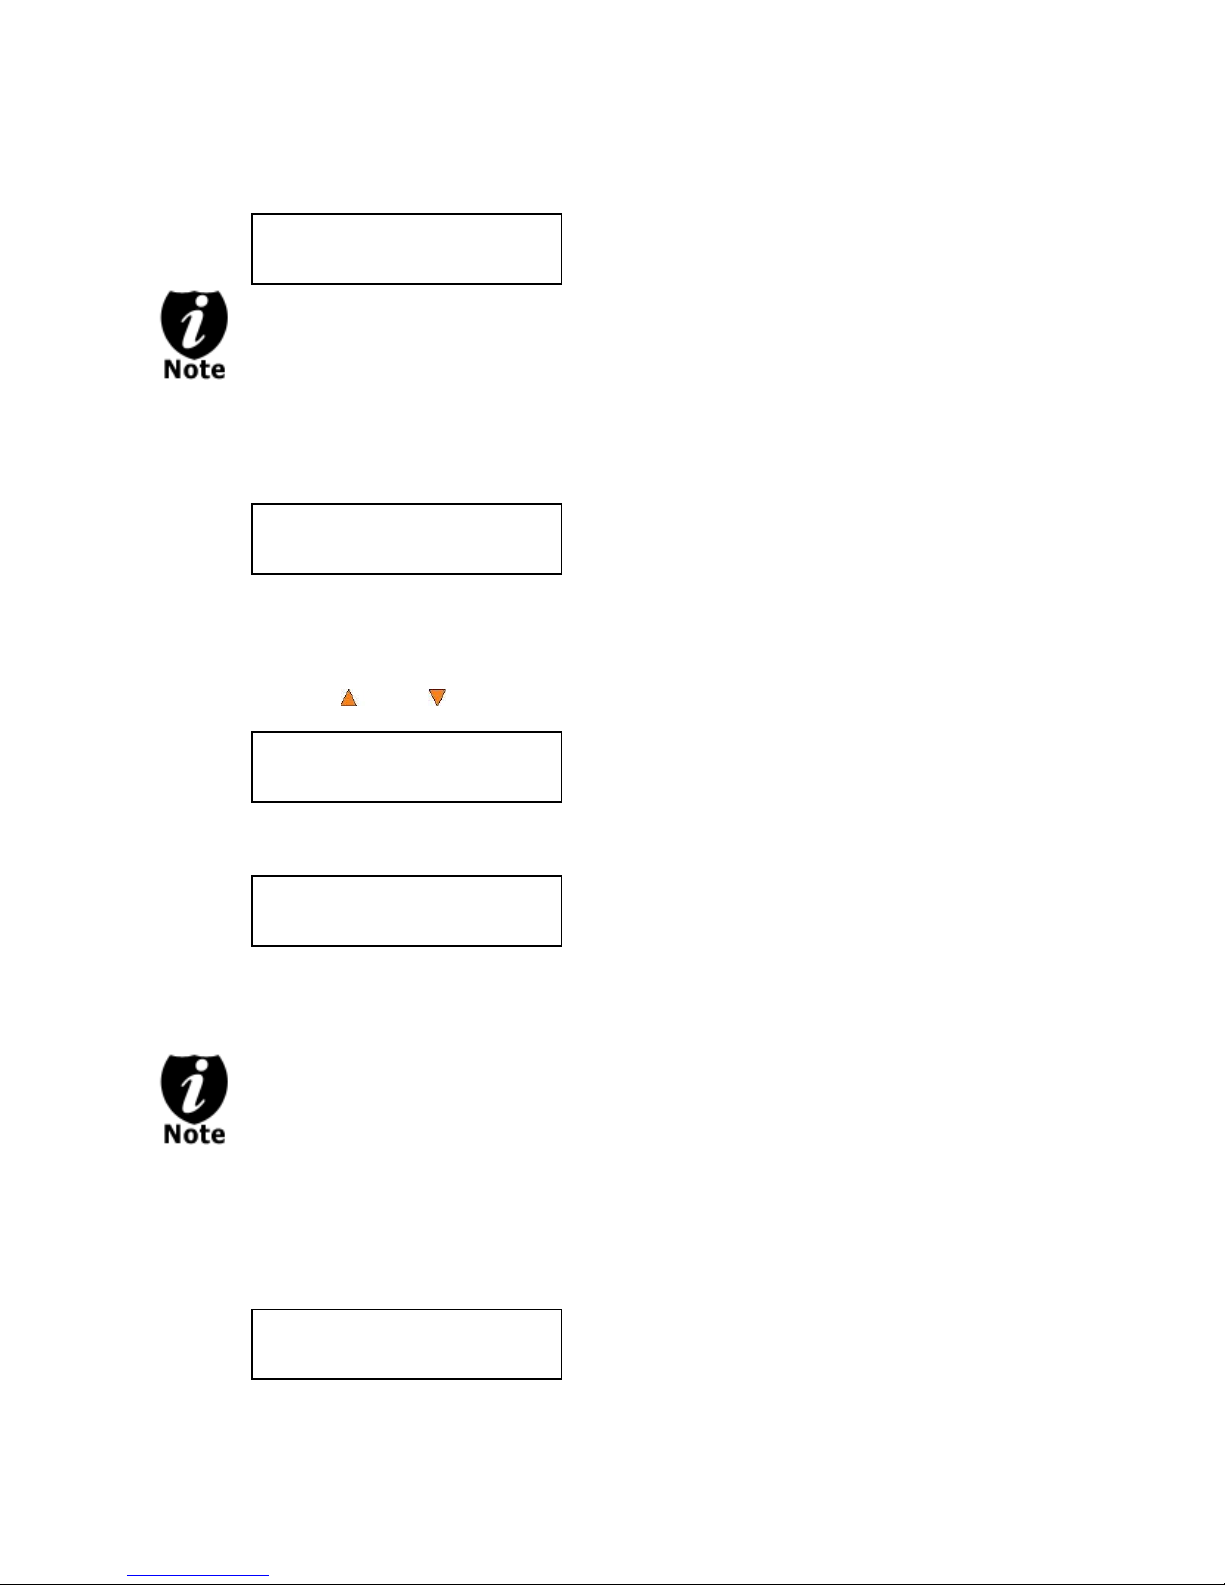
If you would like to use one of the Writers as the source, use the up or down button to locate
Drive 1 Port x.x
Pioneer DVD-RW DVR-1
DUPLICATOR 3.37
1.Copy
Counter:
No Counter
Counter:
No Counter
DUPLICATOR 3.37
8.Select Source
Drive 1 or up and press ENT/Enter button to select it.
If the drive you’ve selected is same as the original source, the system will NOT
respond to the ENT/Enter button. Please press ESC/Escape button to go back to
the main menu.
Once the source has been selected, you will be guided to the main menu. You should see
the following screen:
Section 2: Making Copies from the Reader
(when the Reader is selected as the source drive).
Step 1: Use the Up or Down button to navigate to the Copy menu:
Step 2: Press the ENT/Enter button to enter the Copy menu. You should then see the
Counter feature screen.
The Counter feature will let you choose how many copies you want to make for your project.
It allows the system to count the number of copies you’ve made for this job and prompt you
when the desired number has been achieved.
The Counter feature is for your convenience only, and will allow you to make more
copies than the amount desired, if so required.
You can choose not to input your desired number of copies if you prefer to copy
continuously with no interruption. (It will still count the number of copies you’ve made for this
job, but it will not notify you when to stop.) To do so, simply press ENT/Enter button when
you see the “No Counter” on the 2nd line of the screen below:
- 8 -
Page 12
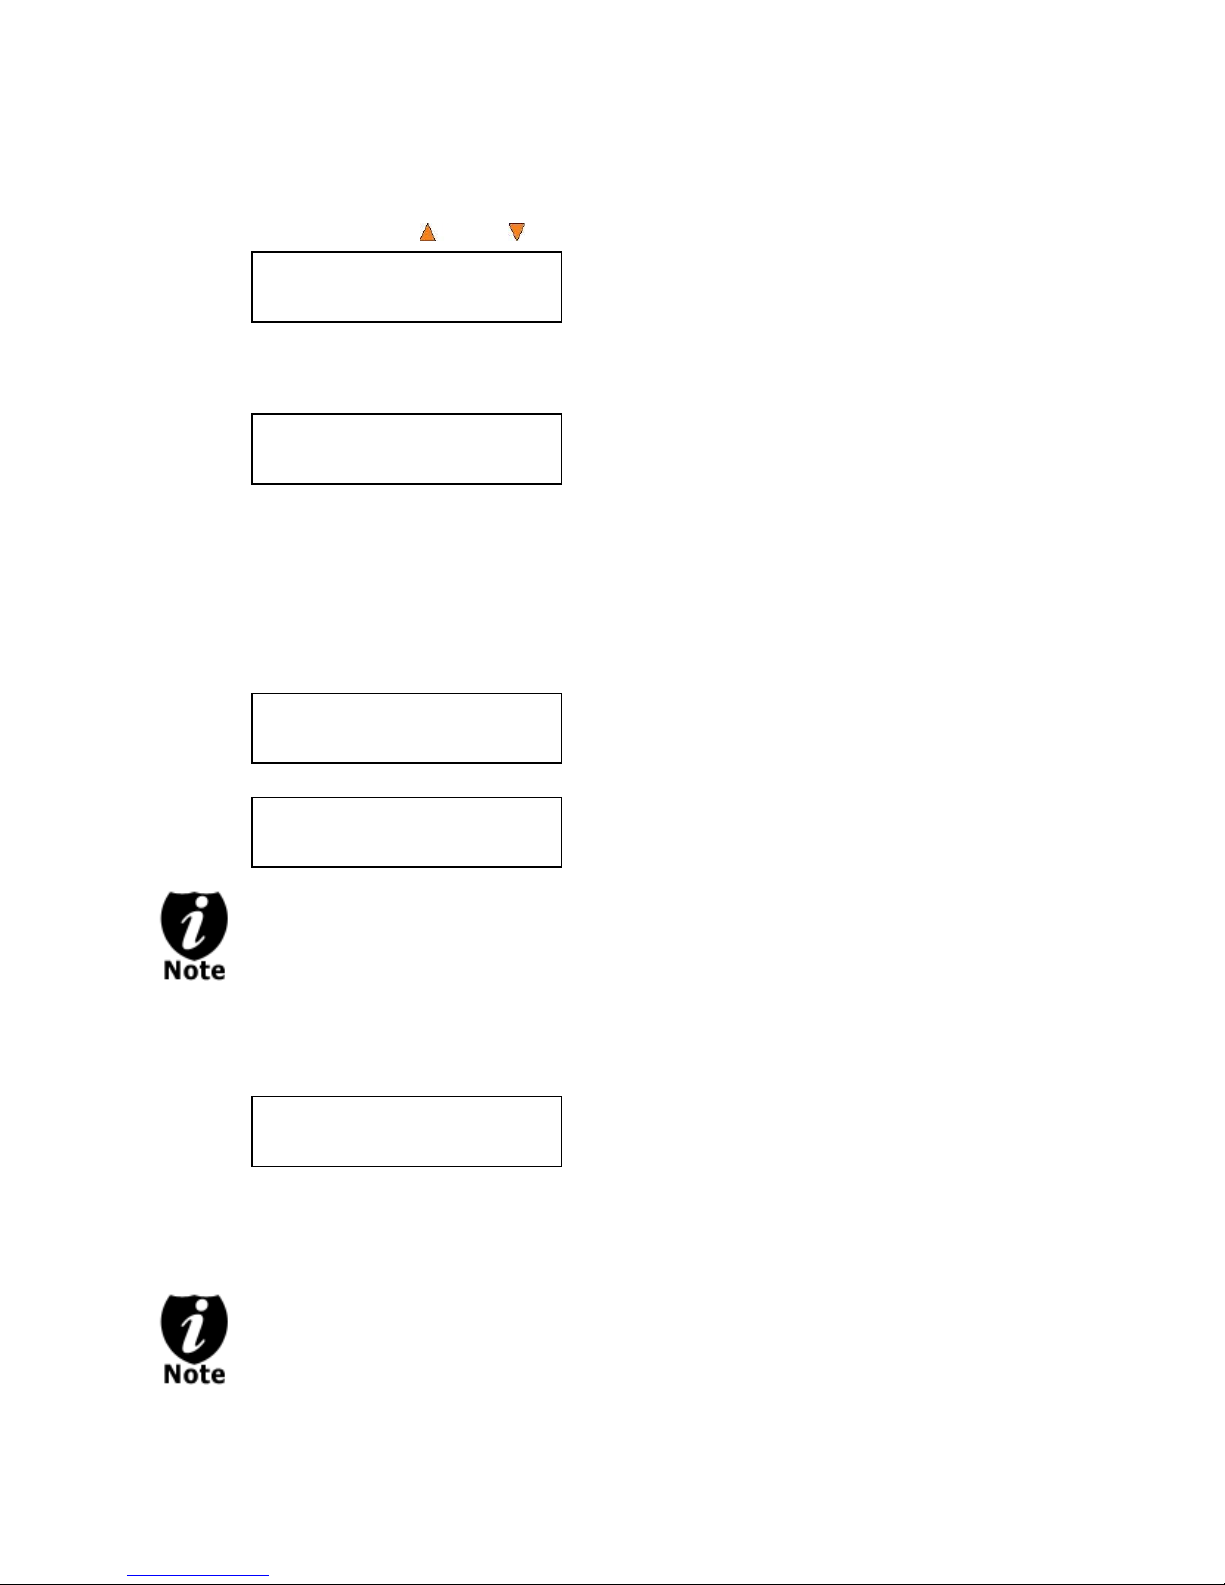
Or, you can choose to enter the desired number of copies for this job by following the simple
Counter:
Specify Counter
Specify Counter:
[ ] OK?
Preparing
Waiting for Master
Preparing
Waiting for Blanks
Preparing
7 Disc Detected, Go?
The “7” indicates there are seven discs recognized by the Writer.
Actual quantity may be different depending on the size of your
machine or the number of discs you inserted.
procedure below:
a) Simply press the Up or Down button to the following screen:
b) Then press the ENT/Enter button to submit. You should see the following Specify
Counter screen:
c) Please refer to the “Input Name and Number” section of “Chapter 2: Getting to know
your System” on how to enter the desired amount. Then press ENT/Enter to
continue to the next step.
Step 3: Once the Counter selection is submitted, you shall see the following Preparation
screen and the corresponding trays that do not contain disc(s) in them will
automatically be ejected:
OR
If either one of the above screens is displayed for more than 2 minutes after you
have inserted your master disc or blank discs, please check the quality of the discs.
Step 4: After you’ve placed your master disc and blank discs in the drive(s), please allow 5-
10 seconds for the system to detect them. After they have been recognized, then
you shall see the following screen:
By default, the “Auto Start” setting is set to “Auto”. Therefore, if your system is not
completely filled with blank discs and there is no activity within 30 seconds, or if all
writers are filled and the system detects this, the system will start automatically.
- 9 -
Page 13
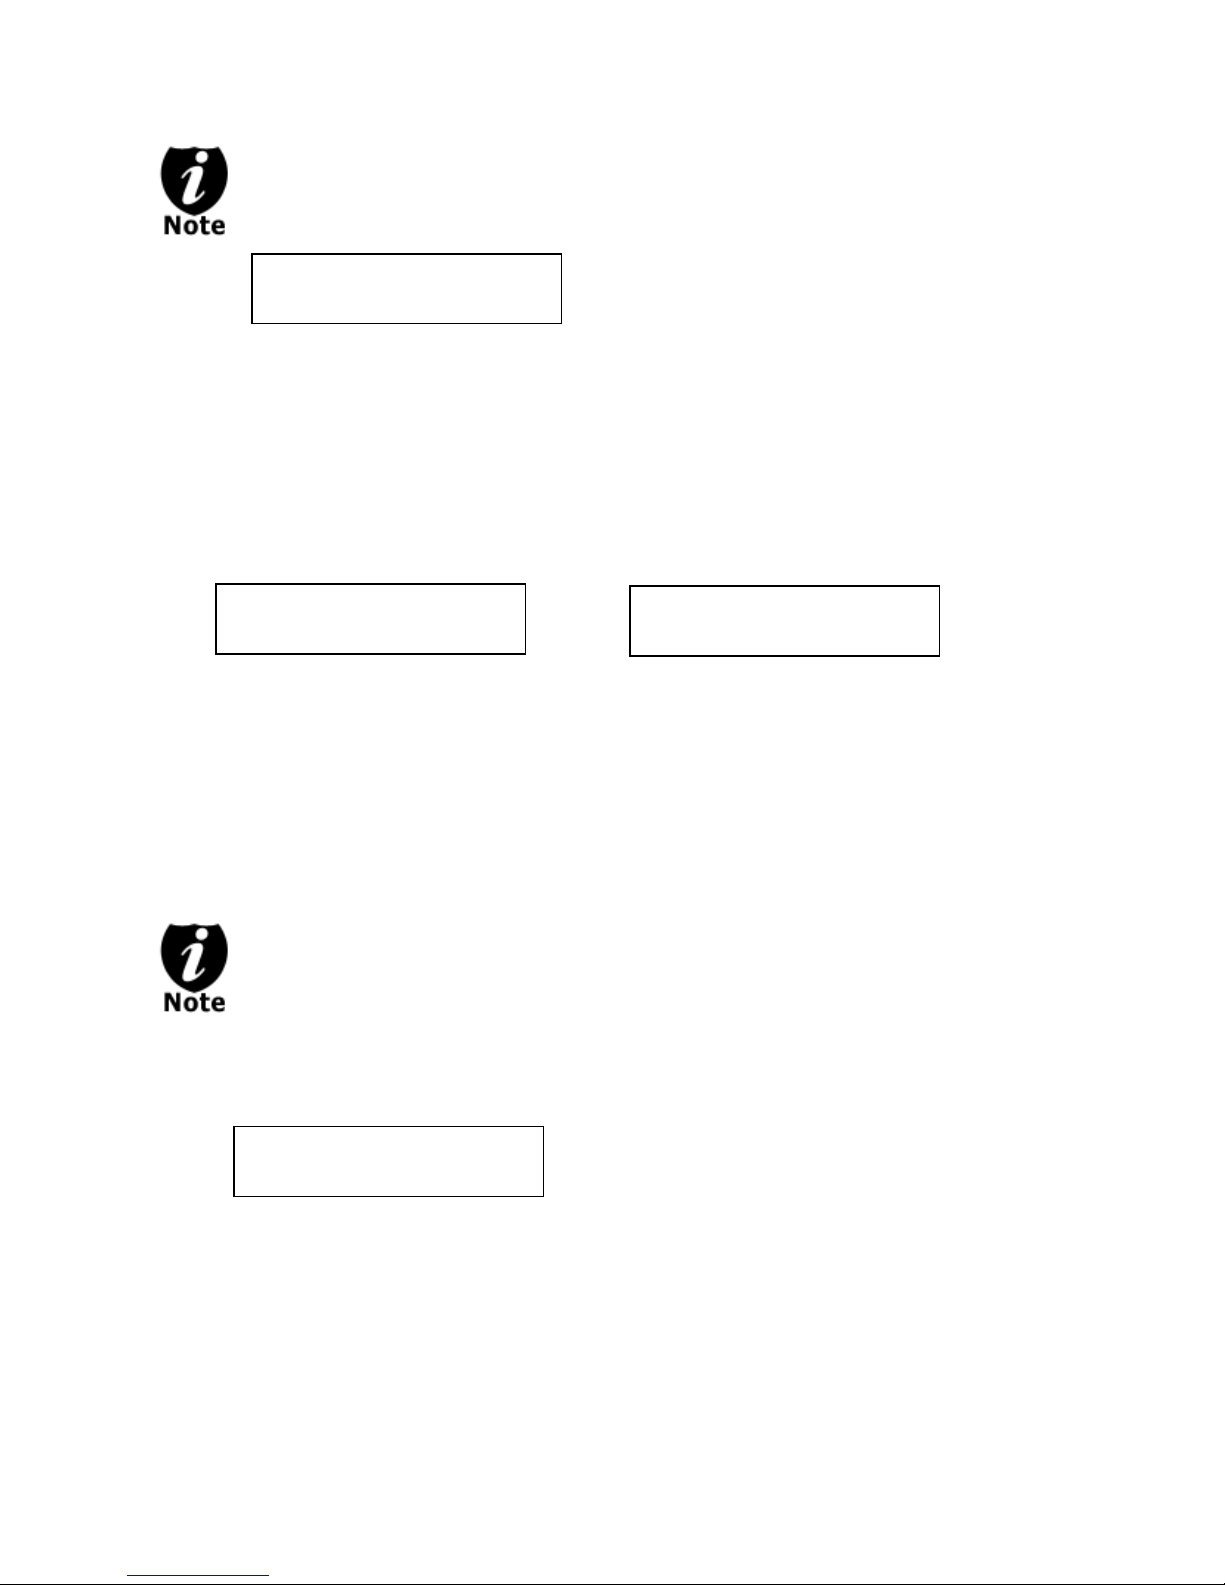
4012MB indicates the total capacity of your
master disc.
0 indicates you have made zero copies thus far.
10% indicates the current percentage of the
copying progress.
401MB indicates the current amount of data that
has been copied from the master disc.
Once the number of blank discs you inserted matches the number of discs
4012MB indicates the total capacity of your
master disc.
0/21 indicates you have a project size of
twenty-one copies and you have made zero
copies thus far.
10% indicates the current percentage of the
copying progress.
401MB indicates the current amount of
data that has been copied from the master
disc.
“PASS 7” indicates that you’ve just made 7 successful
copies.
“FAIL 0” indicates that you have no failure in this run.
“7” indicates that you’ve successfully copied 7 copies so far.
Processing...
Please Wait
PASS 7 FAIL 0( 7)
Waiting for Blanks
Copying... 4012MB
0/21 10% 401MB
Copying ... 4012MB
0 10% 401MB
detected on the screen, press ENT/Enter (if you are not using Auto Start or wish to
speed up the process) to confirm and the following Processing screen will appear.
If the number of blank discs you inserted does not match the number of discs
detected on the screen, please give 10-15 seconds for the system to recognize all of
your blank discs.
Step 5: After 2 or 3 seconds of processing time, one of the following Copy progress screens
will appear. The left-hand screen is shown when “Specify Counter” is selected and
the right-hand screen is shown when “No Counter” is selected.
“Specify Counter” “No Counter”
It is normal to see the progress indicator stay at 0-10% and 100% for
approximately 30 seconds for CD duplication and up to 1 minute for DVD
duplication. That is caused by the initializing and finalizing stages.
Step 6: Once the duplication run is completed, the successful copies will be ejected and you
shall see the following screen.
- 10 -
Page 14
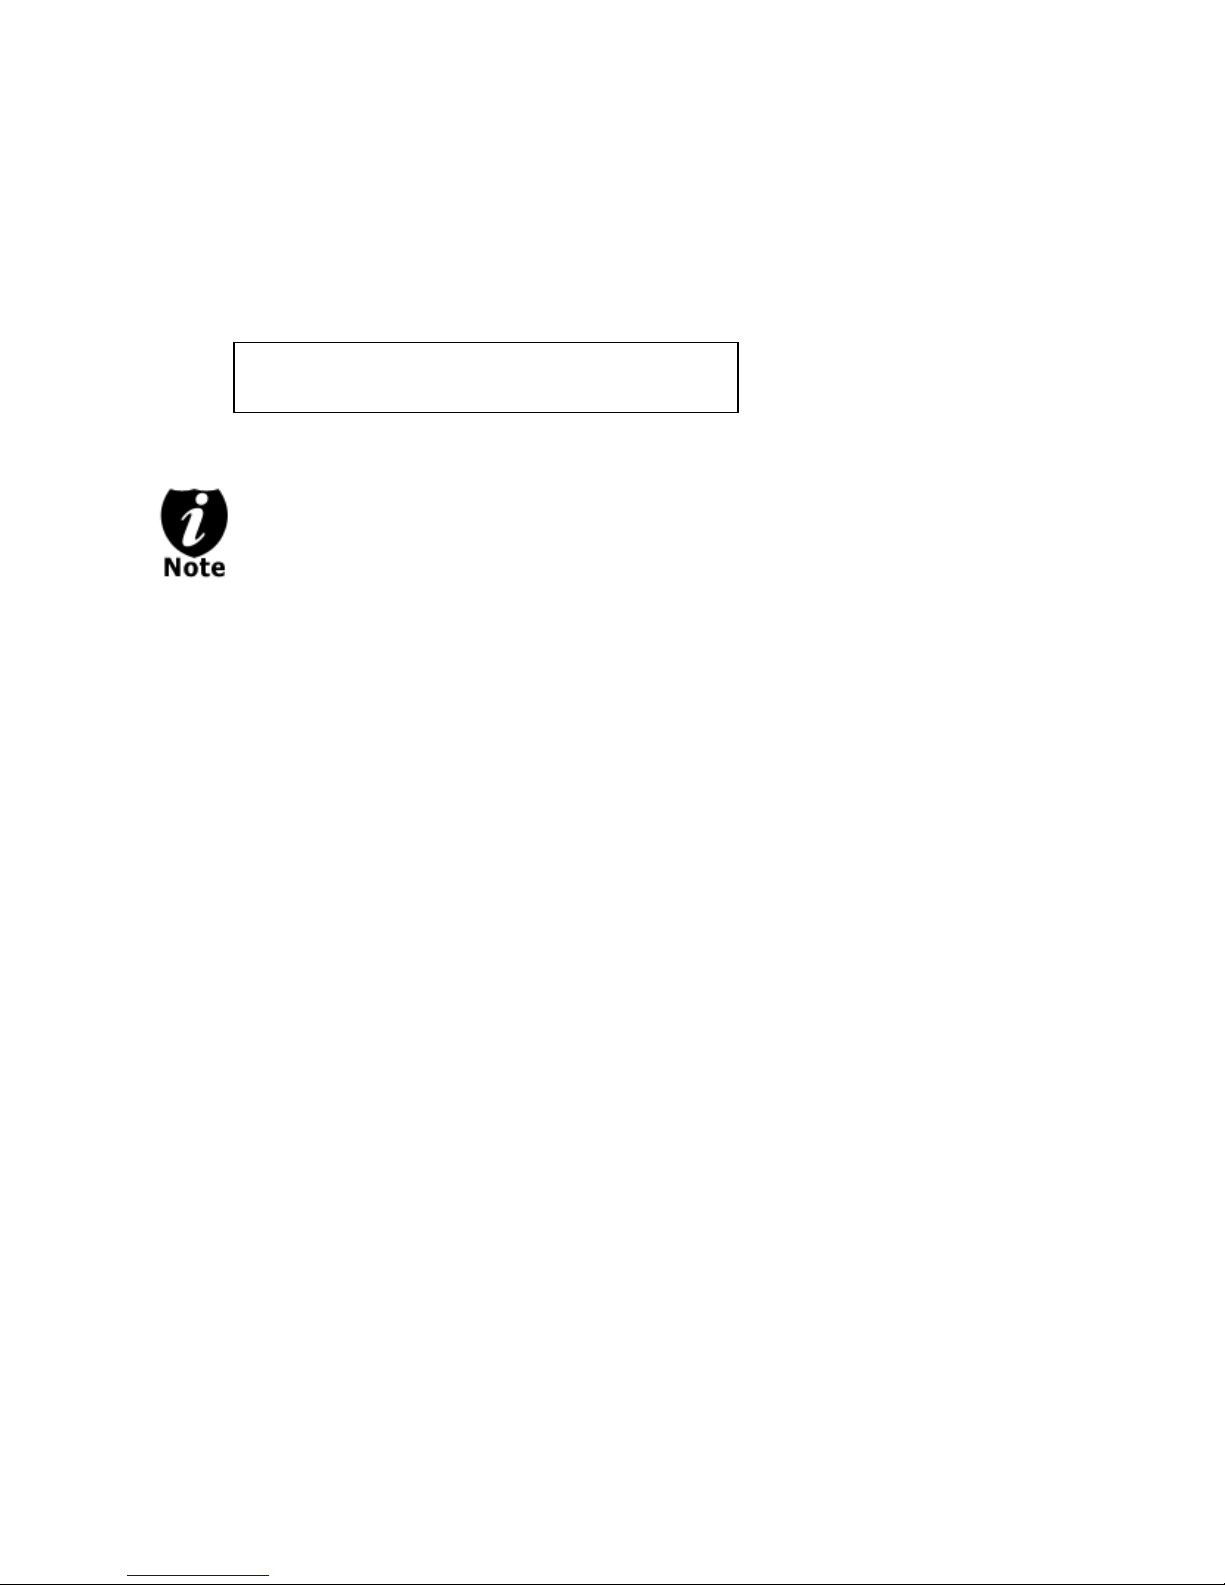
Step 7: Remove the successful copies and refill the trays with additional blank media to
Pass 21 Fail 0
Job Completed! Press OK to Finish
continue making more copies. You can also press the ESC/Escape button to
terminate your project and go back to the main menu.
If you’ve specified a counter value for your project and your project is completed, you shall
see the following screen:
You can then press ENT/Enter to go back to main menu.
If you happen to have any failed discs (bad copy), the failed disc(s) will not be
ejected automatically. You need to manually eject them and throw them away if
they are write once recordable disc(s).
- 11 -
Page 15
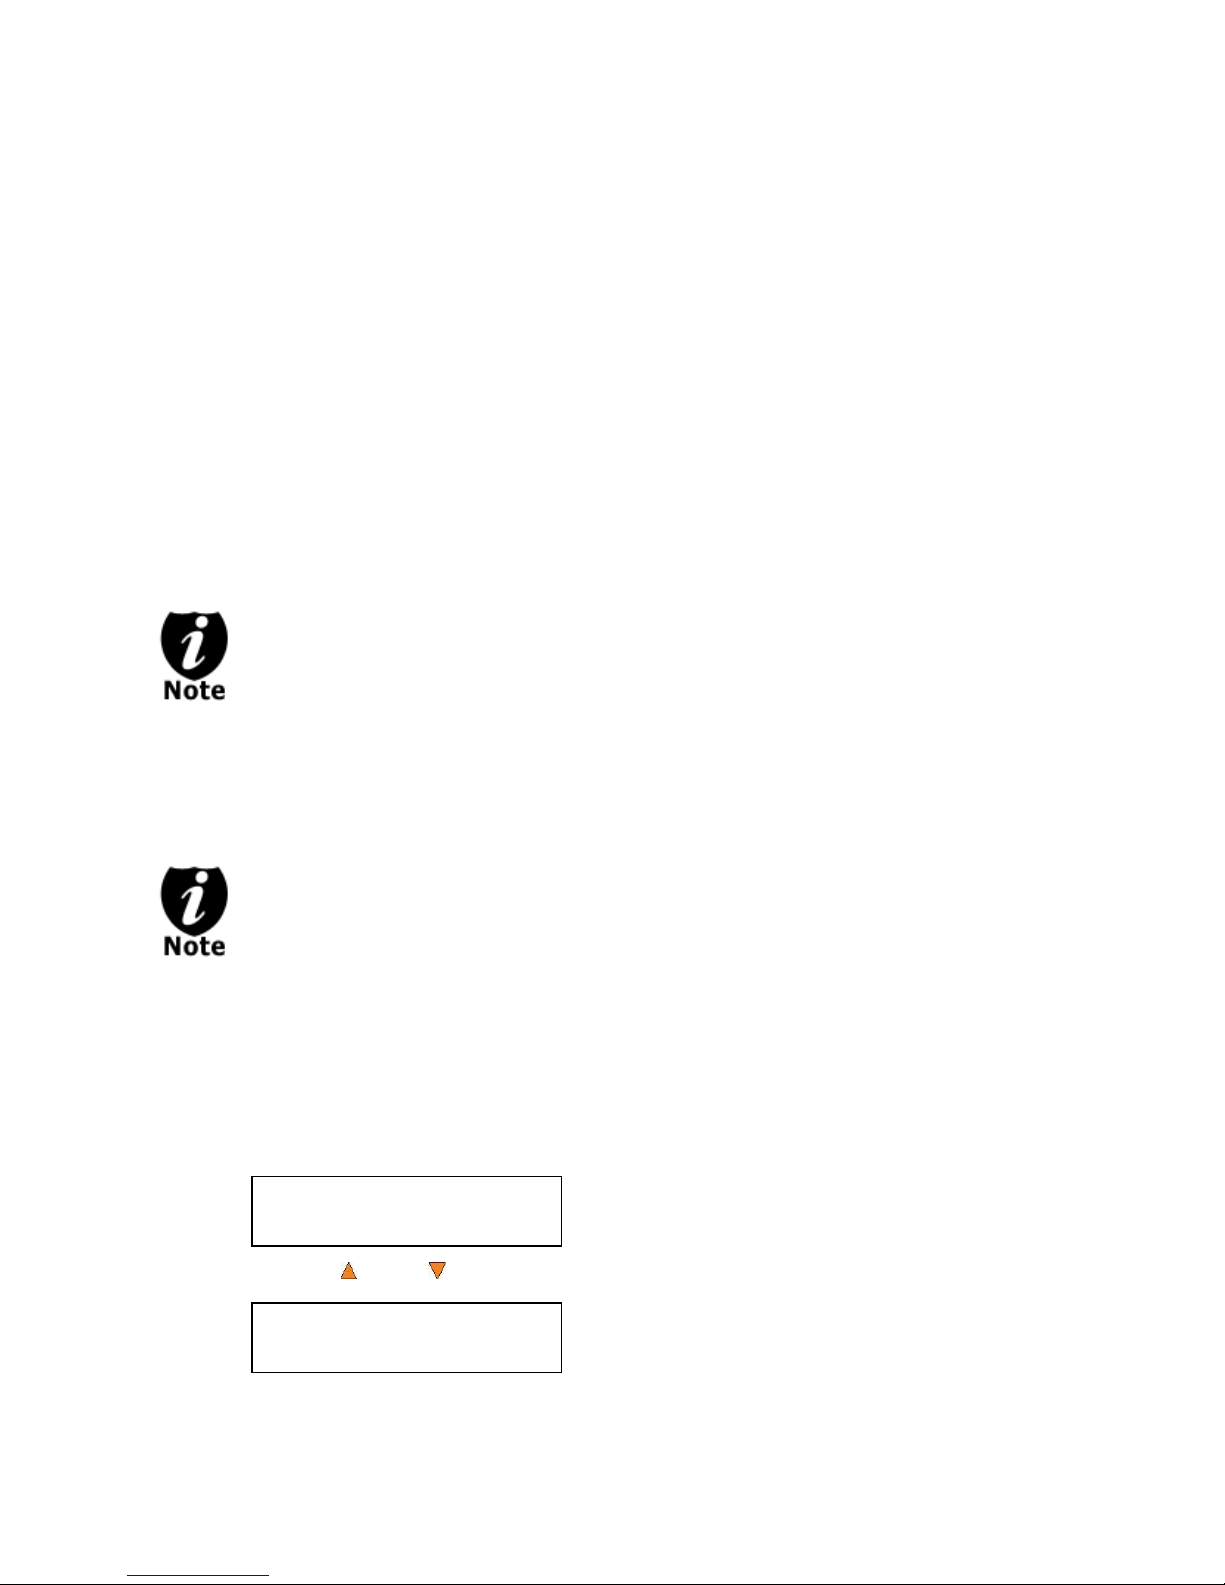
Making Hard Drive-to-Disc Copies
DUPLICATOR 3.37
1.Copy
DUPLICATOR 3.37
10.Hard Drive Setup
(This function is not available if the duplicator does not have a hard drive installed.)
Copying from the hard drive is the best way to make copies. Overall, there are four benefits of
copying from the hard drive.
Performance. Copying from the hard drive will enable the writer dives to boost the copying
performance to its limit.
Stability. Copying from hard drive will stabilize the duplication process compared to disc-to-
disc duplication.
Durability – The hard drive is a more durable storage device than recordable discs. The
recording surface of a recordable disc is exposed and can easily be scratched on its surface,
while hard drives are covered with metal and mounted inside the system protecting it from
incidental damage.
Convenience – With your master disc(s) stored inside the hard drive, you can have access
to each one easily. There is no need to carry your master discs every time you want to make
a copy; they are all stored inside the system.
Throughout this manual, the term partition(s) is also used to refer to image files in
the hard drive.
If your system has a Hard Drive installed, a partition/image will be created whenever you begin
to load master disc content into the hard drive. The number of images the hard drive can hold is
determined by the capacity of your hard drive and the size of every master disc image you
transferred into the hard drive.
Hard Drive Manufactures use conversion rate of 1GB = 1 Billion Bytes or 1000^3
Bytes. However, most Operating Systems, including our Duplication System use
standard conversion rate of 1GB = 1.074 Billion Bytes or 1024^3 Bytes. Therefore,
for an advertised 160GB Hard Drive (160 Billion Bytes), the true capacity base on
our system’s standard is actually 149GB.
The following steps will show you how to load your master disc into the installed hard drive as
an image and copy the stored image onto blank discs.
Section 1: Loading Master Disc content into the Hard Drive as a partition/image.
When you turn on your system, after it has booted up, you should see the following
signifying your system is ready.
Step 1: Use the Up or Down button to navigate to the Hard Drive Setup menu.
- 12 -
Page 16
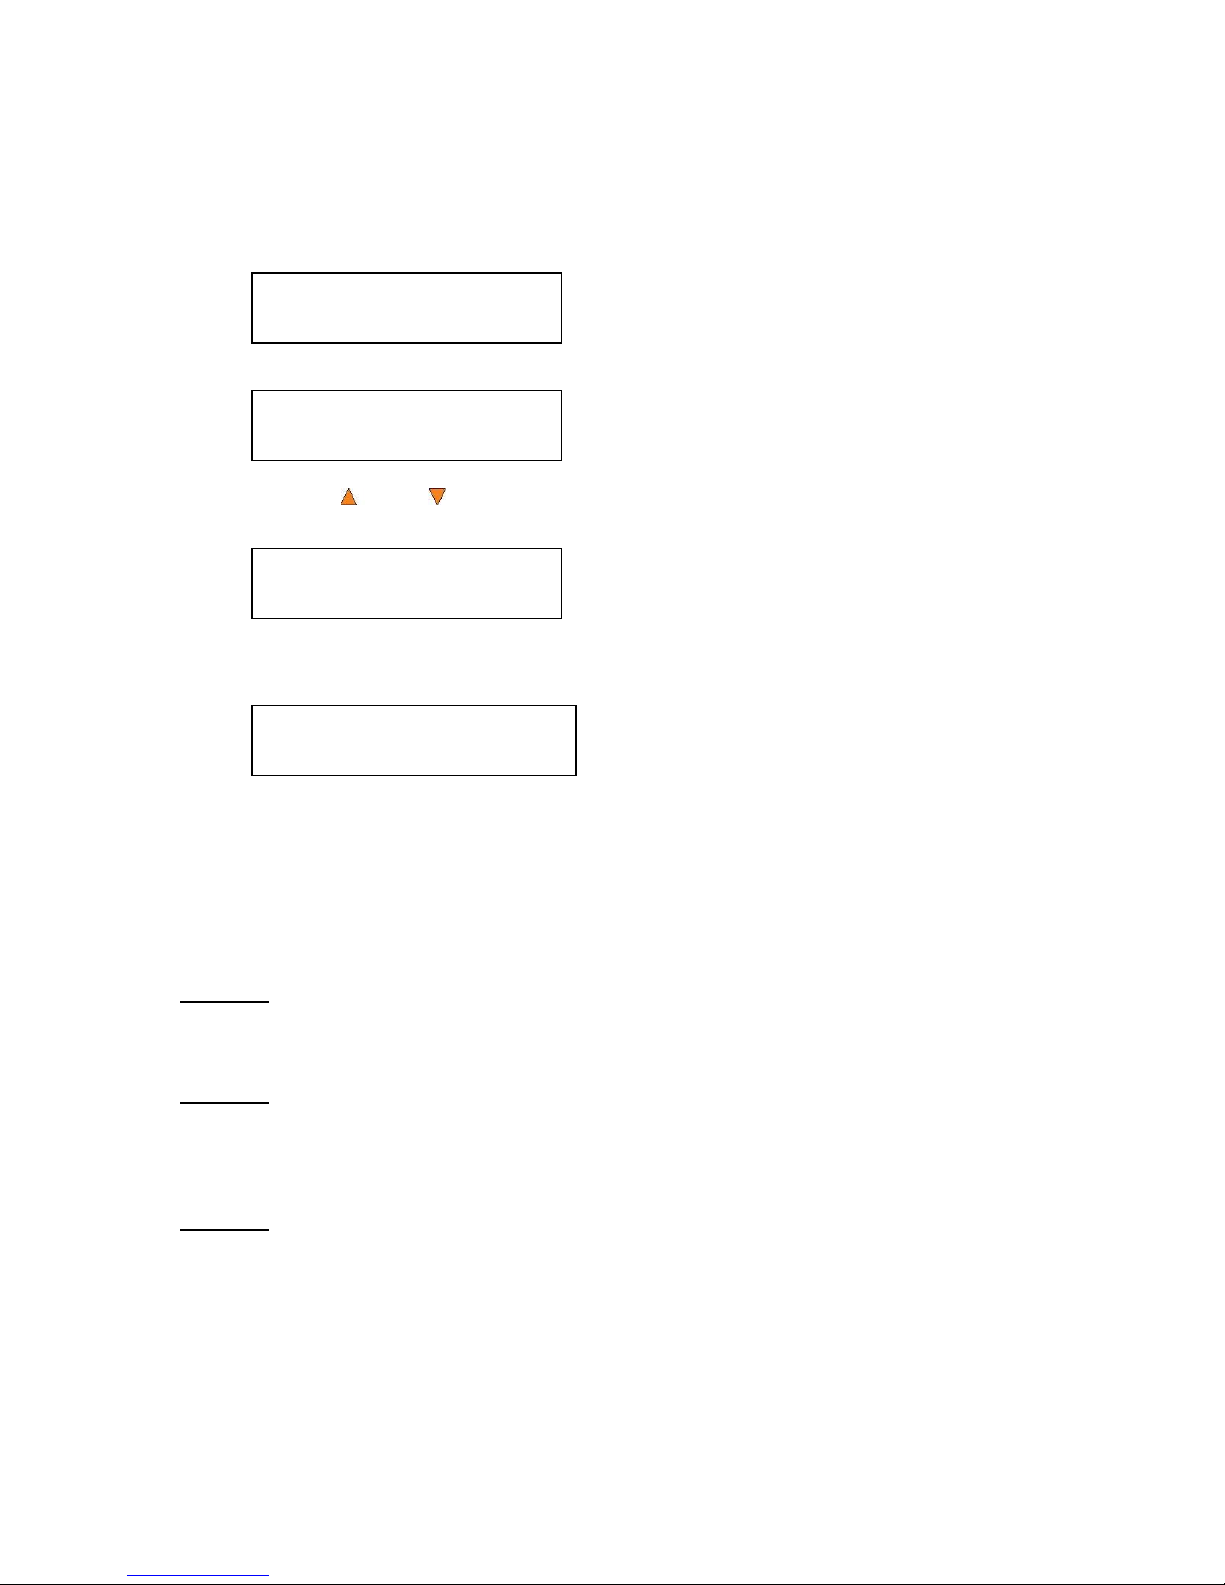
Step 2: Press ENT/Enter button to enter the Hard Drive Setup menu.
Hard Drive Setup
1.Select Partition
Hard Drive Setup
2.Load Partition
Select HDD as source
OK?
Load Partition[160GB]
Load►New Partition
160GB indicates the total available capacity of
the system’s hard drive – this number will vary
based on the size of the hard drive installed in
your duplicator.
If the current source is not Hard Drive, you will see the screen below. Please press the
ENT/Enter button once to proceed.
Once you’ve entered the Hard Drive Setup menu, you will see following screen:
Step 3: Use the Up or Down button to locate the Load Partition menu; as shown in the
reference screen shot below.
Step 4: Press the ENT/Enter key to enter the Load Partition menu and you should see the
following screen.
You have a choice when loading your master disc content into the hard drive by pressing the
up or down button to find your desired partition naming method:
Option 1:
A new partition/image
Screen Shot (New Partition)
Option 2:
Overwrite one of the existing partitions/images (if any exists, including the reserved
partition/image)
Screen Shot (Overwrite)
Option 3:
Choose Auto Generate to have the system automatically generate a partition/image name
for you.
Screen Shot (Auto Gen)
- 13 -
Page 17
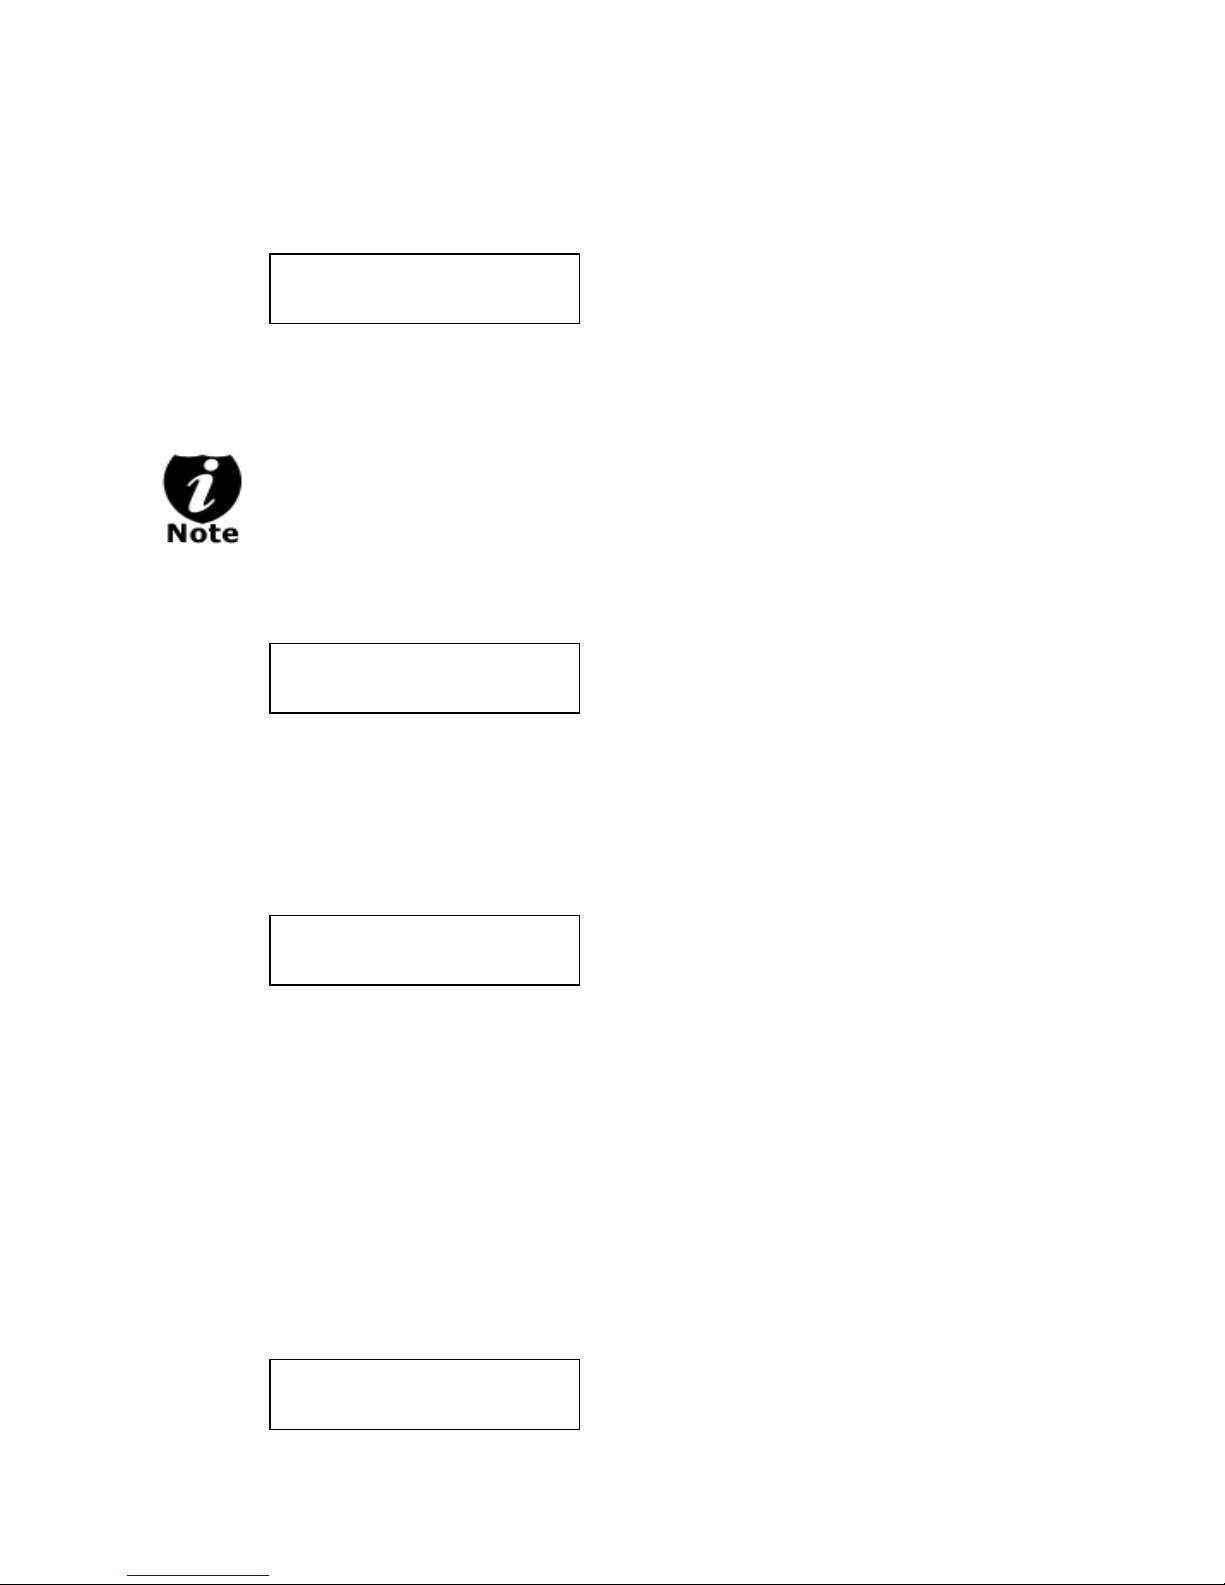
From 1 of the 3 choices above, press the ENT/Enter button to submit your selection.
4012MB indicates the total capacity of your
master disc.
FUN1.VEF indicates the name of the
partition/image where the data is being loaded
into.
10% indicates the current percentage of the
master disc that has been loaded into the hard
drive.
401MB indicates the current amount data from
the master disc that has been loaded into the
hard drive.
Edit Partition Name
[ ]OK?
This Will Overwrite
[FUN1.VEF ]OK?
Loading... 4012MB
FUN1.VEF 10% 401MB
Load Partition OK!
Press OK to Continue
If you have chosen to create a new partition/image, you should see the following screen
after you submit your selection.
Please refer to the “Input Name and Number” section of “Chapter 2: Getting to know
your System” to enter the desired title. Then press the ENT/Enter to continue to the next
step.
After you submitted a hard drive partition/image name, the system will
automatically append a partition/image name suffix of .VEF.
If you have chosen to overwrite one of the existing partitions/images, you should see the
following screen after you submit your selection.
Then press ENT/Enter to continue to the next step.
If you have chosen Auto Generate, Then precede to the next step.
Step 5: Please place your master disc into the Reader or the 1st Writer if there’s no Reader
installed in your system. Once the system recognizes your master disc, the loading
progress screen will be displayed, as show below:
Step 6: Once the loading process is completed, you should see the following screen:
- 14 -
Page 18
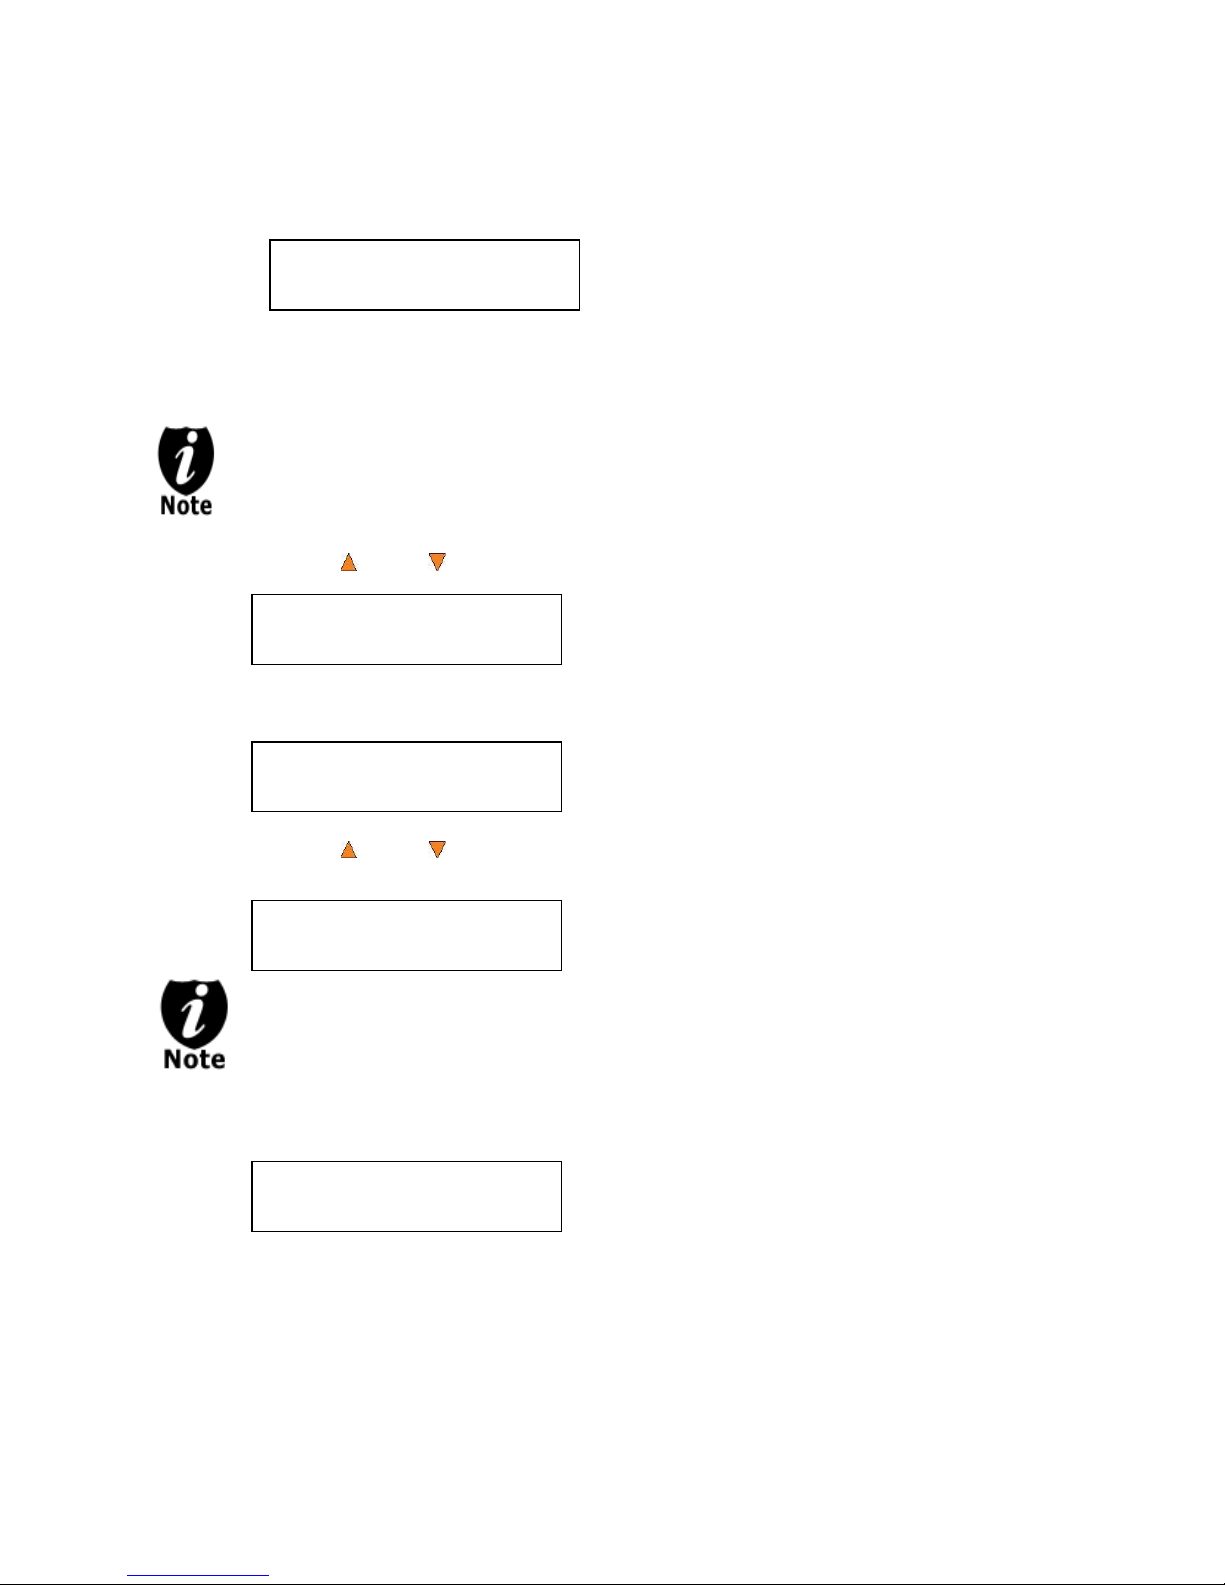
You can then press the ENT/Enter button to go back to the Hard Drive Setup menu. And
DUPLICATOR 3.37
10.Hard Drive Setup
DUPLICATOR 3.37
8.Select Source
Drive 0 Port x.x
ASUS DVD-E818A
HARD DRVIE Port x.x
HITACHI HDS721616PL
DUPLICATOR 3.37
8.Select Source
then press the ESC/Escape button to return to the Main menu. You should see the following
screen:
Section 2: Selecting the Copy Source to the Hard Drive.
Ignore this section and proceed to Section 3 if you have just completed Section 1:
Loading Master Disc content into the Hard Drive as an image as this process will
automatically switch the source to the hard drive.
Step 1: Use the Up or Down button to navigate to the Select Source menu.
Step 2: Press ENT/Enter button to enter the Select Source menu and you shall see a
screen similar to below:
Step 3: Use the Up or Down button to locate the Hard Drive and press the ENT/Enter
button to select it.
If the hard drive has already been pre-selected as the source, the system will NOT
respond to the ENT/Enter button. Please press the ESC/Escape button to go back
to the main menu.
Once the source has been selected, you will be guided to the Main menu. You should see
the following screen:
- 15 -
Page 19
Section 3: Making Copies from an existing partition/image of the Hard Drive.
DUPLICATOR 3.37
1.COPY
Counter:
No Counter
Counter:
No Counter
Counter:
Specify Counter
Specify Counter:
[ ] OK?
Choose Partition:
[FUN1.VEF]4012MB
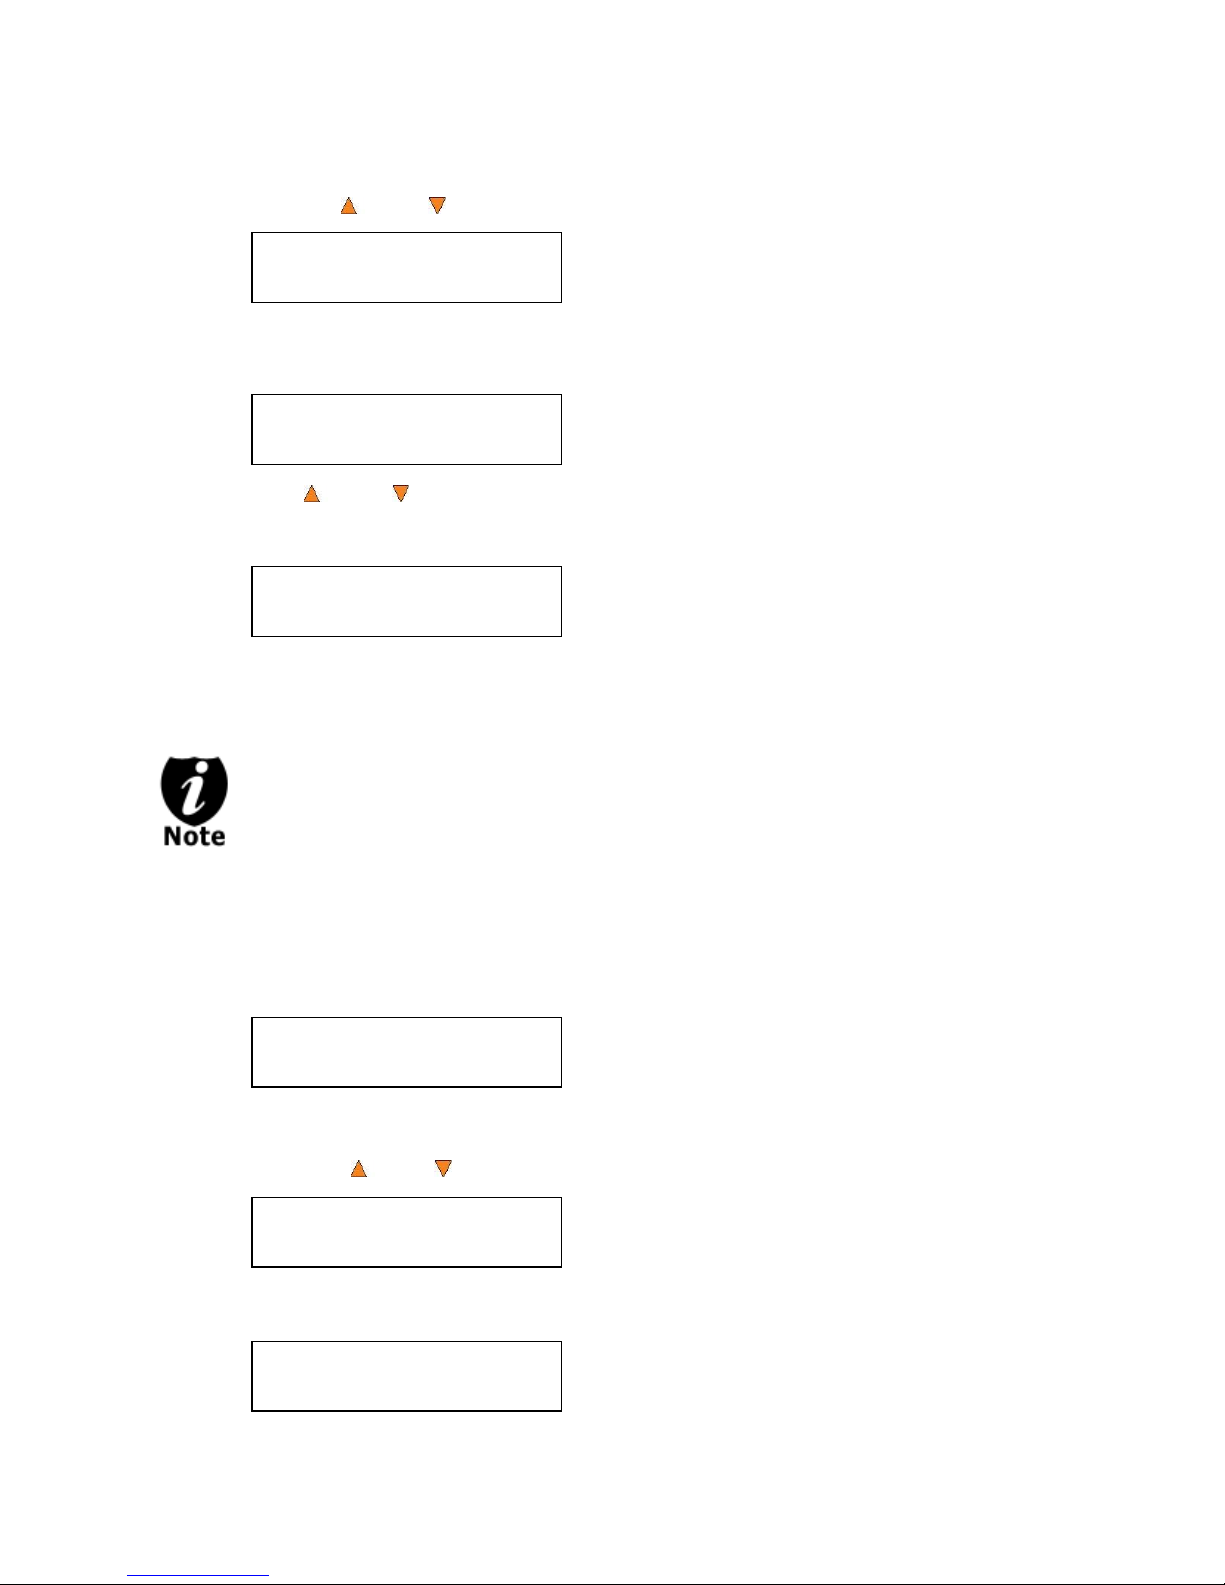
Step 1: Use the Up or Down button to navigate to the Copy menu:
Step 2: Press the ENT/Enter button to enter the Copy menu. You should then see the
Choose Partition menu.
Step 3: Use Up or Down button to choose the desired partition/image to copy from
and press the ENT/Enter button to submit your selection. You should then see the
Counter feature screen.
The Counter feature will let you choose how many copies you want to make for your project.
It allows the system to count the number of copies you’ve made and prompt you when the
desired number of copies has been made for this job.
The Counter feature is for your convenience only, and will allow you to make more
copies than the amount desired, if so required.
You can choose not to input your desired number of copies if you prefer to copy
continuously with no interruption. (It will still count the number of copies you’ve made for
this job, but it will not notify you when to stop.) To do so, simply press the ENT/Enter
button when you see the “No Counter” on the 2nd line of the screen below:
Or, you can choose to enter the desired number of copies for this job by following this simple
procedure:
a) Press the Up or Down button to following screen:
b) Then press the ENT/Enter button to submit, and you should see the following
Specify Counter screen:
- 16 -
Page 20
c) Please refer to the “Input Name and Number” section of “Chapter 2: Getting to know
Preparing
Waiting for Blanks
Preparing
7 Disc Detected, Go?
Processing...
Please Wait
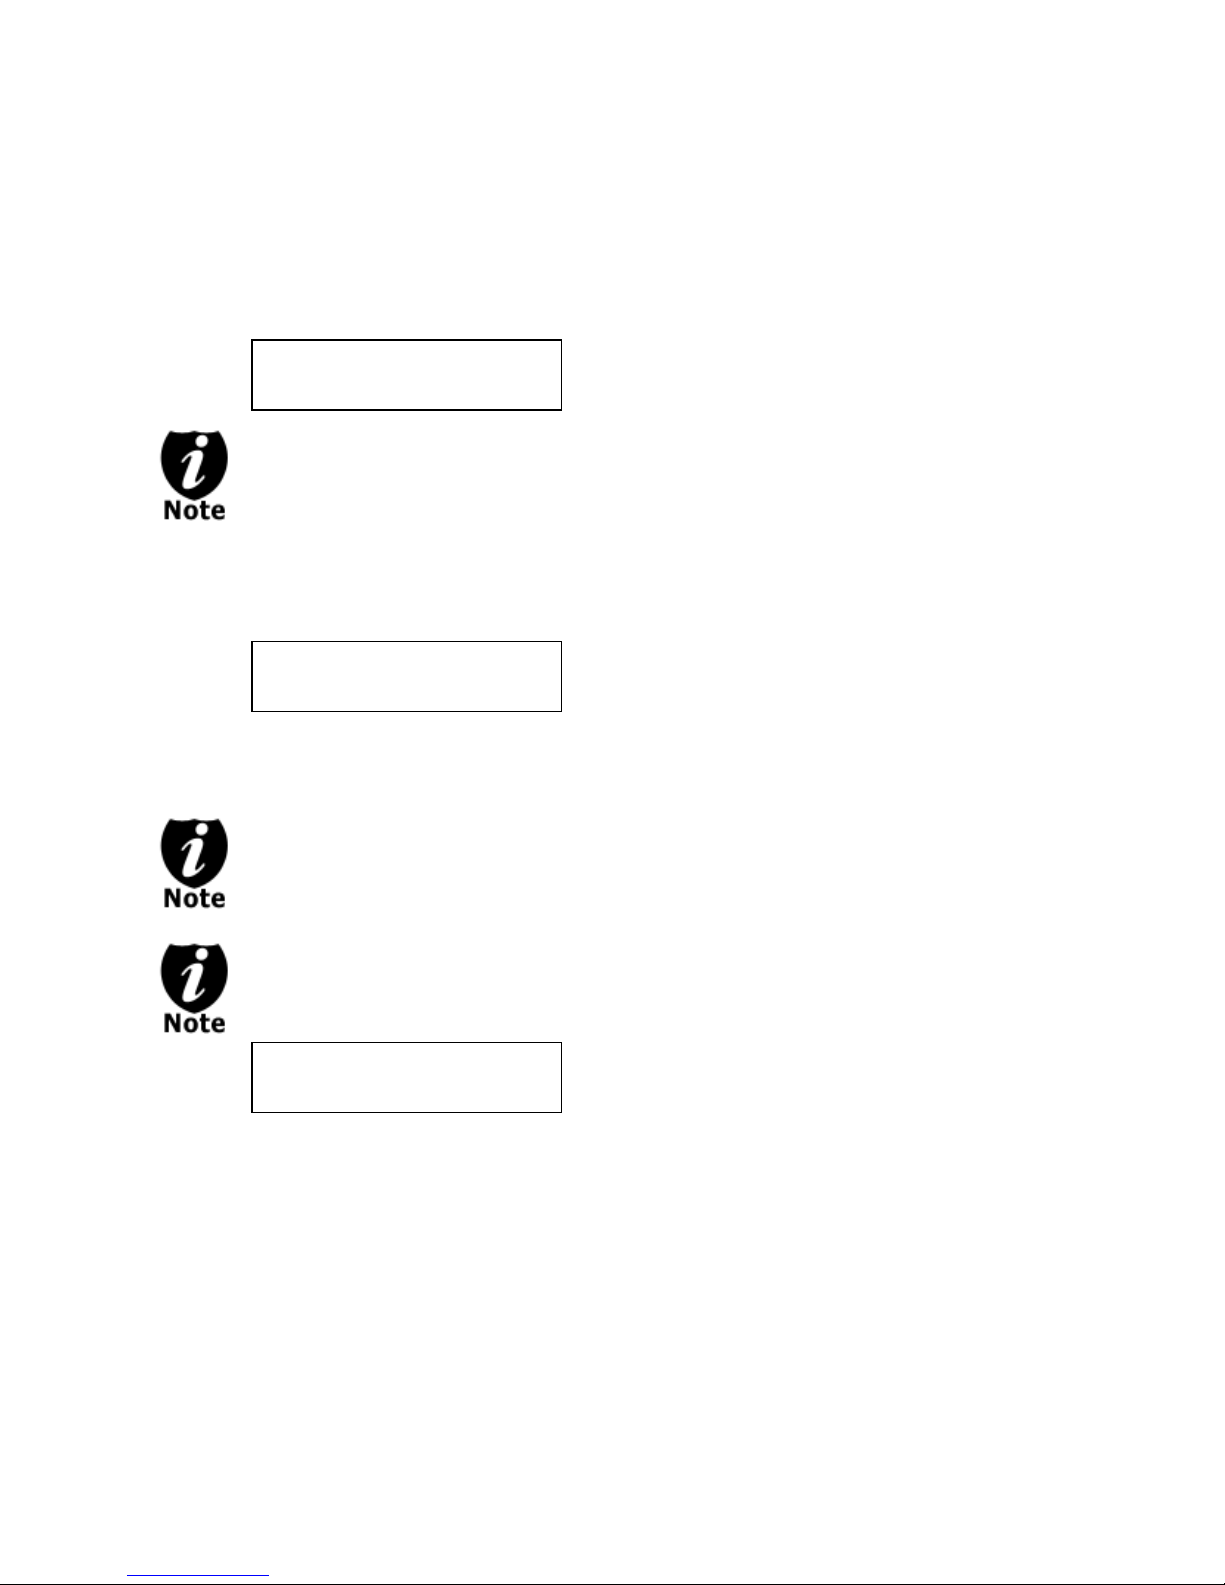
The “7” indicates there are seven discs recognized by the Writer. Actual quantity may be
different depending on your machine. Actual quantity may be different depending on the
size of your machine or the number of discs you inserted.
your System” to enter the desired amount. Then press the ENT/Enter to continue on
to the next step.
Step 4: Once the Counter selection is submitted, you shall see the following Preparation
screen and the corresponding trays that do not contain disc(s) in them will
automatically be ejected:
If the above screen is displayed for more than 2 minutes after you have inserted
your blank discs, please check the quality of the discs.
Step 5: After you’ve placed your blank discs into the drives, please allow 5-10 seconds for
the system to detect them. After they have been recognized, you shall see the
following screen:
By default, the “Auto Start” setting is set to “Auto”. Therefore, if your system is not
completely filled with blank discs and there is no activity within 30 seconds, or if all
writers are filled and the system detects this, the system will start automatically.
Once the number of blank discs you inserted matches the number of discs
detected on the screen, press ENT/Enter (if you are not using Auto Start or wish to
speed up the process) to confirm and the following Processing screen will appear.
If the number of blank discs you inserted does not match the number of discs
detected on the screen, please give 10-15 seconds for the system to recognize all of
your blank discs.
Step 6: After 2 or 3 seconds of processing time, one of the following Copy progress screens
will appear. The left-hand screen is shown when “Specify Counter” is selected and
the right-hand screen is shown when “No Counter” is selected.
- 17 -
Page 21
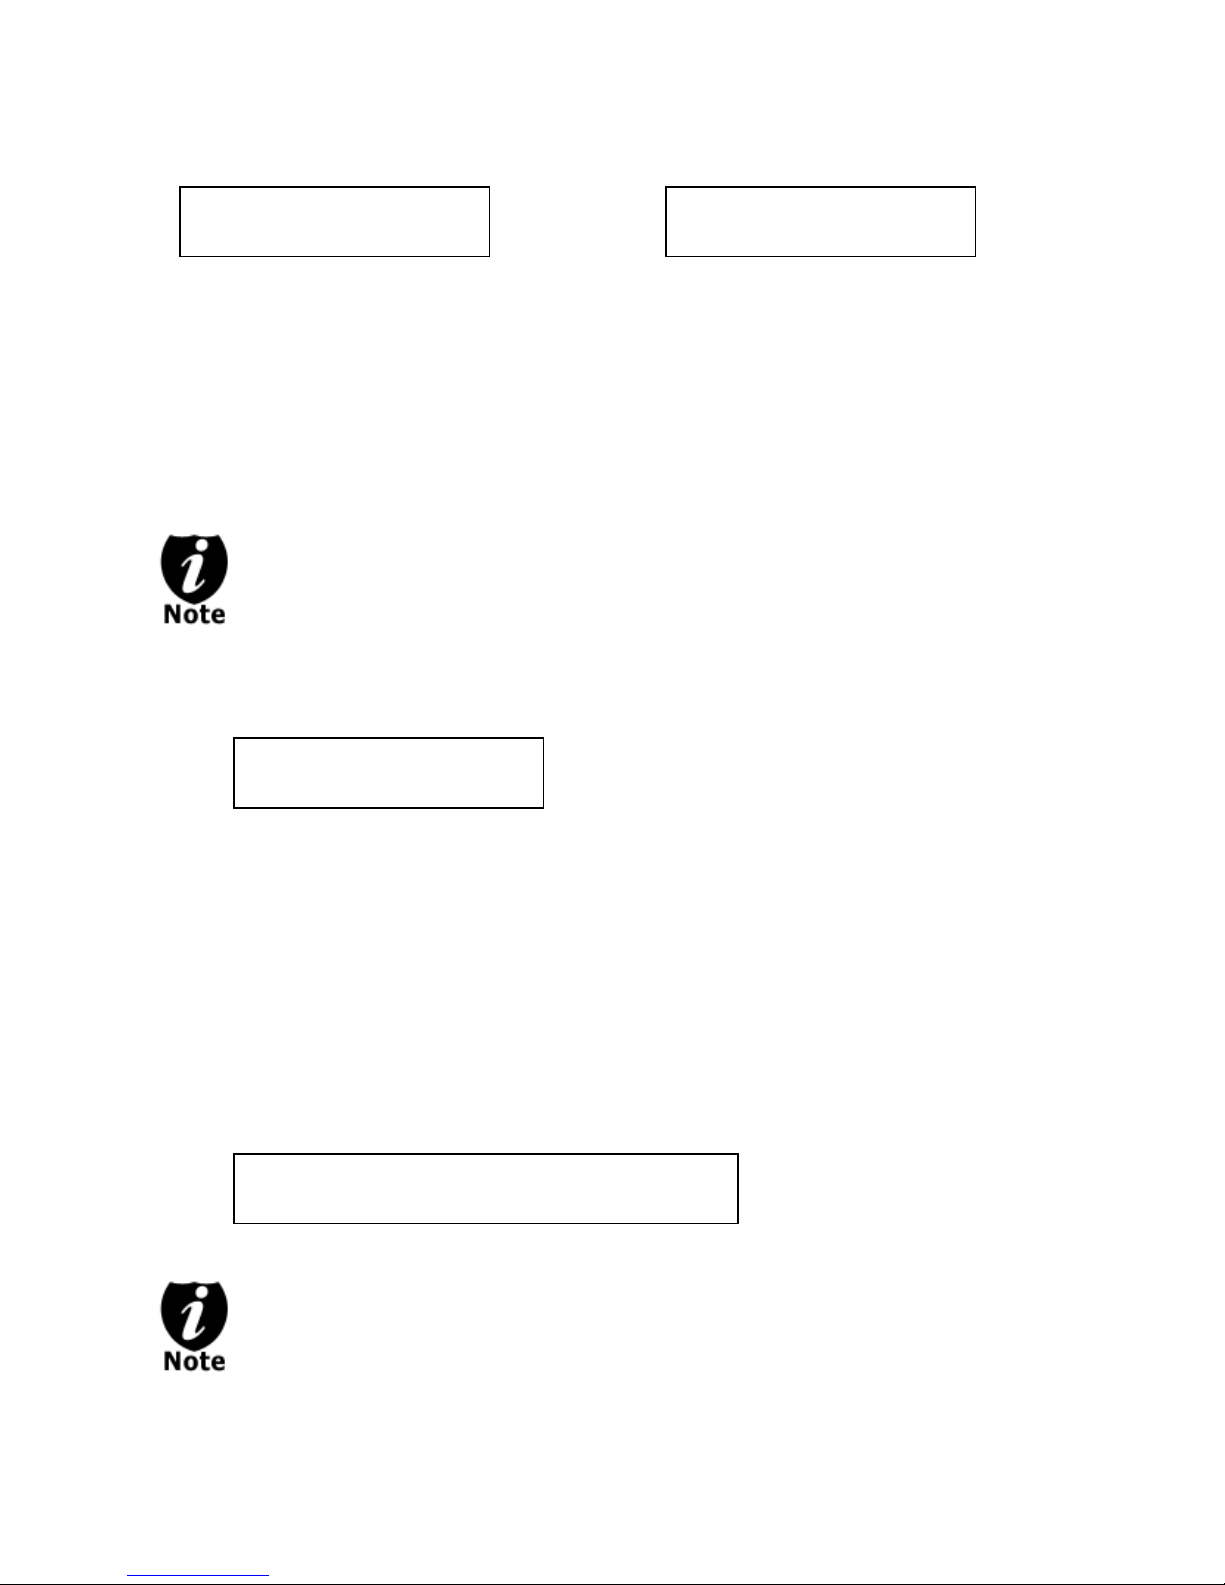
H indicates you are copying from a hard drive
partition/image.
4012MB indicates the total capacity of your master
disc image.
0/21 indicates you have a project size of twenty-one
copies and you have made zero copies thus far.
10% indicates the current percentage of the copying
progress.
401MB indicates the current amount data that has
been copied from the master disc image.
H indicates you are copying from a hard drive
partition/image.
4012MB indicates the total capacity of your master
disc image.
0 indicates you have made zero copies thus far.
10% indicates the current percentage of the copying
progress.
401MB indicates the current amount data that has
been copied from the master disc image.
“Specify Counter” “No Counter”
“PASS 7” indicates that you’ve just made 7 successful
copies.
“FAIL 0” indicates that you have no failure in this run.
“7” indicates that you’ve successfully copied 7 copies
so far.
PASS 7 FAIL 0( 7)
Waiting for Blanks
Pass 21 Fail 0
Job Completed! Press OK to Finish
Copying... H4012MB
0/21 10% 401MB
Copying ... H4012MB
0 10% 401MB
It is normal to see the progress indicator stays at 0-10% and 100% for
approximately 30 seconds for CD duplication and up to 1 minute for DVD
duplication. That is caused by the initializing and finalizing stage.
Step 7: Once the duplication run is completed, the successful copies will be ejected and you
shall see the following screen.
Step 8: Remove the successful copies and refill the trays with additional blank media to
continue making more copies. You can also press the ESC/Escape button to
terminate your project and go back to the main menu.
If you’ve specified a counter value for your project and your project is completed, you shall
see the following screen:
You can then press ENT/Enter to go back to main menu.
If you have any failed discs (bad copy) during a run, the failed disc(s) will not be
ejected automatically. You need to manually eject them and throw them away if
they are write once recordable disc(s).
- 18 -
Page 22
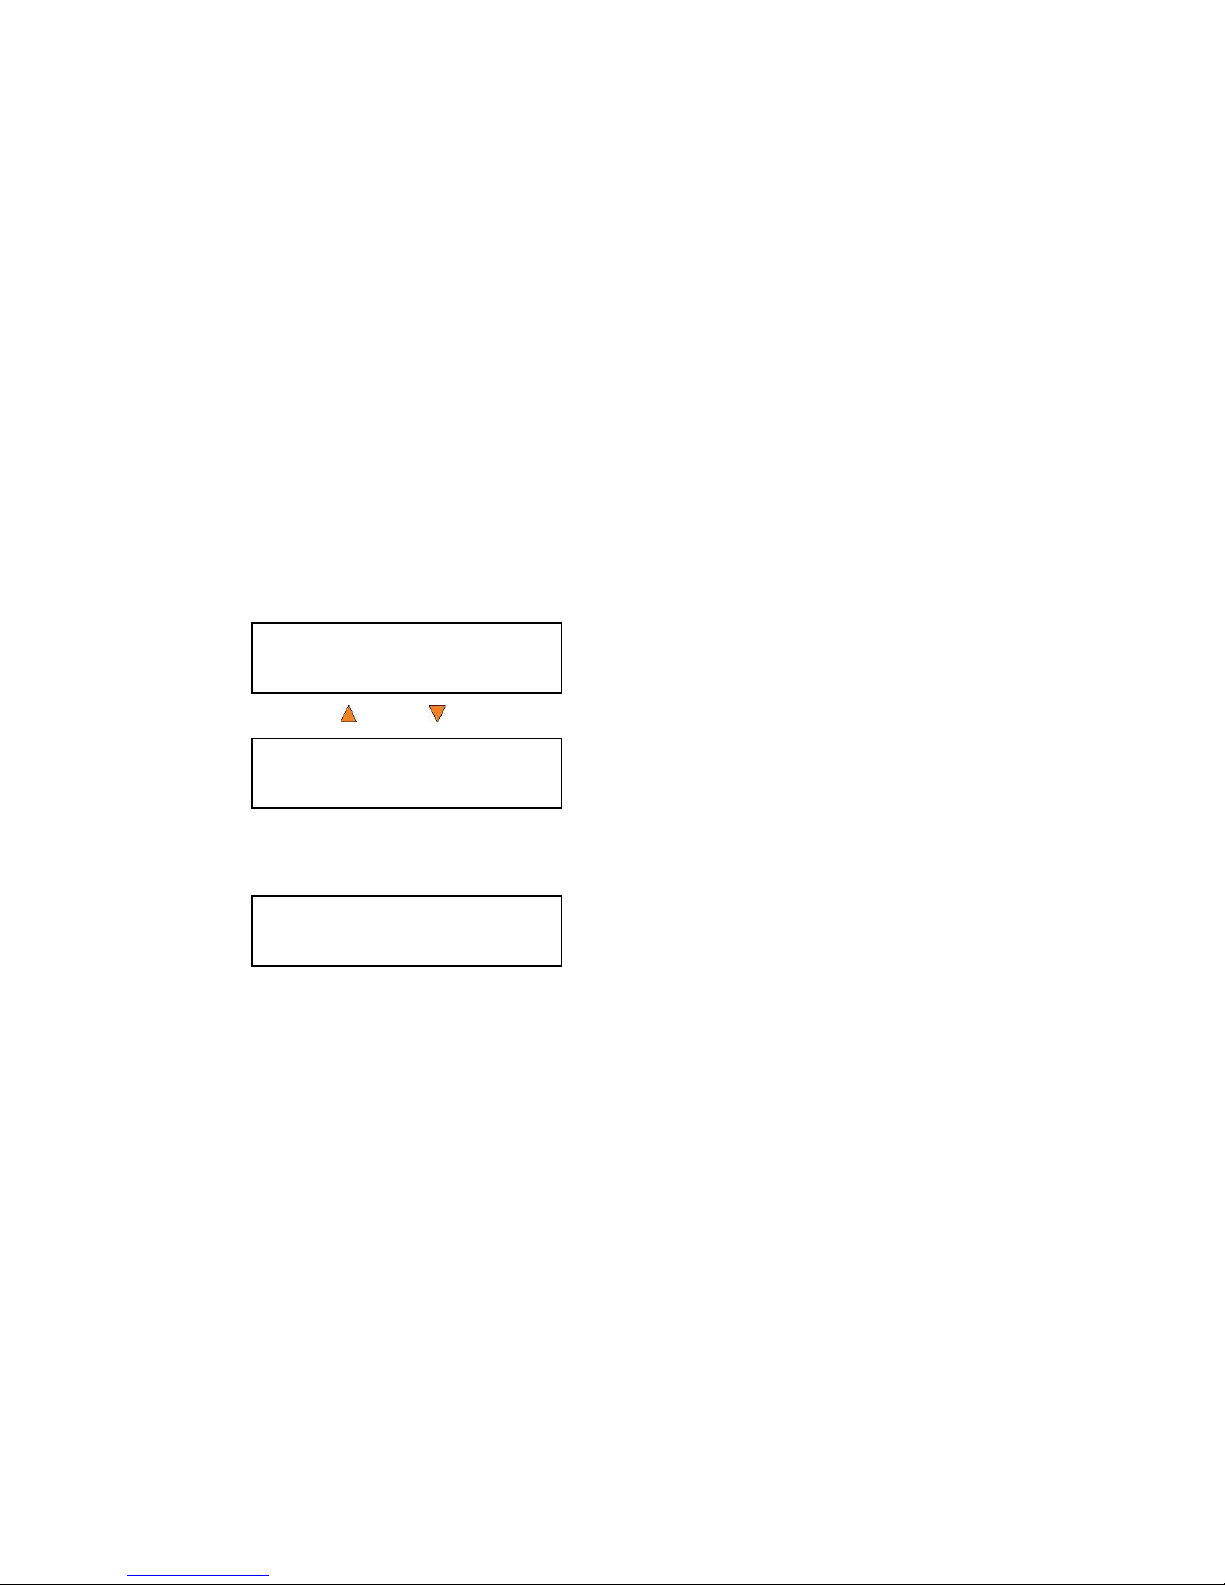
Select the Duplication Speed
DUPLICATOR 3.37
7.Select Burn Speed
Select Burn Speed
CD to CD
DUPLICATOR 3.37
1.Copy
This process will allow you to adjust the duplication speed subject to your needs.
By default, the duplication speed will be set to the optimal speed for each format and setting.
However, under some circumstances, you may want to reduce the duplication speed. Those
circumstances typically are as follows:
Poor Blank Media Quality. When your blank media quality is not good, lowering down the
duplication speed is necessary to make good copies.
Poor Master Disc Quality. If your master disc condition is not good, lowering down the
duplication speed will greatly reduce the failure rates.
Duplication Quality. Overall, the lower the speed, the higher the quality of your duplicates.
If you have time, it is a good choice to lower down the speed to produce the best quality
duplicates.
When you turn on your system, after it has booted up, you should see the following signifying
your system is ready.
Step 1: Use the Up or Down button to navigate to the Select Burn Speed menu.
Step 2: Press the ENT/Enter button to enter the Select Burn Speed menu and you shall see
a screen similar to below:
Step 3: Select the Correct Speed Type
There are different types of recording speed based on the disc format and source:
HDD/CD to CD: Copying to CD-R/RW media from a pre-loaded CD partition/image
in the hard drive or a CD master disc in the Reader/Writer.
HDD/DVD to DVD: Copying to DVD±R media from a pre-loaded DVD partition/image
in the hard drive or a DVD master disc in the Reader/Writer.
HDD/DVD-DL to DVD-DL: Copying to Double/Dual Layer Recordable DVD media
from pre-loaded a DVD-DL partition/image in the hard drive or a Double/Dual Layer
DVD master disc in the Reader/Writer.
HDD/BD-SL to BD-SL: Copying to BD-R/RE media from a pre-loaded BD
partition/image in the hard drive or a Blu-ray master disc in the Reader/Writer.
HDD/BD-DL to BD-DL: Copying to Double Layer BD-R/RE media from a pre-loaded
BD-DL partition/image in the hard drive or a Double Layer Blu-ray master disc in the
Reader/Writer.
HDD/BD-XL to BD-XL: Copying to Triple Layer BD-R/RE media from a pre-loaded
BD-XL partition/image in the hard drive or a Triple Layer Blu-ray master disc in the
Reader/Writer.
- 19 -
Page 23
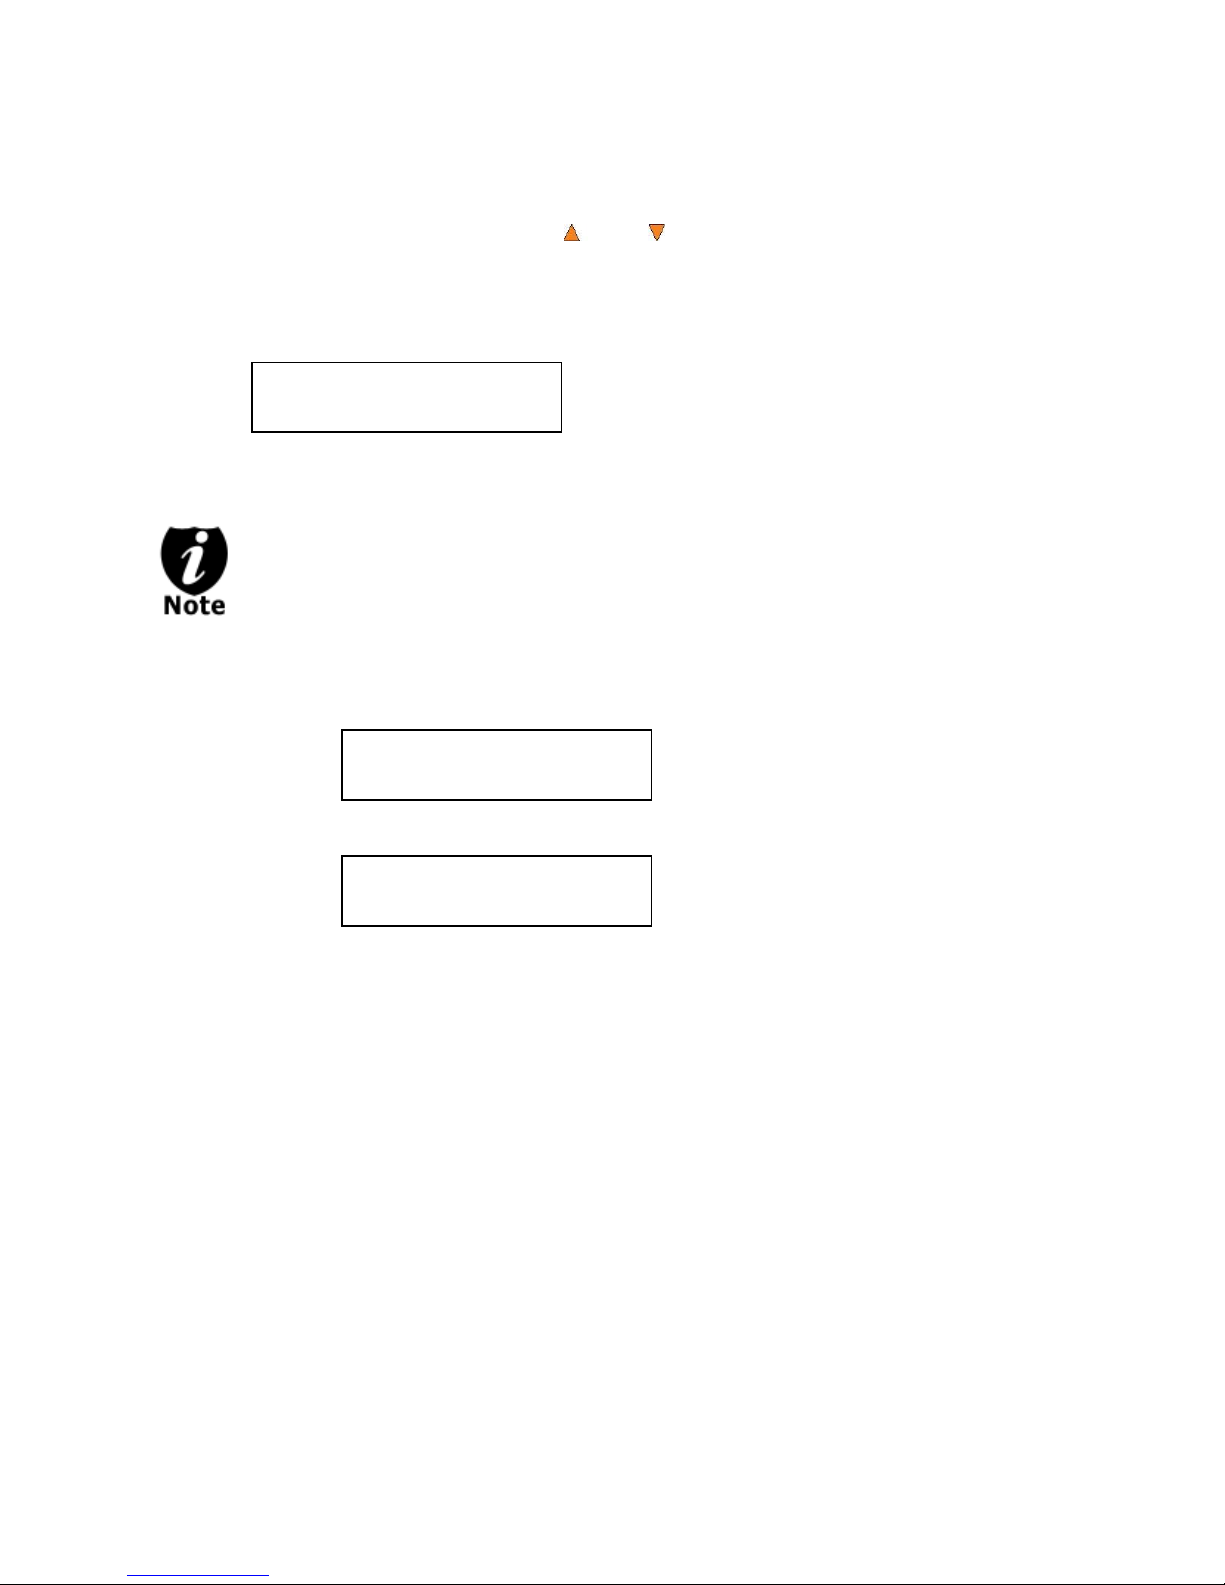
CD to CD Speed:
16x
CD to CD Speed:
Adjusted to: 24x
DUPLICATOR 3.37
7.Select Burn Speed
Depending on the type of duplication job(s) and your system restrictions, you need to
select the correct speed type in order for this setting to take effect. To select various
speed types, you need to press the Up or Down button to adjust and press the
ENT/Enter button to submit your selection.
Step 4: Once you have submitted the desired speed types, you should see the following
screen for speed adjustment.
You can press the up or down button to select the desired speed value and then press the
ENT/Enter to submit the selection.
If the speed value you’ve selected is the same as the current speed value, the
system will NOT respond to the ENT/Enter button. Please press the ESC/Escape
button to go back to the main menu.
Step 5: Once the speed setting has been successfully changed, you shall see the following
screen for 2 seconds.
Then you will be directed back to the main menu:
- 20 -
Page 24
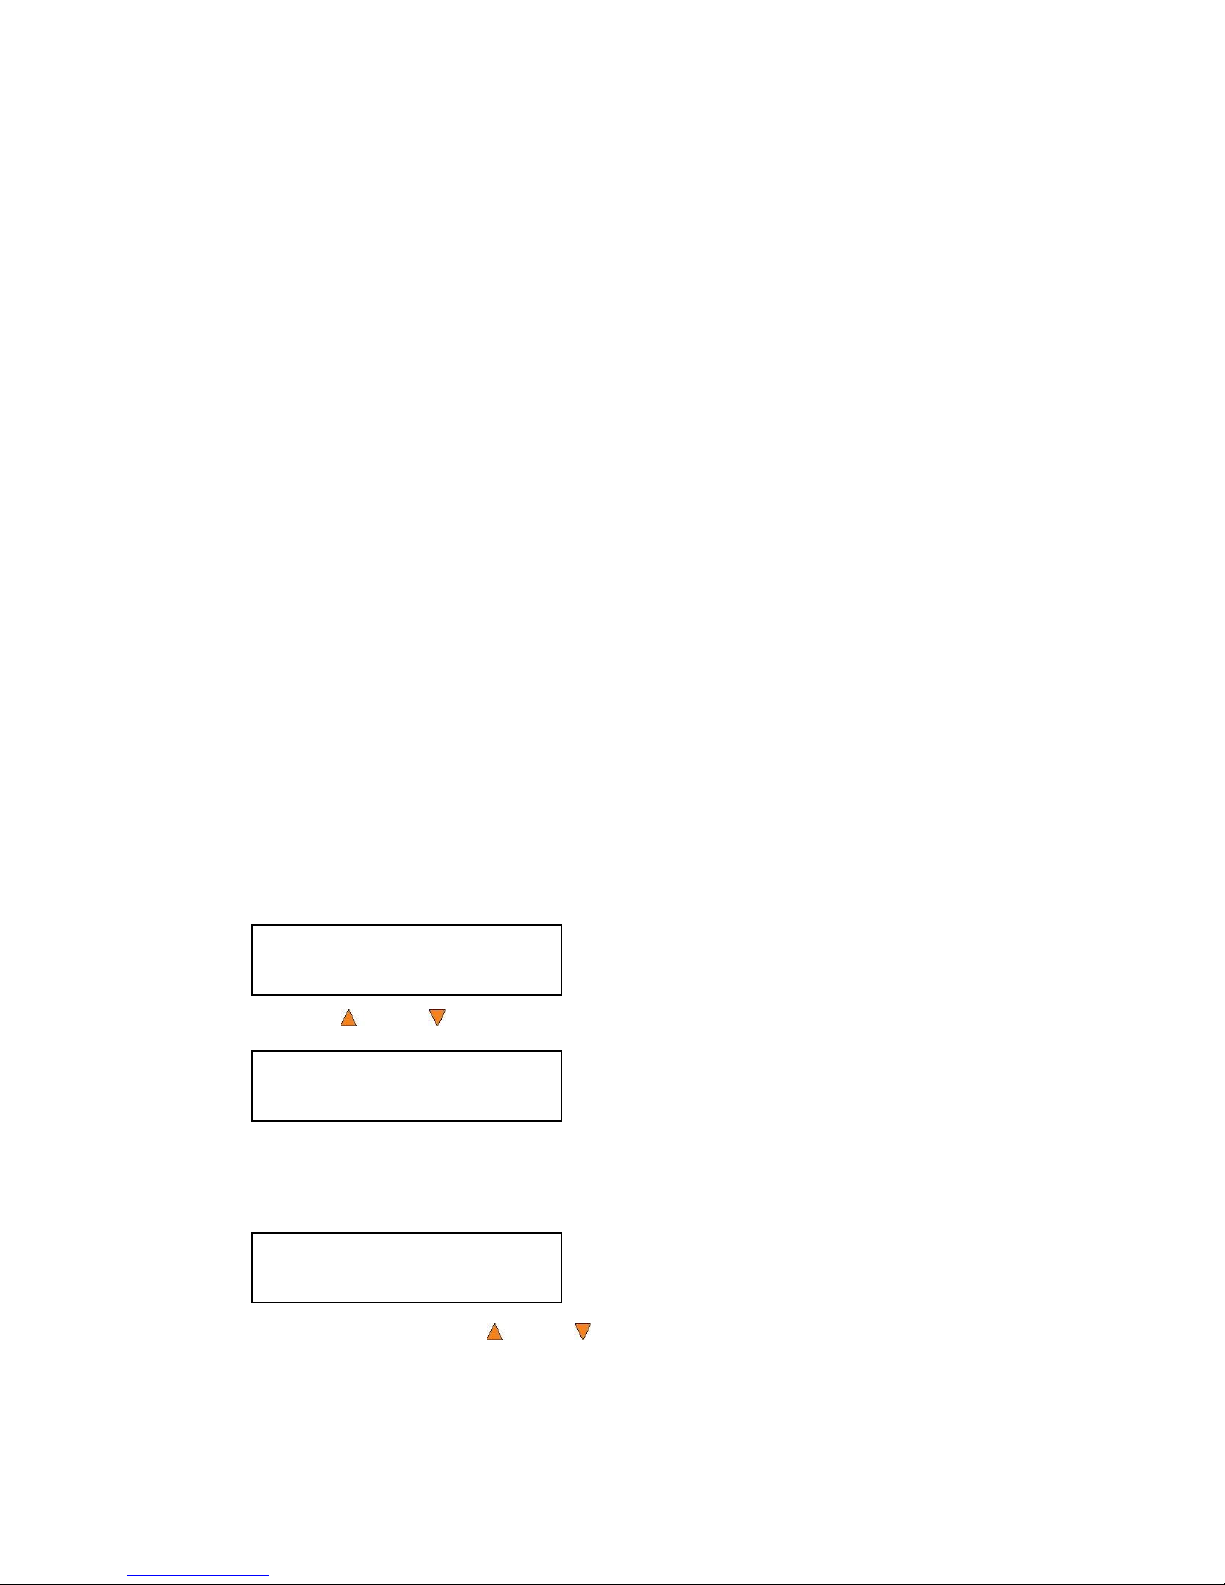
Mix Audio Tracks
DUPLICATOR 3.37
11.Mix Audio Tracks
Mix Mode:
Directly to Blank CD
DUPLICATOR 3.37
1.Copy
This process will guide you to mix an Audio CD from various tracks among different Audio CDs.
The following are the ways you can mix an Audio CD:
Mix directly to Blank CD-R media (This option is not available if you have a CD+G
Duplication System.)
By mixing an audio CD directly to blank CD-R media, all the tracks you selected will be
transferred to the blank CD-R media directly track by track. Once you’ve completed your
track selection(s); you will be instructed to finalize your mixed Audio CD. You can operate
this by choosing “Edit Track to: Blank CD” when asked.
Please do this cautiously; if any of the Audio CD tracks you wish to mix are not readable due
to scratches or poor quality, the blank CD-R media will be ruined.
Mix through the Hard Drive (This option is available ONLY if your system has a hard drive
installed.)
By mixing an audio CD through the Hard Drive, all the tracks you select will be transferred to
the Hard Drive. Once you’ve completed your track selection(s); you will be instructed to copy
them onto a blank 80 min CD-R media. You can operate this function by choosing “Edit
Track to: Hard Drive” when asked.
This is considered a safer method to perform the mix audio tracks. If any of the Audio CD
tracks you wish to mix are not readable due to scratches or bad quality, the blank CD-R
media will NOT be ruined since the blank CD-R media isn’t being recorded on until all Audio
CD tracks are successfully transferred to the hard drive.
When you turn on your system, after it has booted up, you should see the following signifying
your system is ready.
Step 1: Use the Up or Down button to navigate to the Mix Audio Tracks menu.
Step 2: Press the ENT/Enter button to enter the Mix Audio Tracks menu and you shall see
the Mix Mode screen similar to below (If your system is a CD+G Duplication System
or does not have a hard drive installed, please skip ahead to Step 3):
At this point, you can press the Up or Down button to choose how you want to mix
your audio tracks, either by mixing through the hard drive or directly to blank CD’s. Then
press the ENT/Enter button to submit your selection.
- 21 -
Page 25
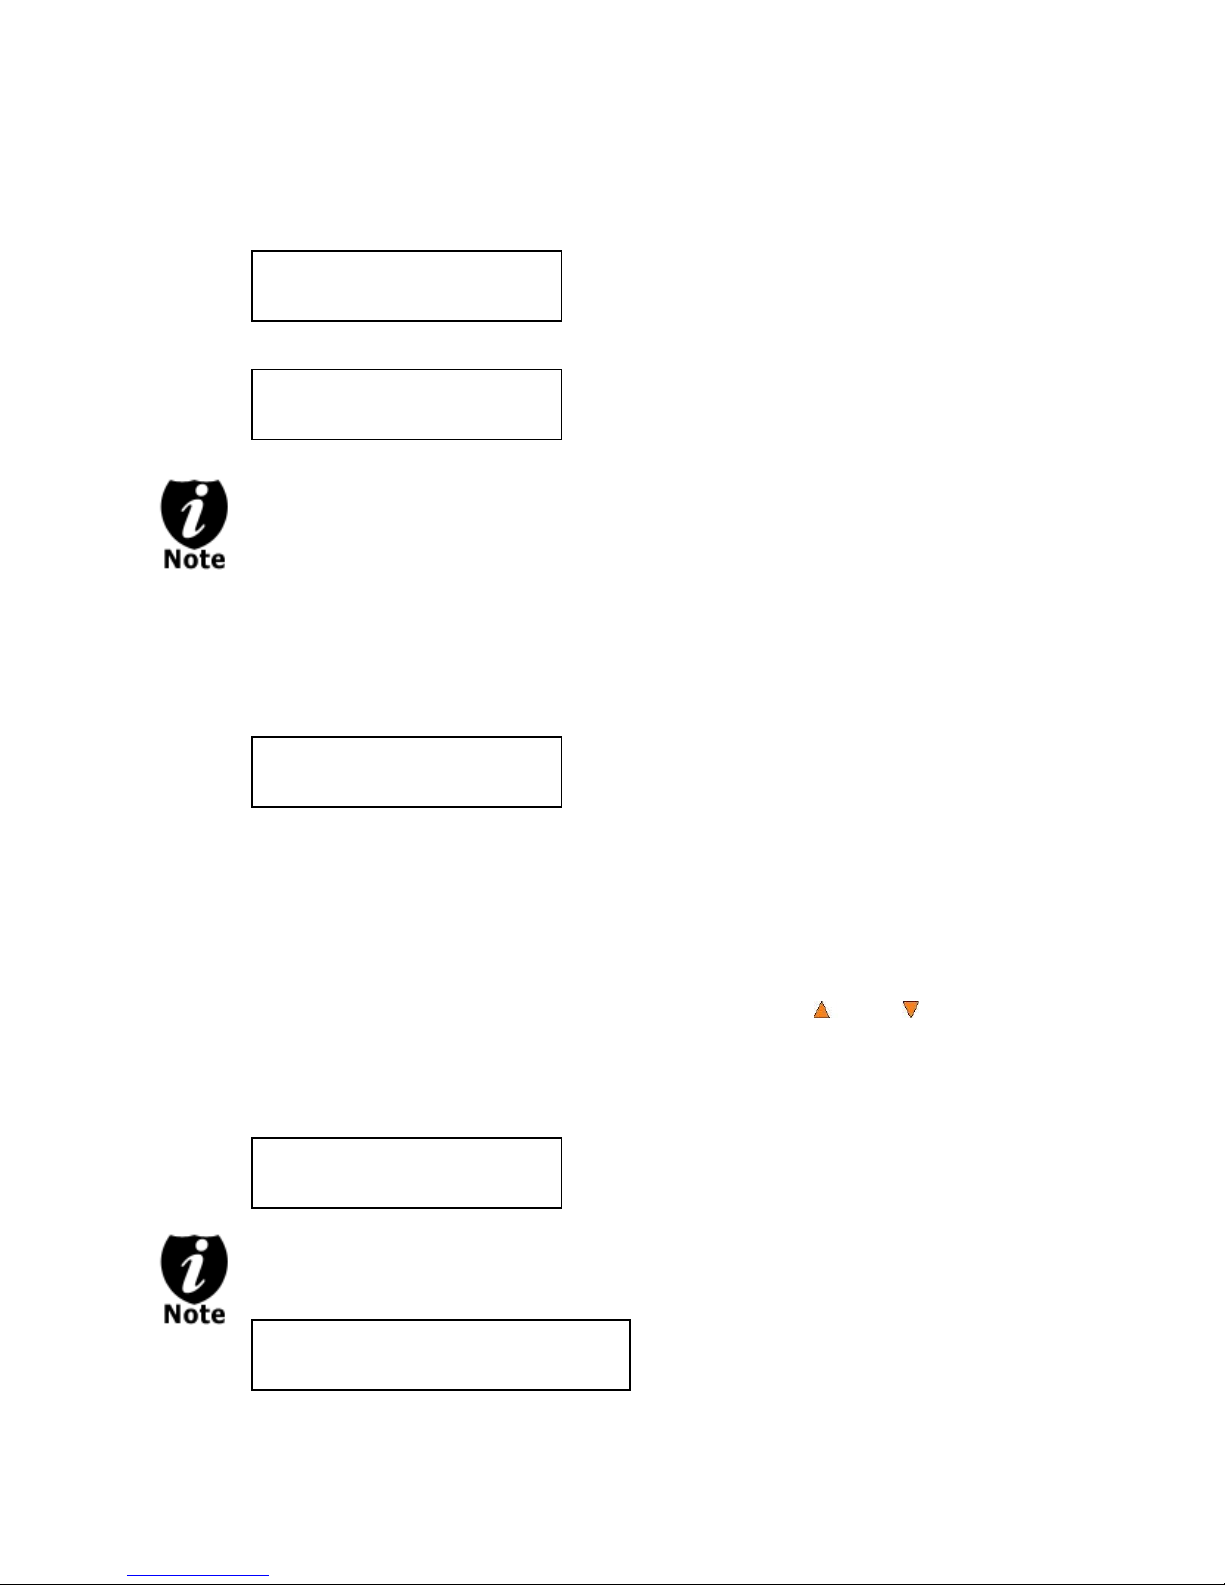
Step 3: Once the Mix Mode selection is submitted, you shall see following Preparation
Preparing
Waiting for Master
Preparing
Waiting for a Blank
Total: 0 Trk 0m: 0s
Track 1: 4m:31s
“Total: 0 Trk 0m: 0s” indicates that you have zero track(s)
selected and it has zero minutes and zero seconds playtime.
“Track 1: 4m:31s” indicates currently you are focusing on
track one of the Audio CD you’ve inserted and has a
running time of four minute and thirty-one seconds.
Total: 1 Trk 4m:31s
*Track 1: 4m:31s
Over Blank Disc Capacity
Press OK to Continue
screen and the corresponding trays that do not contain disc(s) in them will
automatically be ejected:
Or
If either one of the above screens is displayed for more than 2 minutes after you
have placed your master disc or blank disc into the drives, please check the disc
quality.
Step 4: After you’ve placed an Audio CD containing the track(s) you wish to copy, and a
blank CD-R media in the writer drive(s), please allow 5-10 seconds for the system
to detect them. After they have been recognized, then you should see the following
screen:
Step 5: When you see the above screen shot, you can press the Up or Down button
to display the playtime of each track on this audio CD and press the ENT/Enter
button to select the track you wish to be mixed. Once a track is selected, you shall
see the symbol “*” on the left of the track number on the 2nd line as shown in the
below screen.
If the track you have selected will cause the total playtime of all audio tracks to be
more than your blank CD-R media capacity, you should see the following screen.
- 22 -
Page 26
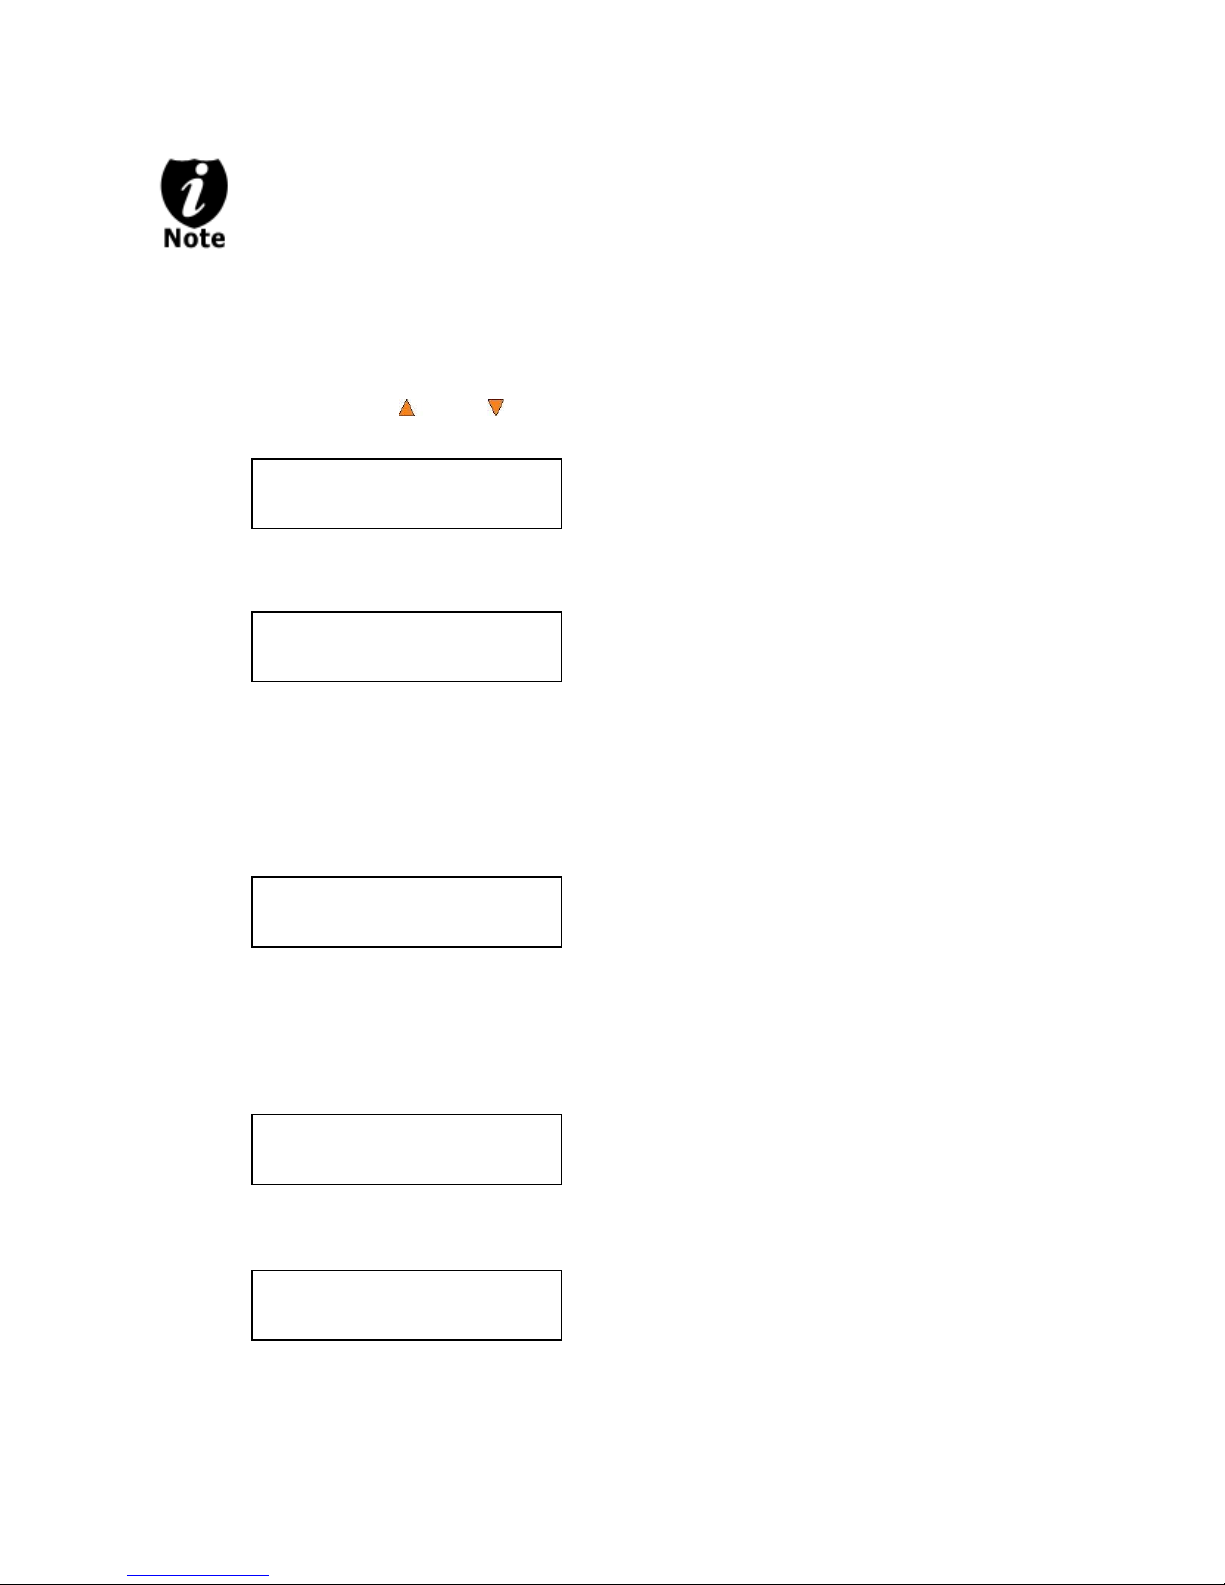
Total: 6 Trk 26m:17s
Are you done?
Mixing... 1
10% 4m:31s
“1” indicates that the system is currently transferring track one.
“10%” indicates that the current transferring progress of the
current track, track one.
“4m:31s” indicates the current running time of that track.
Mixing Complete!
Finish Mixing?
Mixing Complete!
Finish Mixing?
Mixing Complete!
Confirm to Finalize?
Given the limited space of the screen, the message above will scroll across the
screen in order to show the full message.
You need to press the ENT/Enter button to return to the track selection menu. The
track selected that caused this error message will be de-selected automatically. Then,
you can select a different track with smaller playtime.
Step 6: Once you have finished selecting the tracks on this Audio CD you want to mix, you
can press the Up or Down button until you see “Are you done?” on the 2nd
line as in the following screen.
Step 7: You can now press ENT/Enter button to confirm your selection. The system will now
start the mixing process as shown in the following screen.
Step 8: Once the mixing process is completed, you will see the following screen:
When you’re finished adding tracks, you can choose to finalize the job (mark the completion)
by performing the following steps:
a) Press the ENT/Enter button when you see “Finish Mixing?” on the 2nd line of the
screen like below.
b) Then press the ENT/Enter button to submit, and you should see the following
confirmation screen:
- 23 -
Page 27
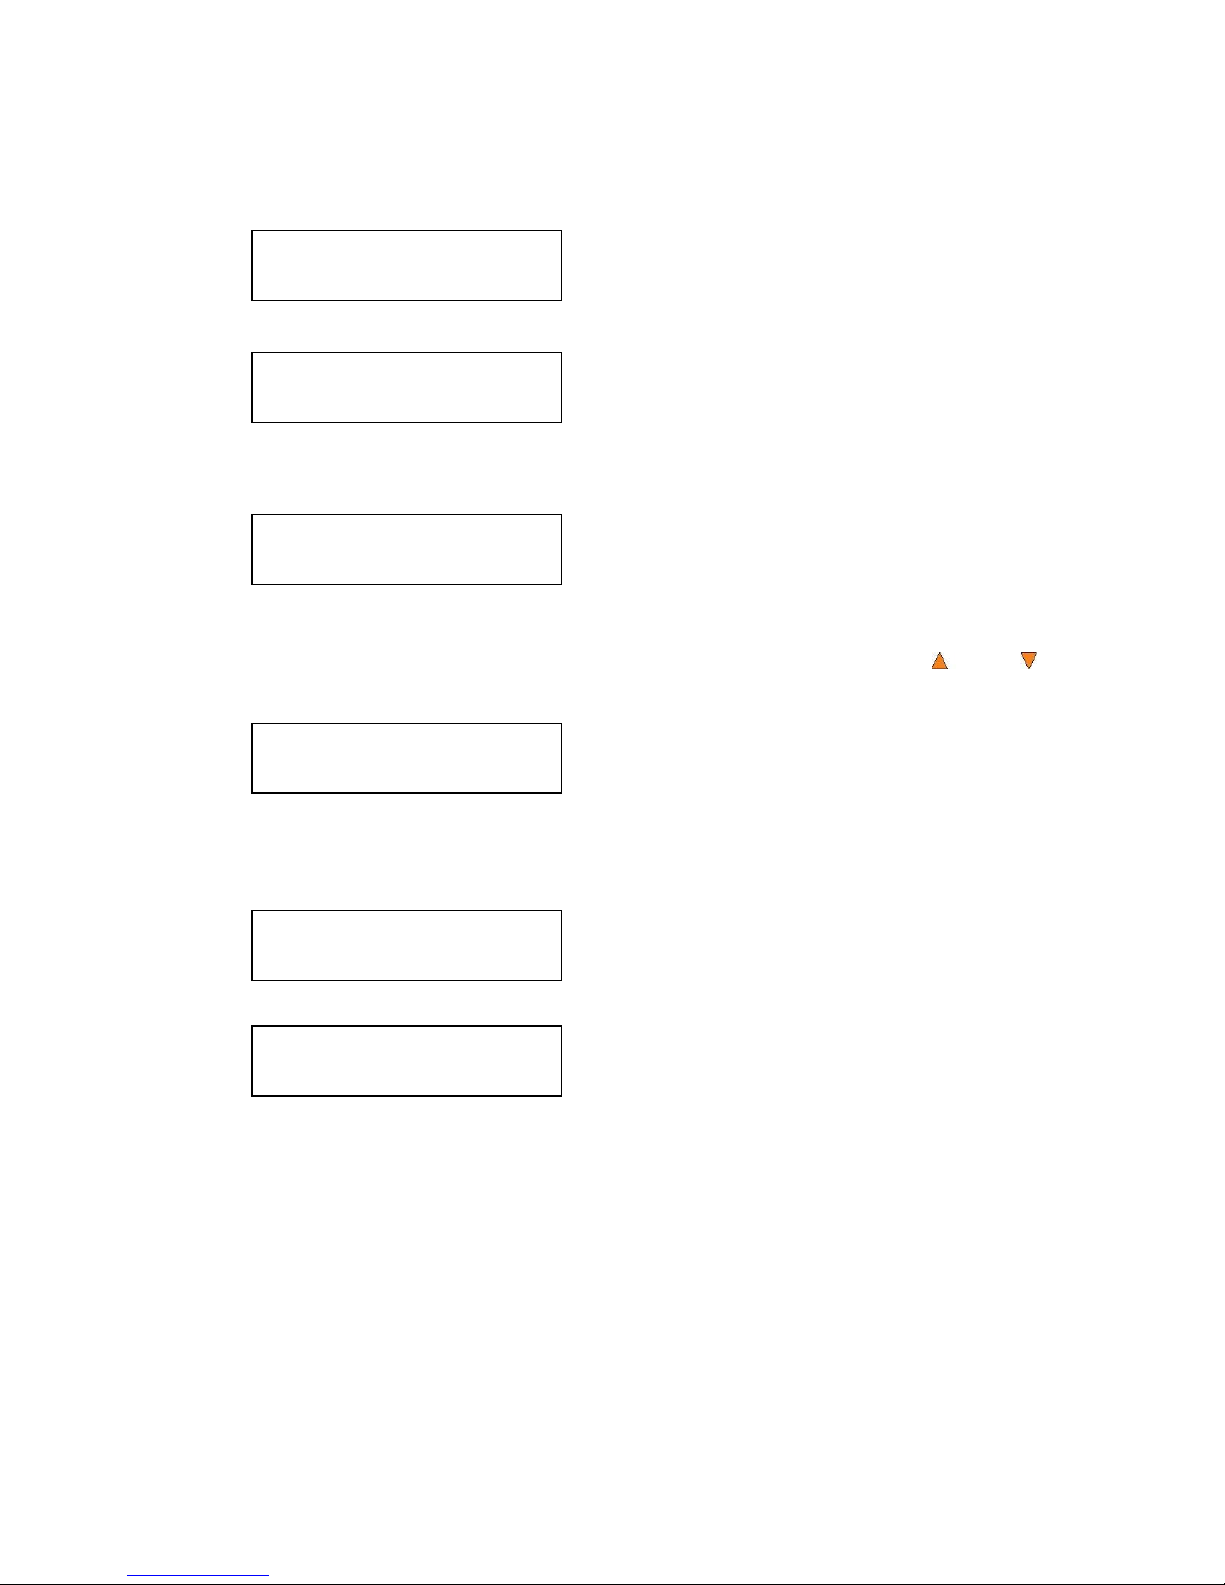
c) Press the ENT/Enter button once to confirm your selection, and you should see the
Mixing Complete!
Insert Next Master?
Finalizing...
Please Wait
Copying... H 228MB
0/1 10% 23MB
Job Completed!
Press OK to Finish
Job Completed!
Press OK to Finish
DUPLICATOR 3.37
11.Mix Audio Tracks
following Finalizing screen (if you choose to mix directly to a blank CD) or Copying
screen (if you choose to mix through the hard drive).
OR
d) Once the finalizing/copying process is completed, you should see the following
screen.
You can then press the ENT/Enter button and you will be guided back to the main menu.
Or you can choose to mix more tracks from other Audio CD’s by pressing the Up or
Down button until you see “Insert Next Master?” on the 2nd line as in the following screen.
Then press the ENT/Enter button to repeat Steps 3 through 8.
When the whole process is complete, your mixed copy will be ejected and you shall see the
following:
Press ENT/Enter button and you will be directed back to the main menu:
- 24 -
Page 28
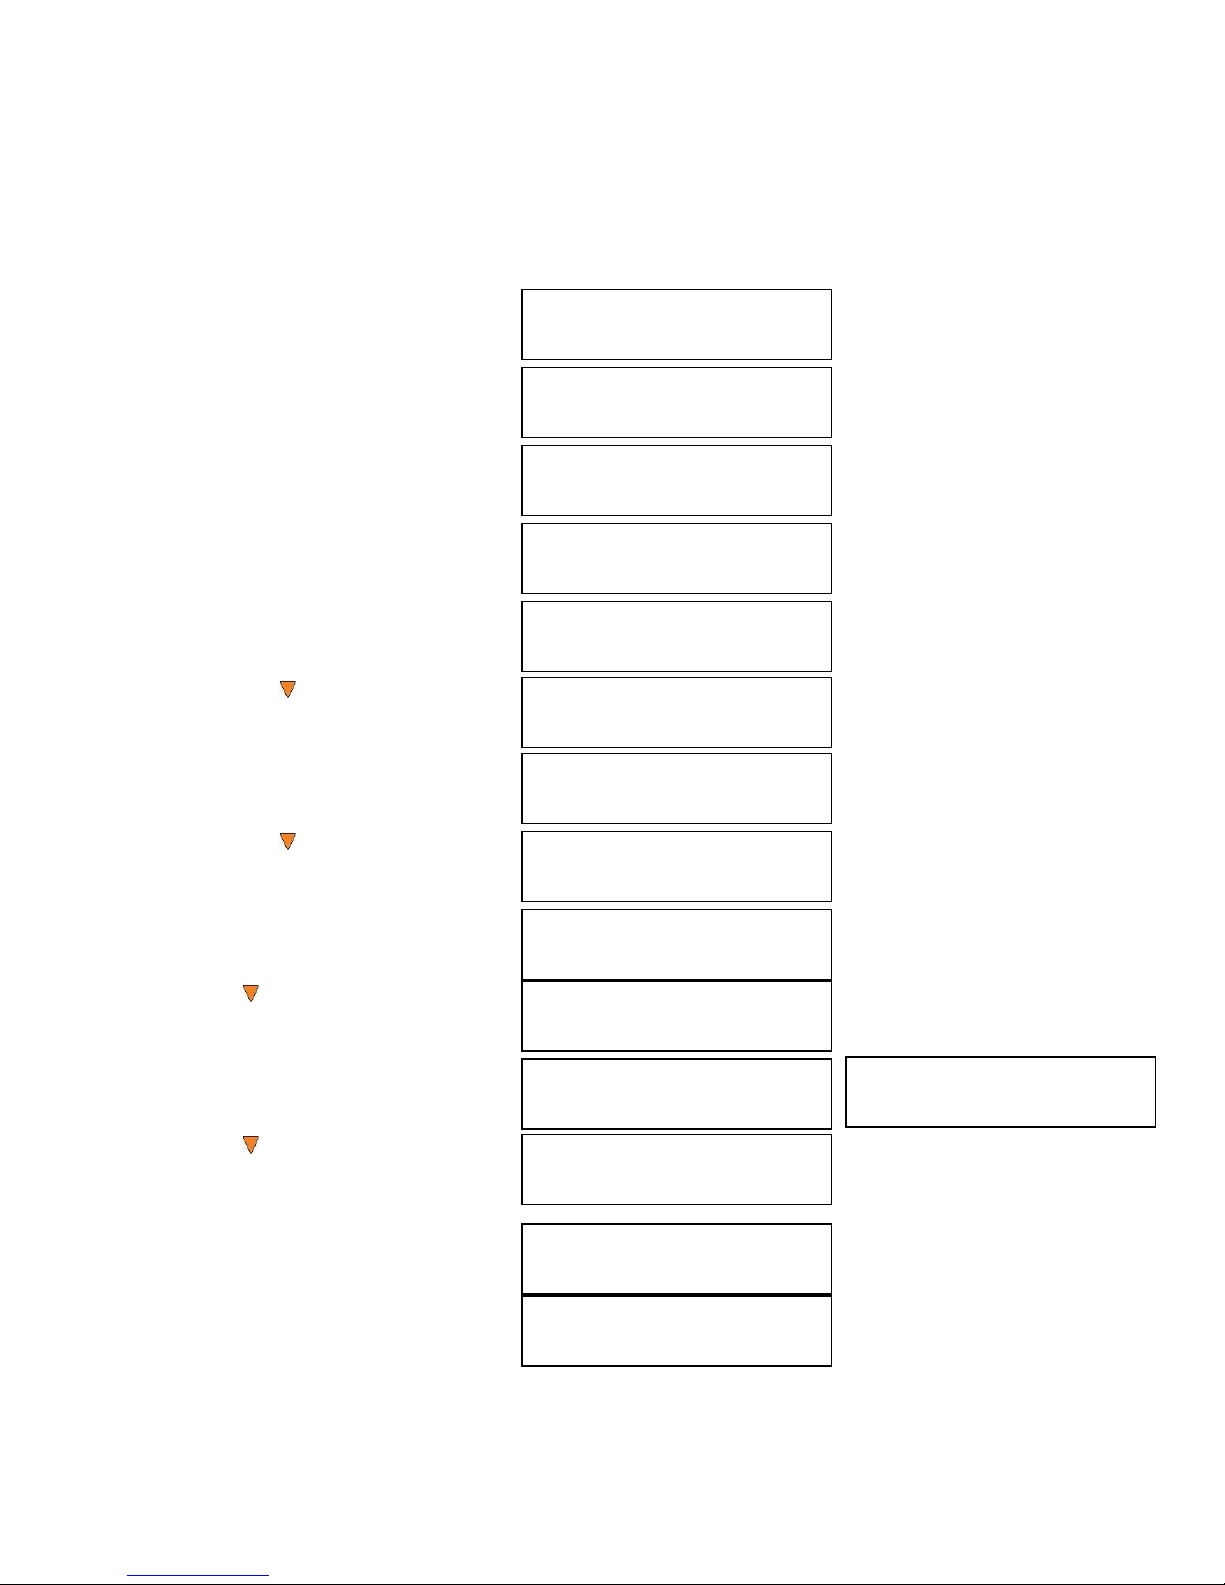
Example of Mixing Audio Tracks directly to Blank CD
DUPLICATOR 3.37
11.Mix Audio Tracks
Mix Mode:
Directly to Blank CD
Preparing
Waiting for a Blank
Preparing
Waiting for Master
Total: 0 Trk 0m:00s
Track 1: 4m:31s
Total: 0 Trk 0m:00s
Track 2: 4m:49s
Total: 1 Trk 4m:49s
*Track 2: 4m:49s
Total: 1 Trk 4m:49s
Track 4: 4m:58s
Total: 2 Trk 9m:47s
*Track 4: 4m:49s
Total: 2 Trk 9m:47s
Are you done?
Mixing... 2
0% 4m:31s
Mixing Complete!
Finish Mixing?
Insert Next Master?
Preparing
Waiting for Master
Total: 2 Trk 9m:47s
Track 1: 4m:03s
For the example below, we will mix a new Audio CD from 2 different Audio CD’s.
From CD1: song 2, and song 4
From CD2: song 3, song 4 and song 5
1. Go to menu Mix Audio Tracks.
2. Press ENT/Enter button.
3. Press ENT/Enter button.
4. Insert Blank CD-R media.
5. Insert CD1.
6. Press the Down button until
you see “Track 2” on the 2nd line.
7. Press ENT/Enter button once.
8. Press the Down button until
you see “Track 4” on the 2nd line.
9. Press ENT/Enter button once.
10. Press Down button until you
see “Are you done?” on the 2nd line.
11. Press ENT/Enter button once
12. Press Down button until you
see “Insert Next Master?” on the
2nd line.
13. Press ENT/Enter button once.
14. Insert CD2.
- 25 -
Page 29
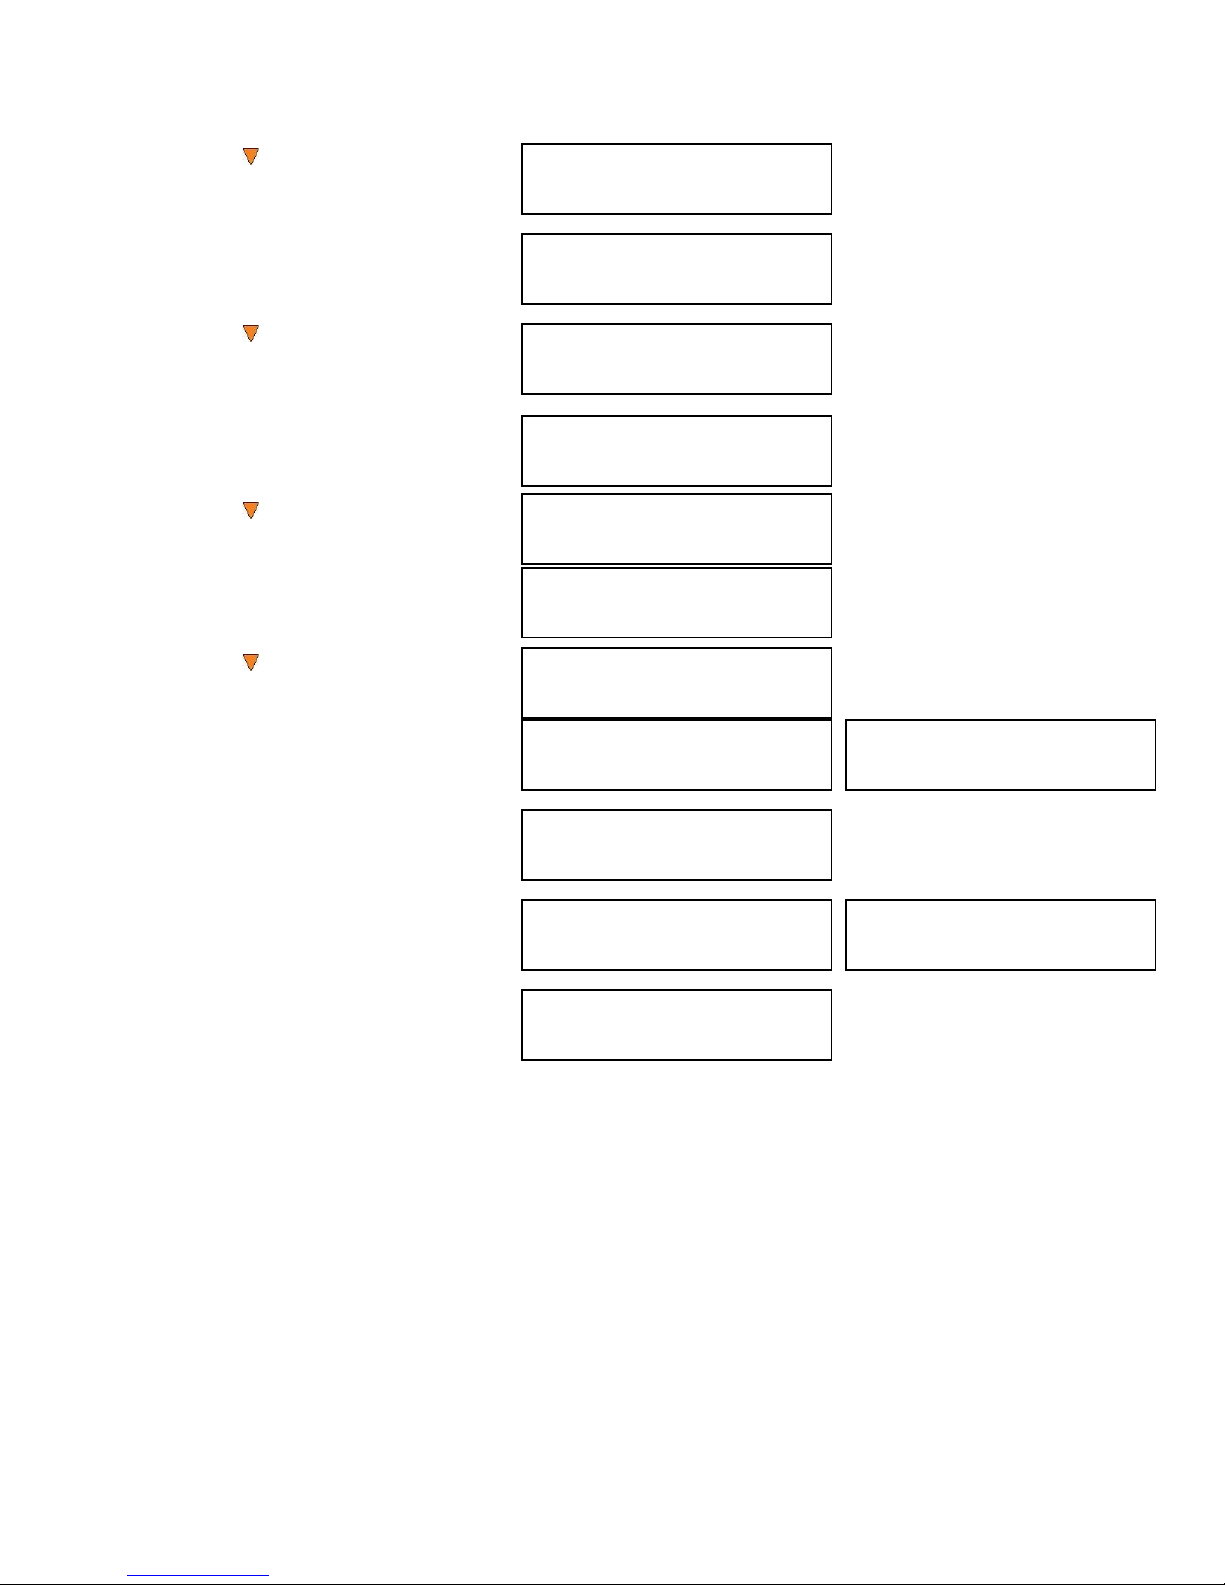
15. Press Down button until you
Total: 2 Trk 9m:47s
Track 3: 4m:47s
Total: 3 Trk 14m:34s
*Track 3: 4m:47s
Total: 3 Trk 14m:34s
Track 4: 5m:26s
Total: 4 Trk 20m:00s
*Track 4: 5m:26s
Total: 5 Trk 24m:27s
Are you done?
Mixing... 3
0% 4m:47s
Mixing Complete!
Finish Mixing?
Total: 4 Trk 20m:00s
Track 5: 4m:27s
Total: 5 Trk 24m:27s
*Track 5: 4m:27s
Mixing Complete!
Confirm to Finalize?
Finalizing...
Please Wait
Job Completed!
Press OK to Finish
DUPLICATOR 3.37
11.Mix Audio Tracks
see “Track 3” on the 2nd line.
16. Press ENT/Enter button once.
17. Press Down button until you
see “Track 4” on the 2nd line.
18. Press ENT/Enter button once.
19. Press Down button until you
see “Track 5” on the 2nd line.
20. Press ENT/Enter button once.
21. Press Down button until you
see “Are you done?” on the 2nd line.
22. Press ENT/Enter button once.
23. Press ENT/Enter button once.
24. Press ENT/Enter button once.
25. Press ENT/Enter button once.
- 26 -
Page 30
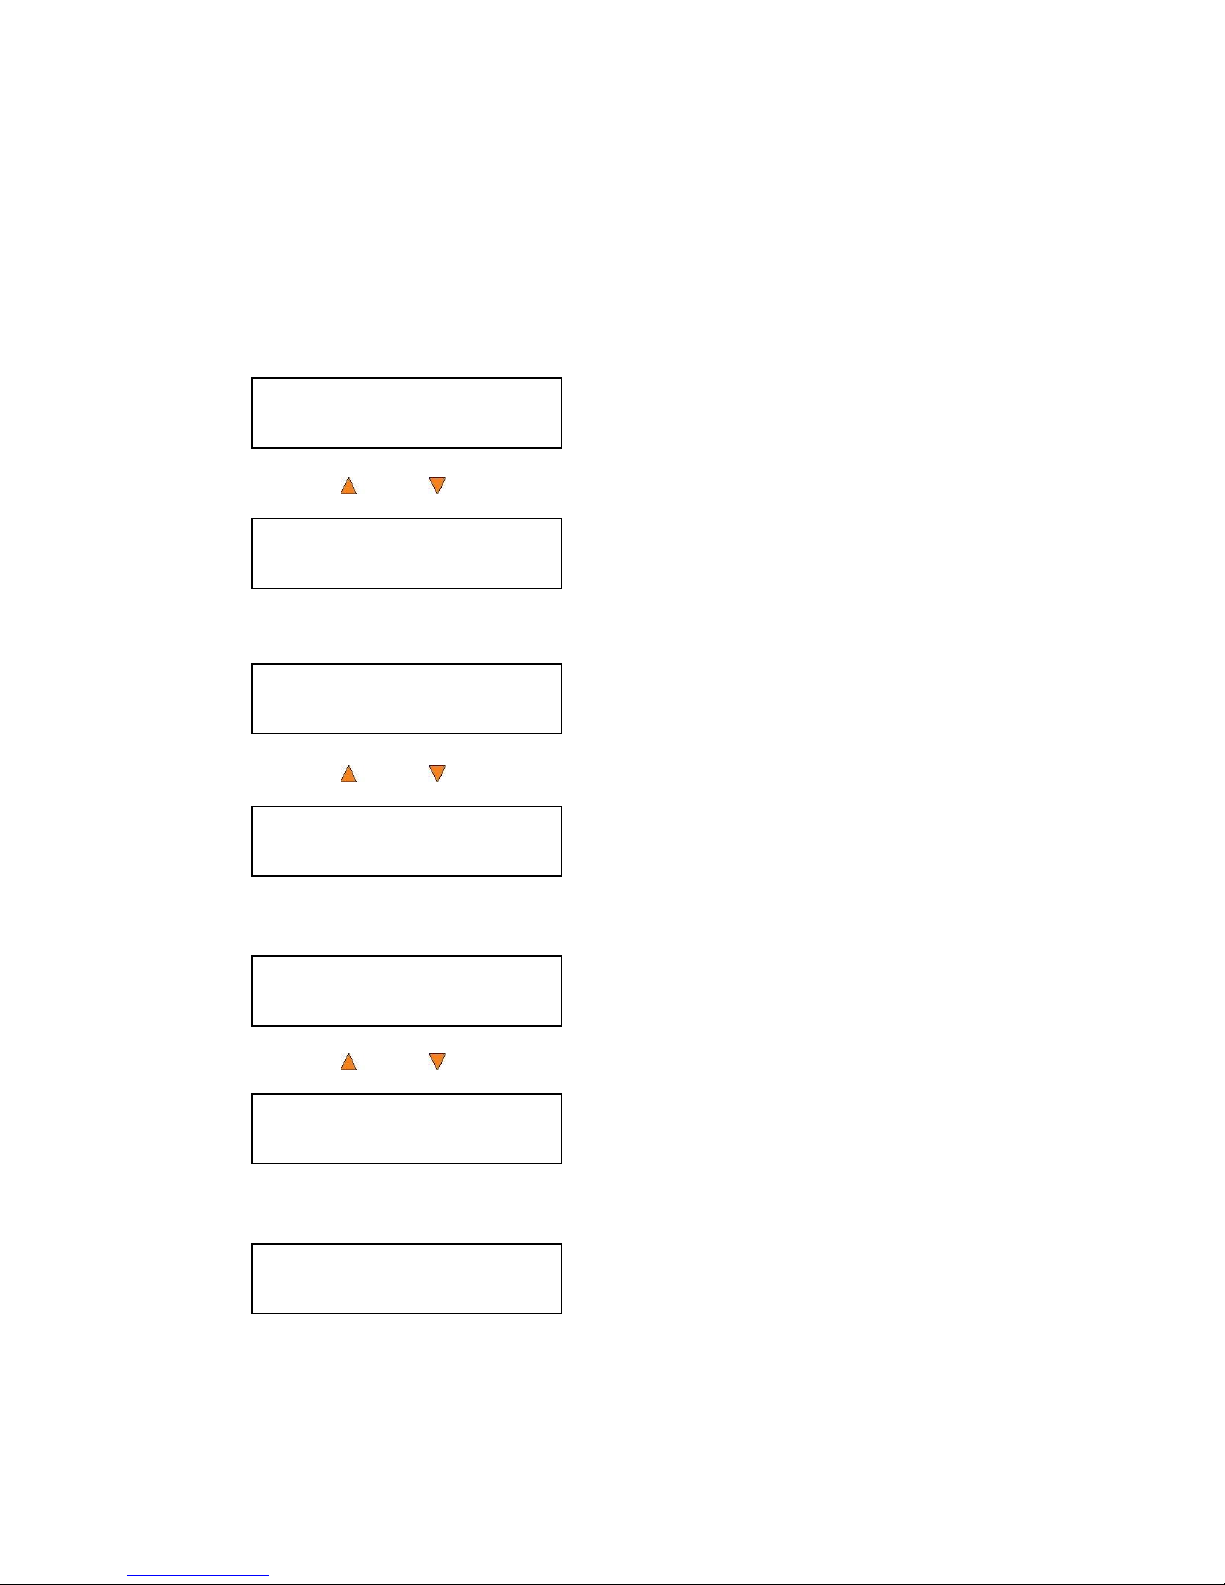
Change the Setup settings
DUPLICATOR 3.37
12.Setup
Setup
1.Language
DUPLICATOR 3.37
1.Copy
Setup
2.Auto Start
Auto Start
Auto
Auto Start
Full
Setup
2.Auto Start
Most of the internal settings and information is stored inside the Setup menu. To explore and
modify them is simple. Below is an example how to modify the “Auto Start” setting. Please note
that the default setup is set for optimal performance of the system, it is unnecessary to change if
you are satisfied with the outcome.
When you turn on your system, after it has booted up, you should see the following signifying
your system is ready.
Step 1: Use the Up or Down button to navigate to the Setup menu.
Step 2: Press the ENT/Enter button to enter the Setup menu and you shall see a screen
similar to below:
Step 3: Use the Up or Down button to navigate to the Auto Start setting.
Step 4: Press the ENT/Enter button to enter the Auto Start setting and you shall see a
screen similar to below:
Step 5: Use the Up or Down button to change the value to “Full”.
Step 6: Press the ENT/Enter button to submit the change. Once completed, you will be
guided back to the setting menu.
- 27 -
Page 31
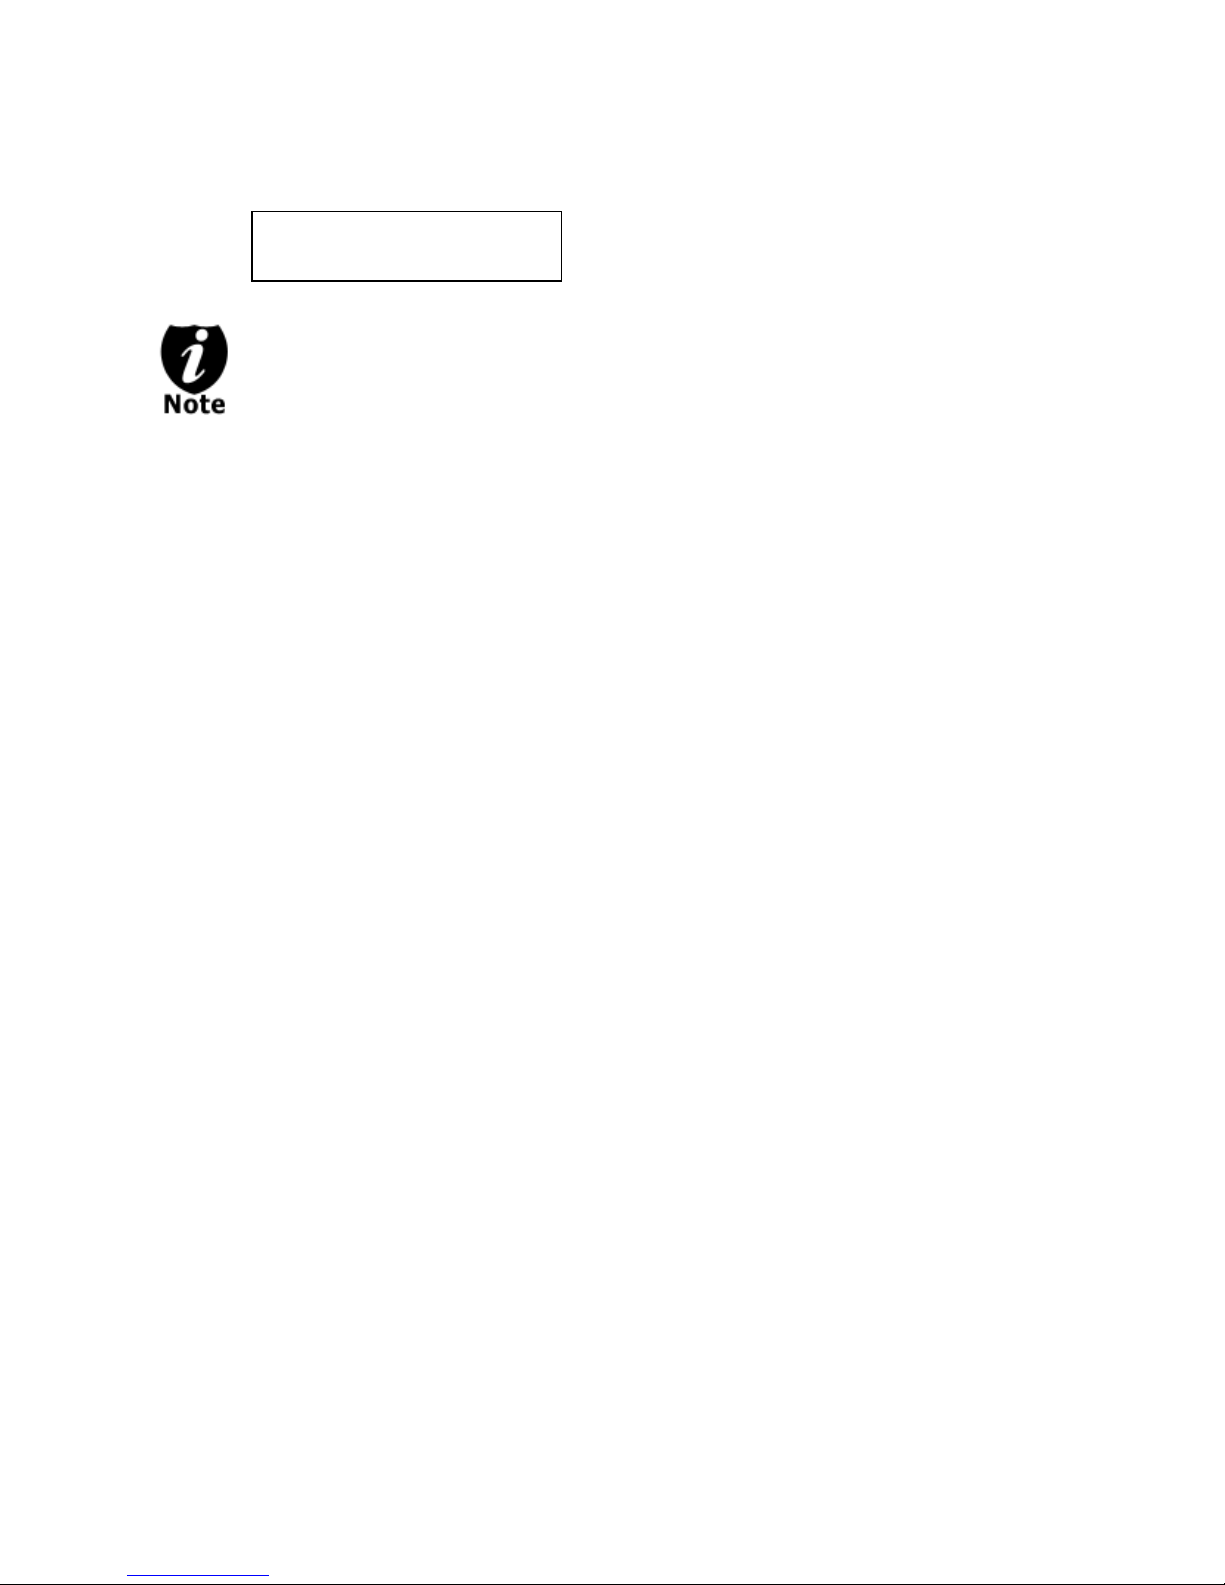
Step 7: Press ESC/Escape button to go back to the main menu.
DUPLICATOR 3.37
12.Setup
This change will only be effective for the current usage until you power off the
system unless you perform the Save function under the Utilities menu, or perform
the Shutdown function under the main menu.
- 28 -
Page 32
Chapter 4: Menu Overview
1. COPY
This menu will guide you to make CD/DVD/BD copies. For more information, please refer
to “Make Disc-to-Disc Copies” on page 7 or “Make Hard Drive-to-Disc Copies (ONLY for
systems that have a hard drive installed) on page 12.
2. BD Safe Copy
Use the “BD Safe Copy” menu will allow the user to ensure they are creating a more
reliable Blu-ray copy. During the BD Safe Copy process, it will perform the data recording
and a verification process at the same time to ensure the data readability and accuracy of
the subsequent copied discs. However, because of this extra measure, the duplication
process will take longer than the traditional copy process.
This menu will only be shown in Blu-ray models and only applies when making
Blu-ray copies.
3. TEST
This menu will guide you to make a simulation of the copying process. During this
simulation process, all write once recordable discs such as (DVD-R, CD-R) will be reusable.
The purpose of performing such simulation is to ensure error free duplication.
Due to the physical limitation of DVD+R/RW & BD-R/RE recordable format, you
cannot perform this procedure on these formats. If you do so, you will encounter
a failure messages.
If you are using CD-RW/DVD-RW discs as your blank media during the
simulation, any content that may have been recorded inside those discs will be
permanently ereased.
4. COMPARE
This menu will guide you to perform a bit-by-bit comparison between your master disc (or
master disc image on the hard drive) and all the copied discs. The reason to perform this
compare operation is to ensure all of your copies identically compare to the master disc.
5. TEST + COPY
This menu will guide you to perform the simulation of copying process and if everything
passes during the simulation, the real copying process will be performed. If there’s an error
encountered during the simulation, an error message will be displayed and the copying
process will not be initiated.
6. COPY + COMPARE
This menu will guide you to make copies, after which, it will perform an additional
comparison process automatically to ensure data correctness.
- 29 -
Page 33

7. SELECT BURN SPEED
This menu will guide you to adjust the duplication speed on various duplication job types.
For more information, please refer to “Select the Duplication Speed” on page 19.
8. SELECT SOURCE
This menu will guide you to select a Reader/Writer drive as the source drive (where your
master disc will be placed into) for Copy related operations. For more information, please
refer to section 1 of “Make Disc-to-Disc Copies” - “Select the Copy Source” on page 7.
9. ERASE
This menu will guide you to erase your rewriteable discs in the Writer Tray. There are two
options to erase your rewriteable discs:
Full Erase: It will erase the entire disc which will make it impossible to be
recovered.
Quick Erase: It will erase the index of the rewritable disc, not the data section.
10. HARD DRVE SETUP
10.1 Select Partition
This function will guide you to choose the default partition/image.
10.2 Load Partition
This function will guide you to load your master disc content into the hard drive as a
partition/image. For more information, please refer to section 1 of “Make Hard Drive-to-
Disc Copies” - “Loading Master Disc content into the Hard Drive as a partition/image”
on page 12.
10.3 Rename Partition
This function will guide you to rename an existing partition/image (including Reserve
partition/image) in the hard drive.
10.4 Delete Partition
This function will guide you to delete or remove an existing partition/image (including
Reserve partition/image) in the hard drive.
10.5 Partition Info
This function will display additional information of all existing partitions/images in the
hard drive. Such information includes partition/image disc type, capacity, etc.
10.6 Select Loading Drive
This function will guide you to select a Reader/Writer drive as the source drive (where
your master disc will be placed into) for partition/image loading/creating related
operations.
10.7 Format Hard Drive
This function will guide you to re-format the entire hard drive of the system. During the
formatting process, all of your hard drive contents will be permanently lost. Please use
this function with caution.
- 30 -
Page 34

10.8 Display Order
This function will allow you to change the display order of the existing partitions/images
in the hard drive. The default setting is in a chronological order.
11. MIX AUDIO TRACKS
This process will guide you to mix an Audio CD from various tracks among different Audio
CDs. For more information, please refer to “Mix Audio Tracks” on page 21.
12. SETUP
12.1 Language
This setting will allow you to choose which language you prefer be used to navigate
the controller function of this system.
12.2 Auto Start
This setting allows you to choose Auto, Full, or Off. If Auto is selected, this feature
automatically starts the duplication process when all writer drives detect recordable
media inside, or waits for 30 seconds before starting the duplication process if there is
at least one recordable disc in a writer drive and any of the remaining writer drives are
empty. If Full is selected, this feature allows the system to copy automatically once
your master disc and all of the writer trays of the system are filled with recordable
media, but will not start automatically if any writer drives remain empty. If Off is
selected, the copy process requires you to press the ENT/Enter button to start the
duplication. This feature applies to applications inside the operation menu such as
COPY, TEST, TEST+COPY, COPY+COMPARE, etc.
12.3 Read Error Skip
Normally, when the system encounters a reading error while reading your master disc,
the duplication job will be aborted and all the recordable media will be ruined. However,
if you believe that your master disc has a small, insignificant error due to physical
damages, you can enable the setting to allow the system to skip any read error* it
encounters.
*This function will not fix the error; it will only skip it to make the rest of the data
readable.
12.4 CD Writing Mode
This setting will allow you to select which mode you would like to duplicate a CD.
There are two different modes, “Disc at Once” and “Track at Once”. Unless you
understand completely what they mean, we strongly suggest you to set it as “Disc at
Once”.
12.5 Max Audio, VCD & CDG Speed
Audio CD’s and Video CD’s do not have internal error checking capability, so
duplicating at too high a speed may cause frequent errors. This setting will allow you to
adjust the maximum duplication speed for Audio and Video CD.
12.6 Buzzer
This setting will allow you to choose whether you want to hear a beep when you press
a button or when a task has been completed.
- 31 -
Page 35

12.7 Startup Menu
This setting will allow you to choose which menu you would like to see first when you
turn on the system.
12.8 Screen Saver
This setting will allow you to choose whether you want to enable the Screen Saver
feature or not. By enabling this feature, a screen saver will be displayed when your
system has been idle for a long period of time.
12.9 Duplication Mode
There are two duplication modes: Load and Copy and On the Fly. Load and Copy
allows faster duplication from the Hard Drive by simultaneously copying onto the blank
media in the writer drives while loading the master disc to the hard drive. All
subsequent copies will be created from the stored master on the HDD. The On the Fly
mode instructs the system to copy directly from the master disc. When using On the
Fly mode, no information is stored on the hard drive.
12.10 Counter
This option will allow you to enable/disable the Counter feature by turning this feature
ON or OFF. This feature will notify you how many discs have been copied and how
many discs are left to go.
12.11 DVD+R High Compatibility Mode
This feature will allow you to enable/disable the DVD+R High Compatibility Mode
feature by turning this feature ON or OFF. The purpose of this feature is to increase the
compatibility of DVD+R media with a broader range of DVD Video players. This
process will increase the amount of time required to duplicate your disc(s).
12.12 ISRC
This option will allow you to enable/disable copying the ISRC code of the Audio CD.
ISRC is the serial# of the audio tracks that uniquely identifies the song in that audio
track. This ISRC code is commonly found in commercial Audio CD’s and rarely seen
on home made Audio CDs. By enabling this feature, the duplication performance will
be lowered.
12.13 Disable Drives
This feature allows you to disable certain drives/trays when those drives/trays are
producing high failure rates or not functioning properly.
12.14 External Connection (Optional)
This feature will allow you to turn on/off the USB/eSATA/Network port on the back of
your system. This option will allow one or more drives on the system to be controlled
by a PC. This feature will only be visible if supported External Connections were
installed.
*Please note that system needs to be restarted when this setting is changed.
12.15 Overburn
Overburning is the process of recording data past the normal size limit. Many disc
manufacturers extend a recordable disc to leave a small margin of extra groove at the
outer edge. This feature allows you to turn the ability to use the overburn area ON or
OFF.
- 32 -
Page 36

*Please note that supported DVD drives need to be installed to perform overburning
DVD discs.
12.16 BD Safe Copy Menu
Use this setting to choose whether you want to show “BD Safe Copy” on the main
menu, or not.
*This menu only shows in Blu-ray models.
13. Utility
13.1 Disc Info
If you are uncertain about the type of blank recordable media you are using, the
system is equipped with the disc info function to help identify and notify you of the disc
information encoded within.
This feature will identify your blank recordable media’s format, capacity, manufacture
ID as well as the media’s certified writing speed. Please note that limited information
will be displayed for media in the Reader drive.
13.2 Prescan
Approximately 50% of failures reported by our system are caused by errors in the
master disc which our Reader couldn’t overcome. When this kind of failure occurs, it
tends to waste all of your blank recordable media.
To help detect flaws in the master disc prior to performing the duplication process, we
introduce the “Prescan” feature. This feature will scan and detect any bad sectors
existing in the master disc. It is recommended to perform this feature before starting
the duplication task for all master discs. By doing so you can prevent wasting blank
media due to an error in the master disc.
13.3 System Info
By entering this menu, you will be able to see the hardware and software information
pertaining to your system.
13.4 Device Info
By entering this menu, you will be able to see the information for devices built inside
your system, such as the drives. That information includes but not limited to
manufacture, model number, etc.
13.5 Load Default
This function will reset all of the options back to manufacture’s default. You can
perform this function if your system is acting abnormal. You’ll need to perform
“Shutdown” and restart the system in order for this to take effect.
13.6 Update Firmware
This function will update the software for your system. To update, you need to insert a
manufacture Certified Update CD into one of the drives and make sure no other discs are
in rest of the drives. Then you can press the ENT/Enter button to update. We strongly
suggest you do not upgrade your system’s firmware unless your system is getting
unstable.
- 33 -
Page 37

13.7 Save
This function will save all the settings you’ve modified since the last time the system
was booted.
14. Account Management
This menu will allow the Administrator to perform the following user administrative tasks.
This feature is disabled by default. Prior to activating this feature, the duplicator recognizes
all users as the only activated user defined as the administrator. The pre-defined
password for this menu is “0000”.
14.1 View User
This menu allows you to view current existing user accounts.
14.2 Create User
This menu allows you to create additional user accounts. Each user has its own
settings. During this process, you will be prompted to enter a new user name (up to 8
alphanumeric letters or numbers) and user password (consists of a 4 digit number) for
a new account.
14.3 Edit User Info
This menu allows you to change the existing user account’s name and password.
During this process, you will be asked to select the existing account and then you will
be prompted to enter the new user name and new user password for this account.
User “Admin” is the administrative account, you can NOT change the user name
for this account, but you will be able to change the password for this account.
14.4 Delete User
This menu allows you to delete the existing user account. During this process, you will
be asked to select the existing account to be removed.
User “Admin” is the administrative account; you can NOT delete this account.
14.5 Password on Bootup
This menu allows you to enable/disable the user administrative feature prompt; user
login upon boot up. During this process, you will be asked to select “ON” or “OFF”
(enable/disable).
15. AUTOCOPY
This function will allow the system to operate the disc-to-disc copy function without any
user inputs for ease of operation.
16. Shutdown
This function saves any system settings that you have entered and makes sure it is safe to
turn off your system. Once you see the Ready to Power OFF message, then you can
- 34 -
Page 38

safely turn off the machine via the Power Switch. Turning off your system without
performing this function will increase the risk of damaging your system.
- 35 -
Page 39

Appendix A: External Device (USB/eSATA/Network) Setup Guide (Optional)
*This only applies if you have external connections installed
If there’s a switch next to the USB/eSATA/Network Port:
1. Power off your system
2. Set the switch to “ON” position at the back of your system.
3. Using the standard USB2.0/USB3.0/eSATA/Network cable to connect your computer to
your system.
4. Power on your system.
5. Your computer should recognize a number of external devices depending on the system
you purchased.
If there is NOT a switch next to the USB/eSATA/Network Port:
1. Using the standard USB2.0/USB3.0/eSATA/Network cable to connect your computer and
your system.
2. Power on your system.
3. Go into menu “Setup”.
4. Go into submenu “External Connection” .
5. Press Up or Down button to change the setting to “ON”.
6. Press ENT/Enter button to submit your selection.
7. The system will either restart by itself or prompts you restart it manually by powering the
system off and back on.
8. Your computer should recognize a number of external devices depending on the system
you purchased.
Above instructions are for you to turn on the USB/eSATA/Network port. However, if
you wish to turn it off, please perform the same instructions except you either set
the switch to “OFF” or change the “External Connection” setting to “OFF”.
Every PC related product has compatibility issues. Even though the
USB/eSATA/Network connection(s) have been thoroughly tested before the unit
was shipped out of the factory, there’s still a slight chance that your PC/Mac
computer is not compatible with the units USB/eSATA/Network connection. If that
happens, please contact your PC/Mac manufacture for possible configuration
changes to make it work or try it on another PC/Mac computer.
- 36 -
Page 40

Appendix B: Troubleshooting
Frequently Asked Questions
1. No display on the LCD or the unit does not operate when the power is on.
Check the power cable connection and that the environment for the power outlet is normal.
Make sure the power voltage on the duplicator matches the voltage of your power outlet.
If the system was stored in a location where the temperature dropped below 32⁰F (0⁰C)
within the past 24 hours, leave the system in a warm room with temperatures at least 65⁰F
(19⁰C) for 4 hours prior to powering it on.
2. The system cannot recognize the master disc.
Check the format of the master disc or the master itself for damage.
Your master disc may be copy protected. Normally, most of the DVD/Blu-ray Disc and
some of the CD you have purchase from stores have copy protected encoded in them.
Use one of the Writers to read your master disc by selecting one of writers as the Copy
source (please refer to section 1 of Make Disc-to-Disc Copies” - “Select the Copy Source”
on page 7.) If it works, make a copy of your master disc and treat the copy as the new
master. Then set the Copy source back to the Reader and try again.
3. Buttons do not function.
Maybe it is still busy on a task. Give it sometime and press it again. If it still doesn’t work,
turn off the machine, and then restart the machine after a minute.
4. Copy completed but the copies are not readable / executable?
Use “compare” feature to check the copied disc.
Based on our experience, the quality of your media plays a big role on this part. Try to use
high quality media to prevent such problems.
Please use another BD/DVD/CD player/ROM to test the copied media. Sometimes, your
BD/DVD/CD Player/ROM may not be compatible with recordable BD/DVD/CD disc.
5. The failure rate is high.
Lower the “write speed” and try again.
Quality of blank disc may be poor.
Quality of your master disc may be poor.
6. Do I need to upgrade my system’s firmware?
Unless your system is getting unstable, we strongly suggest not upgrading your system’s
firmware. Please contact our Tech Support if your system is getting unstable.
7. Cannot boot-up or fails to upgrade firmware.
Contact our Tech Support.
8. Can I load data directly from my computer to my system’s Hard Drive?
No, your system’s Hard Drive has a unique file system that computers will not recognize.
Thus, you can’t perform any read/write operations to the Hard Drive from your computer.
- 37 -
Page 41
9. Why some writers won’t copy?
DUPLICATOR 3.37
13.Utilities
Utilities
1.Disc Info
Utilities
5.Load Default
Load Default
Press OK to Continue
Utilities
5.Load Default
DUPLICATOR 3.37
13.Utilities
DUPLICATOR 3.37
16.Shutdown
Shutdown
Press OK to Shutdown
System Checking OK!
Ready to Power Off
If those writers are associated with USB/eSATA/Network connections (normally a USB
logo sticker will be placed in front of such writer’s tray), please make sure the external
connections is off and restart your system. For more information, please refer to “Appendix
A: External Device (USB/eSATA/Network) Setup Guide”.
Reset back to default. ( Troubleshoot #10 )
Contact our tech support.
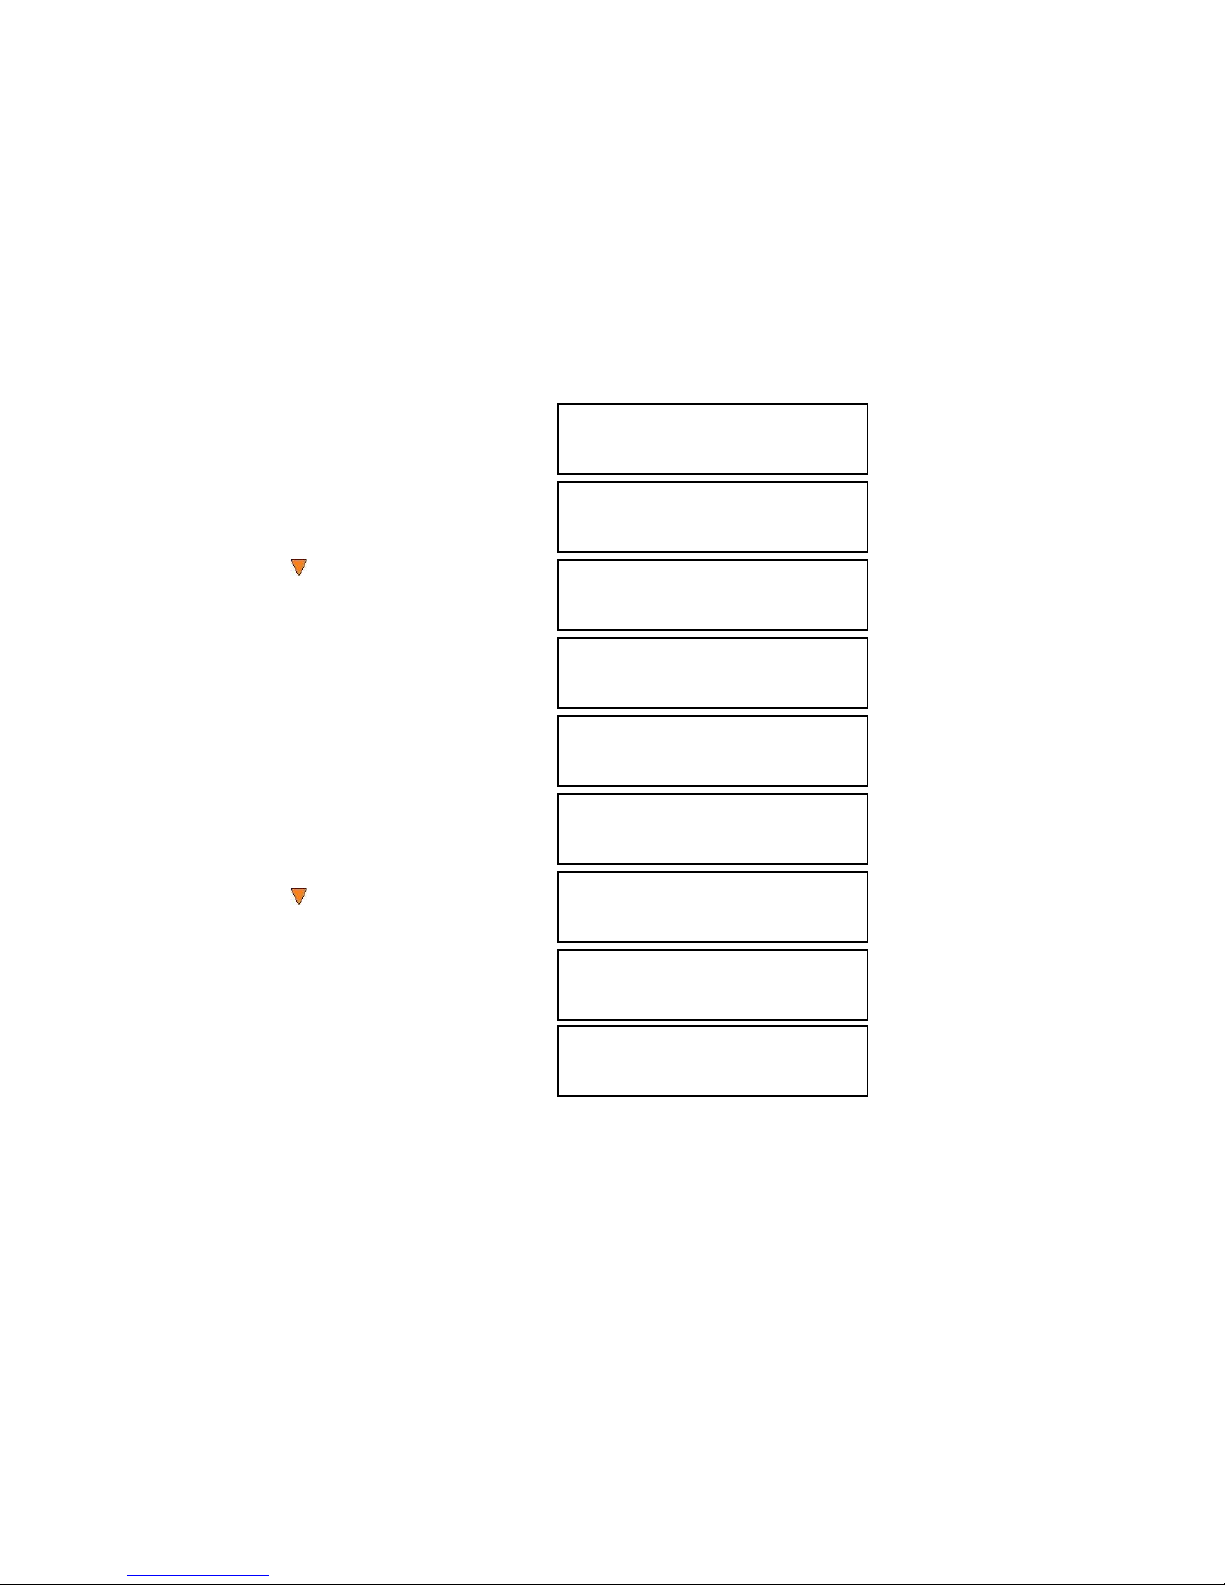
10. How do I reset my system back to default?
a) Go to menu Utilities.
b) Press the ENT/Enter button.
c) Press Down button until you
see “Load Default” on the 2nd line
d) Press ENT/Enter button.
e) Wait for 3-4 seconds.
f) Press ESC/Escape button.
g) Press Down button until you
see “Shutdown” on the 2nd line.
h) Press ENT/Enter button.
i) Press ENT/Enter button.
j) Power off the system and power it back on. All settings should be restored back to
default.
- 38 -
Page 42
Error Code
Error
Code
Error Message
Description & Recommended Solutions
200
Source Disc
Empty
Description:
The intended master disc is detected and identified successfully, but
it is a blank disc.
Possible Solution:
Please double check the master disc to ensure it contains data.
201
Bad Master
Description:
The master disc is detected but can not be identified within 3
minutes.
Possible Solution:
Please check the master disc quality for defects or errors.
202
No Targets!
Description:
The blank disc(s) are missing when the job has already started.
Possible Solution:
Please make sure blank discs are placed in writer trays.
203
Burner Mixed or
Firmware
version Mixed
Description:
The model or firmware version of all writers in the duplicator is not
the same.
Possible Solution:
This typically happens when you recently replaced a writer drive.
Contact Tech Support.
204
Targets &
Master Not
Compatible!
Description:
The master disc and targets (blanks) do not have same format.
Possible Solution:
Please go to “Disc Info” in “Utilities” to make sure the master disc
and the blank discs are the same format, (for example, using a CD
Master and CD blank discs).
205
Targets Not
Blank!
Description:
The target (blank) discs are detected and identified as neither RW
discs nor blank discs.
Possible Solution:
Please go to “Disc Info” in “Utilities” to make sure the intended blank
discs are empty.
Typically the system will show an error message and error code if a problem occurs. Please
reference the below diagram for a description of the error codes and the recommend solution:
- 39 -
Page 43
Error
Code
Error Message
Description & Recommended Solutions
206
Targets &
Master Size
Mismatch!
Description:
When the error code occurs during the Compare process, the size of
the master disc and the successfully copied disc(s) is different.
When the error code occurs during a Copy related process, the
capacity of the blank disc(s) is less than the data size of the master
disc.
Possible Solution:
When the error code occurs during the Compare process, contact
Tech Support.
When the error code occurs during a Copy related process, please
go to “Disc Info” in “Utilities” to make sure the blank disc’s capacity is
large enough to fit the data size of the master disc.
207
Targets M Code
Mixed!
Description:
The blank discs contain different manufacture codes.
Possible Solution:
Please go to “Disc Info” in “Utilities” to make sure every blank disc
has the same media ID (M-Code). Replace the one(s) that are
different if necessary.
208
Targets are not
RW discs!
Description:
The target(blank) discs are not Rewritable discs
Possible Solution:
Please go to “Disc Info” in “Utilities” to make sure every blank disc is
a rewriteable disc.
209
Master Disc is
CSS Protected!
Description:
The master disc is copy-protected.
Possible Solution:
This master disc contains copy-protection. Please try a different
master disc without any copy-protection.
210
Bad Discs!
Description:
The target (blank) disc(s) are detected but can not be identified.
Possible Solution:
Please double check the blank disc(s) quality.
211
This format can
not be tested!
Description:
The target (blank) disc(s) is DVD+R, DVD+RW, DVD+R DL, BD-R or
BD-RE.
Possible Solution:
Above disc formats are not supported by the Test function. Please
use DVD-R/RW or CD-R/RW discs if this function.
- 40 -
Page 44
Error
Code
Error Message
Description & Recommended Solutions
212
DVD is not
supported!
Description:
Your system does not support the DVD format.
Possible Solution:
Please purchase a system that supports DVD.
213
DVD-RAM is
not supported!
Description:
Your system does not support the DVD-RAM format.
Possible Solution:
Please purchase a system that supports DVD-RAM.
214
Blu-ray is not
supported!
Description:
Your system does not support the Blu-ray format.
Possible Solution:
Please purchase a system that supports Blu-ray.
230
Not enough
HDD space
Description:
The empty space in the hard drive is less than the size of the master
disc.
Possible Solution:
Please free up hard drive space by deleting unnecessary
partitions/images.
231
Redundant
Name
Description:
The name entered has already been used in the system.
Possible Solution:
Please enter a different name, or rename the existing file name
which is in conflict before you re-enter this name.
232
Format Failed!
Description:
The system is not able to format the hard drive. A detailed error code
will be displayed at the end of the error message in the following
format
Example: Format Failed (Error:232) (XX-YY),
XX: The index of the hard drive which generated the error
YY: The error code
Possible Solution:
Possible Hard Drive defect; please contact Tech Support.
233
Hard Drive
Corrupted
Description:
The hard drive’s information is corrupted.
Possible Solution:
Please re-format the hard drive.
235
Hard Drive
Access Error
Description:
There’s an error when accessing the hard drive.
Possible Solution:
Possible Hard Drive defect; please contact Tech Support.
- 41 -
Page 45
Error
Code
Error Message
Description & Recommended Solutions
240
Wrong
Password!
Description:
The password entered is not correct
Possible Solution:
Please confirm you typed in the correct password or try a different
password.
241
Login Failed
Description:
An incorrect password was entered 3 times consecutively
Possible Solution:
Wait for 5 minutes, then try to use the correct password for next the
attempt. If the problem persists, call Tech Support.
250
Source Cannot
Be HDD
Description:
The source is configured in the hard drive when trying to perform the
Mix Audio Tracks function.
Possible Solution:
Change the Copy source to the Reader.
251
Copy Audio
Error
Description:
An error occurred during the mixing process of your audio CD.
Possible Solution:
Try a different master or blank disc.
252
Not Audio CD
Description:
The Master Disc is not an Audio CD when preparing the mixing
process.
Possible Solution:
Please verify your master disc is an Audio CD.
253
Over Blank Disc
Capacity
Description:
The total size of the selected tracks is larger than the capacity of the
target blank disc during the track selection process.
Possible Solution:
Try to select an alternative track with a smaller capacity.
260
No Update File
Description:
The system can NOT locate the Firmware Update File during the
Update Firmware process.
Possible Solution:
1. Confirm the file is not a “zip” file. If it is, please extract it before
you burn it into a CD.
2. Confirm the update file is written as “Mode 1” Data CD. Usually a
Data CD created with Windows XP or Roxio’s Drag-to-Disc is not in
this format. Please use a software like Nero Burning ROM.
3. Make sure there are no other discs in the system and try to insert
the update disc into another tray to perform the operation.
- 42 -
Page 46
Error
Code
Error Message
Description & Recommended Solutions
261
Wrong update
File
Description:
The Firmware Update File is not compatible with your system or the
Firmware Update File is corrupted.
Possible Solution:
1. Try to re-download the Firmware Update File.
262
Unknown flash
model
Description:
The Firmware Update File is not meant for your system.
Possible Solution:
1. Try to contact Tech Support for the proper Update file.
263
User Abort
Description:
A job is being aborted by user pressing the ESC/Escape button for
more than 5 seconds during a job run.
Possible Solution:
Restart the job when ready with the proper master disc & blank
discs.
- 43 -
Page 47
Appendix C: Safety & Regulatory information
Safety Introduction
Notices and Safety
Please read the following instructions carefully before operating the machine and refer
to them as needed to ensure the continued safe operation of your machine.
This product and supplies have been designed and tested to meet strict safety
requirements. These include safety agency evaluation and certification, and
compliance with electromagnetic regulations and established environmental standards.
The safety and environment testing and performance of this product have been
verified using certified materials only.
Unauthorized alterations, which may include the addition of new
parts/devices, may impact the product certification. Please contact your
sales representative for more information.
Marks, Labels
Symbols
All warnings and instructions marked on or supplied with the product should be
followed.
This symbol alerts users to areas of the equipment where there is the
possibility of personal injury.
FCC Notices for USA
This equipment has been tested and found to comply with the limits for a Class B digital
device, pursuant to Part 15 of the FCC Rules. These limits are designed to provide
reasonable protection against harmful interference in a residential installation. This
equipment generates uses and can radiate radio frequency energy and, if not installed and
used in accordance with the instructions, may cause harmful interference to radio
communications. However, there is no guarantee that interference will not occur in a
particular installation. If this equipment does cause harmful interference to radio or
television reception, which can be determined by turning the equipment off and on, the user
is encouraged to try to correct the interference by one or more of the following measures:
- Reorient or relocate the receiving antenna.
- Increase the separation between the equipment and receiver.
- Connect the equipment into an outlet on a circuit different from that to which the
receiver is connected.
- Consult the dealer or an experienced radio/TV technician for help.
(Reference CFR 47 Part 15 Section 15.21)
Changes or modifications to this equipment not specifically approved by the manufacture
may void the user’s authority to operate this equipment.
- 44 -
Page 48
Safety Information
Operational Safety Information
This equipment and supplies have been designed and tested to meet strict safety
requirements. These include safety agency examination, approval, and compliance
with established environmental standards.
To ensure the continued safe operation of your equipment, follow these safety
guidelines at all times:
Do These
Always follow all warnings and instructions that are marked on or supplied with the
equipment.
Before cleaning this product, unplug the product from the electrical outlet. Always
use materials specifically designated for this product, the use of other materials may
result in poor performance and create a hazardous situation.
Always exercise care when moving or relocating equipment.
Always locate the machine on a solid support surface (not on plush carpet) that has
adequate strength to support the weight of the machine.
Always unplug this equipment from the electrical outlet before cleaning.
Do not use aerosol cleaners. Aerosol cleaners can be explosive or
flammable when used on electromechanical equipment
Do Not Do These
Never use a ground adapter plug to connect the equipment to a power outlet that
lacks a ground connection terminal.
Never attempt any maintenance function that is not specifically described in this
documentation.
Never obstruct ventilation openings. They are provided to prevent overheating.
Never remove covers or guards that are fastened with screws. There are no operator
serviceable areas within these covers.
Never locate the machine near a radiator or any other heat source.
Never push objects of any kind into the ventilation openings.
Never place this equipment where people might step on or trip on the power cord.
- 45 -
Page 49

Electrical Safety Information
1. The power receptacle for the machine must meet the requirements stated on the
data plate on the rear of the machine. If you are not sure that your electrical supply
meets the requirements, please consult your local power company or an electrician
for advice.
2. The socket outlet shall be installed near the equipment and shall be easily
accessible.
3. Use the power cable that is supplied with your machine. Do not use an extension
cord or remove or modify the power cord plug.
4. Plug the power cable directly into a correctly grounded electrical outlet. If you are not
sure whether or not an outlet is correctly grounded, consult an electrician.
5. Do not use an adapter to connect any equipment to an electrical outlet that lacks a
ground connection terminal.
6. Do not place this equipment where people might step or trip on the power cable.
7. Do not place objects on the power cable.
8. Do not push objects into slots or openings on the machine. Electrical shock or fire
may result.
9. Do not obstruct ventilation openings. These openings are used to provide proper
cooling to the machine.
Electrical Supply
1. This product shall be operated from the type of electrical supply indicted on the
product’s data plate label. If you are not sure that your electrical supply meets the
requirements, please consult a licensed electrician for advice.
2. Always connect equipment to a correctly grounded power outlet. If in doubt, have the
outlet checked by a qualified electrician.
This equipment must be connected to a protective earth circuit. This
equipment is supplied with a plug that has a protective earth pin. This
plug will only fit into an earthed electrical outlet. This is a safety
feature. If you are unable to insert the plug into the outlet, contact a
licensed electrician to replace the outlet.
Disconnect Device
The power cable is the disconnect device for this equipment. It is attached to the
back of the machine as a plug-in device. To remove all electrical power from the
equipment, disconnect the power cable from the electrical outlet.
- 46 -
Page 50
Emergency Power Off
Agency
Standard
Underwriters
Laboratories Inc.
CSA C22.2 No. 60950-1-03
SPORTON
International Inc.
EN 55022:1998/A1:2000/A2:2003
Class B,
EN 61000-3-3:1995/A1:2001,
EN 55024:1998/A1:2001/A2:2003
If any of the following conditions occur, turn off the machine immediately and
disconnect the power cable(s) from the electrical outlet(s). Contact an
authorized Service Representative to correct the problem:
The equipment emits unusual odors or makes unusual noises.
The power cable is damaged or frayed.
A wall panel circuit breaker, fuse, or other safety device has been tripped.
Liquid is spilled into the machine.
The machine is exposed to water.
Any part of the machine is damaged
Maintenance Information
1. Any operator product maintenance procedures will be described in the user
documentation supplied with the product.
2. Do not carry out any maintenance on this product which is not described in the
customer documentation
3. Use supplies and cleaning materials only as directed in the Operator section of
this manual.
4. Do not remove covers or guards that are fastened with screws. There are no
parts behind these covers that you can maintain or service.
Certification
Do not use aerosol cleaners. Aerosol cleaners can be explosive or
flammable when used on electromechanical equipment.
This product is certified by the following Agency using the Safety standards listed
- 47 -
Page 51

Regulatory Information
Certifications in Europe: CE Mark (European Union)
The CE mark applied to this equipment symbolizes the manufacture’s declaration of
conformity with the following applicable Directives of the European Union as of the dates
indicated:
2006/95/EC
December 12, 2006 Council Directive 2006/95/EC as amended. Approximation of the
laws of the member states related to low voltage equipment.
2004/108/EC
December 15, 2004 Council Directive 2004/108/EC as amended. Approximation of the
laws of the member states related to electromagnetic compatibility.
A full declaration of conformity, defining the relevant directives and referenced standards,
can be obtained from your Authorized local dealer.
In order to allow this equipment to operate in proximity to Industrial Scientific
and Medical (ISM) equipment, the external radiation from the ISM equipment
may have to be limited or special mitigation measures taken.
- 48 -
 Loading...