

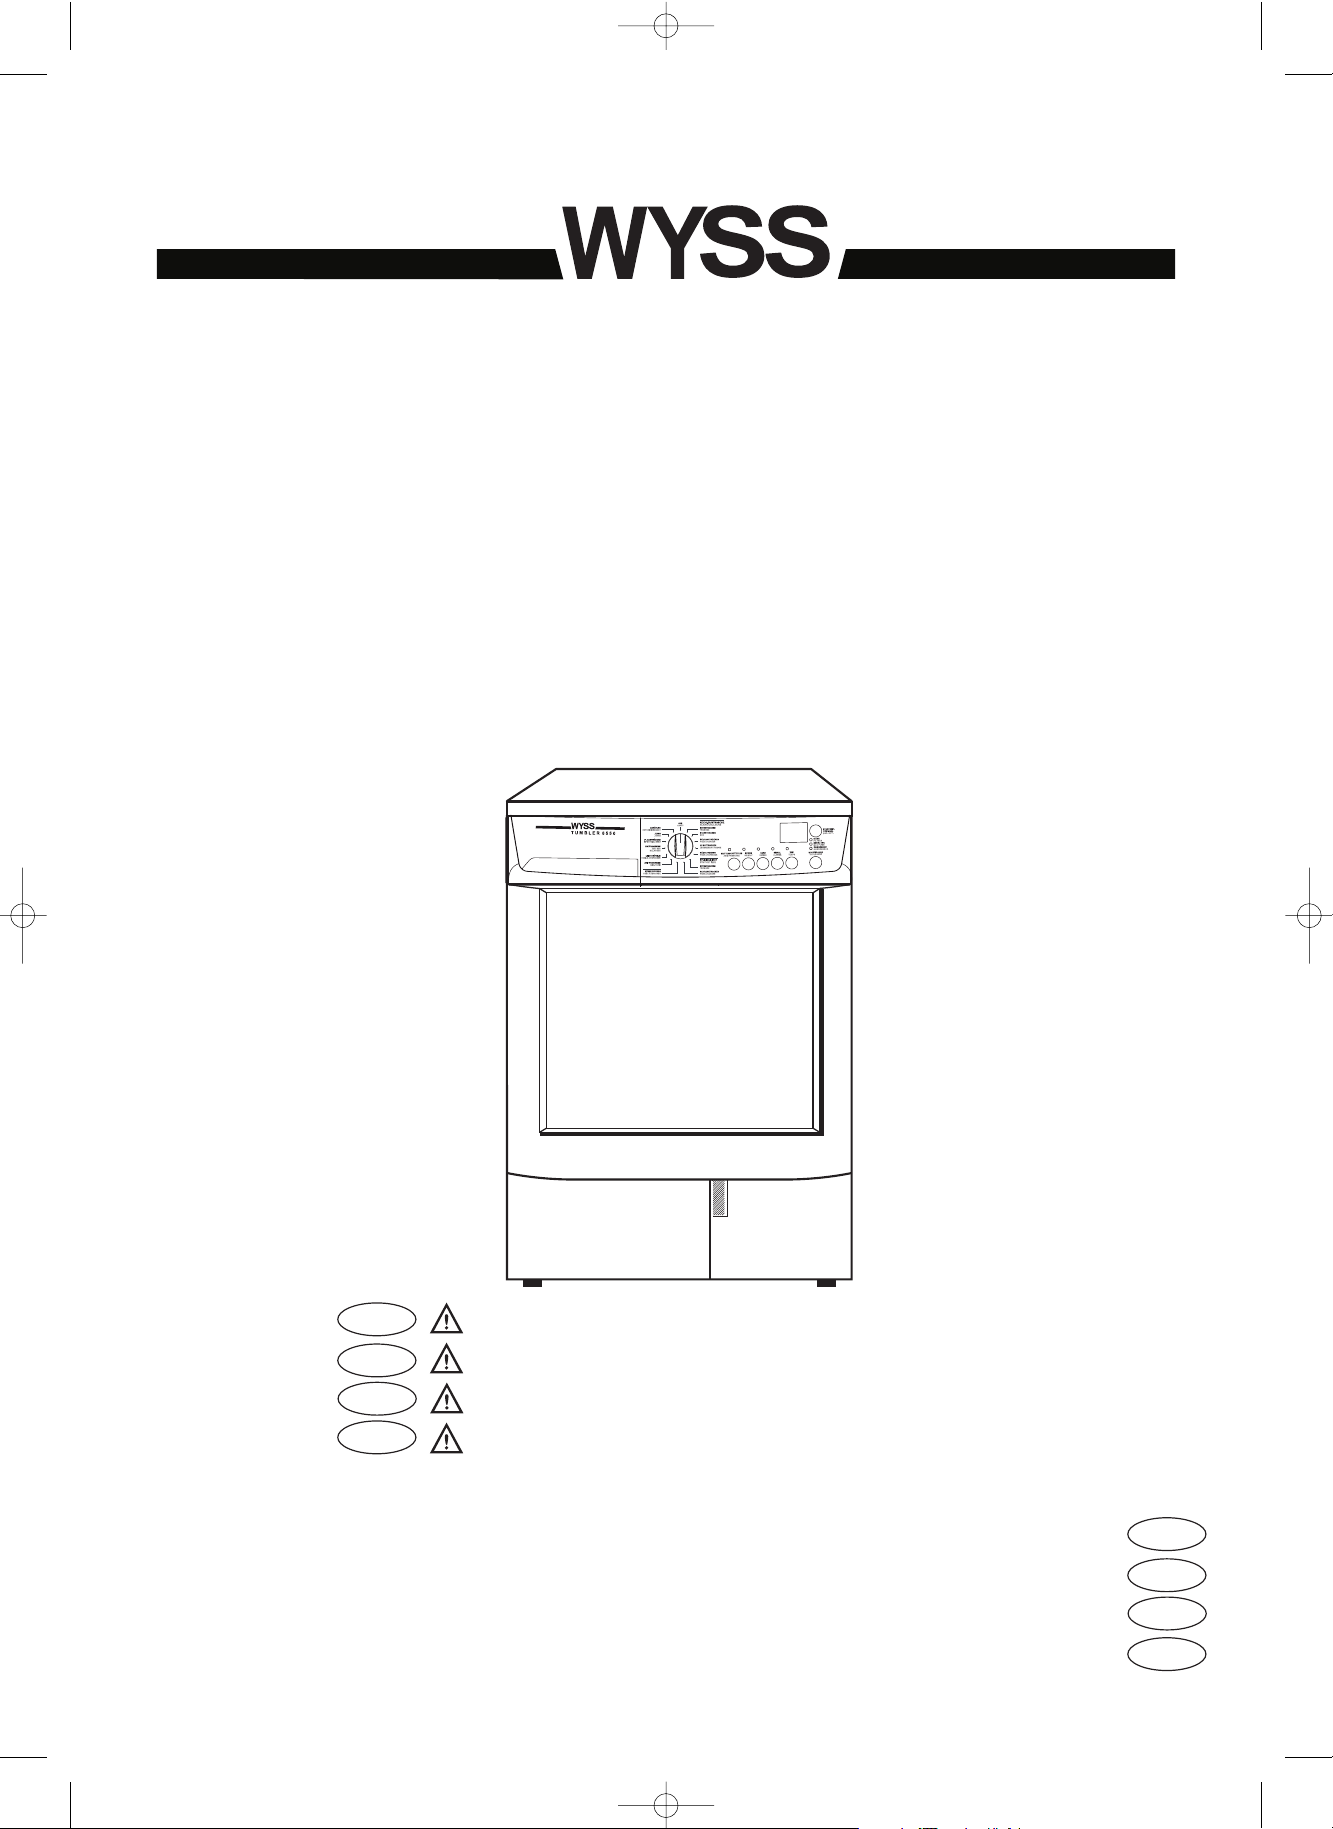
WYSS TUMBLER6550 User Manual
Unpacking: see page 6
Débridage: voir page 23
Entfernen der Transportsicherung: s. S. 40
Disimballo: vedere pagina 57
INSTRUCTION BOOKLET
MODE D’EMPLOI
GEBRAUCHSANWEISUNG
LIBRETTO ISTRUZIONI
D
F
GB
I
Tumble Dryer
Seche-Linge
Wäschetrockner
Asciugabiancheria
TUMBLER 6550
125987711
D
F
GB
I
125987711.qxp 2007-06-25 10:45 Page 1
2
Contents
Dear customer,
Please read these operating instructions carefully and pay particular attention to the safety notes indicated in
the first pages.
We recommend that you keep this instruction booklet for future reference and pass it on to any future owners.
Transport damages
After unpacking the machine please check it is not damaged. If in doubt, do not start it but contact your local
Service Centre.
The symbols you will see on some paragraphs of this booklet have the following meaning:
The warning triangle emphasize information that is particularly important for your safety or correct
functioning of the appliance.
The information marked with this symbol provides additional instructions and practical tips on the use of
the appliance.
Tips and information about economical and ecological use of the machine are marked with this symbol.
Our contribution to the protection of the
environment: we use recycled paper.
Important safety information ......................3
Disposal ..............................................................3
Tips for environmental protection ............4
Technical specifications................................4
Description of the appliance ......................4
Adjusting the level of conductivity ..........5
Installation ..........................................................6
• Unpacking ............................................................6
• Positioning ............................................................6
• Electrical connection ............................................6
• Stacking kit............................................................6
• Door reversal ........................................................6
• Connecting a drain hose ......................................7
Use ........................................................................8
• The control panel ............................................8-10
• Programme Chart ..............................................11
• Operating sequence............................................12
• Useful hints ........................................................13
Maintenance and Cleaning ........................14
• External cleaning ................................................14
• Cleaning the door................................................14
• Cleaning the filters ..............................................14
• Cleaning the condenser unit ..............................14
• Emptying the water reservoir ..............................15
• Cleaning the air intake grille................................15
Something not working? ............................16
Guarantee Conditions............................17
Service ....................................................18
125987711.qxp 2007-06-25 10:45 Page 2
ENGLISH
3
Important safety information
Installation
• This appliance is heavy. Care should be taken
when moving it.
• Any electrical work required to install this
appliance should be carried out by a qualified
electrician or competent person.
• Any electrical work required to install this
appliance should be carried out by a qualified
electrician or competent person.
• Care must be taken to ensure that the appliance
does not stand on the electrical supply cable.
• If the machine is situated on a carpeted floor, please
adjust the feet in order to allow air to circulate freely.
Use
• Do not overload the appliance (see programme chart).
• Clothes which are dripping wet should not be
placed in the dryer.
• As some bulky items such as duvets and
eiderdowns should be dried in large commercial
machines because of their bulk, check with the
manufacturer of the item if it is suitable for drying
in a domestic machine, even if the dry weight of
the item is within the limit advised.
• Please make sure that no gas lighters have
accidentally been left in pockets of garments to be
loaded into appliance.
• Danger of explosion: Never tumble dry items that have
been in contact with inflammable solvents (petrol,
methylated spirits, dry cleaning fluid and the like). As these
substance are volatile, they could cause an explosion.
Only tumble dry items washed with water.
• Risk of fire: items that have been spotted or soaked with
vegetable or cooking oil constitute a fire hazard and
should not be placed in the tumble dryer
• If you have washed your laundry with stain
remover you must execute an extra rinse cycle
before loading your tumble dryer.
• In order to avoid danger of fires caused by excessive
drying, do not use appliance to dry the following items:
Cushions, quilts and the like (these items accumulate heat).
Items containing rubber foam or materials similar
to rubber foam.
• Leave the door slightly ajar when the appliance is not
being used. This will allow the seal to be preserved.
• Clean fluff filters after using tumble dryer. To
prevent fire risks, do not use the appliance if the
fluff filters are damaged.
• Do not allow fluff to accumulate around the dryer.
General safety
• It is dangerous to alter the specifications or
attempt to modify this product in any way.
• •Under no circumstances should you attempt to
repair the machine yourself. Repairs carried out by
inexperienced persons may cause injury or serious
malfunctioning. Contact your local Service Centre.
Always insist on genuine Electrolux spare parts.
Child safety
• Children are often not aware of how dangerous
electrical appliances can be. When the machine is
working, children should be carefully supervised
and not be allowed to play with the appliance.
• The packaging components (e.g. plastic film, polystyrene)
can be dangerous to children - danger of suffocation!
Keep them out of children’s reach.
• Make sure that children or pets do not climb into the drum.
• When the appliance is to be scrapped, cut off the
electrical supply cable and destroy the plug with
the remaining cable. Disable the door catch in
order to prevent children from becoming trapped
inside while playing.
These warnings have been provided in the interest of safety. You MUST read them carefully before installing or
using the appliance.
• Packaging materials
The materials marked with the symbol are recyclable.
This means that they can be recycled by disposing
of them properly in appropriate collection containers.
Check with your local Council or Environmental
Health Office to see if there are facilities in your
area for re-cycling this appliance.
When the appliance is to be scrapped, cut off the power
supply cable and make the door closing device unusable
to prevent young children from being trapped inside
.
• Machine
Use authorised disposal sites for your old appliance.
Help to keep your country tidy!
• Old appliance
The symbol on the product or on its packaging
indicates that this product may not be treated as household
waste. Instead it shall be handed over to the applicable
collection point for the recycling of electrical and electronic
equipment. By ensuring this product is disposed of
correctly, you will help prevent potential negative
consequences for the environment and human health,
which could otherwise be caused by in appropriate waste
handling of this product. For more detailed information
about recycling of this product, please contact your local
city office, your household waste disposal service or the
shop where you purchased the product.
Disposal
125987711.qxp 2007-06-25 10:45 Page 3
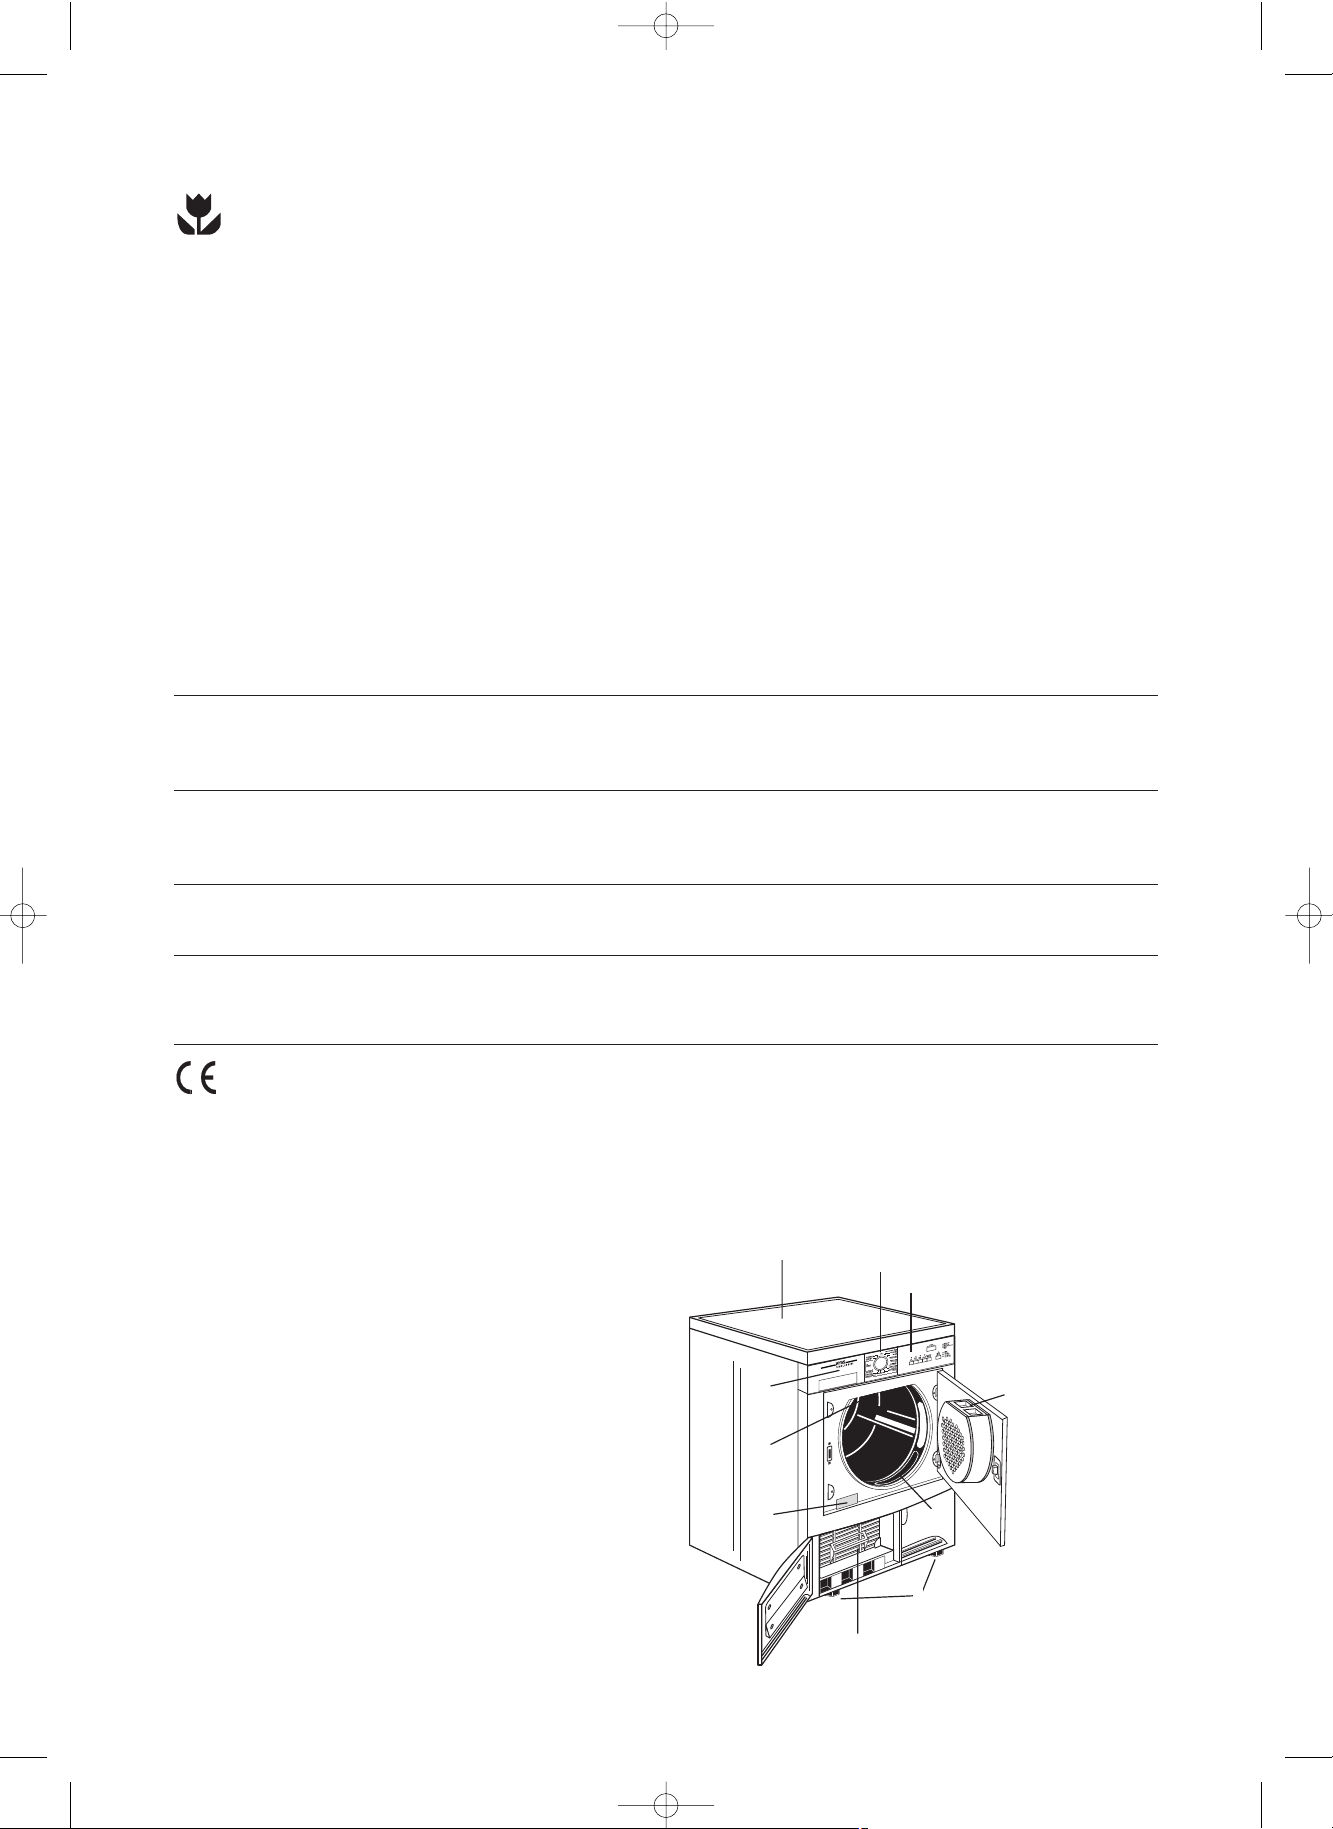
Description of the appliance
4
To save energy and to help protect the environment,
we recommend that you follow these hints:
• Try to load the maximum capacity of the machine
as small loads are uneconomical.
• Always load well spun laundry. The higher the spin
speed, the lower the electricity consumption and
the shorter the drying times.
• Do not over-dry laundry, this avoids creasing and
saves energy.
Select the drying time/section according to the type
of laundry and the required degree of dryness.
• To utilize the maximum load, laundry which is to be
dried ready to put away (store dry) can be dried
together with items to be ironed. To do this, select
the time for iron-dry, remove the iron-dry items at
the end of the programme and then finish-dry the
rest of the load.
• Clean the filters regularly to avoid excessive drying
times and high electricity consumption.
• Ventilate the room well. The room temperature
should not exceed +35°C during drying.
Tips for environmental protection
Technical specifications
DIMENSIONS: Height 85 cm
Width 60 cm
Depth 58 cm
ELECTRICAL CONNECTION: 220-230 V/50 Hz
MAX. POWER ABSORBED: 2350 W
MIN. FUSE RATING: 10 A
MAX. DRYING CAPACITY: Cotton, linen 6 kg
Synthetics 3 kg
CONSUMPTION: Cotton, linen 3.36 kWh (6.5 kg store dry)
Cotton, linen 2.70 kWh (6.5 kg iron dry)
Synthetics 1.20 kWh (3 kg store dry)
This appliance complies with the following E.E.C. Directives:
- 73/23 EEC of 19.2.73 (Low Voltage Directive) and subsequent modifications;
- 89/336 EEC of 3.5.89 (Electromagnetic Compatibility Directive) and subsequent modifications.
01 Table top
02 Time selector dial
03 Control panel
4 Water reservoir
5 Drum light
06 Fluff filters
07 Rating Plate
08 Condenser Unit
09 Adjustable feet
0
1
2
8
9
3
7
6
4
5
6
J
30
60
90
125987711.qxp 2007-06-25 10:45 Page 4
5
ENGLISH
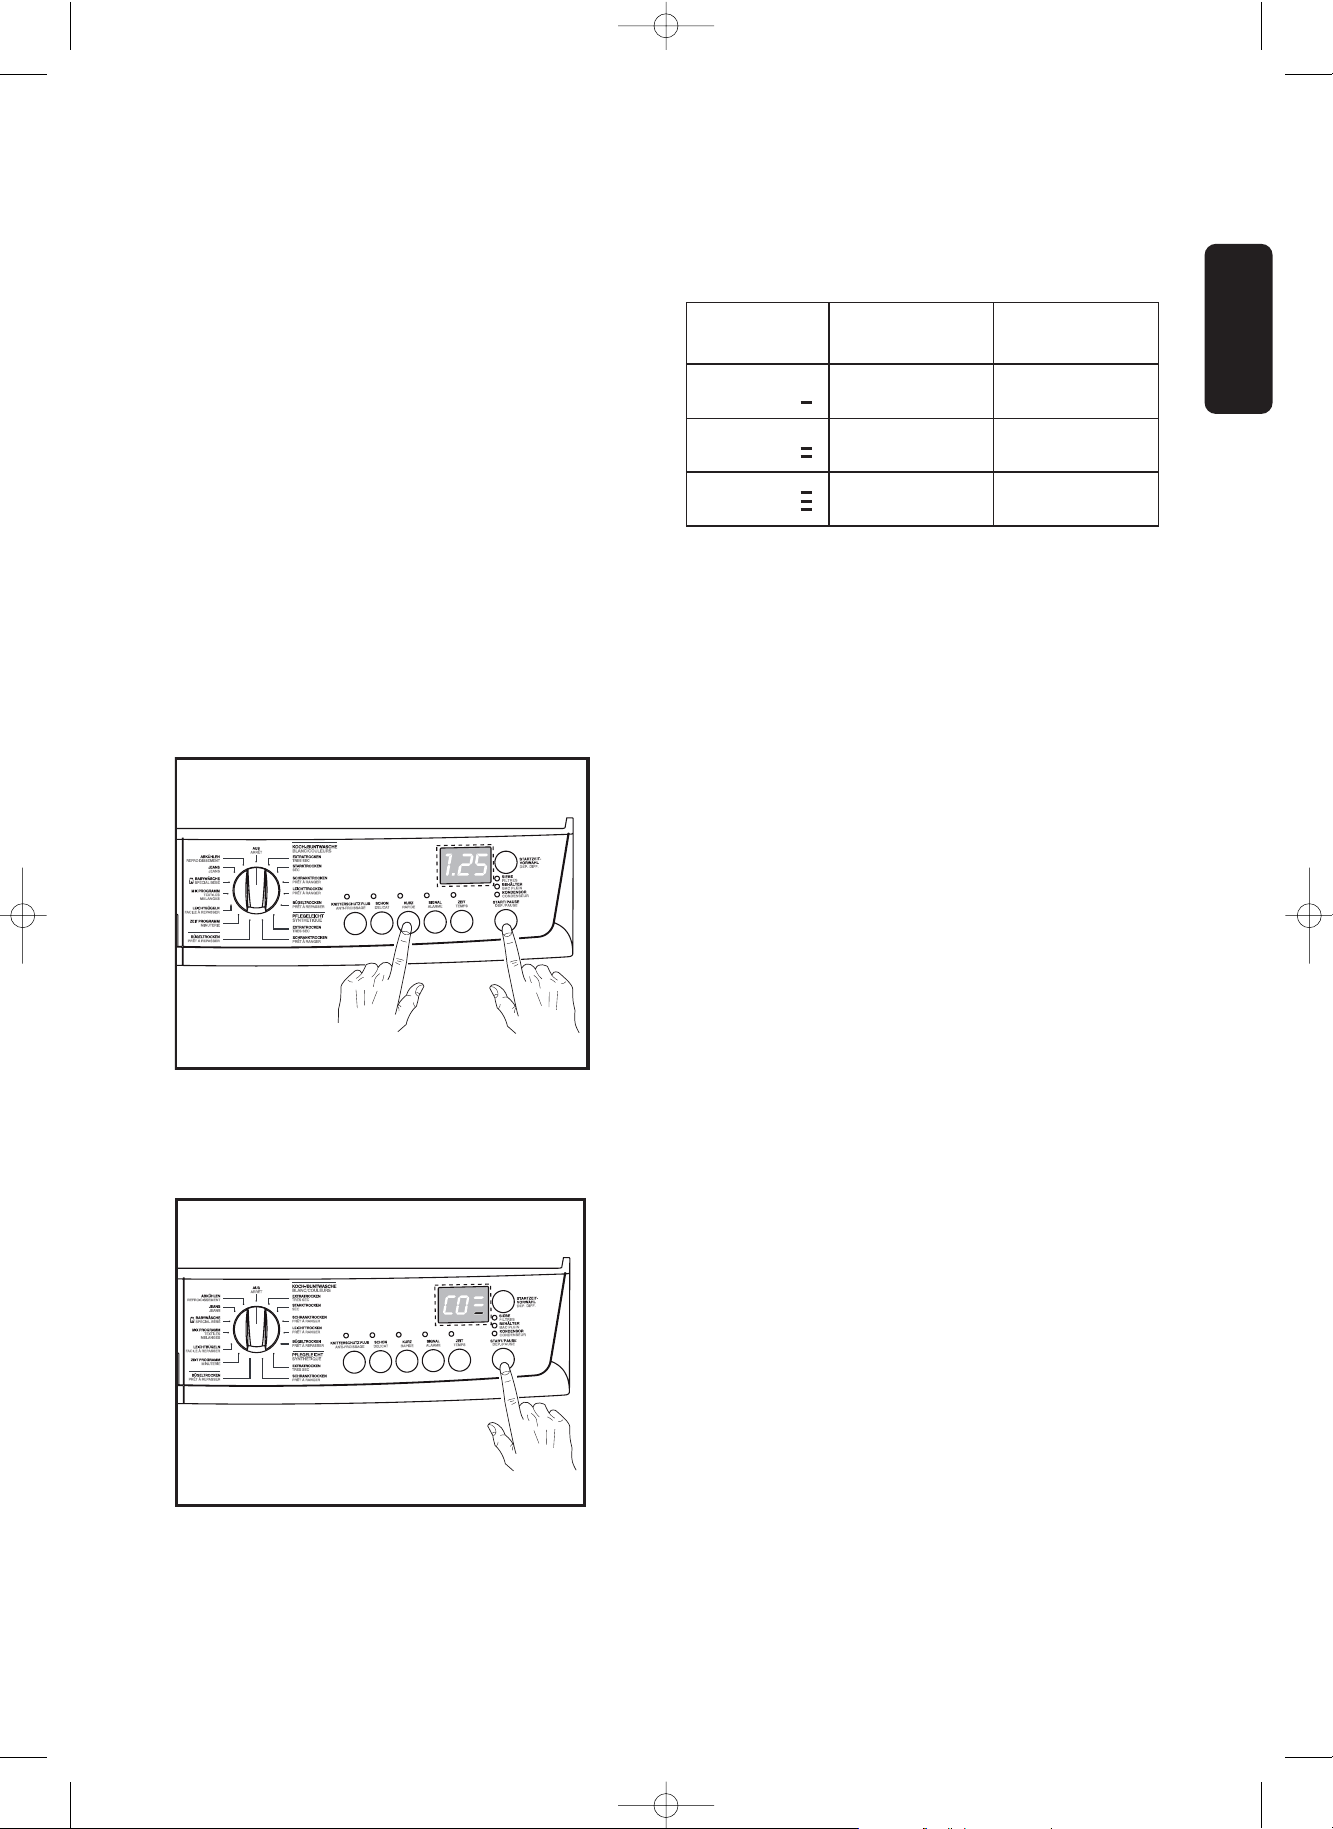
Adjusting the level of conductivity
Water contains, a variable quantity of limestone and
mineral salts of which quantities vary according to
geographical locations thus varying its conductivity
values.
Relevant variations of the conductivity of the water
compared to those prefixed by the factory could
slightly influence the residual humidity of the laundry
at the end of the cycle.
Your dryer allows you to regulate the sensitivity of
the drying sensor based on conductivity values of
the water by using the following procedure.
Procedure:
Turn the programme selector dial to switch on the
appliance
In selection mode press simultaneously the buttons
3 and 6 until «C0» appears on the digits.
Adjusting the level of conductivity:
Press the button 5 sequentially: the level of
conductivity is indicated by the lighting of the
horizontal hyphens.
1
2
3
4
5
6
1
2
3
4
5
6
Normally, the appliance is factory-set to the
highest level; however, certain models may be
configured differently.
Memorizing the new setting:
Simultaneously press down the buttons 3 and 6 until
the previous drying cycle time appears again on the
display and the buzzer sounds.
Display
Conductivity
degree
Approximative
value (µS/cm)
CC 00
Low < 300
CC 00
Medium 300 - 600
CC 00
High > 600
125987711.qxp 2007-06-25 10:45 Page 5
6
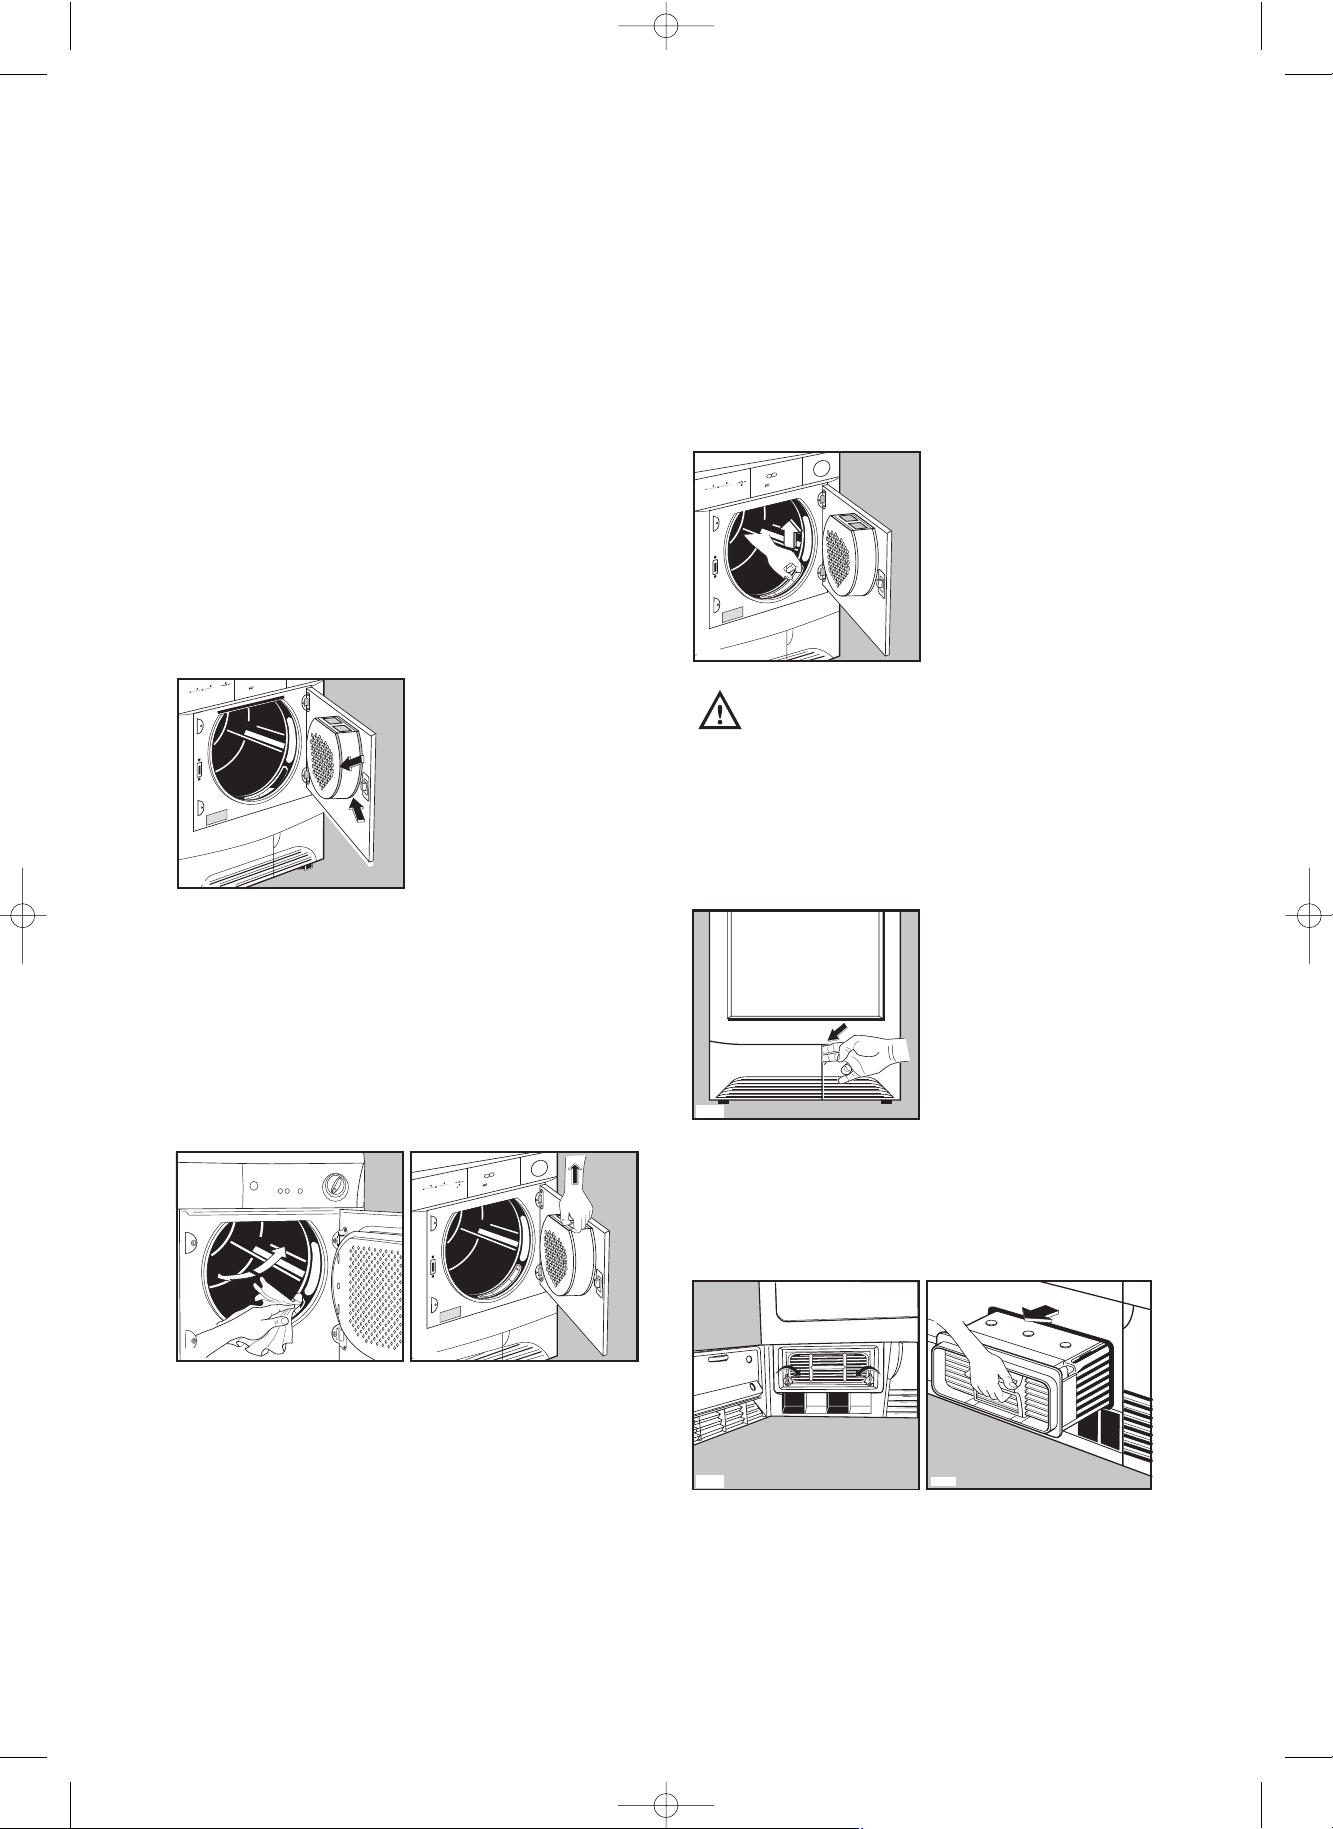
Installation
Warning!
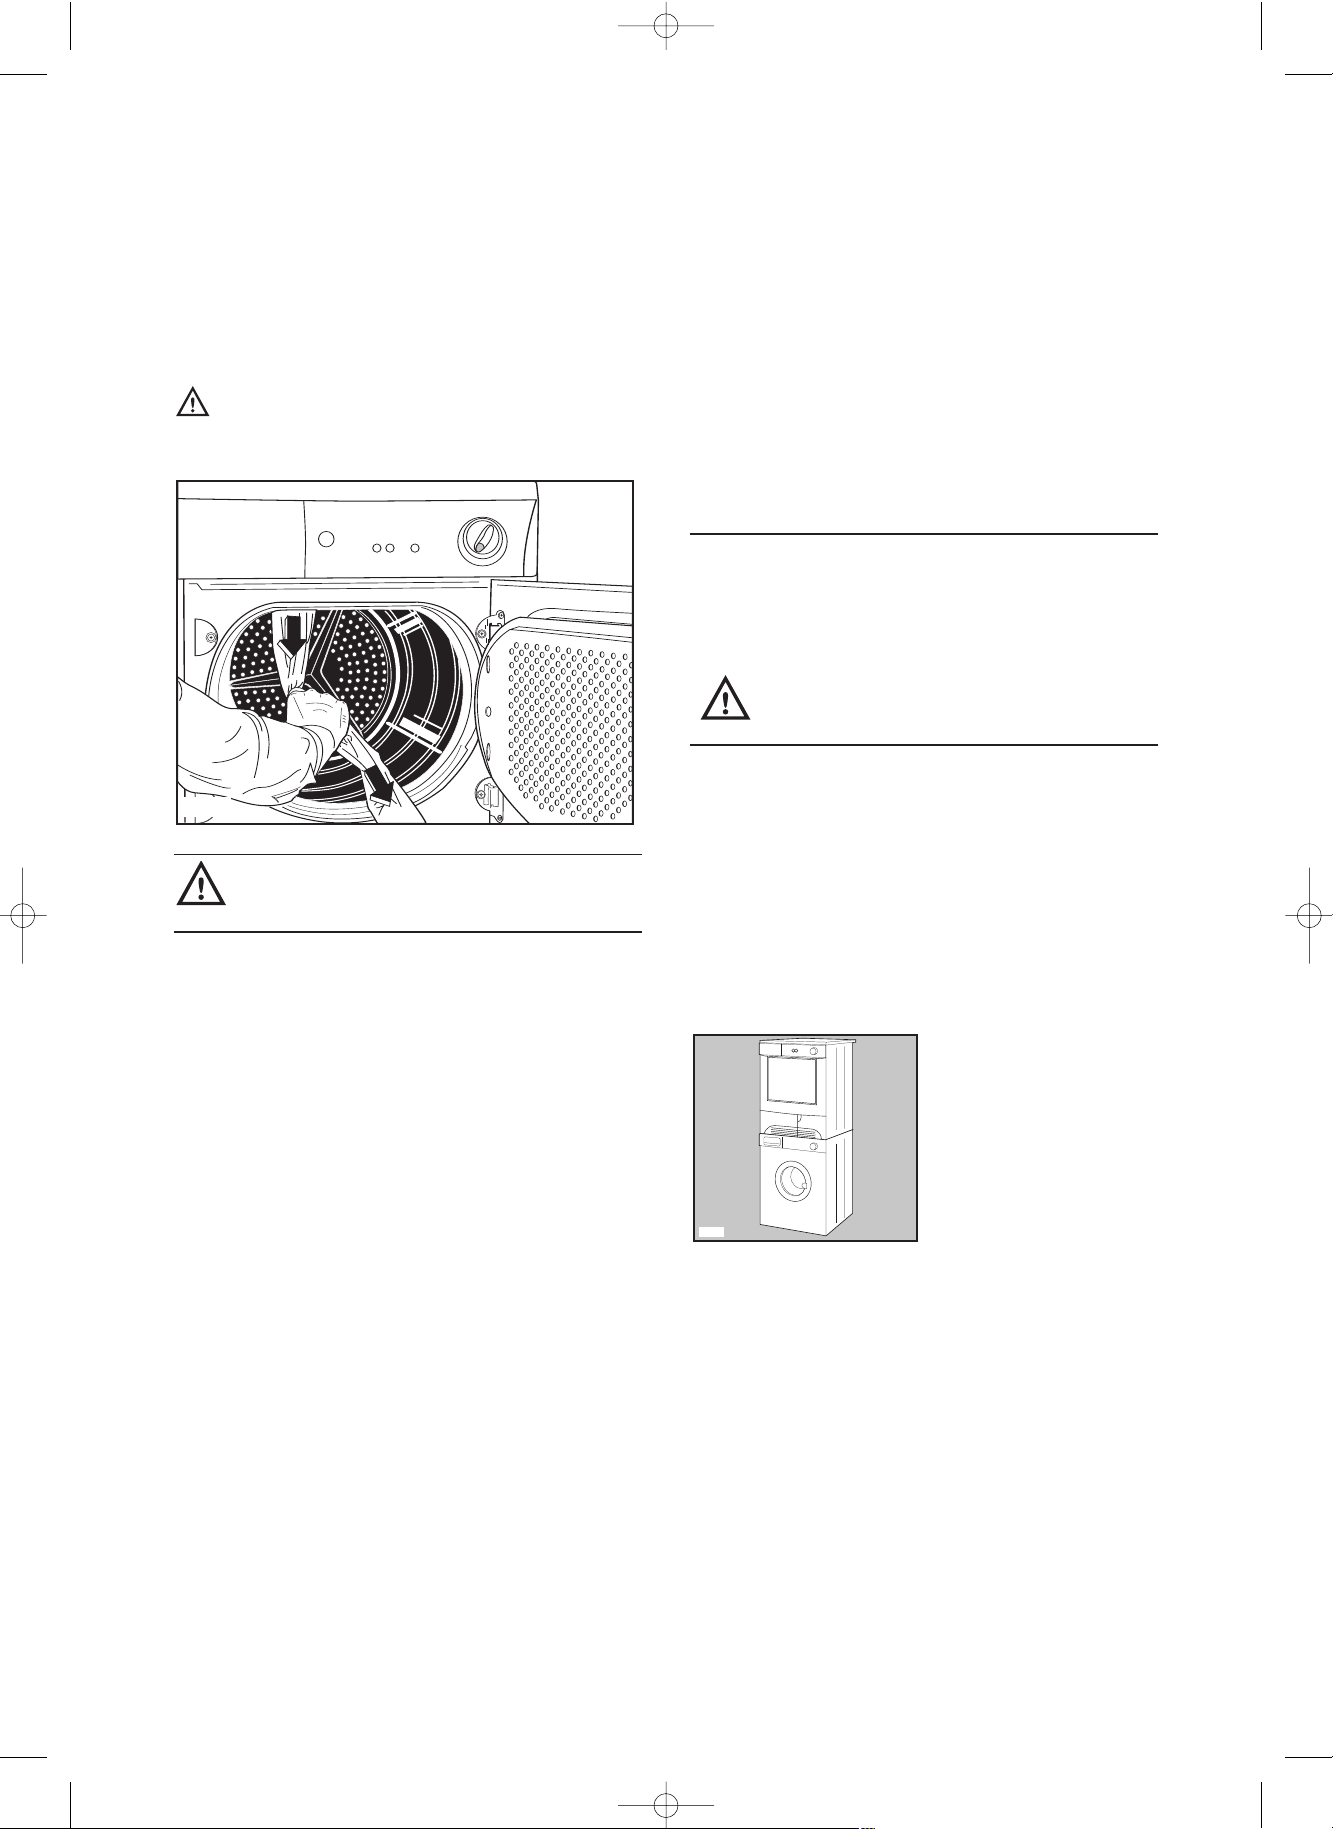
Unpacking
Slide out the polythene bag with the
polystyrene stuffing before using the appliance
Pull off adhesive strips from inside machine on top
of drum
.
Should the appliance be moved, it must be
transported vertically.
Positioning
It is recommended that, for your convenience, the
machine is positioned close to your washing
machine.
The tumble dryer must be installed in a clean place,
where dirt does not build up.
Air must be able to circulate freely all round the
appliance. Do not obstruct the front ventilation grille
or the air intake grilles at the back of the machine.
To keep vibration and noise to a minimum when the
dryer is in use, it should be placed on a firm, level
surface.
Once in its permanent operating position, check that
the dryer is absolutely level with the aid of a spirit
level. If it is not, raise or lower the feet until it is.
The feet must never be removed.
Do not restrict the floor clearance through deep-
pile carpets, strips of wood or similar. This might
cause heat build-up which would interfere with
the operation of the appliance.
Important
The hot air emitted by the tumble dryer can reach
temperatures of up to 60°C. The appliance must
therefore not be installed on floors which are not
resistant to high temperatures.
When operating the tumble dryer, the room
temperature must not be lower than +5°C and higher
than +35°C, as it may affect the performance of the
appliance.
P1106
Electrical connection
This machine is designed to operate on a 220-230 V,
single-phase, 50 Hz supply.
Check that your domestic electrical installation can
take the maximum load required (2.35 kW), also
taking into account any other appliances in use.
Connect the machine to an earthed socket, in
accordance with current wiring regulations.
The manufacturer declines any
responsibility for damage or injury
through failure to comply with the
above safety precaution.
Should the appliance power supply
cable need to be replaced, this must
be carried out by our Service
Centre.
Important!
The power supply cable must be accessible after
installing the machine.
Stacking kit
A special stacking kit is available through your
dealer, to enable the mounting of the dryer on top of
a front loading washing machine with cover’s depth
between 48 and 60 cm.
Read carefully the instructions supplied with the kit.
Door reversal
To make it easier to load or unload the laundry the
door can be reversed.
This operation must be carried out by qualified
personnel.
Please contact the nearest Service Centre.
P1148
125987711.qxp 2007-06-25 10:45 Page 6
7
ENGLISH
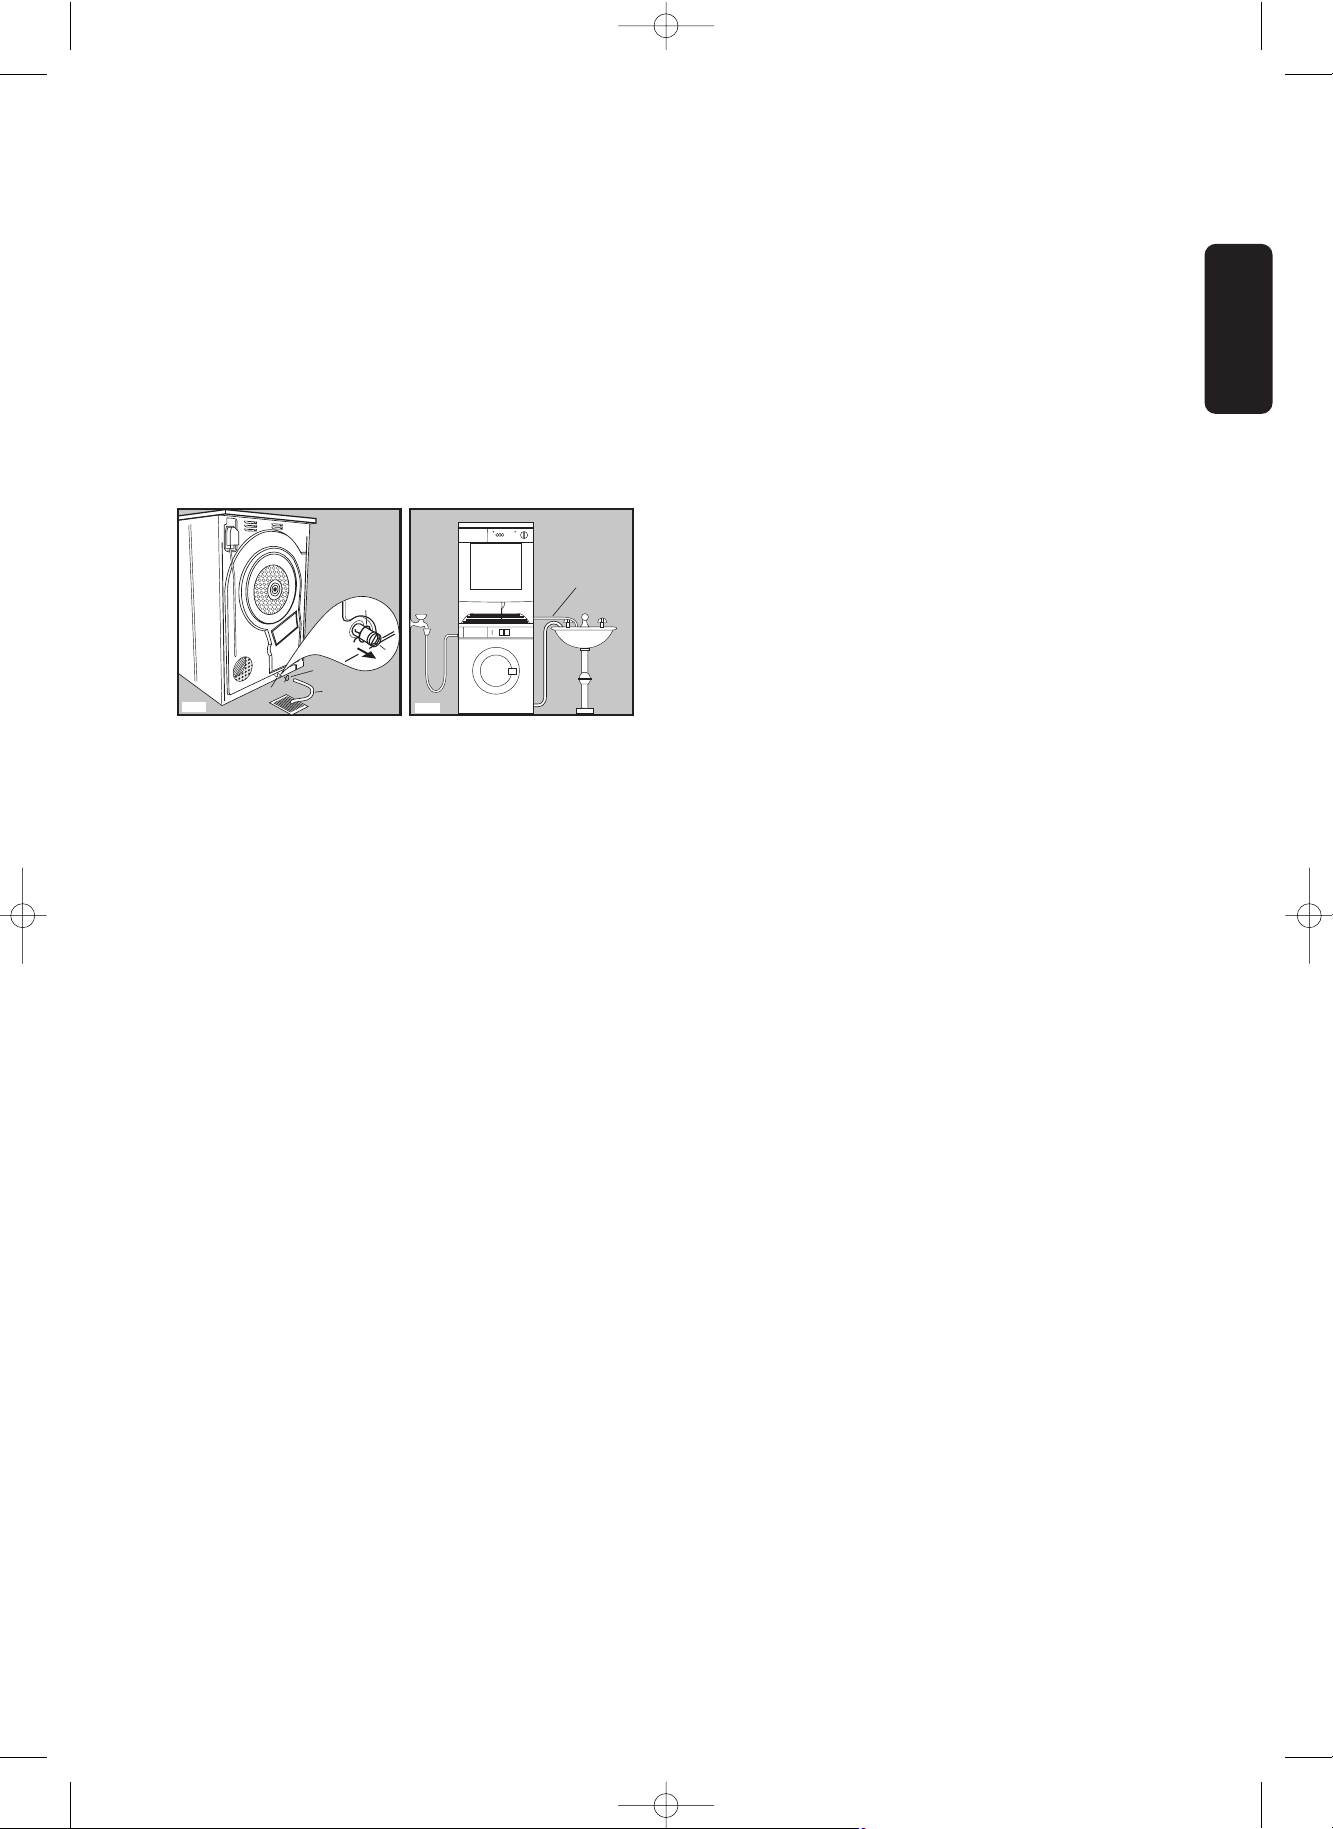
Connecting a drain hose
If there is a sink or drain near the appliance, the
condensed water can be discharged directly through
a hose that is available on the market.
In order to connect the hose to the appliance
proceed as follows:
• Remove the clamp (A);
• Pull out the plug (B);
• Insert the drain hose (C);
• Fasten the hose (C) to the appliance using the
clamp (A).
If the appliance is stacked on the washing machine,
the condensed water can be discharged through the
hose C as shown in figure, but take into account that
the hose must be pointed downwards.
P1161
C
A
B
A
B
C
P1160
125987711.qxp 2007-06-25 10:45 Page 7
8
Use
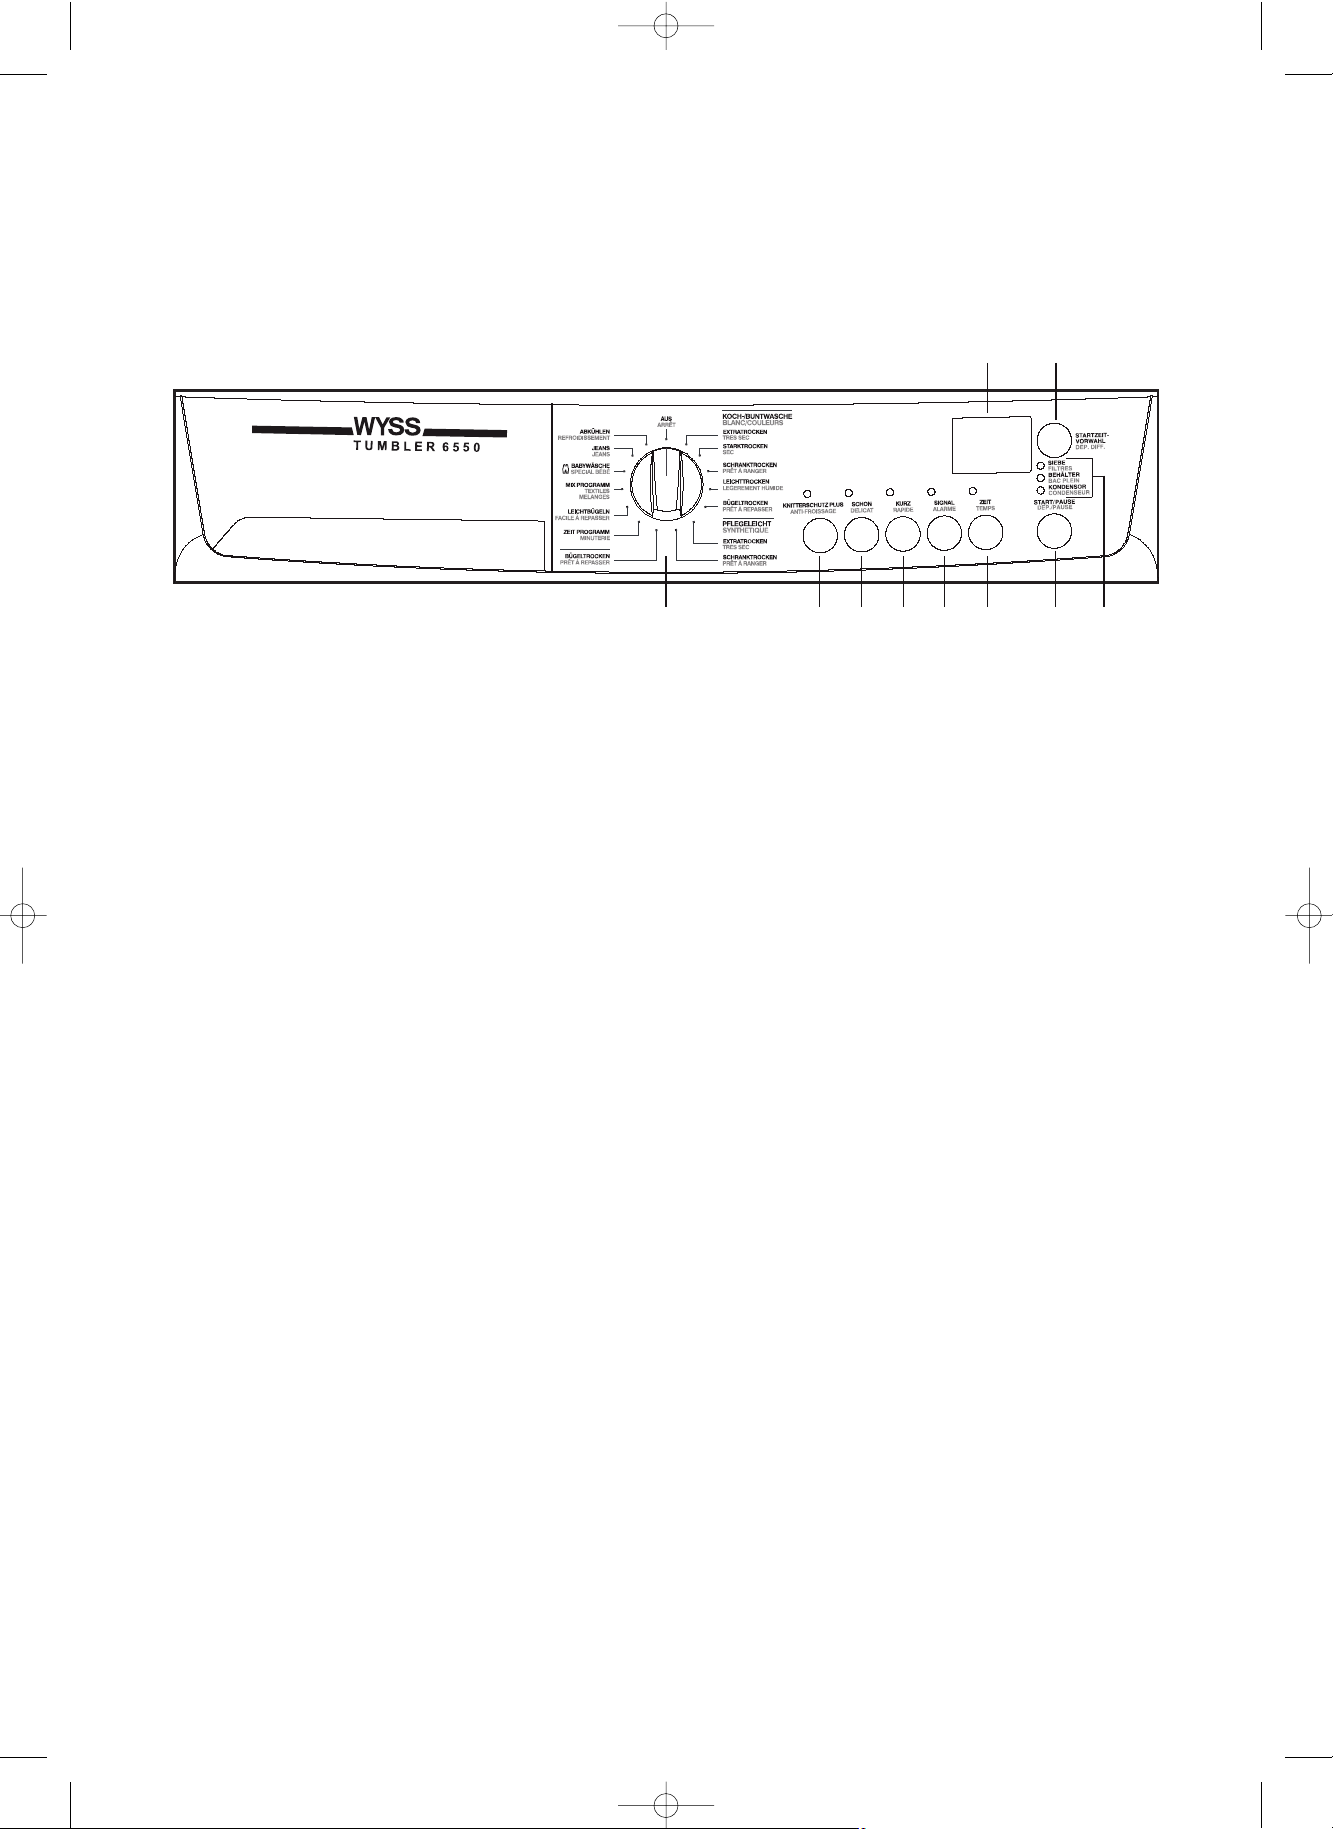
The control panel
1 2 3 4 5 6 7 10
89
1 Programme/Time selector dial
Allows you to select electronically controlled or time
controlled drying.
Turn the dial to the required programme or time.
Electronically controlled drying
(automatic)
The appliance runs these programmes with the help
of probes which detect the degree of dampness of
the laundry.
Simply select the programme according to the type
of laundry and degree of drying required.
2 Long Anticrease - KNITTERSCHUTZ
PLUS
If this additional function is selected, the anti-crease
phase at the end of the drying cycle is lengthened
by 60 minutes. The laundry can be removed at any
time during the anti-crease phase.
3 Low temperature button - SCHON
Pressing this button allows drying to be performed
at a lower temperature, for delicate items.
The corresponding pilot light comes on.
This option can also be used for time controlled drying.
4 Quick drying button
- KURZ
By depressing this button the drying time is reduced
in the following programmes:
• Cotton&linen (KOCH-/BUNTWASCHE
• Synthetics (PFLEGELEICHT)
The corresponding light illuminates. This option
cannot be selected together with “low temperature”
function .
5 Buzzer OFF button - SIGNAL
A buzzer sounds
• when selecting the programme
• when depressing the buttons
• when an incorrect option selection is made
• when the programme selector dial is turned to
another position during the programme or when
you depress an option button during the cycle
• at the end of the programme
• when the water reservoir is full
• if the machine is not working correctly
• when the small door at the bottom is open
By depressing button “SIGNAL” the acoustic signal
is switched off.
The corresponding light comes on.
6 Time button - ZEIT
To select the programme duration after setting the
TIME programme.
You can select a programme duration from 20 mins
to 2 hrs in 10- minute steps.
1. Turn the programme knob to the TIME
programme. The display will show 0.10
(corresponding to the ABKUHLEN programme).
2. Press the TIME button repeatedly until the desired
programme duration is shown in the display, e.g.
00.20 for a programme of 20 minutes. If the
programme duration is not selected, the duration is
automatically set to 10 mins.
7 Start/pause button - START/PAUSE
Press this button to start the dryer after having s
elected the programme and the options.
The relevant
light will stop flashing. If you have chosen a delayed
start, the machine will begin the countdo wn.
If the door of the appliance or the small door at
the bottom is opened while the programme is
125987711.qxp 2007-06-25 10:45 Page 8
9
ENGLISH
running, this button must be pressed again after
closing the door in order to restart the
programme from the point at which it was
interrupted.
This button must also be depressed after a
power failure and after having re-inserted the
water reservoir, if it has been emptied in the
middle of a programme after lighting up of the
“BEHÄLTER” light.
In both cases the light of the Start/Pause button
flashes to remind you that the start button needs to
be pressed again.
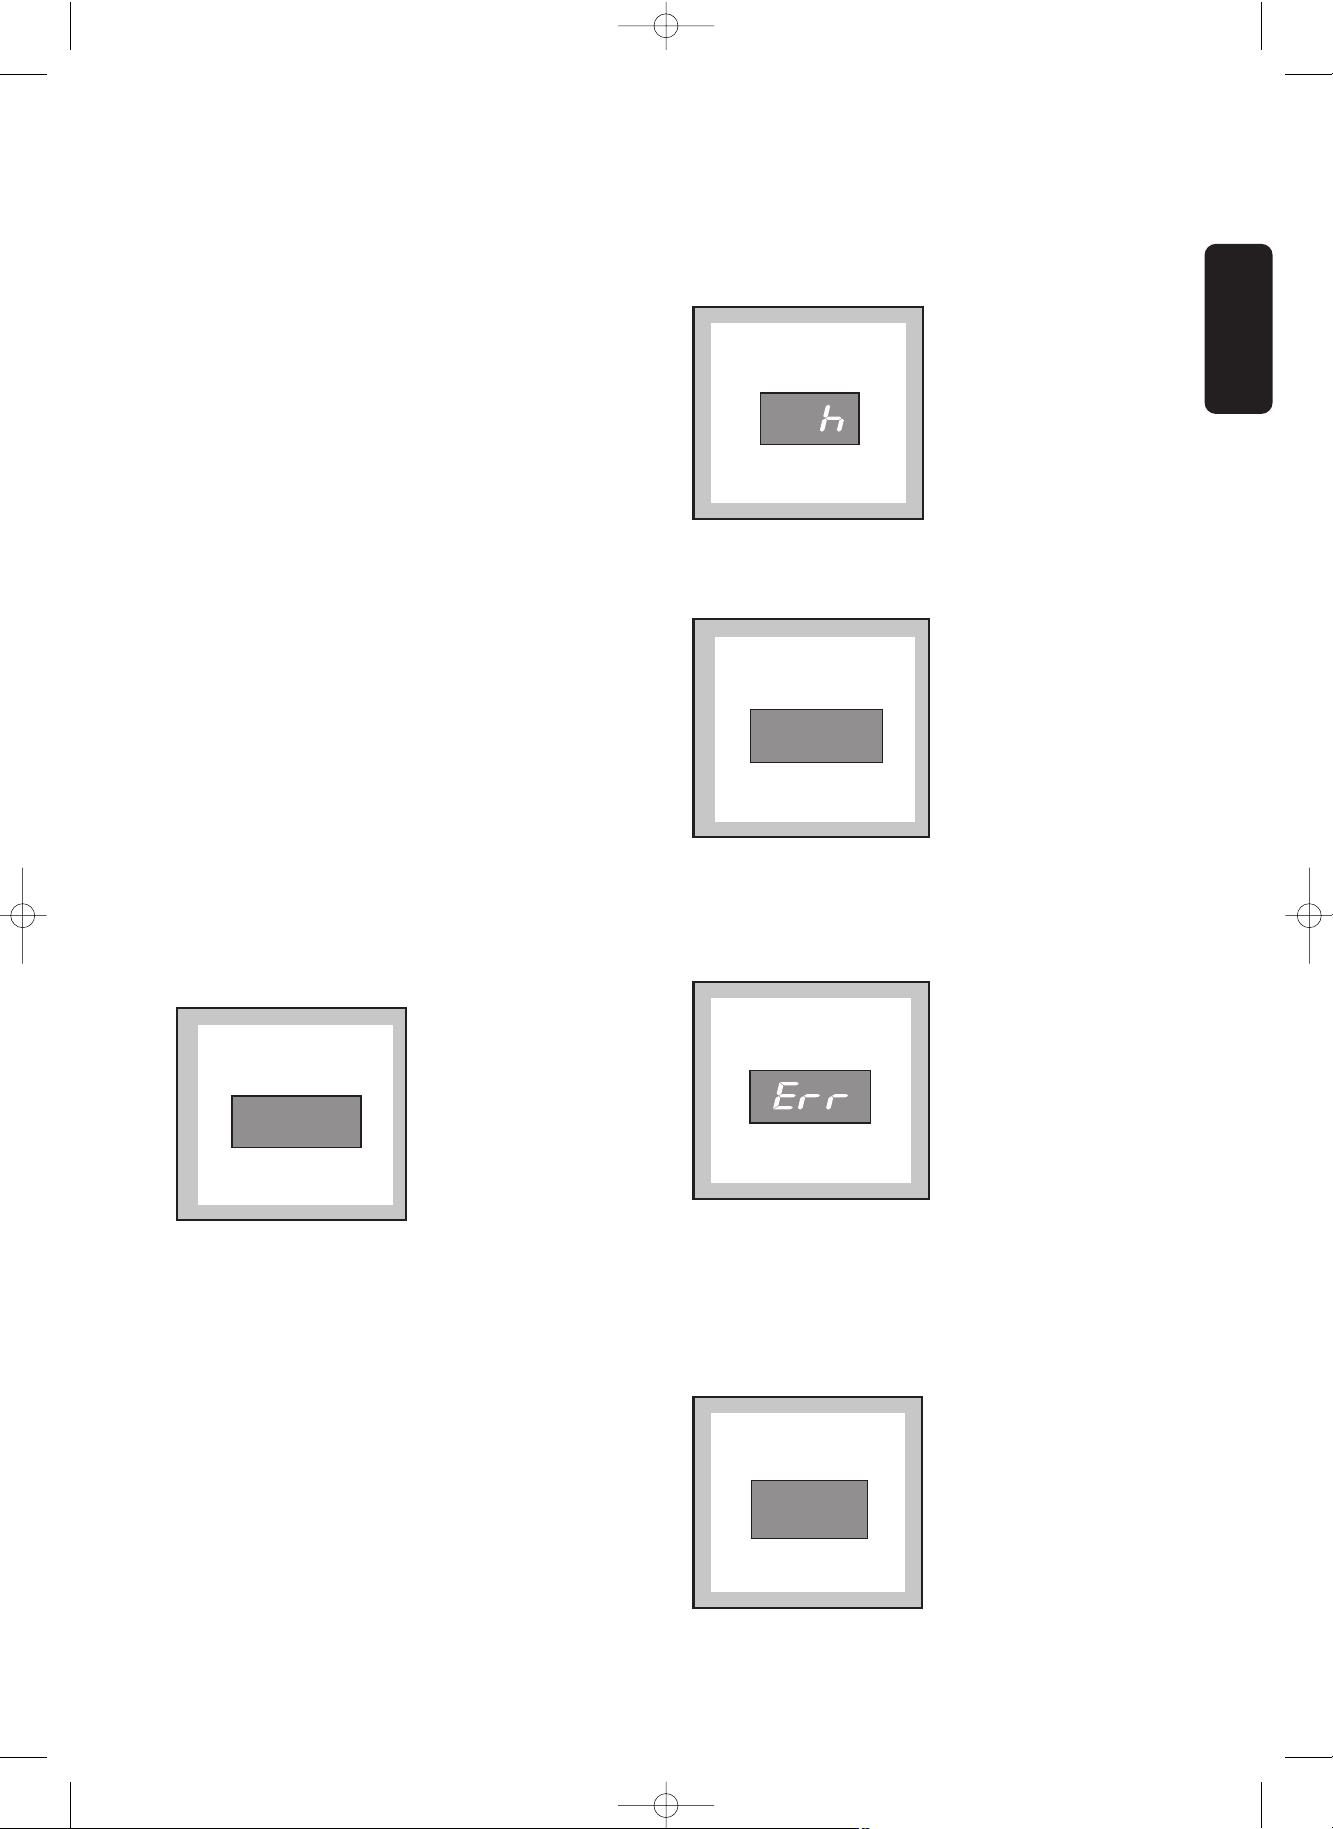
8 DISPLAY
The display shows the following information:
• duration of selected programme
• delayed start
• end of programme
• incorrect option selection
• alarm code
• Duration of selected programme
After you have selected the programme, its
duration (in hours and minutes) appears on the
display. It is calculated automatically on the basis
of the maximum load accepted for each type of
fabric and of the required degree of drying.
When the programme starts, the remaining time is
displayed every 5 minutes.
• Delayed start
If you have selected a delay time by means of the
relevant button, the display shows it for 3
seconds; then it shows the duration of the
previously selected programme.
The countdown is displayed every 30 minutes until it
displays “90 minutes” and then hour by hour.
1.20
• End of programme
A zero indicates the end of the programme and it
is displayed after the “anti-creasing” phase.
• Incorrect option selection
If you select an option that is not compatible with
th e programme you have selected, the display
show s Err (error).
This code will reappear during the execution of the
programme if you press one of the option buttons or
turn the programme selector.
• Alarm code
In case of a functional anomaly, the display shows
an alarm code (e.g. E21). See page 14 for more
detailed information.
E21
0
3
125987711.qxp 2007-06-25 10:45 Page 9

10
9 Delay Start button -
STARTZEIT-
VORWAHL
This button allows you to delay the starting of the
programme by 20 hours max.
This option must be selected after having selected
the programme and before pressing START/PAUSE
to start the programme.
Every time the button is pressed, the time is
increased by 30 minutes, until the display shows a
delay of “2 hours”. After this, the delay is displayed
hour by hour.
The minutes or hours of delay that have been
selected are displayed for 2 seconds, then the
display shows the duration of the previously
selected programme.
The countdown begins after you have pressed the
START/PAUSE button.
To cancel the delay time press the START/PAUSE
button and after press the STARTZEITVORWAHL
button until the display indicates AUS’. Then press
the START/PAUSE button again.
When the delay is cancelled, the display shows 0’
and after the duration of the programme.
During the delayed start, it is not possible to change
the programme or the delay time that have been
selected. To do this, you must first switch off the
machine by setting the programme selector dial to
“AUS”. Select the new programme, the options and
the delayed start, then press the START/PAUSE
button.
During the delayed start, to cancel or change
functions that have been selected, simply set the
appliance to PAUSE. Once you perform the desired
operation, press once again the START/PAUSE
button.
If you wish to add more laundry while the machine is
performing the countdown, simply open the door.
This button must be depressed also after a power
failure and after having re-inseted the water
reservior, if it has been emptied in the middle of a
programme after ligting up of light BEHÄLTER
When you close the door, press the START/PAUSE
button again to cause the countdown to be
resumed
.
10 Indicator lights
These lights indicate the following functions:
SIEBE light (Clogged filters)
This light illuminates at the end of the programme to
remind you that the filters must be cleaned.
BEHÄLTER light - (Full tank)
This light comes on at the end of the programme to
remind you that the water reservoir must be emptied
out. If this light illuminates during a programme this
means that the water reservoir is full. The buzzer
sounds, the programme stops, the light of the
Start/Pause button flashes.
KONDENSOR light - (Clogged condenser)
It comes on every 80 cycles to remind you that the
condenser must be cleaned.
125987711.qxp 2007-06-25 10:45 Page 10
11
ENGLISH
(*) According to IEC 61121 Standards.
Type of laundry Degree of drying required
Max-load
(1)
Cotton & linen
extra dry
ready to wear
store dry
slightly damp
iron dry
6 kg
6 kg
6 kg (*)
6 kg
6 kg (*)
Fresh & Cool (ABKÜHLUNG AND AUFFRISCHEN)
This position on programme selector dial can be used to freshen the laundry (e.g. to remove a persistent
odour of moth-balls). Programme duration 10 mins.
Load
It is often difficult to estimate the weight of items to be dried. We therefore recommend that you adopt the
following guidelines:
• cotton, linen: drum full but not too tightly packed;
• synthetics: drum no more than half full;
• delicate fabrics: drum no more than one third full.
Synthetics
extra dry
store dry
iron dry
3 kg
3 kg(*)
3 kg
Jumpers
Baby cycle
2 kg
Jackets, shirts, chemises.
Easy iron
1 kg
•“
Babywäsche-Programm” is a special programme for jumpers to be dried “ready to wear”.
• “Auffrischen” is a special programme for synthetics.
Programme chart
Automatic drying (electronic programmes)
Programme
Extratrocken
Schranktrocken
Bügeltrocken
Babywäsche
Extratrocken
Starktrocken
Schranktrocken
Leichttrocken
Bügeltrocken
Leichtbügeln
Jeans
Heavy cotton
6 kg
Jeans
Cotton & Synthetics
Time
1 kg
Zeit Programm
Cotton & Synthetics
MIX
3 kg
Mix Programm
125987711.qxp 2007-06-25 10:45 Page 11
12
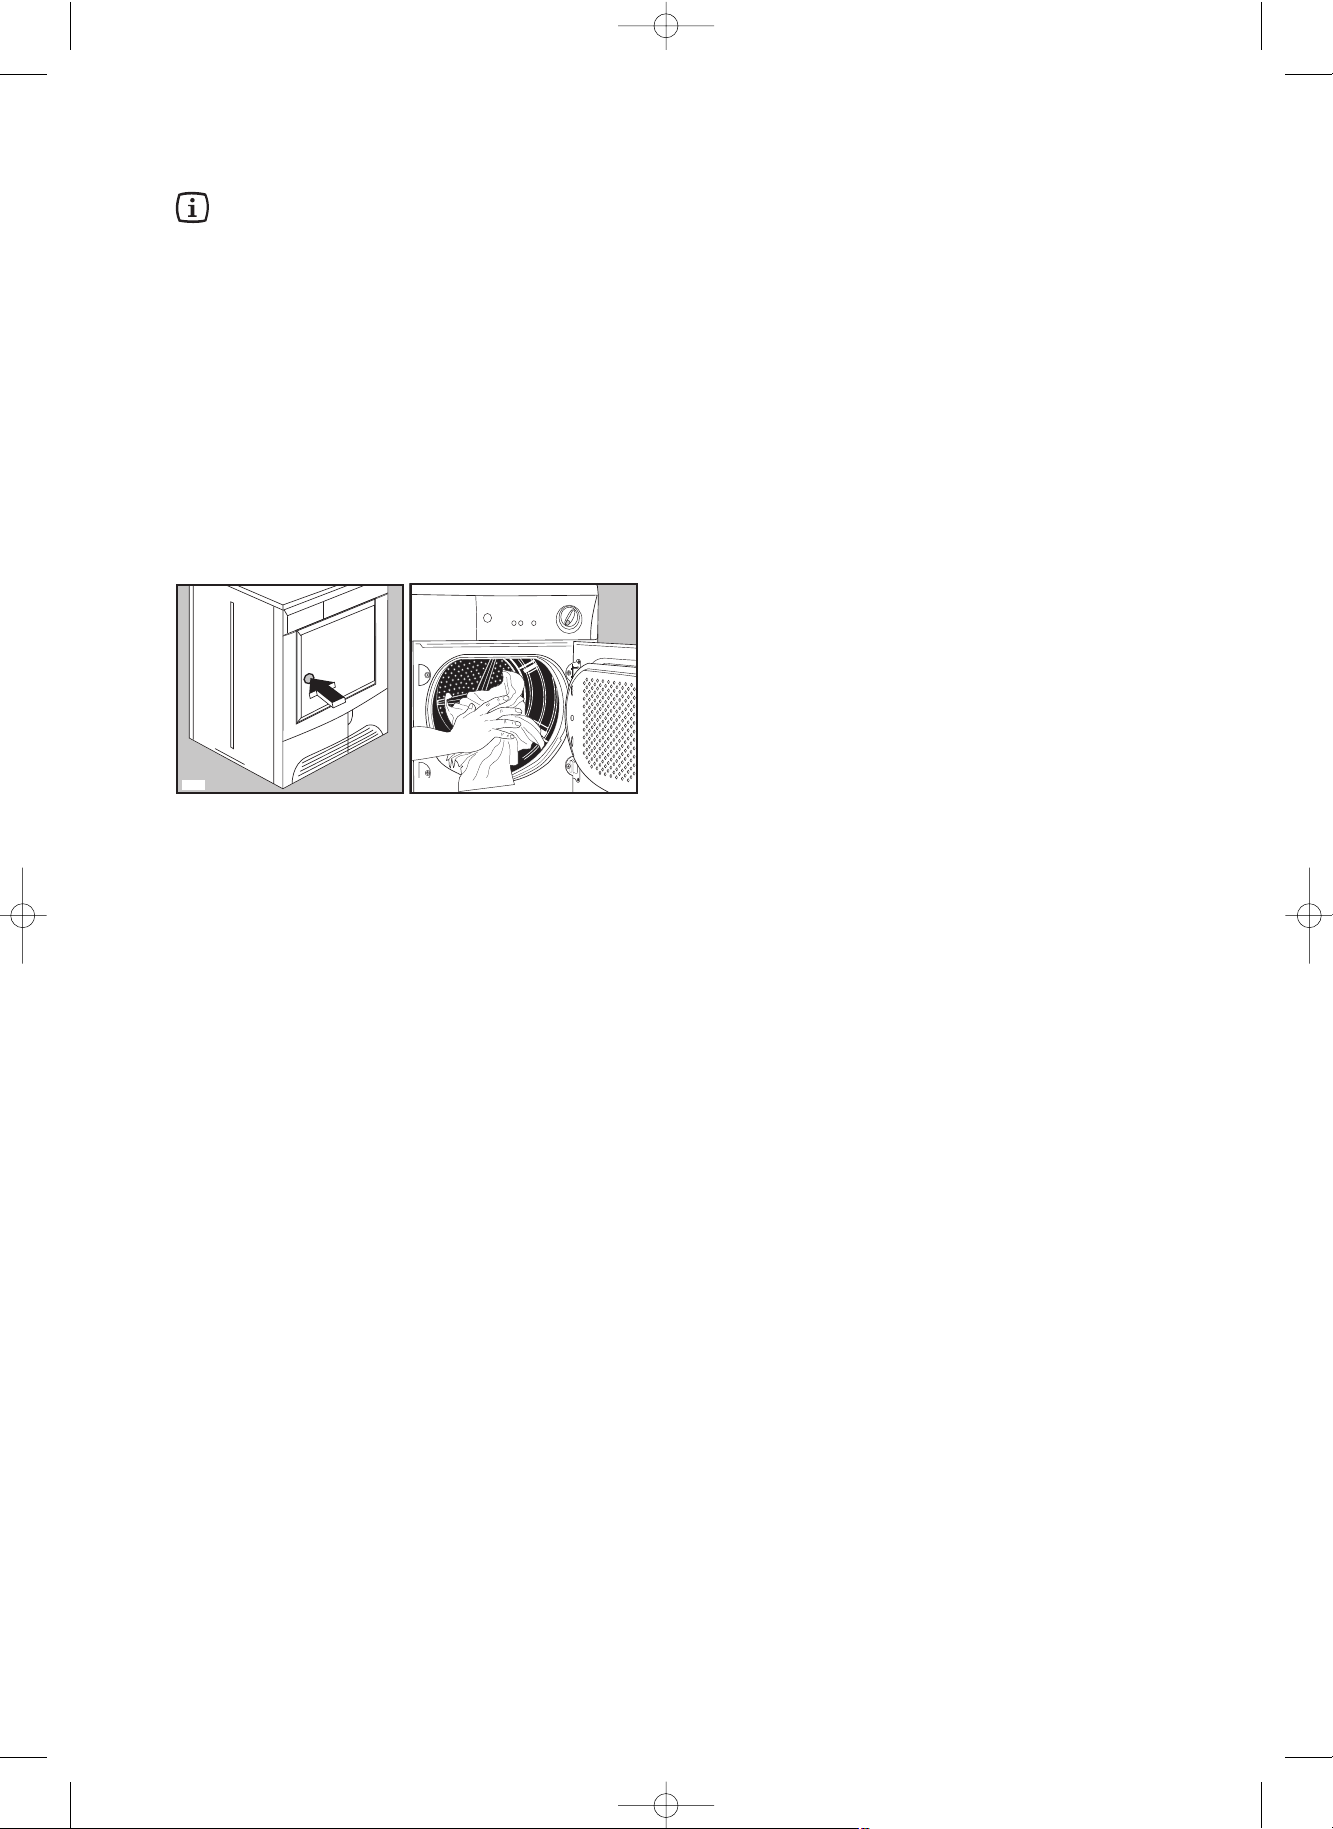
Before using your tumble dryer for the first
time, we recommend to place a few damp
cloths inside the appliance and dry for 30
minutes.
There may be dust inside a brand new tumble dryer.
Drying
1. Connect the appliance.
2. Open the door (see picture).
3. Load the items one at a time, shaking them out
loosely.
4. Close the door. Please check the laundry does
not get caught between the door and filter.
5. Select the drying programme or time. The lights
TROCKNEN, ABKÜHLEN and ENDE come on.
The light of the START/PAUSE button flashes
and the display shows the duration of the
programme.
6. If required, press the SCHON button and/or the
SIGNAL AUS button or the KURZ button.
7. Select the STARTZEIT-VORWAHL if required.
The selected delay appears on the display for 2
seconds, then the duration of the selected
programme is displayed.
8. Press the START/PAUSE button: the
corresponding light stops flashing and drying
starts. Only the TROCKNEN light stays lit. If you
have selected the STARTZEIT-VORWAHL, the
machine begins its countdown.
The drum turns alternately in both directions
during drying.
All drying programmes end with a 10 minute
cooling phase (light ABKÜHLEN is on).
You may remove the laundry after this phase.
The ENDE, SIEBE and BEHÄLTER lights
illuminate and the buzzer sounds
The display shows a static zero.
9. If the laundry is not removed at the end of the
cycle, the dryer performs an anti-creasing
phase (duration: 30 minutes maximum).
P1108
P1149
If you do not remove the laundry, the dryer will
stop automatically at the end of the anti-creasing
phase.
The ENDE, SIEBE and BEHÄLTER lights remain
lit and the buzzer sounds every 10 seconds for 2
minutes.
The light of the START/PAUSE button goes off
and a flashing zero appears on the display.
10.Turn the programme selector dial to “AUS”; all
the lights go out. The appliance is switched off.
Remove the laundry.
If you open and then close the door before
turning the programme selector dial to “AUS”,
all the lights corresponding to the phases
making up the performed programme come
on and the display shows the duration of the
programme.
After each use
• Clean the filters (see page 14).
• Empty the water reservoir (see page 15).
Important!
If the drying programme has to be stopped before it
reaches the end, we recommend that you turn the
programme selector dial to position”ABKÜHLUNG”
and wait until the end of this phase before removing
the laundry. This will avoid a build-up of heat inside
the appliance. To do this first turn the dial to “AUS”
and then to and depress START/PAUSE Button
.
Modifying the programme
To change a programme which is running, first
cancel it by turning the programme selector dial to
“AUS”. Select the new programme and press the
START/PAUSE Button.
Operating sequence
125987711.qxp 2007-06-25 10:45 Page 12
ENGLISH
13
Useful hints
• Try to load to the maximum capacity of the
machine as small loads are uneconomical.
For information, here is a list of the average
weights of some common laundry items.
Sheet 700 - 1000 g
Tablecloth 400 - 500 g
Kitchen towel 70 - 120 g
Table napkin 50 - 100 g
Towelling hand towel 150 - 250 g
Bathrobe 1000 - 1500 g
Man’s shirt 200 - 300 g
Pillowcase 100 - 200 g
Man’s pyjamas 400 - 500 g
Ladies’ nightdress 200 - 250 g
• Never tumble dry the following:
Particularly delicate items such as net curtains,
woollen, silk, fabrics with metal trim, nylon tights,
bulky materials such as anoraks, blankets,
eiderdowns, sleeping bags, feather quilts and any
items containing rubber foam or materials similar
to rubber foam.
• Always follow the instructions on garment labels:
may be tumble dried
normal drying (high temperature)
delicate drying (low temperature)
do not tumble dry
• Close pillowcases and covers with fasteners to
prevent small laundry items getting tangled inside
them. Close press studs, zips and hooks and tie
belts and apron strings.
• Sort laundry according to type and degree of
drying required.
• Do not over-dry laundry, this avoids creasing and
saves energy.
• Avoid drying dark clothes with light coloured fluffy
items such as towels as they could attract the fluff.
• The laundry must be thoroughly spun before
tumble drying.
• Easy-care items, too, e.g. shirts, should be briefly
pre-spun before drying (depending on crease
resistance approx. 30 seconds or using the special
brief spin programme of your washing machine).
• Knitted textiles (knitted underwear) may shrink a
little during drying. Please do not overdry items of
this type. It is advisable to allow for shrinkage
when choosing the size of new purchases.
• You can also put starched items into your dryer.
However, to achieve the desired starched effect,
choose the programme “iron dry”. To remove any
starch residues, wipe out the internal drum after
drying with a moist cloth and then rub it dry.
• To avoid a static charge when drying is completed,
use either a fabric softener when you are washing
the laundry or a fabric conditioner specifically for
tumble dryers.
• Remove the laundry when the dryer has finished
drying.
• If individual items are still damp after drying, set a
brief post-drying time, but at least 30 minutes.
This will be necessary particularly for multilayered
items (e.g. collars, pockets, etc.).
125987711.qxp 2007-06-25 10:45 Page 13
14
Maintenance and Cleaning
You must disconnect the appliance from the
electricity supply, before you can carry out any
cleaning or maintenance work.
External cleaning
Use only soap and water and then dry thoroughly.
Important: do not use methylated spirit, diluents or
similar products.
Cleaning the door
Clean periodically the interior part of the door to
remove any fluff from the seals around the filter.
Accurate cleaning ensures correct drying.
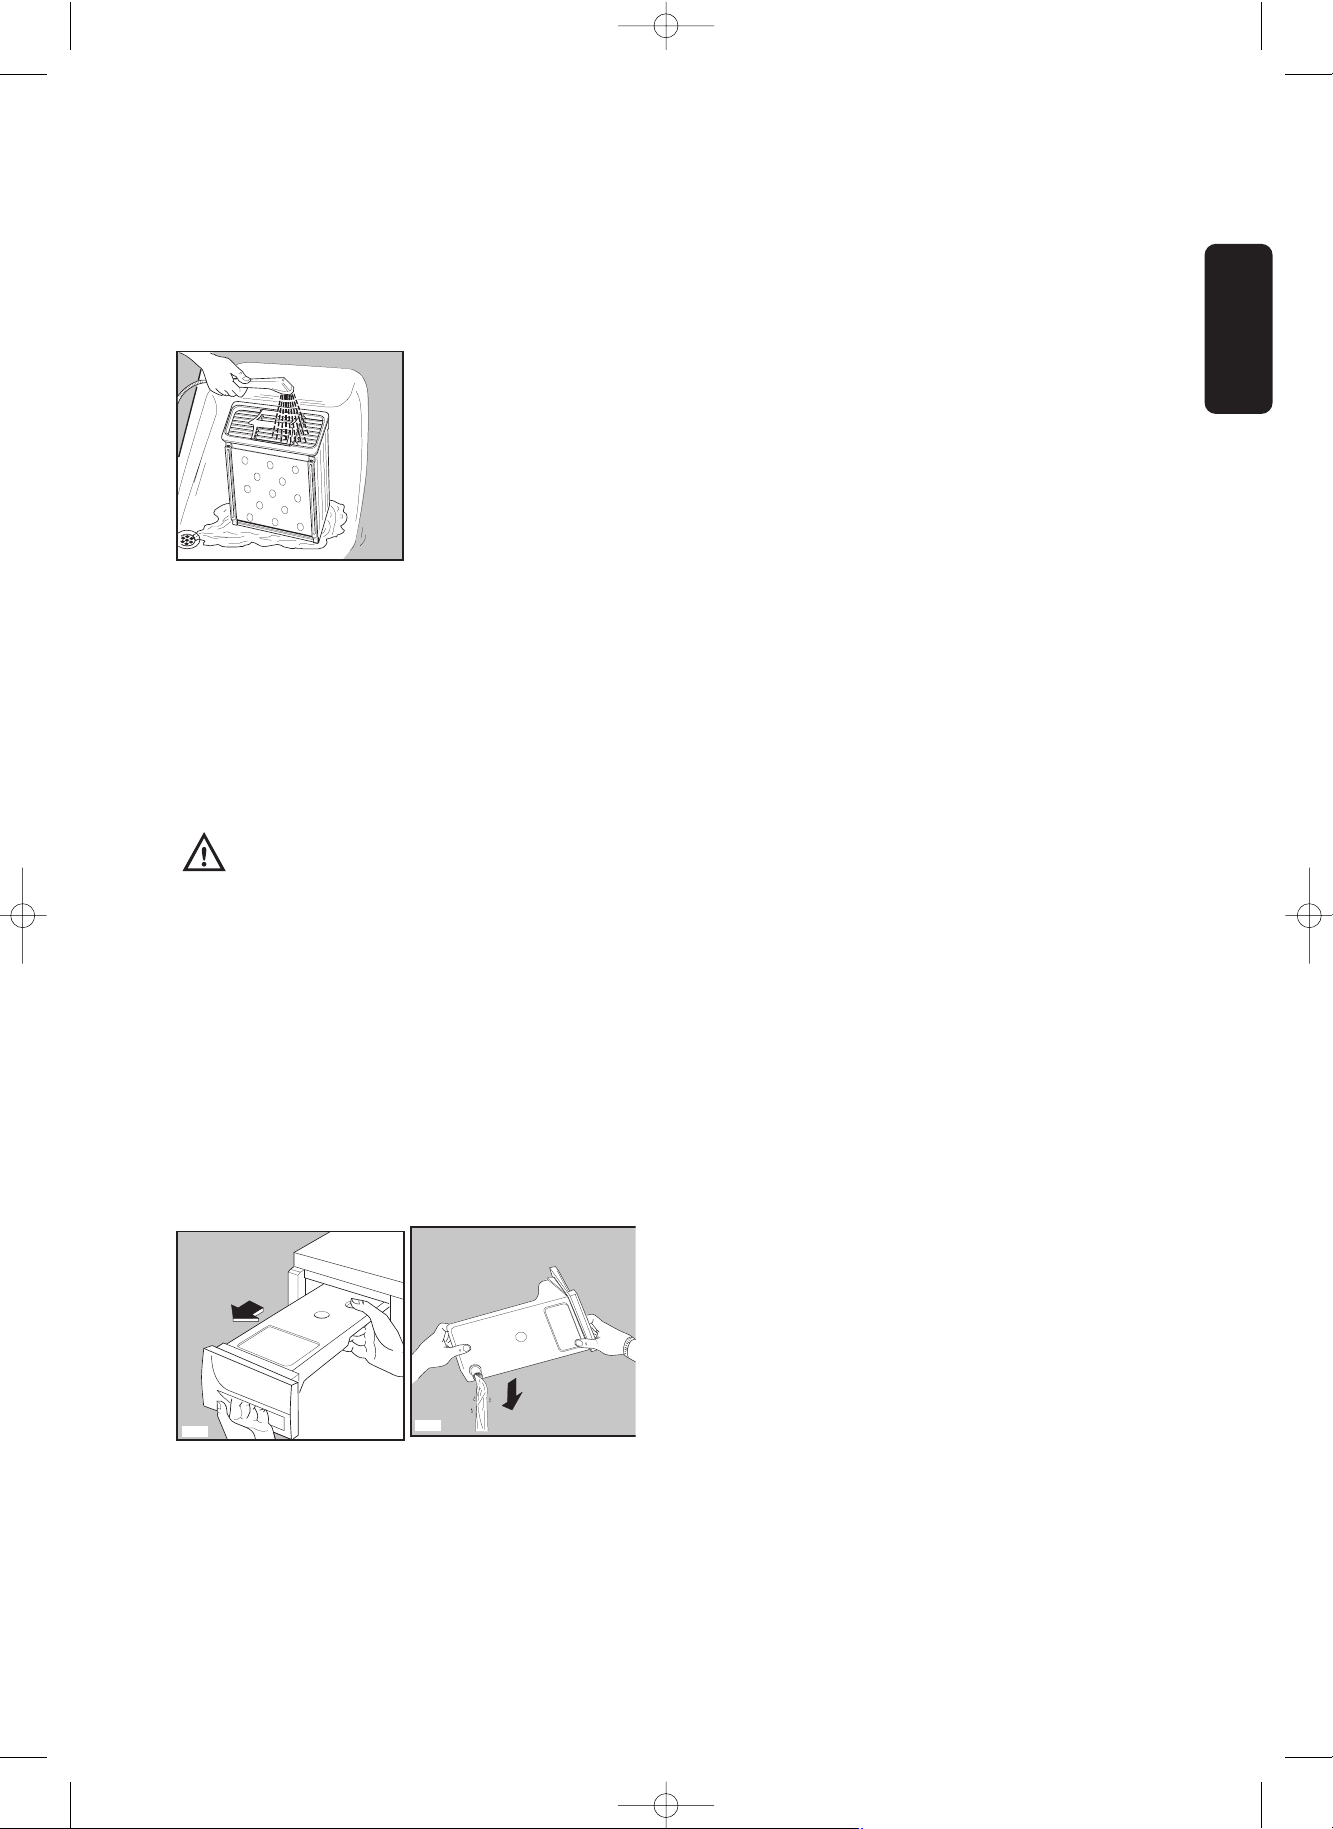
Cleaning the filters
Your dryer will only function well if the filters are
clean.
The filters collect all the fluff which accumulates
during drying and they must therefore be cleaned
at the end of each programme, before removing
the laundry, with a damp cloth.
The light SIEBE (Filter cleaning) is on to remind you
this operation.
The filter in the inner door must be removed for
cleaning.
Do not be alarmed by the amount of fluff. It is not
due to excessive wear caused by the dryer. All
fabric loses fluff when drying but it goes un-noticed
in the air. In a tumble dryer it simply collects in the
filter.
A
U
T
O
R
E
V
E
R
S
E
kg 5
kg 2,5
8
0
0
/
9
0
0
7
0
'
-
9
0
'
3
5
'
-
5
0
'
1
0
0
0
/
1
2
0
0
6
5
'
-
8
5
'
3
0
'
-
4
5
'
8
0
0
/
9
0
0
8
0
'
-
1
0
0
'
5
5
'
-
7
0
'
1
0
0
0
/
1
2
0
0
7
5
'
-
9
5
'
5
0
'
-
6
5
'
6
5
0
5
0
'
-
6
0
'
3
0
'
-
3
5
'
kg 2,5
kg 1
P1151
P1110
A
U
T
O
R
E
V
E
R
S
E
kg 5
kg 2,5
8
0
0
/
9
0
0
7
0
'
-
9
0
'
3
5
'
-
5
0
'
1
0
0
0
/
1
2
0
0
6
5
'
-
8
5
'
3
0
'
-
4
5
'
8
0
0
/
9
0
0
8
0
'
-
1
0
0
'
5
5
'
-
7
0
'
1
0
0
0
/
1
2
0
0
7
5
'
-
9
5
'
5
0
'
-
6
5
'
6
5
0
5
0
'
-
6
0
'
3
0
'
-
3
5
'
kg 2,5
kg 1
P1150
After a while, a withish patina due to detergent
residue on laundry forms on the filters. When this
occurs, clean the filters with warm water using a
brush. Remove the filter in the door opening as per
picture (it can be positioned with the tooth facing to
the left or to the right).
Do not use the appliance without filters.
Cleaning the condenser unit
Clean the condenser when light KONDENS0R
(Condenser cleaning) comes on.
The condenser is situated at the lower part of the
cabinet behind a small door. To open the door,
push the catch as per picture.
During the drying cycle or at the end, it is normal for
water to be present on the surface of the condenser
insertion.
To pull out the condenser, first turn the two red
stops downwards and then remove the condenser
unit holding it at the handle.
P1155
P1154
P1153
A
U
T
O
R
E
V
E
R
S
E
kg 5
kg 2,5
8
0
0
/
9
0
0
7
0
'
-
9
0
'
3
5
'
-
5
0
'
1
0
0
0
/
1
2
0
0
6
5
'
-
8
5
'
3
0
'
-
4
5
'
8
0
0
/
9
0
0
8
0
'
-
1
0
0
'
5
5
'
-
7
0
'
1
0
0
0
/
1
2
0
0
7
5
'
-
9
5
'
5
0
'
-
6
5
'
6
5
0
5
0
'
-
6
0
'
3
0
'
-
3
5
'
kg 2,5
kg 1
P1152
125987711.qxp 2007-06-25 10:45 Page 14
ENGLISH
15
Clean it with a brush and rinse it under the shower if
necessary.
Also clean the outside, removing all fluff.
Clean the rubber seal round the condenser cabinet
and in the inner part of the small door with a damp
cloth.
Important! Do not use pointed objects or utensils to
clean the spaces between the plates, as this could
damage the condenser and make it permeable.
Re-fit the condenser, turn the red stops upwards
and close the door.
Do not use this appliance if the condenser
has not been fitted.
Emptying the water reservoir
Water extracted from the laundry condenses inside
the machine and is collected in a reservoir.
The reservoir must be emptied after each drying
cycle to ensure efficient operation when the
machine is next used. The pilot light BEHÄLTER
(Water reservoir full) reminds you this operation.
Proceed as follows:
•Pull out the reservoir
•
Turn it upside down and let water flow down
•Re-fit the reservoir
The reservoir must be re-inserted correctly.
If this is not done the pilot light BEHÄLTER comes
on during next drying and the programme stops,
leaving the laundry damp. The buzzer will sound.
After emptying and inserting the reservoir the
“START/PAUSE” button has to be depressed again
to allow the programme to continue.
P1157
P1156
P0639
Handy tip: The condensed water may be used in a
steam iron or to top up a battery, etc. In this case it
must be filtered (e.g. through a coffee filter).
Cleaning the drum
When your laundry does not reach the desired
degree of dryness, in other words, when it turns out
either too dry or too damp, we advise you to clean
the inside of the drum with a cloth soaked with
vinegar.
This will eliminate the slight patina that has formed
in the drum (due to residues of detergent and
softeners used in the washing, and to the lime
contained in the water), which prevents the probes
from detecting the correct degree of dryness.
125987711.qxp 2007-06-25 10:45 Page 15
16
Something not working?
If, after the above checks, there is still a fault, call
your local Service Centre.
Please make sure you give the model and serial
Before contacting your local Service Centre, please make the following checks:
Problem Possible cause
• The dryer does not work:
• The dryer does not dry properly:
number of the appliance.
This information can be found on the rating plate
(see picture on page 4 ).
•
The door(s) has (have) not been closed.
•
The plug is not properly inserted in the power
socket.
•
There is no current at the socket.
•
The main fuse or the fuse in the plug has blown.
•
The selector dial is not set correctly.
•
The water reservoir is full or not properly inserted
(the “BEHÄLTER” light is on). The programme starts
in any case but it stops after approx. 4 minutes.
•
The START/PAUSE Button has not been depressed.
•
The STARTZEIT-VORWAHL option has not been
selected.
•
The laundry has not been spun properly.
•
The filters and/or the condenser are clogged up.
•
The water reservoir is full.
•
The room temperature is too high.
•
The selected time or drying cycle was not suitable
for the laundry.
•
The SCHON button has been pressed.
•
There is too much laundry inside the appliance.
•
The dryer is not correctly installed.
125987711.qxp 2007-06-25 10:45 Page 16
17
ENGLISH
Guarantee Conditions
2 year warranty covering household
appliances.
We would like to congratulate you on your purchase of a
WYSS product. You have made a good choice and
selected a product of extremely high quality, which also
rates excellently in the area of ecobalance
.
We provide a two-year warranty covering the operating
ability and operational safety of this appliance insofar as
we guarantee that the appliance is free from material
defects and manufacturing defects. During the two-year
warranty period, from the day on which the appliance is
first installed onwards, we will replace faulty parts free of
charge to the owner in line with the following provisions.
The new warranty period of two years applies only to
those appliances which come with this warranty brochure.
This warranty only applies however if the inspection
carried out by WYSS AG/SA locates a defect that is
without doubt covered by these warranty provisions.
The following conditions apply to the warranty:
1. The warranty covers appliances which are in operation
in Switzerland and the Principality of Liechtenstein and
which were distributed by WYSS
.
2. The warranty claims can only be asserted on presentation
of this warranty certificate after it has been correctly filled out by
the dealer or on presentation of the sale invoice specifiying the
serial number.
3. The following are excluded from coverage by the
warranty: Damage resulting from misuse or negligence,
inadequate maintenance and cleaning, improper handling
and installation, faulty current supply, exposure to water,
fire, electro-magnetic fields or force majeure. Lights, parts
made of glass and plastic, and expendable parts. In
addition, damages arising as a result of transport
subsequent to delivery to the initial purchaser and
transport charges should a service technician be unable to
reach an appliance by car are also excluded.
4. The warranty obligation shall expire if repairs or
modifications are made or individual parts are replaced by
a party other than an authorised WYSS AG/SA customer
service point.
5. If repairs or customer service work are requested due to
reasons not covered by this warranty, they are to be paid
by the client. 6. Replaced parts shall become the property
of WYSS AG/SA and are to be returned immediately upon
request.
7. Removing or rendering unrecognisable the appliance’s
original serial number, or using non-genuine spare parts,
releases WYSS AG/SA from all its warranty obligations.
8. Work completed under warranty does not bring about
an extension of the appliance’s warranty period.
9. Constructive and proximate damages cannot be
awarded.
Initial operation
Date/location
Model
Supplier’s stamp
Serial number
WYSS brothers AG/SA
factory of laundry systems
6233 Büron
041 933 00 74
Fax:041 933 13 20
(
125987711.qxp 2007-06-25 10:45 Page 17

18
Sales and service centre
4052 Basel 9014 St. Gallen
St. Albanvorstadt 10 Zürcherstrasse 238
061 270 70 00 071 277 78 78
3014 Bern 8008 Zürich
Militärstrasse 59 Seefeldstrasse 116
031 331 56 41 044 383 25 85
1004 Lausanne
Av. De Morges 9
021 625 88 58
In the event of technical faults, please first check
whether you can remedy the problem yourself with
the help of the operating instructions (section “What
to do if…”).
If you were not able to remedy the problem yourself,
please contact the Customer Care Department or
one of our service partners.
In order to be able to assist you quickly, we require
the following information:
– Model description
– Product number (PNC)
– Serial number (S No.)
(for numbers see rating plate)
– Type of fault
– Any error messages displayed by the appliance
So that you have the necessary reference numbers
from your appliance at hand, we recommend that
you write them in here:
Model description: .....................................
PNC: ..........................................................
S No.: .........................................................
Service
125987711.qxp 2007-06-25 10:45 Page 18
FRANÇAIS
19
Sommaire
Chère cliente, Cher client,
veuillez lire attentivement cette notice d’utilisation.
Tenez compte surtout des avertissements importants donnés dans les premières pages de cette notice.
Gardez cette notice d’utilisation pour toute consultation future. Remettez-la à l’acheteur éventuel de votre
appareil.
Dégâts de transport
A la réception de l'appareil, nous vous prions de faire les «réserves d'usage» en présence du livreur (dégâts
esthétiques par exemple).
Comment lire votre notice d’utilisation?
Les symboles suivants vous guideront tout au long de la lecture de votre notice d’utilisation:
Instructions de sécurité
Conseils et recommandations
Informations liées à la protection de l’environnement
Notre contribution à la protection de l’environnement:
nous utilisons du papier recyclé.
Avertissements et conseils
importants
. . . . . . . . . . . . . . . . . . . . . . . . . . . .20
Recyclage . . . . . . . . . . . . . . . . . . . . . . . . . . . . .20
Conseils écologiques . . . . . . . . . . . . . . . . .21
Caractéristiques techniques . . . . . . . . . .21
Description de l’appareil . . . . . . . . . . . . . .21
Qualité de séchage : réglage de la
conductivité
. . . . . . . . . . . . . . . . . . . . . . . .22
Installation . . . . . . . . . . . . . . . . . . . . . . . . . . . .23
●
Débridage . . . . . . . . . . . . . . . . . . . . . . . . . . . .23
●
Emplacement . . . . . . . . . . . . . . . . . . . . . . . . . .23
●
Raccordement électrique . . . . . . . . . . . . . . . . .23
●
Installation en colonne . . . . . . . . . . . . . . . . . . .23
●
Réversibilité de la porte . . . . . . . . . . . . . . . . . .23
●
Raccordement d’un tuyau d’évacuation . . . . .24
Utilisation . . . . . . . . . . . . . . . . . . . . . . . . . . . . .25
●
Bandeau de commandes . . . . . . . . . . . . . .25-27
●
Temps de séchage . . . . . . . . . . . . . . . . . . . . .28
●
Comment faire un séchage? . . . . . . . . . . . . . .29
●
Guide de séchage . . . . . . . . . . . . . . . . . . . . . .30
Entretien . . . . . . . . . . . . . . . . . . . . . . . . . . . . . .31
●
Nettoyage extérieur . . . . . . . . . . . . . . . . . . . . .31
●
Nettoyage de la porte . . . . . . . . . . . . . . . . . . .31
●
Nettoyage des filtres . . . . . . . . . . . . . . . . . . . .31
●
Nettoyage du condenseur d’air . . . . . . . . . . . .32
●
Vidange du bac d’eau de condensation . . . . .32
●
Nettoyage de la grille d’aspiration . . . . . . . . . .32
En cas d'anomalie
de fonctionnement
. . . . . . . . . . . . . . . . . . . .33
Garantie . . . . . . . . . . . . . . . . . . . . . . . . . . . . . . .34
Service aprèse-vente . . . . . . . . . . . . . . . . .35
125987711.qxp 2007-06-25 10:45 Page 19
20
Avertissements et conseils importants
Installation
●
Si l'installation électrique de votre habitation nécessite
une modification pour le branchement de votre appareil
faites appel à un électricien qualifié.
●
Assurez-vous, après avoir installé l'appareil, que
celui-ci ne repose pas sur le câble d'alimentation.
●
Si le sèche-linge est installé sur un sol recouvert
de moquette, réglez les pieds de façon à ce que
l’air puisse circuler librement autour de l’appareil.
Utilisation
●
Votre appareil est destiné à un usage domestique.
Ne l’utilisez pas à des fins commerciales ou
industrielles ou pour d’autres buts que celui pour
lequel il a été conçu.
●
Débranchez toujours l'appareil après son
utilisation.
●
N'introduisez jamais dans l'appareil du linge
simplement égoutté.
●
Ne séchez pas d'articles ayant été traités avec
des produits chimiques, tels que les produits
utilisés pour le nettoyage à sec, car ils pourraient
provoquer une explosion.
• Risque d'incendie : ne faites pas sécher dans
votre appareil du linge qui a été taché ou imbibé
d'huile végétale ou d'huile de cuisson.
• Risque d'incendie : si vous avez prétraité votre linge avec
du détachant (spray ou liquide) avant lavage, effectuez un
cycle de rinçage supplémentaire avant de le charger
dans votre séche linge.
●
Contrôlez qu'un briquet n'est pas resté dans une
poche.
●
Ne séchez en aucun cas des chaussures (tennis,etc.),
car elles pourraient s’encastrer entre le hublot et le
tambour, bloquant ce dernier.
●
Laissez la porte entrouverte lorsque le sèchelinge n'est pas utilisé, mais veillez à ce que les
enfants ne s'enferment pas dans l'appareil.
●
Les filtres doivent être nettoyés après chaque
utilisation. N'utilisez jamais l'appareil avec des
filtres endommagés ou sans filtres. Cela pourrait
provoquer un incendie.
●
Evitez l’accumulation de poussière autour de l’appareil
pour permettre à l’air de circuler librement.
Sécurité
●
Il est dangereux de modifier ou d'essayer de modifier
les caractéristiques techniques de cet appareil.
●
N'essayez jamais de réparer l'appareil vousmême. Les réparations effectuées par du
personnel non qualifié peuvent provoquer des
dommages importants.
Seul un Service Après-Vente recommandé est
habilité à intervenir. En cas d'intervention, exigez
des pièces de rechange certifiées constructeur.
Sécurité des enfants
●
Les enfants ne sont souvent pas en mesure de
reconnaître les risques émanant des appareils
ménagers. Il est donc indispensable de les garder sous
surveillance lorsque l'appareil fonctionne. Ne les
laissez pas jouer avec le sèche-linge!
●
Les éléments constituant l'emballage (les films
en plastique, les morceaux de styropor par ex.)
peuvent présenter un danger pour les enfants.
Risque d'asphyxie! Gardez les éléments
d'emballage hors de la portée des enfants.
●
Assurez-vous que les enfants ou vos animaux
domestiques ne puissent pas pénétrer dans le
tambour du sèche-linge.
●
Si vous procédez à la mise à la casse de votre
appareil, veillez à mettre hors d'usage ce qui
pourrait représenter un danger: coupez le câble
d'alimentation au ras de l'appareil et détériorez
le dispositif de fermeture de la porte.
Vous éviterez ainsi que les enfants s’y enferment
en se mettant ainsi en danger de mort.
Les avertissements suivants sont donnés pour votre sécurité. Nous vous prions de bien vouloir les lire
attentivement avant d'installer et d'utiliser l'appareil.
Recyclage
●
Recyclage de l’emballage
Tous les matériaux marqués par le symbole
sont recyclables. Pour qu’ils puissent être
récupérés (recyclés), il est nécessaire de les
déposer dans les déchetteries prévues à cet effet
(renseignez-vous auprès des autorités locales).
●
Mise à la casse de l’ancien appareil
Informez-vous auprès de la municipalité au sujet de
l’endroit où déposer l’ancien appareil pour qu’il
puisse être ensuite recyclé ou détruit.
Elimination de l’ancien appareil!
Le symbole sur le produit ou son emballage
indique que ce produit ne peut être traité comme
déchet ménager. Il doit être remis au point de collecte
dédié à cet effet (collecte et recyclage du matériel
électrique et électronique). En procédant à la mise au rebut
réglementaire de l’appareil, nous preservons
l’environnement et notre sécurite, s’assurant ainsi que les
déchets seront traités dans des conditions appropriées.
Pour obtenir plus de détails sur le recyclage de ce produit,
veuillez prendre contact avec les services de votre
commune ou le magasin où vous avez effectué l’achat.
125987711.qxp 2007-06-25 10:46 Page 20
FRANÇAIS
21
Conseils écologiques
Afin de réaliser des économies d’énergie, nous vous
conseillons de respecter les instructions suivantes:
●
Utilisez si possible l’appareil à pleine capacité;
des charges partielles sont peu économiques.
●
Tout le linge à sécher doit être essoré avant
d'être introduit dans le tambour. Plus la vitesse
d'essorage sera importante, plus courte sera la
durée du séchage d'où économie d'énergie.
●
Evitez de sécher le linge trop longtemps:
choisissez le temps/secteur de séchage en
fonction de la nature des textiles et du degré de
séchage désiré.
●
Pour utiliser l'appareil à pleine capacité vous
pouvez sécher en une fois du linge “prêt à
ranger” avec du linge “prêt à repasser”.
Sélectionnez le temps de séchage pour “prêt à
repasser” et à la fin du programme retirez ce
linge. Complétez le programme en sélectionnant
un temps supplémentaire pour le linge “prêt à
ranger”.
●
Nettoyez régulièrement les filtres pour éviter des
temps de séchage trop longs: vous
économiserez de l’énergie.
●
Pendant le fonctionnement de l’appareil, la
température ambiante ne doit pas dépasser
+ 35°C.
Caractéristiques techniques
DIMENSIONS: hauteur 85 cm
largeur 60 cm
profondeur 58 cm
PUISSANCE DE BRANCHEMENT: 220-230 V/50 Hz
PUISSANCE TOTALE ABSORBEE: 2350 W
FUSIBLE: 10 A
CAPACITE DE SECHAGE: coton, lin 6,0 kg
synthétiques 3 kg
CONSOMMATIONS: coton, lin 3,36 kWh (6 kg prêt à ranger)
coton, lin 2,70 kWh (6 kg prêt à repasser)
synthétiques 1,20 kWh (3 kg prêt à ranger)
Cet appareil est conforme aux Directives Communautaires suivantes:
- 73/23 CEE 19/02/73 (Basse tension) et modifications successives;
- 89/336 CEE 03/05/89 (Compatibilité Electromagnétique) et modifications successives.
Description de l’appareil
01 Plan de travail
2 Programmateur/Minuteuer
03 Le bandeau de commandes
04 Bac d’eau de condensation
05 Eclairage intérieur
06 Filtres
07 Plaque signalétique
08 Condenseur d’air
09 Pieds réglables
0
1
2
8
9
3
7
6
4
5
6
J
30
60
90
125987711.qxp 2007-06-25 10:46 Page 21
 Loading...