

Wyrestorm NHD-000-CTL, NHD-100-RX, NHD-100-TX, NHD-200-TX, NHD-SW-0501 Installation Manual
...
Copyright © 2017 WyreStorm Technologies | wyrestorm.com
NetworkHD™
Document Revision:
v2.0
Document Date:
TBD
Supported Firmware:
2.0
100, 200 & 400 Series Components
Installation Guide
Thank you for choosing this WyreStorm product.
Please read these instructions carefully before installing to avoid complications later.
NetworkHD 100/200/400 Series Installation Guide | Copyright © 2017 WyreStorm Technologies | wyrestorm.com
2 of 40
IMPORTANT! Safety Information
Note:
Provides special information for installing, configuring, and operating the
equipment.
IMPORTANT!
Provides special information that is critical to installing, configuring, and
operating the equipment.
CAUTION!
Provides special information on avoiding situations that may cause damage to
equipment.
WARNING!
Provides special information on avoiding situations that may cause physical
danger to the installer, end user, etc.
ELECTRIC SHOCK!
The source power poses an electric shock hazard that has the potential to
cause serious injury to installers and end users.
ELECTRICAL DISCONNECT:
The source power outlet and power supply input power sockets should be
easily accessible to disconnect power in the event of an electrical hazard or
malfunction.
WEIGHT INJURY!
Installing some of the equipment requires two installers to ensure safe handling
during installation. Failure to use two installers may result in injury.
Safety Classifications
Safety Statements
1. Read these instructions in their entirety and retain a copy for later reference.
2. Follow all instructions and heed all warnings.
3. Do not expose this apparatus to rain, moisture, sprays, drips or splashes and ensure that no objects containing liquids are
placed on the apparatus, including cups, glasses and vases.
4. Do not place this unit in a confined space such as enclosed shelving, cabinets or bookshelves. Ensure the unit is adequately
ventilated.
5. To prevent the risk of electric shock or fire hazard due to overheating, do not cover the unit or obstruct ventilation openings
with material, newspaper, cardboard or anything that may restrict airflow into the unit.
6. Do not install near external heat sources such as radiators, heat registers, boilers or any device that produces heat such as
amplifiers or computers and do not place near sources of naked flame.
7. Unplug apparatus from power supply during lightning storms or when unused for long periods of time.
8.
Protect the power cable from being walked on, pinched or restricted in any way, especially at plug connections.
9. Only use attachments/accessories specified by the manufacturer.
10. Units contain non-serviceable parts - Refer all servicing to qualified service personnel.
IMPORTANT!
Do Not Hot swap HDMI or LAN connections - Please insert and extract cables carefully with the power SWITCHED
OFF. Power is passed along transmissions so connecting and disconnecting cables while powered can result in
damage to circuitry or possible injury.

NetworkHD 100/200/400 Series Installation Guide | Copyright © 2017 WyreStorm Technologies | wyrestorm.com
3 of 40
Contents
IMPORTANT! Safety Information ...................................................................................................................................... 2
Contents ........................................................................................................................................................................... 3
Introduction....................................................................................................................................................................... 5
Before Beginning ..................................................................................................................................................................................................... 5
Product Overview .................................................................................................................................................................................................... 5
In the Box .................................................................................................................................................................................................................. 6
NHD-000-CTL Front & Rear Panels ...................................................................................................................................................................... 6
NHD-100/200/400-TX Front Panel ....................................................................................................................................................................... 7
NHD-200-TX Rear Panel ......................................................................................................................................................................................... 7
NHD-220-RX Front Panel........................................................................................................................................................................................ 7
NHD-100/200/210/220-RX Rear Panels ............................................................................................................................................................. 8
NHD-SW-0501 Front Panel .................................................................................................................................................................................... 8
NHD-SW-0501 Rear Panel ..................................................................................................................................................................................... 8
NHD-400-TX Rear Panel .......................................................................................................................................................................................10
NHD-400-RX Rear Panel .......................................................................................................................................................................................10
Installation ...................................................................................................................................................................... 11
Shelf Placement.....................................................................................................................................................................................................11
Rack Placement .....................................................................................................................................................................................................11
Wiring and Connections .......................................................................................................................................................................................11
Ethernet Wiring .................................................................................................................................................................................................11
RS-232 Wiring ...................................................................................................................................................................................................11
Audio Out Wiring ...............................................................................................................................................................................................11
Basic Wiring Diagrams .........................................................................................................................................................................................12
NetworkHD 100 Series with Control System ...............................................................................................................................................12
NetworkHD 200 Series with NetworkHD Touch Control ............................................................................................................................12
Specifications ................................................................................................................................................................. 13
NHD-100-TX / NHD-200-TX .................................................................................................................................................................................13
NHD-SW-0501 ........................................................................................................................................................................................................14
NHD-100-RX / NHD-200-RX / NHD-210-RX ......................................................................................................................................................15
NHD-220-RX ...........................................................................................................................................................................................................16
NHD-400-TX/NHD-400-RX ...................................................................................................................................................................................16
Configuration .................................................................................................................................................................. 18
NHD-200-TX Dipswitch Configuration ...............................................................................................................................................................18
Network Configuration .........................................................................................................................................................................................18
Network Switches ............................................................................................................................................................................................18
Multicast & IGMP Snooping ............................................................................................................................................................................18
PoE ......................................................................................................................................................................................................................18
NetworkHD Touch ............................................................................................................................................................................................19
NHD-000-CTL .........................................................................................................................................................................................................19
WyreStorm Management Suite ...........................................................................................................................................................................20
NetworkHD Maintenance Tool ............................................................................................................................................................................21
NetworkHD 000 Console Software.....................................................................................................................................................................23
Configuring IP Addresses ....................................................................................................................................................................................24
Creating Aliases .....................................................................................................................................................................................................25
Creating Groups .....................................................................................................................................................................................................26
Creating Video Walls .............................................................................................................................................................................................26
Configuring the NHD-220-RX...............................................................................................................................................................................29
Configuring the NHD-SW-0501 ...........................................................................................................................................................................31
Configuring CEC & RS-232 Control .....................................................................................................................................................................32
Uploading Configurations to the NHD-000-CTL ...............................................................................................................................................34
Video Adjustments ................................................................................................................................................................................................34
Audio Adjustments ................................................................................................................................................................................................36
Preview Streams....................................................................................................................................................................................................36
Troubleshooting .............................................................................................................................................................. 37
Contacting Technical Support .............................................................................................................................................................................38
Warranty and Service ...................................................................................................................................................... 39
Warranty Limits & Exclusions ..............................................................................................................................................................................39
Obtaining Warranty Service .................................................................................................................................................................................39

NetworkHD 100/200/400 Series Installation Guide | Copyright © 2017 WyreStorm Technologies | wyrestorm.com
4 of 40
Publication Disclaimer .................................................................................................................................................... 40

NetworkHD 100/200/400 Series Installation Guide | Copyright © 2017 WyreStorm Technologies | wyrestorm.com
5 of 40
Introduction
This Installation Guide covers the process of installing and configuring a WyreStorm NetworkHD 100 or 200 series system.
Print out this page to use as a checklist for items required to install this WyreStorm product.
WyreStorm recommends reading through this document in its entirety to become familiar with the product’s
features prior to starting the installation process.
Before Beginning
WyreStorm recommends visiting the product page before installing this product for updates to this Installation Guide as well as other
information about this product.
Read through this document in its entirety. ....................................................................................................................................
NetworkHD 100, 200 or 400 series components updated to the latest firmware ..............................................................
Firmware update files and procedures for NetworkHD 100 or 200 series components can be found in the Download Section of
the appropriate product model on WyreStorm.com.
Approved and fully configured network switch(s) .........................................................................................................................
To view approved switches and applicable switch configuration guides visit the Download Section of any NetworkHD 100 or 200
series component on WyreStorm.com.
Required cables and connectors. .......................................................................................................................................................
Product Overview
NetworkHD™ 100 and 200 series components facilitate the transmission of Full HD 1080p video with 2.1 audio to any number of
HDMI displays over standard Ethernet (Cat5e/6) infrastructure. The NHD-100-RX and NHD-200-RX enables the display of a single
image on a display while the NHD-210-RX decoder adds video wall playback to the system and the NHD-220-RX adds multi-view (PiP)
playback on a single display.
Functioning on 10/100 or Gigabit Layer2 managed switches, NetworkHD™ does not require complicated VLAN configurations or PC
software. The NHD-000-CTL controller creates a simple, single interface while also capable of fully integrating with leading control
brands including WyreStorm Enado™.
Intuitive and powerful system control is available with the NetworkHD Touch iPad app. The NetworkHD Touch app allows for a drag
and drop experience with live video previews of all sources and displays. With direct integration of the Enado™ Control solution, there
is never a need to open or switch between additional applications.
For further information on this product and other WyreStorm ranges, visit our website or download our latest product guide at
WyreStorm.com
NetworkHD 100/200/400 Series Installation Guide | Copyright © 2017 WyreStorm Technologies | wyrestorm.com
6 of 40
In the Box
NHD-000-CTL
NHD-100-TX / NHD-100-RX
1 x NHD-000-CTL Main Unit
1 x Power Adapter (12v 1A DC)
3 x Power Supply Region Adapters
2 x Mounting Ears
1 x Main Unit
1 x Power Adapter (12v 1A DC)
3 x Power Supply Region Adapters
2 x 3-Pin Phoenix Connectors
2 x Mounting Ears
NHD-200-TX
NHD-200-RX / NHD-210-RX / NHD-220-RX
1 x Main Unit
1 x Power Adapter (12v 1A DC)
3 x Power Supply Region Adapters
2 x 3-Pin Phoenix Connectors
2 x Mounting Ears
1 x HDMI to DVI Converter
1 x VGA to DVI Converter
1 x Component to DVI Converter
1 x Main Unit
1 x Power Adapter (12v 1A DC)
3 x Power Supply Region Adapters
2 x 3-Pin Phoenix Connectors
2 x Mounting Ears
NHD-SW-0501
NHD-400-TX/NHD-400-RX
1 x NHD-SW-0501 Main Unit
1 x AC Power Cord
1 x 11-Pin Phoenix Connector
2 x 4-Pin Phoenix Connector
2 x 3-Pin Phoenix Connector
2 x Mounting Brackets
1 x Main Unit
1 x Power Adapter (12v 1A DC)
3 x Power Supply Region Adapters
2 x Mounting Brackets
1 x 3-Pin Phoenix Connector (RX only)
1 x IR Emitting Cable
1 x IR Receiving Cable
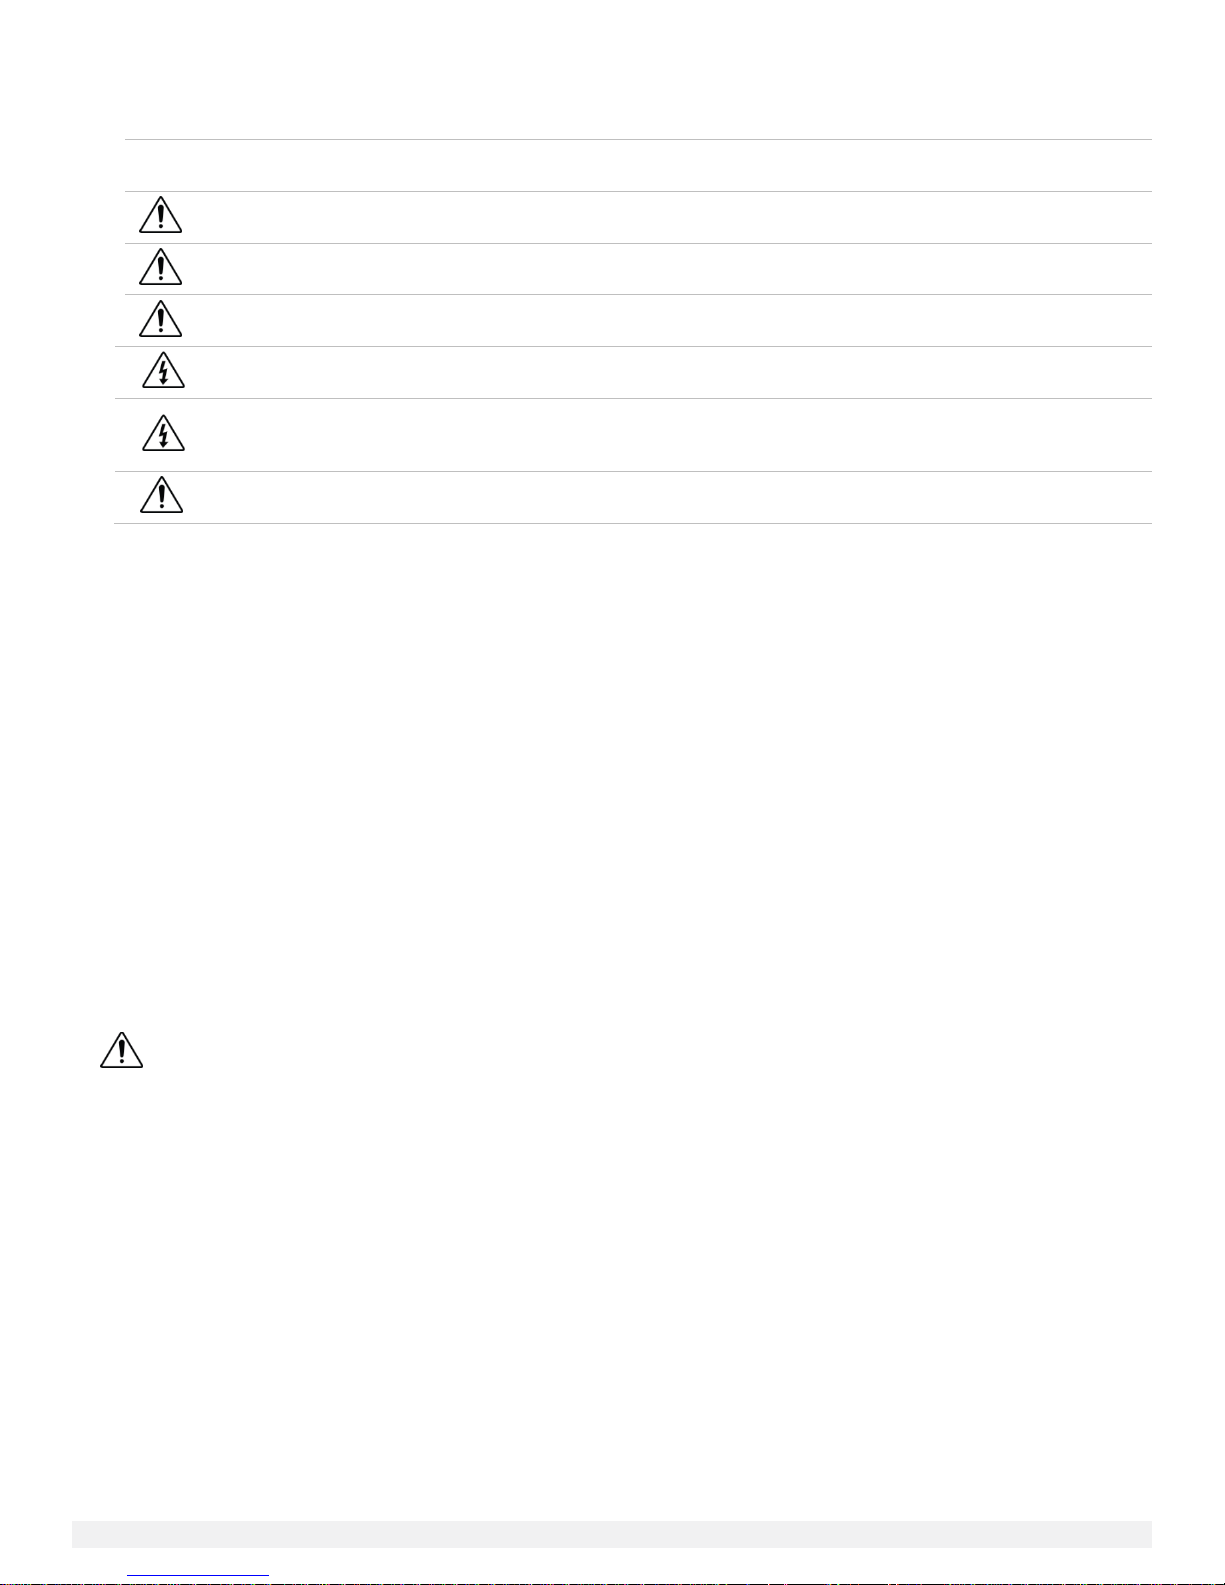
Card Insert
Provided insert cards can be placed to identify information such as an IP address.
Status LED Indicator
Solid Blue: Unit is operating properly and has an active sync to a source.
Flashing Blue: Unit does not have an active sync to a source.
Power LED Indicator
Solid Red: Unit is powered on
Reset Button
Press down for 5 seconds to reset the NHD-000-CTL back to factory default settings.
AV/POE LAN Port
10/100Mbps LAN port. Default IP configuration set to 169.254.1.1 with a subnet mask of
255.255.0.0. Will also power the NHD-000-CTL if connected to a PoE capable network switch.
Control LAN Port
10/100Mbps LAN port. Default IP configuration set to 192.168.11.243 with a subnet mask of
255.255.0.0.
RS-232
For WyreStorm use only.
Power Connector
Connects to a 12v 1A PSU.
NHD-000-CTL Front & Rear Panels
NetworkHD 100/200/400 Series Installation Guide | Copyright © 2017 WyreStorm Technologies | wyrestorm.com
7 of 40
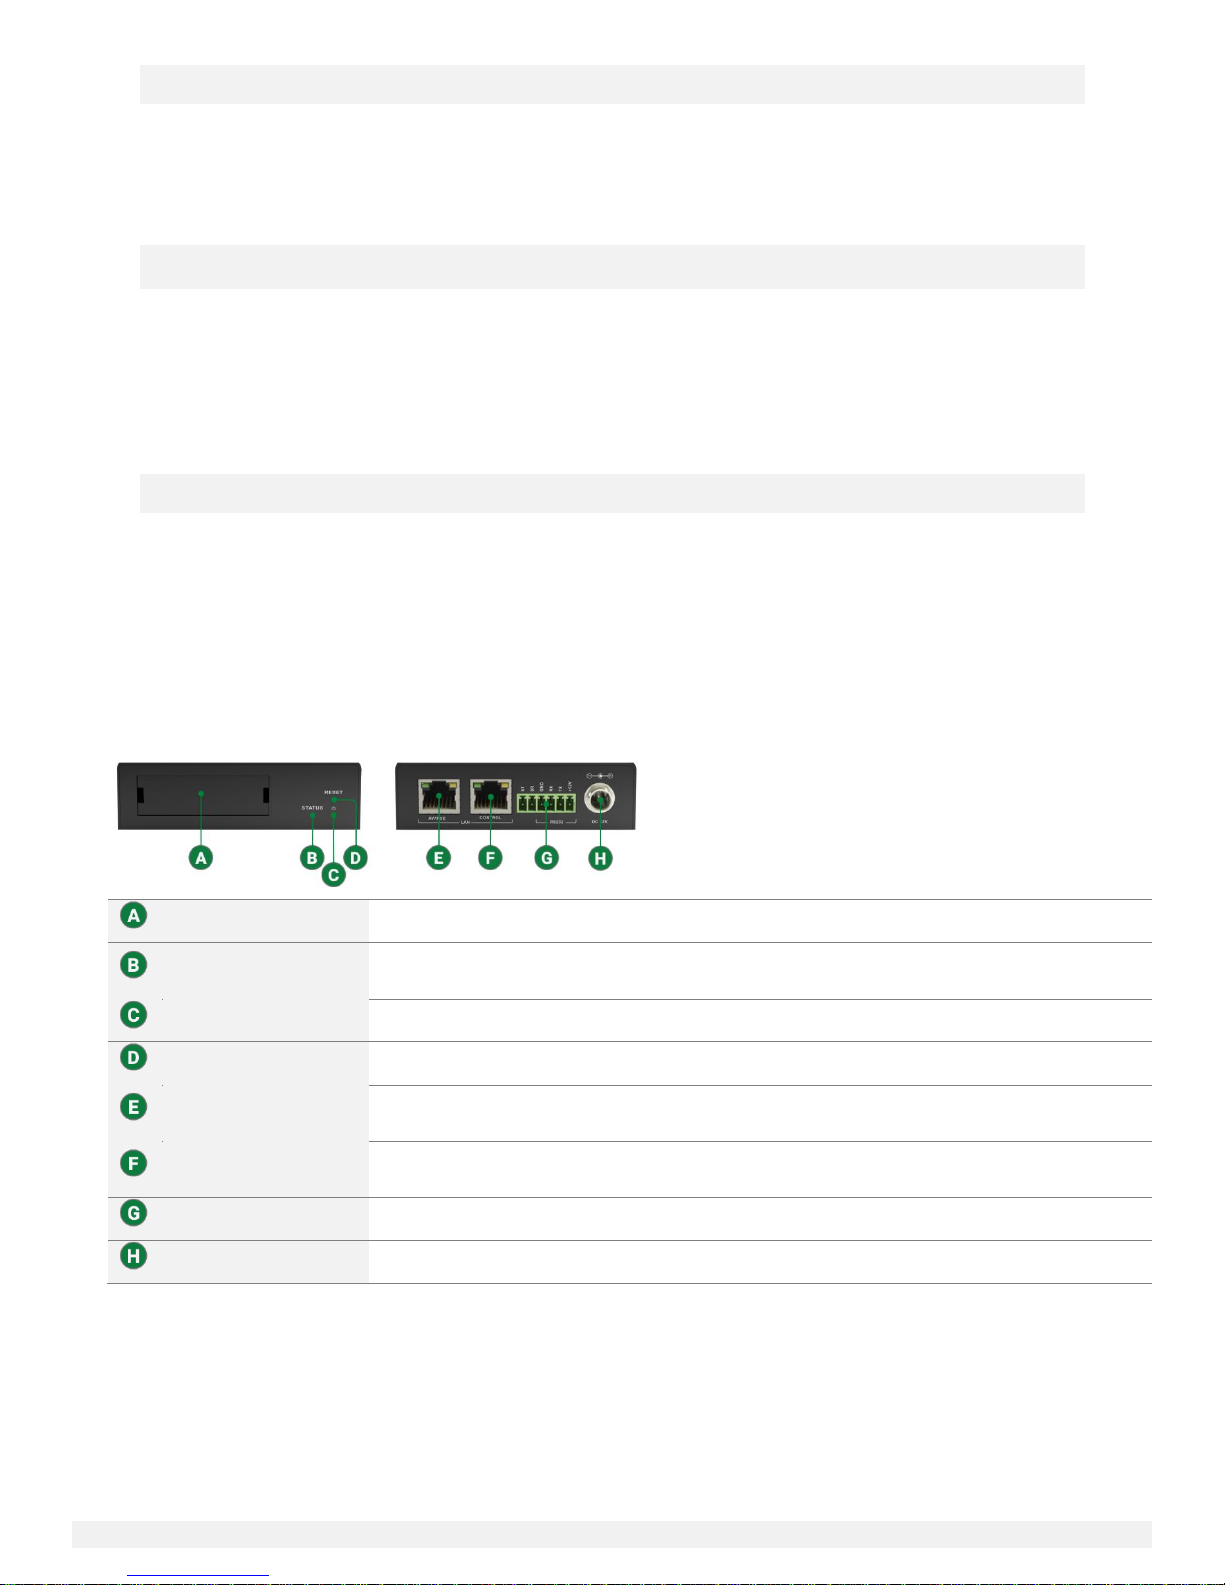
NHD-100/200/400-TX Front Panel
Power LED Indicator
Solid Red: Unit is powered on
Status LED Indicator
Solid Blue: Unit is operating properly and has an active sync to a source.
Flashing Blue: Unit does not have an active sync to a source.
AV IN
Connects to a DVI-D source or supplied converters for HDMI, VGA or Component.
Line In
Connects to a 3.5mm mini jack plug to transmit audio.
Audio Out
3-Pin Phoenix connector. Supplies line level audio output of source connected to AV IN.
Ethernet Port
PoE 10/100Mbps LAN port
RS-232 Output
3-Pin Phoenix connector. Connects to third party devices for RS-232 control.
3 Dipswitch Selector
Configures the AV IN format. Dipswitch configuration information can be found on the underside
of the unit.
Power Connector
Connects to a 12v 1A PSU.
Power LED Indicator
Solid Red: Unit is powered on.
Status LED Indicator
Solid Blue: Unit is operating properly and has an active sync to a source.
Flashing Blue: Unit does not have an active sync to a source.
ID Button
When pressed OSD (On Screen Display) information such as IP address, Remote and Local
hostnames.
NHD-200-TX Rear Panel
NHD-220-RX Front Panel
NetworkHD 100/200/400 Series Installation Guide | Copyright © 2017 WyreStorm Technologies | wyrestorm.com
8 of 40
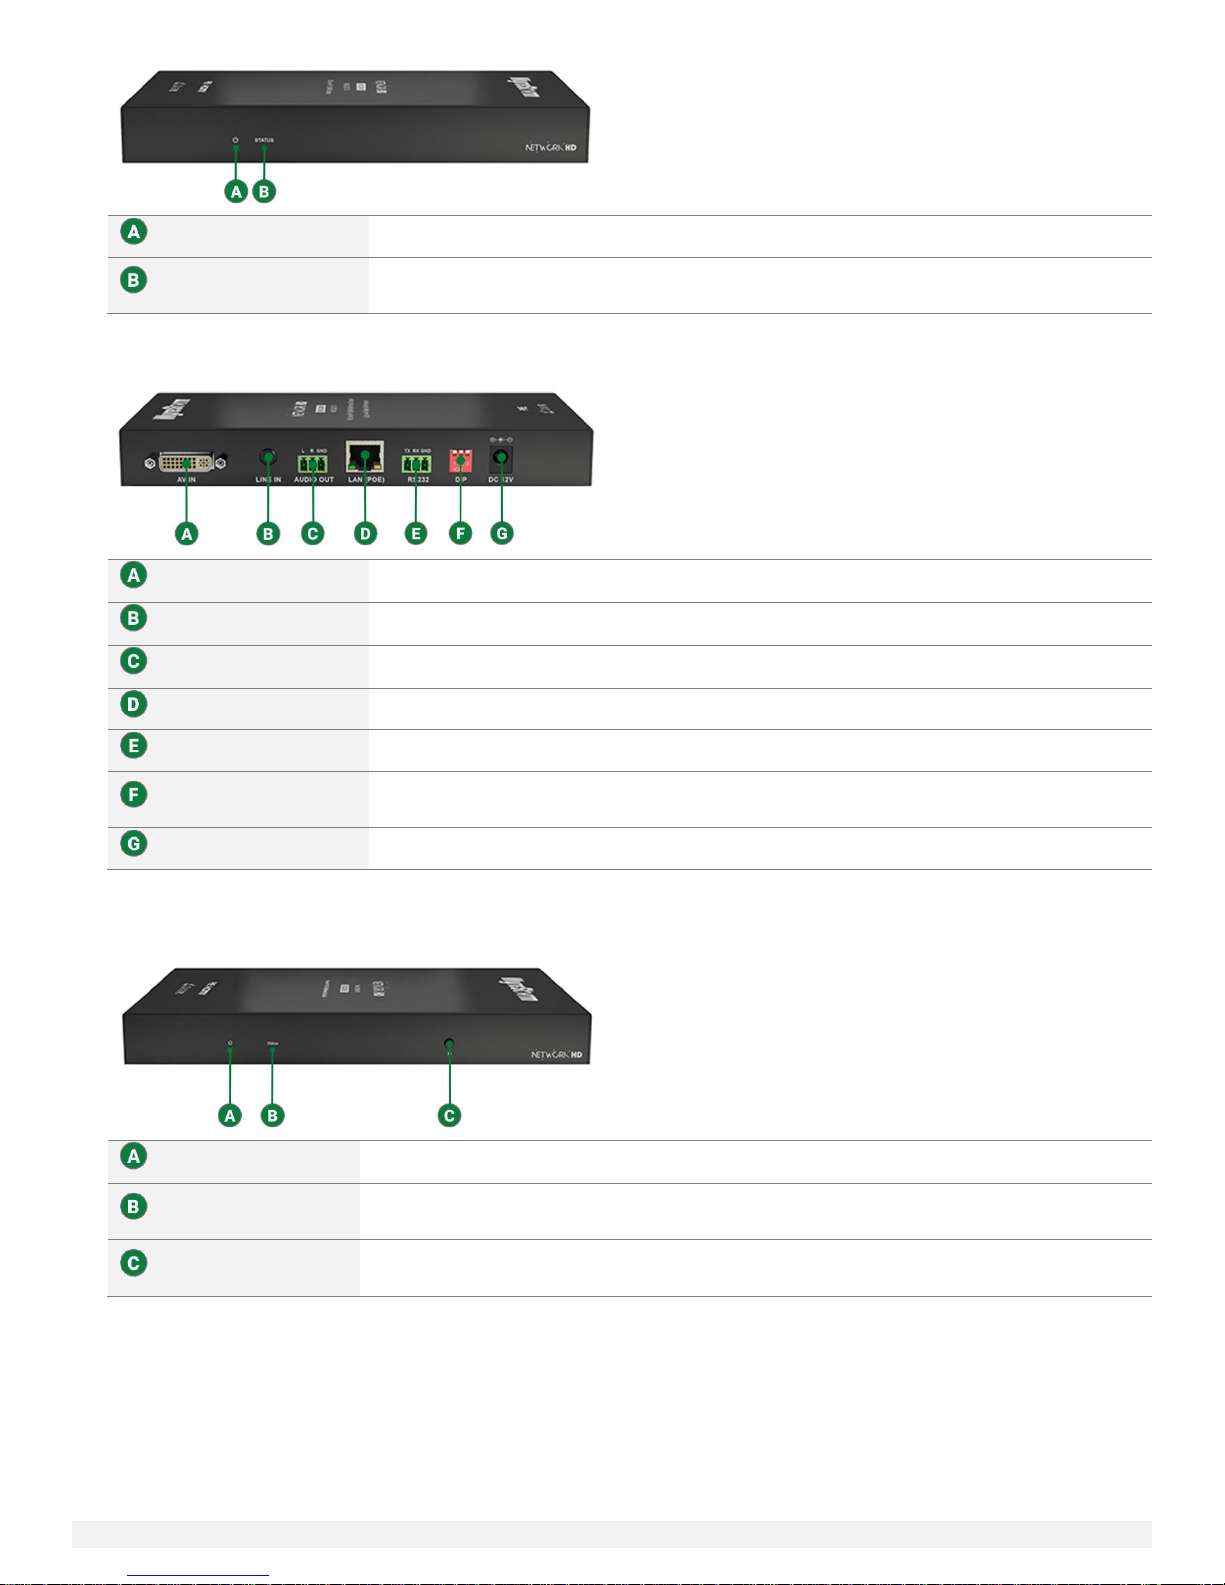
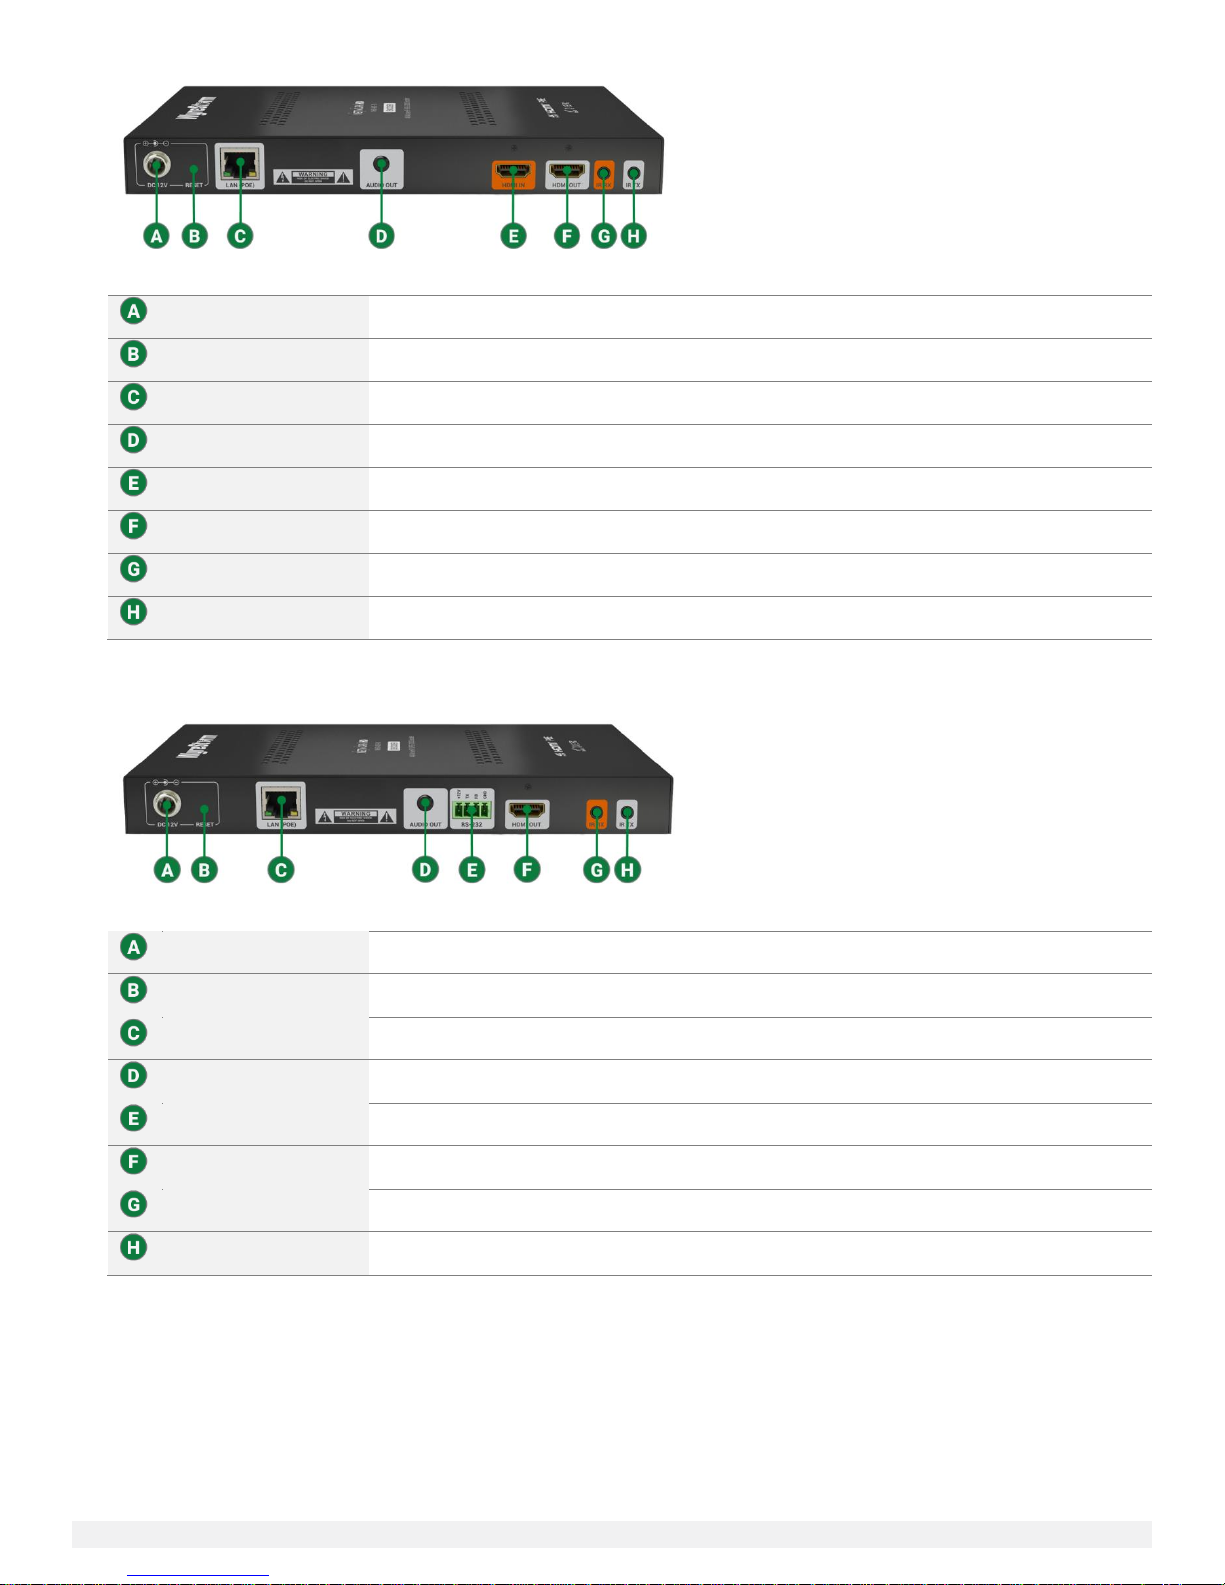
NHD-100/200/210/220-RX Rear Panels
Grounding Screw
Can be used to ground the decoder chassis.
Power Connector
Connects to a 12V 1A PSU.
Ethernet Port
PoE 10/100Mbps LAN port
HDMI Output
19-Pin type A HDMI female digital video/audio output.
Audio Out
3-Pin Phoenix connector. Supplies line level audio output of source connected to AV IN.
RS-232 Debug Port
3-Pin Phoenix connector. For WyreStorm use only.
RS-232 Output Port
3-Pin Phoenix connector. Connects to third party devices for RS-232 control.
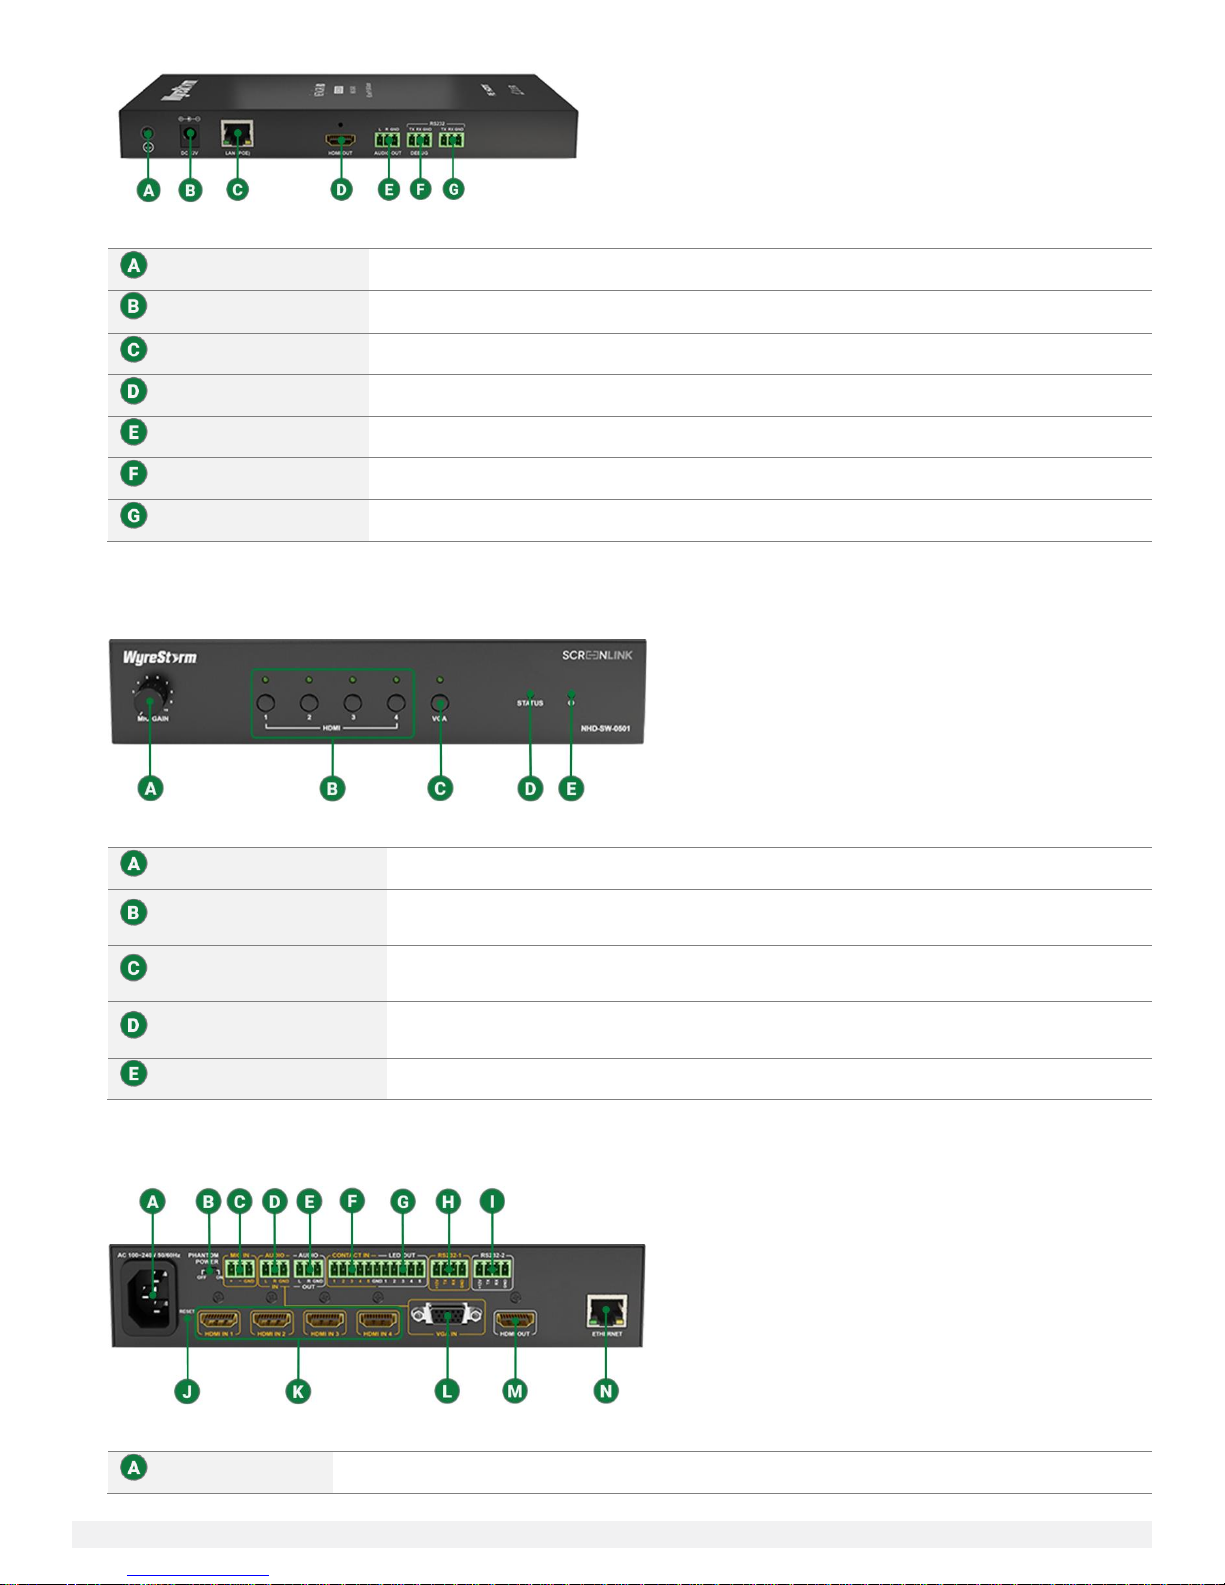
Mic Gain
Adjusts the gain of the Mic Input from 0 to 40db.
HDMI Input 1-4 Selection
Press to select and HDMI input as the active source. An illuminated LED indicates the currently
HDMI source.
VGA Input Selection
Press to select VGA input as the active source. An illuminated LED indicates the currently
selected source is VGA>
Status LED Indicator
Solid Blue: Unit is operating properly and has an active sync to a source.
Flashing Blue: Unit does not have an active sync to a source.
Power LED Indicator
Solid Red: Unit is powered on.
AC Power
Connects to a 100~240V AC 50/60Hz AC mains outlet.
NHD-SW-0501 Front Panel
NHD-SW-0501 Rear Panel

NetworkHD 100/200/400 Series Installation Guide | Copyright © 2017 WyreStorm Technologies | wyrestorm.com
9 of 40
Phantom Power
On: Provides 48V DC 100mA to a microphone connected to Mic In
Off: No power supplied – use this setting for dynamic (passive) microphones.
Mic In
3-Pin Phoenix Connector. Connect to a microphone to allow for overlay with selected source audio.
Verify that the Phantom Power switch on the rear panel is set to Off before connecting dynamic
(passive) microphones.
Audio In
3-Pin Phoenix Connector. Connect to the analog audio output of the VGA source connected to the
VGA In. Audio signal received on this port is played ONLY when the VGA input is selected.
Audio Out
3-Pin Phoenix Connector. Connect to the line level input of an audio pre-amplifier or power speaker for
output from selected source.
Contact In
5-Pin Phoenix Connector. Connect to a remote I/O control device such as a panel switch for selecting
inputs remotely.
LED Out
Connects to a remote device to show LED indication of selected source.
RS-232-1
4-Pin Phoenix Connector. Is used for controlling the NHD-SW-0501 via an external control system.
RS-232-2
4-Pin Phoenix Connector. Is used as an RS-232 output to control local devices such as connected
sources.
Reset
Press and hold for a full 5 seconds while the NHD-SW-0501 is powered on to restore factory default
settings.
HDMI In 1-4
19-Pin type A HDMI female digital video/audio input.
VGA In
15-Pin VGA VESA (DSUB 15). Connect to a DSUB 15 VGA output of a device such as a computer.
HDMI Out
19-Pin type A HDMI female digital video/audio output.
Ethernet Port
8-Pin RJ-45 female | 10/100Mbps auto-negotiating. Connect to a supported Layer 2 network switch to
transmit audio/video to a supported NetworkHD decoder.
NetworkHD 100/200/400 Series Installation Guide | Copyright © 2017 WyreStorm Technologies | wyrestorm.com
10 of 40
NHD-400-TX Rear Panel
Power Connector
Connects to a 12v 1A PSU.
Reset
Press and hold for 3 seconds to factory default unit.
LAN
PoE 10/100Mbps LAN port
Audio Out
3.5mm mini jack port. Stereo audio output.
HDMI In
Connects to a 19-Pin HDMI cable.
HDMI Out
Loop out for HDMI In. Can be connected to a local HDMI display.
IR RX
Connects to an IR Receiver.
IR TX
Connect to an IR Emitter.
Power Connector
Connects to a 12v 1A PSU.
Reset
Press and hold for 3 seconds to factory default unit.
LAN
PoE 10/100Mbps LAN port
Audio Out
3.5mm mini jack port. Stereo audio output.
RS232
4-Pin Phoenix RS232 Output.
HDMI Out
Loop out for HDMI In. Can be connected to a local HDMI display.
IR RX
Connects to an IR Receiver.
IR TX
Connect to an IR Emitter.
NHD-400-RX Rear Panel

NetworkHD 100/200/400 Series Installation Guide | Copyright © 2017 WyreStorm Technologies | wyrestorm.com
11 of 40
Installation
Shelf Placement
This product should be installed on a solid, flat, level surface. The location should be dry, well ventilated, and out of direct sunlight.
It is not acceptable to stack multiple products one atop of the other without a ventilation space between the units. WyreStorm
recommends that if using more than two of this product, an empty space at least 1 rack unit (1.75 in) in height is used between every
2 chassis. This will assist in heat dissipation and prevent overheating.
Rack Placement
Mounting ears are included with these products for installation on a solid flat surface. For NetworkHD decoders these mounting ears
are typically used for mounting behind a display. If mounting a unit behind a display or in an enclosed area, ensure that the top and
bottom vents are not obstructed.
NetworkHD 100 or 200 series encoders can be installed into the NHD-000-RACK. The NHD-000-RACK can hold up to 12 encoders
and should be installed into a 19-inch equipment rack with at least 5RU of available space.
Note: The NHD-000-RACK is not included with NetworkHD components.
Wiring and Connections
WyreStorm recommends that all wiring for the installation is run and terminated prior to making connections to the product.
Read through this section in this entirety before running or terminating the wires to ensure proper operation and to avoid
damaging equipment
Ethernet Wiring
RS-232 Wiring
Audio Out Wiring
NetworkHD 100/200/400 Series Installation Guide | Copyright © 2017 WyreStorm Technologies | wyrestorm.com
12 of 40
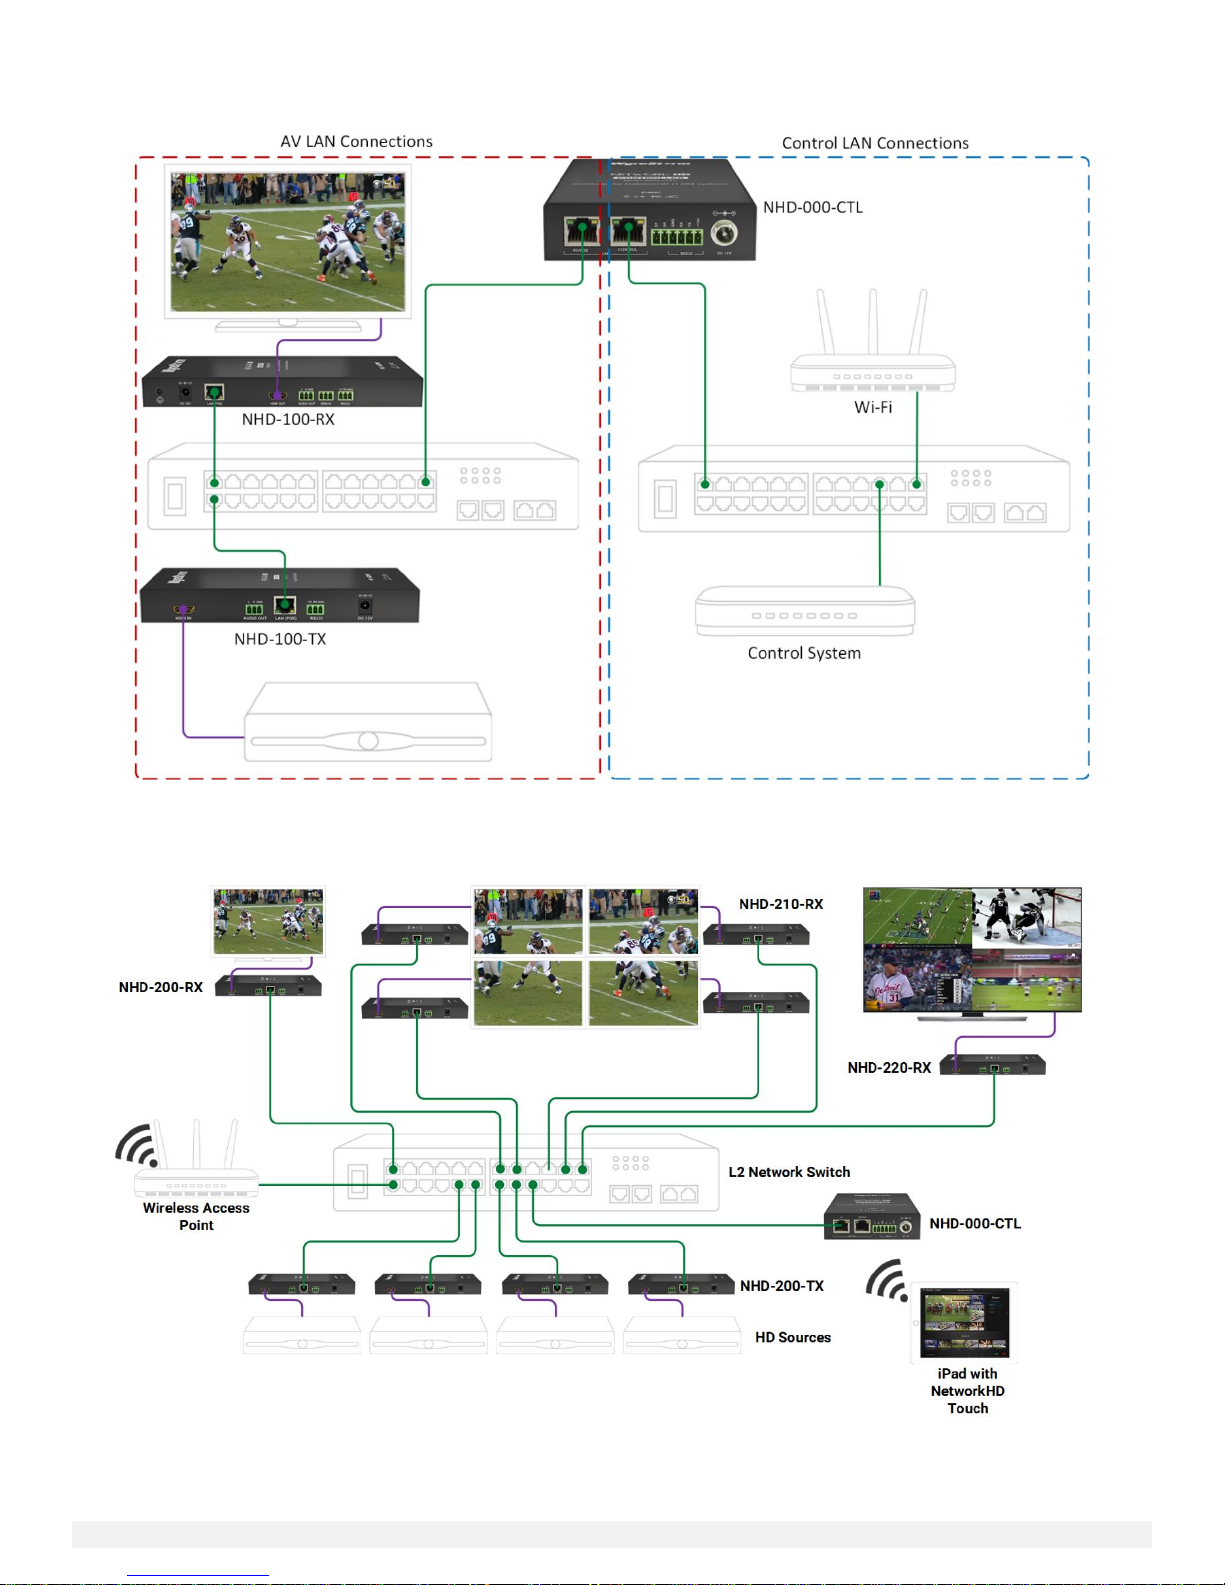
Basic Wiring Diagrams
NetworkHD 100 Series with Control System
NetworkHD 200 Series with NetworkHD Touch Control
 Loading...