

Wyrestorm EX-70-H2X-ARC Quick Start Manual
4K UHD HDCP 2.2 HDBaseT 5-Play Extender Set with ARC, 2-way
PoH, Ethernet, IR and RS-232 (4K: 70m/230ft | 1080p: 100m/328ft)
EX-70-H2X-ARC
Quickstart Guide
In the Box
1x EX-70-H2X-ARC Transmitter
1x EX-70-H2X-ARC Receiver
1x 12V DC 2A Power Supply (US/UK/EU)
2x 3-pin Screw Down Phoenix Connectors
2x IR Emitters
2x Wide-band IR Receivers (30-50KHz)
4x Mounting Brackets (1pr for TX and 1pr for RX)
1x Quickstart Guide (this document)
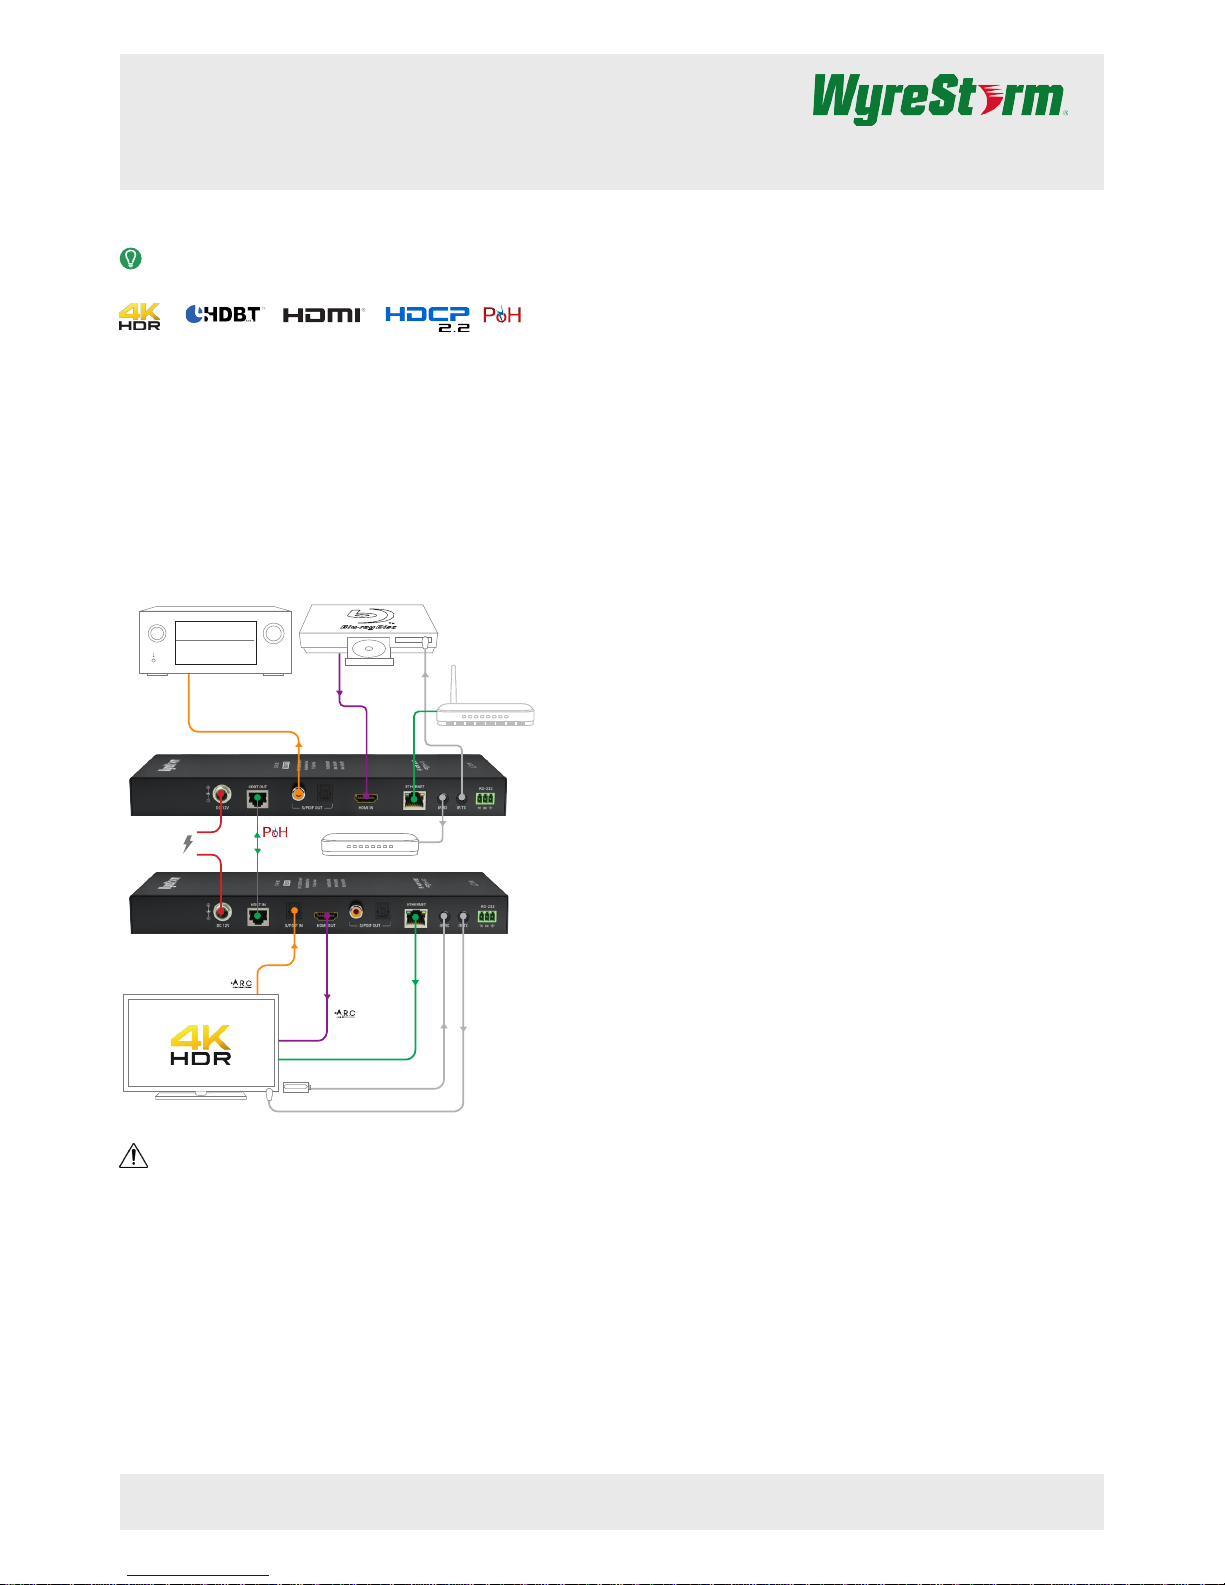
Basic Wiring Diagram
HDMI Source
HDMI
Digital Audio
Digital Audio
or
HDBaseT
Cat5e/6/6a
Ethernet
HDMI
IR Emitter
IR Emitter
IR Receiver
AV Receiver
UHD/4K Display
12 DC 2A
Power Supply
EX-70-H2X-ARC Transmitter (TX)
EX-70-H2X-ARC Receiver (RX)
IR to Control System
CAB-IR-LINK (Sold Separately)
Note: Audio from the RX is only
available on the S/PDIF Out. ARC
is not supported on the HDMI In.
Router
IMPORTANT!
Do not connect or disconnect (hot plug) the HDMI, or HDBaseT connections
while the transmitter or receiver is powered on. Doing so may cause damage
to the units or connected devices.
Additional Information
This Quickstart Guide provides the basic steps for the common uses of this
product. Detailed installation and conguration information may be found in
the download tab located on the product page.
• WebUI Reference Guide – Setup for advanced Matrix features such as IP
and testing of connections
• H2 Matrix Operation User Guide – Single page document showing the
operation via front panel and included IR remote.
• Drivers and API – Precongured drivers for popular control systems and
API document.
Installation
Before Beginning
• Verify that all items are included in the packaging per the In the Box list.
Pre Wire
1. Run a Cat5e/6/6a cable from the transmitter location to the receiver
location. Terminate the cable per the HDBaseT Wiring section.
2. (Optional) If using 3rd party IR emitters or connecting blocks at either the
transmitter or receiver, run the wire and terminate per the IR TX (Emitter)
Wiring section.
3. (Optional) If using RS-232 pass-through, run the wire and terminate per
the RS-232 Wiring section.
4. (Optional) If using 3rd party IR receivers at either the transmitter or
receiver, run the wire and terminate per the IR RX (Receiver) Wiring
section.
Transmitter Installation
1. Connect an HDMI source to the HDMI In on the transmitter using an
HDMI cable from a high quality brand such as WyreStorm Express.
2. (Optional) Place an IR emitter onto the source device near the device’s
IR receiver and connect it the IR TX port.
3. (Optional) If using the ARC function to return audio from the remote
display, connect a digital input on an AV Receiver to the S/PDIF Out.
4. Connect the cable created in Pre Wire step 1 to the HDBT Out.
5. (Optional) Connect the 3-pin connector to the RS-232 port on the
transmitter and the opposite end to a port on a control system.
6. If using PoH from the transmitter to power the receiver, connect the
included 12V DC 2A power supply to the DC 12V jack.
7. If using ARC or the audio inputs and outputs, see ARC and Audio In/Out
Settings for switch conguration
Receiver Installation
1. Connect the HDMI Out on the receiver to an input on the display using
an HDMI cable from a high quality brand such as WyreStorm Express.
2. (Optional) Place an IR emitter onto the source device near the device’s
IR receiver and connect it the IR TX port.
3. Connect the cable created in Pre Wire step 1 to the HDBT In.
4. (Optional) If using RS-232 pass-through, connect the 3-pin connector
to the RS-232 port on the receiver and the opposite end to a port on the
device being controlled.
5. If using PoH from the receiver to power the transmitter, connect the
included 12V DC 2A power supply to the DC 12V jack.
6. If using ARC or the audio inputs and outputs, see ARC and Audio In/Out
Settings for switch conguration.
Copyright © 2016 WyreStorm Technologies | wyrestorm.com
EX-70-H2X-ARC Quickstart Guide | 170210
North America: 518-289-1294 | EMEA/ROW: 44 (0) 1793 230 343
support@wyrestorm.com
1 of 4
WyreStorm recommends reading through this document in its entirety to become familiar with the product’s features prior to starting the installation
process.
Extends UHD and HDR content up to 70m/230ft (1080p to 100m/328ft) and features a revised chipset for improved compatibility with 4K UHD sources.
Additional features include 2-way PoH, bidirectional Ethernet, IR & RS-232 pass-through.
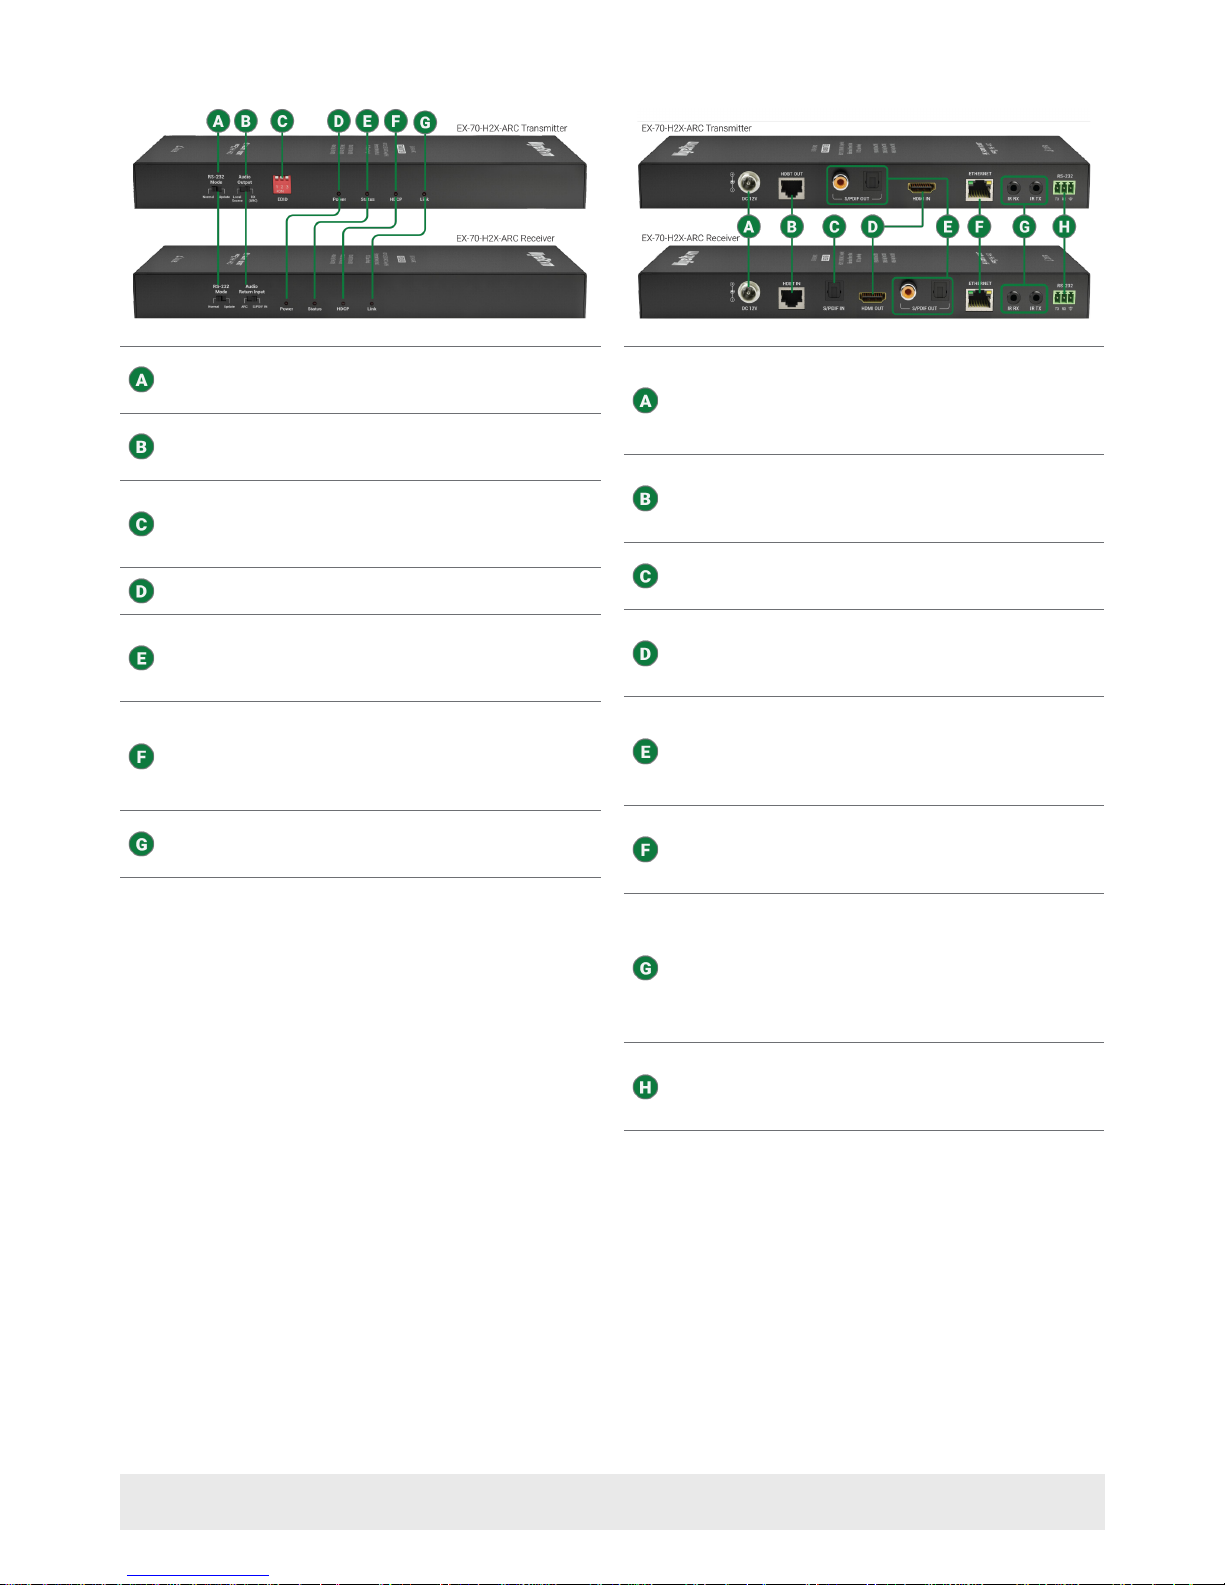
Front Panel (TX/RX) Rear Panel (TX/RX)
RS-232 Mode
Switches the mode for the RS-232 port.
Normal: RS-232 HDBaseT pass-through.
Update: RS-232 rmware update.
Audio Output (TX)
Audio Control (RX)
Sets the source to use for the transmitters
S/PDIF output. See ARC and Audio In/Out
Settings.
EDID Settings
(TX Only)
3 Position Dipswitch:
Used to set EDIDs to correct resolution
conflicts between the source and the display.
See EDID Settings.
Power LED
Solid: The transmitter is powered On
Off: The transmitter is powered Off
Status LED
Flashing: The transmitter is operating
normally.
Off: The transmitter is Not operating
normally.
HDCP LED
Solid: Audio and Video signal is HDCP
protected.
Flashing: Audio and Video signal is not HDCP
protected.
Off: No Audio and Video signal.
LINK LED
Solid: Link to receiver has been established.
Flashing: Link to receiver has not been
established.
Power In
5.5mm Screw Down Barrel Jack
Connect to the included 12V DC 2A power
supply. Only connect to either the transmitter
or receiver when using PoH. See Power
Supply Wiring.
HDBT Out (TX)
HDBT In (RX)
8-pin RJ-45 female
Connect the transmitter HDBT Out to receiver
HDBT In using the cable created in Pre Wire
step 1.
S/PDIF In
(RX Only)
TOSLink (Digital Optical)
Connect to the S/PDIF audio output of the
display when ARC is not supported.
HDMI In (TX)
HDMI Out (RX)
19-pin type A HDMI female digital video/
audio: Supports HDMI and DVI/D (requires
adapter-not included). Limited to 297MHz
pixel clock
S/PDIF Out
RCA Female (Digital Coax)
TOSLink (Digital Optical)
Outputs audio signal from local source or
ARC audio from remote display.
See ARC and Audio In/Out Settings.
Ethernet
8-pin RJ-45 female | 10/100 Mbps autonegotiating
Connect to the Ethernet port on a network
enabled display.
IR TX/RX
3.5mm (1/8in) Mono Plug
IR TX: Connect to the supplied IR emitter to
control a local device from the remote display
location via HDBaseT.
IR RX: Connect to the supplied IR receiver to
send IR to the remote display via HDBaseT.
See IR Wiring.
RS-232
3-pin Screw Down Phoenix Connector
Used to send and receive RS-232 signals to/
from the source location via HDBaseT and
rmware updates. See RS-232 Wiring.
Copyright © 2016 WyreStorm Technologies | wyrestorm.com
EX-70-H2X-ARC Quickstart Guide | 170210
North America: 518-289-1294 | EMEA/ROW: 44 (0) 1793 230 343
support@wyrestorm.com
2 of 4
 Loading...