

Wyrestorm ENA-001-010, ENA-MINI-010 Installation Manual

Copyright © 2016 WyreStorm Technologies | wyrestorm.com
ENA-001-010 | ENA-MINI-010
WyreStorm Enado™ Controller with IR, RS-232 & IP control
Release Date:
[Date of Release]
Supported Firmware:
4.0.0
Installation Guide
Thank you for choosing this WyreStorm product.
Please read these instructions carefully before installing to avoid complications later.
ENA-001-010 | ENA-MINI-010Installation Guide | Copyright © 2016 WyreStorm Technologies | wyrestorm.com
2 of 34
Note:
Provides special information for installing, configuring, and operating the
equipment.
IMPORTANT!
Provides special information that is critical to installing, configuring, and
operating the equipment.
CAUTION!
Provides special information on avoiding situations that may cause damage to
equipment.
WARNING!
Provides special information on avoiding situations that may cause physical
danger to the installer, end user, etc.
ELECTRIC SHOCK!
The source power poses an electric shock hazard that has the potential to
cause serious injury to installers and end users.
ELECTRICAL DISCONNECT:
The source power outlet and power supply input power sockets should be
easily accessible to disconnect power in the event of an electrical hazard or
malfunction.
WEIGHT INJURY!
Installing some of the equipment requires two installers to ensure safe handling
during installation. Failure to use two installers may result in injury.
IMPORTANT! Safety Information
Safety Classifications
Safety Statements
1. Read these instructions in their entirety and retain a copy for later reference.
2. Follow all instructions and heed all warnings.
3. Do not expose this apparatus to rain, moisture, sprays, drips or splashes and ensure that no objects containing liquids are
placed on the apparatus, including cups, glasses and vases.
4. Do not place this unit in a confined space such as enclosed shelving, cabinets or bookshelves. Ensure the unit is adequately
ventilated.
5. To prevent the risk of electric shock or fire hazard due to overheating, do not cover the unit or obstruct ventilation openings
with material, newspaper, cardboard or anything that may restrict airflow into the unit.
6. Do not install near external heat sources such as radiators, heat registers, boilers or any device that produces heat such as
amplifiers or computers and do not place near sources of naked flame.
7. Unplug apparatus from power supply during lightning storms or when unused for long periods of time.
8. Protect the power cable from being walked on, pinched or restricted in any way, especially at plug connections.
9. Only use attachments/accessories specified by the manufacturer.
10. Units contain non-serviceable parts - Refer all servicing to qualified service personnel.
IMPORTANT!
Do Not Hot swap connections - Please insert and extract cables carefully with the power SWITCHED OFF. Power is
passed along transmissions so connecting and disconnecting cables while powered can result in damage to
circuitry or possible injury.

ENA-001-010 | ENA-MINI-010Installation Guide | Copyright © 2016 WyreStorm Technologies | wyrestorm.com
3 of 34
Contents
IMPORTANT! Safety Information ...................................................................................................................................... 2
Contents ........................................................................................................................................................................... 3
1 Introduction................................................................................................................................................................... 4
Before Beginning ..................................................................................................................................................................................................... 4
2 Product Overview .......................................................................................................................................................... 5
Key Features ............................................................................................................................................................................................................ 5
In the Box .................................................................................................................................................................................................................. 5
ENA-001-010 Enado Control Solution .................................................................................................................................................................. 6
ENA-MINI-010 Enado Mini IP Control Solution ................................................................................................................................................... 8
Specifications .......................................................................................................................................................................................................... 9
Typical Application .................................................................................................................................................................................................. 9
3 Installation .................................................................................................................................................................. 12
Shelf Placement.....................................................................................................................................................................................................12
Rack Placement .....................................................................................................................................................................................................12
Wiring and Connections .......................................................................................................................................................................................12
4 Configuration .............................................................................................................................................................. 14
Connection Steps ..................................................................................................................................................................................................14
Network Configuration .........................................................................................................................................................................................14
5 Product Operation ....................................................................................................................................................... 15
Accessing the Configuration UI...........................................................................................................................................................................15
Firmware Update ...................................................................................................................................................................................................15
Network Settings ...................................................................................................................................................................................................15
Help menu ..............................................................................................................................................................................................................15
Creating a Project ..................................................................................................................................................................................................16
Adjusting I/O Ports ................................................................................................................................................................................................16
Downloading & Importing Device Commands..................................................................................................................................................17
Creating Rooms & Activity Buttons ....................................................................................................................................................................20
Creating Activity Layouts .....................................................................................................................................................................................21
Button Groups ........................................................................................................................................................................................................21
Adding Commands to Buttons ............................................................................................................................................................................23
Assigning Activity Layouts & Ports .....................................................................................................................................................................26
Uploading Custom Icons ......................................................................................................................................................................................26
Visual Theme .........................................................................................................................................................................................................26
QR Codes ................................................................................................................................................................................................................27
Remote Access ......................................................................................................................................................................................................27
Triggered Commands ...........................................................................................................................................................................................28
Adding a Video Source .........................................................................................................................................................................................29
Publishing a Project ..............................................................................................................................................................................................30
Adjusting Controller Preferences ........................................................................................................................................................................30
Project & Controller Backup .................................................................................................................................................................................30
6 Troubleshooting .......................................................................................................................................................... 31
Unable to Locate Enado’s IP Address ................................................................................................................................................................31
Devices Aren’t Being Controlled ..........................................................................................................................................................................31
Testing Commands ..............................................................................................................................................................................................31
Activity Layouts Aren’t Publishing.......................................................................................................................................................................31
Cannot Gain Remote Access...............................................................................................................................................................................31
Custom Image Will Not Upload ...........................................................................................................................................................................31
Contacting Technical Support .............................................................................................................................................................................31
7 Warranty and Service .................................................................................................................................................. 32
Warranty Limits & Exclusions ..............................................................................................................................................................................32
Obtaining Warranty Service .................................................................................................................................................................................32
Publication Disclaimer .................................................................................................................................................... 34

ENA-001-010 | ENA-MINI-010Installation Guide | Copyright © 2016 WyreStorm Technologies | wyrestorm.com
4 of 34
1 Introduction
This Installation Guide will guide the installer through the process of installing and configuring a WyreStorm ENA-001-010 or ENAMINI-010 controller.
Print out this page to use as a checklist for items required to install this WyreStorm product.
WyreStorm recommends reading through this document in its entirety to become familiar with the product’s
features prior to starting the installation process.
Before Beginning
WyreStorm recommends visiting the product page before installing this product for updates to this Installation Guide as well as other
information about this product.
Read through this document in its entirety. ....................................................................................................................................
ENA-001-010 or ENA-MINI-010 ...........................................................................................................................................................
Required cables and connectors to connect sources and displays. .......................................................................................
See Installation for details on connector types and wiring guidelines.
A/V equipment to be controlled in the system. ..............................................................................................................................
Ethernet network components and network usernames and passwords (if applicable). ................................................
PC or Mac with a compatible web browser. ....................................................................................................................................
Google Chrome, Mozilla Firefox and Apple Safari are recommended.

ENA-001-010 | ENA-MINI-010Installation Guide | Copyright © 2016 WyreStorm Technologies | wyrestorm.com
5 of 34
2 Product Overview
WyreStorm Enado redefines integrators’ ability to control AV distribution systems by combining powerful hardware and intuitive,
cross-platform software to create an end-to-end AV distribution and control system that is always on, updated and accessible.
The Enado Controller offers exceptional performance and capability within one compact unit, designed to offer high levels of
functionality the Enado Controller utilizes a unique software platform that scales to the highest level.
The system can be programmed via a simple but advanced web browser application and is designed to offer maximum control
flexibility eliminating the requirement for proprietary applications. The powerful software can run on any client device that offers a
compatible web interface making the controller ideal for both professional and residential control.
For further information on this product and other WyreStorm ranges, visit our website or download our latest product guide at
wyrestorm.com
Key Features
Server based, centrally managed IP control system eliminates the need to download and update individual Apps
& configuration files to every control device
Revolutionary remote management & access for installer & user
Fast, reliable, affordable control ideal for WyreStorm installations
Extensive I/O to control devices through IR, RS-232, IP or Relays
Sleek, 1U design allows for installation flexibility in a rack, cabinet or shelf
B.Y.O.D structure that allows for unlimited access capability with tablets, smartphones, PCs or Macs
In the Box
1x ENA-001-010 or ENA-MINI-010 controller
1x Printed Installation Guide (this document). Full manual also available for download at WyreStorm.com
8x CAB-IR-LINK cables (ENA-001-010 only)
4x RS-232 male to female DB9 cables (ENA-001-010 only)
1x Ethernet patch cable
2x Rack Ears (ENA-001-010 only)
1x 100-240v AC power cables (AUS, UK, US, EU form factors, ENA-001-010 only)
1x 5v 2A power supply (ENA-MINI-010 only)

ENA-001-010 | ENA-MINI-010Installation Guide | Copyright © 2016 WyreStorm Technologies | wyrestorm.com
6 of 34
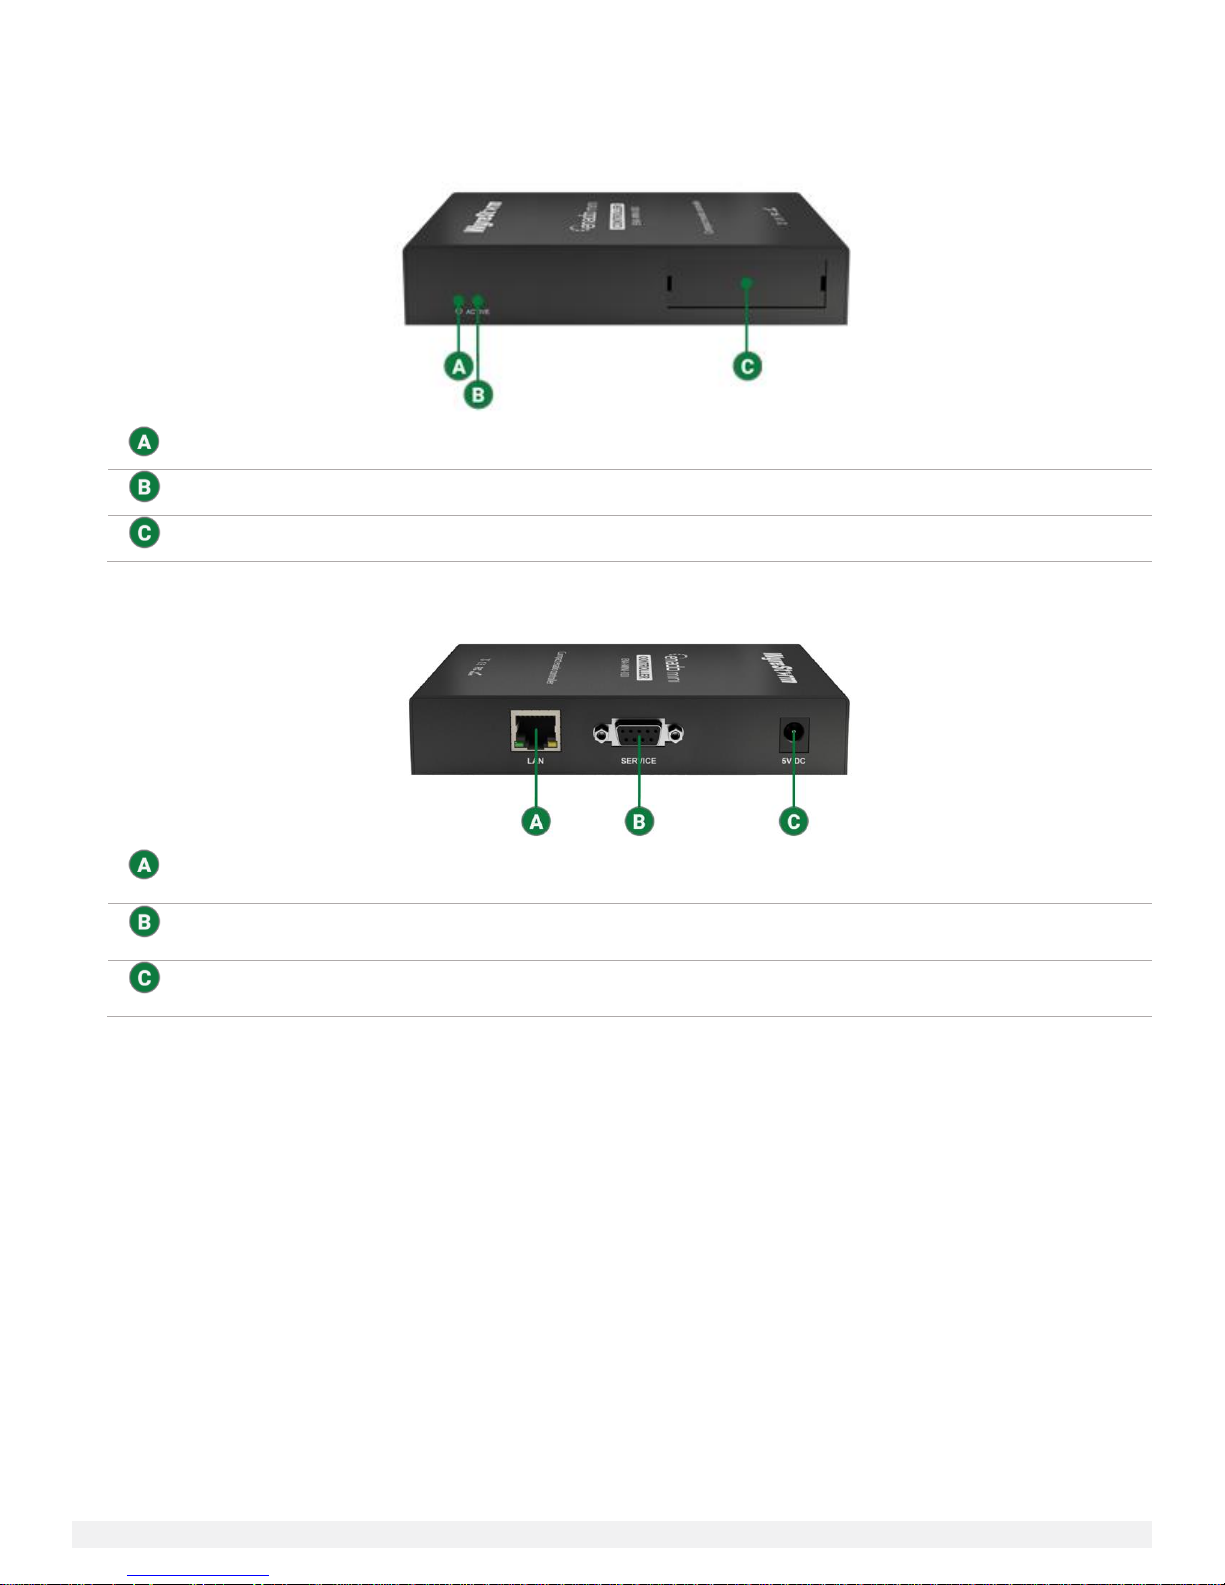
IR TX Blasters
Currently not used
Power LED
Solid: Enado is powered on
Transmission LED
Flashes: Data is sent from Enado
Warning LED
Solid: Enado is not functioning properly
IR RX Learning
Port
Can be used to learn IR commands from an IR remote.
Power Switch
Turns the Enado on or off
Ground Terminal
Can be used to ground the chassis
AC Power Plug
Connects to a 100-240V AC 50/60Hz AC mains outlet
8 Port Ethernet
Switch
10/100Mbps umanaged network switch. Connects to a LAN with a DHCP server for Enado to
acquire an IP address
IR RX Learning
Port
Can be used with an IR RX cable for IR learning. Performs same function as front panel IR RX
IR TX Ports
Are used with IR TX cables or CAB-IR-LINK integration cables to send IR commands to devices
RS-232 Ports
Are used to send serial commands to devices
Sensor I/O
Are used to triggered open or closed circuits. Requires 12volt input
USB 2.0 Port
Can be used for an EasySync USB to RS485 adapter.
ENA-001-010 Enado Control Solution
Front Panel
Rear Panel

ENA-001-010 | ENA-MINI-010Installation Guide | Copyright © 2016 WyreStorm Technologies | wyrestorm.com
7 of 34
Audio and Video
Inputs/Outputs
8x LAN - 8-pin RJ-45 female
16x IR TX - 3.5mm (1/8in) TS Mono
1x IR IN - 3.5mm (1/8in) TRS Stereo
4x RS-232 - 9-pin DB9 Female
4x NO (Normally Open) Relays – Shared 24pin Phoenix
4x NC (Normally Closed) Relays - Shared 24pin Phoenix
4x Sensors (12V) - Shared 24pin Phoenix
1x USB Type A
Communication and Control
HDMI
Max Cable Run: 15m | DVI/D supported with adapter (not included)
Ethernet
10/100 Mbps auto-negotiating
Power
Power Supply
Input: 100~240V AC 50/60Hz | Output: 5V DC 2A
Max Power Consumption
1.4W
Environmental
Operating Temperature
32°F ~ 113°F (0°C ~ 45°C)
10% ~ 90%, non-condensing
Storage Temperature
-4°F to ~ 158°F (-20°C ~ +70°C)
10% ~ 90%, non-condensing
Maximum BTU
4.77 BTU/hr
Dimensions and Weight
Rack Units/Wall Box
1U
Height
26mm/1.03in
Width
141mm/5.56in
Depth
115mm/4.53in
Weight
0.42kg/0.92lbs
Regulatory
Safety and Emission
CE | FCC
Specifications
ENA-001-010 | ENA-MINI-010Installation Guide | Copyright © 2016 WyreStorm Technologies | wyrestorm.com
8 of 34
Power LED
Solid: Enado is powered on.
Active LED
Flashing: Enado is functioning properly.
Blank Insert
Can be used with a card insert to identify information such as an IP address.
LAN Port
10/100 Mbps Ethernet port. Connects to a LAN with a DHCP server for Enado to acquire an IP
address.
RS-232 Service
Port
For WyreStorm use only.
Power Supply
Adapter
Connects to a 5v 2A power supply.
ENA-MINI-010 Enado Mini IP Control Solution
Front Panel
Rear Panel

ENA-001-010 | ENA-MINI-010Installation Guide | Copyright © 2016 WyreStorm Technologies | wyrestorm.com
9 of 34
Audio and Video
Inputs/Outputs
1x LAN - 8-pin RJ-45 female
Communication and Control
HDMI
Max Cable Run: 15m | DVI/D supported with adapter (not included)
Ethernet
10/100 Mbps auto-negotiating
Power
Power Supply
Input: 100~240V AC 50/60Hz | Output: 5V DC 2A
Max Power Consumption
1.4W
Environmental
Operating Temperature
32°F ~ 113°F (0°C ~ 45°C) | 10% ~ 90%, non-condensing
Storage Temperature
-4°F to ~ 158°F (-20°C ~ +70°C) | 10% ~ 90%, non-condensing
Maximum BTU
4.77 BTU/hr
Dimensions and Weight
Rack Units/Wall Box
1U
Height
26mm/1.03in
Width
141mm/5.56in
Depth
115mm/4.53in
Weight
0.42kg/0.92lbs
Regulatory
Safety and Emission
CE | FCC
Specifications
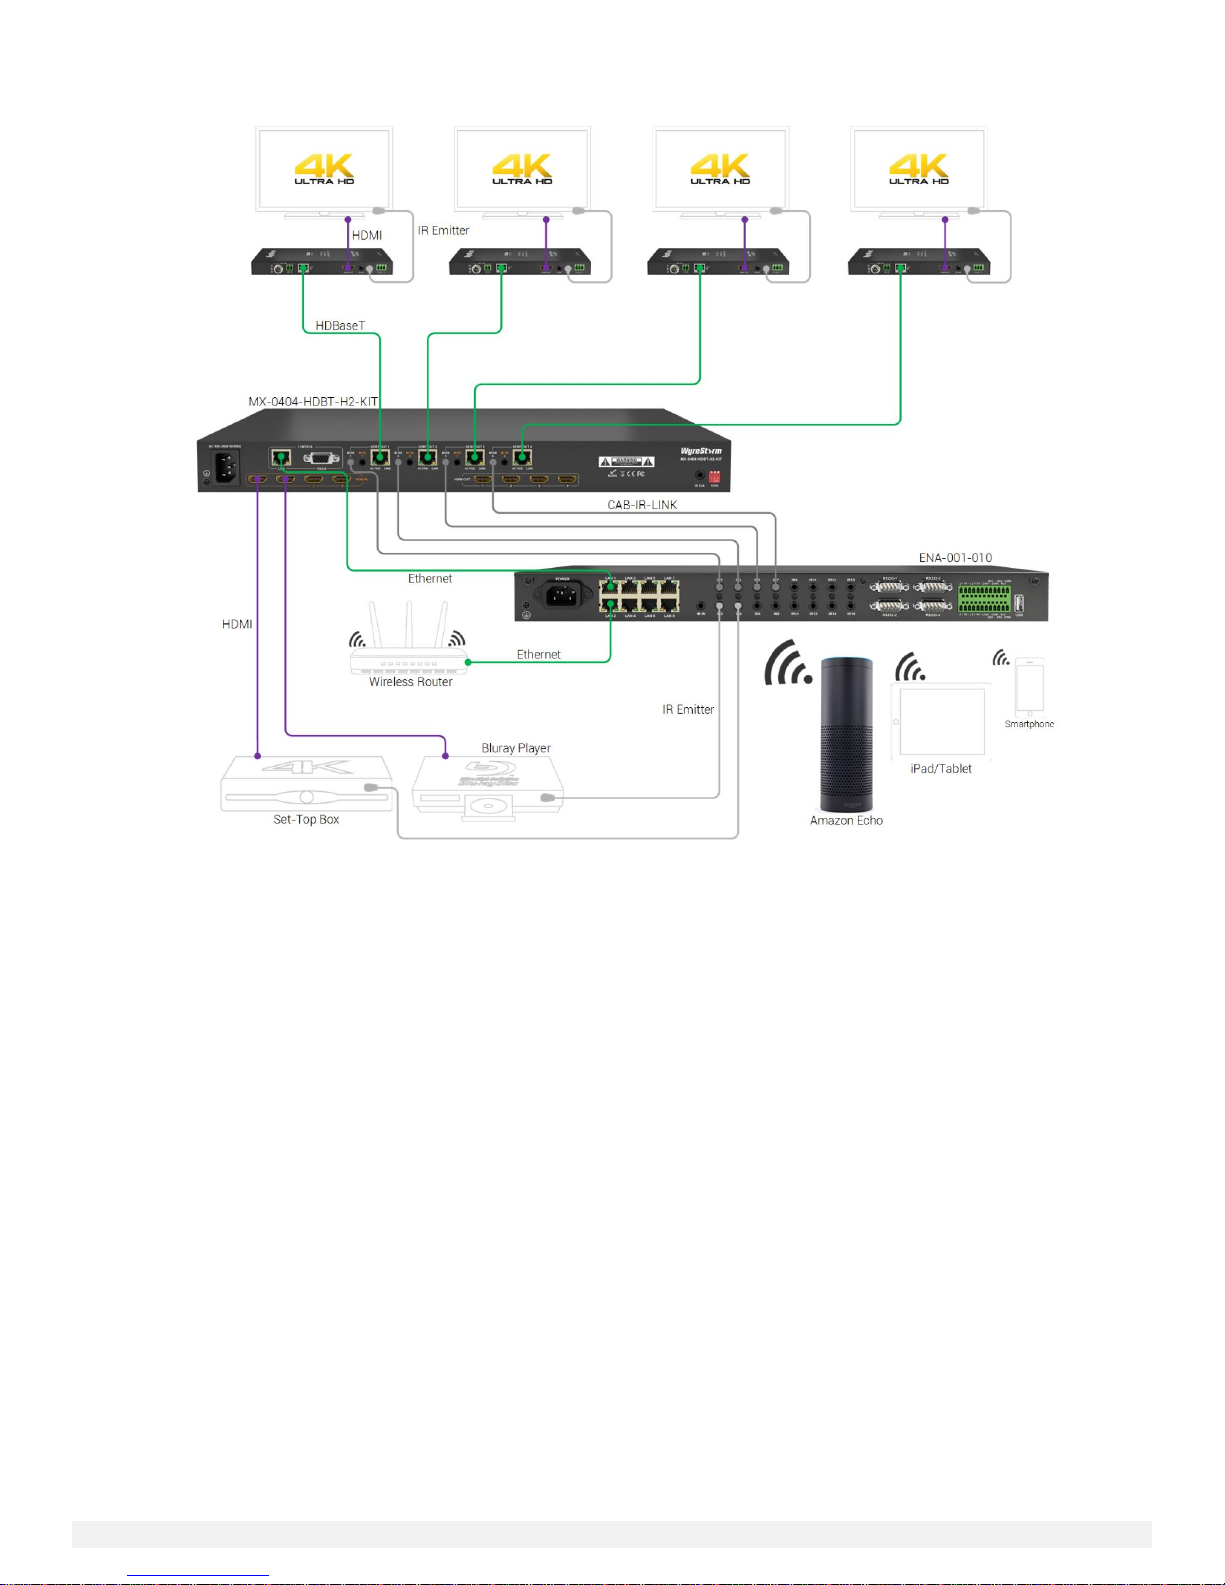
Typical Application
A typical application for this product contains the following components. While other items can be added to the configuration, the
items listed below are the devices typically found in the average installation of this product.
ENA-001-010
Cable/Satellite Box(es) & Bluray player(s)
Network router/switch
WyreStorm MX-0404-HDBT-H2-KIT with POH receivers
ENA-001-010 | ENA-MINI-010Installation Guide | Copyright © 2016 WyreStorm Technologies | wyrestorm.com
10 of 34
Basic Wiring Diagram
ENA-001-010 | ENA-MINI-010Installation Guide | Copyright © 2016 WyreStorm Technologies | wyrestorm.com
11 of 34
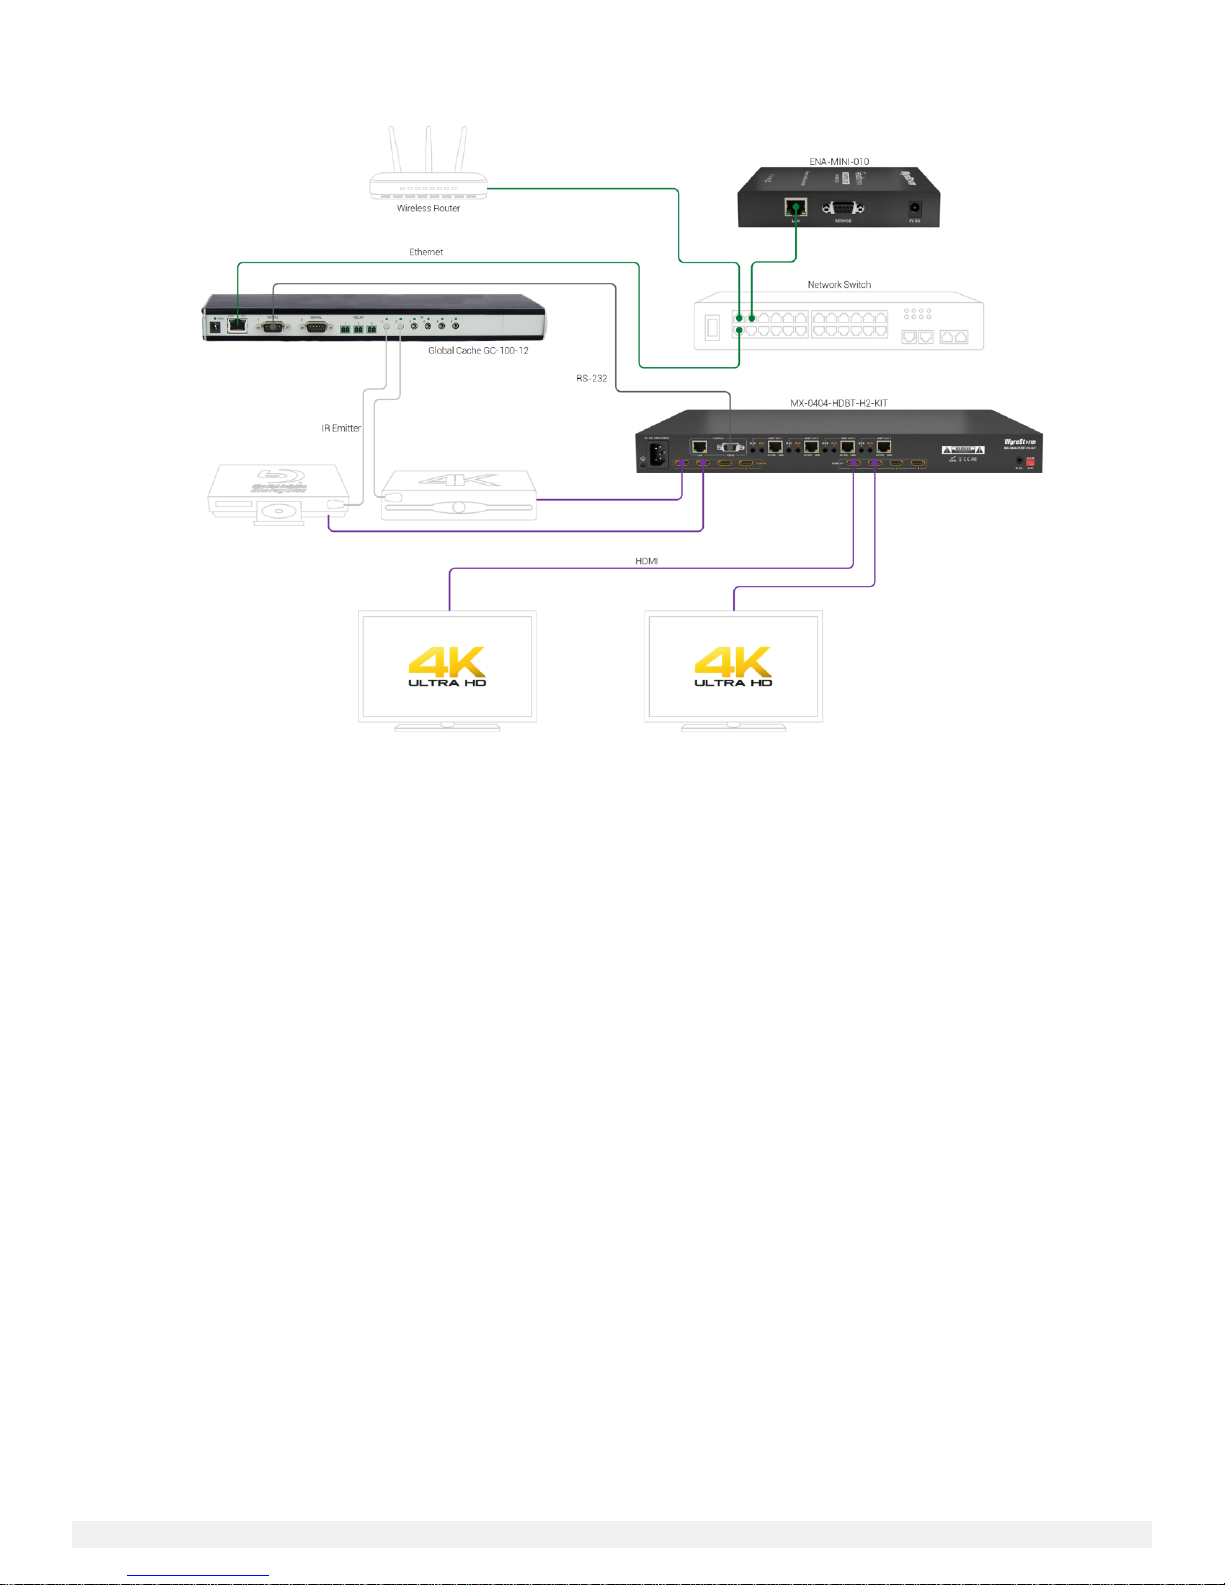
ENA-MINI-010 with Global Cache Adapater
 Loading...