

Page 1
R
INSTALLATION
AND
OPERATING INSTRUCTIONS
CONTACT BUN TOASTER
INTENDED FOR OTHER
THAN HOUSEHOLD USE
Model:
RETAIN THIS MANUAL FOR FUTURE REFERENCE
APPLIANCE MUST BE KEPT CLEAR OF COMBUSTIBLES AT ALL TIMES
FOR YOUR SAFETY:
liquids in the vicinity of this or any other appliance.
WARNING:
cause property damage, injury or death. Read the Installation, Operating and
Maintenance Instructions thoroughly before installing or servicingthis equipment.
Initial heating of appliance may generate smoke or fumes and must be done in a well ventilated area.
Overexposure to smoke or fumes may cause nausea or dizziness.
This equipment has been engineered to provide you with year-round dependable service when used
according totheinstructions in this manual and standard commercialkitchen practices.
Improper installation, adjustment, alteration, service or maintenance can
Do not store or use gasoline or other flammable vapors and
M2000-JIB
!!
!!
Phone: +1
Fax: +1 (214) 565-0976
Toll Free: +1 (800) 527-2100
Website: www.apwwyott.com
E-mail: info@apwwyott.com
(214) 421-7366
(800) 733-2203
24 Hour Service Hotline
1
ANSI/NSF4
P/N 70202001 3/06
APW WYOTT
729 Third Avenue
Dallas, TX 75226
Page 2
TABLE OF CONTENTS
Safety Precautions 2
General Information 2
Installation 3
Location 4
Operating Instructions 4
Cleaning 5
Daily Parts Cleaning 5
Daily Conveyor Cleaning 5
One-Time Boil Out of Conveyor 6
Daily Griddle Cleaning 6
Troubleshooting 8
Specifications 9
Replacement Parts List w/Exploded View 10
Wiring Diagram 12
Warranty 14
SAFETY PRECAUTIONS
APW Wyott toasters are designed, built, and sold for commercial use and should be operated by trained
personnel only. Clearly post all CAUTIONS, WARNINGS and operating instructions near each unit to
insureproper operationand to reducethe chanceof personalinjury and/or equipment damage.
Always disconnect power before cleaning or servicing the toaster. Surfaces will remain hot after power has
been turned off, allow unit to cool before cleaning or servicing. Never clean the toaster by immersing it in
water. The toaster is not protected against water jets; DO NOT CLEAN TOASTER WITH A WATER JET.
Alwaysclean equipmentbefore first use.
Operatingtoaster withoutlegs will void the warranty. Insureall accessoriesand exteriorpanels areproperly
installedand adjustedbefore applyingpower andoperating.
GENERAL INFORMATION
Check the rating label for your model designation and electrical rating. Rating Label is located on the
bottomfront of the control panel.
Overalldimensions withfeeder: 23.5"(59.7cm)W x 25.9"(65.8cm) H x 17.5"(44.5cm) D
ElectricalRatings:
M2KA:208VAC,2880W,13.8A60Hz
M2KH:240VAC,3840W,16A60Hz
CordsetConfiguration:
208/250V:NEMA6-20PPlug, 4foot, 3wire grounded cord.
If the supply cord is damaged, the manufacturer or an authorized service agent or a similarly qualified
personmust replaceit to avoida hazardor warranty.
ShippingWeight:
94lbs (42.7 Kg)
2
Page 3
1. Examine carton for damage
The freight carrier has assumed responsibility for its safe transit and delivery. If equipment is
receiveddamaged, eitherapparent orconcealed, aclaim must be made withdelivering carrier.
a. Apparent damage or loss must be noted on the freight bill at the time of delivery.
The carrier representative (Driver) the freight bill. If this is not done, the
carriermay refuse the claim.The carrier can supply thenecessary forms.
b. Concealed damage or loss if not apparent until after the toaster is removed from
carton,
shouldarrange an inspection.
2. VerifyParts
Afterremoving unit from the shipping carton, unwrappingloose partsand remove any packingtape,
plasticwrap and nylon tie-down. Verify thefollowing parts:
Item Packaging Qty
Legs In plastic bag 4
Feeder/Bun Chute Wrapped, loose in top of carton 1
Conveyor In individual carton 1
Instruction Manual Loose in carton 1
Teflon Sheet Kit (optional) Loose in carton Optional
a request for inspection must be made to the carrier within 15 days. The carrier
INSTALLATION
must sign
Besure to saveall contentsand packaging material.
NOTE:
BECLEANED WITHWARM SOAPY WATERTO REMOVE MANUFACTURINGOILS,THENRINSED
AND DRIED THOROUGHLY. Apply oil (vegetable oil) to the conveyor chain after washing. (Bun oil can be
usedif it containsno animalfats, salts or dairyproducts).
3. AssembleLegs
4. ConveyorInstallation
PRIORTO INITIAL START-UP,ALLREMOVABLEPARTSANDTHE GRILLSURFACE SHOULD
Lay the toaster on its back and install the four adjustable legs into the threaded holes on the bottom
of the toaster sides. Hand tighten the legs by gripping the black shank and turning until it is seated
firmly against the bottom of the toaster. Set the toaster upright on a flat surface. Unscrewing the
lower, chrome insert of each leg levels the unit. Flats are provided on two sides of the insert to allow
useof a wrench.Precise levelingis notrequired for proper operation.
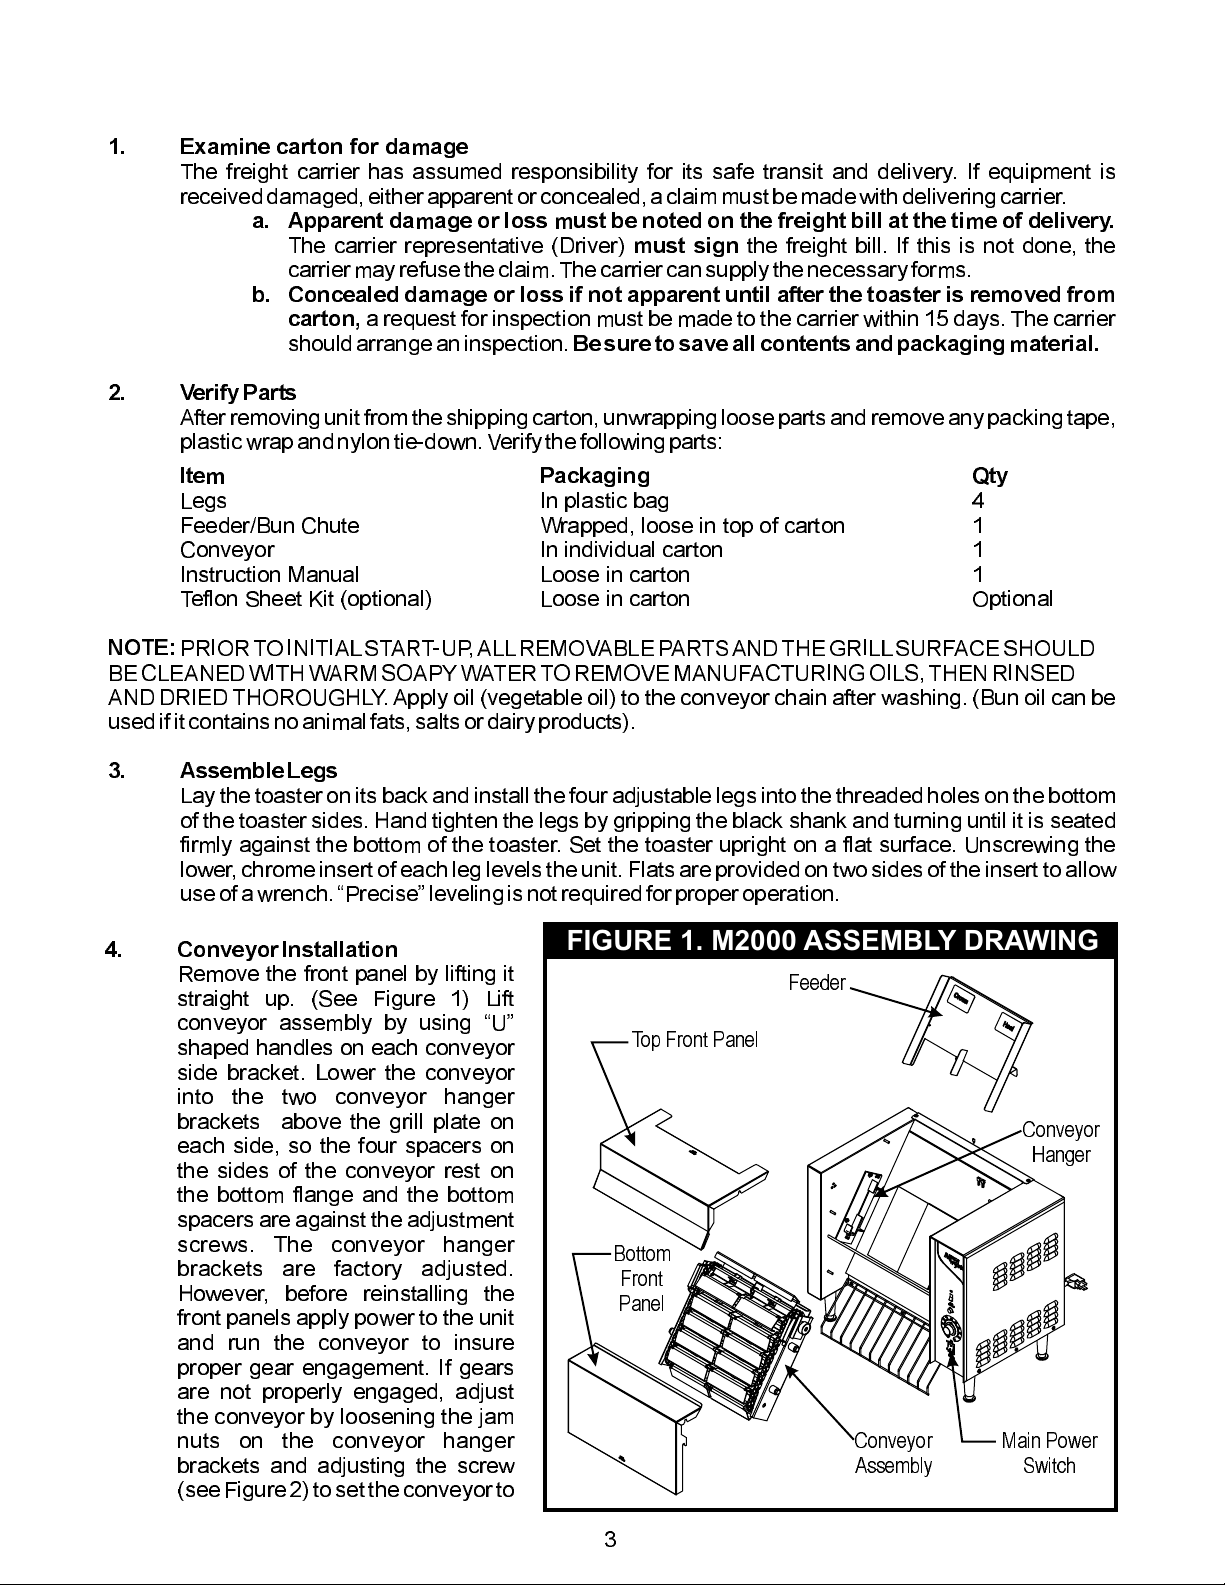
FIGURE 1. M2000 ASSEMBLY DRAWING
Remove the front panel by lifting it
straight up. (See Figure 1) Lift
conveyor assembly by using U
shaped handles on each conveyor
side bracket. Lower the conveyor
into the two conveyor hanger
brackets above the grill plate on
each side, so the four spacers on
the sides of the conveyor rest on
the bottom flange and the bottom
spacers are against the adjustment
screws. The conveyor hanger
brackets are factory adjusted.
However, before reinstalling the
front panels apply power to the unit
and run the conveyor to insure
proper gear engagement. If gears
are not properly engaged, adjust
the conveyor by loosening the jam
nuts on the conveyor hanger
brackets and adjusting the screw
(see Figure 2) toset the conveyorto
Top Front Panel
Bottom
Front
Panel
Feeder
Conveyor
Assembly
Conveyor
Hanger
Main Power
Switch
3
Page 4
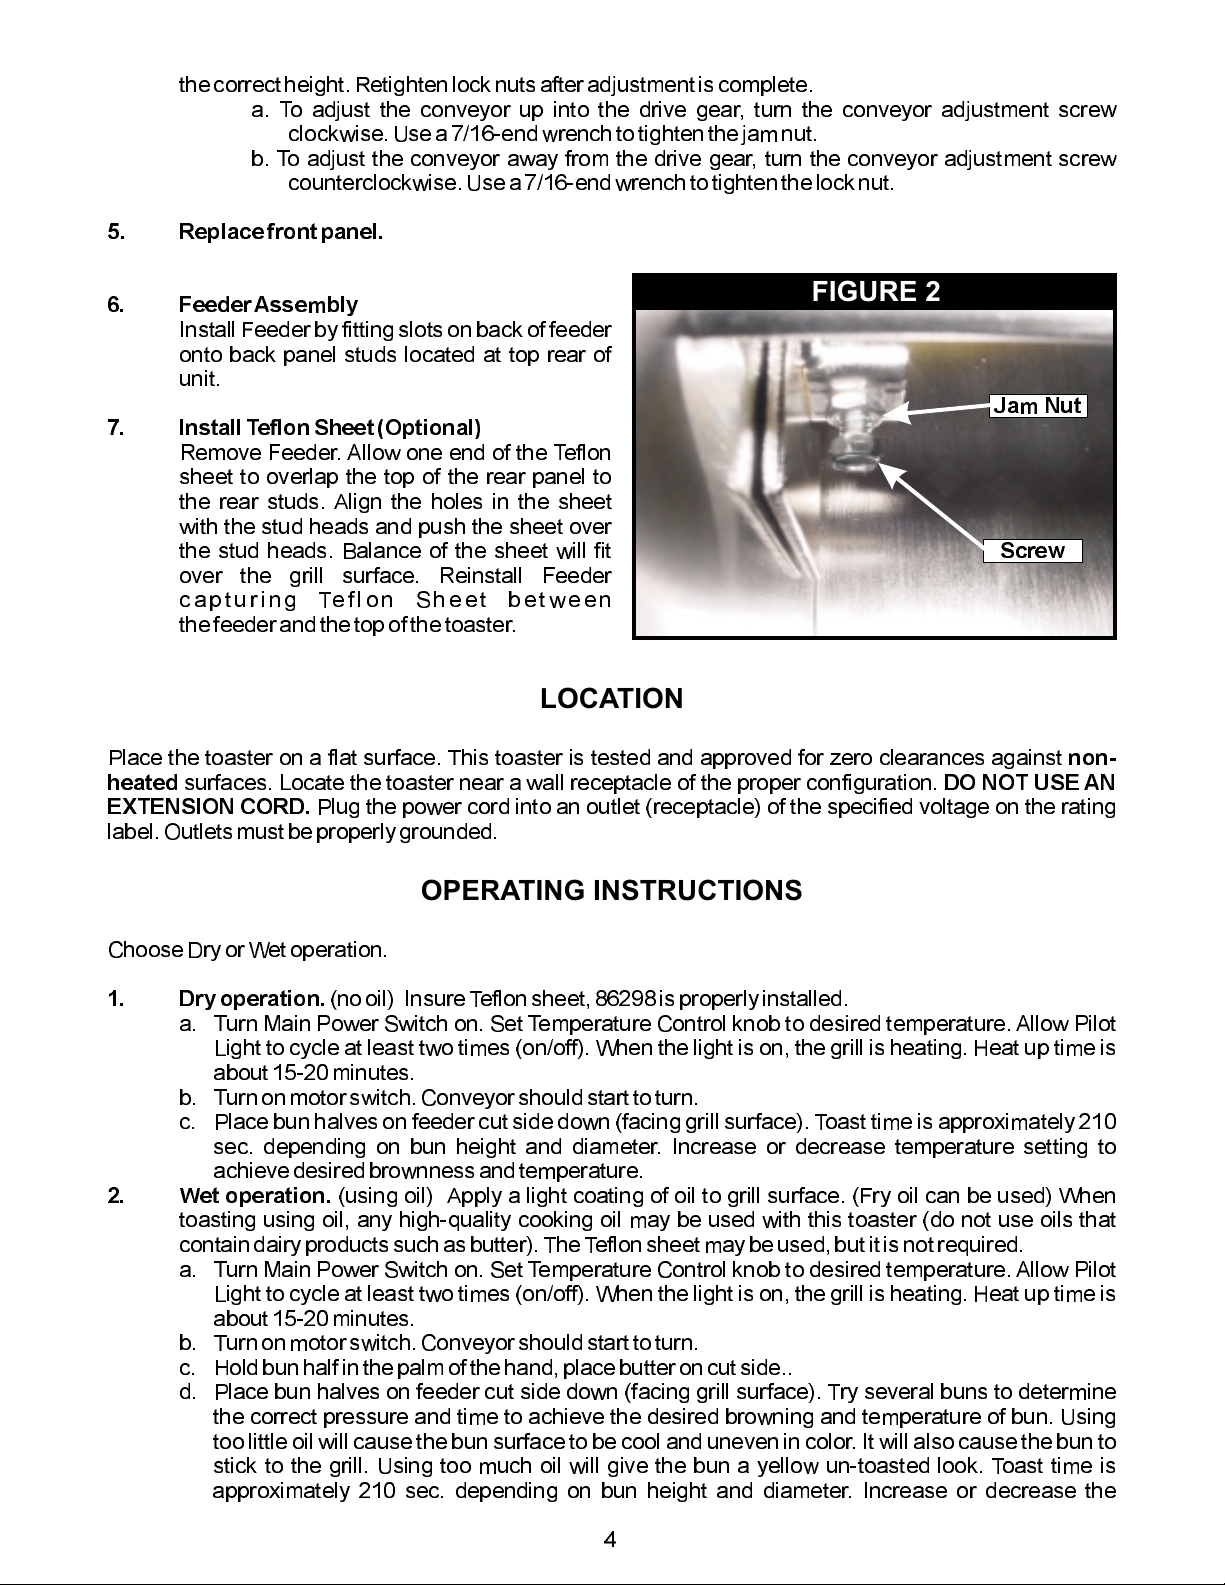
thecorrect height. Retighten lock nuts afteradjustment iscomplete.
a. To adjust the conveyor up into the drive gear, turn the conveyor adjustment screw
clockwise.Use a 7/16-end wrench to tighten thejam nut.
b. To adjust the conveyor away from the drive gear, turn the conveyor adjustment screw
counterclockwise.Use a7/16-end wrenchto tighten the lock nut.
5. Replacefront panel.
6. FeederAssembly
Install Feeder by fitting slots on back of feeder
onto back panel studs located at top rear of
unit.
7. InstallTeflonSheet(Optional)
Remove Feeder. Allow one end of the Teflon
sheet to overlap the top of the rear panel to
the rear studs. Align the holes in the sheet
with the stud heads and push the sheet over
the stud heads. Balance of the sheet will fit
over the grill surface. Reinstall Feeder
capturing Teflon Sheet between
thefeeder and the top ofthe toaster.
FIGURE 2
Jam Nut
Screw
LOCATION
Place the toaster on a flat surface. This toaster is tested and approved for zero clearances against
heated DO NOT USE AN
EXTENSION CORD.
label.Outlets mustbe properlygrounded.
surfaces. Locate the toaster near a wall receptacle of the proper configuration.
Plug the power cord into an outlet (receptacle) of the specified voltage on the rating
non-
ChooseDry or Wet operation.
1. Dryoperation.
a. Turn Main Power Switch on. Set Temperature Control knob to desired temperature. Allow Pilot
Light to cycle at least two times (on/off). When the light is on, the grill is heating. Heat up time is
about15-20 minutes.
b. Turnon motorswitch. Conveyorshould startto turn.
c. Place bun halves on feeder cut side down (facing grill surface). Toast time is approximately 210
sec. depending on bun height and diameter. Increase or decrease temperature setting to
achievedesired brownnessand temperature.
2. Wet operation.
toasting using oil, any high-quality cooking oil may be used with this toaster (do not use oils that
containdairy productssuch asbutter). The Teflon sheet may beused, butit is notrequired.
a. Turn Main Power Switch on. Set Temperature Control knob to desired temperature. Allow Pilot
Light to cycle at least two times (on/off). When the light is on, the grill is heating. Heat up time is
about15-20 minutes.
b. Turnon motorswitch. Conveyorshould startto turn.
c. Holdbun halfin thepalm ofthe hand, place butter oncut side..
d. Place bun halves on feeder cut side down (facing grill surface). Try several buns to determine
the correct pressure and time to achieve the desired browning and temperature of bun. Using
too little oil will cause the bun surface to be cool and uneven in color.It will also cause the bun to
stick to the grill. Using too much oil will give the bun a yellow un-toasted look. Toast time is
approximately 210 sec. depending on bun height and diameter. Increase or decrease the
(nooil) InsureTeflonsheet, 86298is properlyinstalled.
(using oil) Apply a light coating of oil to grill surface. (Fry oil can be used) When
OPERATING INSTRUCTIONS
4
Page 5
temperaturesetting toachieve desiredbrownness and temperature.
NOTE:
Should the temperature setting be changed, allow several cycles for the grill plate to adjust.
Oncethe desired setting has beenachieved, notethe temperatureand keepit set there.
CLEANING
WARNING:Make sure the toaster is in the off position and has been off at least 15 30 minutes. Do
notattempt this cleaning procedureif the toastercomponentsare toohot to touch.
Never spray water on the toaster or controls. Damage to the toaster as well as injury could occur.
Severeinjury and burns may occurif youdo not follow this instructionsheet.
DISASSEMBLY
Turnoffmain power switchand conveyorswitch. Disconnectthe power supply cord fromthe wall outlet. The
toasterwill be hotwhen turnedoff.Allow thetoaster to cool for atleast 15 30 minutes before handling.
CAUTION
NOTE:Do not use any chlorideor chlorine-based productsto cleanor rinsetoaster ortoaster parts.
DailyParts Cleaning:
The Feeder, and Top and Bottom Front Panel can be placed in a dishwasher or sink and washed with
detergentand warmwater.
DailyConveyor Cleaning:
Conveyor may be hot and is heavy, use caution when lifting and removing.
assembly by gripping the two handles at the top and lifting forward until it clears the gears. Lift it up and out
gently placing it in a sink with the drain stopped, or in a suitable container to soak over night. Conveyor can
be placed in the sink or container while warm. The soak
solution is a mix of 10 parts hot water (120ºF or more) to 1 part (minimum) INSIDE OUT brand 3-IN-1. Fill
the sink or suitable container with thesolution, to completelycover the conveyorby approximately one inch.
Allow the conveyor to soak in the solution over night. Remove the conveyor from the solution. Use a stiff
non- metalbrush or plastic pad to remove residualbun oil. Insure the chains are clean and free from debris.
Use a brush to remove any soil or debris remaining on the chain. Rinse conveyor with plain hot water and
allow to drain. Lubricate both chains thoroughly with vegetable oil. Bun oil may be used if it contains no
animal fats, salts or dairy products.
Gently replace conveyor into toaster.
afterover nightuse!
duringdisassembly andcleaning. Removethe Topand Bottom Front Panels.
Remove the conveyor
Use caution when handling a hot conveyor.
Note: Chain Lubrication is critical to chain life. Oil the chain daily.
Discard used soak solution. Clean and sanitize sink or container
USE
Replace all removed toaster parts.Plug power supplycord into wall outlet.Turn mainpower switch on.Turn
conveyorswitch on.
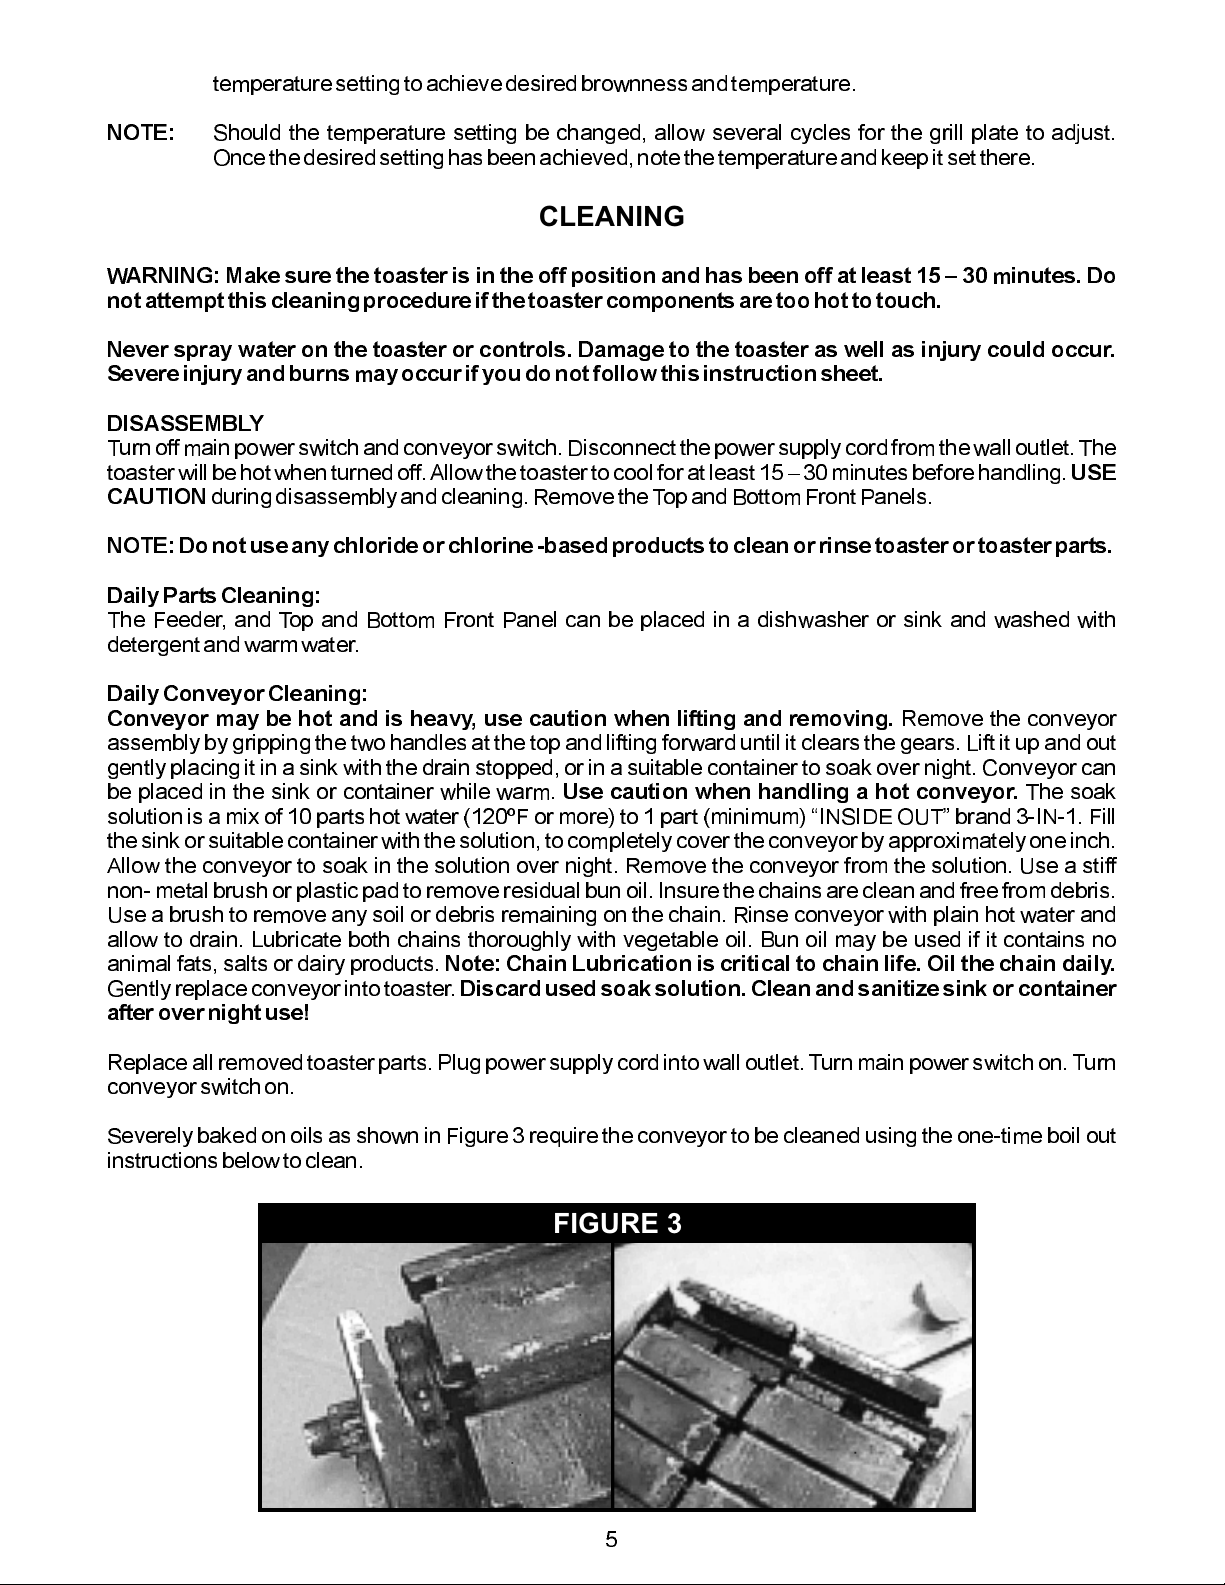
Severely baked on oils as shown in Figure 3 require the conveyor to be cleaned using the one-time boil out
instructionsbelow toclean.
FIGURE 3
5
Page 6

ONE-TIME BOIL OUT OF CONVEYOR
NOTE:This is for experienced operators only, and instores thatapprove thisoperation.
1. Turnoff power and drainthe oilfrom one ofthe Fryers,and allow it to cool.
2. TurnToaster main power switch off. Remove power supply plug fromthe walloutlet.
3. Some surfaces will remain hot after toaster is turned off. Allow time for toaster to cool. (15-30
minutes)Use cautionduring disassemblyand cleaning.
4. Remove the Top and Bottom FrontPanels.
5. When thefryer hascooled and has drained, close the drainvalve.
6. Remove the Conveyor assemblyby grasping the two handles at the top, and lifting forward until
it clears the gears.
7. placethe ConveyorAssemblyinto theFryer.
Gently
8. Add water to the cooledFryer leaving enough room to add two (2) gallons of INSIDE OUT 3 IN
1 HEAVYDUTYCLEANER andthe ConveyorAssembly.
9. Add additionalwater tothe Fryer, if necessary, tocompletely coverthe ConveyorAssembly.
10. Set the temperature of the Fryer to 200ºF, and allow the conveyor to soak in the solution for 60
minutes.
11. Shut off the Fryer and allowthe conveyorto cool.
12. After the conveyor
NOTE: Drain the solution prior to removing the Conveyor Assembly.
has cooled, remove the conveyor from the Fryer. If there are areas with bun oil, use a stiff non-
metal brush or plastic pad to remove. Insure the chains are clean and free from impediment.
Usea brush toremove anysoil or impediment remainingon the chain.
13. Rinse conveyor with hot water and allow to drain. Lubricate both chains thoroughly with
vegetableoil. Bunoil may be used ifit containsno animalfats,
saltsor dairyproducts.
14. Before assembly of the conveyor check the Following: Conveyor Assembly hardware to insure
fasteners are tight and there are no signs of wear,Gears are tight on the Conveyor shaft and the
Motor Shaft and the Hanger Bracket screws are tight and the brackets have not shifted during
use.
15. Gently replace conveyor into toaster. Replace all removed parts. Plug power supply cord into
wall.Turnmain powerswitch on.Turnconveyor switch on.
Note:Chain Lubricationis critical to chain life.Oil chaindaily.
LAST IMPORTANT NOTE:
Theconveyor must stay cleanto optimize speed and bun
temperature.
DailyGriddle Cleaning:
Dry Operation:
collectedon the sheet. If thesheet is worn, replace it with anew sheet.
Wet Operation:
freeof burned on bread thatmay causebuns to stick.
Tools neededfor cleaning:
Alsoneeded:
(Wet)terry towel Catchpan forfood soil Commonkitchen scraper
KEEPCONVEYOR LOOKING NEW.
Wipe off the Teflon sheet with a damp cloth to remove any debris or particles that have
It is not necessary to completely remove residue, as long as the grill surface is smooth and
Scotch-BriteTMQuick CleanSmallAppliance CleanerNo. 702or Equivalent
Scotch-BriteTMMulti-Purpose Pad Holder No.405 or Equivalent
Scotch-BriteTMSqueegee No.410 orEquivalent
Scotch-BriteTMGriddle PolishingPad No.46 or Scotch-BriteGeneral Purpose
ScrubbingPad No. 9650 or Equivalent
Daily-cleaning instructions of conveyor should be followed after this boil out.
6
Page 7

If Teflon sheet is installed remove it when Bun Grill Toaster is cool. Set the toaster temperature to 350°F.
Scrapeloose food particles withscraper into a pan under grill plate.
Squeeze 1 to 2 ounces of Scotch-BriteTM Quick Clean SmallAppliance Cleaner No. 702 or equivalent into
measuringreservoir ofbottle. Pour cleaner onto pad.Do notpour directlyonto grill surface.
FIGURE 4 FIGURE 5 FIGURE 6
FIGURE 7
Scourusing Scotch-Brite Multi-PurposePad HolderNo. 405or equivalent,and Scotch-Brite
TM TM
FIGURE 8
GriddlePolishing PadNo. 46 (or9650). (SeeFigure 4)
Afterscouring, Squeegeethe surfaceclean withthe Scotch-Brite SqueegeeNo. 410 (SeeFigure 5)
Turn off Bun Grill Toaster and wipe surface with clean wet towel. If the surface is still hot, use the Scotch-
TM
Brite MultiPurpose PadHolder to movethe towelover the surface. (See Figure 6)
TM
.
Drythe grill thoroughly. Coat the grillplate witha light filmof cookingoil. See Figure7)
Rinseall cleaning tools with hotwater.(See Figure8)
Wipedown all external stainlesssteel surfaces with a dampcloth.
RE-ASSEMBLY
Before assembling the conveyor check the following: Fasteners on the Conveyor Assembly hardware
should be tight with no signs of wear. Conveyor Shaft Gear and Motor Shaft Gear are tight. Hanger Bracket
Screwsare tight and the bracketshave notshifted during use.
7
Page 8

TROUBLESHOOTING GUIDE
Alwaysask and check the following:
1.
2.
3.
4.
If the above checks out, and you still have problems, call an APW Wyott authorized service agent.
APWSERVICE HOTLINE 1-800-733-2203
Is the unit connectedto alive power source of theproper voltage?
Checkthe circuit breaker.
Is power switch ON and pilotlight glowing?
Checkthe rating label. Is theunit connectedto the correctpower source?
PROBLEM
PROBLEM CAUSE SOLUTION
Buns wont toast Wrong temperature setting
Excessive cupping of bun
surface
Buns toast unevenly Excessive cupping of bun
surface
Conveyor pressure too light
Buns stick to grill Teflon sheet worn.
Doughy buns or excessive
sugar and moisture, plus grill
temperature too high.
Build up on Grill Surface
No power No power at the wall
receptacle
Power cord disconnected
Main switch
Conveyor will not turn (Motor
turns)
Drive gears not engaged
Gear set screws not tight
CAUSE
SOLUTION
Increase temperature setting
and allow two cycles to warm
up.
Buns are stale, use fresher
buns
Buns may be stale. Try fresher
buns
Adjust conveyor tension
Replace Teflon sheet
Reduce grill temperature
Allow buns to age.
Clean Grill per instructions
Check circuit breaker or fuse
Check plug at receptacle
Check that switch is ON and
operative
Check gear alignment and
engagement
Check screws and tighten if
required
8
Page 9

17.447
17.447
17.447
23.498
23.498
SPECIFICATIONS
21.888
21.888
21.888
APPROX.
19.340
20.590
21.840
19.340
20.590
21.840
00
APPROX.
16.272
16.272
16.272
4.000
15.002
15.002
15.002
9.500
9.500
10.750
10.750
12.000
12.000
9
Page 10

37
37
43
43
48
48
PARTS LIST w/EXPLODED VIEW
EXPLODED VIEW
71
62
62
71
69
69
40
40
26
26
19
19
24
24
57
65
65
57
27
27
6
6
25
25
53
53
55
66
66
38
38
55
41
41
42
58
58
60
60
42
39
39
3
3
12
45
45
44
44
12
23
23
20
20
13
13
63
63
54
54
1
11
11
1
2
2
9
9
5
5
16
16
67
51
51
70
70
67
22
22
59
59
68
68
56
56
46
46
21
21
10
52
31
31
52
10
61
32
32
61
33
33
49
49
39
39
14
14
30
50
50
30
29
29
28
28
64
64
18
18
34
34
47
47
8
8
4
4
17
17
15
15
35
35
36
36
7
7
Page 11

PARTS LIST
ITEM PART NUMBER DESCRIPTION QUANTITY
1
2
3
4
5
6
7
8
9
10
11
12
13
14
15
16
17
18
19
20
21
22
23
24
25
26
27
28
29
30
31
32
33
34
35
36
37
38
39
40
41
42
43
44
45
46
47
48
49
50
51
52
53
54
55
56
57
58
59
60
61
62
63
64
65
66
67
68
69
70
71
86260
86219P
86204
70202012
86210
86207
86261
70202009
86233
94200095
83733
86235
83065 SON
86259
86234
70200052
86206
86211
85033
85043
89057
88984
89143
86265
84559
89120
87074
94200089
70200051
94000172
89408
63012
89491
70900009
34236
34237
89003
89073
88889
39100
89071
89061
88993
89164
89163
86202
39099
89059
88901
88948
89054
89029
89111
60113
85647
86491
88961
85284
88923
89063
88705
86284
86253
85285
89182
86256
70439098
69147
89042
70202016
70202015
PANEL, TOP FRONT
ELEMENT, GRILL 208/240V
PLATE, MOTOR MOUNTING
PANEL, CONTROL M-2000 JIB
PANEL, LEFT SIDE OUTER
PANEL, BACK
PANEL, BOTTOM FRONT
LABEL, M2K JIB CONTROL
ANGLE, GRILL PLATE
KIT, POWER SUPPLY, 5V/24V OUTPUT
ROD, FRONT AND TOP
W/ASS'Y, LEFT SIDE PANEL
W/A Hanger Arm LH
SHIELD, FRONT GRILL
W/ASS'Y, RIGHT SIDE PANEL
CHAIN/WEIGHT CONV.ASS'Y (COMP) M-95-2
PANEL, BOTTOM
PANEL, RIGHT SIDE OUTER
GEAR, 13 TOOTH 3/8 BORE
GEAR, 19 TOOTH
WASHER, LOCK #6 INTERNAL
SCREW 6-32 X 3/8 PAN HD
PLUG, HYCO # DP-187
W/ASS'Y, SUPER FEEDER
PLUG, HOLE HEYCO #DP687
CLIP, JIFFY
PIN, HANGER
MERKLE-KORFF MOTOR
SPEED CONTROL BRACKET
10K OHM POTENTIOMETER
SWITCH, LIGHTED ROCKER
S/A, PILOT LIGHT
SWITCH,ROCK,DPST,20A 250VAC,BLK (TEXT)
LEG, 4" METAL ADJ. LEG
TERMINAL BLOCK END MTG
TERMINAL BLOCK .250 MALE
BOLT,1/4-20 X 1/2" SS HEX
SCREW, #8 X 1/2 HEX TAPIT SHT MTL TYPE AB
SCREW #8 X 1/2 AB SMS PHL TRUSS LGM NI PLT
PROBE, THERMOSTAT
WASHER, #10 FLAT
NUT, HEX 10-24
SCREW 10-32X3/8 TRS HD PHILLIPS NYLK MS
SCREW, 1/4-20 X 5/8 HEX SL NCK PL
NUT, JAM HEX 1/4-20 N.P. SS
COVER, INSULATION
T'STAT, FASTRON G6
WASHER #10 EXTERNAL LOCK
SCREW 6/32 X 1/4 PAN HD M/S BLKZC
SCREW 6-32 X 3/4 PAN HD
NUT, KEPS 6-32
SCREW, 10-24 X 3/8 PH PAN SS
BUSHING, STRAIN RELIEF SR-7W-2
INSULATION, 21X19X1
CORDSET, 14/3 600V .440 HSJO 620P
W/A Hanger Arm RH
NUT, HEX 10-24, GREEN
FAN, COOLING 4.5" 105CFM 208/230V
SCREW, 8-32x1-3/4 SLT PAN MS SS
NUT, HEX 8-32
KNOB 039-266 8A BLACK
SCREW, 8-32x1/4 PHIL PAN TYPE 23 ZINK
RACK, BOTTOM WIRE
ASSY, FAN CORD(FAN CORD 85283)
BUSHING, .5 HEYCO 2058
BRACKET, CAPILARY
RELAY,SLD ST 50A 280V OUT,90-280VAC IN
PAD, THERMAL FOR SSR 69146 (TEXT)
SCREW 8-32 X 1/2 PH SL SS
LABEL, CROWN
LABEL, HEEL
1
1
1
1
1
1
1
1
2
1
1
1
1
1
1
1
1
1
1
1
4
4
3
1
1
2
2
1
1
1
1
1
1
4
1
5
10
7
27
1
9
7
13
2
2
1
1
12
2
2
4
1
1
1
1
1
1
1
4
4
1
8
1
1
1
1
1
1
2
1
1
11
Page 12

WIRING DIAGRAM
RTD PROBE 39100
RTD PROBE 39100
L2
WHITE
BLACK
IN LINE RE SISTOR
ORANGE
RED
4
L1
L1
6
LIGHTED ROCKER SWI TCH 89408
RED
RED
WIRE NUT
89149
10
10 10
PILOT LIGHT 6301 2
WIRES NOT IN WIRE SET
88
9
9
7
7
THERMOSTAT 39099
5
L2
5
3
ORANGE
GREEN
6 PIN HARNESS 94100134
3 PIN HARNESS 94100061
POWER SUPPLY 941 00140
GREEN
6
LIGHTED ROCKER SWI TCH 89406
BLUE
SPEED POT. 94000172
WHITE
BLACK
9
L2
5
7
L1 L1
6
4
L1
3
L2
WIRE HARNESS 94200093
BLUE
WHITE
RED
BLACK
11
RED
BLACK
RED
12
12
11
MOTOR 94200089
RELAY 70439098
13
10
11
BLACK
RED
14
13
BLACK
L2
14
RED
11
L1
1
14
L2
2
11
L1 B ROWN
L2 BL UE
13
GRILL PLATEN 86219-P
CORDSET 85640
14
1
2
GRND
FAN 85284
FAN CORD 85283
M2K TE RMINAL BLOCK ASSY
34236 (1) 34237 (5)
Page 13

Notes:
IMPORTANT FOR FUTURE REFERENCE
Please complete this information and retain this manual for the life of the equipment. For
WarrantyServiceand/or Parts,this informationis required.
ModelNumber SerialNumber DatePurchased
13
Page 14

Notes:
14
Page 15

APW WYOTT EQUIPMENT LIMITED WARRANTY
APW Wyott Foodservice Equipment Company warrants it's equipment against defects in materials and workmanship, subject to the
following conditions:
This warranty applies to the original owner only and is not assignable.
Should any product fail to function in its intended manner under normal use within the limits defined in this warranty,at the option of
APW Wyott such product will be repaired or replaced by APW Wyott or its Authorized Service Agency. APW Wyott will only be
responsible for charges incurred or service performed by its Authorized Service Agencies. The use of other than APW Wyott
Authorized Service Agencies will void this warranty and APW Wyottwill not be responsible for such work or any charges associated
with same. The closestAPWWyottAuthorized Service Agent must be used.
This warranty covers products shipped into the 48 contiguous United States, Hawaii, metropolitan areas ofAlaska and Canada. There
will be no labor coverage for equipment located on any island not connected byroadway to the mainland.
Warranty coverage on products used outside the 48 contiguous United States, Hawaii, and metropolitan areas of Alaska and Canada
may vary.ContacttheinternationalAPWWyottdistributor,dealer, or service agencyfor details.
TimePeriod
One year for parts and one year for labor, effective from the date of purchase by the original owner. The Authorized Service Agency
may, at their option, require proof of purchase. Parts replaced under this warranty are warranted for the un-expired portion of the
original product warranty only.
Exceptions
Inall cases, parts covered by extended warranty will be shipped FOB the factoryafter the first year.
Portable Carry In Products
Equipment weighing over 70 pounds or permanently installed will be serviced on-site as per the terms of this warranty. Equipment
weighing 70 pounds or under, and which is not permanently installed, i.e. with cord and plug, is considered portable and is subject to
the following warranty handling limitations. If portable equipment fails to operate in its intended manner on the first day of
connection, or use, atAPWWyott'soptionoritsAuthorized ServiceAgency,itwillbeservicedonsiteorreplaced.
From day two through the conclusion of this warranty period, portable units must be taken to or sent prepaid to the APW Wyott
Authorized Service Agency for in-warranty repairs.No mileage or travel charges are allowed onportable units after the first day of use.
If the customer wants on-site service, they may receive same by paying the travel and mileage charges. Exceptions to this rule: (1)
countertop warmers and cookers, which arecovered under the Enhanced WarrantyProgram, and (2) toasters or rollergrills which have
instore service.
Exclusions
The following conditions are notcovered by warranty:
If the equipment has been changed, altered, modified or repaired by other than an Authorized Service Agency during or after the
warranty period, then the manufacturer shall not be liable for any damages to any person or toany property, which may result from the
use of the equipment thereafter.
This warranty does not cover services performed at overtime or premium labor rates. Should service be required at times which
normally involve overtime orpremium labor rates, the ownershall be charged for the difference betweennormal service rates and such
premium rates.APWWyottdoesnotassumeanyliability for extended delays in replacing orrepairing any items beyond itscontrol.
Inall cases, the use of other than APWWyottAuthorized OEM Replacement Parts will void thiswarranty.
This equipment is intended for commercial use only.Warranty is void ifequipment is installed in other than commercial application.
WaterQualityRequirements
Water supply intended for a unit that has in excess of 3.0 grains of hardness per gallon (GPG) must be treated or softened before
being used. Water containing over 3.0 GPG will decrease the efficiency and reduce the operation life of the unit.
Note: Product failure caused by liming or sediment buildup is not covered under warranty.
THE FOREGOING WARRANTY IS IN LIEU OF ANY AND ALL OTHER WARRANTIES EXPRESSED OR IMPLIED
INCLUDING ANY IMPLIED WARRANTY OF MERCHANTABILITY OR FITNESS FOR PARTICULAR PURPOSES
AND CONSTITUTES THE ENTIRE LIABILITY OFAPW WYOTT. IN NO EVENT DOES THE LIMITED WARRANTY
EXTEND BEYOND THE TERMS STATED HEREIN.
*Gas/Electric Cookline:
component parts, except switches andthermostats. (2 additional yearsonparts only.Nolaboronsecond or third year.)
*BroilerBriquettes,
*Heat Strips:
*GlassWindows, Doors, Seals, Rubber Seals, LightBulbs:
*Equipment failure relating to improper installation, improper utility connection or supply and problems due to
ventilation.
*Equipment that has not been properly maintained, calibration of controls, adjustments, damage from improper cleaning
and water damage to controls.
*Equipment that has not been used in an appropriate manner, or has been subject to misuse or misapplication, neglect,
abuse, accident, alteration, negligence, damage during transit, deliveryorinstallation, fire, flood, riot oractofgod.
*Equipment that has the model numberor serial number removed or altered.
Models FD, FDL, FDD, FDDL. Two(2)YearWarranty on element only. Nolaborsecond year.
Models GCB, GCRB, GF, GGM, GGT, CHP-H, EF, EG, EHP. Three (3) Year Warranty on all
RockGrates,CookingGrates,BurnerShields,Fireboxes:
90Day Material Only. No Labor.
90DayMaterialOnly.NoLabor.
9/05
15
Page 16

R
Phone: +1
(214) 421-7366
Fax: +1 (214) 565-0976
Toll Free: +1 (800) 527-2100
Website: www.apwwyott.com
E-mail: info@apwwyott.com
(800) 733-2203
24 Hour Service Hotline
16
APW WYOTT
729 Third Avenue
Dallas, TX 75226
 Loading...