

Page 1
INSTALLATION
AND
OPERATING
INSTRUCTIONS
R
INTENDED FOR OTHER THAN HOUSEHOLD USE
RETAIN THIS MANUAL FOR FUTURE REFERENCE
UNIT MUST BE KEPT CLEAR OF COMBUSTIBLES AT ALL TIMES
Safety Precautions
General Information
Installation
Operation Instructions
Cleaning Instructions
Troubleshooting
Replacement Parts List
Wiring Diagram
Warranty Procedure
Warranty
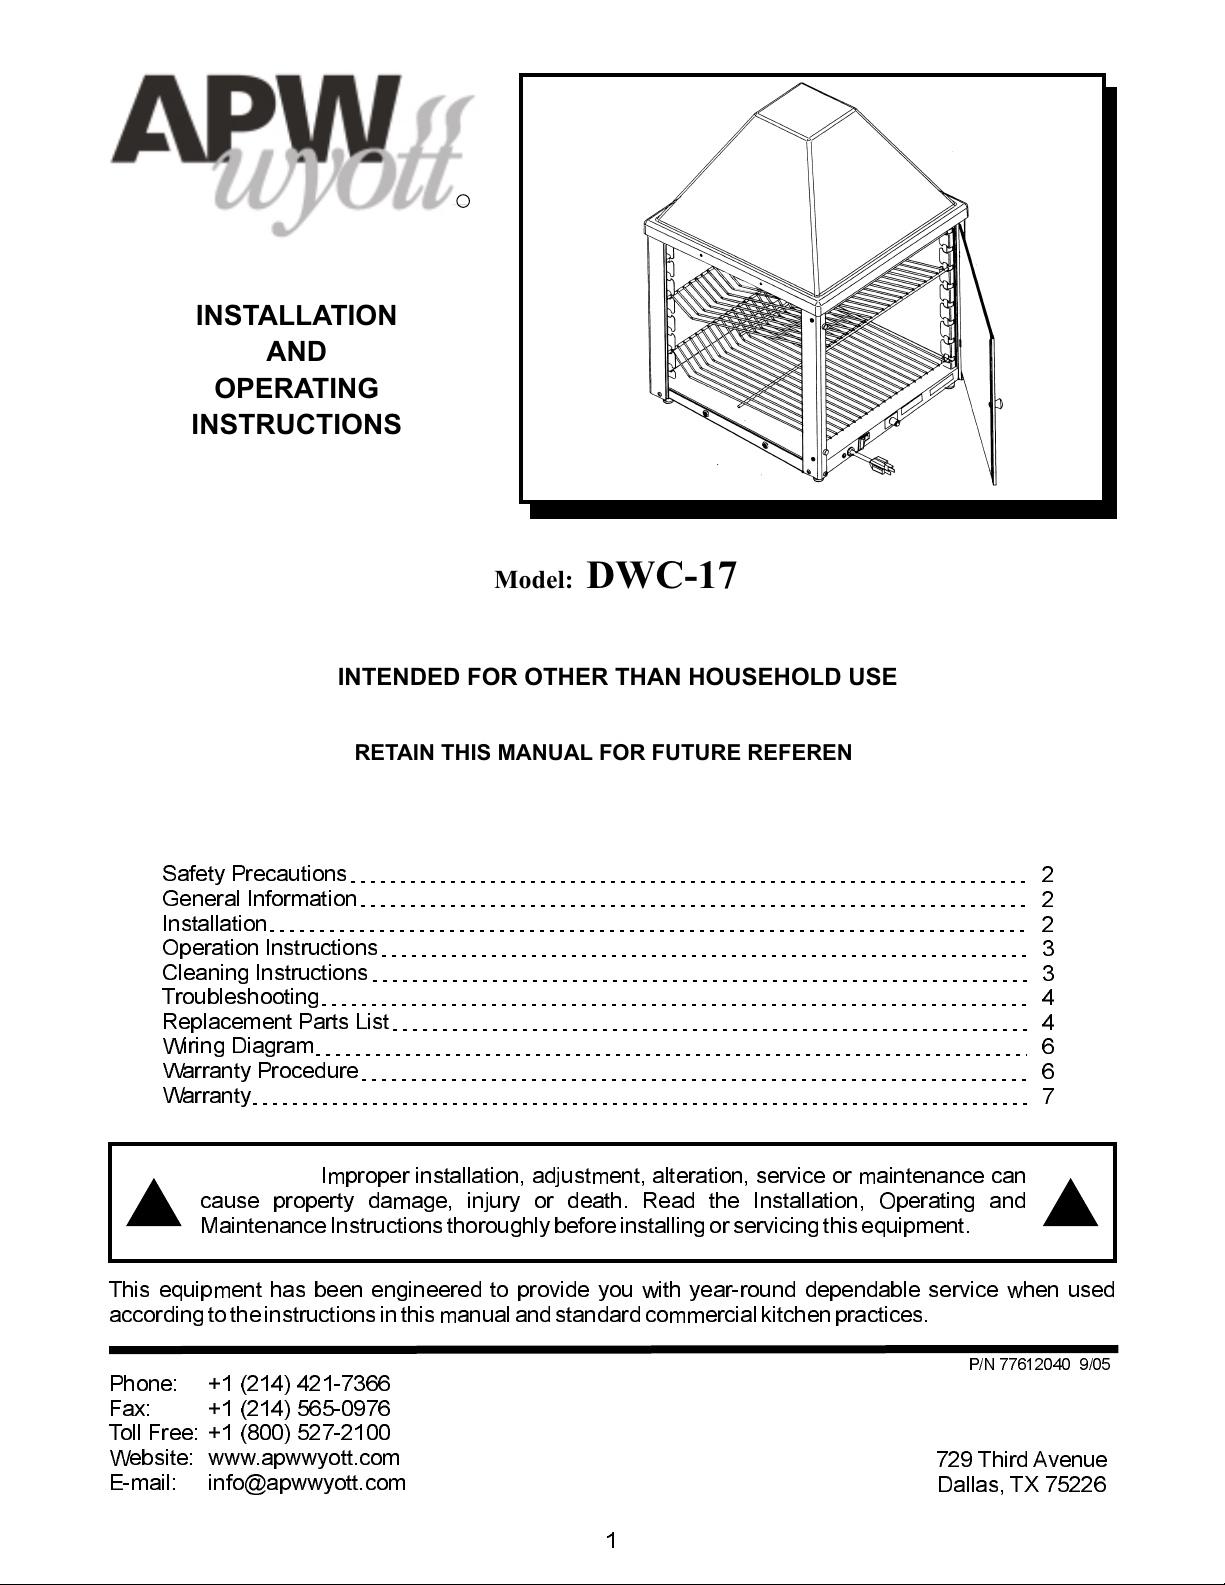
Model:
DWC-17
WARMING CABINET
TABLE OF CONTENTS
2
2
2
3
3
4
4
6
6
7
WARNING:
cause property damage, injury or death. Read the Installation, Operating and
Maintenance Instructions thoroughly before installing or servicingthis equipment.
This equipment has been engineered to provide you with year-round dependable service when used
according totheinstructions in this manual and standard commercialkitchen practices.
Phone: +1
Fax: +1 (214) 565-0976
Toll Free: +1 (800) 527-2100
Website: www.apwwyott.com
E-mail: info@apwwyott.com
(214) 421-7366
Improper installation, adjustment, alteration, service or maintenance can
!!
P/N 77612040 9/05
APW WYOTT
729 Third Avenue
Dallas, TX 75226
1
Page 2
IMPORTANT FOR FUTURE REFERENCE
Please complete this information and retain this manual for the life of the equipment. For
WarrantyServiceand/or Parts,this informationis required.
ModelNumber SerialNumber DatePurchased
SAFETY PRECAUTIONS
APW Wyott equipment is designed, built and sold for commercial use and should be operated by trained
personal only. Make sure all CAUTIONS, WARNINGS and operating instructions are clearly posted near
each unit to insure proper operation and reduce the chance of personal injury and/or equipment damage.
Always disconnect power before cleaning or servicing the unit. Surfaces will remain hot after power has
been removed,allow unit to cool before cleaning or servicing. Never clean the unit by immersing it in water.
The unit is not protected against water jets; DO NOT CLEAN UNIT WITH A WATER JET. Always clean
equipmentbefore firstuse.
GENERAL INFORMATION
Check therating label for your model designation and electrical rating. Rating Label is locatedon the inside
frameof the unit.
Overalldimensions:
18.25(46.4 cm) W x 18.5(47.0 cm) D x 25.12(63.8 cm)H
Electricalratings:
120VAC, 660W, 60Hz, NEMA5-15Plug
PowerCord:
6 foot, 3 wire grounded cord. If the supply cord is damaged, the manufacturer or an authorized service
agentor a similarlyqualified personmust replaceit in order to avoida hazard.
ShippingWeight:
54Lbs. (24.5 Kg.)
INSTALLATION
1. UnpackUnit
Remove unit from shipping carton, unwrap loose parts and remove any packing tape, plastic wrap
andnylon tie-down.
NOTE:
warm soapy water to remove manufacturing oils, then rinsed and dried thoroughly. Please follow
thecleaning instructionson page3.
2. Switch the position of the door knobs from inside to outside by using a screw driver.The knobs are
onthe inside forshipping purposes.
Prior to initial start-up, all removable parts and interior surfaces should be cleaned with
2
Page 3
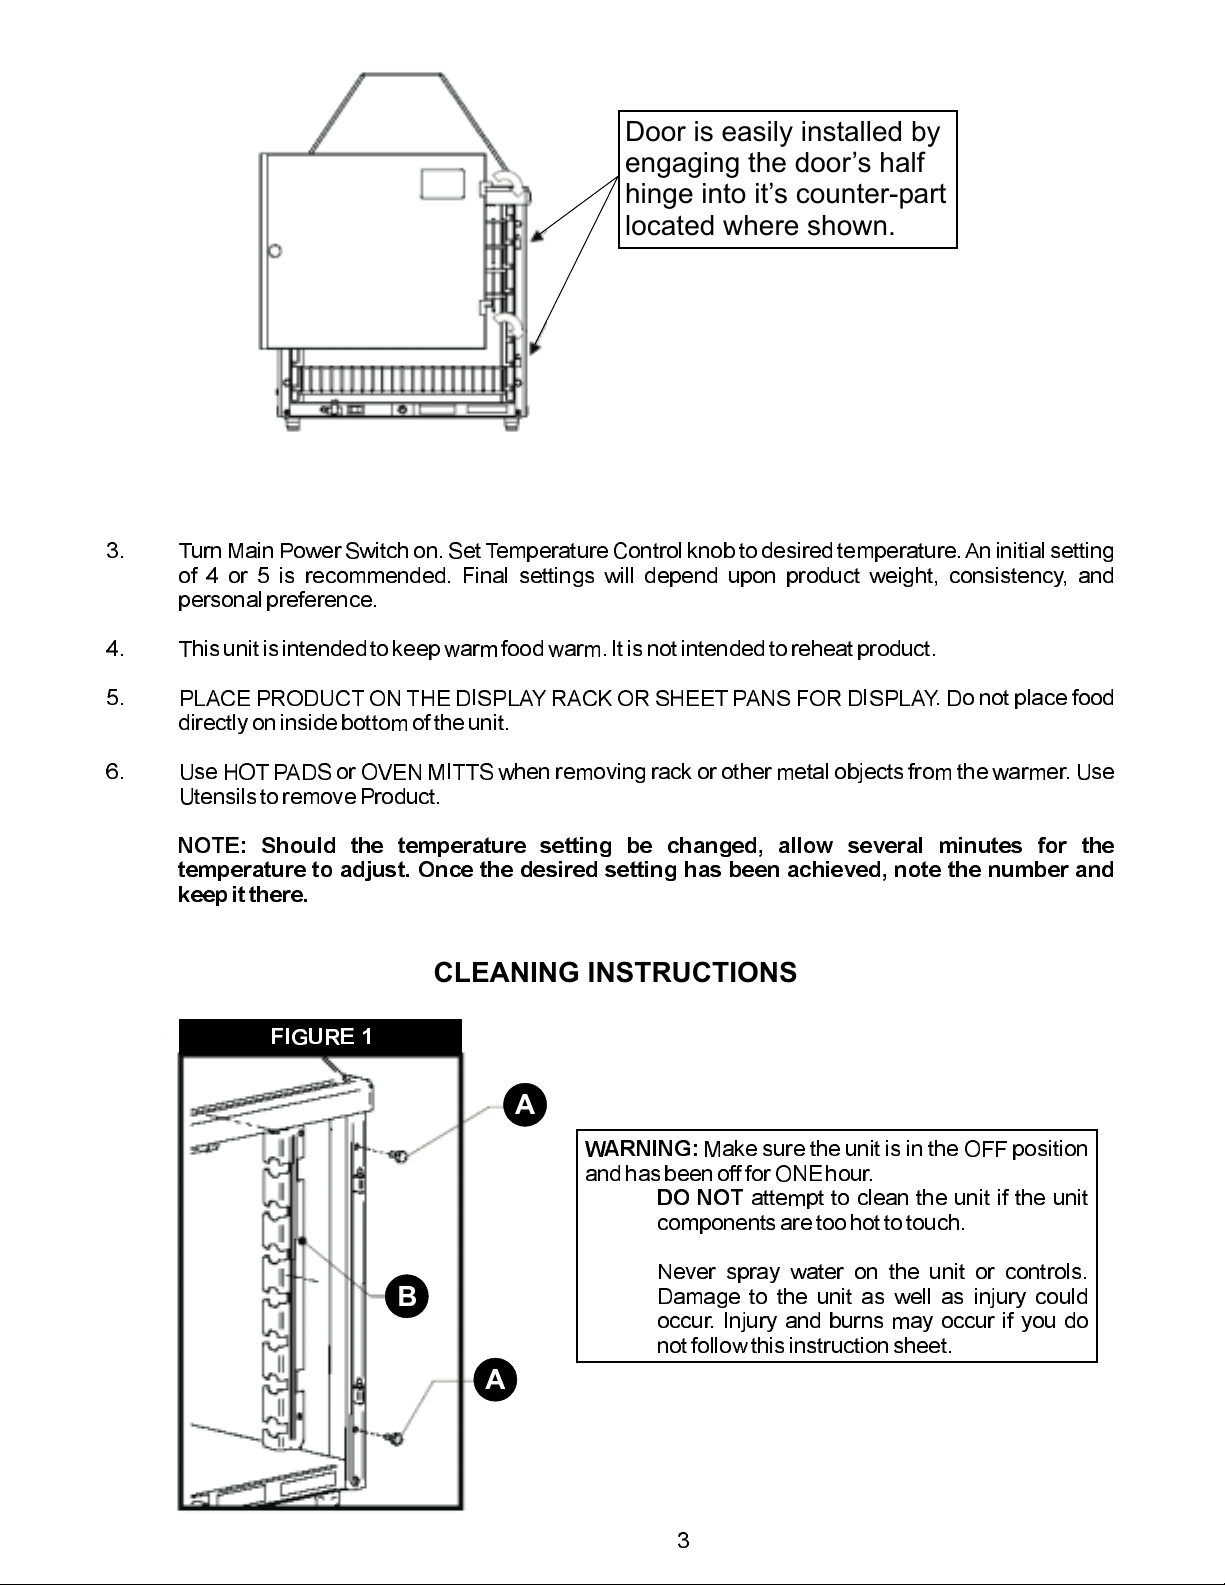
Door is easily installed by
engaging the door’s half
hinge into it’s counter-part
located where shown.
OPERATION INSTRUCTIONS
3. TurnMain Power Switchon. Set TemperatureControl knob to desired temperature.An initial setting
of 4 or 5 is recommended. Final settings will depend upon product weight, consistency, and
personalpreference.
4. Thisunit is intendedto keepwarm foodwarm. It isnot intendedto reheat product.
5. PLACE PRODUCT ON THE DISPLAY RACK OR SHEET PANS FOR DISPLAY. Do not place food
directlyon inside bottom of theunit.
6. Use HOT PADS or OVEN MITTS when removing rack or other metal objects from the warmer. Use
Utensilsto remove Product.
NOTE: Should the temperature setting be changed, allow several minutes for the
temperature to adjust. Once the desired setting has been achieved, note the number and
keepit there.
CLEANING INSTRUCTIONS
FIGURE 1
A
WARNING:
andhas been offfor ONEhour.
B
Make sure the unit is in the OFF position
DO NOT
componentsare toohot to touch.
Never spray water on the unit or controls.
Damage to the unit as well as injury could
occur. Injury and burns may occur if you do
notfollow this instructionsheet.
attempt to clean the unit if the unit
A
3
Page 4

Cleaning should be done Daily.
1. Remove door by pulling it, in an upward direction. Start the lifting motion with the door in the open
position.
2. In order to effectively clean the interior of the unit, you will need to remove all four Corner Rack
Supports,which arefastened with2 thumbscrewseach.
3. To remove the Corner Rack Supports (Item B in Fig.1), turn the thumbscrews in a counter-
clockwise direction.Repeat the process for all four CornerRack Supports. Note that each Corner
RackSupport is fastened by twothumb screwswhich areshown by (Item Ain Fig.1)
4. Cleanwith warm soapy water anda softcloth only.
5. ammonia, alcohol, or chlorine type cleaner will cause cracking of the enclosure
6. Once the interior of the cabinet, along with Corner Rack Supports have been cleaned in the
DO NOT USE ANY
anddoor(s).
fashiondescribed above,re-install allfour of them using thethumbscrews providedwith theunit.
TROUBLESHOOTING
Alwaysask and check the following:
1. Is the unit connectedto alive power source of theproper voltage?
2. Checkthe circuit breaker.
3. Is power switch ON and lightglowing?
4. Checkthe rating label. Is theunit connectedto the correctpower source?
5. If the above checksout, andyou still have problems, call anAPW Wyottauthorized service agent.
REPLACEMENT PARTS LIST - DWC-17 WARMING CABINET
ITEM
PART NUMBER
1 77612021 TOP 1
2 77612012 TOP SUB ASSEMBLY 1
3 85830 HEATING ELEMENT 1
4 69127 HIGH-LIMIT SAFETY SWITCH 1
5 85836 BLOWER MOTOR / FAN ASSEMBLY 1
6 75916 LAMP, 40 W, COATED 1
7 46879 LAMP SOCKET 1
8 66725 LIGHT GUARD WIRE RACK 1
9 88890 THUMBSCREW FOR LIGHT 1
10 69128 THERMOMETER 1
11 77612027 PLASTIC DOOR 1
12 77612026 DISPLAY RACK 2
13 89408 MAIN SWITCH, LIGHT ROCKER 1
14 89101 STRAIN RELIEF BUSHING 1
15 55947 POWER CORDSET 1
16 69155 TEMPERATURE CONTROL THERMOSTAT 1
17 89499 INDICATOR KNOB 1
18 77612033 CORNER RACK SUPPORT 4
19 77612041 THUMB SCREW FOR RACK SUPPORTS 8
DESCRIPTION
QUANTITY
4
Page 5

EXPLODED VIEW - DWC-17 WARMING CABINET
3
5
4
6
1
2
11
7
8
10
11
9
12
19
15
18
13
16
14
17
5
Page 6

WIRING DIAGRAM - DWC-17 WARMING CABINET
WARRANTY PROCEDURE
If warranty service is needed onyourAPW Wyottequipment, followthese steps:
1. Securethe model and serial numberfrom therating labelon your warmingcabinet.
2. Consult the enclosed directory, find the service agency nearest you, call the numberlisted or the 24-
hour toll free service hot line, 1-800-733-2203. If there is not a service agency listed for your area,
theparts distributorwill provideservice foryour warmingcabinet.
3. To order parts, consult the enclosed directory. The parts distributor is listed at the beginning of each
statelisting. The partsdistributors havea complete stock of partsfor your warming cabinet.
6
Page 7

APW WYOTT EQUIPMENT LIMITED WARRANTY
APW Wyott Foodservice Equipment Company warrants it's equipment against defects in materials and workmanship, subject to the
following conditions:
This warranty applies to the original owner only and is not assignable.
Should any product fail to function in its intended manner under normal use within the limits defined in this warranty,at the option of
APW Wyott such product will be repaired or replaced by APW Wyott or its Authorized Service Agency. APW Wyott will only be
responsible for charges incurred or service performed by its Authorized Service Agencies. The use of other than APW Wyott
Authorized Service Agencies will void this warranty and APW Wyottwill not be responsible for such work or any charges associated
with same. The closestAPWWyottAuthorized Service Agent must be used.
This warranty covers products shipped into the 48 contiguous United States, Hawaii, metropolitan areas ofAlaska and Canada. There
will be no labor coverage for equipment located on any island not connected byroadway to the mainland.
Warranty coverage on products used outside the 48 contiguous United States, Hawaii, and metropolitan areas of Alaska and Canada
may vary.ContacttheinternationalAPWWyottdistributor,dealer, or service agencyfor details.
TimePeriod
One year for parts and one year for labor, effective from the date of purchase by the original owner. The Authorized Service Agency
may, at their option, require proof of purchase. Parts replaced under this warranty are warranted for the un-expired portion of the
original product warranty only.
Exceptions
Inall cases, parts covered by extended warranty will be shipped FOB the factoryafter the first year.
Portable Carry In Products
Equipment weighing over 70 pounds or permanently installed will be serviced on-site as per the terms of this warranty. Equipment
weighing 70 pounds or under, and which is not permanently installed, i.e. with cord and plug, is considered portable and is subject to
the following warranty handling limitations. If portable equipment fails to operate in its intended manner on the first day of
connection, or use, atAPWWyott'soptionoritsAuthorized ServiceAgency,itwillbeservicedonsiteorreplaced.
From day two through the conclusion of this warranty period, portable units must be taken to or sent prepaid to the APW Wyott
Authorized Service Agency for in-warranty repairs.No mileage or travel charges are allowed onportable units after the first day of use.
If the customer wants on-site service, they may receive same by paying the travel and mileage charges. Exceptions to this rule: (1)
countertop warmers and cookers, which arecovered under the Enhanced WarrantyProgram, and (2) toasters or rollergrills which have
instore service.
Exclusions
The following conditions are notcovered by warranty:
If the equipment has been changed, altered, modified or repaired by other than an Authorized Service Agency during or after the
warranty period, then the manufacturer shall not be liable for any damages to any person or toany property, which may result from the
use of the equipment thereafter.
This warranty does not cover services performed at overtime or premium labor rates. Should service be required at times which
normally involve overtime orpremium labor rates, the ownershall be charged for the difference betweennormal service rates and such
premium rates.APWWyottdoesnotassumeanyliability for extended delays in replacing orrepairing any items beyond itscontrol.
Inall cases, the use of other than APWWyottAuthorized OEM Replacement Parts will void thiswarranty.
This equipment is intended for commercial use only.Warranty is void ifequipment is installed in other than commercial application.
WaterQualityRequirements
Water supply intended for a unit that has in excess of 3.0 grains of hardness per gallon (GPG) must be treated or softened before
being used. Water containing over 3.0 GPG will decrease the efficiency and reduce the operation life of the unit.
Note: Product failure caused by liming or sediment buildup is not covered under warranty.
THE FOREGOING WARRANTY IS IN LIEU OF ANY AND ALL OTHER WARRANTIES EXPRESSED OR IMPLIED
INCLUDING ANY IMPLIED WARRANTY OF MERCHANTABILITY OR FITNESS FOR PARTICULAR PURPOSES
AND CONSTITUTES THE ENTIRE LIABILITY OFAPW WYOTT. IN NO EVENT DOES THE LIMITED WARRANTY
EXTEND BEYOND THE TERMS STATED HEREIN.
*Gas/Electric Cookline:
component parts, except switches andthermostats. (2 additional yearsonparts only.Nolaboronsecond or third year.)
*BroilerBriquettes,
*Heat Strips:
*GlassWindows, Doors, Seals, Rubber Seals, LightBulbs:
*Equipment failure relating to improper installation, improper utility connection or supply and problems due to
ventilation.
*Equipment that has not been properly maintained, calibration of controls, adjustments, damage from improper cleaning
and water damage to controls.
*Equipment that has not been used in an appropriate manner, or has been subject to misuse or misapplication, neglect,
abuse, accident, alteration, negligence, damage during transit, deliveryorinstallation, fire, flood, riot oractofgod.
*Equipment that has the model numberor serial number removed or altered.
Models FD, FDL, FDD, FDDL. Two(2)YearWarranty on element only. Nolaborsecond year.
Models GCB, GCRB, GF, GGM, GGT, CHP-H, EF, EG, EHP. Three (3) Year Warranty on all
RockGrates,CookingGrates,BurnerShields,Fireboxes:
90Day Material Only. No Labor.
90DayMaterialOnly.NoLabor.
9/05
7
Page 8

R
Phone: +1
(214) 421-7366
Fax: +1 (214) 565-0976
Toll Free: +1 (800) 527-2100
Website: www.apwwyott.com
E-mail: info@apwwyott.com
APW WYOTT
729 Third Avenue
Dallas, TX 75226
8
 Loading...