

Wynn's AIRCOMATIC III User Manual
Manual
Contents
Contents
Cleaning of air conditioning and aeration system
Nettoyage du système de climatisation et d’aération
Reinigung der Klima- und Belüungsanlage
Limpieza del sistema de climatización y de aeración
Pulizia del sistema di aereazione dell’ aria condizionata
Reiniging van airconditioning en beluchtingsystemen
Очистка системы вентиляции и кондиционирования
Neutralize bad smells in car interior
Neutraliser les mauvaises odeurs à l’intérieur du véhicule
Schlechte Gerüche im Fahrzeuginnenraum entfernen
Neutraliza malos olores en el interior del coche
Neutralizzare i cattivi odori dell’abitacolo
Slechte reuk in het interieur van voertuigen neutraliseren
Устранение неприятного запаха внутри салона автомобиля
Maintenance
Entretien
Wartung
Mantenimiento
Manutenzione
Onderhoud
Обслуживание
4
8
14
English
Français
Deutsch
Español
Italiano
Nederlands
Русский
Standards
Normes
Normen
Normas
Norme
Normen
Стандарты
16
18
20
22
24
26
28
30
4
5
A
1
2
3
Cleaning of air conditioning and aeration
EN
Nettoyage du système de climatisation
FR
DE
Limpieza del sistema de climatización y
ES
Pulizia del sistema di aereazione dell’
IT
NL
RU
Reiniging van airconditioning en
Очистка сис темы вентиляции и
system
et d’aération
Reinigung der Klima- und
Belüftungsanlage
de aeración
aria condizionata
beluchtingsystemen
кондиционирования
4 5
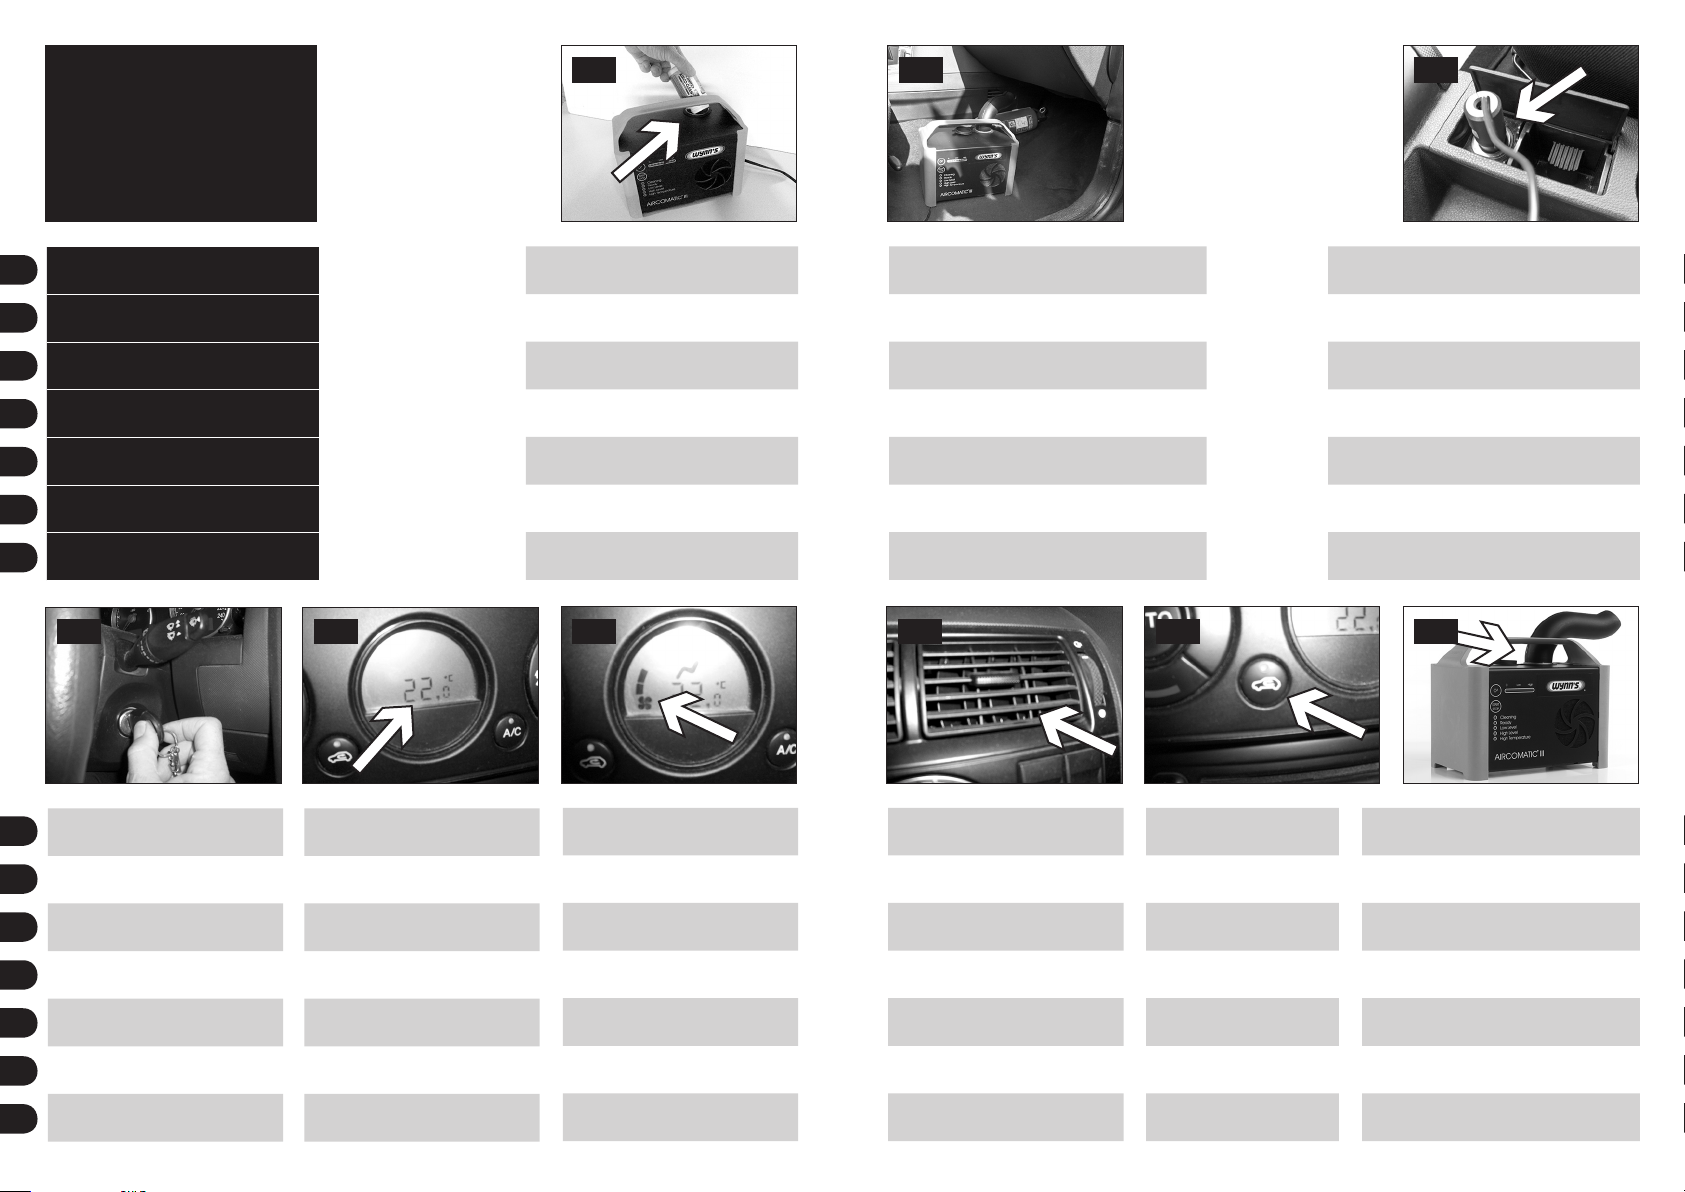
Start engine.
EN
Démarrer le moteur.
FR
Motor starten.
DE
Arrancar el coche.
ES
Avviare il motore dell’autovettura.
IT
Start de motor.
NL
Запустить двигатель.
RU
Set internal temperature to 22°C.
Régler la commande de température
sur 22°C.
Die Temperaturreglung auf 22°C
einstellen.
Poner la temperatura interna a 22°C.
Regolare la temperatura interna a 22°C.
Temperatuurkeuze op 22°C.
Поставить регулятор температуры
на 22С.
Fill 1 bottle of 100 ml Wynn’s Airco-Clean®
ultrasonic for cars in the machine.
Vider un flacon de 100 ml de Wynn’s AircoClean® ultrasonique dans la machine.
Ein 100 ml Fläschchen Wynn’s Airco-Clean®
Ultraschall für Fahrzeuge in das Gerät gießen.
Vaciar un envase de 100 ml de Wynn’s AircoClean® ultrasónico para coches en el aparato.
Versare 1 flacone da 100 ml di Wynn’s AircoClean® ultrasonic nell’attrezzatura
Giet 1 flesje van 100 ml Wynn’s Airco-Clean®
ultrasonisch voor wagens in het toestel.
Залить 1 бутылку 100 мл продукта Wynn’s
Airco-Clean Ultrasonic for Cars в ус тановку
6
Set fan at lowest speed.
Ventilation en position minimale.
Gebläse auf niedrigste Stufe.
Poner la ventilación en la velocidad
mínima.
Selezionare la ventilazione al minimo.
Ventilator op laagste snelheid.
Включить вентилятор на
минимальное значение.
Put the machine horizontally upright on the floor at
the passenger side.
Poser l’appareil en position horizontale à l’avant, sur le
tapis, côté passager.
Das Gerät horizontal auf die Matte der Beifahrerseite
stellen.
Poner el aparato horizontalmente en la zona del
asiento delantero del acompañante.
Posizionare l’apparecchio orizzontalmente sul
tappetino lato passeggero.
Plaats het toestel horizontaal op de voertuigvloer
onder de aanzuigopening van de airconditioning
Установить установку в горизонтальное положение
на пол со стороны пассажира переднего сидения.
7
Set air flow to the centre dashboard
vents only.
Sélectionner la ventilation frontale.
Vordere Belüftung einstellen.
Posicione las rejillas de modo frontal.
Selezionare la ventilazione frontale.
Ventilatie op frontaal instellen.
Направить воздушный поток в центр
приборной доски.
8
Set ventilation to "recirculate".
Ventilation en position
recyclage.
Auf Umluft einstellen.
Activar la posición de
“recirculación” del aire.
Selezionare la modalità di
ricircolo.
Op recirculatie zetten.
Поставить в положение
«рециркуляция».
Connect the power plug to a 12 V DC connection in
the car (cigarette lighter or other).
Brancher la fiche de contact sur une source de courant
12 V dans la voiture (allume-cigare ou autre).
Netzstecker mit einem 12 V GS Stromanschluss
(Zigarettenanzünder oder anderem) verbinden.
Conectar la clavija de toma de corriente a una
conexión 12 V DC en el coche (encendedor u otro).
Collegare lo spinotto a 12 VDC con l’attacco
nell’autovettura (accendisigari o altro)
Verbind de stekker met een 12 V GS aansluiting in de
wagen (sigarettenaansteker of andere).
Подсоединить клемму к источнику 12 вольт в
автомобиле (прикуриватель или др.)
9
Connect the outlet tube and position it in the
air inlet opening.
Raccorder le tuyau diffuseur et le diriger vers
l’aspiration de la climatisation.
Stutzen einsetzen und in Richtung
Umluftansaugung des Fahrzeugs positionieren.
Conectar la boquilla y dirigirla a la boca de
aspiración de la climatización.
Collegare il tubo e posizionarlo verso il condotto
di apertura d’aria.
De uitstroombuis plaatsen en deze op de
aanzuigopening van de airco richten.
Установить выпускной патрубок и направить
его в сторону воздухозаборной решетки.
6
7
10
11
12
13
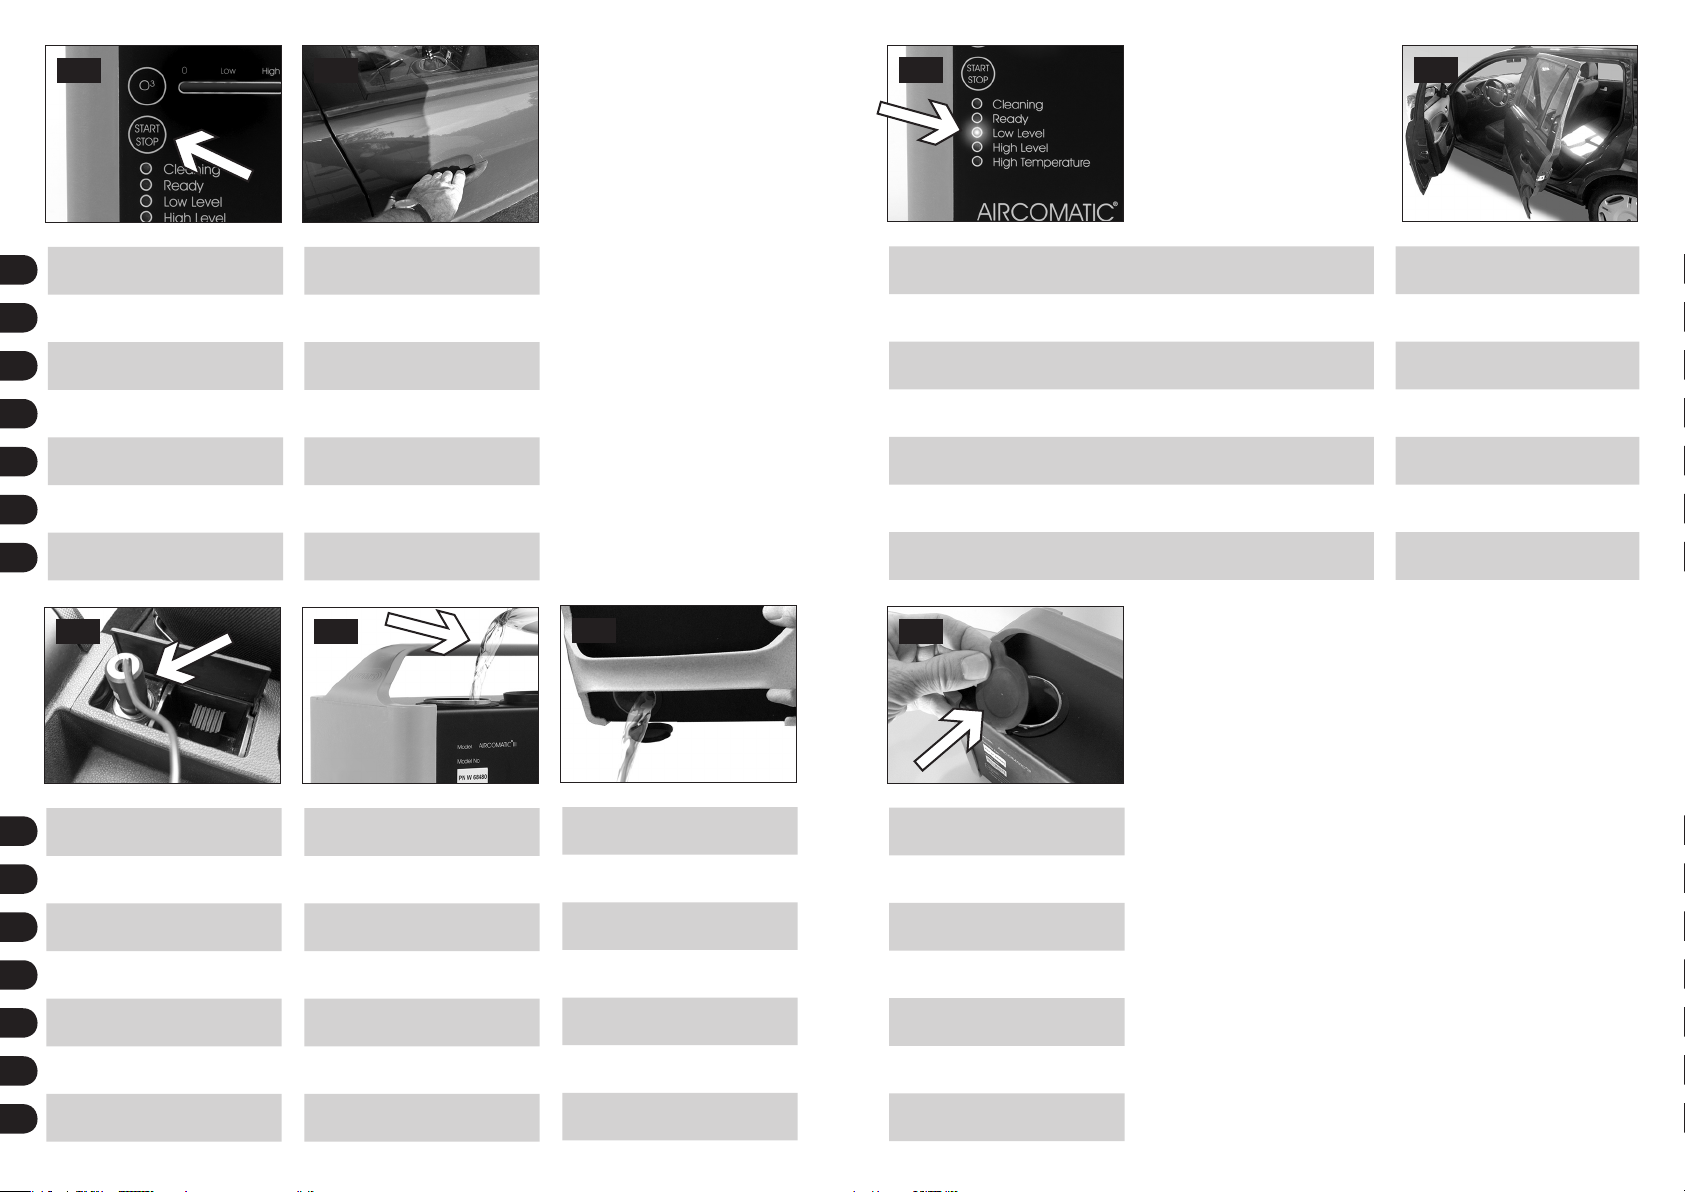
Push the ‘START’ button.
EN
Appuyer sur le bouton ‘START’
FR
Drücken Sie den ‘START’ Schalter.
DE
Presionar el botón ‘Marcha’ (‘START’).
ES
Premere il pulsante di avvio (‘START’).
IT
Druk op de ‘START’ toets.
NL
Нажать кнопку «старт».
RU
14 15
Disconnect power source and dispose
EN
of residue.
Débrancher et vider le liquide restant.
FR
Netzstecker ziehen und Restflüssigkeit
DE
entfernen.
Desconectar y eliminar el resto del
ES
líquido de la máquina.
Scollegare l’apparecchio
IT
dall’alimentazione elettrica e svuotarlo.
Stekker verwijderen en restvloeistof
NL
verwijderen.
Отсоединить установку от источника
RU
питания и вылить остатки жидкости.
Get out of the vehicle and close doors.
Sortir du véhicule et fermer les portes.
Fahrzeug verlassen und Türen schließen.
Salir del vehículo y cerrar las puertas.
Uscire dal veicolo e chiudere le porte.
Uit het voertuig stappen en de deuren
sluiten.
Выйти из автомобиля и закрыть
двери.
Rinse the machine with a little water
(max. 100ml).
Rincer la machine avec un peu d’eau
(max. 100 ml).
Das Gerät mit einem bisschen Wasser
reinigen (maximal 100 ml).
Limpiar el aparato con un poco de agua
(max. 100ml).
Risciacquare con acqua (max. 100ml).
Toestel met een weinig water (max. 100
ml) reinigen.
Прополоскать установку небольшим
количеством воды (макс. 100 мл).
16
Empty machine.
Vider la machine.
Gerät entleeren.
Vaciar el aparato.
Svuotare l’attrezzatura
Toestel ledigen.
Слить воду для прополаскивания.
The machine automatically switches off • At the end of the treatment time • At
minimum fluid level.
La machine s’arrête automatiquement • A la fin du traitement • Quand le liquide a
atteint son niveau minimal.
Des Gerät stoppt automatisch • Am Ende der Behandlungszeit • Bei Erreichung des
Minimumniveaus der Flüssigkeit.
El aparato deja de funcionar automáticamente • Cuando el tratamiento haya
finalizado • Cuando el nivel del líquido está en el mínimo.
L’attrezzatura si spegne automaticamente • Alla fine del trattamento • Quando il
livello del liquido è al minimo.
Het toestel schakelt automatisch uit • Na einde behandelingstijd • Bij minimaal
niveau.
Установка выключится автоматически • После окончания обработки • При
минимальном объеме жидкости.
17
Put cap back on filling opening.
Remettre le bouchon sur l’orifice de
remplissage.
Einfüllstutzen mit Verschlusskappe
verschließen.
Instalar el tapón en la boca de carga.
Mettere il coperchio di chiusura
dell’attrezzatura.
Dop weer op de vulopening plaatsen.
Надеть колпачок на отверстие для
заливки жидкости.
Open 2 opposite doors and leave open for
about 5 minutes.
Ouvrir les 2 portes opposées et les laisser
ouvertes pendant 5 minutes.
Zwei gegenüberliegende Türen öffnen
und ungefähr 5 Minuten offen lassen.
Abrir 2 puertas opuestas y dejarlas
abiertas aproximadamente 5 minutos.
Aprire le 2 portiere opposte e lasciarle
aperte per 5 minuti.
Open 2 tegenover elkaar liggende deuren
en laat ze ongeveer 5 minuten open.
Открыть 2 противоположные двери и
проветрить салон в течение 5 минут.
8
9
B
1
2
3a
Neutralize bad smells in car interior
EN
Neutraliser les mauvaises odeurs à
FR
DE
ES
Neutralizzare i cattivi odori dell’abitacolo
IT
NL
Устранение неприятного запаха внутри
RU
l’intérieur du véhicule
Schlechte Gerüche im
Fahrzeuginnenraum entfernen
Neutraliza malos olores en el interior del
coche
Slechte reuk in het interieur van
voertuigen neutraliseren
салона автомобиля
3b
on the floor between front and rear seat
EN
sur le tapis entre les sièges avants et
FR
arrières
auf die Matte zwischen Vorder- und
DE
Rücksitz
en el suelo entre el asiento delantero
ES
y trasero
sul pavimento tra i sedili davanti e quelli
IT
di dietro
op de grond tussen voor- en achterstoel
NL
на полу между передним и задним
RU
сидениями.
3c
in the trunk
dans le coffre
im Kofferraum
en el maletero
nel bagagliaio
in de kofferbak
в багажнике
Fill 1 bottle of 60 ml Wynn’s Air Purifier
in the machine.
Vider un flacon de 60 ml de Wynn’s Air
Purifier dans la machine.
Ein 60 ml Fläschchen Wynn’s Air Purifier
in das Gerät gießen.
Vaciar un envase de 60 ml de Wynn’s Air
Purifier en el aparato.
Versare un flacone da 60 ml di Wynn’s
Air Purifier nell’attrezzatura.
Giet 1 flesje van 60 ml Wynn’s Air
Purifier in het toestel.
Вылить 1 бутылку 60 мл продукта
Wynn’s Air Purifier в установку.
4
Connect the power plug to a 12 V DC connection in
the car (cigarette lighter or other)
Brancher la fiche de contact sur une source de courant
de 12 V dans le véhicule (allume- cigare ou autre).
Der Netzstecker mit einer 12 V GS Verbindung (einem
Zigarettenanzünder oder anderem) verbinden.
Conectar la clavija de toma de corriente a una
conexión 12 V DC en el coche (encendedor u otro).
Collegare lo spinotto a 12 V DC nella connessione
dell’autovettura (accendisigari o altro)
Verbind de stekker met een 12 V GS aansluiting in de
wagen (sigarettenaansteker of andere).
Подсоединить клемму к истонику питания 12
вольт в автомобиле (прикуриватель или др.)
Put the machine horizontally upright on a convenient place
in the middle of the car interior.
Poser l’appareil en position horizontale sur un endroit
approprié à l’intérieur du véhicule, de préférence au milieu.
Das Gerät auf eine passende Stelle in der Mitte des
Fahrzeuginnenraums horizontal aufrecht stellen.
Poner el aparato derecho (horizontalmente) en un lugar
conveniente, en el medio del interior del coche.
Posizionare l’attrezzatura orizzontalmente al centro
dell’abitacolo dell’autovettura.
Plaats het toestel horizontaal op een geschikte plaats in het
midden van het wageninterieur.
Установить установку в горизонтальном положении с
удобном месте в середине салона автомобиля.
• During treatment, engine running is necessary
for cars equipped with an energy saving system.
• Laisser le moteur en marche pendant le
traitement en cas de voitures équipées d’un
système d’économies d’énergie.
• Motor während der Behandlung laufen lassen
wenn der Wagen mit einem energiesparenden
System ausgerüstet ist.
• En los motores equipados con un sistema de
ahorro energético, es necesario que el motor esté
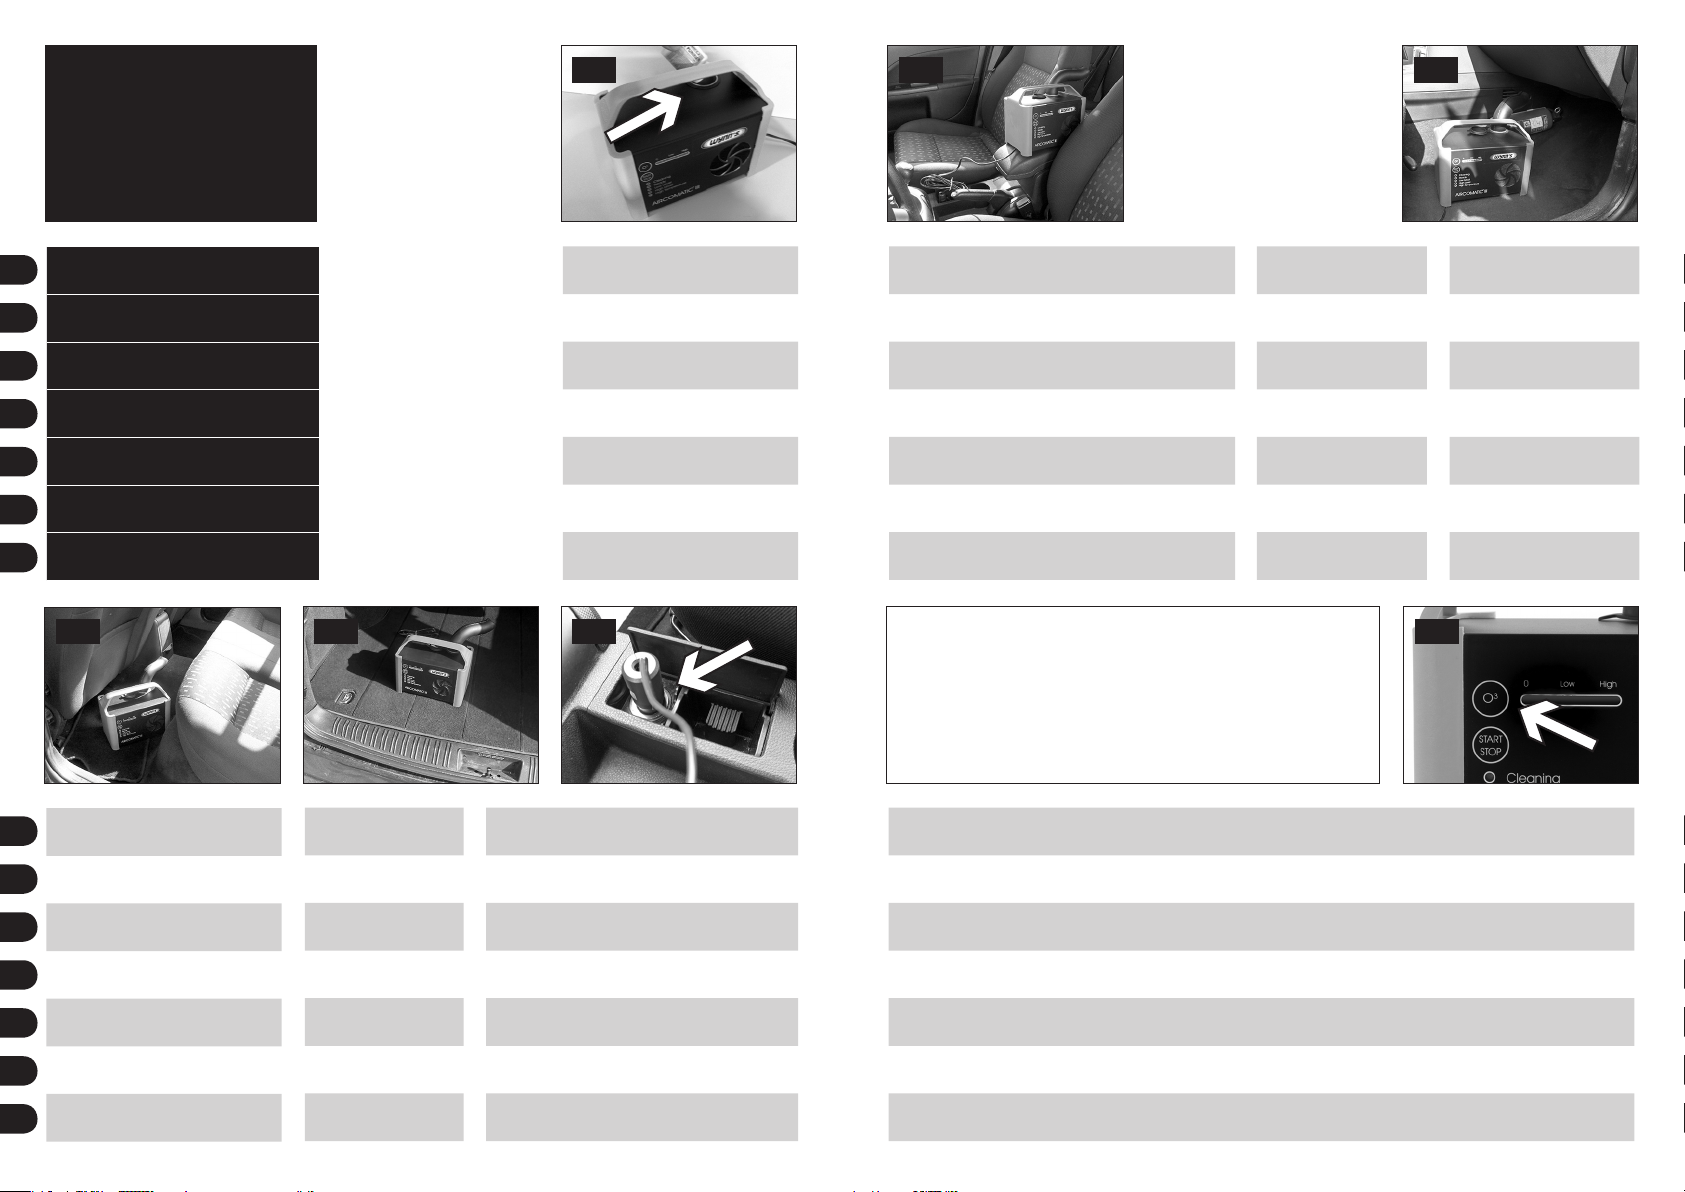
Set treatment level of ozone generation, by pushing O3 button. Each push on this button will select the next treatment level. The
levels are indicated by the LED on the machine.
Régler le niveau de traitement de la génération d’ozone en poussant sur le bouton O3.
Das Behandlungsniveau der Ozonerzeugung wird mit dem O3 Drucktaster eingestellt. Bei jedem Drücken wird das nächste
Behandlungsniveau gewählt. Die Niveaus werden mit LED auf dem Gerät angezeigt.
Ajustar el nivel de tratamiento de generación de ozono, presionando el botón O3. Cada presión (clic) en este botón, seleccionará el
siguiente nivel de tratamiento. El nivel de tratamiento estará indicado por la luz LED del aparato.
Selezionare il livello di generazione di ozono premendo il pulsante O3. Ogni volta che viene premuto questo pulsante viene
selezionato il livello di trattamento successivo. I livelli vengono indicati dal LED presente sull’attrezzatura.
Stel het ozonbehandelingsniveau in door op de O3 toets te drukken. Bij elke druk op deze toets selecteert men het volgende
behandelingsniveau. De niveaus worden door een LED aangegeven op het toestel.
Установить уровень выработки озона нажатием кнопки О3. Каждое нажатие данной кнопки переводит на новый уровень
обработки. Уровни указаны при лампочках на панели установки.
en marcha durante el tratamiento.
• Durante il trattamento e’ necessario mantenere il
motore acceso per le macchine equipaggiate con
un sistema di risparmio energetico.
• De motor moet draaien tijdens de behandeling
bij wagens met energie spaarsysteem.
• Во время очистки, автомобили, оснащенные
системами энергосбережения должны
работать.
Alternatively you can put
the machine:
Vous pouvez éventuellement
aussi le poser:
Eventuelle andere mögliche
Stellen sind:
Alternativamente se puede
poner el aparato:
Viceversa è possible
posizionare l’attrezzatura:
De machine kan eventueel
geplaatst worden:
Установку можно
поставить:
on the floor at the passenger
side.
à l’avant, sur le tapis côté
passager
auf die Matte der Beifahrerseite
en el suelo en la zona del
acompañante
sul pavimento del lato
passeggero dell’autovettura
vooraan op de mat aan de
passagierskant
на полу у переднего сидения
пассажира
5
10
11
5a
5b
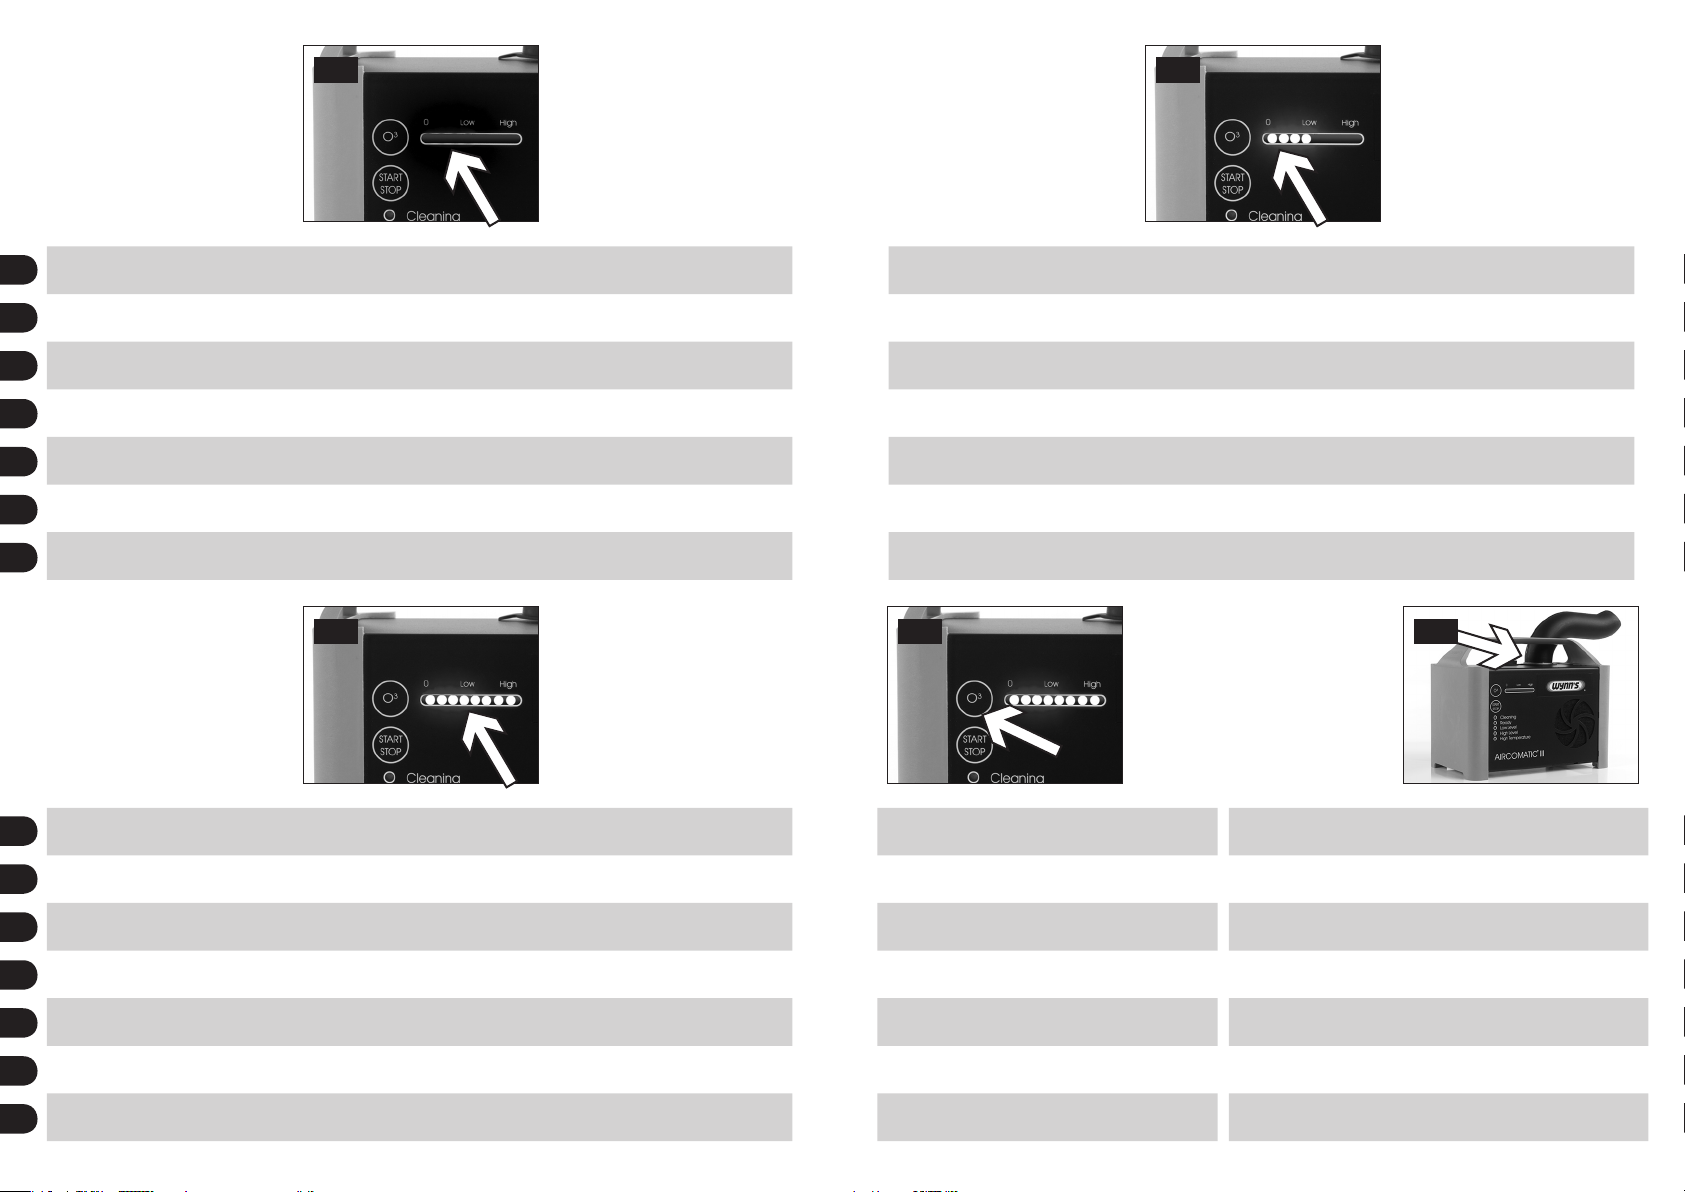
No LED lighted = 0 position. No ozone treatment. When started, the machine will immediately start the treatment with the Air
EN
Purifier liquid. This position is chosen for average smell problems.
Pas de pression sur le bouton O3 = pas de LED allumée = position 0. Pas de traitement d’ozone. Lorsqu’on met la machine en marche,
FR
le traitement avec le liquide Air Purifier commencera immédiatement. On choisit cette position pour des problèmes d’odeur moyens.
Keine LED Anzeige = Position 0. Keine Ozonbehandlung. Wenn das Gerät gestartet wird, dann fängt die Behandlung mit der Air
DE
Purifier Flüssigkeit sofort an. Diese Position wird bei mittelmäßigen Geruchsproblemen gewählt.
LED sin encender = posición 0. No tratamiento de ozono. Cuando se pone en marcha el aparato, el tratamiento con el líquido Air
ES
Purifier comienza inmediatamente. Esta posición es apropiada para problemas de olores medios.
Nessun LED acceso = posizione 0. Ossia nessun trattamento all’ozono. Appena accesa l’attrezzatura comincerà il trattamento con il
IT
liquido Air Purifier. Questa selezione è indicata per problemi medi di cattivo odore.
Geen LED licht = 0 positie. Geen ozonbehandeling. Als men het toestel aanzet, dan begint de behandeling met Air Purifier vloeistof
NL
onmiddellijk. Deze positie is geschikt in geval van middelmatige reukproblemen.
Лампочки не горят = позиция 0. Нет озоновой обработки. После включения установка сразу же начнет обработку с
RU
продуктом Air Purifier. Данная позиция выбирается при наличии несильного запаха.
5c
LED lighted on ‘High’ position. Ozone treatment 30 min. Immediately after this ozone treatment, the treatment with the Air Purifier
EN
liquid will start. This position is chosen for severe smell problems.
Deux pressions sur le bouton O3 = affichage LED sur la position ‘High’. Traitement à l’ozone pendant 30 minutes. Immédiatement
FR
après, le traitement avec Air Purifier commencera. On choisit cette position pour des problèmes d’odeurs impor tants.
LED-Anzeige auf ‘High’ Position. Ozonbehandlung während 30 Minuten. Nach der Ozonbehandlung wird die Behandlung mit Air
DE
Purifier Flüssigkeit sofort anfangen. Diese Position wird bei schweren Geruchsproblemen gewählt.
LED encendido en posición ‘high’. Tratamiento de ozono 30 min. Después de este tratamiento de ozono, el tratamiento con Air Purifier
ES
comienza inmediatamente. Esta posición es apropiada para severos problemas de olor.
LED acceso sulla posizione ‘High’. Trattamento all’ozono della durata di 30 minuti. Immediatamente dopo questo trattamento partirà
IT
quello con il liquido Air Purifier. Questo livello è indicato per gravi problemi di cattivo odore.
LED licht op ‘High’ positie. Ozonbehandeling 30 min. Onmiddellijk na deze ozonbehandeling zal de behandeling met Air Purifier
NL
vloeistof starten. Deze positie is geschikt in geval van zware reukproblemen.
Загорается лампочка в верхней позиции. Озоновая обработка 30 минут. Сразу после обработки озоном начинается
RU
обработка продуктом Air Purifier. Данная позиция выбирается при наличии очень сильного запаха.
LED lighted on ‘Low’ position. Ozone treatment 15 min. Immediately after this ozone treatment, the treatment with the Air Purifier
liquid will start. This position is chosen for strong smell problems.
Une pression sur le bouton O3 = affichage LED sur la position ‘Low’. Traitement à l’ozone pendant 15 minutes. Immédiatement après
ce traitement à l’ozone, le traitement avec Air Purifier commencera. On choisit cette position pour des problèmes d’odeur forts.
LED-Anzeige auf ‘Low’ Position. Ozonbehandlung während 15 Minuten. Nach der Ozonbehandlung wird die Behandlung mit Air
Purifier Flüssigkeit sofort anfangen. Diese Position wird bei starken Geruchsproblemen gewählt.
LED encendido en posición ‘low’. Tratamiento de ozono de 15 min. Después de este tratamiento de ozono, el tratamiento con Air
Purifier comienza inmediatamente. Esta posición es apropiada para problemas de olores fuertos.
LED acceso alla posizione ‘Low’. Trattamento all’ozono di 15 minuti. Immediatamente dopo questo trattamento all’ozono parte il
trattamento con il liquido Air Purifier. Questa selezione è indicata per for ti problemi di cattivo odore.
LED licht op ‘Low’ positie. Ozonbehandeling 15 min. Onmiddellijk na deze ozonbehandeling zal de behandeling met Air Purifier
vloeistof starten. Deze positie is geschikt in geval van sterke reukproblemen.
Загорается лампочка в нижней позиции. Озоновая обработка 15 минут. Сразу же после озоновой обработки начинается
обработка продуктом Air Purifier. Данная позиция выбирается при наличии сильного запаха.
5d
If the LED light is in ‘High’ position and the O3 button is
pushed, it moves to 0 position.
Lorsque l’affichage LED se trouve en position haute ‘High’ et
que l’on appuie sur le bouton O3 il retourne à la position 0.
Wenn die LED-Anzeige sich in ‘High’ Position befindet und
man drückt die O3 Taste, dann geht es zur 0 Position.
Cuando el LED está en posición ‘High’ y el botón O3 se
presiona, se mueve a la posición 0.
Se il LED è acceso nella posizione ‘High’ e il pulsante O3 è
premuto si avvia la posizione 0.
Als het LED licht zich in ‘High’ positie bevindt en men drukt
op de O3 toets, dan gaat deze terug naar 0 positie.
Если загорается лампочка в верхней позиции, а кнопка
О3 нажата, это перевод в позицию «0».
Connect the outlet tube and position it, so that it is not too close to a
surface or directed towards a window.
Raccorder le tuyau diffuseur et le diriger de telle manière qu’il ne soit pas
trop près d’une surface ou d’une vitre.
Stutzen einsetzen und so richten, dass er sich nicht zu dicht bei einer
Oberfläche befindet oder in der Richtung eines Fensters positioniert wird.
Conectar la boquilla y dirigirla de tal manera que no esté demasiado cerca
de una superficie o no sea dirigida a una ventana.
Collegare il tubo di uscita e posizionarlo in modo che non sia troppo vicino
ad alcuna superficie o diretto verso il finestrino.
Plaats de uitstroombuis en richt ze zodanig dat ze zich niet te dicht bij
een oppervlak bevindt of gericht is naar een venster.
Установить выпускной патрубок и сориентировать его таким образом,
чтобы он был не совсем близко к поверхности и не направлен к стеклу окна.
6
 Loading...