

Wybron 87250, 89020, Eclipse IT Iris, 817010, 811020 User Manual
Eclipse IT Iris
User Manual

87250 – 1K (7.5-inch) Eclipse IT Iris
810060 – 10-inch Eclipse IT Iris
812020 – 2K (12-inch) Eclipse IT Iris
823020 – 24-inch Eclipse IT Iris
Manual issue date: Feb. 26, 2009
CONTENTS
Declaration of Conformity ...........................................................3
Safety Information.........................................................................4
Introduction....................................................................................5
Quick Start ....................................................................................6
Using the Eclipse IT Iris..............................................................7
Operating Modes................................................................7
Signal and Power...............................................................7
Fan Speed Control ...........................................................7
Installing the Eclipse IT Iris ........................................................8
Menu Tree...................................................................................10
Alerts/Error Messages.................................................. 12
DMX Address..................................................................13
Settings .......................................................................... 14
Sensor Info .....................................................................14
Self Test (Demo) ...........................................................15
History..............................................................................15
Reset Defaults............................................................... 16
Head-Feet Restrictions............................................................17
Equipment Compatibility.......................................................... 18
Cables......................................................................................... 18
Non-RDM Equipment and Infotrace.......................................19
Coloram IT Products and Standard Environments.............19
Specifications............................................................................. 20
Parts List..................................................................................... 21
Infotrace System Overview..................................................23
Illustrated Parts Breakdown....................................................25
Warranty Information.................................................................28

Safety Notice
SAVE THESE INSTRUCTIONS

READ AND FOLLOW ALL INSTRUCTIONS
CAUTION: The Eclipse IT Iris mechanical dimmer/dowser has been
designed to withstand the rigors of entertainment lighting. However, the
teflon coating on the Iris blades can only withstand temperatures up to 600°F.
When used with some excessively hot fixtures, degradation and possibly
flaking of this coating may occur.
USE WITH EXCESSIVELY HOT FIXTURES – OVER 700°F AT THE IRIS
BLADES – THAT RESULTS IN DEGRADATION OF THE HIGH TEMP
POWDER COATING IS EXCLUDED FROM THE PRODUCT WARRANTY.
This manual gives step-by-step instructions for preparation, setup, and
operation of the Eclipse IT Iris dowser.
There is a potential risk of fire, electric shock, or injury to persons if the
product is not used as instructed.
The Eclipse IT Iris dowser is to be used in an indoor environment only and is
not intended for residential use.

Introduction
Wybron’s Coloram IT system includes mechanical dowsers (Eclipse IT Iris and Eclipse IT
Shutter) and PS Power Supplies, all utilizing the Remote Device Management (RDM)
industry-standard feedback protocol. Offering a wide range of models with easy setup and
use, the Coloram IT system is part of Wybron’s Infotrace Control and Management System
– a new way to manage an entire lighting installation with RDM feedback
The lightweight Eclipse IT Iris dowser slides easily into the gel frame holder of its light
fixture. The compact PS Power Supply attaches easily to the truss of the lighting rig or
mount into a 19-inch rack.
The DMX512 control signal from the lighting console is connected to the PS Power Supply
and can continue on to additional PS power supplies or other DMX-controlled devices. The
power supply sends power, DMX control signal, and RDM information on a single cable,
eliminating the need for a separate power cable for the dowser.
Eclipse IT Iris dowsers are 100% compatible with all products of the Coloram IT family,
including Coloram IT and CXI IT color changers, PS Power Supplies, and Eclipse IT Shutter
dowsers. Eclipse IT Iris dowsers may be daisy-chained with other Coloram IT devices.
This manual gives step-by-step instructions for preparation, setup, and operation of the
Eclipse IT Iris.
Caution:
The Coloram IT System, including Eclipse IT Iris, is not compatible with Coloram II
(RAM) or Forerunner systems.
Do not connect Eclipse IT Iris dowsers to Coloram II (RAM) power supplies or
Forerunner power supplies.
Do not connect Coloram II (RAM) units to PS power supplies.
Damage from such action will not be covered by the product warranties.
Quick Start
1. Connect the Equipment
A. Attach the Eclipse IT Iris dimmer/dowser to a powered light fixture.
B. Connect the Eclipse to the PS Power Supply using the 4-pin Wybron
power/data cable.
C. Connect the PS Power Supply to non-dimmed 100-240 VAC, 50/60Hz power
and a DMX source.
Optional
D. Connect dimmers that have Infochip installed to the Infogate hardware and
software. Refer to the Infogate and Infochip manuals for details.
E. Using Infogate:
i. Initiate “Perform Discovery”
ii. In the DMX Map, drag and drop the DMX address for the Eclipse to DMX
address 1.
F. Refer to the Infogate user manual for further details.
2. Send DMX Levels
A. On the lighting console, vary the level of the Eclipse DMX channel to open and close
the dowser fins.
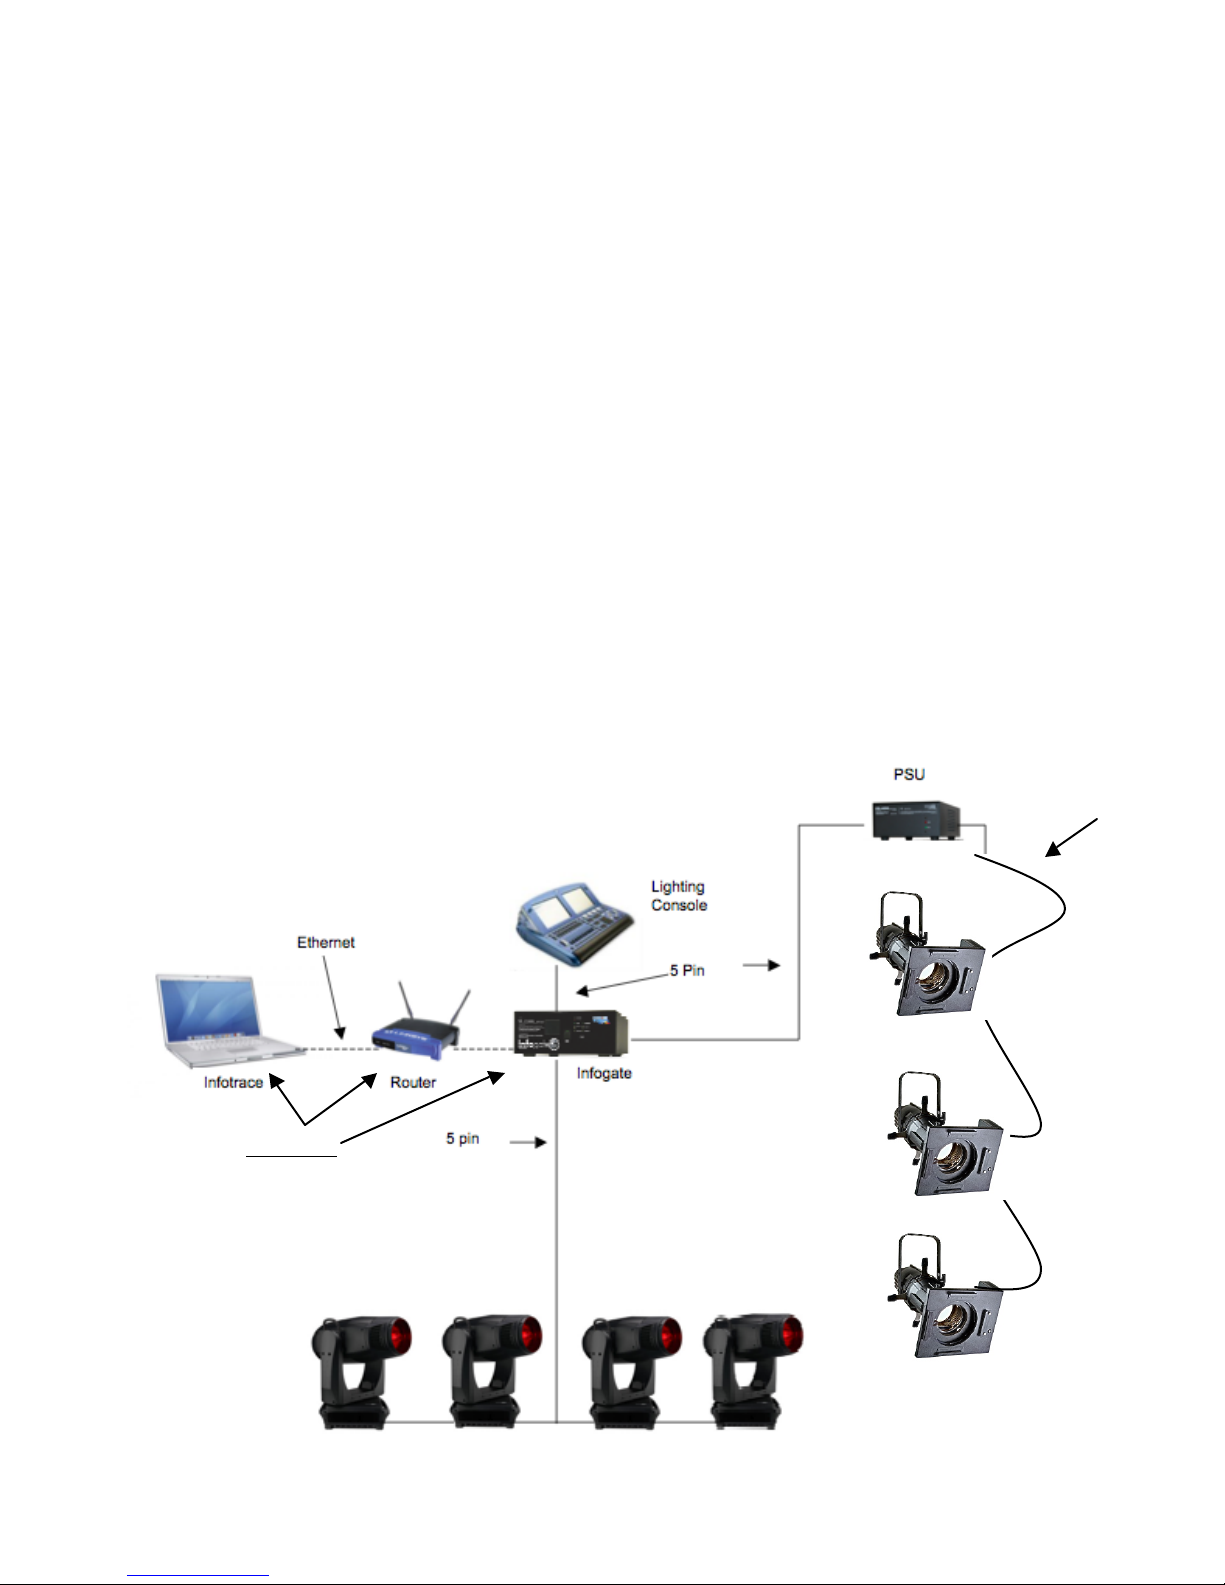
Connection Diagram
Figure 2
Connection Diagram
Figure 1
Four Pin
Optional

Using the Eclipse IT Iris Dowser
Operating Modes
The Eclipse has several modes of operation. In all cases, the PS Power Supply is needed
for control and power. Please refer to the Menu Details below for information on how to
select DMX, Local, Snap, Fast, or Smooth mode.
DMX512 Control
The level (0-100%) of the DMX channel to which the dowser is addressed
determines the fin position. The fins are closed at 0% and open at 100%.
Local Wired Pendant Control
A handheld pendant can be attached via a 3-pin XLR cable to manually open and
close the fins. Movement from fully open to fully closed or vice-versa takes two
seconds – this allows for precise fin positioning. Press the " + " button to open the
fins and the " - " button to close them. The wired pendant cable can be up to 1,000
feet long.
Self Test/Demo Mode
The dowser unit can be controlled by the menu buttons on the dowser unit. Please refer to
the Menu Details below, under Self Test (Demo) for details.
Signal and Power
The Eclipse uses a PS Power Supply with Coloram IT cables for DMX signal, RDM
communication and 24VDC power. The dowser can be daisy-chained with Coloram IT and
CXI IT color changers and Eclipse IT Shutter dowsers. Fin position is determined by the
DMX level (0-100%) of the control channel to which the dowser is addressed. The dowser
uses one DMX channel.
Fan Speed Control
The small fan in the Eclipse cools the electronics enclosure, therefore it always runs at full
speed and CANNOT be slowed or stopped.
Installing the Eclipse IT Iris
1. Attach the Eclipse to the fixture
Slide the dowser's mounting bracket into the gel frame holder of your fixture and lock the
gel frame retention clip (if available). The unit operates most effectively with the electronics
module oriented to the side or bottom.
2. Attach the safety cable
A safety cable is attached to the dowser. Run this cable around the pipe or truss from which
you hang the light fixture and clip it to itself.
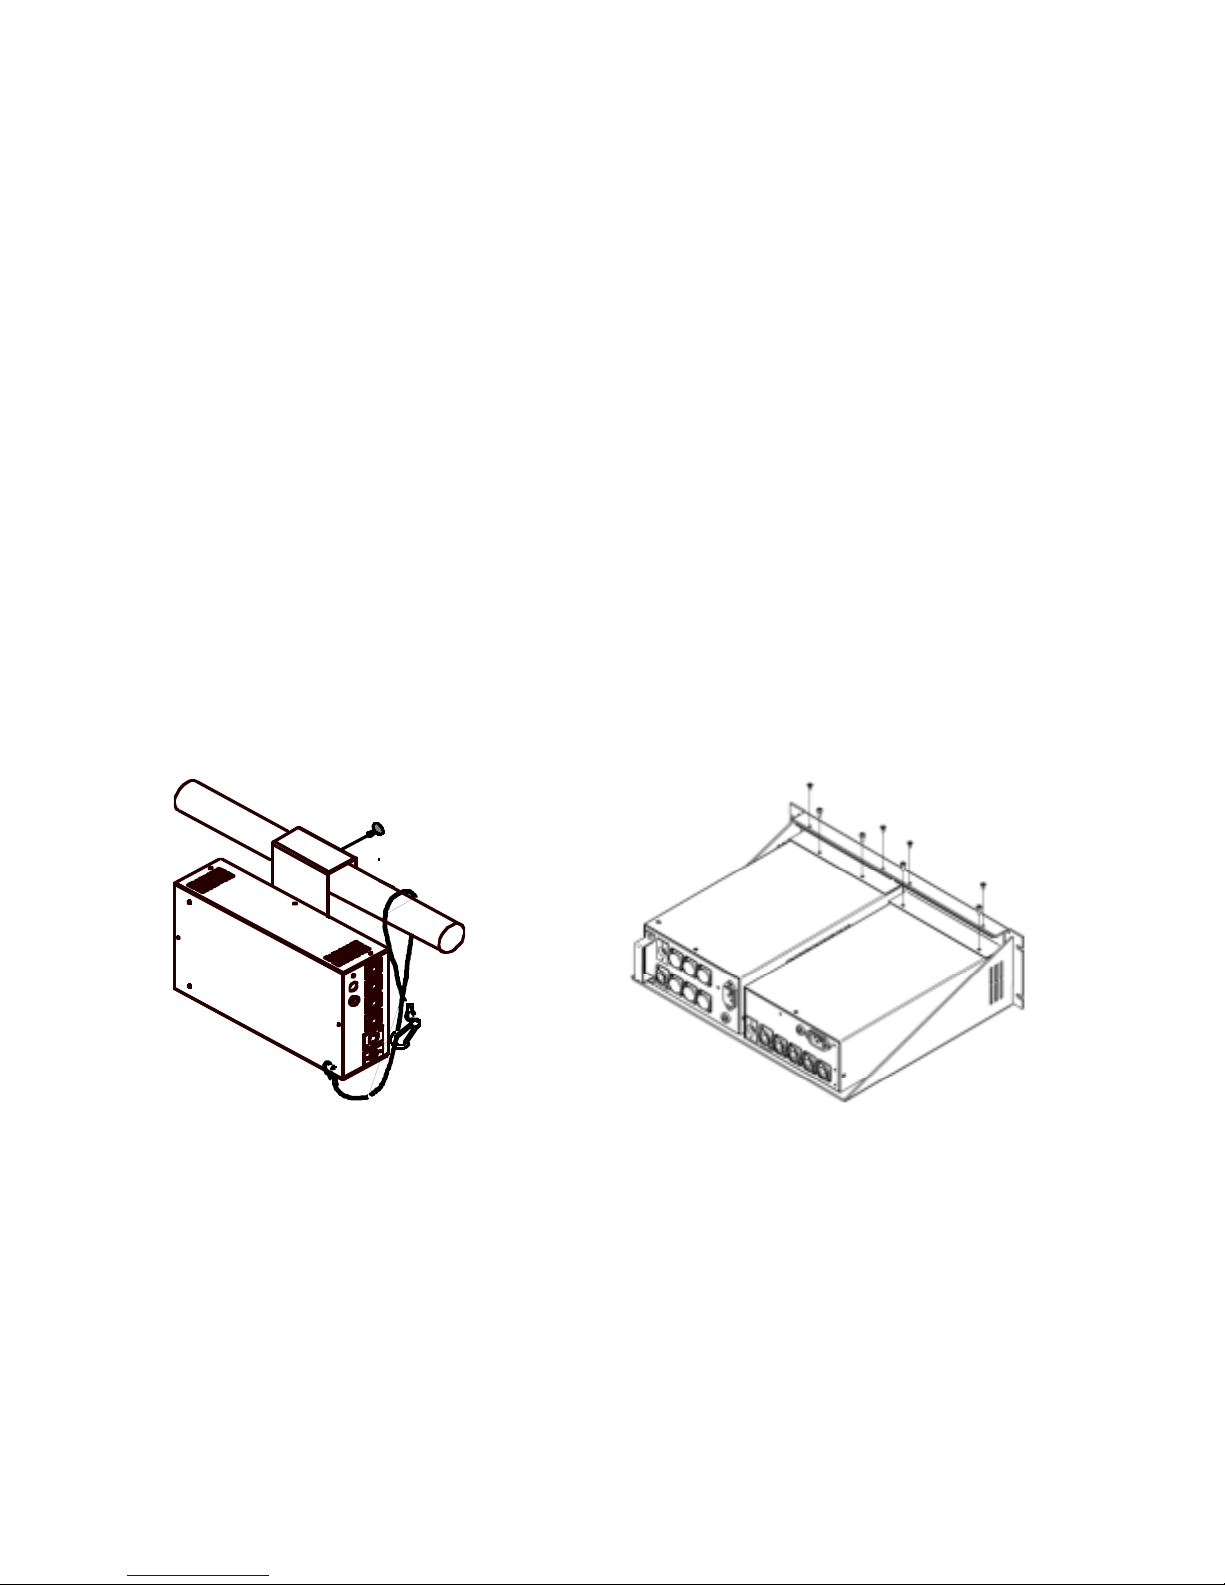
3. Mount the power supply
The PS Power Supply is designed to be free-standing, truss-mounted, or rack-mounted.
You decide which mounting method best suits your application.
The power supply comes with a mounting bracket which hooks over the pipe or truss of
your lighting rig and is then locked into place with a thumb screw. If you have selected this
mounting method, connect the safety cable by running it around the pipe or truss to which
the power supply is attached.
90
25
0
VA
60
4
AM
P
BL
O
AT
11
5
2
AM
P
BL
O
AT
23
0
Figure 2 Figure 3
The power supply can also be mounted into a 19-inch rack using the optional PS Power
Supply rack mount kit. The rack mount kit will accommodate two PS Power Supplies side
by side.
4. Connect the Eclipse to the power supply
Connect the dowsers to the power supply using 4-pin Coloram IT cable.

Refer to the HEAD-FEET RESTRICTIONS section of this manual for details regarding the
length of cable runs.
5. Connect the power supply to AC power
Plug the AC cord into a non-dimmed power circuit. The power supply automatically
accommodates 100 - 240 VAC (50/60 Hz).
Power at the PS Power Supply is indicated by a red LED indicator.
Caution: Do not power the PS Power Supply from a dimmer. Severe damage
will result and is not covered by product warranty.
6. Connect the DMX512 source
Connect the DMX512 signal source to the DMX input connector on the back of the power
supply using standard DMX cable. Valid DMX signal will be indicated by a flashing green
LED. The dowsers will now open and close their fins according to their respective DMX
signal levels.
[Alerts Menu] >
[DMX Status]
DMX Address: 512
Settings >
Sensor Info >
History
Eclipse Iris IT
Graphical Menu Tree
[Alerts Menu] >
[DMX Status]
DMX Address: 512
Settings >
Sensor Info >
History
Local Control >
 Loading...