

Wuyi Zhouyi STG901Q, STG1101Q, STG1301Q, STG8062, ZLST901Q General Operations Manual
...
1
General Operations Manual for 10 Snow Thrower Models
Company: Wuyi Zhouyi Mechanical & Electrical Co.,LT
Address: Jinyan Mountain Industry Function Area , Quanxi Wuyi ,
Zhejiang ,China

2
1. GENERAL
This symbol indicates CAUTION. Serious personal injury and/or damage to property may result if
the instructions are not followed carefully.
1. SYMBOLS
The following symbols appear on the machine. They are there to remind you of the care and attention required in use.
This is what the symbols mean:
Warning.
Read and understand the owner’s manual before using this machine
Disconnect the spark plug wire, and consult technical literature before performing repairs or maintenance
Danger - rotating fan. Danger - rotating auger
Keep hands out of discharge chute
Keep hands and feet away from rotating parts.
Risk of burns
Keep bystanders at a safe distance from the machine. Never point the discharge chute towards bystanders.
Use hearing protection

14
2. SAFETY INSTRUCTIONS
2.1 GENERAL
• Please read through these instructions carefully. Learn all the controls and the correct use of the
machine.
• Never allow children or anyone who is not familiar with these instructions to use the snow thrower.
Local regulations may impose restrictions as regards the age of the driver.
• Never use the machine if others, particularly children or animals, are in the vicinity.
• Remember that the driver is responsible for accidents that happen to other people or their property.
• Be careful not to trip or fall, especially when reversing the machine.
• Never use the snow thrower under the influence of alcohol or medication and if you are tired or ill.
2.2 PREPARATIONS
• Check the area to be cleared and remove any loose or foreign objects.
• Disengage all controls before starting the engine.
• Never use the snow thrower unless properly dressed. Wear footwear that improves your grip on a
slippery surface.
• Warning – Petrol is highly inflammable.
a. Always store petrol in containers that are made especially for this purpose.
b. Only fill or top up with petrol outdoors, and never smoke when filling or topping up.
c. Fill with petrol before starting the engine. Never remove the filler cap or fill with petrol while the
engine
is running or still warm.
d. Screw the filler cap on tightly and wipe up any spilt petrol.
• Adjust the height of the auger housing to ensure it stays above gravel paths.
• Never, under any circumstances, make adjustments while the engine is running (unless otherwise
specified in the instructions).
• Allow the snow thrower to adjust to the outdoor temperature before using it.
• Always use protective goggles or a visor during use, maintenance and service.
WARNING! This machine produces an electromagnetic field during operation. This field may under some
circumstances interfere with active or passive medical implants. To reduce the risk of serious or fatal injury, we
recommend persons with medical implants to consult their physician and the medical implant manufacturer
before operating this machine.The declared vibration total value has been measured in accordance with a
standard test method and may be used for comparing one tool with another. The declared vibration total value
may also be used in a preliminary assessment of exposure.
Residual risks
Even when the machine is used as prescribed it is not possible to eliminate all residual risk factors. The
following hazards may arise in connection with the power tool’s construction and design:
1. Damage to lungs if an effective dust mask is not worn.
2. Damage to hearing if effective hearing protection is not worn.
2.3 OPERATION
• Keep hands and feet away from rotating parts. Always avoid the discharge chute opening.
• The snow thrower must never be used to remove anything but snow
• Be careful when driving on or crossing gravel paths, pavements and roads. Be aware of hidden dangers
and traffic.

14
• Never direct the discharge chute towards a public road or traffic.
• If the snow thrower hits a foreign object, stop the engine, disconnect the spark plug cable and carefully
inspect the machine for damage. Repair the damage before using the machine again.
• If the machine starts vibrating abnormally, stop the engine and look for the cause. Vibration is normally
a sign of something wrong.
• Stop the engine and disconnect the spark plug cable:
a. If the machine steers away from the driving position.
b. If the auger housing or discharge chute is blocked and must be cleaned.
c. Before beginning repairs or adjustments.
• Always make sure the rotating parts have stopped and all the controls are disengaged before cleaning,
repairing or inspection.
• Before leaving the machine unattended, disengage all the controls, put it into neutral gear, stop the
engine and set the stop switch in position “OFF”.
• Never run the engine indoors except when taking it in and out of its place of storage. In this case ensure
the door to the storage place is open. Exhaust fumes are toxic.
• Never drive across a slope. Move from the top down, and from the bottom to the top. Be careful when
changing direction on a slope. Avoid steep slopes.
• Never operate the machine with insufficient protection or without the safety devices in place.
• Existing safety devices must not be disconnected or disengaged.
• Do not alter the engine’s regulator setting and do not race the engine. The possibility of personal injury
increases when the engine is run at high revs.
• Never use the snow thrower near enclosures, cars, windowpanes, slopes etc. without properly setting the
discharge chute deflector.
• Always keep children away from areas to be cleared. Get another adult to keep the children under
supervision.
• Do not overload the machine by driving it too fast.
• Take care when reversing. Look behind you before and during reversing to check for any obstacles.
• Never point the discharge chute towards bystanders. Do not allow anyone to stand in front of the
machine.
• Disengage the auger when the snow thrower is to be transported or is not in use Do not drive too fast on
slippery surfaces when transporting.
• Only use accessories that are approved by the machine’s manufacturer.
• Never drive the snow thrower in bad visibility or without satisfactory lighting.
• Always ensure you have a good balance and a tight grip on the handle.
• Never use the snow thrower on a roof.
• Do not touch engine components because they are warm during use. Risk of burn injuries.
2.4 MAINTENANCE AND STORAGE
• Tighten all nuts and screws so that the machine is in safe working condition. Check the shear bolts
regularly.
• Always use genuine spare parts. Non-genuine spare parts can entail a risk of injury, even if they fit the
machine.
• Never store the machine with petrol in the tank in buildings where the fumes can come into contact with
open flames or sparks.
• Allow the engine to cool before putting the machine instore.
14
• Before a long storage, check the instructions for recommendations.
• Replace damaged warning and instruction stickers.
• Let the engine run a couple of minutes with the auger connected after use. This prevents the auger from
freezing solid.
The vibration emission during actual use of the power tool can differ from the declared total value depending
on the ways in which the tool is used.
There is the need to identify safety measures to protect the operator that are based on an estimation of exposure
in the actual conditions of use (taking account of all parts of the operating cycle such as the times when the
tool is switched off and when it is running idle in addition to the trigger time).
3. ASSEMBLY
Note: Instructions to the left and right sides start from the driving position behind the snow thrower.
1. When the package is opened, please check all components against the installation diagram. In case of
any omission or shortage, please contact the dealer to make up.
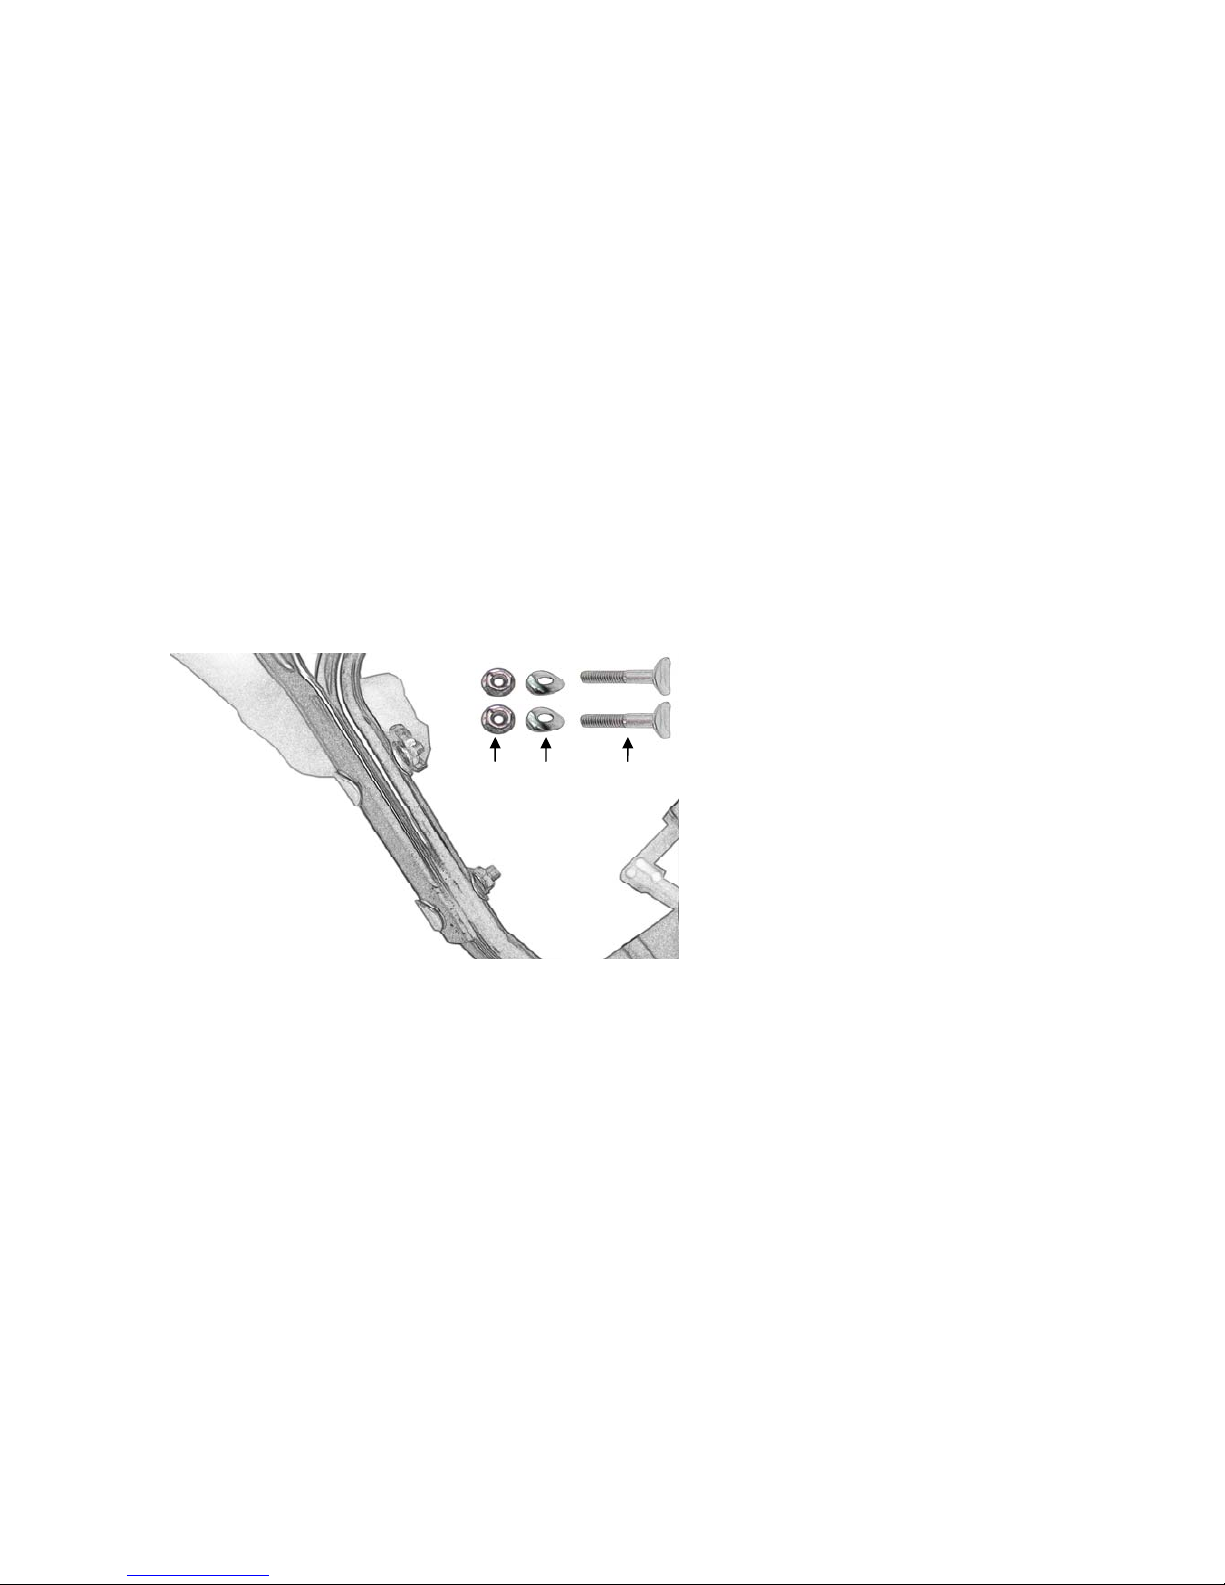
2. Install the handle - Step 1: use two M8×40 leaf-shape bolts(1), two leaf-shape washers (2), and two
flange nuts (3) to mount the operating handle assembly onto the arm rest by aligning them to two
mounting holes on the right side (see Figure 2).
(Figure 2)
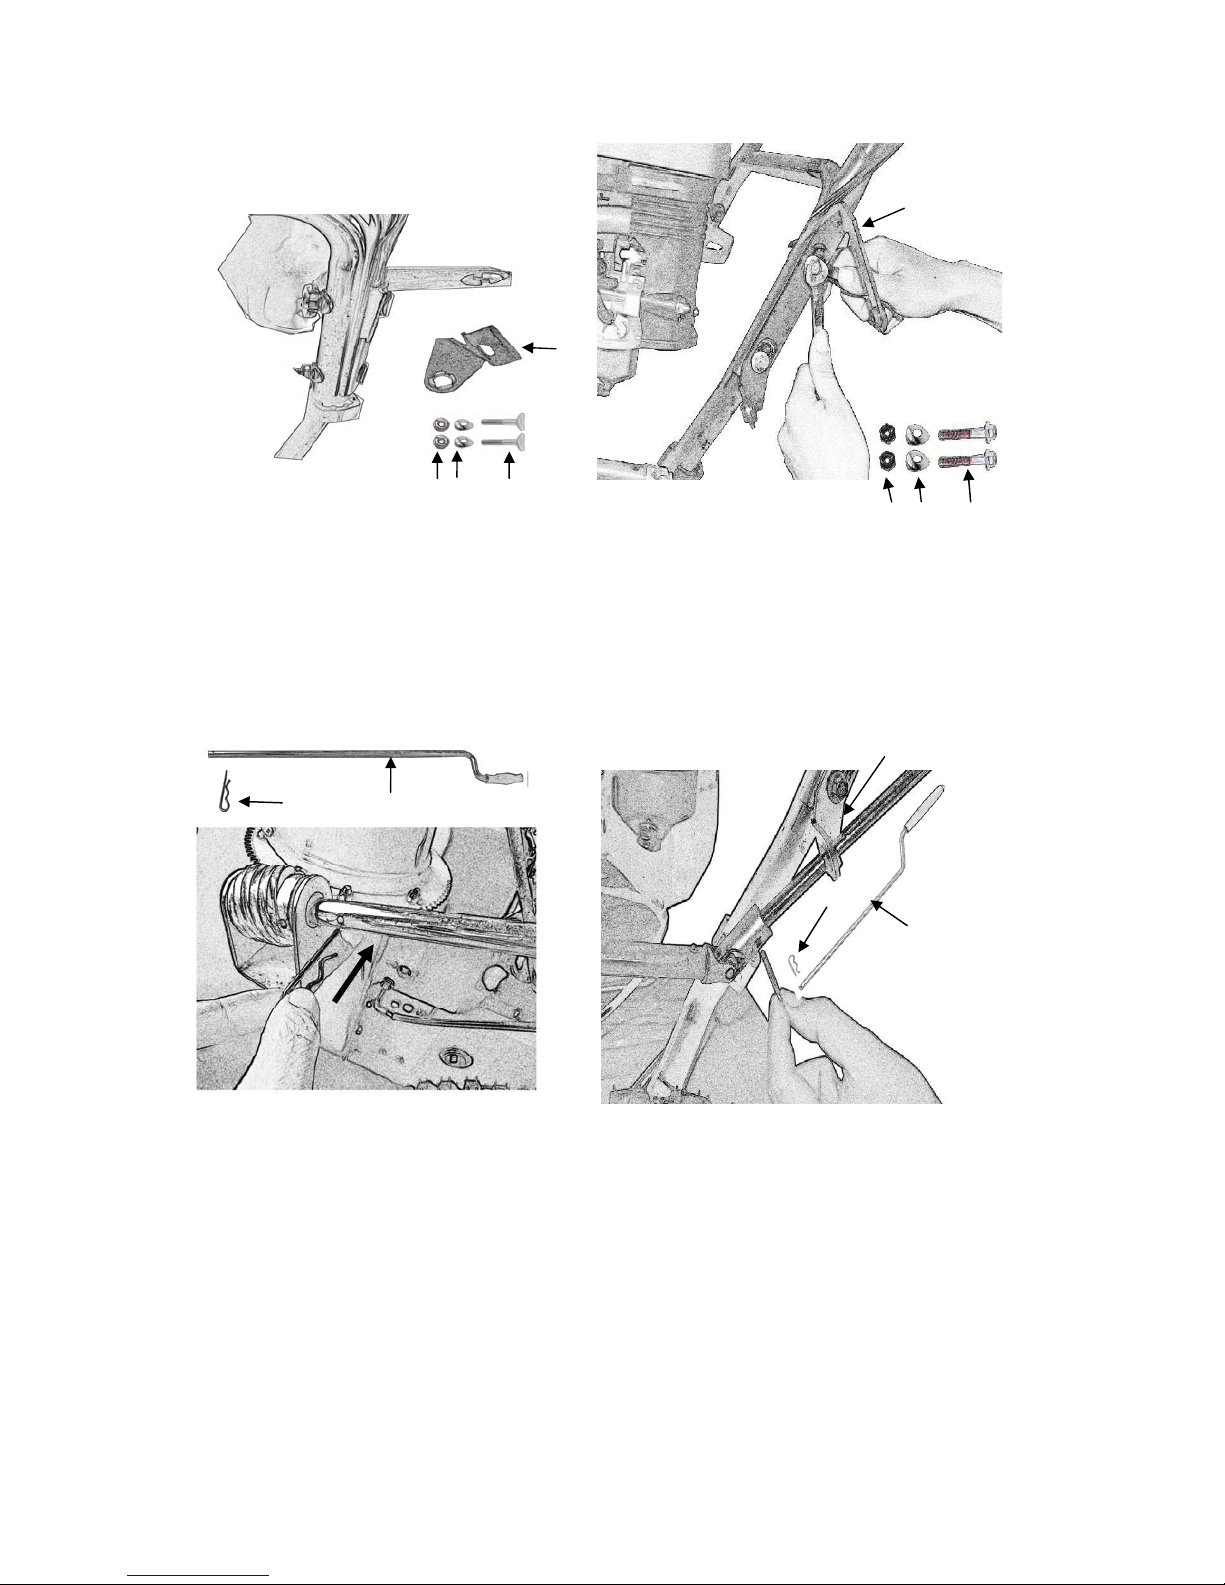
3. Install the handle - Step 2:
A. For STG556 (6562), installation should be carried out in accordance with Figure 3: mount two M8×40
leaf-shape bolts(4), two leaf-shape washers (5), and two flange nuts (6) along with the chute rocker
holder (7) into the two mounting holes on the left side of the arm rest.
B. For other machine models, installation should be carried out in accordance with Figure 4: mount two
M8×45 flange screws(8), two leaf-shape washers (9), and two locknuts (10) along with the chute rocker
holder (11) into the two mounting holes on the left side of the arm rest.
3 2 1
14
(Figure 3)
4 Mount the rocker:
A. For STG5556 (6562) (See Figure 5), pass the rocker (12) through the rocker base (7) as shown in
Figure3, and pass the pin (13) through the rocker (12) so that it is coupled to gear shaft;
B. For other machine models (see Figure 3), pass the rocker (14) through the rocker base (11) as shown in
Figure4, and pass the pin (15) through the rocker (11) so that it is coupled to the universal joint;
(Figure 5) (Figure 6)
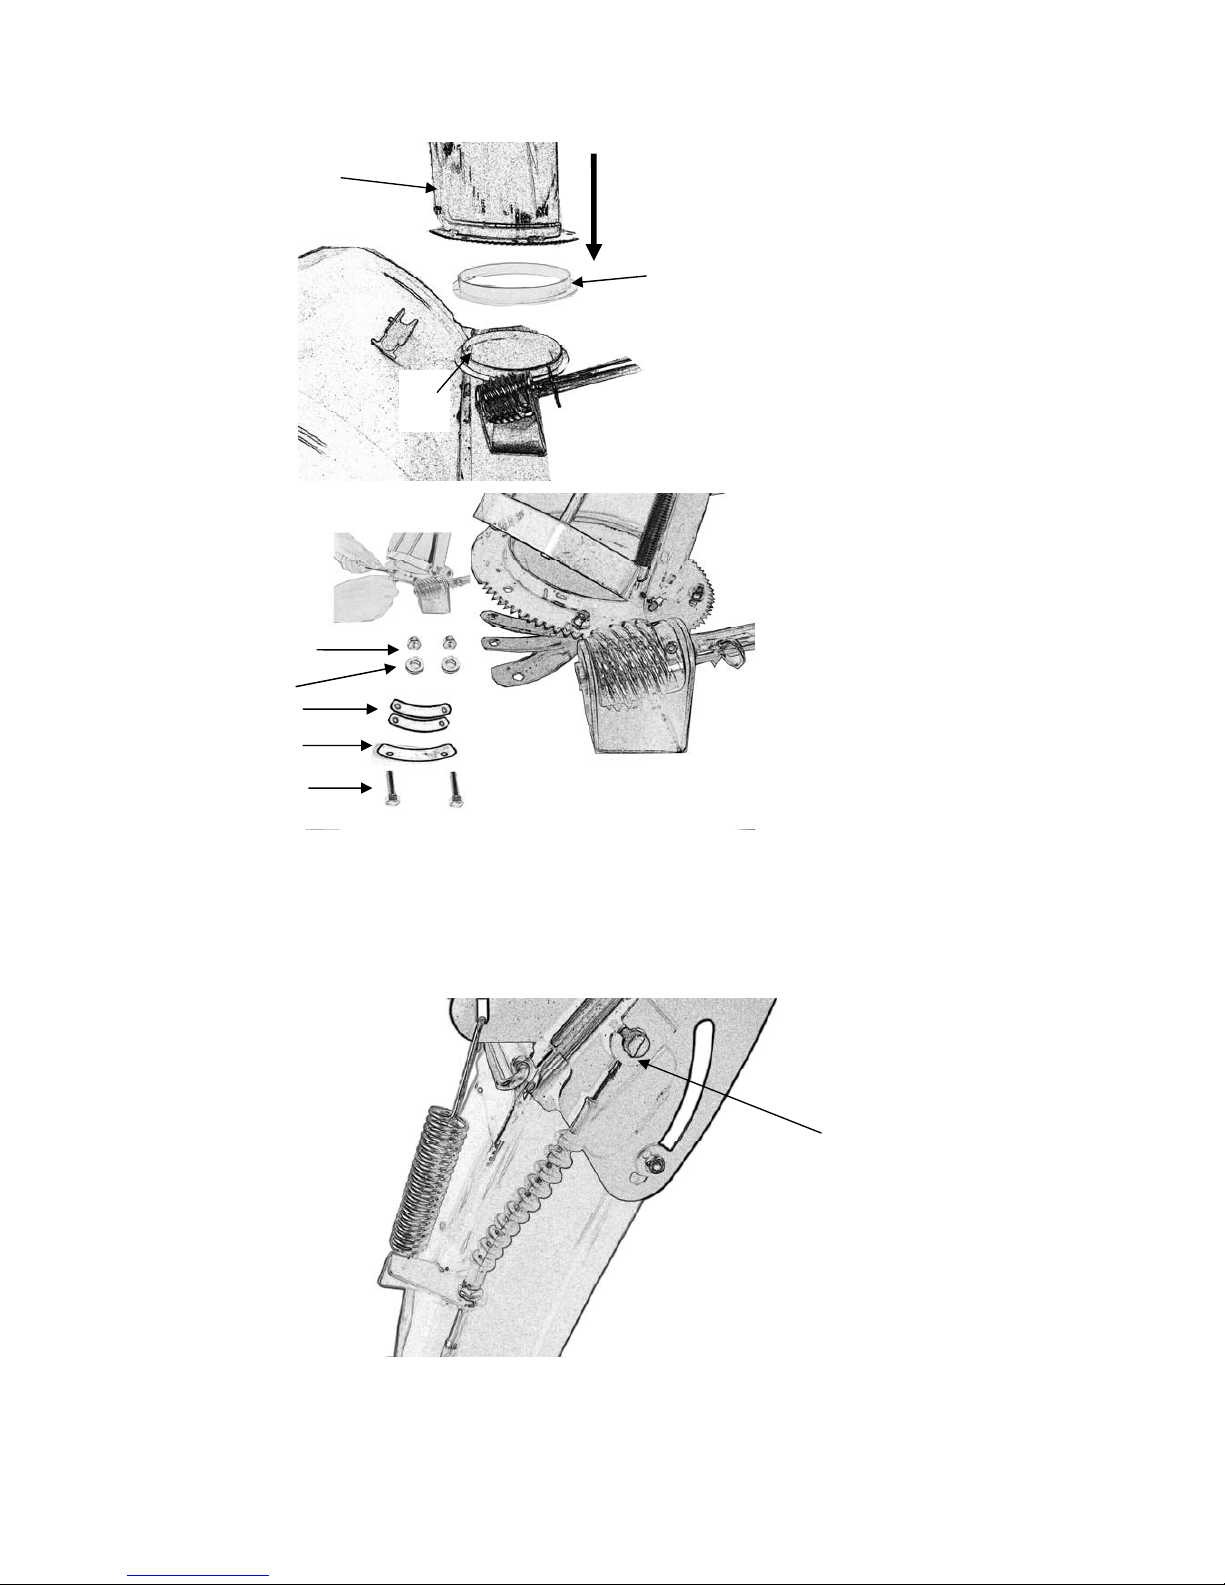
5. Install the chute: Place the chute plastic ring (16) below the chute (17) and locate it onto the chute base
(18) on the housing (see Figure 7); connect and tighten up the chute presser (19) plus two chute washers
(20) with hexagon nipples (21), M6 washers (22), and M6 lock nuts (23) (see Figure 8).
13 12
7
(Figure 4)
10 9 8
11
14
15
11
14
(Figure 8)
6. Install the chute wire: Fix the wire end (24) onto the chute cap, adjust the bolt length on the wire, and
tighten up (see Figure 9).
(Figure 9)
7. Install the speed handle and chute cap regulation handle: Pass two regulation handles (25) above the
17
16
18
21
23
22
19
20
24
Figure 7
 Loading...