

Page 1

WUXI HUTEC
Functional Specification
Product: Dehumidifier Remote-Control
Type: HJ-CSJ63/64/65/66/81/82
Customer: W C Wood Company Limited
Rev: A
By: Jimmy.Liu
Date: 26th Aug,2005
Warning:
Changes or modifications not expressly approved by the party responsible for compliance
could void the user's authority to operate the equipment.
A. Brief
There are three parts of the Dehumidifier Remote-Control.
a. Electrical source board (Same as the normal dehumidifier: 4-75517-101,
4-75517-102)
- Voltage rage: 115VAC / 60Hz,220AC /50Hz
b. Receiving-Control(HJ-CSJ63/64/65/66)
- Receiving-Control receives the instruction from the Transmitting-Control
and controls the fan and compressor to be on or off.
c. Transmitting-Control(HJ-CSJ81/82)
- User sets the RH on Transmitting-Control, and the T ransmitting-Control emit s the
instruction to Receiving-Control to open or close compressor according to the
ambient RH and user’s RH set-point.
- In order to save power, the transmitting-control sleeps 57s and wakes up 3s per
minute normally. In sleep status, the transmitting-control does nothing , not tests
the RH or temperature ,not emits instruction to Receiving-control, not changes
the LCD. So the current is lower than 80uA in sleep status. You can wake up
transmitting-control by pressing any key while it’s in sleep status.
While time reaches per minute or user presses any key , the transmitting-control
wakes up. In wake up status, transmitting-control tests the RH and the
temperature, then it decides what to do. The current is about 4mA in wake up
status.
- The distance of the remote is about 15m indoors or above 20m outdoors.
B. Functional Specification
1 OF 7
Page 2

Part a Electrical source board
Same as the normal dehumidifier: 4-75517-101,4-75517-102,not described here.
Part b Receiving-Control
Four Led Lights: Fan-speed-high light (LED1),
Fan-speed-low light (LED2),
Power-on light (LED3),
Bucket-full light (LED4.RED)/Low-temp light (LED4.GREEN)
TWO Buttons: Power button(SW1), Fan-speed button(SW2)
TWO Temperature sensors: ambient-temperature sensor, coil-temperature sensor
ONE Buzzer: bucket-full alarm
Figure.1 Receiving-Control
1.
Normal mode
1) When first time turning on power to the receiving-control, the receiving-control begin
to work with the power-on light on according to the instruction from the
transmitting-control. If the remote communicates error for 30 minutes, the power-on
light flashes and the audible alarm (Bi-Bi) will be generated. After communicate error,
you can press Power button and Fan-speed button at receiving-control. Fan will run at
the speed according to your selection. Compressor will keep on for 52 minutes and
keep off for 8 minutes.
2) When the fan speed is chosen high on the transmitting-control, the fan-speed-high
light is on and the high-speed fan runs if it is enable.
When the fan speed is chosen low on the transmitting-control, the fan-speed-low light
is on and the low-speed fan runs if it is enable
3) Compressor must lag behind fan for 4 minutes. Once the compressor quits running,
it needs 4 minutes of interval if it should be turn on again.
4) When bucket full condition is detected for 2 seconds, compressor & fan will be
turned off sequentially . Then bucket-full light will be on and the audible alarm (1s on/1s
off) will be generated every hour.
5) The buzzer is able to alarm only because being set enable from transmitting-control.
2 OF 7
Page 3

2. Very-Low-temp mode
If ambient temperature is below 4’C for 4mins, the control stops, the four LED lights
flash until the ambient temp is above 5’C for 8mins.
3. Low-temp mode
When the ambient temperature is lower than 15’C and lasts over 10 minutes
continuously, the receiving-control will automatically enter into the low-temp mode and the
low-temp light begins flash.
In the low-temp mode, there are two conditions:
Condition A:
If humidity does not reach your set point, the compressor runs 52mins on/8mins off.
At the end of the cycle, the receiving-control checks the coil-temp.
If the coil-temp is above 5’C, the compressor continues 52mins on until the humidity
reach the Set-point.
If the coil-temp is below 5’C, the compressor keeps stopping and fan runs to defrost
for 8mins again. At the end of the cycle, check the coil-temp again.
Condition B:
If humidity reaches the set point in 52mins, the compressor stops and the fan runs,
the receiving-control runs defrost for 4mins. at the end of the 4mins, check the coil-temp.
If the coil-temp is above 5’C, the compressor and the fan keep stopping unless
humidity increases to the set point again.
If the coil-temp is below 5’C, the receiving-control runs defrost for 4mins again, and
then check the coil-temp.
Once the ambient temperature is above 18’C for 10mins, the remote enter the
normal-mode.
4. Defrost mode:
When the coil temperature falls below 2’C more than 10 minutes, the receiving-control
will automatically enter ‘Defrost mode’. In ‘Defrost Mode’, the compressor will be
turned off, the fan will continue running with the selected fan speed. The compressor
remains off until coil temperature rises to 9’c or higher more than 10 minutes.
(Note: the defrost point is not decide, maybe is 2’C and 9’C, 4’C and 10’C, 6’C and
11’C.)
5. Fail-safe mode
If the coil temperature sensor and ambient temperature sensor fail to work properly,
the control will run in a fail-safe mode. The fan will run at the speed you select and the
compressor will cycle with 52 minutes on / 8 minutes off sequence.
6. Self-test mode
While power is off, press Fan-speed button and Power button at the same time for 3
seconds, you will see all LED light on and the buzzer alarms for 1 sec. It means the
3 OF 7
Page 4
receiving-control has entered the self-test mode. Then you can test the parts of the
receiving-control one by one.
Press fan-speed button, fan-speed-high light is on and high speed fan runs.
Press fan-speed button, fan-speed-low light is on and low speed fan runs.
Press fan-speed button, power-on light is on and compressor & high speed fan run.
Press fan-speed button, bucket-full light is on or off if the bucket is full or not.
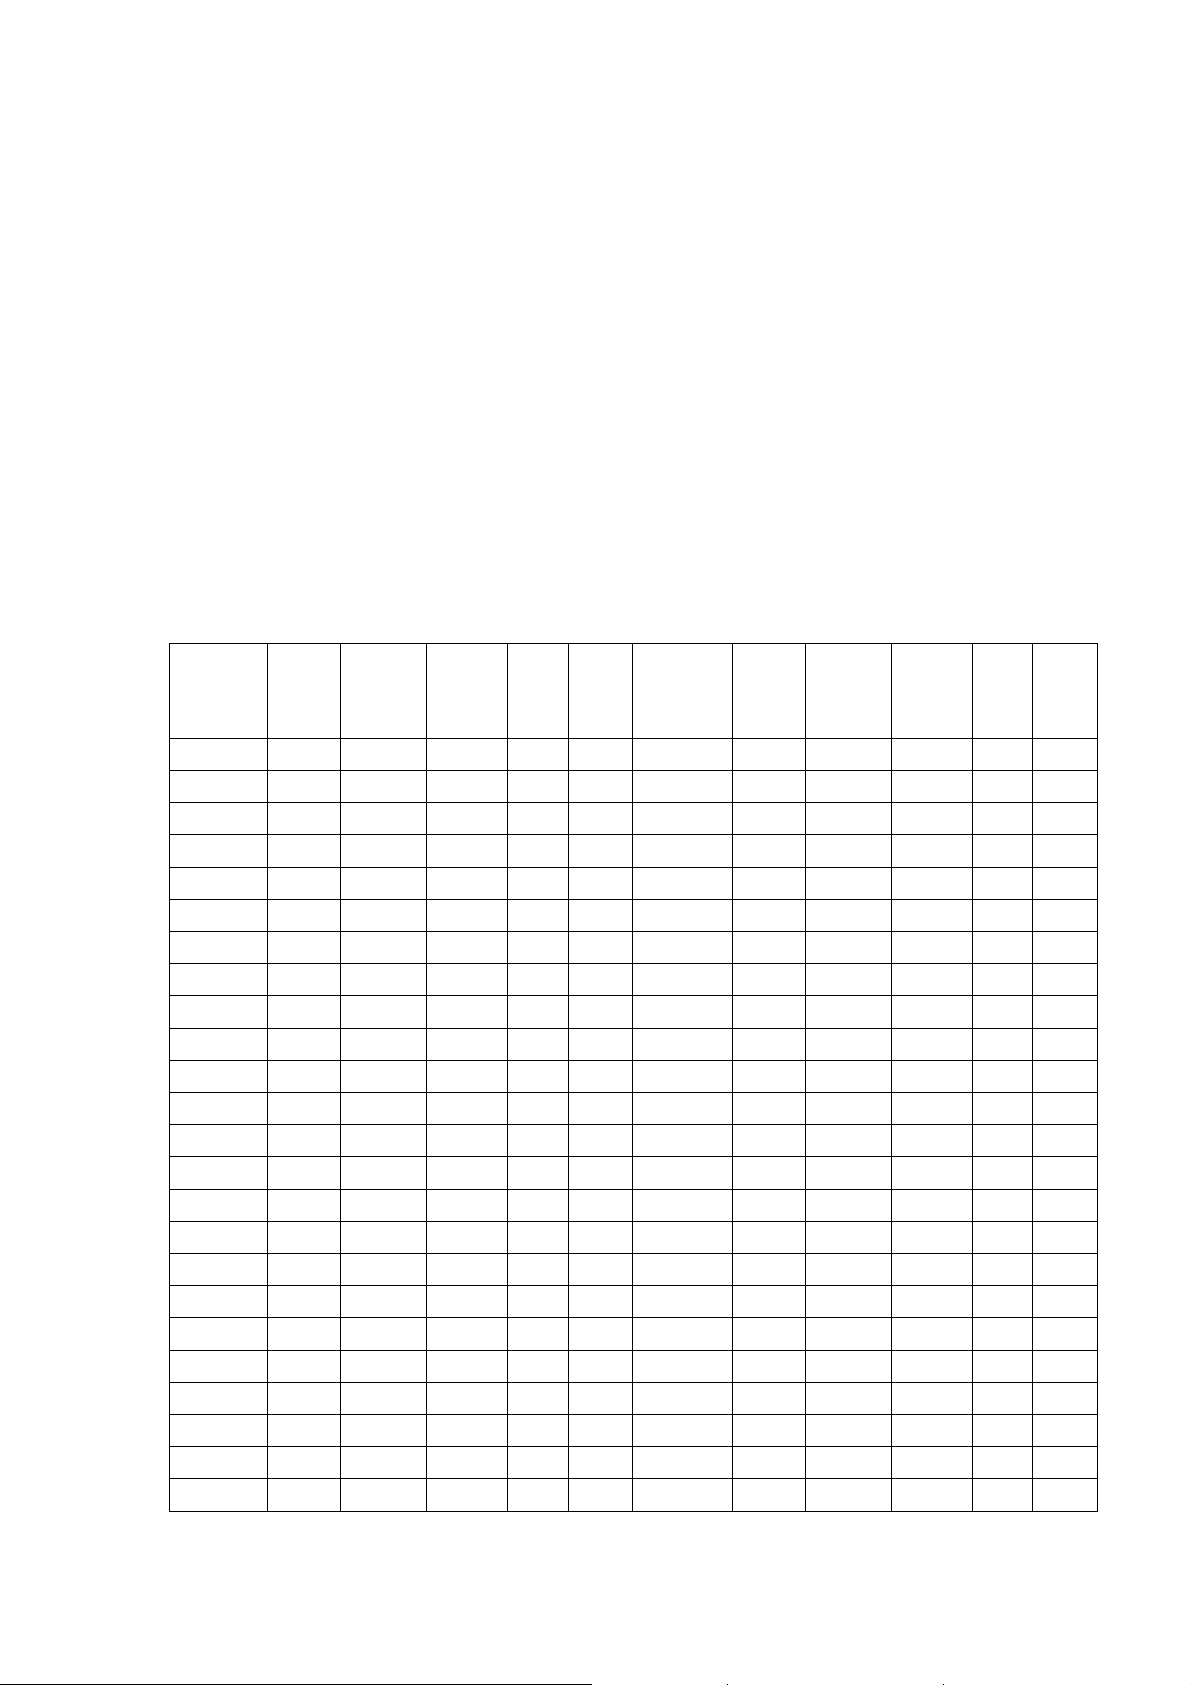
Press fan-speed button, test the ambient temperature, and the temp will be symbol by
the 4 LED lights. (See table.1)
Press fan-speed button, test the coil temperature, and the temp will be symbol by the
4 LED Lights. (See table.1)
Press fan-speed button, you will quit the test mode and enter the power off status.
You can quit the self-test mode and enter the power off status at any time if you press
power button.
Table.1
Ambient
temp
℃
-29- -26 0 0 0 1 1 -29- -25 0 0 0 1 1
-25- -21 0 0 1 0 0 -24- -21 0 0 1 0 0
-20- -18 0 0 1 0 1 -20- -17 0 0 1 0 1
-17- -14 0 0 1 1 0 -16- -14 0 0 1 1 0
-13 - -1 1 0 0 1 1 1 -13- -11 0 0 1 1 1
-10- -8 0 1 0 0 0 -10- -8 0 1 0 0 0
-7 - -6 0 1 0 0 1 -7- -5 0 1 0 0 1
-5 - -3 0 1 0 1 0 -4- -2 0 1 0 1 0
-2 - 0 0 1 0 1 1 -1- 1 0 1 0 1 1
1-2 0 1 1 0 0 2-3 0 1 1 0 0
3-5 0 1 1 0 1 4-6 0 1 1 0 1
6-7 0 1 1 1 0 7-9 0 1 1 1 0
8-10 0 1 1 1 1 10-12 0 1 1 1 1
11-12 1 0 0 0 0 13-15 1 0 0 0 0
13-15 1 0 0 0 1 16-18 1 0 0 0 1
16-17 1 0 0 1 0 19-21 1 0 0 1 0
18-20 1 0 0 1 1 22-24 1 0 0 1 1
21-23 1 0 1 0 0 25-28 1 0 1 0 0
24-27 1 0 1 0 1 29-32 1 0 1 0 1
28-30 1 0 1 1 0 33-37 1 0 1 1 0
31-34 1 0 1 1 1 38-42 1 0 1 1 1
35-38 1 1 0 0 0 43-49 1 1 0 0 0
39-43 1 1 0 0 1 50-53 1 1 0 0 1
44-48 1 1 0 1 0
Low
Temp
Led
Bucket
Full
Led
Table of the temp
Power
Led
Low
Fan
Led
High
Fan
Led
Coil
Temp
℃
Low
Temp
Led
Bucket
Full
Led
Power
Led
Low
Fan
Led
High
Fan
Led
4 OF 7
Page 5
49-53 1 1 0 1 1
1=on, 0=off.
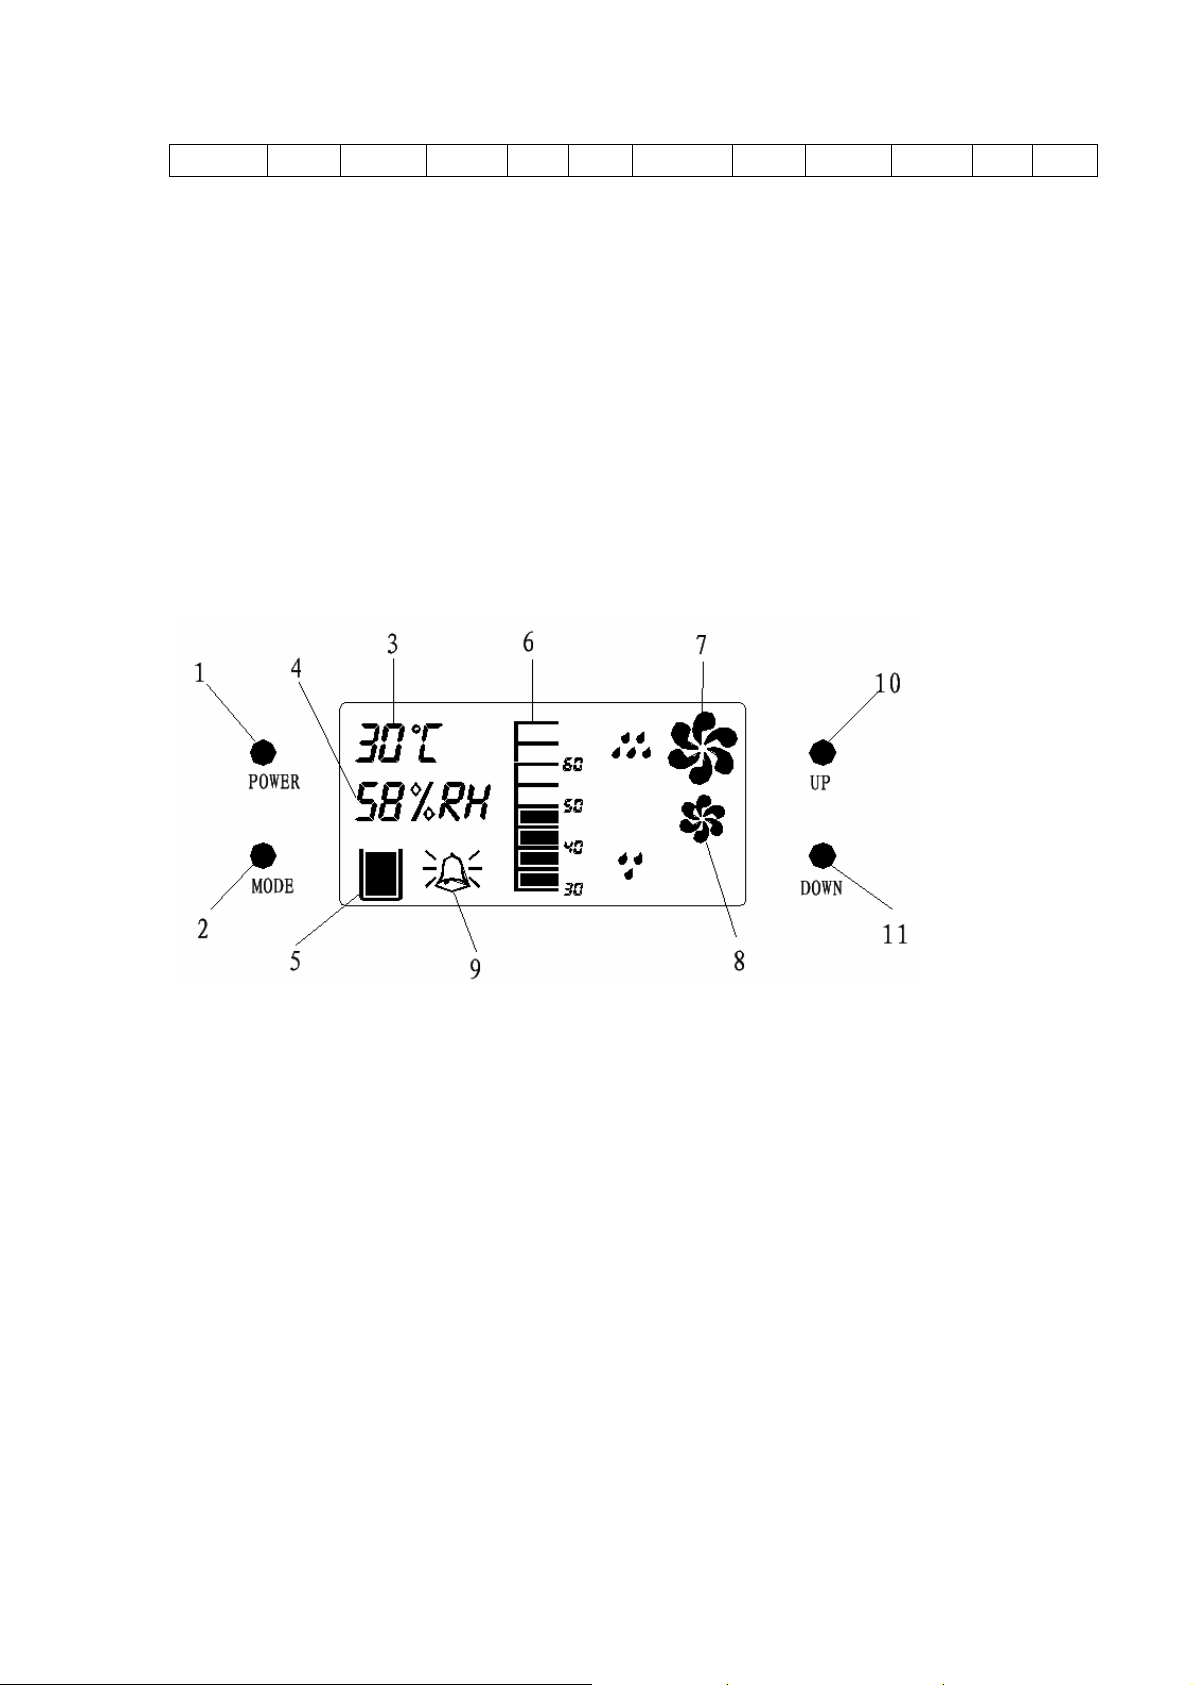
Part c Transmitting control
Four Buttons: Power button(1)
Mode button(2)
“UP” button (10)
“DOWN” button(11)
LCD: Fan speed high(7), Fan speed low(8), RH setting bar(6),ambient temperature(3),
ambient RH(4),buzzer(9) and full-bucket(5).
Two Sensors: ambient temperatur e sensor, RH sensor
Figure .2 Transmitting-Control
1. Power-off mode
User can shut down the power at any time. When the power is shut, LCD will be off,
and all displays & outputs on receiving-control will be shut down also.
2. Power-On Mode (Operating Mode)
LCD is on, ambient temp and ambient RH will be displayed. RH setting bar shows the
user set-point, initial is 35%. Fan speed shows the previous set fan speed, initial is fan
speed high.
Compressor & fan will be on if the ambient RH is 5% higher than user set point.
Once the room RH reaches 3% below the user set point, compressor & fan will be
turned off sequentially.
3. Fail-safe mode
If either the humidity sensor or thermistor fails to work properly, the control will run in
5 OF 7
Page 6

fail-safe mode. The fan will run with user selected fan speed and the compressor will cycle
with 52 minutes on / 8 minutes off sequence.
4. Setup mode
The control will automatically return to Operating Mode if the setup process is not
completed within 2 minutes.
All the changes made by user will be effective immediately. However, compressor
on/off sequence MUST follow the Criteria of compressor control.
a. Fan speed setup
Setup Mode can be activated by pressing ‘MODE’ button in Operating Mode. All
icons on LCD display will be off except the icons of fan speed, the icon of selected fan
speed will flash. ‘UP’ & ‘DOWN’ button can be used to change the fan speed.
b. RH setup
Pressing ‘MODE’ button again, RH setting bar with numbers will be displayed. ‘UP’ &
‘DOWN’ button can be used to change the RH set point. RH blocks will be showed as
solid & flash with selected RH set-point on LCD display.
Once the RH bar reaches the highest block, the control will switch to Fan-Only Mode,
compressor will be turned off irrelevant to the ambient humidity.
Once the RH bar reaches the lowest block, the control will switch to Continuous
Mode, compressor will be always on irrelevant to the ambient humidity.
c. Temperature Unit
Pressing ‘MODE’ button again, temperature readout will be displayed with selected
unit (‘C or ‘F). ‘UP’ & ‘DOWN’ button can be used to change the unit.
d. Buzzer setup
Pressing ‘MODE’ button again will activate buzzer setup, ‘UP’ & ‘DOWN’ button can
be used to set buzzer on or off. .
e. Exit from Setup-Mode
Pressing ‘MODE’ button again will bring the control back to Operating Mode.
5. Yard Mode
z ONE TO ONE :
First, you keep the receiving-control and transmitting-control off. Then press ‘UP’ &
‘MODE’ at the same time on transmitting-control for 2 sec and the transmitting-control
will emit “one to one” yard. Finally, you press fan-speed button on receiving-control.
Now you will hear a “BI”, it means the “one to one” is ok.
In ONE TO ONE mode, one transmitting-control just controls one receiving-control.
6 OF 7
Page 7

z ONE TO ALL:
First, keep the receiving-control and transmitting-control off. Then press ‘UP’ &
‘MODE’ at the same time and press “POWER” in succession. Now, the
transmitting-control is on and emit “one to all” yard. All receiving-control beside the
transmitting-control will receive the yard and be controlled by this transmitting-control.
It means “ONE TO ALL” is ok.
In ONE TO ALL mode, one transmitting-control just controls all receiving-control.
6. Self-test Mode
Keep the LCD off, press ‘UP’ & ‘DOWN’ at the same time and press “POWER” in
succession. All symbol on LCD will light, it means the self-test mode.
1) Test LCD
Press ‘UP’ ,all clear except “88°E” & “88%RH”.
Press ‘UP’, all clear except “BUCKET” & “BUZZER”.
Press ‘UP’, all clear except “RH setting bar”.
Press ‘UP’ ,all clear except “big fan” , ”small fan” , ”sun” and “compressor”.
Press ‘UP’, all light.
Press ‘UP’, it recycle from “88°E” & “88%RH”.
Press ‘DOWN’ will recycle also.
2) test RH and temp
Press ‘MODE’, all clear except RH and the ambient temp. It shows the ambient RH
and ambient temperature.
3) quit self-test mode
Press ‘MODE’, will quit Self-test Mode and enter Operating Mode.
You can quit Self-test Mode and enter Operating Mode at any time if you press
“POWER”
7 OF 7
 Loading...