

Page 1
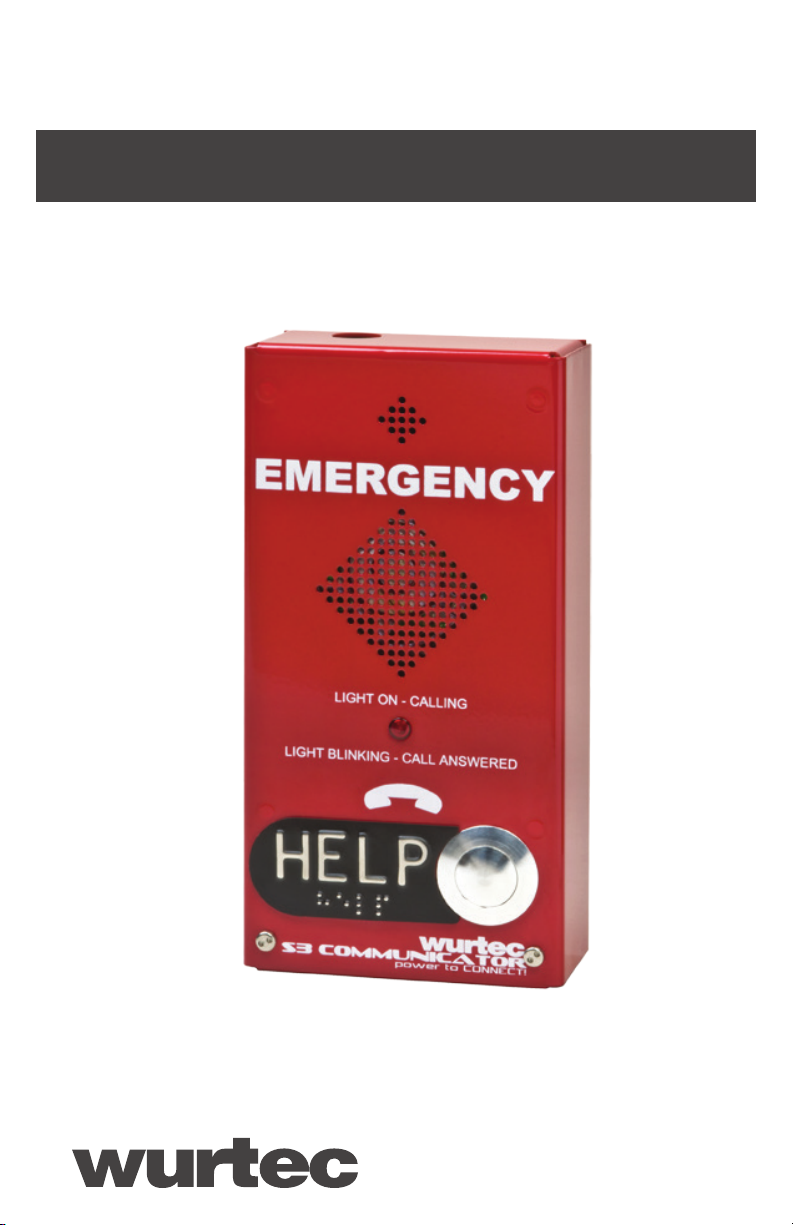
S3 Communicator
Building Powered
Emergency Telephone Guide
Use with Part Numbers 11-930 through 11-939
Version 5.0 September 2019
Page 2
For Quick Set-Up go immediately to page 5!
Applies to Part Numbers: 11-930, 11-931, 11-932, 11-933, 11-935, 11-936, 11-939
Contents
Getting Started ...........................................................3
Introduction ..............................................................4
Before Programming the Wurtec S3 Communicator ...............................5
Quick Set-Up (from onboard keypad)
Programming Phone Numbers ...............................................6
Programming Site Identication Message .......................................6
Adjusting Onboard Volume ..................................................7
Adjusting Conversation Volume ..............................................7
Resetting to Factory Defaults ................................................8
Installation
Line Connection ..........................................................9
Power Requirements .......................................................9
Programming (Locally or Remotely)
Programming Phone Numbers ...............................................9
Programming Ring-Down Line ..............................................10
Programming Ring Time ...................................................10
Programming Messages (Site ID) ............................................11
Programming Messages (Announcements) ....................................11
Getting Started
1.
Carefully open the shipping box and remove contents.
2.
Inspect the telephone(s) for any damage.
3.
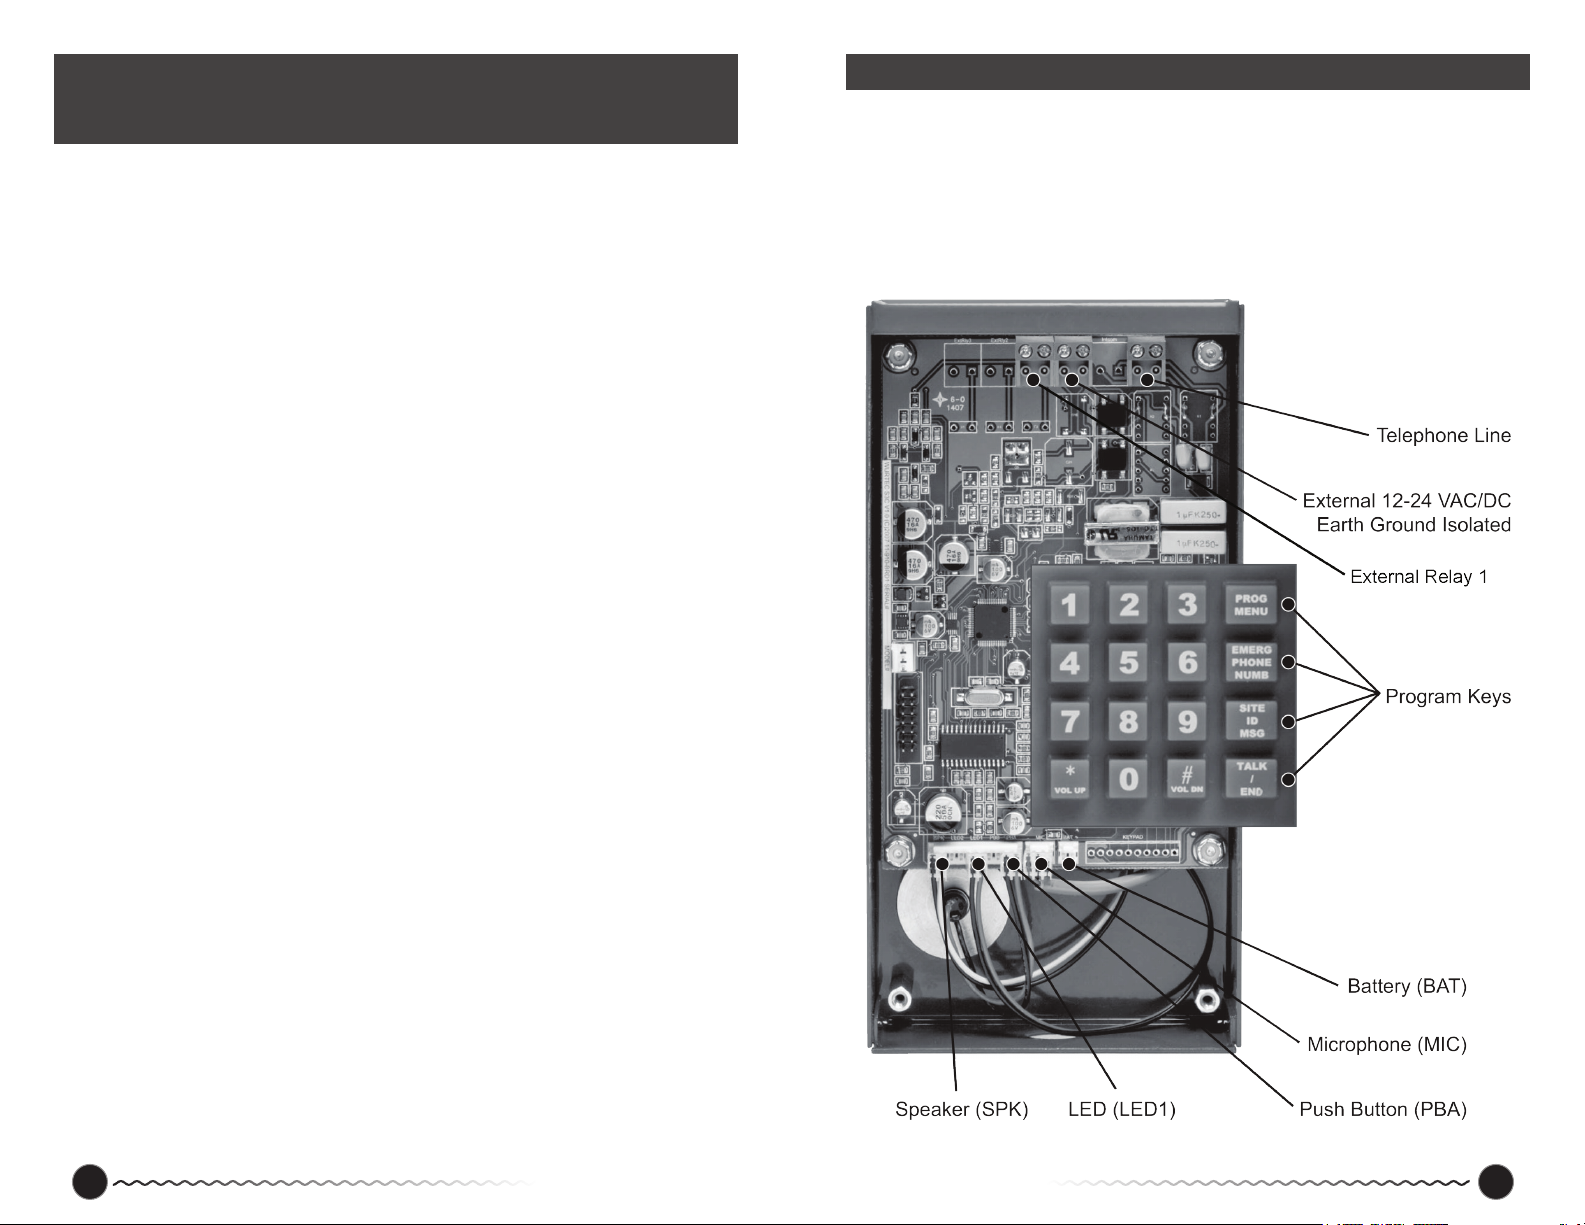
Make sure the microphone, speaker and LED are connected correctly to the pins. See
drawing below for locations.
If there is any damage call us for advice at 800-837-1066 or our tech line at 419-930-1066.
Programming (Locally or Remotely) | Advanced Options
User Preferences - Announcements On/O ....................................12
User Preferences - Immediate Two-Way Conversation On/O ......................13
User Preferences - Call Cancellation On/O ....................................13
User Preferences - Maintenance Announcements On/O .........................14
User Preferences - Timing Out ..............................................14
Talk Time ...............................................................15
Access Code ............................................................15
Touch Tone ID ...........................................................16
Ring Count .............................................................16
Unit Number (Line Sharing) .................................................17
External Output ..........................................................17
Program Status ..........................................................18
Calling Into Remote Phone ..................................................19
Reset to Factory Defaults ...................................................19
Testing the Phone Line .....................................................19
Phone Line Volume ........................................................20
Flowchart ................................................................21
Troubleshooting ....................................................... 21-25
Glossary .................................................................26
Warranty Policy ...........................................................27
2 Buy Online! Wurtec.com Buy Online! Wurtec.com 3
Page 3

Introduction
There are two ways to program the Wurtec S3C: 1) locally [using onboard keypad and battery
or external power supply] or 2) remotely [accessing the S3C from another location by calling
it]. We recommend programming LOCALLY.
Power Requirements: Externally 12-24V AC/DC isolated from earth ground at 200 mA
or higher. The rechargeable 9V battery should be rated 150 mAh or better. External
power keeps battery charged. A fully charged battery allows up to 4 hrs. of talk time
upon power failure.
Line Requirements: It is highly recommended to use a shielded twisted pair for the
telephone line with the shielding grounded at the controller or at the source of the
telephone line.
Use the program keys on the onboard keypad to program Emergency Phone Numbers and
Site ID Message. You can perform these programming procedures and access all available
options by entering the Program Menu, which is explained on pages 9-18.
Before Programming the Wurtec S3 Communicator
STEP 1
When programming locally be sure to have a 9V battery with adequate charge
connected to the phone or external power connected. This will energize the keypad
so it can be programmed. Keypad will NOT be active with telephone line power
only.
STEP 2
Be sure to have all the information you need programmed ready before you begin
programming the phone. The phone will repeat itself every three seconds until
the information is programmed into the phone or you press
programming mode.
STEP 3
The phone can be programmed backed to factory defaults at any point (see page
8) if a mistake is made. Also take note that if information is programmed incorrectly
the rst time, just follow the steps of programming again and it will overwrite the
previous program. For example, if an incorrect phone number was programmed,
follow the steps of programming the phone number again and the latest number
programmed would be the one saved to the phone.
VOL UP
then 0 to exit
To leave any menu at any time press
then 0 .
VOL UP
STEP 4
If you are having trouble getting the keypad to work for programming at this
point, please see the trouble shooting section on page 21, or the troubleshooting
owcharts on page 24 and 25. The trouble shooting page also has our help line
number for any questions or problems.
4 Buy Online! Wurtec.com Buy Online! Wurtec.com 5
Page 4
Quick Set-Up (from onboard keypad)
Quick Set-Up (from onboard keypad) cont.
Programming Phone Numbers
(The number(s) you want the S3C to autodial)
EMERG
STEP 1
Press the
STEP 2
The phone will say “press 1 for rst number, 2 for second number, 3 for third
number.” Choose which number you want to enter. The phone will ask you to enter
the number followed by the
phone to autodial and press the
the phone. See page 10 for ring-down programming.
STEP 3
Once the number is programmed, the phone will recite the number. If the number
is correct and you are nished you may press
If you have another number to program the phone will automatically revert back to
the phone number program menu and you will hear an option to program phone
numbers 2 and 3, follow the same steps to program those numbers if you choose to
do so. Note: The rst number will dial for 30 seconds, the second number will dial
for 60 seconds, and the third number will dial for 120 seconds.
PHONE
button on the keypad.
NUMB
#
key. At this point enter the number you want the
VOL DN
#
key. Up to 24 digits can be programmed into
VOL DN
Programming Site Identication Message
STEP 1
Press the
STEP 2
Press 1 to record. The phone will say “at the tone, record your message followed
by
when nished. A typical message consists of the address, name of the building the
elevator is in, and the elevator number if more than one elevator is present, and a
call back number. The site identication message should not exceed 16 seconds.
STEP 3
If the message that has been recorded is correct you may
press
needs to be recorded again, follow the steps for programming the site identication
message again. The new recording will automatically overwrite the old recording.
You can repeat this process until the message is correct.
SITE ID
button on the keypad.
MSG
#
. After you heard the tone, record the message and press the
VOL DN
then 0 to exit programming mode. If the message is incorrect and
VOL UP
then 0 to exit program mode.
VOL UP
#
key
VOL DN
Adjusting Onboard Volume
(volume of the programming menu voice)
STEP 1
To increase the volume of the onboard programming menu voice press the
TALK
and
/ END
8). Continue to press the
is reached. The number will increase as the volume increases. The phone will say
“8” repeatedly once it has hit its maximum volume.
STEP 2
To decrease the volume of the onboard programming voice press the
TALK
and
/ END
8). Continue to press and release the
reached. The number will decrease as the volume decreases. The phone will say
“1” repeatedly once it has reached its lowest volume.
keys at the exact same time then release. You will hear a number (1-
VOL UP
#
keys at the same time and then release. You will hear a number (1-
VOL DN
TALK
/ END
and
at the same time until the desired volume
VOL UP
TALK
/ END
Adjusting Conversation Volume
STEP 1
Be sure the phone is connected to a live telephone line and has either external
power connected or a 9V battery. If you have both the external power and a 9V
battery connected, be sure the battery is rechargeable, or it could result in a battery
malfunction and could damage the phone and or harm the installer.
STEP 2
To increase the volume of the person you are speaking to rst press the
key. If you have a live telephone line, the phone will say “Please enter number to
be dialed” and then you will hear a standard dial tone. DO NOT dial a number.
TALK
/ END
TALK
/ END
and
Once you hear the dial tone, Press the
and then release. You will hear your dial tone increase in volume and also hear
a number. Continue to press the
release until the desired volume is reached. The number will increase with each
volume increase. The phone will say “8” once the maximum volume is reached.
When nished press
TALK
to hang up the phone. (continued on next page)
/ END
#
and
keys until the desired volume is
VOL DN
and
VOL UP
keys at the exact same time
VOL UP
keys at the same time and then
TALK
/ END
6 Buy Online! Wurtec.com Buy Online! Wurtec.com 7
Page 5

Quick Set-Up (from onboard keypad) cont.
Installation
STEP 3
To decrease the volume of the person you are speaking to rst press the
key. If you have a live telephone line, the phone will say “Please enter number to
be dialed” and then you will hear a standard dial tone. DO NOT dial a number.
Once you hear the dial tone, Press the
time and then release. You will hear your dial tone decrease in volume and also
hear a number. Continue to press
release until the desired volume is reached. The number will decrease with each
volume decrease. The phone will say “1” once the lowest volume is reached. When
nished press
TALK
to hang up the phone.
/ END
Resetting to Factory Defaults
STEP 1
To reset everything to factory defaults press the
same time.
STEP 2
The phone will say “Factory defaults, press 1 to reset to default, 2 to cancel,
or
then 0 to disconnect.” To reset to default, press the 1 button on the
VOL UP
keypad. The phone will then say “Reset” and then shut o. At this point anything
that has been programmed in the phone is erased and reset to factory defaults.
Factory Defaults are as follows:
Voice Announcements - On
Call Cancellation - O
Immediate Two-Way Conversation - O
Maintenance Announcements - O
Ring Count - 1 Ring
Volume - Mid Level (4)
Emergency Phone Numbers - None
Site ID Message - None
Announcements - None
Talk Time - 180 seconds
Touch Tone ID - None
TALK
/ END
TALK
/ END
and
#
and
keys at the exact same
VOL DN
#
keys at the same time and then
VOL DN
#
VOL UP
and
keys at the exact
VOL DN
TALK
/ END
Line Connection
A.
Connect the telephone line wires to the “TELCO” pins on the circuit board using the
supplied connector. Check the phone line for a dial tone, touch tone capabilities and
noise. You can do this by using the
TALK
button. We suggest you call your emergency
/ END
numbers and have them call you back. This will verify touch tone lines, phone numbers
and line conditions.
B.
IMPORTANT! This step will save you time and unnecessary eld trips! Carefully
tape the shielding and any additional wires on the phone cable so they will not short
out the electronics or the telephone line at the circuit board. NOTE: GROUND THE
SHIELDING AT THE CONTROLLER OR SOURCE OF TELEPHONE LINE ONLY!
Power Requirements
A.
TELCO Voltage: 24-52 VDC
B.
TELCO Current: 23 mA
C.
External Voltage: 12-24 VAC/DC Isolated from Earth ground.
D.
External Current: 200 mA or Higher
E.
Battery Voltage: 9 VDC
F.
Battery Type: Rechargeable 150 mAh or higher
The S3 Communicator is not polarity sensitive.
Programming (Locally or Remotely)
To program Phone Numbers, Messages, Advanced Options and access Program Status press
PROG
the
MENU
button.
Programming Phone Numbers
STEP 1
Press
STEP 2
Press 1 for phone numbers.
STEP 3
Press 1 to program the rst number you want the phone to autodial. Press 2
PROG
button on the keypad.
MENU
for the second number you want the phone to autodial. Press 3 for the third
number you want the phone to autodial. If you only want one number programmed,
continue to the next step. If you want more than one number programmed, repeat
the following steps for each corresponding number slot.
STEP 4
Press 1 to program the number. Press 2 to review the number that was
previously programmed. Press 3 to delete the number.
previous menu. Or
then 0 to leave programming mode. (continued on next
VOL UP
#
to return to the
VOL DN
page)
8 Buy Online! Wurtec.com Buy Online! Wurtec.com 9
Page 6
Programming (Locally or Remotely)
STEP 5
Press 1 to program the number you want the phone to autodial. The phone will
ask you to “Enter number followed by
#
. Enter the number and press the
VOL DN
key. The phone will recite the number programmed. If the number is correct you
can continue on to programming by pressing
If you are nished programming the number you can press
#
to return to the previous menu.
VOL DN
then 0 to leave
VOL UP
programming mode.
Programming Ring-Down Line
STEP 1
Press
STEP 2
Press 1 for phone numbers.
STEP 3
Press 1 for rst emergency number.
STEP 4
Press 1 to program rst emergency number. The phone will say “enter number
STEP 5
At this point you can press
PROG
button on the keypad.
MENU
followed by
for the number, then press
VOL UP
#
. Since there is no number to dial on a ring-down line, program a
VOL DN
#
VOL DN
programming or you can press
#
. The phone will then say “You entered star”.
VOL DN
to return to the previous menu and continue with
then 0 to exit program mode.
VOL UP
Programming Ring Time
Ring Time allows you to program how long the rst emergency number is dialed. By default,
the rst emergency number will dial for 45 seconds. This can be programmed from 30 to 99
seconds depending on elevator code and or preference. Note: 2009 elevator code states a
45 second default ring time. Pre-2009 code states a 30 second default ring time. Please
be sure to program accordingly.
STEP 1
Press
STEP 2
Press 5 for Ring Time.
PROG
button on the keypad.
MENU
#
VOL DN
Programming (Locally or Remotely)
Programming Messages (Site ID)
Follow the steps below to program the Site ID message and local announcements. The Site
ID must identify where the emergency call is coming from. It’s played every time a call is
placed to or from the S3C, if not in immediate two-way. It is very important that this message
be recorded, as this is normally the way the call can be traced without verbal communication
from the passenger.
DEFAULT SETTING: The Site ID message will play inside the elevator cab. This can be
turned o in the Announcements Menu. (see page 12)
STEP 1
Press
STEP 2
Press 2 for message menu.
STEP 3
Press 1 if you want to program the site identication message. Press 2 if you
STEP 4
To program the site identication message press 1 . The phone says “at the
PROG
button.
MENU
want to program for in car announcements. Press
Or
then 0 to exit program mode.
VOL UP
tone, record your message followed by
then press
#
. If the message is correct you can press
VOL DN
#
. At the tone, record the message and
VOL DN
#
to return the previous menu.
VOL DN
#
to get to the previous
VOL DN
menu and continue programming, if you made a mistake and need to record again,
simply follow the steps again and it will automatically record over the old message.
If you are nished programming press
then 0 to exit program mode.
VOL UP
Programming Messages (Announcements)
There are three in car local announcements that notify the trapped person which of the 3
possible emergency numbers are being dialed. Each message can be up to 6 seconds long
and can typically contain the number that is being dialed or the name of the location the
number is dialing. For example, if the rst number was programmed to dial 911, you may
record ‘Calling 911’ or ‘Calling Police’.
STEP 3
Press 1 to program Ring Time. Press 2 to review.
STEP 4
The phone will ask you to enter a number between 30 and 99 followed by the
VOL DN
STEP 1
Press
#
STEP 2
Press 2 for message menu. (continued on the next page)
PROG
MENU
button.
Once you have entered your choice, the phone will repeat the number back to
you. If correct press
#
to return to the previous menu or
VOL DN
then 0 to exit
VOL UP
programming.
10 Buy Online! Wurtec.com Buy Online! Wurtec.com 11
Page 7
Programming (Locally or Remotely)
STEP 3
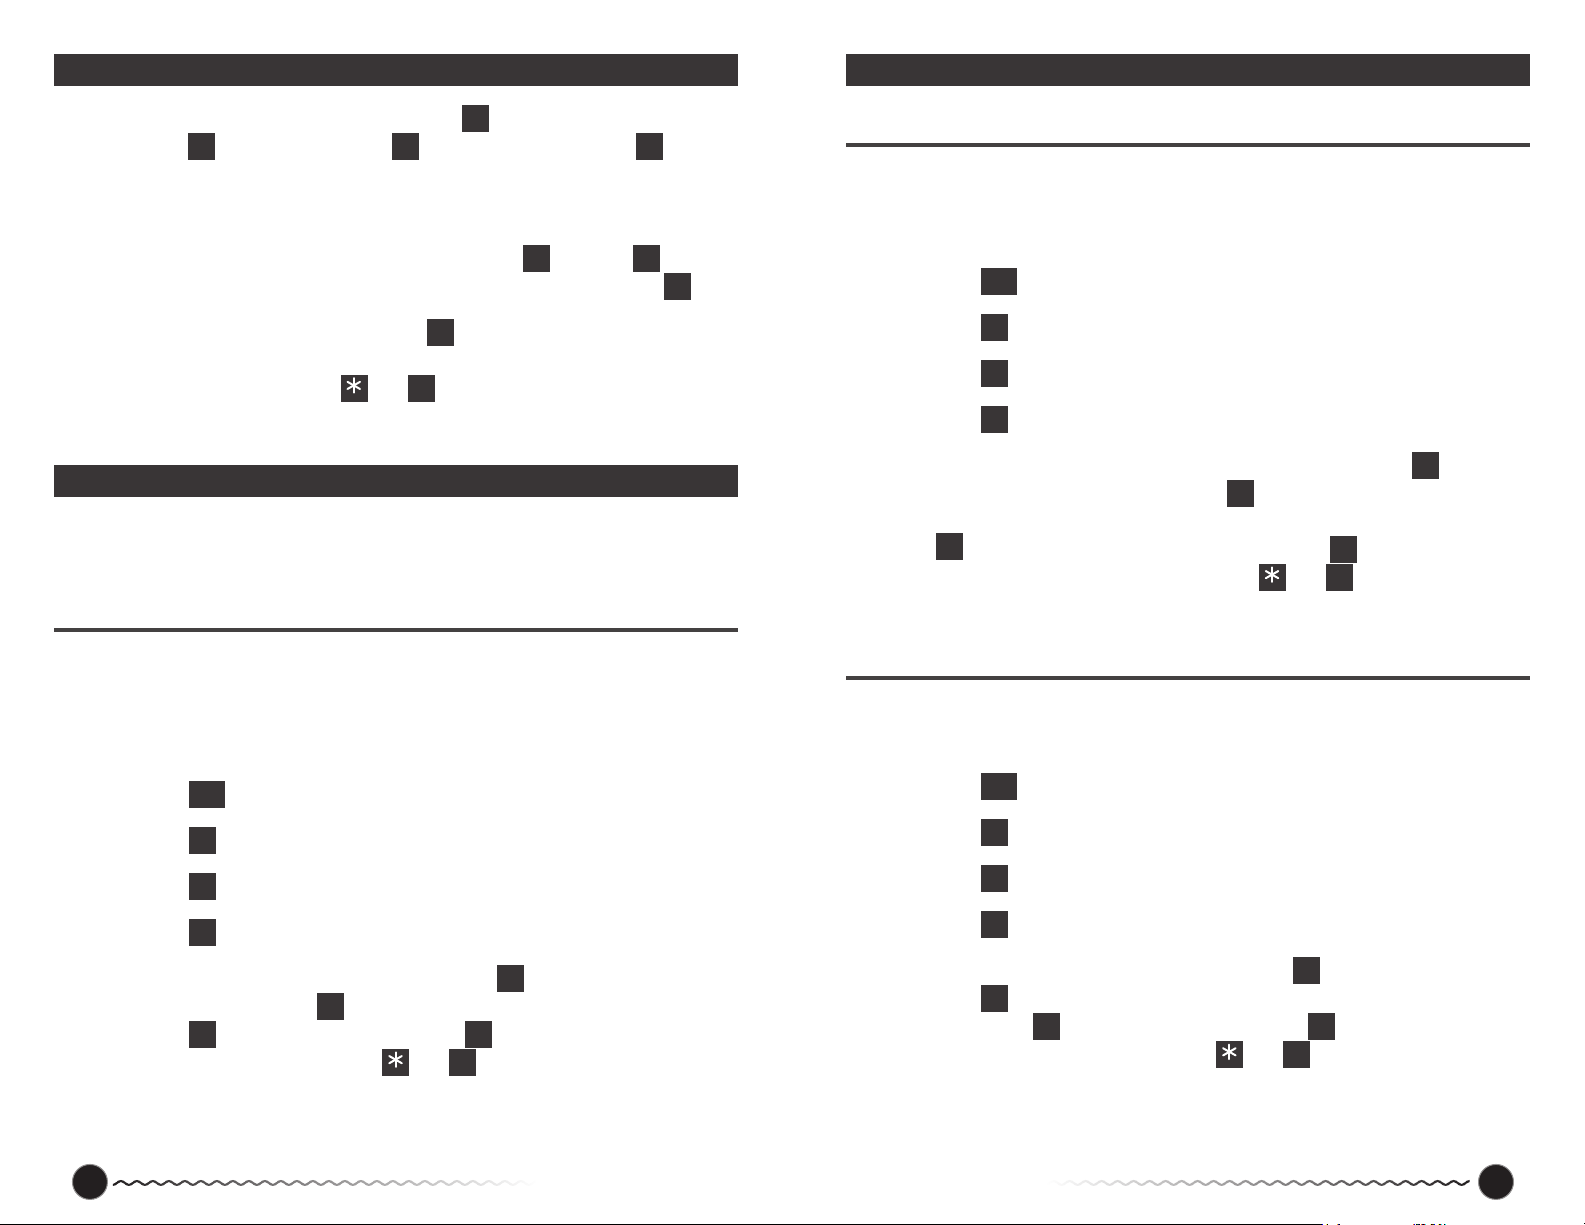
To program the in car announcements press 2 . The phone will then ask you to
press 1 for rst announcement, 2 for second announcement, or 3 for third
announcement. These announcements coincide with the emergency numbers
programmed into the phone. The message itself is played inside the elevator. For
example, if the phone is set to dial 911, you may record “calling police station.” To
program an announcement for the rst number press 1 then press 1 again to
record. The phone will say “at the tone record your message followed by
STEP 4
If the message is correct you can press
menu, you can follow the steps again to record your new message over the old
message, or you can press
Note: The recorded announcement should not exceed 6 seconds.
then 0 to exit program mode.
VOL UP
#
to return to the previous programming
VOL DN
Programming (Locally or Remotely) | Advanced Options
In this group of menus, you will have the option to choose user preferences, set talk time,
enter an access code, enter touch tone ID, set ring count and review program status.
User Preferences - Announcements On/O
#
VOL DN
Programming (Locally or Remotely) | Advanced Options
User Preferences - Immediate Two-Way Conversation On/O
This feature allows the persons in the car to speak immediately with the called party after the
emergency call is answered. NOTE: If Immediate Two-Way Conversation is enabled the
Site ID message will not play.
STEP 1
.
Press
STEP 2
Press 3 for advanced options.
STEP 3
Press 1 for user preferences.
STEP 4
Press 2 for immediate two-way conversation.
STEP 5
Once in the immediate two-way conversation menu, you can press 1 to turn on
PROG
button on the keypad.
MENU
immediate two-way conversation. Press 2 to review whether immediate two-way
conversation is on or o (immediate two-way conversation is o by default). Press
to turn o immediate two-way conversation. Press
3
menu to continue on programming. Or press
mode once you are nished.
VOL UP
#
to return to the previous
VOL DN
then 0 to exit programming
Announcements are used to notify persons in the car which of the possible three emergency
phone numbers are being dialed. Use these at your discretion. Turning o announcement will
also turn o the Site ID message inside the elevator cab. The Site ID will, however, still play
for the operator.
STEP 1
Press
STEP 2
Press 3 for advanced options.
STEP 3
Press 1 for user preferences.
STEP 4
Press 1 for announcements menu.
STEP 5
Once in the announcements menu you can press 1 to turn on the
PROG
button on the keypad.
MENU
announcements. Press 2 to review whether announcements are on or o.
Press 3 to turn o announcements. Press
continue programming. Or press
then 0 to disconnect.
VOL UP
#
to return to the previous menu to
VOL DN
User Preferences - Call Cancellation On/O
When Call Cancellation is ON, the voice prompt states “Press button again to cancel” as soon
as a call is made. Pressing the button again will abort the call.
STEP 1
Press
STEP 2
Press 3 for advanced options.
STEP 3
Press 1 for user preferences.
STEP 4
Press 3 for call cancellation.
STEP 5
Once in the call cancellation menu, you can press 1 to turn on call cancellation.
PROG
button on the keypad.
MENU
Press 2 to review whether call cancellation is on or o (by default call cancellation
is o). Press 3 to turn o call cancellation. Press
menu to continue programming. Press
nished.
then 0 to exit programming when
VOL UP
#
to return to the previous
VOL DN
12 Buy Online! Wurtec.com Buy Online! Wurtec.com 13
Page 8
Programming (Locally or Remotely) | Advanced Options
Programming (Locally or Remotely) | Advanced Options
User Preferences - Maintenance Announcements On/O
When Maintenance Announcements are ON voice prompts are enabled for: external power
failure, battery failure, and telephone line failure. If there are any failures, you’ll hear them
announced in the car: “External power failure” or “Battery failure” or “Telephone line failure.”
The message is played every 5 minutes for external power and battery failure until xed. The
message for telephone line failure will play for the rst time after 30 minutes and then every 5
minutes thereafter until it is xed.
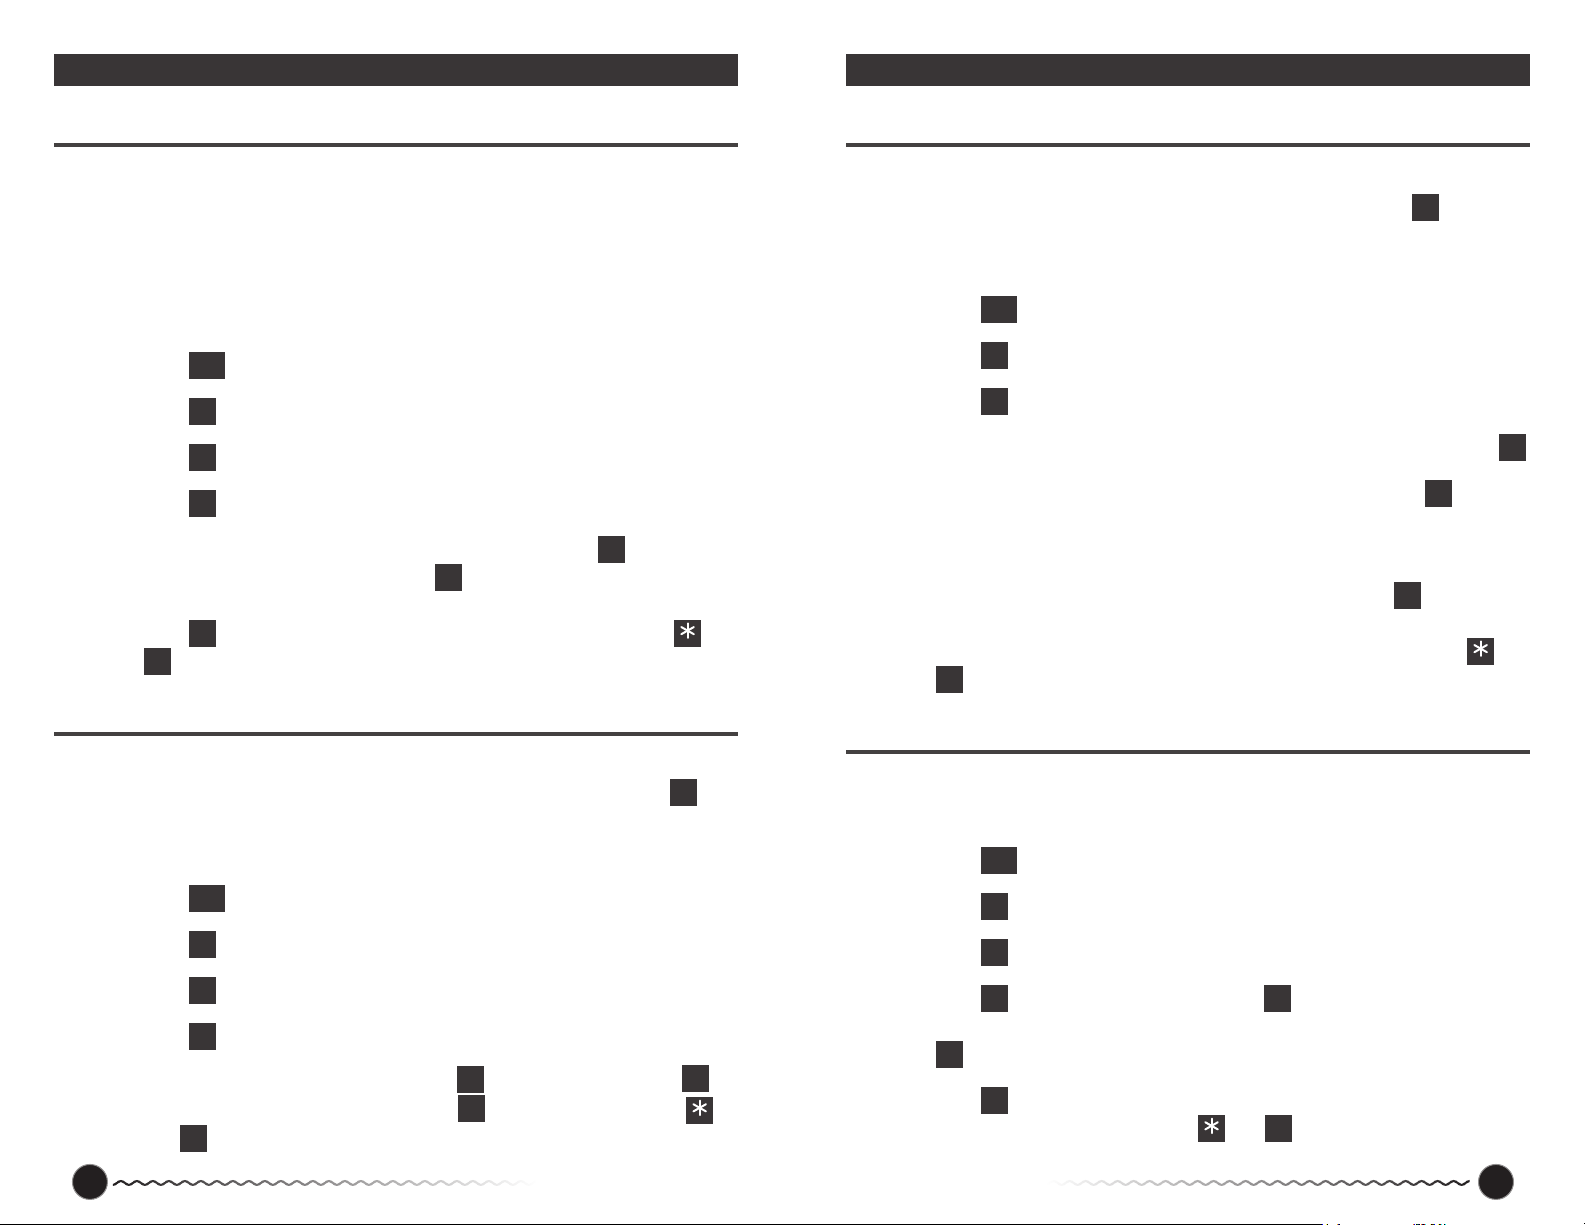
STEP 1
Press
STEP 2
Press 3 for advanced options.
STEP 3
Press 1 for user preferences.
STEP 4
Press 5 for maintenance announcements.
STEP 5
Once in the maintenance announcements menu, you can press 1 to turn
PROG
button on the keypad.
MENU
on maintenance announcements. Press 2 to review whether maintenance
announcements are on or o (maintenance announcements are o by default).
#
Press
0
to return to the previous menu to continue programming. Press
VOL DN
to exit programming mode once you are nished.
VOL UP
User Preferences - Timing Out
When Timing Out is ON, fteen (15) seconds before the end of time specied by talk time (see
page 15 for an expalanation of this feature) the phone will prompt “Timing out, press 1 to
avoid disconnection”. When Timing Out if OFF, the phone will stay on the line until the called
party hangs up.
STEP 1
Press
PROG
button on the keypad.
MENU
then
Talk Time
Talk Time is the period of time allowed for two-way conversations. Fifteen (15) seconds
before the end of the time period the voice prompt will say “Timing out. Press 1 to avoid
disconnection” on the operator end. Enter a number between 30 and 999 seconds. Factory
set default is 180 seconds.
STEP 1
Press
STEP 2
Press 3 for advanced options.
STEP 3
Press 2 for talk time.
STEP 4
To program a dierent talk time than the default 180 seconds (3 minutes) press
STEP 5
The phone will say “enter a number between 30 and 999 followed by
STEP 6
If you have entered the desired talk time correctly you can press
PROG
button on the keypad.
MENU
#
. The
VOL DN
number you enter is in seconds. For example, if you press 45, that would be 45
seconds.
#
to return to
VOL DN
the previous menu to continue with programming, you can repeat the steps again to
re-enter a dierent number to overwrite the previous one, or you can press
to exit programming if you are nished.
0
Access Code
This code enables password protection for programming from a remote location. Enter up to
eight (8) digits. Factory set default is none.
STEP 1
Press
STEP 2
Press 3 for advanced options.
PROG
button on the keypad.
MENU
VOL UP
1
then
STEP 2
Press 3 for advanced options.
STEP 3
Press 1 for user preferences.
STEP 4
Press 4 for timing out.
STEP 5
Once in the timing out menu, you can press 1 to enable timing out. Press 2 to
review whether timing out is on or o. Press 3 to disable timing out. Press
then 0 to exit programming mode once you are nished.
VOL UP
STEP 3
Press 3 for Access Code.
STEP 4
Press 1 to program an access code. Press 2 to review what the already
programmed access code is (by default there is no access code). You can press
to erase the access code altogether.
3
STEP 5
Press
#
to return to the previous menu and continue on programming. If you are
VOL DN
nished programming you can press
then 0 to exit program mode.
VOL UP
14 Buy Online! Wurtec.com Buy Online! Wurtec.com 15
Page 9
Programming (Locally or Remotely) | Advanced Options
Programming (Locally or Remotely) | Advanced Options
Touch Tone ID
This feature is for programming with SoundNet capable call centers. If this feature is used
make sure Announcements are turned OFF and Immediate Two-Way Conversation is turned
ON. See pages 12 and 13 for those options.
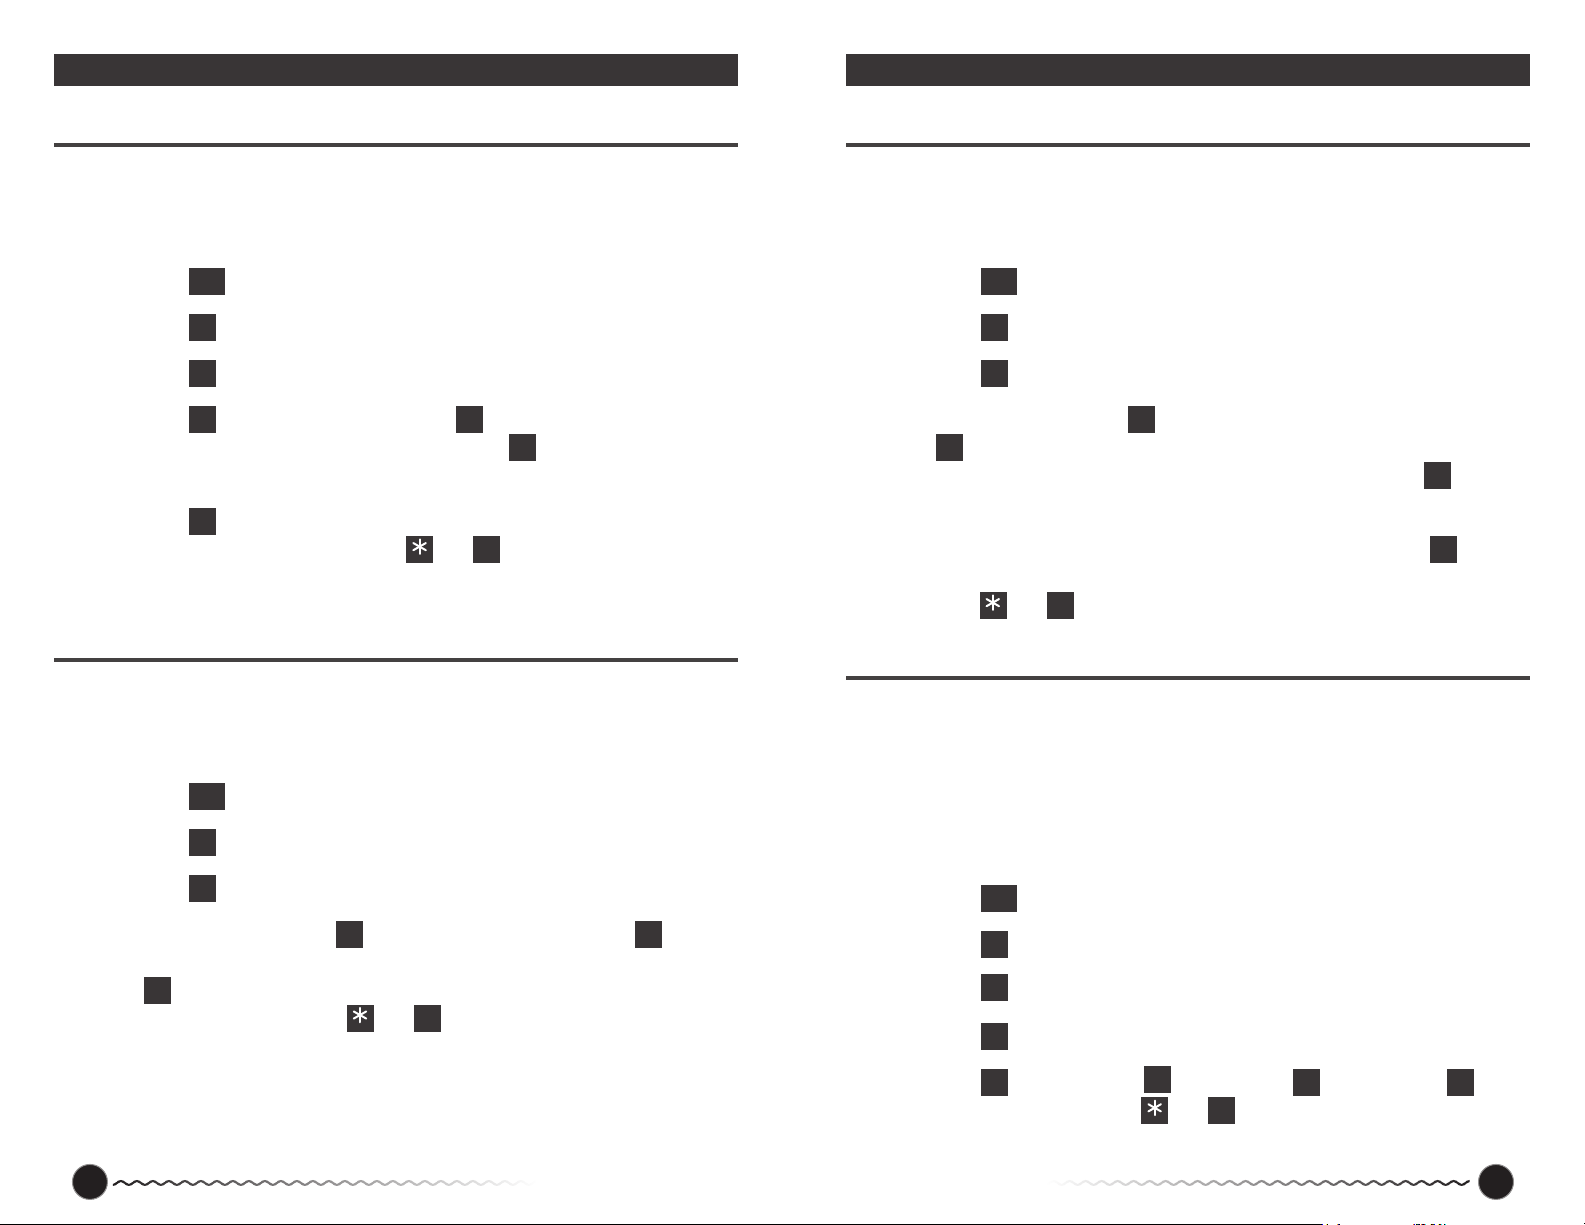
STEP 1
Press
STEP 2
Press 3 for advanced options.
STEP 3
Press 4 for Touch Tone ID.
STEP 4
Press 1 to program touch tone ID. Press 2 to review what the already
STEP 5
Press
PROG
button on the keypad.
MENU
programmed ID is (by default there is no ID). Press 3 to erase the Touch Tone ID
altogether.
#
to return to the previous menu and continue on programming. If you are
VOL DN
nished programming you can press
then 0 to exit program mode.
VOL UP
Ring Count
Use this feature to program the number of rings to occur before the emergency telephone
answers a call. Enter between zero (0) and nine (9). If you enter zero (0) the telephone will
never answer an incoming call. Factory set default is 1.
STEP 1
Press
STEP 2
Press 3 for advanced options.
PROG
button on the keypad.
MENU
Unit Number (Line Sharing)
Use this feature when sharing more than one S3C on a single line. Each phone will need a
unique identication number. Enter a number between 1 and 9. NOTE: If line sharing you
must use “1” as the rst unit number.
STEP 1
Press
STEP 2
Press 3 for advanced options.
STEP 3
Press 6 for Unit Number.
STEP 4
At this point you can press 1 to program desired Unit Number. You can press
STEP 5
Once you have chosen an option in step 4 you can at this point press
PROG
button on the keypad.
MENU
to review what unit number is already programmed into the phone (by default
2
there is no unit number programmed into the phone). You can press 3 to delete
the unit number programmed into the phone.
#
to return
VOL DN
to the previous menu to continue with programming. If you are nished, you can
press
then 0 to exit program mode.
VOL UP
External Output
External output(s) can be programmed to activate on button press, battery failure, external
power failure, and telephone line failure. By default, the external output relay is set to
activate on telephone line power to comply with 2009 code. This output can be used to
trigger a remote alarm board per the 2009 code. WARNING: If using the 2009 code this
feature should NOT be changed from default setting of activating on telephone line
failure.
STEP 3
Press 5 for Ring Count.
STEP 4
At this point you can press 1 to program desired ring count. Press 2 to review
what the already programmed ring count is (by default the ring count is 1). Press
#
to return to the previous menu to continue on programming. If you are nished
VOL DN
programming you can press
then 0 to exit programming.
VOL UP
STEP 1
Press
STEP 2
Press 3 for advanced options.
STEP 3
Press 7 for external outputs.
STEP 4
Press 1 for rst output.
STEP 5
Press 1 to program. Press 2 to review. Press 3 to disable. Press
PROG
button on the keypad.
MENU
return to external outputs or
#
VOL DN
then 0 to disconnect. (continued on next page)
VOL UP
to
16 Buy Online! Wurtec.com Buy Online! Wurtec.com 17
Page 10
Programming (Locally or Remotely) | Advanced Options
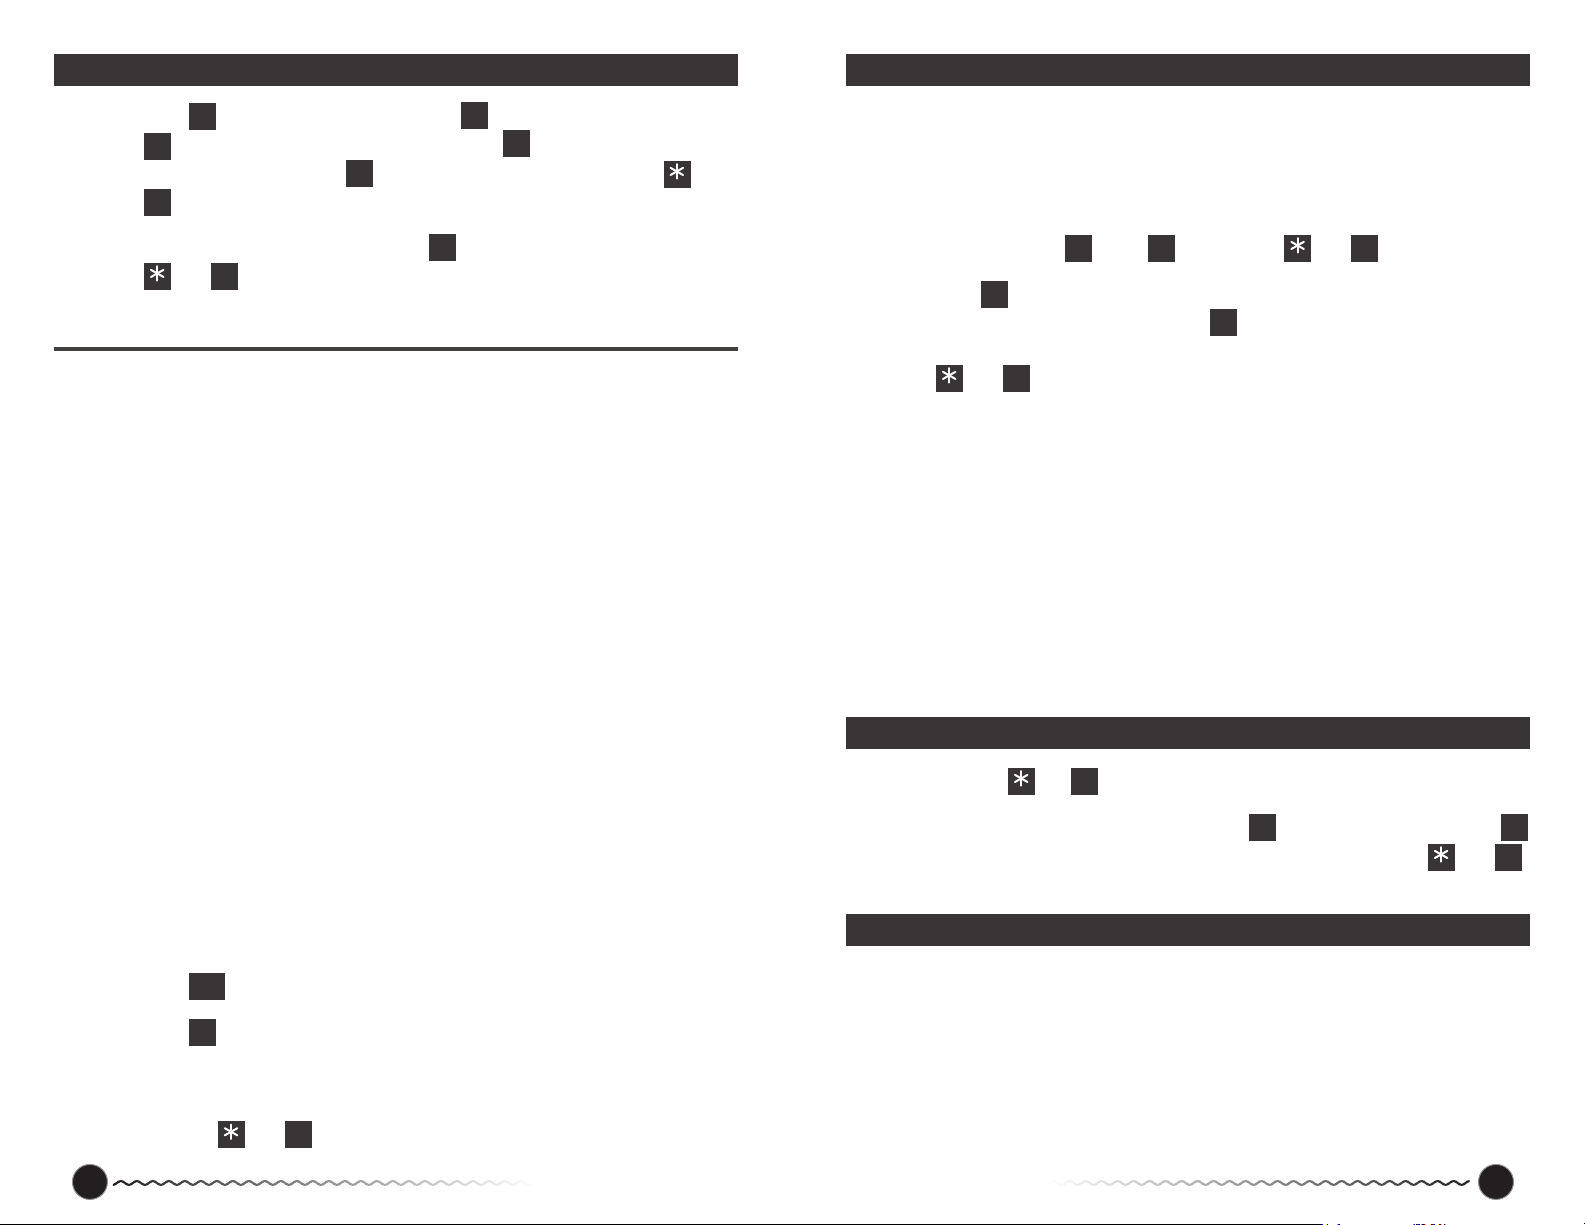
STEP 6
Press 1 to activate on button press, press 2 to activate on battery failure, press
to activate on external power failure, or press 4 to activate on telephone
3
line failure (default). Press
to disconnect.
0
STEP 7
When programming is complete, Press
then 0 to exit phone programming.
VOL UP
#
to return to rst external output or Press
VOL DN
#
to return to previous menus or Press
VOL DN
VOL UP
Program Status
The Program Status feature will recite the menu settings that are currently programmed in the
phone. The phone will recite in order the settings for:
- serial number
- S3 Communicator model number
- version number
- programmed phone numbers
- announcements on/o
- immediate two-way conversation on/o
- call cancellation on/o
- maintenance announcements
- timing out
- talk time
- access code
- touch tone ID
- ring count
- ring time
- unit number
- rst external output
STEP 1
Press
STEP 2
Press 4 and the phone will begin to recite the information stated above.
PROG
button on the keypad.
MENU
then
Calling Into Remote Phone
It is possible to program the S3Communicator from a remote location by calling into the
telephone. Using a dedicated touch tone telephone, dial the phone number of the S3
Communicator.
STEP 1
Once the phone answers you will hear the following: “This is an emergency
telephone. Press 1 to talk, 2 to program, or
STEP 2
Press 1 , You will then be in a two way conversation with whomever is currently
then 0 to disconnect.
VOL UP
in the elevator. If you choose to press 2 it will take you into programming mode
and may prompt for password if one is programmed Or you can choose to press
then 0 which will hang the phone up.
VOL UP
Note: If the phone you are calling is line sharing with another S3 Communicator it
may ask you to enter a unit number. At this point you would need to enter the unit
number of the phone you are trying to reach. Also, if an access code has been
programmed into the phone, it will ask you to enter it in order to continue on to the
phone options stated above in steps 1 and 2.
If you do not know the Access Code you must go to the job site and gain access to
the circuit board keypad and reset to factory defaults or change the access code. If
you are unable to get to the job site, you can call Wurtec Inc. All phone numbers
are listed on troubleshooting page 21.
Reset to Factory Defaults
STEP 1
Press the
STEP 2
The phone will then give the option to press 1 to reset back to default. Press 2
VOL UP
to cancel resetting back to default. You also have the option to press
to exit program mode.
and
#
keys at the exact same time.
VOL DN
then 0
VOL UP
Testing the Phone Line
To make sure you have a good telephone line, you can make an outside call from the S3
Communicator using the onboard keypad. This is a good time to verify emergency numbers.
(continued on next page)
STEP 3
At this point the phone will automatically revert back to the main program menu.
You can choose any option to continue with programming. If you are nished, you
can press
then 0 to exit program mode.
VOL UP
18 Buy Online! Wurtec.com Buy Online! Wurtec.com 19
Page 11
Testing the Phone Line (cont.)
Flowchart
STEP 1
Press
STEP 2
If you do not have a valid telephone line the phone will say “invalid telephone line”.
TALK
key on the keypad.
/ END
At this point you will need to trouble shoot the telephone line or call the telephone
service provider. If your phone line is valid, the phone will say “Enter number to
be dialed” and you should hear a standard dial tone. At this point you can dial the
emergency number to verify it works or you can press
TALK
to hang up the phone.
/ END
Phone Line Volume
STEP 1
Be sure the phone is connected to a live telephone line and has either external
power connected or a 9V battery. If you have both the external power and a 9V
battery connected be sure the battery is rechargeable, or it could result in a battery
malfunction.
STEP 2
To INCREASE the volume of the person you are speaking to rst press the
key. If you have a live telephone line, the phone will say “Please enter number to
be dialed” and then you will hear a standard dial tone. DO NOT dial a number.
Once you hear the dial tone, Press the
and then release. You will hear a number and your dial tone increase in volume.
Continue to press the
TALK
/ END
and
the desired volume is reached. The phone will say “8” once the maximum volume
is reached. When nished press
STEP 3
To DECREASE the volume of the person you are speaking to rst press the
key. If you have a live telephone line, the phone will say “Please enter number to
be dialed” and then you will hear a standard dial tone. DO NOT dial a number.
Once you hear the dial tone, Press the
and then release. You will hear a number and your dial tone decrease in volume.
Continue to press the
TALK
/ END
and
the desired volume is reached. The phone will say “one” once the lowest volume is
reached. When nished press
TALK
and
/ END
keys at the same time and then release until
VOL UP
TALK
to hang up the phone.
/ END
TALK
and
/ END
#
keys at the same time and then release until
VOL DN
TALK
to hang up the phone
/ END
keys at the exact same time
VOL UP
#
keys at the exact same time
VOL DN
TALK
/ END
TALK
/ END
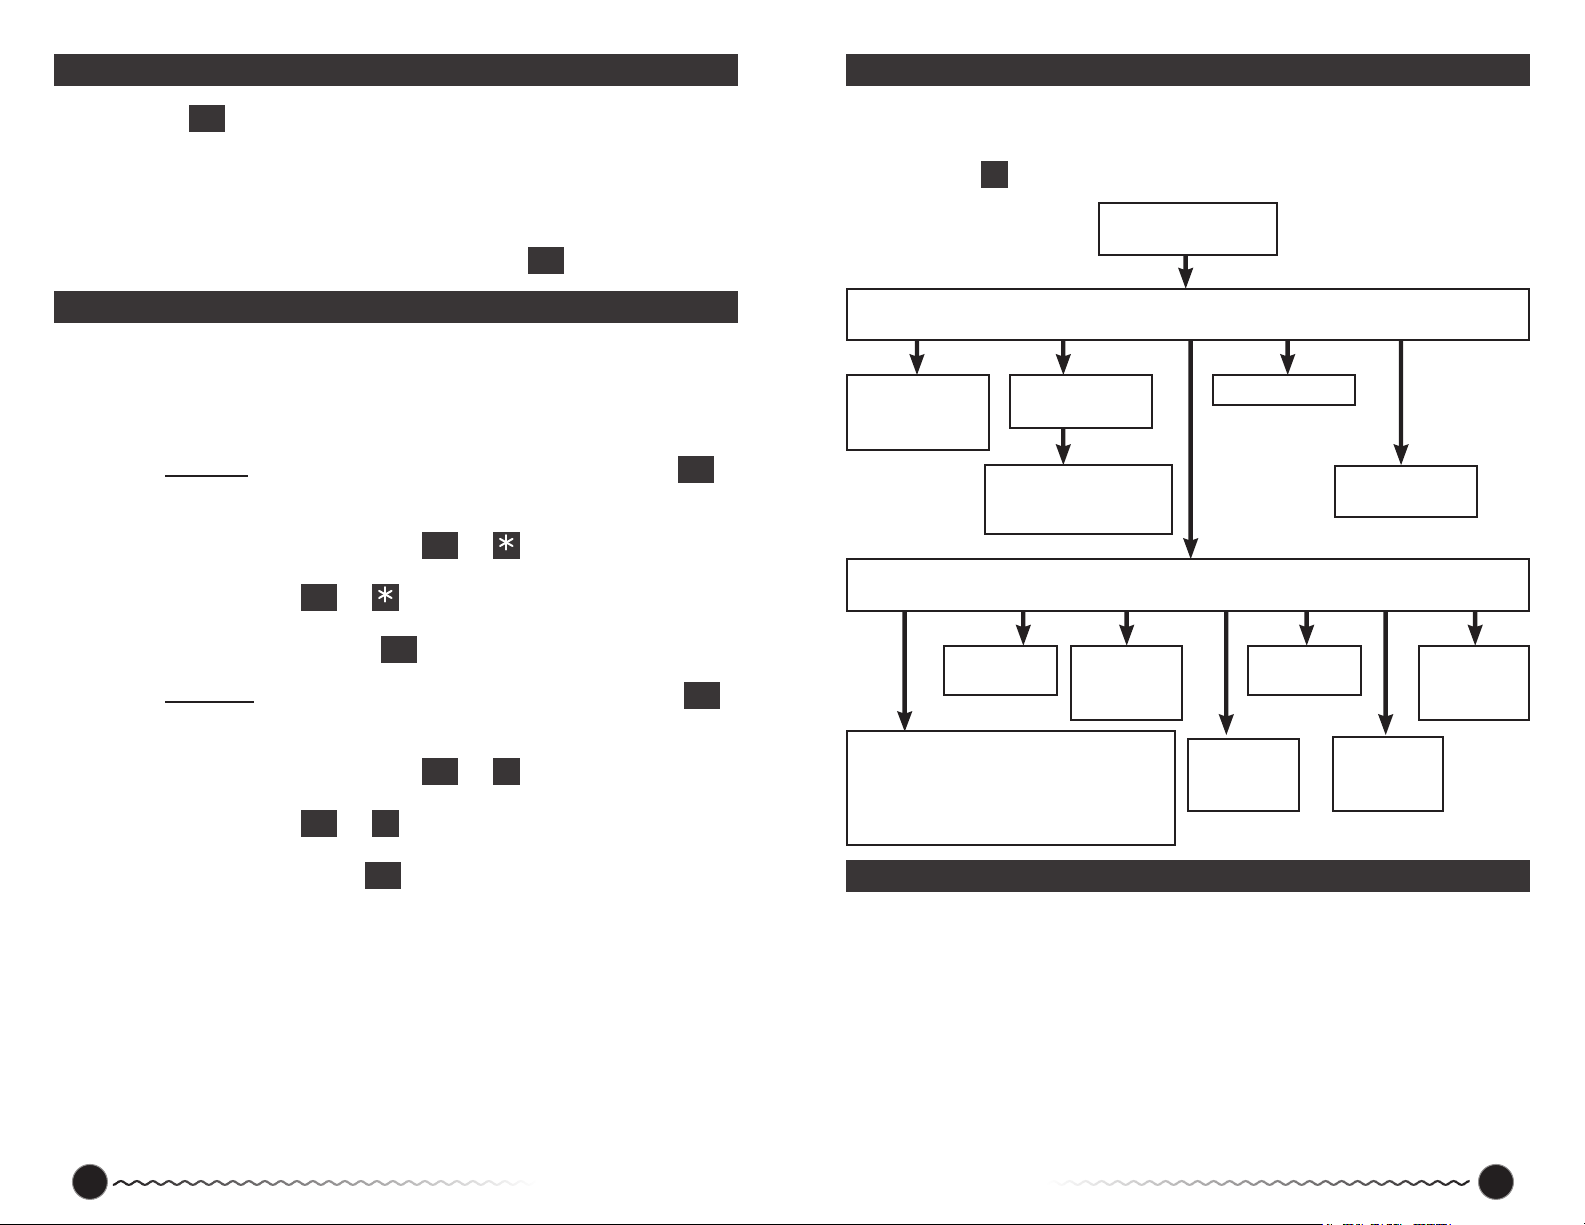
Note: This ow chart is for programming the phone with the onboard keypad. When calling
into the phone to program you can use this ow chart as well, but you will have the added
step of pressing 2 to enter program mode once the phone answers.
Push Program Menu
Button on Keypad
Main Menu
1-Phone Numbers 2-Messages 3-Advanced Options 4-Program Status 5-Ring Time *0-Disconnect
1-First Number
2-Second Number
1-Site ID
2-Announcements
Program Status
3-Third Number
1-First Announcement
2-Second Announcement
1-To Program
2-To Review
3-Third Announcement
Advanced Options
1-User Preferences 2-Talk Time 3-Access Code 4-Touch Tone ID 5-Ring Count 6-Unit # 7-External Output
1-To Program
2-To Review
1-To Program
2-To Review
3-To Delete
1-Announcements On/Off
2-Immediate Two-Way Conversation On/Off
3-Call Cancellation On/Off
4-Timing Out On/Off
1-To Program
2-To Review
1-To Program
2-To Review
3-To Delete
1-To Program
2-To Review
3-To Delete
1-To Program
2-To Review
3-To Delete
5-Maintenance Announcement On/Off
Troubleshooting
If you have any questions about the installation or operation of your S3 Communicator, please
call us toll free at (800) 837-1066, 8:00 am—5:00 pm, Monday-Friday. You can also call our
direct Tech Line at 419-930-1066.
Keypad Not Working
If you are programming before you connect the phone in the elevator be sure you have
a fresh 9V battery connected to the phone. The 9V battery energizes the keypad when
programming outside of the elevator. CAUTION when connecting the phone to external
power be sure the 9V battery is rechargeable, otherwise you could damage the phone.
20 Buy Online! Wurtec.com Buy Online! Wurtec.com 21
Page 12

Troubleshooting (cont.)
Troubleshooting (cont.)
Keypad or Push Button Not Working
The push button uses the telephone line voltage to energize the phone. Check your
telephone line connection on the phone and do a telephone line diagnostic by pressing the
TALK
key on the keypad (be sure you either have a 9V battery connected to the phone or the
/ END
external power connected to the phone to energize the keypad). Also be sure the push button
is plugged into PBA on the circuit board.
Have a Good Telephone Line but Phone Says “Telephone Line Failure”
Wurtec supplies a 12VAC isolation transformer with the phone. This transformer should be
used with the phone. If you are getting a power source directly from the controller, it can
create a ground loop with the telephone line and cause the phone to malfunction. External
building power is only needed if you are line sharing the phone or if you are going to take
advantage of the maintenance announcements (page 14). If you ARE line sharing, use the
supplied transformer. If you are NOT line sharing, simply disconnect the external power and
be sure you have at least 24VDC on your telephone line and the phone should work properly.
Phone Does Not Respond to Touch Tone When Calling Remotely
Using a land line telephone, the S3 Communicator should respond to touch tones with no
problems. If you are having a problem, check to be sure the phone you are using to call into
the S3 Communicator is not set on “pulse” dialing. If you are having trouble programming
remotely with a cellular phone it could just be because of the cellular phone reception or the
nature of the phone itself. Some cellular phones work ne, some don’t work at all. If you are
having trouble with a cellular phone, the only options are to use a land line phone or to be on
site and program the phone using the onboard keypad.
Phone Connects to Emergency Operator but There is Only Momentary
Communication
When an operator picks up the phone, there WILL be a momentary instance where the
person inside the elevator will hear the operator then contact will be cut o, unless immediate
two-way conversation is enabled. What is happening is the operator at that point is getting
the automated message of the phone and contact has been temporarily disabled. Once the
operator presses 1 to accept the call, any Site ID message will be played, then two-way
conversation will be re-established.
Call into the Phone Remotely but the Phone Doesn’t Say Anything
This typically happens when a phone is set up for line sharing and the unit number
programmed into the phone is not set to 1. When line sharing, each phone must have a
dierent unit number. Your rst phone should be set up as unit 1, the next phone as unit 2,
and so on. If for some reason unit one becomes unhooked or is not detected, the others
on the line will pick up but not play anything. The phone will sit and wait on the line until the
unit number is pressed. There can be up to 8 phones on a line so it can be any unit number
between 2 and 8. If the incorrect unit number is pressed the phone will hang up and you will
have to try again.
Note: The S3 Communicator requires an analog telephone line. A digital line must be run
through an analog port and must have at least 24VDC on the telephone line to work properly.
Phoe Says “Call in Progress” When Initiating a Call
This typically happens when the telephone line run to the phone is unshielded or the shielding
is ungrounded. The phone is sensitive to voltage induced on the telephone line and can cause
the phone to believe it is stuck o hook. Use shielded twisted pair cable for the telephone line
and ensure the shielding is grounded at the source of the telephone line or in the controller.
S3 Communicator Does Not Hang Up After Conversation Ends
This most commonly happens if the S3 Communicator is on a “Ring - Down” line. On most
ring-down systems a “wink” signal is not sent to the phone to hang the phone up. If this is
the case you have the following options: You can have the operator press
before they hang up. You can also change the talk time to a lesser time so the phone stays
online for less time. The operator will receive a message 15 seconds before the allotted talk
time to press 1 to continue the call. Each time 1 is pressed to continue, the talk time is
reloaded.
then 0
VOL UP
22 Buy Online! Wurtec.com Buy Online! Wurtec.com 23
Page 13
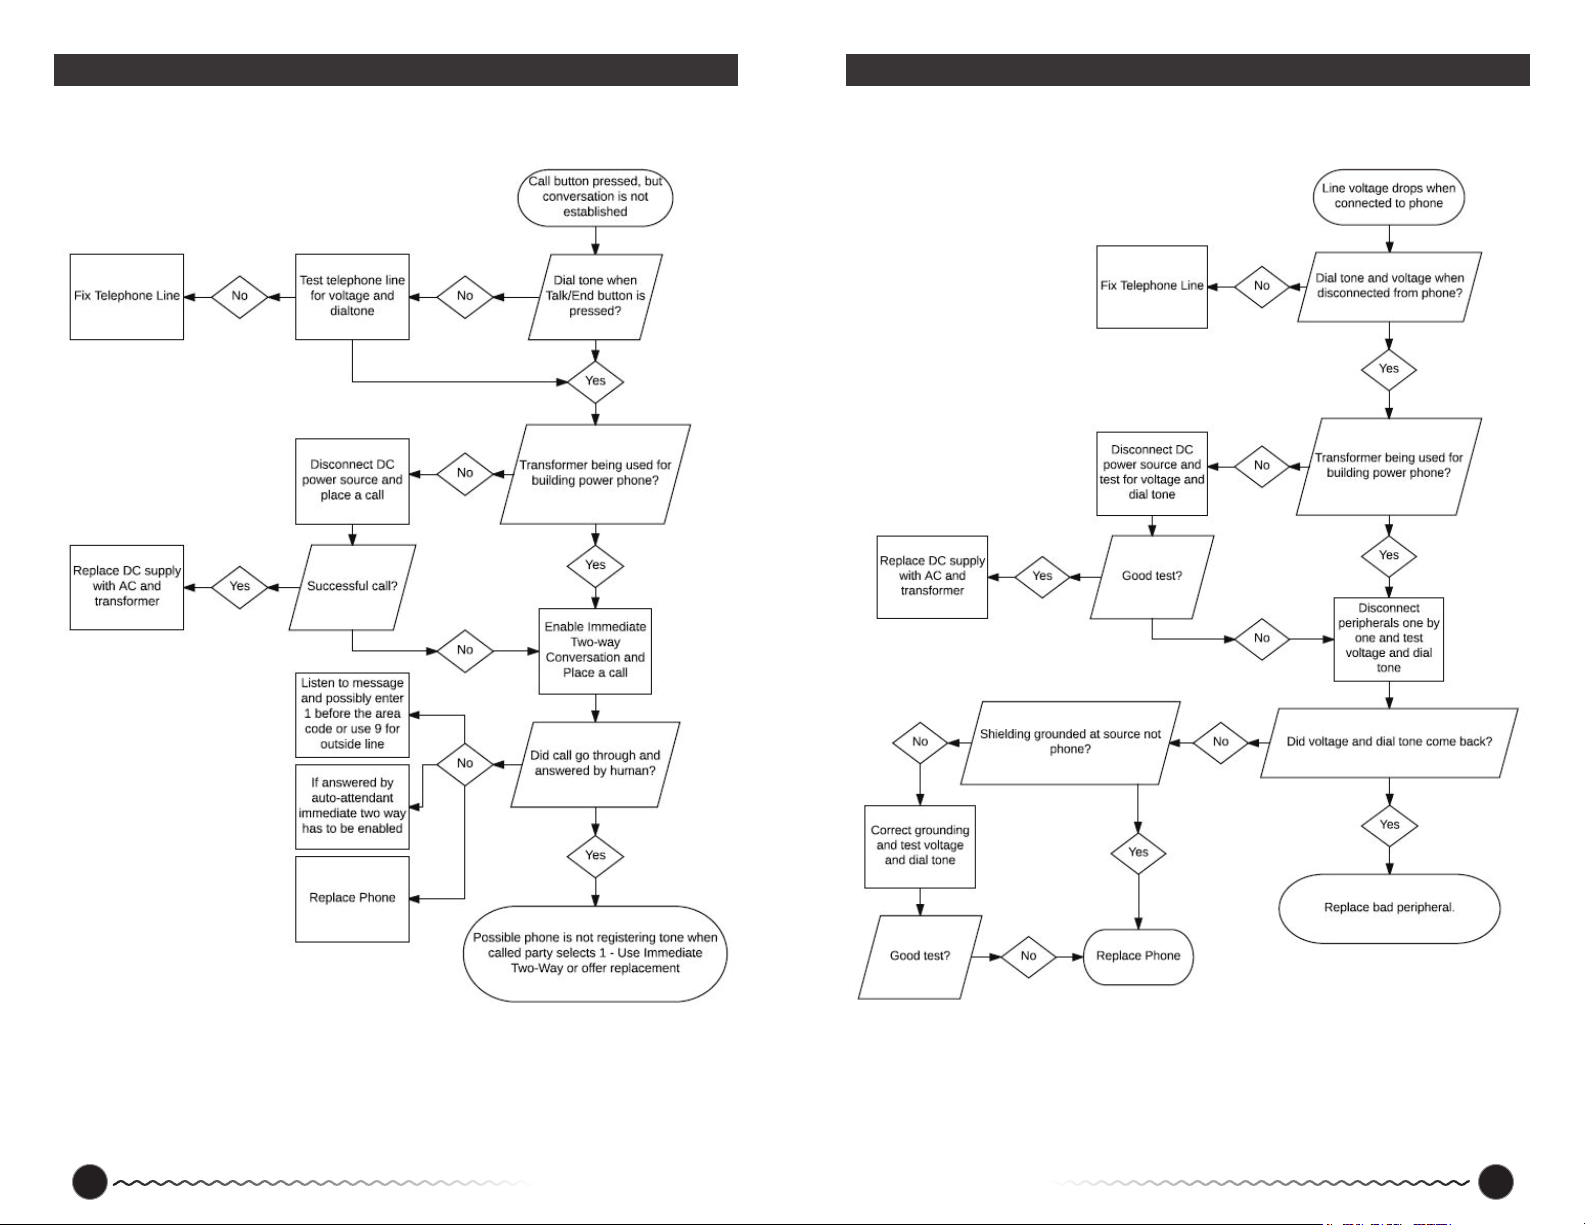
Troubleshooting Flowchart Troubleshooting Flowchart
24 Buy Online! Wurtec.com Buy Online! Wurtec.com 25
Page 14

Glossary
Warranty Policy
Immediate Two-Way Conversation
This option disables the automated message the operator will get when an emergency
call is placed from the S3 Communicator. If this option is enabled the operator will NOT
automatically receive the site ID message, the operator will have to press 2 to receive the
message. The operator will not be prompted to press 2. But you WILL be able to talk
immediately.
Maintenance Announcements
These are announcements that are played inside the elevator car if one of the following
parameters are met: The building power goes down, the telephone line has gone down, or
the battery has failed.
Ring - Down Line
A ring down line is a phone line that does not require a number to be dialed. Once the phone
is picked up or “on hook” the phone will automatically dial to a predetermined phone on the
other end. When programming use a single
to add a 2 second pause.
VOL UP
Site ID Message
This is a message that is recorded by the person programming the S3 Communicator. This
is the message played for the operator automatically once the call is accepted. A typical site
ID message should consist of: building name, address, elevator number if more than one is
present, and a callback number.
Telco
Telephone Line
“Wink” Signal
A wink signal is a momentary drop in voltage on a telephone line. This signal is something
the phone detects and perceives it as the “hang up” signal. When a conversation is over, one
person will hang up the phone on one end, a wink signal is sent which in turn hangs up the
phone on the other end. This is an automatic process.
DAMAGES DURING SHIPPING
Should your package arrive damaged, you must contact the shipping company to place the
claim. We cannot do this for you. Do not ship the material back before the carrier inspects the
shipment or we cannot issue credit.
RETURN POLICY
A return goods authorization (RGA) number must be obtained from the sales department
before returning goods for warranty reasons, repair service, or credit. Items received without
authorization may be returned at your expense.
WARRANTY
Wurtec Inc., Toledo, Ohio, warrants the manufactured products, to the original purchaser, to
be free from defects, in materials and workmanship, during normal use and services, for a
period of one (1) year after installation, subject to the following conditions:
A. A defective product shall be returned to Wurtec Inc. identied with our return
authorization number and freight prepaid, within fteen (15) days after discovery of
possible defect. Wurtec Inc. reserves the right to request proof of purchase as well as
other proof to document warranty claim.
B. Specically, this warranty does NOT cover products claimed to be defective which
have been damaged or failed due to ordinary wear and tear, neglect caused by lack of
proper maintenance or service, misuse, accidents, improper application or installation,
alterations or Acts of God.
C. Products of other manufacturers, supplied by Wurtec Inc., are covered by that
manufacturer’s warranty.
Wurtec Inc.’s obligation under this warranty shall be limited to replacing or repairing, at
our option, the parts or product subject to availability, which have been returned to us and
deemed defective. Replaced or repaired parts or products shall be shipped, FOB, our plant.
Any other damages or claims are hereby expressly waived by the purchaser.
This warranty is your assurance of a quality product. Wurtec Inc. is dedicated to customer
satisfaction. You can expect prompt and courteous attention to your service needs from us.
26 Buy Online! Wurtec.com Buy Online! Wurtec.com 27
Page 15

6200 Brent Drive, Toledo, Ohio | Ph: 800.837.1066 | Buy Online! wurtec.com
 Loading...