

Wuhan Guide Sensmart IR510 N1, IR510 N1 WIFI, IR510 N2, IR510 N2 WIFI Quick Start Manual
SERIES SERIES
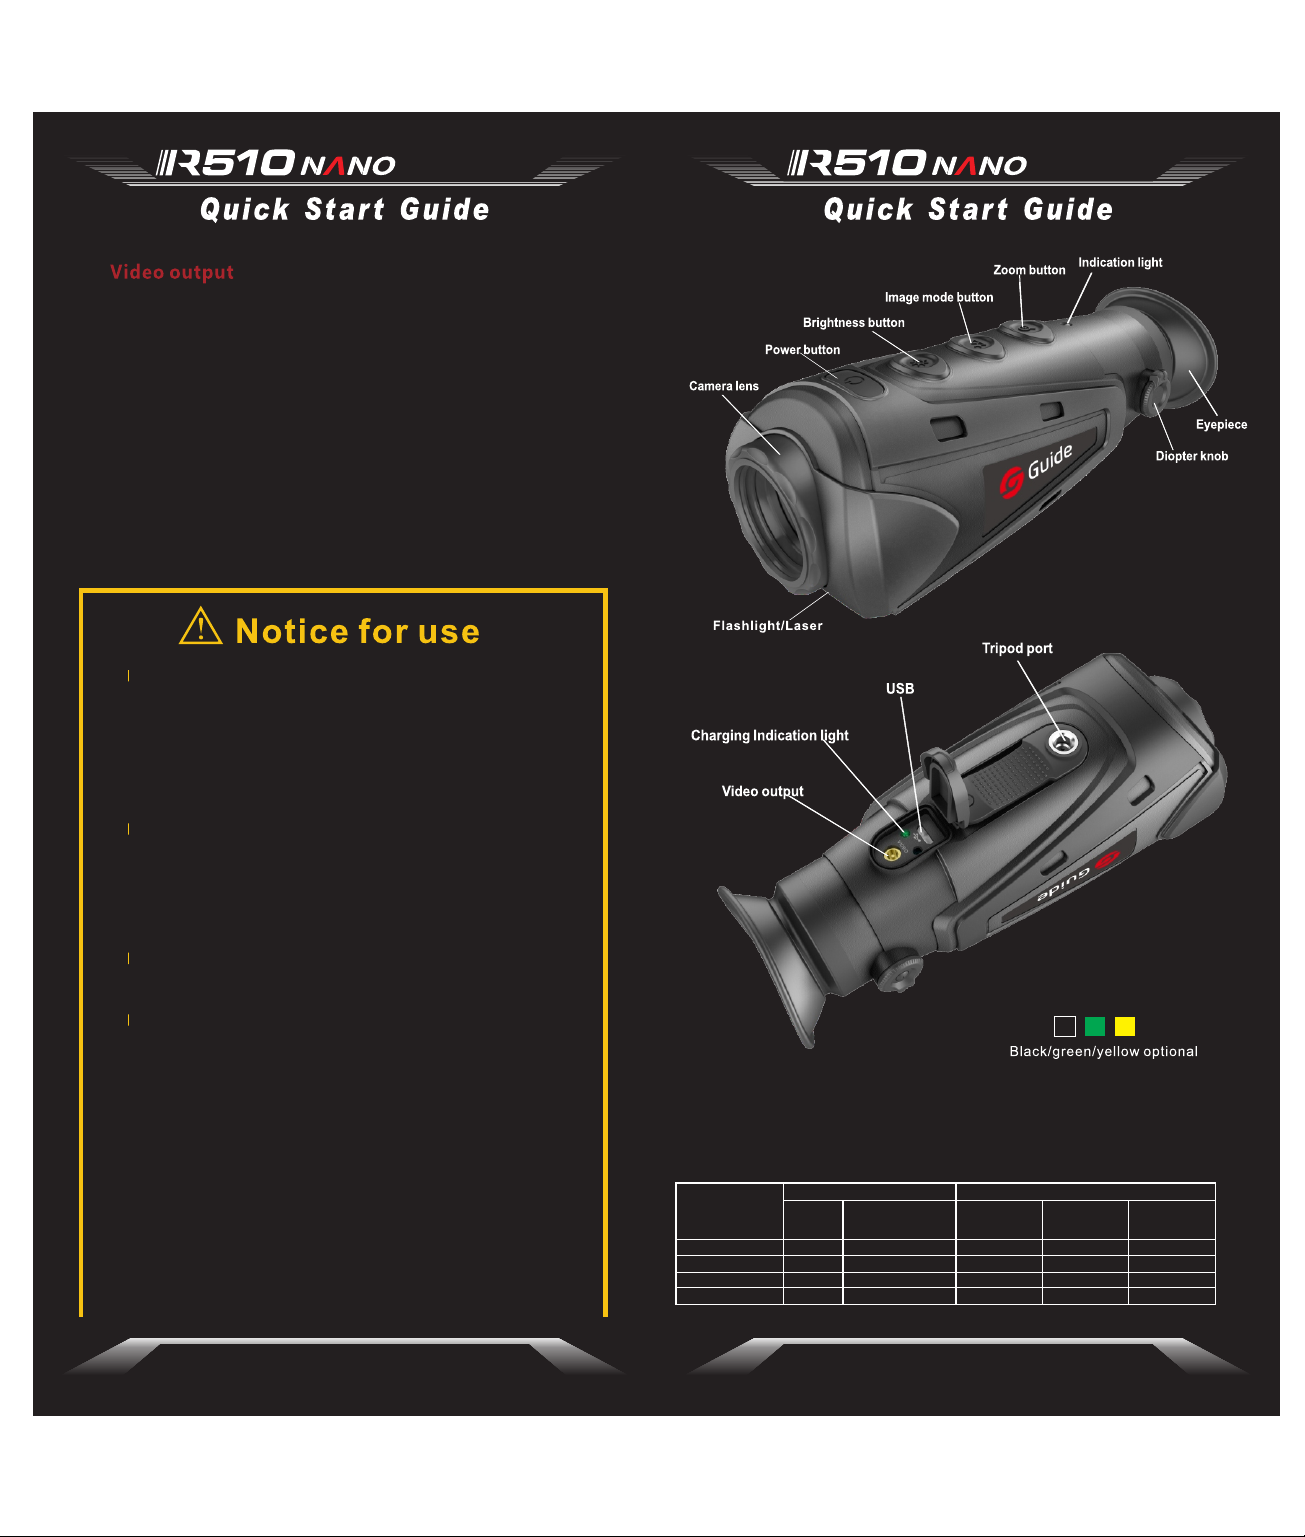
A video output port is provided next to the USB interface at
the bottom of the thermal imager, and will output the image
of the thermal imager to an external monitor for display
through the supplied the video cable.
Simultaneously press "Image Mode Button + Zoom
Button" to turn on the video output; in the video output
status, there is a video output icon.
Cursor switch
Simultaneously press the “Image Mode Button + Brightness
Button” to switch on/off the cursor.
Ther mal image rs shall not be p ointed to h ighstre ngth ener gy sources (i ncludin g the Sun, lase r
tran smittin g equipment s and their r eflection
sour ces), whi ch otherwis e will have a n egative
influ ence on its a ccuracy and d amage or
perm anently d amage infra red detec tor of it.
When t he therma l imager will b e not used fo r a
long t ime, char ge the therma l imager at l east 2.5
hour s every two m onths durin g the stora ge, and
stor e the therm al imager in a dr y and wellvent ilated en vironment .
Huma n eyes shal l not be irradi ated by the l aser
desi gnator of t he thermal im ager.
Do not c harge the b attery in an en vironme nt over
40℃.
Our company shall not bea r any le ga l responsibility for any
mistake and accident caused b y own rea so ns or rea so ns of
any third party i n th e course of using this pr od uc t by the user
or pro pe rt y l os s and personal i nj ur y c au se d by misjudgment
against images.
We prepare t hi s guide with t he purpose of fa ci li ta ti ng us er s to
use and understand our products. We wil l try ou r b es t t o
ensure t he acc ur ac y of contents o f th is gui de , but we st il l
cannot ensure the completeness of con te nt s of i t. Since we
have been c on ti nu ou sl y updating and u pg ra di ng our products,
we reserve the r ig ht to modify this guide a t a ny time without
prior notice.
Statement:
This guide is applicable to the IR510 Nano series products, including
the following four models. The differences are as follows,please
carefully read this guide before using the thermal imager.
Model
IR510 N1
IR510 N1 WI FI
IR510 N2
IR510 N2 WI FI
19mm
√
√
×
Lens
25mm (supports
expansion lens)
×
×
√
√
Wifi(APP)
Function
Freeze
×
√
××
√
√
×
√
×
WUHAN GUIDE SENSMART TECH CO.,LTD.http://www.guideir.com
Image
enhance
×
√
×
√

SERIES SERIES
The thermal imager has three power states: Power On,
Standby and Power Off;
Power On: Press and hold the power button for 2 seconds,
so that the thermal imager is turned on, and the startup
screen appears on the eyepiece;
Standby:
Manual standby: Press the power button to enter the
standby mode in the power-on status;
Automatic standby: In the power-on status, if there is no
button operation within five minutes, the automatic standby
prompt will pop up; The automatic standby will be cancelled
by any button operation during the standby prompt display;
Cancel Standby: In the standby mode, press any button to
cancel standby.
Power Off:
Manual power off: Press and hold the power button for 2
seconds so that the thermal imager is powered off;
Auto power off: In the standby state, if there is no button
operation within 30 minutes (default), the thermal imager will
automatically shut down.
Click to set five brightness levels of the image;
Ligh t/laser
indi cator
Noti ce:This m odel is equip ped with a 25 mm extended
lens w hich can bl ock the laser e mission .
Zoom button
Click this button to enlarge the image by 2x and 4x in
turns
Freeze: Press and hold the button to freeze the current
screen with the Frz icon appearing at the left upper corner
of the screen. Press any button to retrieve the real-time
screen.
Image enhance: Press and hold the button to set 5
enhancement levels of image.
Pres s and hold th e button to swi tch
on/o ff t he light/la ser indic ator.
Click this button to switch the white hot mode, black hot mode
and red hot mode;
White Hot Mode
Black Hot Mode
Red Hot Mode
WIFI switch
WiFi Connection
The th ermal ima ger can be conn ected by WI FI and mobile
phon e, and most a ll function s(except St artup and
Shut down)of its b uttons bein g control led remotel y by
APP on mob ile phone.
User s need to sea rch and downl oad “Ther mal Vi ewer”
APP from a m obile phone a pplicat ion market, t hen open
the APP, find th e WIFI “Handh eld-TI” a nd enter the
pass word "123 45678". Onc e the conne ction is
succ essful, u sers can oper ate the the rmal imager
remo tely.
Before using the thermal imager for the first time, be sure to
charge the thermal imager for at least three hours with the
matched USB charger.
During charging, please pull out the USB cover at the bottom
of the thermal imager, insert the supplied USB charging
cable, and engage the power to charge the battery. (Charging
voltage is 5V)
During normal charging, the charge indication light will turn
red;
When the charging is completed, the charge indication light
will turn green.
The object with higher temperature
shows in white or light gray;
The object with higher temperature
shows in black or dark gray;
The object with higher temperature
shows in red;
Press and hold the “Image Mode Button”
to switch on/off WIFI.
Diopter adjustment
The di opter adj ustment kno b is used to ad just the
eyep iece diop ter in order to s uit users o f diff erentleve l myopia.
When the thermal imager is turned on, the battery power
identification is shown at the lower left corner of the screen.
The lighted battery power identification shows the remaining
battery power.
WUHAN GUIDE SENSMART TECH CO.,LTD.http://www.guideir.com
 Loading...