


GeoPro K2 Series
Hardware Operating Instructions
Geosun Spatial Technology Co., Ltd.

About
Welcome to use GeoPro K2 series. This book describes how to install, set up and use
GeoPro K2 series, including GeoPro K2E and GeoPro K2G. For GeoPac, the embedded
multi-function GNSS data collecting & processing software, please refer to GeoPac User’s
Manual for more information.
Please read the instructions before start!
Copyright © 2011 Geosun Spatial Technology Co., Ltd. All rights reserved.
For more information, please visit: www.geosun-gnss.com.

Contents
Overview ........................................................................................................................................ 1
GeoPro K2 Series Overview .................................................................................................. 2
Innovative Technology ........................................................................................................... 3
Configuration Advantages ..................................................................................................... 4
Notice ................................................................................................................................... 5
GeoPro K2 Series Introductions ...................................................................................................... 6
Front View............................................................................................................................. 7
Back View ............................................................................................................................. 8
Interfaces .............................................................................................................................. 9
Standard Configuration List ................................................................................................. 10
Basic Operations .......................................................................................................................... 11
Taking Out and Putting Back the Touch Pen ........................................................................ 12
Power On ............................................................................................................................ 13
Power Off ............................................................................................................................ 13
Stylus Property Settings ...................................................................................................... 14
Power Management ............................................................................................................ 15
Installing and Removing the Battery ........................................................................... 15
Charging ................................................................................................................... 16
Smart Charging ......................................................................................................... 16
Checking the Remaining Power ................................................................................. 17
Power Saving Mode .................................................................................................. 17
Installing Micro SD Card ...................................................................................................... 18
Installing SIM Card .............................................................................................................. 19
Serial Port Settings ............................................................................................................. 20
Bluetooth Settings .............................................................................................................. 20
Bluetooth Settings ..................................................................................................... 21
Bluetooth Dial-up Connection .................................................................................... 23
Using the Electronic Compass ............................................................................................. 26
Restoring WinCE System .................................................................................................... 27
Installing, Uninstalling or Updating GeoPac Software ........................................................... 28
Upgrading the Firmware ...................................................................................................... 28
Connecting to PC ......................................................................................................................... 30
Installing Microsoft ActiveSync ............................................................................................ 31
Hardware Connection Setup with PC................................................................................... 31
Microsoft ActiveSync Automatic Connection ........................................................................ 32
Visiting GeoPro K2 Series Handheld ................................................................................... 32
Technical Parameters ................................................................................................................... 33
System Configuration ................................................................ .......................................... 34
GPS Performance ............................................................................................................... 34
Positioning Accuracy ........................................................................................................... 34
i

Interfaces ............................................................................................................................ 34
Power Performance ............................................................................................................ 34
Application Function ............................................................................................................ 35
Physics ................................ ............................................................................................... 35
Electric Specifications ......................................................................................................... 35
Troubleshooting ............................................................................................................................ 36
Common Troubleshooting ................................................................................................... 37
ActiveSync Common Problems ........................................................................................... 38
Index ............................................................................................................................................ 39
Contact Us .................................................................................................................................... 40
ii

Overview
GeoPro K2 Series Overview
Innovative Technology
Configuration Advantages
Notice
1
CHAPTER
1

GeoPro K2 Series Hardware Operating Instructions
GeoPro K2 Series Overview
Specially designed for industrial users, GeoPro K2 series industry-grade GIS data collector
is small in size and easy to carry. The rugged design of GeoPro K2 series makes it
withstand 1.5 meters natural fall and meets IP67 standard, which makes your fieldwork
easy and safe even in extreme conditions. Furthermore, the large capacity Li-Ion battery
provides up to 8 hours of continuous operation.
GeoPro K2 series offers overall GNSS/GIS solutions, which is compatible with
international main-stream GIS platforms especially Geosun GIS, while supporting
large-size image data (up to 10GB) and hundreds megabyte level vector data loading.
GeoPro K2 series, with independent intellectual property, offers high-accuracy real-time
differential and kinematic survey for post-processing. Based on Windows CE operating
system, Geosun can offer users customized applications or functions according to different
requirements.
GeoPro K2 series includes GeoPro K2E and GeoPro K2G., whose configurations are
shown in the following table, in which √ means configured, × means not available:
Module GeoPro K2E GeoPro K2G
Camera
Bluetooth √ √
GPRS √
3G/WCDMA ×
Electronic Compass √ √
3.5 Inches Touch Screen √ √
Battery Number 2 2
3 Megapixel × ×
5 Megapixel √ √
√
×
Note: You can find the product nameplate after removing the battery, the first four
characters of the SN show the product type, such as “GK2E” for GeoPro K2E, and
“GK2G” for GeoPro K2G.
2

Innovative Technology
Flexible, Diversified Wireless Communication Technology
GPRS Data Transmission
With mature GPRS data transmission technology, the data transmission and
communication is not restricted by operation distance, which is especially
suitable for urban or mountainous area where the broadcasting signal is subject
to be blocked.
Integrated Bluetooth Wireless Communications
Built-in Bluetooth communication modules easily realize short distance
wireless data transmission.
Integrated Three-dimensional Electronic Compass
The built-in electronic compass plays an effective assistance to the GPS fieldwork,
which helps GeoPro K2 series to provide the accurate direction for users even with
poor satellite signals or in low-speed or static status.
Intelligent Speech Technology
Support intelligent judgement, voice prompt, status warning and etc.
Overview
Intuitive Digital Image
The embedded digital camera can capture the related image on-site directly for
convenient attribute annotation while the built-in microphone supports audio
annotation. And the Geosun GeoPac software installed inside will automatically
match the image with current GPS position for convenient background application.
U Disc File Management Mode
Easy U disc storage style is adopted for file management. Without any special
software, just the plug-and-play operation enables users to download and manage the
handheld files conveniently.
Smart Charging
Power adapter provides 5.2V/2A output. Smart charging module is designed to help
identify the charging status. And the K2 series handheld will automatically shut down
after fully charged.
3

Geo Hardware Operating Instructions
GeoPro K2 Series
Configuration Advantages
Professional Software Support
GeoPac software of Geosun is a professional GNSS data acquisition, processing and
management software suite, which adopts unique high-accuracy data processing
algorithm and contains many optional application modules. With GeoPac, you can
easily handle the point, line, plane, annotation and image, realizing seamless
integration of fieldwork and office work.
Integrated Handheld Design
Highly integrated industry design and all built-in key components, ABS + PC shell,
withstand 1.5 meters natural fall. Industrial three proofing standard: waterproof,
shockproof and dustproof.
High-end Configuration
3.5 inches sunlight readable color touch screen. The built-in Micro SD card slot
supports massive storage expansion up to 32GB. And USB data download is
supported.
Standard Li-Ion Battery with Large Capacity
3.7 V/4200mAh large capacity battery are equipped as standard configuration, which
can support continuous operation up to 8 hours in GPS mode while 6 hours in GPS +
GPRS mode (with only one battery inside).
Data Communication
Support GPRS wireless communication which breaks distance limitation.
Enabling data transmitting and receiving freely in areas where GPRS is available.
Operation Mode
Touch screen and keyboard, easy to operate.
4

Overview
Notice
Although GeoPro K2 series handheld is made of corrosion-resistant and impact-resistant
materials, this kind of sophisticated instrument still needs careful usage and maintenance.
Please preserve the handheld in dry environment as possible. To improve its stability and
service life, the handheld should avoid being exposed to extreme environment, such as
damp, high or low temperature, corrosive gas or liquid and etc.
To ensure the continuity and quality of satellite tracking, the space over observation site
should be as open as possible, without large obstacles over 15° elevating angle. To reduce
various electromagnetic interference to GNSS satellite signal, please make sure no strong
electromagnetic interference in 200m range around the observation site, such as TV tower,
microwave station, high-voltage transmission. To avoid or to reduce the occurrence of
multipath influence, the site should be set far away from the terrain and ground features
where the electromagnetic wave signal reflection is strong, such as high buildings, large
area waters, etc.
Warnings:
This equipment contains ESDS (Electrostatic Discharge Sensitive Device), with level
C electrostatic anti-interference test. To touch, move or plug the equipment, please
follow the ESD (Electro-Static Discharge) instruction.
Must be used and preserved in the stipulated temperature range. For details, please
refer to the chapter Technical Parameters.
5

GeoPro K2 Series Introductions
CHAPTER2
Front View
Back View
Interfaces
Standard Configuration List
6
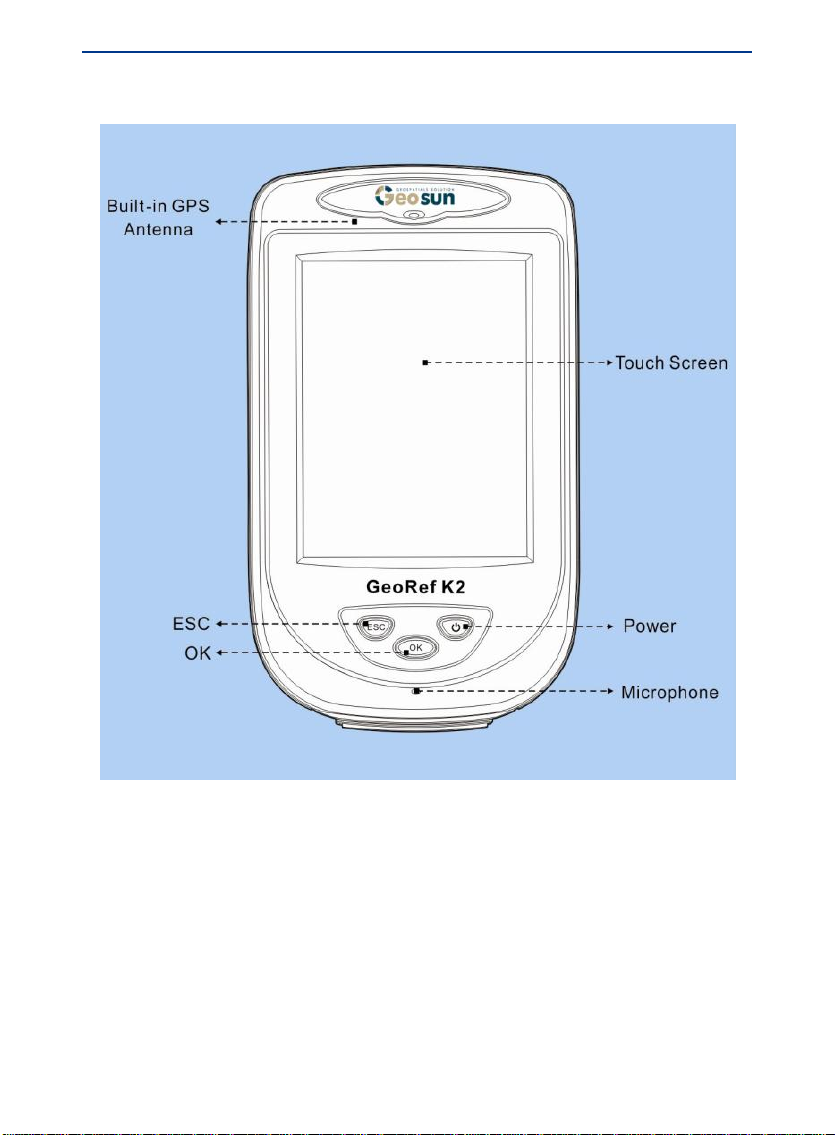
Front View
GeoPro K2 Series Introductions
Built-in GPS Antenna
Touch Screen: 3.5 inches sunlight readable color touch screen
Microphone: Support on-site audio collection for attribute annotation
Power: Press this button for 2 sec to turn on the handheld, or 3 sec to turn off it
ESC: Exit the current window
OK: Confirm the information of the current window
7
GeoPro K2 Series Hardware Operating Instructions
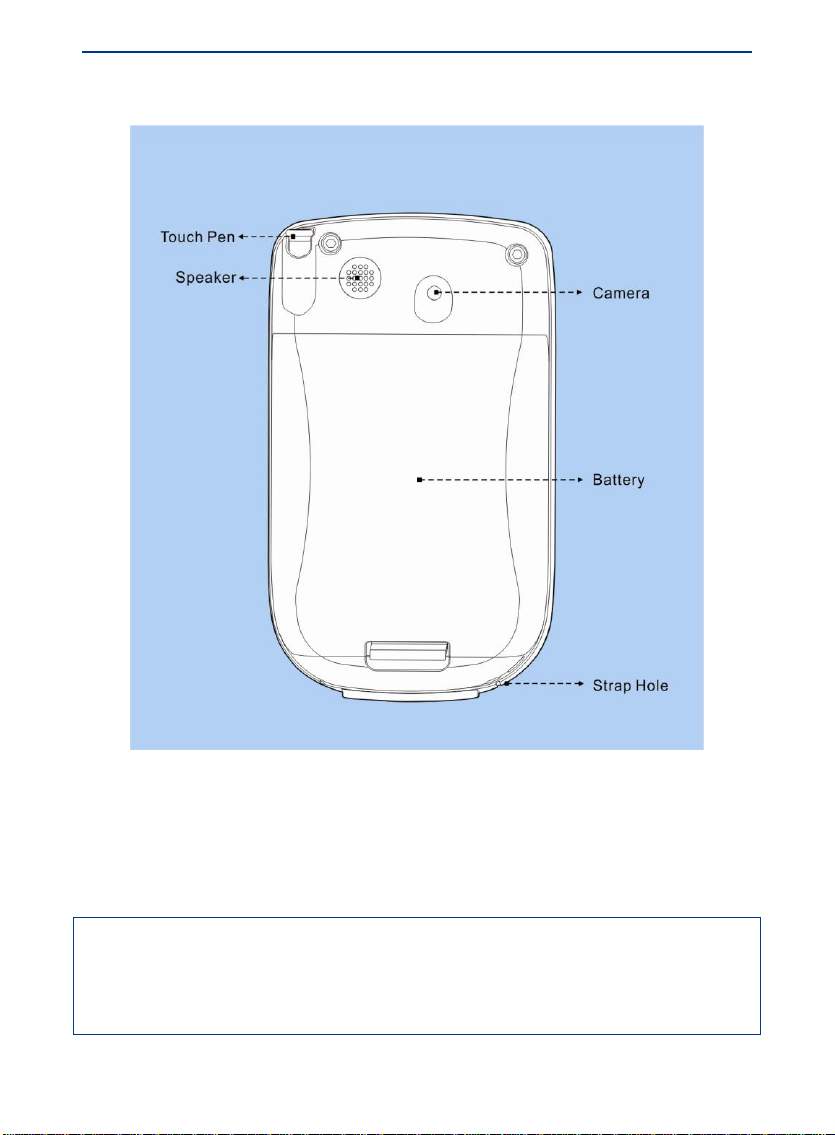
Back View
Touch Pen
Speaker: Voice reporting
Camera: on-site image collection for attribute annotation
Li-Ion Battery: 3.7V/4200mAh
Strap Hole: hold the strap to prevent the handheld from slipping
Note: There may be no voice or the voice may be hoarse when the speaker gets water
inside. But this will not affect the instrument performance as the handheld is entirely
waterproof even for the part connecting with the speaker. However, please dry the speaker
in time.
8
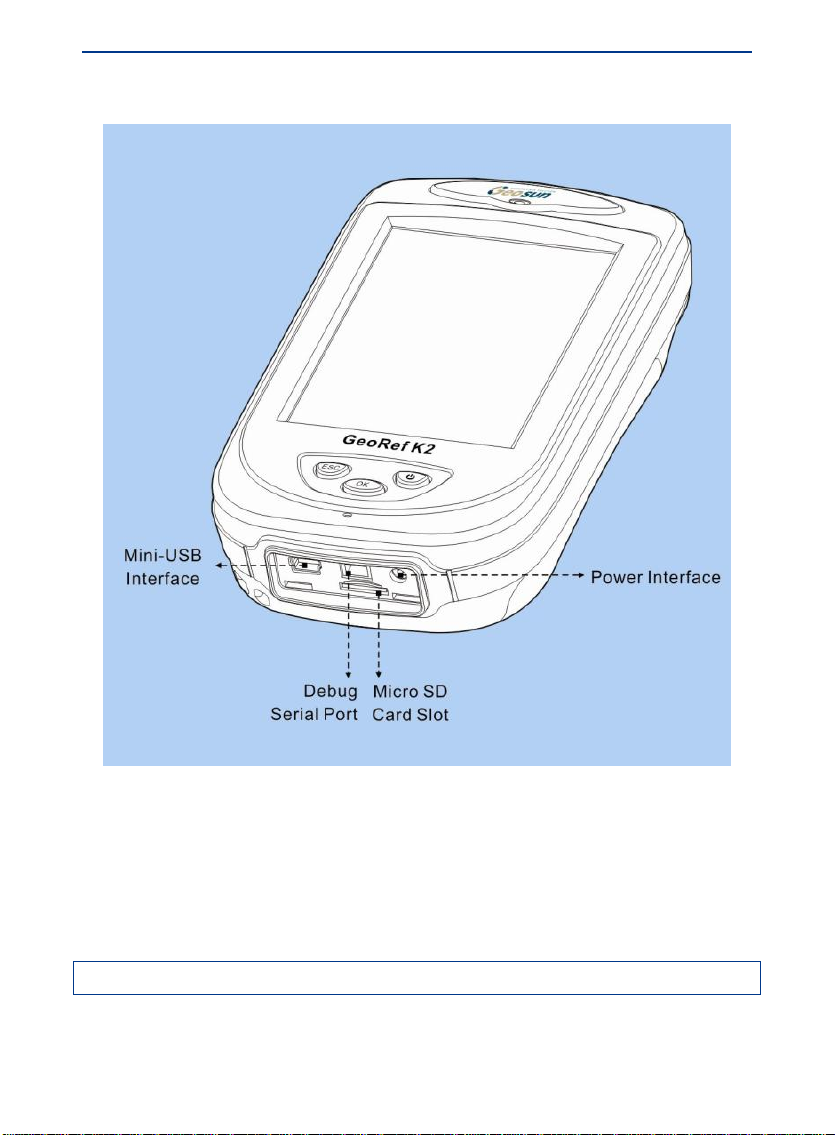
Interfaces
GeoPro K2 Series Introductions
Mini-USB Port: Connecting PC for data transmission
Debug Serial Port: For the E-boot writing by factory
Power Interface: For charging
Micro SD Card Slot: For installing Micro SD card, supports massive storage
expansion up to 32 GB
Note: Close the plug to avoid water and dust when you don’t use the interfaces.
9

GeoPro K2 Series Hardware Operating Instructions
Standard Configuration List
Configuration Item Number
GeoPro K2 Series Handheld 1
Charger 1
Universal Adapter 1
USB Data Cable 1
Picture
Battery 2
Micro SD Card (2G Byte, Flash) 1
Touch Pen 2
Geosun GEO CD (Containing all Geosun
GEO catalogues, software, manual, video)
GeoPro K2 Series Bag 1
10
1

Basic Operations
3
Taking Out and Putting Back the Touch Pen
Power On
Power Off
Stylus Property Settings
Power Management
Installing Micro SD Card
Installing SIM Card
Serial Port Settings
Bluetooth Settings
Using the Electronic Compass
Restoring WinCE System
Installing, Uninstalling or Updating GeoPac Software
Upgrading the Firmware
CHAPTER
11

GeoPro K2 Series Hardware Operating Instructions
Taking Out and Putting Back the Touch Pen
1. The touch pen is in the pen slot at the back of the handheld. Lightly pull the touch pen
cap, and take it out, as shown below:
2. To put back the touch pen, let the cap toward the outside, and then push it until the top
of the pen reach the end of the slot.
Note: Please take out and put back the touch pen gently!
12

Power On
1. Press the power button for 2 seconds, the
handheld will turn on and load WinCE
system automatically, as shown right:
The startup process lasts for about 30
seconds, please be patient.
2. When the startup process is completed,
the desktop of WinCE system will be shown
as right:
Basic Operations
Power Off
There are two ways to turn off the handheld:
1. Press the power button for more than 3
seconds.
2. Tap Start>Suspend menu item in
WinCE system desktop.
13

GeoPro K2 Series Hardware Operation Instructions
Stylus Property Settings
1. Tap Start>Control Panel menu item to open Control Panel dialog box.
2. Tap Stylus icon in Control Panel dialog box to open Stylus Properties dialog box.
3. Set up double-tap speed. Double tap the grid pattern to set double-tap speed and
double tap file icon to test the double tap setting in Double-Tap page.
4. Calibrate the touch screen. Tap the Recalibrate button to open Calibration page.
Follow the instructions on the top of the screen to calibrate the touch screen.
14

Power Management
Installing and Removing the Battery
1. Insert the raised parts of battery into the corresponding slot.
Basic Operations
2. Press down the end with plastic spring of the battery until you hear the sound of lock.
3. To remove the battery, pull up the plastic spring of the battery until you hear the sound of
popup, and then gently take out the battery.
Note: The battery life will be reduced with temperature decreasing and charge times
increasing. Typically, a new 4200 mAh battery can support continuous work for about 8
hours. The working time may be different depending on the communication configuration,
the status of screen backlighting, etc.
15

GeoPro K2 Series Hardware Operation Instructions
Warning:
1. Don't put battery in fire or use metal short-circuit electrode. Please use the special battery
and charger from manufacturer only.
2. Stop using the battery once you find it heated abnormally, distorted, leaked, or smelly.
Please replace it by a new one.
3. If the battery life significantly is shortened, please stop using and change a new one as
the battery has aged.
Charging
Special charger should be used for In order to help users to know the charge status, GeoPro K2 series offers the smart charging
K2 series, and only in certain temperature
range (0 ℃~40 ℃).
Methods and requirements: Commonly
there will be some power left in the battery
before users start to use it. Please firstly
run out of all the power before first
charging. Please charge the handheld for 8
hours for the first three times (in power off
status), and later on 4 to 5 hours charging
(in power off status) is enough. When the
handheld is not used for a long time,
please make sure the battery is charged
once a month to keep its performance.
Warning: Do not disassemble or replace the battery by yourself. Please go to the
maintenance station or contact the dealer if there is any problem about battery.
Smart Charging
In order to help users to know the charge status, GeoPro K2 series offers the smart charging
tool in the embedded GeoPac software. For more details, please refer to GeoPac User’s
Manual.
16

Checking the Remaining Power
Tap the Start>Settings>Control
Panel >Power properties item to check the
remaining power. If the remaining power
shown in Main battery area is 100%, but on
the task bar, the battery icon is along with a
lightning bolt signal, then it means the
battery is not yet fully charged. If the
charging is stopped at this time, the
remaining power (shown in this dialog box)
may be reduced to 85%.
Only when the power part shown in Main
battery area is as Good and 100%, the battery
is really fully charged.
Basic Operations
Note: This is because the charging voltage detected by WinCE is a little higher than the real
battery voltage. Constant pressure charging is important for full charging. Please complete
the whole charging process to ensure the working time.
Power Saving Mode
In default condition, screen backlighting will be turned off automatically if no operation
(press keys or tap touch screen) has been carried out for 1 minute. The system will enter the
standby mode if no operation has been carried out for 30 minutes, and be power off if no
operation has been carried out for 2 hours.
17

GeoPro K2 Series Hardware Operation Instructions
Installing Micro SD Card
1. Open the rectangular soft plug at the button of the handheld, you can find Micro SD slot.
2. Put the Micro SD card upside down (the metal surface upward), then push the card into
the slot till the card is completely inside the slot, and then close the plug.
3. You can remove the Micro SD card by lightly pressing the card to make it half pop-out
automatically, and then pull it out gently.
Note: Micro SD card (TF card) is a small-size external flash memory card. It is usually used in cell
phone, PDA etc. Ordinary SD card is larger than Micro SD card, and is not suitable for K2
series handheld. Please be sure not to mix them up.
18

Basic Operations
Installing SIM Card
1. Take down the battery.
2. Push the metal cover gently following the arrow direction of UNLOCK to open the metal
cover, and then insert the SIM card into the SIM card slot, as shown below:
3. Push the metal cover back gently following the arrow LOCK direction to lock the SIM
card.
4. Install the battery to finish.
19

GeoPro K2 Series Hardware Operation Instructions
Serial Port Settings
Double tap the Communication Mode Settings icon in the Control Panel, then the
Communication Mode Settings dialog box appears, as shown below:
Users can define the function of COM1 as Radio (PC) or Bluetooth in this dialog box.
Bluetooth Settings
Tap the Bluetooth Settings tag in the Communication Mode Settings dialog box, the
Bluetooth Settings interface appears, as shown below left. To use Bluetooth , you need to
tap the Power On button in the Bluetooth Power area, to turn on the power of Bluetooth .
Thus the Turn On buttons of Bluetooth is activated.
Tap the Turn On button in the Bluetooth area you can enable the Bluetooth. When the
Bluetooth is enabled, you can tap the Turn Off button in the Bluetooth area
20
to disable it.

Basic Operations
Bluetooth Settings
When the Bluetooth is enabled, the icon appears in the task bar, as shown below left.
Double tap the Bluetooth Device Properties icon , the Bluetooth Management interface
pops up as shown below right.
Tap the Scan Device button, the handheld begins to scan Bluetooth devices within 10
meters, and show them in the Scan Device page, as shown below left. Double tap the device
to connect, select the Trusted menu item in the appeared menu, as shown below right.
21

GeoPro K2 Series Hardware Operation Instructions
The Bluetooth Manager dialog box appeared, as shown below left, tap the Yes button. Input
the matching password (user-defined) in the appeared dialog box, tap the OK button, and
then wait for inputting the matching password in the other device.
When the other device finished confirmation, the symbol turns to , which means
the matching is successful, as shown below left. After successfully set up the matching, if a
file is transmitted from the other device, the Bluetooth file transmission window pops up
automatically, as shown below right. Tap the Yes button to start download. The file will be
saved to My Device\My Documents\DefaultInbox\.
22

Basic Operations
Bluetooth Dial-up Connection
Usually, while scanning the devices, several items will be shown for the same device, for
example, the Nokia device shown in the left picture below. To implement its Bluetooth
Dial-up function, please double tap the item with the icon ahead, and then select the
Trusted menu item, and input the matching password.
1. When the matching is successful, double tap the icon item, and select the Active
menu item in the popped up menu. Then the icon will turn to . Now please tap the
OK button.
2. Select Start > Settings > Network and Dial-up Connections > Make New Connection, the
Make New Connection dialog box pops up as shown below left. Input the connection name,
Select Dial-Up Connection, and tap the Next button. Then the Modem dialog box will pop
up, as shown below right.
23

GeoPro K2 Series Hardware Operation Instructions
3. Select the matching device in the Modem dialog box, and tap the Configure button. Then
a Bluetooth authority request will appear in the other device. When the request is accepted
by the other device, the Device Properties dialog box pops up. In the Call Options page,
input the APN provided by GPRS providers in the Extra Settings edit box, as shown below
left.
4. Tap the OK button to return back to the Modem interface. Tap the Next button, The
Phone Number dialog box appears. Input the country code, local area code, phone number
*99***1# (this “*99***1#” is just an example for Chinese APN “CMNET”. For more
exact information of different countries, please contact your local APN company), as shown
below right .Then tap the Finish button.
Using the Electronic Compass
1. Find the Compass icon in the Control Panel interface, as shown below left.
2. Double tap the Compass icon, the compass interface appears, as shown below right.
24

Basic Operations
The electronic compass is able to provide the accurate direction for user even with poor
satellite signals or in low-speed or static status.
Restoring WinCE System
Make sure the backup of software and data
have been done before restoring WinCE
system.
In the power off status, keep pressing the
“OK” button and press the power button until
the handheld turns on and the interface of
“Restoring the system, please wait…” is
shown as right:
This operation will restore all data and settings to the initial status of handheld except
Micro SD. Please note: the software GeoPac will be deleted. Reinstallation is required to
perform any field work.
Warning: To avoid data loss, please do not try this operation if it’s not necessary. Make
sure the backup of software and data have been done before this operation.
27

GeoPro K2 Series Hardware Operation Instructions
Installing, Uninstalling or Updating GeoPac Software
For details, please refer to the GeoPac User’s Manual.
Upgrading the Firmware
Method 1:
1. Connect K2 series to PC with data cable. For details, please refer to chapter:
Connecting to PC.
2. After Microsoft ActiveSync is connected to handheld as below:
3. Click the Explore button of Microsoft ActiveSync to open K2 series resource browser.
Copy the latest version firmware file to “Storage Card”.
4. In power off status, press “ESC” and power button at the same time, the interface of
“Updating the firmware, please wait…” will be shown as below. Then the handheld will be
upgraded to the new version of firmware in Micro SD card.
Method 2:
28

Basic Operations
You can also insert the Micro SD card into Micro SD card reader, and then insert the reader
to the USB interface of a PC. Copy firmware file to the Micro SD card, and insert it into
handheld. Then by the above method, you can also complete upgrading firmware.
Note: If there are several versions of the firmware for the correct type of handheld, the
system will be upgraded to the latest one. Also please make sure there are no other kinds of
firmware for different types of handheld such as V2 series and R2 series, or the system will
mistake them.
29

Connecting to PC
4
Installing Microsoft ActiveSync
Hardware Connection Setup with PC
Microsoft ActiveSync Automatic Connection
Visiting GeoPro K2 Series Handheld
CHAPTER
30

Connecting to PC
Installing Microsoft ActiveSync
GeoPro K2 series is compatible with ActiveSync 4.5 or later. You can download the latest
version from the Microsoft website at:
http://www.microsoft.com/download/en/details.aspx?id=15
After installing the Microsoft ActiveSync, click the Start > Program menu item, find and
run Microsoft ActiveSync. In the pop-up Connection Settings dialog box, choose Allow
USB connections option, shown as below.
Hardware Connection Setup with PC
Turn on GeoPro K2 series to enter WinCE system. Connect GeoPro K2 series and the USB
interface of PC via USB cable, shown as below:
31

GeoPro K2 Series Hardware Operating Instructions
Microsoft ActiveSync Automatic Connection
After the data cable has been connected, Microsoft ActiveSync on the computer will
recognize the handheld device and connect automatically. Then select “No” if it asks “Set
Up a Partnership Yes or No?” and click the OK button, the connection will be completed
successfully. When firstly connected,, the driver will be required. Follow the tips to install
the driver of WinCE. Find the driver in the CD in the handheld goods package.
Visiting GeoPro K2 Series Handheld
After first successful connection, the Microsoft ActiveSync will automatically connect K2
series to PC with data cable. The mobile device can be seen in Windows resource manager,
double-click it then you can visit GeoPro K2 series handheld. Users can add or delete files
saved in GeoPro K2 series by PC operation. Users can also download handheld data files to
PC conveniently. WinCE resource browser interface is shown as the following picture:
32

Technical Parameters
System Configuration
GPS Performance
Positioning Accuracy
Interfaces
Power Performance
Application Function
Physics
Electric Specifications
5
CHAPTER
33

GeoPro K2 Series Hardware Operating Instructions
This chapter describes the technical parameters of Geosun GeoPro K2 series. The
specifications are subject to change without notice.
System Configuration
Operating system: Windows CE 6.0
Microprocessor: 1GHz industrial-grade processor
Storage: 512MB DDR2 SDRAM, built-in 512M flash memory
Display: 3.5 inches sunlight readable color touch screen
GPS Performance
Channel: 50 channels + L1 C/A
SBAS: WAAS, EGNOS, MSAS, GAGAN
Antenna: Built-in high sensitivity anti-interference GPS antenna
Update rate: 1Hz in default, can support up to 5Hz as option
First positioning time: 26 sec (typical, cold start)
Positioning Accuracy
Single Point Positioning: 3-5m
SBAS: 1-3m
Real Time Differential: 1m
Real Time Wide Area Augmentation: 1-3m
Differential Post-Processing: 0.5m
Interfaces
Built-in USB port
Built-in SIM card slot for GPRS communication
Built-in sealed Micro SD card slot
Power Performance
Battery: Built-in 3.7 V Li-Ion battery, 4200mAh
Continuous operating time:
Only GPS: one battery for 8h, double for 16h
GPS + GPRS: one battery for 6h, double for 12h
34

Technical Parameters
Application Function
Wireless communication
Built-in GPRS communication module supporting remote wireless
communication
Built-in Bluetooth module, easily realizing short distance wireless
communication
Built-in electronic compass, an effective assistance to the GPS fieldwork
Video: Built-in a 5 megapixel camera ,support on-site image acquisition and
annotation
Audio: Built-in microphone and speaker, support on-site audio acquisition and
annotation, audio operation instruction and alarming function
Physics
Size: 140×8 4×35mm
Weight: 383g (with battery)
Working temperature: -20℃~+60℃
Storage temperature: -40℃~+80℃
Humidity: 95% non-condensing
Dustproof & waterproof: IP67
Anti-shock: Resistant to 1.5 meters natural fall
Electric Specifications
Level C electrostatic anti-interference test
35

Troubleshooting
Common Troubleshooting
ActiveSync Common Problems
6
CHAPTER
36

Common Troubleshooting
Problem Cause Solution
Can’t turn on. Low battery. Recharge the battery.
Crash in using. Excessive operations were in processing
The screen is
black.
The screen doesn't
respond to
one-tap.
The screen doesn't
respond to
double-tap.
The handheld
can’t be charged.
Can't recognize
the storage card.
Unable to connect
to computer.
GPS signal
reception is poor.
The GPRS dial-up
fails or the
networking is
abnormal.
The Bluetooth
dial-up failure.
Working temperature is beyond the
allowed range (- 20 ℃ ~ 60 ℃).
in the handheld in a short time
In order to prevent battery power loss, the
screen will automatically be black if there
is no operation within one minute.
The handheld does not turn on. Press the "Power" button to turn on the
The handheld runs out of power. Recharge the battery.
No calibration of the touch screen. Realign the touch screen.
The current double-tap speed is too fast or
too slow.
The internal temperature has risen above
40 ℃.
The internal temperature has fallen below
0 ℃.
The storage card has not been inserted
properly.
The gold finger (the metal part of card) is
dirty.
Data cable is not connected properly. Check and connect the data cable.
The synchronization software has not
been installed on the computer.
Located in tunnel, or under viaduct or
other large blocks
SIM card has not been inserted properly. Carefully take out the card, and then insert it
The flow of the SIM card has not been
opened or is used up.
The local network signal is weak. Go to other places with strong signal to
Electromagnetic interference exists around,
such as television tower, microwave station,
high voltage transmission line, etc.
APN setting is not right. Set the APN according to the SIM card.
The device for dial-up can’t offer the icon
item.
Bring the handheld into the environment
where the temperature is in the allowed range.
Restart the handheld.
Press any buttons or tap the screen.
handheld.
Reset the double-tap speed.
Temporarily turn off the handheld, recharge it
when the temperature is dropped to the
allowed range.
Go away from the heat source, such as
sunshine. The handheld will charge
automatically when the temperature drops to
the allowed range.
Charge the handheld when the internal
temperature is over 0 ℃.
Carefully take out the card, and then insert it
into the card slot gently.
Use cotton swab with alcohol to wipe it clean
before use
Install the synchronization software
ActiveSync.
Change location to improve signal receiving.
into the card slot gently.
Contact the GPRS operators to open the flow.
re-establish the communication.
Be away from the area with strong
electromagnetic interference.
Please refer to Geopac User’s Manual for
details.
Use other device for dial-up connection.
Index
37

GeoPro K2 Series Hardware Operating Instructions
ActiveSync Common Problems
Problem Cause Solution
ActiveSync
fails to connect
to the handheld
automatically.
If the problem you encountered still can not be solved, please contact us. Geosun will offer
you excellent after-sales service.
The connection is not
initiated automatically.
An incompatible version
of ActiveSync is
installed.
The connection is not
enabled in ActiveSync.
Microsoft USB drive is
not installed.
In ActiveSync dialog box, select File > Connection
Settings and then tap Connect.
ActiveSync 4.5 and later version is compatible with
GeoPro K2 series. You can download the latest version
from the Microsoft website at
http://www.microsoft.com/download/en/details.aspx?id=15
Check "Allowing the USB connection" in File >
Connection Settings.
Install Microsoft USB drive.
38

Antenna, 34
Application Function, 35
Back View, 8
Battery, 4, 15
Bluetooth Settings, 20
Calibrate the touch screen, 14
Channel, 34
Charging, 16
Check the Remaining Power, 17
Compass, 26
Configuration, 4
Control Panel, 14
Data Communication, 4
Digital Image, 3
Display, 34
Electric Characteristic, 35
File Management Mode, 3
First positioning time, 34
Front View, 7
GeoPac, 4, 27, 28
GeoPro K2 Series, 2
GIS data collector, 2
GPRS Data Transmission, 3
GPS Performance, 34
Hardware Connection Setup with PC, 31
Installing Micro SD Card, 18
Installing Microsoft ActiveSync, 31
Installing SIM Card, 19
Integrated Handheld Design, 4
Index
Intelligent Speech Technology,
Interfaces, 9, 34
Micro SD Card, 9
Microprocessor, 34
Mini-USB Port, 9
Notice, 5
Operating system, 34
Physics, 35
Positioning Accuracy, 34
Power Interface, 9
Power off, 13
Power on, 13
Power Performance, 34
Power Saving Mode, 17
Restoring WinCE System, 27
Serial Port Settings, 20
Setup double-tap speed, 14
SIM Card, 19
Smart Charging, 3, 16
Standard Configuration, 10
Storage, 34
Stylus Property, 14
System Configuration, 34
technical parameters, 34
Touch Pen, 12
Update rate, 34
Upgrading the Firmware, 28
Visiting GeoPro K2 Series Handheld, 32
WinCE system, 13
3
Index
39

GeoPro K2 Series Hardware Operating Instructions
Contact Us
Thank you for using our GeoPro K2 series collector. We will try our best to provide you the
best pre-sales and after-sales service. Please be freely to contact us with any usage
condition or advices about GeoPro K2 series, we will reply to you as soon as possible.
Geosun Spatial Technology Instrument Co., Ltd.
Add: 3rd Floor, Hongye Building, Wuhan University Science Park, University Park
Road, East Lake Hi-tech Development Zone, Wuhan, Hubei, 430223 China
Tel: +86 (0)27 8797 0585
Fax: +86 (0)27 8797 0541
Email: sale@geosun-gnss.com
Website: www.geosun-gnss.com/en
40

GeoPro K2 Series Hardware Operating Instructions
FCC Statement:
This equipment has been tested and found to comply with the limits for a Class B digital
device, pursuant to Part 15 of the FCC Rules. These limits are designed to provide reasonable
protection against harmful interference in a residential installation. This equipment generates
uses and can radiate radio frequency energy and, if not installed and used in accordance with
the instructions, may cause harmful interference to radio communications. However, there is
no guarantee that interference will not occur in a particular installation. If this equipment
does cause harmful interference to radio or television reception, which can be determined by
turning the equipment off and on, the user is encouraged to try to correct the interference by
one or more of the following measures:
-- Reorient or relocate the receiving antenna.
-- Increase the separation between the equipment and receiver.
-- Connect the equipment into an outlet on a circuit different from that to which the receiver
is connected.
-- Consult the dealer or an experienced radio/TV technician for help.
Changes or modifications not expressly approved by the party responsible for compliance
could void the user's authority to operate the equipment.
This device complies with part 15 of the FCC Rules. Operation is subject to the following
two conditions: (1) This device may not cause harmful interference, and (2) this device must
accept any interference received, including interference that may cause undesired operation.
RF Exposure Information (SAR)
This device meets the government’s requirements for exposure to radio waves. This device is
designed and manufactured not to exceed the emission limits for exposure to radio frequency
(RF) energy set by the Federal Communications Commission of the U.S. Government.
Body-worn Operation
This device was tested for typical body-worn operations. The exposure standard employs a
unit of measurement known as the Specific Absorption Rate, or SAR. The SAR limit set by
the FCC is 1.6 W/kg. Tests for SAR are conducted using standard operating positions
accepted by the FCC with the EUT transmitting at the specified power level in different
channels. The highest SAR value for the device as reported to the FCC is 0.17
W/kg when
placed next to the body. Third-party belt-clips, holsters, and similar accessories used by this
device should not contain any metallic components. Body-worn accessories that do not meet
these requirements may not comply with RF exposure requirements and should be avoided.
 Loading...