

Wright Medical Technology SIDEKICK EZ FRAME Surgical Technique

SIDEKICK® EZ FRAME
External Fixator System
SURGICAL TECHNIQUE
™

Contents
Chapter 1 2
2
Chapter 2 3
Chapter 3 4
4
4
Chapter 4 12
Chapter 5 13
Chapter 6 14
Chapter 7 15
Introduction
Intended Use
Device Description
Surgical Technique
Preoperative Planning
Surgical Procedure
System Compatibility
Explant Information
Postoperative Care
Catalog Information
Proper surgical procedures and techniques are the responsibility of the medical
professional. The following guidelines are furnished for information purposes only.
Each surgeon must evaluate the appropriateness of the procedures based on his or her
personal medical training and experience. Prior to use of the system, the surgeon should
refer to the product package insert for complete warnings, precautions, indications,
contraindications and adverse eects. Package inserts are also available by contacting
the manufacturer. Contact information can be found on the back of this surgical
technique and the package insert is available on the website listed.
For information on product availability in your area, please contact your local sales
representative.
1

Introduction
1
chapter
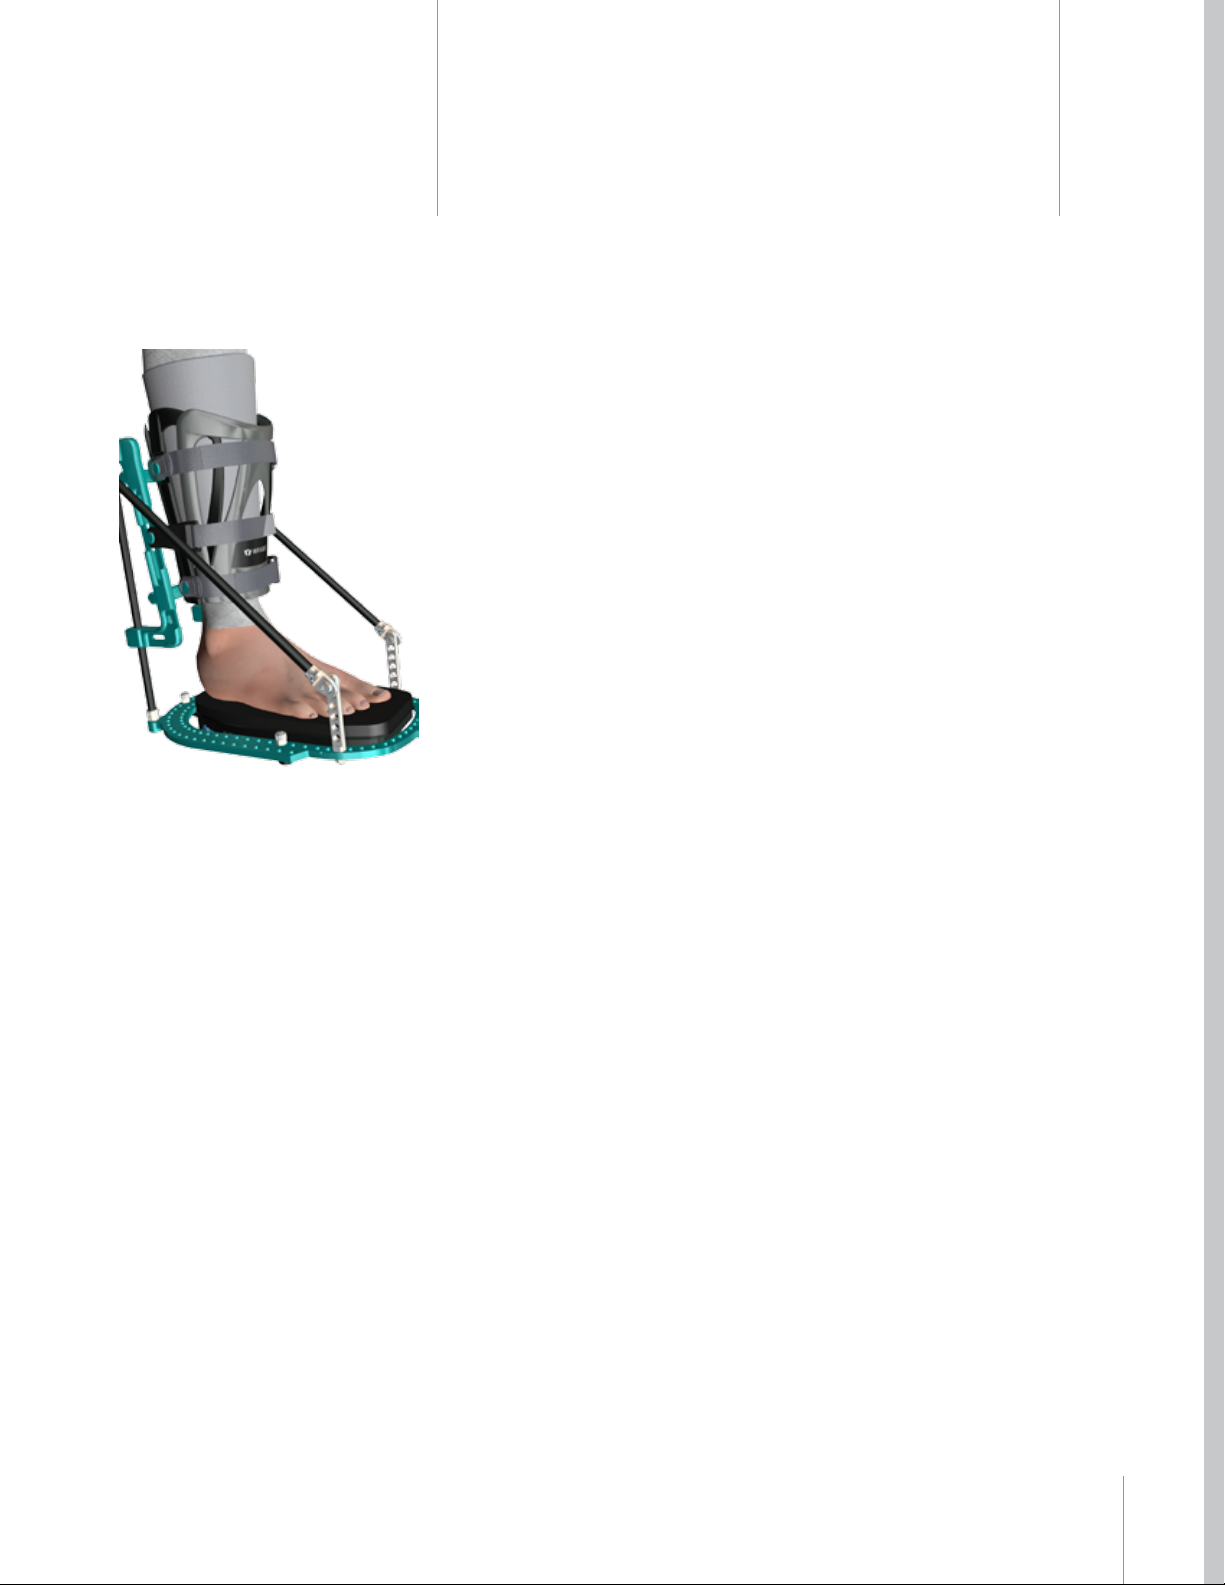
The SIDEKICK® EZ FRAME™ External Fixation System utilizes transosseous thin
wires and is based on the concepts of minimally invasive external fixation.
The system simplifies frame application when compared to traditional ring
fixators by eliminating the need for pins and wires to be placed into the tibia.
A boot is stabilized on the distal leg (tibia) and further stabilized to a distal ring
about the foot with carbon fiber reinforced composite rods that are connected
to the boot and ring respectively. Thin wires are placed into the foot to address
indications, while a frame-boot combination provides stability and support.
Intended Use
Indications for Use
» Triple Arthrodesis
» Isolated Rearfoot Arthrodesis
» Midfoot Arthrodesis
» Comminuted Trauma
» Diabetic Charcot Reconstruction
» Most foot pathology not requiring fixation above the ankle
Contraindications
» Talo-tibial or tibio-calcaneal arthrodesis
» Any pathology requiring absolute rigidity at or above the ankle
» Mentally unt patients
» Poorly vascularized patients
Prior to use of the system, the surgeon should refer to the product package
insert for complete warnings, precautions, indications, contraindications
and adverse effects. Package inserts are also available by contacting the
manufacturer. Contact information can be found on the back of this surgical
technique and the package insert is available on the website listed.
2
Chapter 1 Introduction
Device
Description
The SIDEKICK® EZ FRAME™ was designed to address the need for a simplied
approach to external xation. The system allows for the management of diabetic
Charcot reconstruction, triple arthrodesis, fusion of the midfoot and rearfoot,
challenging comminuted trauma, and most foot pathology not requiring xation
above the ankle. It is a viable tool for ooading and/or immobilizing wounds
associated with diabetic Charcot disease.
The system features transosseous thin wire xation, taking advantage of the
proven benets of minimally invasive external xator concepts. Bone segments
are easily and eectively manipulated for the purposes of midfoot and rearfoot
joint arthrodesis and for fusion of midfoot and rearfoot osteotomies. As with
other external xators, the frame may be applied with or without adjunct internal
xation.
By utilizing a unique combination of total contact casting concepts for the tibia
and thin wire xation in the foot, tibial wires or pins are not needed. By requiring
no pins or wires in the tibia, the SIDEKICK® EZ FRAME™ eliminates complications
associated with tibial xation elements and the time it takes to place these pins
and wires. The tibial boot portion of the frame helps facilitate positioning and
centering of the leg and foot, and the rocker plate helps to align the foot in a
neutral position. This simplies frame application compared to traditional circular
frames.
A rocker-bottom sole and rocker plate is attached to the foot ring. This rocker
plate features a cushioned surface insole upon which the foot can rest during
the healing process after the surgery. This insole (foot pad) may be modied
to accommodate compromised soft tissue as needed, by cutting it to relieve
pressure on compromised soft tissue. The position of the rocker plate can be
adjusted using optional spacers so that the foot is suspended, with no contact or
weight on the plantar surface of the foot. This can be particularly useful following
a ap or skin grafting procedure associated with diabetic Charcot reconstruction.
Spacers are available in two (2) thicknesses (5mm and 10mm).
The sterile boot liner allows for a custom tibial t and is designed to enhance
patient comfort.
The SIDEKICK® EZ FRAME™ is available in Standard and Large size kits.
The SIDEKICK® FREEDOM™ Circular Instrument Kit (RNRCKIT1) should be used
with the SIDEKICK® EZ FRAME™ System.
Replacement Boot Liners (Standard and Large), rocker-bottom soles, and foot
pads are available. The SIDEKICK® EZ FRAME™, and all frame components
(excluding instruments) are intended for single-use only.
chapter
2
Chapter 2 Design Description
3
Surgical
Technique
Preoperative Planning
The proper size xator should be ordered after considering patient anatomy.
Prior to surgery, the surgeon should consider the following while planning:
» Diameter of the distal leg
» Foot width and length
» Tibial length
Surgical Procedure
Example Procedure for Triple Arthrodesis
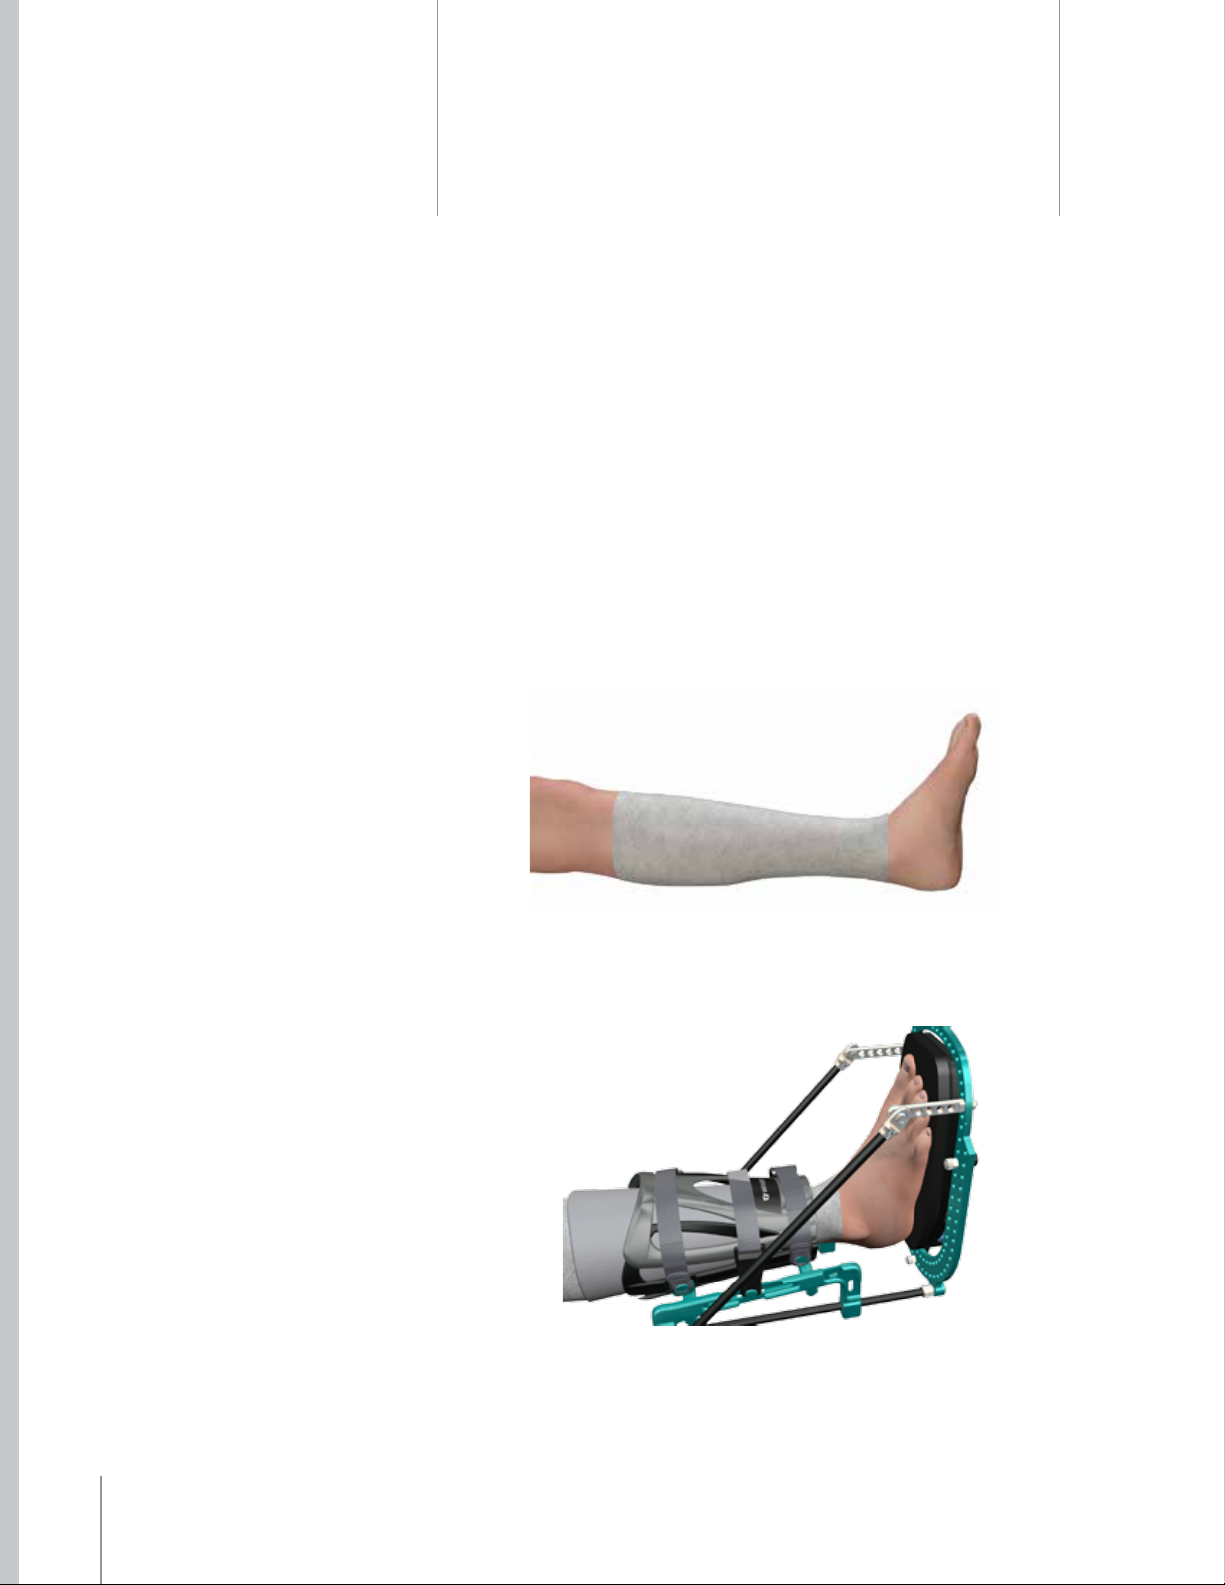
The leg should be prepared to above the knee and wrapped. Cast padding or
Kerlix with an Ace Bandage may be used to prepare the leg as shown.
chapter
3
After the completion of triple arthrodesis with provisional K-wire or screw
xation (surgeon’s preference), closure of all wounds, and application of all drains
as indicated, the foot and leg are placed within the SIDEKICK® EZ FRAME™ Fixator.
The foot should be placed in the center of the rocker plate, and the calf placed
within the boot. The insole may be placed between the foot and the rocker plate.
4 Chapter 3 Surgical Technique
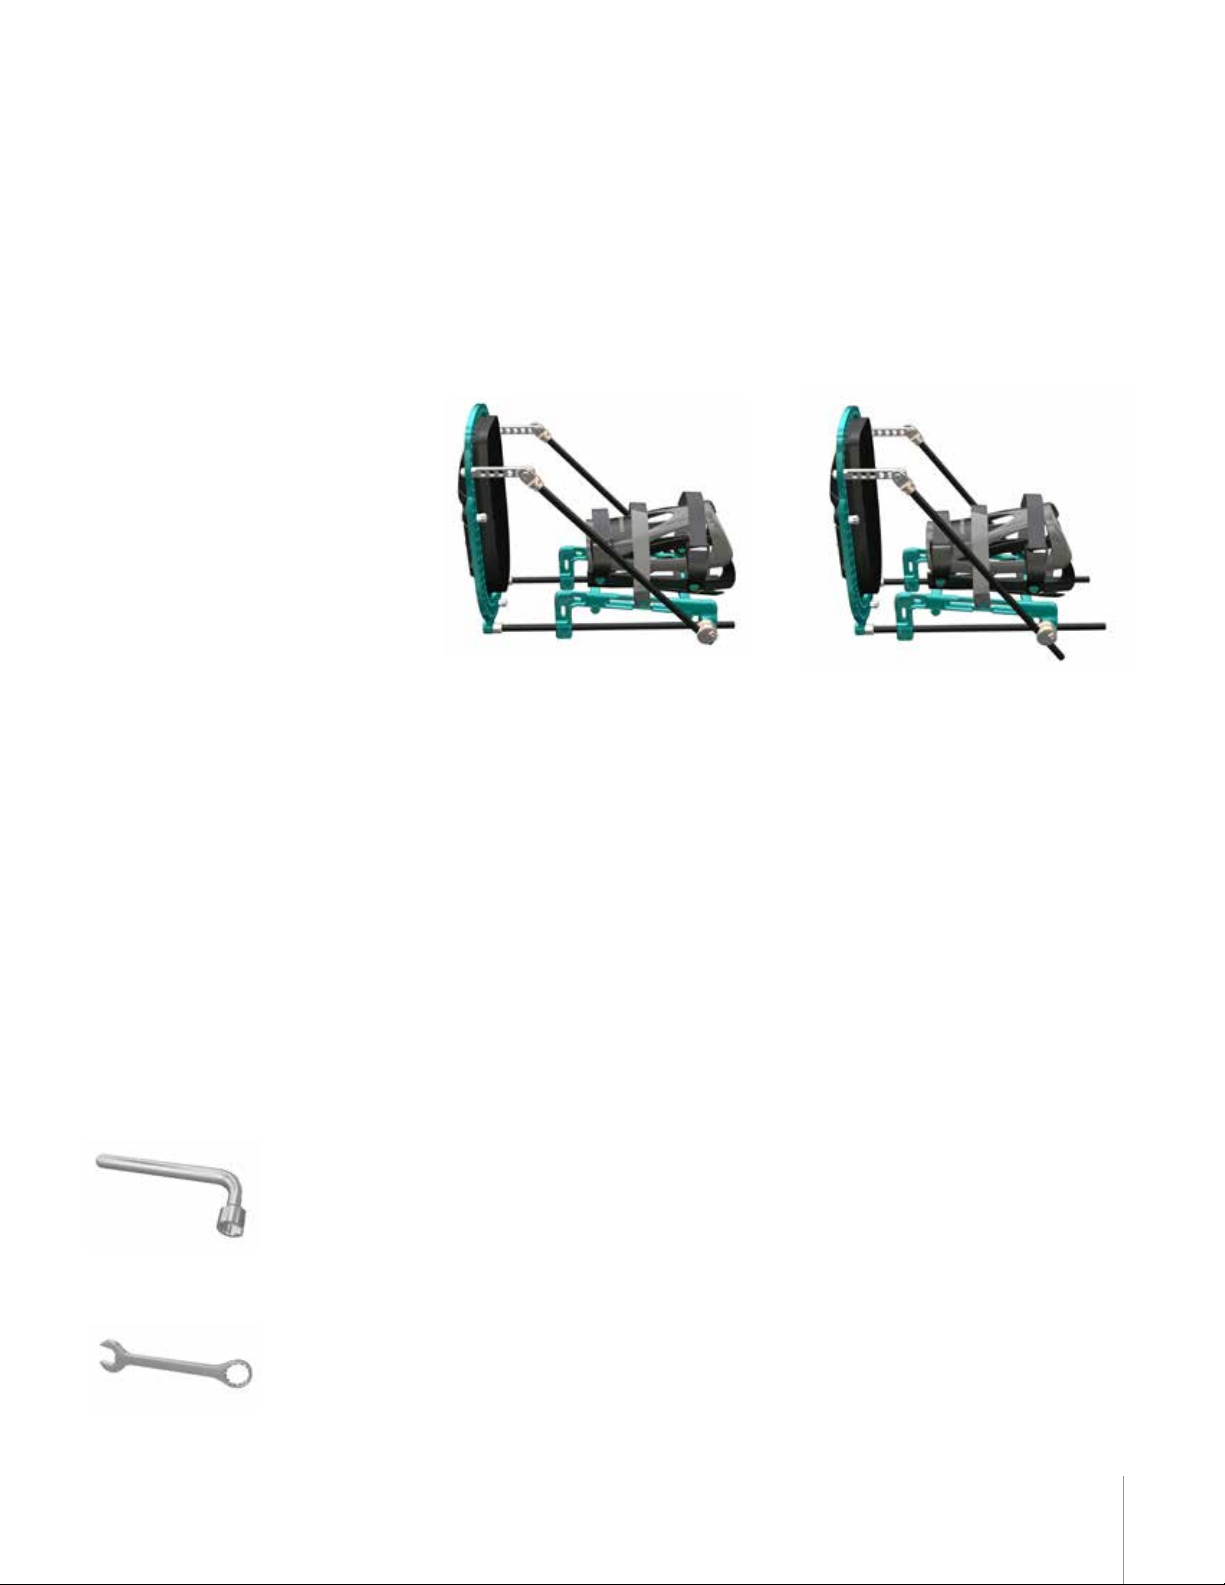
The boot position of the xator can be adjusted. Loosen the four vertical
adjustment locking bolts, the two carbon ber reinforced composite rod clamp
bolts, and the two carbon ber reinforced composite rod connector bolts using
the 10mm wrench (RR301090B SIDEKICK® SLOTTED WRENCH 10mm or the
RR3010 WRENCH 10mm) prior to adjusting the height of the boot assembly.
Once loosened, the boot assembly can be adjusted up or down by sliding the
boot assembly on the carbon ber reinforced rods.
Once adjustments are made to best t patient anatomy, the bolts should
be tightened with the 10mm wrench, locking the frame/boot position.
Subsequently, the surgeon is ready to insert the 2mm Titanium Nitride (TiN)
Tip Wires (#EF002400) across the foot to eventually achieve transosseous
compression of the arthrodesis sites. The 2mm Titanium Nitride (TiN) Tip Wires
(#EF002450) with olive and SIDEKICK® FREEDOM™ 1.8mm wires (#RR18400 and
#RR180400) are also available for use with the system.
When placing transosseous wires, they can be inserted directly through the skin
in a percutaneous manner. When using an olive (stopper) wire, a small 3mm
incision is made in the skin to allow the olive to rest directly against the bone.
Wires are inserted under power, and it is recommended to use a start/stop
technique to minimize potential thermal damage. Once the wire is through both
cortices, the wire can be tapped through the skin on the opposite side manually,
or advanced using the oscillating feature of the hand-held power equipment.
Tapping the wire manually or oscillating the wire may help prevent “wrapping”
soft tissue as the wire penetrates the soft tissue. When placing any percutaneous
xation, be mindful of anatomic safe zones. If a wire causes tension or tenting of
the skin, this tension should be released with a small incision. Utilization of the
uoroscope may be helpful in determining the exact anatomic position.
SIDEKICK® Slotted Wrench 10mm
RR301090B
Wrench 10mm
RR3010
5Chapter 3 Surgical Technique
 Loading...