

Page 1
YOUR NEW BEST FRIEND
USER MANUAL
Item No.: 0805
Page 2
CONTENTS
POWERING THE CHIP SMARTBED™
POWERING THE CHIP SMARTBALL™
POWERING THE CHIP SMARTBAND™
QUICK OVERVIEW - CHIP™
QUICK OVERVIEW - ACCESSORIES
PLAY WITH CHIP™ - CHIP SMARTBALL™
INTRODUCTION
P.1
POWERING CHIP™
P.2
P.3
P.4
P.5
P.6
P.7
PLAY WITH CHIP™
P.8 - P.9
P.10
PLAY WITH CHIP™ - CHIP SMARTBAND™
P.11 - P.12
CUSTOM VOICE COMMAND
P. 13
SLEEP & STANDBY MODE
P.14
APP FUNCTIONALITY
P. 15
Q & A
P. 16
WARRANTY
P.17
Page 3
INTRODUCTION
THANK YOU FOR PURCHASING CHIP™ FROM WOWWEE®!
CHiP™ is an intelligent, affectionate robot pup. With advanced sensors and smart accessories, CHiP™ is
always ready to play! And, CHiP™ aims to please. Praise him when you like what you see and CHiP™ will
learn to favor the behaviors, animations and actions that you prefer. Ready to get started?
Take a few minutes to look through this user manual, and check out the video tutorials and FAQs at
wowwee.com/chip#getting-started.
You can also access a list of tricks, including a full list of Voice Commands, in the app.
NOTE: When using CHiP™, adult supervision is required.
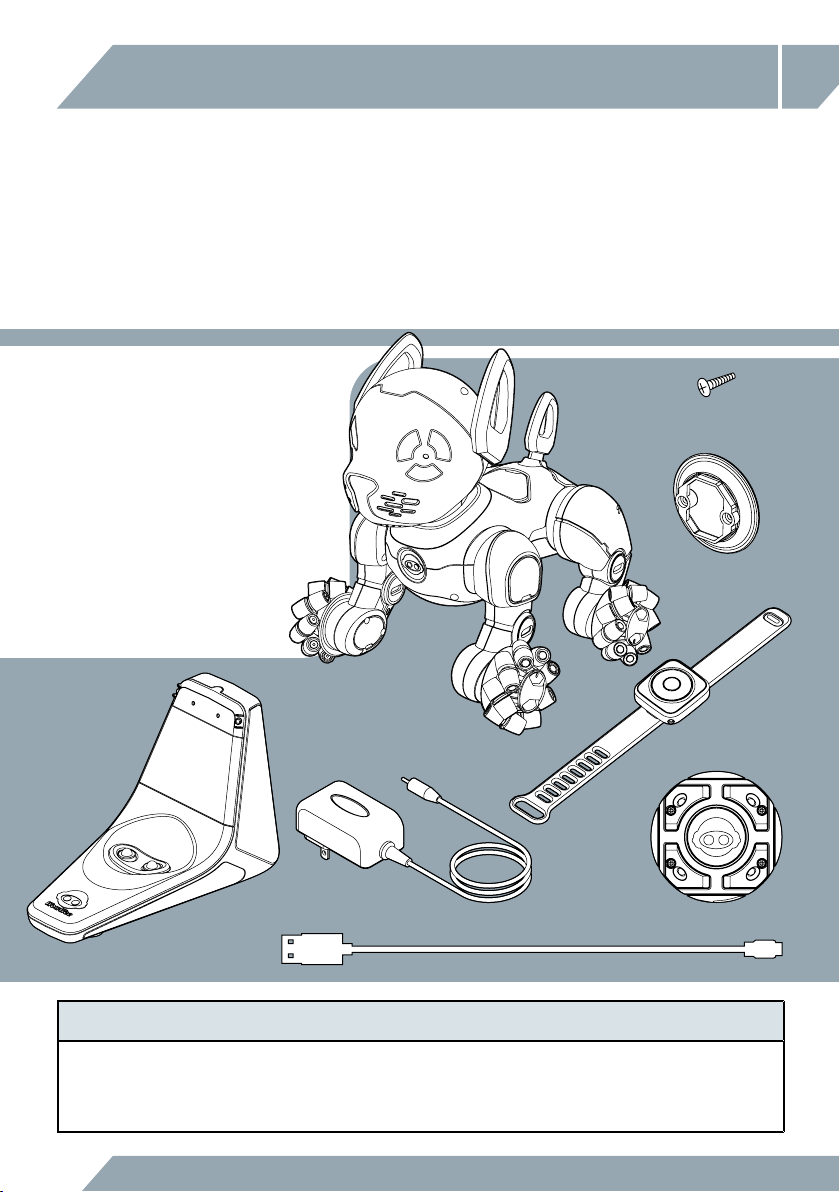
PRODUCT CONTENTS:
1 x CHiP™
1 x CHiP SmartBall™
1 x CHiP SmartBand™
1 x CHiP SmartBed™
4 x Wheel guards
8 x Screws (for wheel guards)
1 x AC/DC power adapter
1 x USB Charge cable
1 x Instruction manual
1 x Quick start guide
8 x Screws
4 x Wheel Guards
1
CHiP™
CHiP SmartBed™ Micro USB Cable
PLEASE NOTE THE FOLLOWING WHEN OPERATING CHIP™
• Do not immerse CHiP™ or any parts in water or any other form of liquid.
• Do not drop, throw, or kick CHiP™ as this might damage mechanical functions.
• Do not leave CHiP™ on surfaces from which he can easily fall.
• Always turn off when not in use.
CHiP SmartBand™
CHiP SmartBall™AC Adaptor
Page 4
2
POWERING CHiP™
USING CHIP™
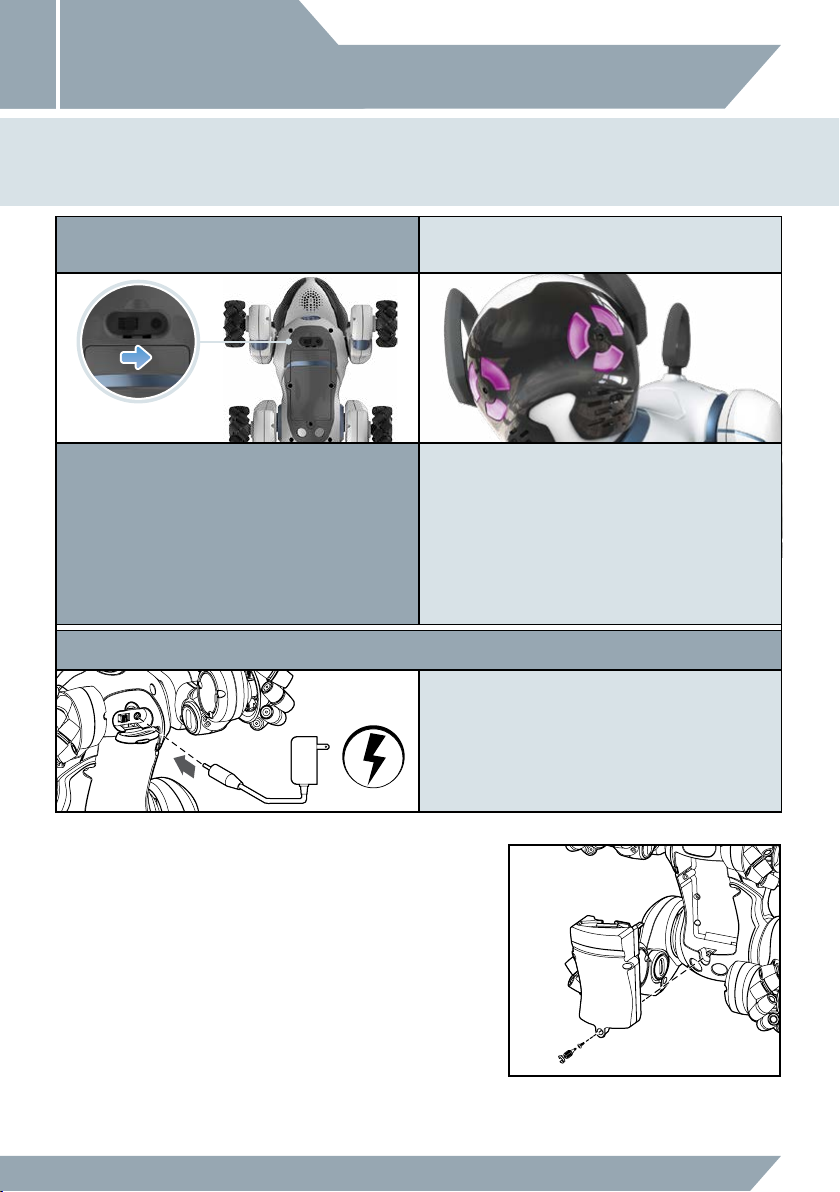
When you first turn on CHiP™, CHiP™ will look surprised and stretch his legs.
TURNING ON CHIP™ LOW BATTERY INDICATORS
ON OFF
To get started with CHiP™, first turn him on by pushing the power
switch located on his chest, to On.
When the batteries grow weak, CHiP™'s eyes will turn PURPLE and
will move very slowly and will make a low battery indication sound.
You can also see current battery levels via the CHiP™ App.
There are 2 ways to recharge CHiP™, either by direct charging or by
using the CHiP SmartBed™.
POWERING CHIP™ - DIRECT CHARGING
Follow the diagram as shown for direct charging.
The CHiP™ product is operated by 1 x 7.4V 1800 mAh
Lithium-ion rechargeable.
INSTALLING OR CHANGING BATTERIES IN THE CHIP™:
1. Using a Phillips screwdriver (not included) remove the
screws on the battery compartment cover.
2. Insert the batteries according to the diagram. Ensure that
the positive and negative polarities match the illustrations
inside the battery compartment.
3. Replace the battery compartment cover and replace the
screws using the screwdriver. Do not over-tighten.
CHIP™ BATTERY DIAGRAM/INS TALLATION
Rechargeable Battery
(included)
NOTE: Do not remove/replace CHiP™ Rechargeable
Battery without first contacting WowWee
support (www.wowweezone.com).
®
Page 5

POWERING THE CHIP SMARTBED™
USING THE CHIP SMARTBED™
When you first plug in the CHiP SmartBed™, CHiP™ will return to it to demonstrate his ability to dock autonomously.
CENTER POSITIVE
POWERING CHIP™ - WITH THE CHIP SMARTBED™
1. Ensure that both CHiP™ and CHiP SmartBed™ are ON and within close proximity (3 meters). CHiP™ will
automatically detect when its power is low, and will drive to CHiP SmartBed™ and recharge; or
2. Hold the Like button on CHiP SmartBand™ while both CHiP™ and CHiP SmartBed™ are within close
proximity. CHiP™ will drive to CHiP SmartBed™ and recharge; or
3. In the case that CHiP™'s power is extremely low and unresponsive to (1) or (2), use the CHiP SmartBed™'s
AC/DC adaptor to directly charge CHiP™.
3
4. When CHiP™’s battery is fully charged, he will stand up to avoid over charging. If you want to call
CHiP™ off his SmartBed before he is fully charged, press and hold the CHiP™ button in the center of
your CHiP SmartBand™.
For optimal tracking, place the CHiP SmartBed™ in a room where CHiP™ would be most often.
CHiP™ will need to physically see the CHiP SmartBed™ before he can locate it.
When the CHiP SmartBed™
is plugged in, it's LED
will turn BLUE.
CHiP's SmartBed™ LED
with turn PURPLE when
CHiP™ is looking for
it, and will remain
PURPLE while CHiP™
is charging.
CHiP™’s eyes will turn PURPLE while he is looking for the CHiP SmartBed™, and
will change to BLUE sleepy eyes when CHiP™ has made contact and is charging
correctly. If CHiP™’s eyes remain purple after sitting, he will attempt to adjust his
position. We do not recommend forcing CHiP™ into a seated position, but you can
help CHiP™ by removing any objects that may be in his way, and/or unplugging
and replugging the charging bed to restart the process.
Page 6
4
POWERING THE CHIP SMARTBALL™
USING THE CHIP SMARTBALL™
When you first turn on the CHiP SmartBall™, CHiP™ will demonstrate his ball handling abilities and play with it.
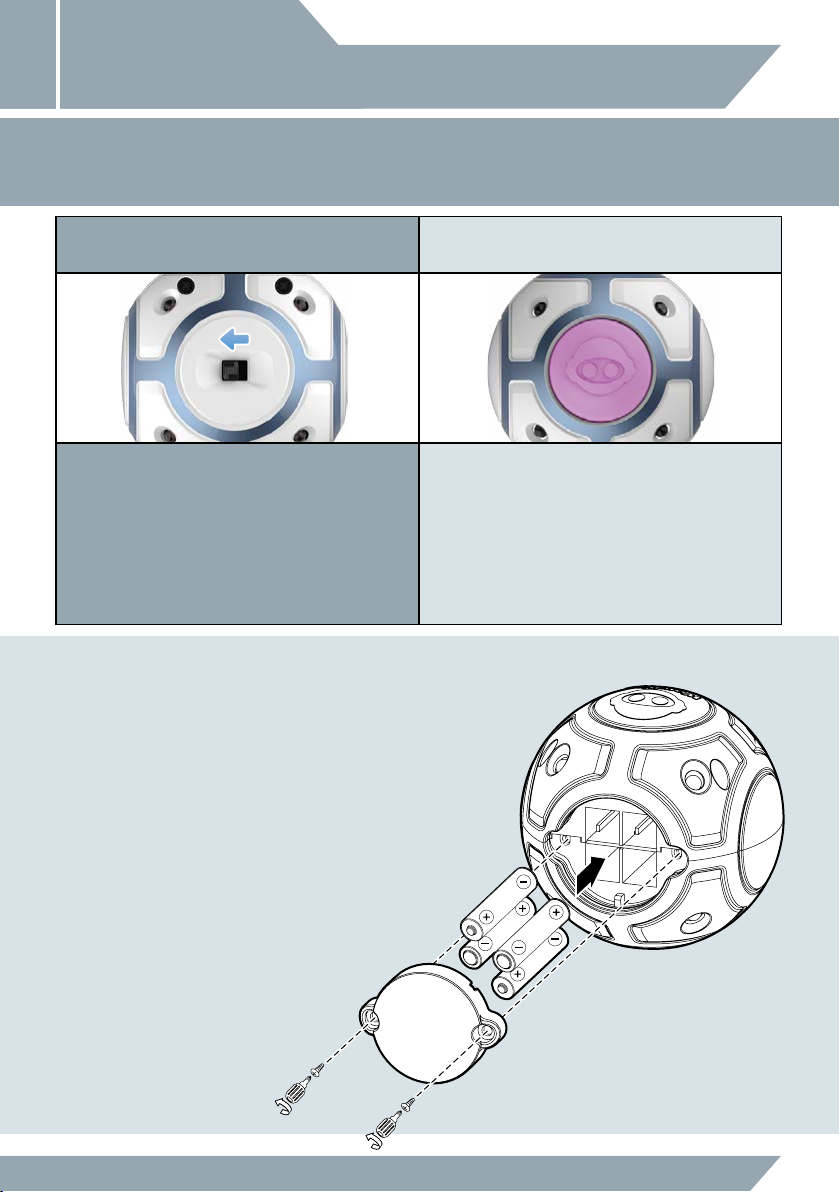
TURNING ON THE CHIP SMARTBALL™ LOW BATTERY INDICATORS
ON OFF
To get started with the CHiP SmartBall™, toggle the power switch to
ON then follow the instructions in the "Playing With CHiP™" section.
USING CHIP™ INSTALLING OR CHANGING
BATTERIES IN THE CHIP SMARTBALL™:
1. Using a Phillips screwdriver (not included) remove
the screws on the battery compartment cover.
2. Insert the batteries according to the diagram. Ensure
that the positive and negative polarities match the
illustrations inside the battery compartment.
3. Replace the battery compartment cover and
replace the screws using the screwdriver. Do not
over-tighten.
When the batteries grow weak, the light on CHiP SmartBall™ will
flash PURPLE and then power down. When this happens, power off
and replace all batteries.
CHIP SMARTBALL™ BATTERY
DIAGRAM / INSTALLATION
4 x “AAA” Size Alkaline Batteries
(not included)
Page 7

POWERING THE CHiP SMARTBAND™
USING THE CHIP SMARTBAND™
When you first power up the CHiP SmartBand™, CHiP™ will respond by tracking and driving towards it.
TURNING ON THE CHIP SMARTBAND™ LOW BATTERY INDICATORS
ON OFF
5
To get started with the CHiP SmartBand™, Press and hold the "CHiP™"
button in the middle of the band for 2 seconds then follow the instructions
in the "Playing With CHiP™" section of this instruction manual.
To power off, press and hold the "CHiP™" button for 4 seconds.
POWERING THE CHIP SMARTBAND™:
1. Plug the Micro USB Cable into the Micro USB port
on the CHiP SmartBand™ and connect to a power
source as indicated in the diagram.
2. Charging is indicated by a flashing PURPLE light.
3. When fully charged, the LED light on the
CHiP SmartBand™ will remain PURPLE (no
longer flashing).
4. Press the center button on CHiP SmartBand™ to
reactivate the band.
IMPORTANT BATTERY INFORMATION
• Use only fresh batteries of the required size and
recommended type.
• Do not mix old and new batteries, different types of batteries
[standard (Carbon-Zinc), Alkaline or rechargeable] or
rechargeable batteries of different capacities.
• Remove rechargeable batteries from the toy before
recharging them.
• Rechargeable batteries are only to be charged under
adult supervision.
• Please respect the correct polarity, (+) and (-).
• Do not try to recharge non-rechargeable batteries.
When the battery grow weak, CHiP SmartBand™ will
flash PURPLE and then power down. When this happens,
recharge CHiP SmartBand™ as indicated below.
DC IN 5V 0.5A
* The CHiP SmartBand™ is operated by 1 x 3.7V 130 mAh
Lithium-ion rechargeable.
• Do not dispose of batteries into fire.
• Replace all batteries of the same type/brand at the same time.
• The supply terminals are not to be short-circuited.
• Remove exhausted batteries from the toy.
• Batteries should be replaced by adults.
• Batteries should be recycled or disposed of as per state and
local guidelines.
Page 8

6
CHIP™ OVERVIEW :
A. LED indicator eyes
B. Tail
C. Omnidirectional wheels
D. Touch sensors
E. IR transmitter
F. Touch sense nose
G. Poseable rubber ears
H. Speaker
I. IR receiver
J. Power switch
K. Direct charge port
L. Charge contacts
QUICK OVERVIEW - CHiP™
J K
G
L
D
D
B
E
A
A
F
H
I
C
Page 9

QUICK OVERVIEW - ACCESSORIES
7
CHIP SMARTBAND™ OVERVIEW:
A. 4-way joypad
B. CHiP™ button
C. Adjustable strap
D. Charging port
C
A
CHIP SMARTBALL™ OVERVIEW:
A. LED indicator
B. Power switch
C. IR sensors
A
B
D
B
C
CHIP SMARTBALL™ OVERVIEW:
A. LED indicator
B. Charge contacts
C. Charging port
B
A
C
Page 10

8
PLAY WITH CHiP™
GETTING STARTED
CHiP™ has omnidirectional wheels, so he can move in all directions – from side to side, left, right, forward,
backward and spin around. Children should be careful when playing with CHiP™’s feet and should not
put their fingers in his wheels. There are four wheel guards included in the CHiP™ package in order to
prevent this. We recommend that parents of younger children install the wheel guards by following the
"Wheel Guard Installation Sheet".
BASIC INTERACTIVE FUNCTION
Once CHiP™ is fully charged, turn him on by pushing the power switch located on his chest, to ON. You can start to interact with him,
even without the app. CHiP™ is quite independent and will move around and react to things, even if you are not sending him commands.
He might even bark to get your attention. Be sure not to leave CHiP™ on a surface from which he can easily fall, such as a countertop, or
near the top of the stairs.
TOUCH RESPONSE
ICON INPUT RESPONSE
Pet Brush CHiP™'s head from front to back or back to front, CHiP™ will lie
Boop (bop on the nose) Tap CHiP™ on the nose and CHiP™ will lick your hand.
Pat - While Standing Tap CHiP™'s head while standing to make CHiP™ sit.
Pat - While Seated Tap CHiP™'s head while seated to make CHiP™ lie down.
Pat - While Lying Down Tap CHiP™'s head while lying down to make CHiP™ stand up.
CHiP™ responds to various kinds of touch. He loves to be stroked on his head or patted on his head.
He also reacts when you touch his nose! Note that he sometimes reacts differently depending on
whether he is standing, sitting or lying down. Take some time to get to know CHiP™!
NOTE: See the"Tricks" section in the CHiP™ App for full list.
down and get excited.
Page 11

PLAY WITH CHiP™
9
MOVEMENT DETECTION
ICON INPUT RESPONSE
Pick CHiP™ up off the ground CHiP™ will act surprised.
Shake About (while CHiP™ is in your
hands)
Spin around on the spot (with CHiP™ in
your hands)
Kiss or touch CHiP™'s nose (while CHiP™
is in your hands)
VOICE COMMANDS
ICON INPUT RESPONSE
CHiP™ can detect when you are moving him around. He will jump forward if you push him from
the front and if you push him from the back, he might look a little annoyed. If you push him from
side to side, he will also react! CHiP™ also knows when he has been picked up. If you shake
him too much, he will become dizzy. But he does like to spin around! Hold him and spin around
and he will be happy.
NOTE: See the"Tricks" section in the CHiP™ App for full list.
CHiP™ will act dizzy.
CHiP™ will be very happy!
CHiP™ will show his affection.
CHiP™ can hear you just like a real dog. To get his attention, all you have to do is say
“Hey CHiP” or "Hello CHiP"
Once his eyes turn green and you hear him go "Woof", you can give him a command. It’s
really important to speak loudly, clearly, and to pronounce the words properly. Otherwise,
CHiP™ might not respond.
NOTE: See the"Tricks" section in the CHiP™ App for a full list of Voice Commands.
Voice Command - Sit Down! Say "Sit Down!" to make CHiP™ sit.
Voice Command - Let's Dance! Say "Let's Dance!" and CHiP™ will dance to his favorite song.
Voice Command - Wanna Play!
Voice Command - Fetch!
Voice Command - Love You! Say "Love You!" and CHiP™ will show his affection.
Voice Command - Yoga! Say "Yoga!" and CHiP™ will show you some cool yoga moves.
Say "Wanna Play?" and CHiP™ will look for and play with the CHiP SmartBall™.
NOTE: You will need a connected CHiP SmartBall™.
Say "Fetch!" and CHiP™ will look for the CHiP SmartBall™ and bring it to you.
NOTE: You will need a connected CHiP SmartBall™ and
CHiP SmartBand™.
Page 12

10
PLAY WITH CHiP™ - CHiP SMARTBALL™
CHiP™ loves his accessories, and you don’t need the app to enjoy using them to play with him! He can
respond to his CHiP SmartBall™ and to commands sent from the CHiP SmartBand™, when they are in range
and powered up.
The accessories use both Bluetooth
®
and IR sensors. He can typically detect the CHiP SmartBall™ and the
CHiP SmartBand™ within about 10 feet (3 meters). If you are not in range, CHiP™ will miss the command.
Even if you are close, it is better if you are in the same room as CHiP™ when you play with him.
GETTING STARTED
The CHiP SmartBall™ is CHiP™’s favorite toy. The CHiP SmartBall™ comes equipped with a number of IR sensors so that CHiP™ can find it easily.
You can safely roll the ball, even on a hard surface and CHiP™ will chase after it!
When you first turn it on, CHiP™ will get excited. The default game mode is chase. CHiP™ will nudge his ball all over the place, and pant
and bark in excitement!
When you’re ready to play with him, grab your CHiP SmartBand™!
TURNING ON
To turn the CHiP SmartBall™ on, simply push the power button to ON. The CHiP SmartBall™ will flash a couple of times as it connects
to CHiP™. Watch him react! A blinking light means the CHiP SmartBall™ is on, and a solid blue light indicates that CHiP™ and the
CHiP SmartBall™ are connected.
NOTE: When you are playing with CHiP™, choose a safe indoor location. Do not play on an elevated surface or near the top of the stairs,
where CHiP™ or the CHiP SmartBall™ could easily fall.
DIFFERENT WAYS TO PLAY
WANNA PLAY
SOCCER
FETCH
NOTE: After 5 minutes the CHiP SmartBall™ will enter Sleep Mode. To reactivate it, turn if off and then on again using the power switch.
It's time to play! CHiP™'s eyes will turn yellow and he will chase the ball around and keep
himself entertained.
Activa ted by:
It's time for a game of catch/soccer! CHiP™’s eyes will turn yellow and then white to let you know he’s
getting set. Once they return to yellow it means he’s ready. Roll the ball and CHiP™ will hit it back to you!
Remember to wait for his eyes to turn solid yellow before rolling it again.
Activa ted by:
It's time to play fetch! CHiP™s eyes will turn yellow which means he’s ready to get started. Roll the ball
and CHiP™ will chase it down. CHiP™ tracks the CHiP SmartBall™ best when he can properly see the
IR sensors on the ball. If CHiP™ stops moving, it’s probably because the ball is rolling on a side where
there no sensors. If this happens, try giving the ball a little kick and CHiP™ should pick it up again.
Once CHiP™ gets it, his eyes will turn teal blue which means it’s time for him to bring it back. Remember,
make sure your CHiP SmartBand™ is in range and that CHiP™ can see it so that he can bring it back
quickly and get ready for another game!
Activa ted by:
NOTE: Requires the CHiP SmartBand™.
Voice Recognition: "Hey CHiP" then "Wanna Play!".
CHiP SmartBand™: Pressing Exclamation Mark button.
Voice Recognition: "Hey CHiP" then "Fetch!".
CHiP SmartBand™: Pressing CHiP™ Head button.
Page 13

PLAY WITH CHiP™ - CHiP SMARTBAND™
GETTING STARTED
The CHiP SmartBand™ is a key part of the CHiP™ experience. When you wear it, you and CHiP™
are connected.
11
PAIRING THE CHIP SMARTBALL™ AND
WEARING THE CHIP SMARTBAND™
CHIP SMARTBAND™
The first time you use
CHiP™, you might have
to pair him with the
CHiP SmartBall™ and
CHiP SmartBand™. To
do so, turn it on and
then hold it on CHiP™’s
back for a few seconds.
The LED will stop flashing
once the item is paired
with CHiP™. It is
advisable to try pairing
the items with CHiP™
one at a time.
To put on the CHiP SmartBand™,
push the strap through the
large loop and then tighten the
CHiP SmartBand™ comfortably
around you wrist. Fasten it by
pushing the blue catch through
one of the smaller loops on
the strap.
CHIP SMARTBAND™ LAYOUT
There are 2 ways to use each button on your CHiP SmartBand™, either through a light tap, or by pushing and holding it.
The CHiP™ Butt on:
The CHiP™ button is like almost like saying “heel”.
TAP
HOLD
When you tap the CHiP™ button, it means you want CHiP™ to stop, look and listen.
Whether CHiP™ is following you, chasing a ball, finding his bed, or doing a dance.
- If you want him to stop what he’s doing immediately and listen up, tap the CHiP™ button.
When you hold the CHiP™ button your band turns into a remote control. Think of the buttons
like a joystick. The buttons indicate forward/backward/left and right. You can also get
CHiP™ to spin if you hit the empty spaces on the band.
NOTE: Simply hold the CHiP™ button again for 2 seconds to exit Drive Mode.
The Location Pin Butt on:
Follow Me CHiP™!! The Location Pin button serves two functions: come and follow.
TAP
HOLD
NOTE: Pressing the CHiP™ button will stop CHiP™ from coming to / following you.
When you tap the Location Pin button on the band, CHiP™’s eyes will turn teal blue, and
he will come right over to you. Once he’s close, tap the CHiP™ button to make him stop in
place. A key hint here is to always have the light on the band pointed at CHiP™’s eyes. If
ever it appears as though CHiP™ isn’t listening, make sure CHiP™ is in range, and that his
eyes can properly see the light on your CHiP SmartBand™.
When you hold the Location Pin button on the band, CHiP™’s eyes will turn teal as well
only this time he’ll follow you around. Again, it’s key to make sure the light on the band is
visible to CHiP™’s eyes. If ever you want to leave follow-me mode, all you need to do is
hit the CHiP™ button.
Page 14

12
The Like Butt on:
The Like button is how CHiP™ learn’s what reactions you like best.
NOTE: For the full list of inputs, check out the "Playing with CHiP™" section in the Manual or the "Tricks" section in app.
The Exclamation Mark But ton:
The Exclamation Mark button means its playtime!
PLAY WITH CHiP™ - CHiP SMARTBAND™
TAP
HOLD
TAP
For every CHiP™ input, there’s about 3-5 outputs. Hitting the Like button means the outputs
will become less randomized and more catered to the one you like best.
For example, when you touch CHiP™’s snout, CHiP™ will elicit three reactions- a kiss,
a pant, and a growl. Hit like for your favorite and CHiP™ will react that way more
consistently moving forward.
When you hold the Like button CHiP™’s eyes will turn purple which means he’s looking for
his bed so that he can recharge. CHiP™ finds his bed best when he’s lined up with the front
of the bed as this is where the sensors emit the strongest signal from. If CHiP™ looks he’s
doing a shimmy, it means he’s a little too far from the bed to track it. Try moving CHiP™
a little closer to the bed so that he can get some rest!
Tap on the Exclamation Mark button will activate Voice Recognition. You can skip the
“Hey CHiP” step and go right to the command. CHiP™'s eyes will turn GREEN and be
ready for a command. i.e. "Sit Down".
HOLD
NOTE: It’s important to make sure the CHiP SmartBall™ is turned on before hitting the button or it won’t elicit any reaction from CHiP™. For
the ins and outs of playtime, See "Playing With CHiP™ - CHiP SmartBall™" section in the Manual.
The CHiP™ Head Butt on:
The CHiP™ Head button means party time!
TAP
HOLD
NOTE: It’s important to make sure the CHiP SmartBall™ is turned on before hitting the button or it won’t elicit any reaction from CHiP™.
For the ins and outs of playtime, See "Playing With CHiP™ - CHiP SmartBall™" section in the Manual.
Holding the CHiP™ Exclamation Mark button will trigger Soccer Mode, CHiP™'s eyes will
turn YELLOW and will be ready to play with the CHiP SmartBall™.
Tap on the CHiP™ Head button and CHiP™ will dance to his favourite song, he will move
and bark with excitement!
Holding the CHiP™ Head button will trigger Fetch Mode, CHiP™'s eyes will turn YELLOW
and will be ready to play with the CHiP SmartBall™.
EDITING THE "HOLD" BUTTON FUNCTIONS
This feature allows you to remap or select new functions for each of the buttons on the CHiP SmartBand™.
Learn more through the CHiP™ App and its tutorials.
NOTE: If you find the CHiP Smar tBall™ is connected to CHiP™ (LED is on and not flashing) but that CHiP™
is unable to track or find the CHiP SmartBall™, please try moving it closer, or rolling it near CHiP™.
Last but not least, you can check your CHiP SmartBand™ battery levels in the CHiP™ App.
When it gets low on battery, charge it up with the included micro USB cable.
For more info on charging, please see "Powering CHiP™ And His Accessories" section in the
Instruction Manual.
Page 15

CUSTOM VOICE COMMAND
NAMING YOUR CHIP™
To rename your CHiP™, you’ll need to open up the CHiP™ App.
In the settings menu, hit the button that reads “Change Voice Command”. This will prompt a screen that
asks you to record your own voice instead. Tap the green microphone to begin. Be sure to pick
a name with two syllables. This will make it easier for CHiP™ to decipher, and he’ll be more responsive
towards it as a result.
13
Page 16

14
SLEEP & STANDBY MODE
ENERGY SAVING MODES
CHiP™ comes equipped with multiple energy saving options to stay active and conserve energy.
See below for explanation for each.
IDLE MODE
CHiP™ loves human interaction, if you do not give CHiP™ any attention for approximately 2 minutes, CHiP™ will try to get your attention.
After approximately 10 minutes, CHiP™ will start exploring the area (for 1 minute) to see what is around. He will keep this routine for up to
30 minutes before he enters Standby Mode.
STANDBY MODE
After approximately 30 minutes of no interactions, CHiP™ will get bored and enter Standby Mode to conserve energy.
During Standby Mode, CHiP™ will lie down and not make any sounds. His eyes will light up in blue but only the bottom segments.
You can wake him by simply sending any commands and CHiP™ will spring back into action.
CHARGING MODE
When CHiP™'s energy is below 10% (CHiP™'s eyes will become PURPLE) CHiP™ will look for the CHiP SmartBed™ and recharge. You can
also send CHiP™ to his bed via the CHiP SmartBand™ or the App.
To wake CHiP™ while he is recharging, give him a command by pressing and holding the CHiP™ Button in the middle of the
CHiP SmartBand™. Note that if you have not used the CHiP SmartBand™ for 5 minutes, it might have gone into Sleep Mode.
To activate the CHiP SmartBand™, press and hold the CHiP™ button for about 4 seconds.
SLEEP MODE
CHiP™ may leave the CHiP SmartBed™ from time to time once fully charged. CHiP™ may remain near the CHiP SmartBed™ in a low
power consumption state waiting for you to come home. In some cases, to prevent over cycling his battery, he will go into Sleep Mode.
You can wake CHiP™ up by sending a command from the CHiP SmartBand™, Alternatively, you can always wake CHiP™ up by turning
CHiP™ off and on.
NOTE: CHiP™ may not find the CHiP SmartBed™ if its out of range (not in the same room). In this event, CHiP™ may be completely out of
batteries and require manual charging. To manually charge CHiP™, connect the power adaptor that is normally connected to the
CHiP SmartBed™, and connect this directly to CHiP™ instead.
Page 17

APP FUNCTIONALITY
THE CHIP™ APP COMPATIBILITY
You will need to download the
CHiP™ App to get the most of CHiP™,
although there are some functions that
you can access without the app.
The app is compatible with both iOS and
Android and is available on the Apple
App Store and the Google Play™ Store,
Amazon Appstore™. Search for the
CHiP™ App and then download it to
CHiP™ works with iPhone
and iPod touch® running iOS 9 or
later. The device must also support
Bluetooth® Smart (also known as
Bluetooth® Low Energy).
®
CHiP™ also works with most
Bluetooth
®
Smart Ready (BLE)
phones and tablets running
Android™ 4.4.4 (KitKat) or later.
your smart device.
APP FUNCTIONS
The CHiP™ App is an important piece to the CHiP™ experience. We push updates through the
app all the time. In order to make sure your CHiP™ is full of all the latest and greatest features,
make sure your app is up to date. There are lots of fun functions built into the app.
See full list below:
®
, iPad®
15
HOME SCREEN
Check CHiP™'s level of
happiness / hungriness / and
energy level
DRIVE SCREEN
You can take direct control of
CHiP™'s movements from your
Smart Device.
TRICKS
Discover all of the different sensor
events CHiP™ can react to.
It covers touch sensors and
voice commands. If ever you
forget how to make CHiP™
do a trick, check in here.
TREATS
To feed CHiP™ a snack, press
and hold any snack icon and
flick it up off the screen.
Page 18

16
Q & A
Q: IS MY TABLET OR PHONE
COMPATIBLE WITH CHIP™?
A: CHiP™ can be controlled using our free app(s) available for compatible smart devices featuring
Bluetooth® Smart technology. These app(s) are available on iTunes® or the Google Play™ store.
iOS devices: All iPhone
are compatible.
Android™ devices: The app is compatible with most Bluetooth
Bluetooth® Low Energy) devices running Android™ 4.4.4 (KitKat) or later. The easiest way to
test compatibility before purchasing the product is to attempt to download the CHiP™ App.
If your device is not compatible, Google Play™ will not allow you to see, download, or
install the app. If the app can download, install, and run correctly on your device, we expect
full compatibility.
®
, iPod® and iPad® devices (excluding iPad® 2) which run iOS 9 or later
®
Smart Ready (also known as
Q: I CANNOT ACCESS GOOGLE PLAY™ ON MY ANDROID™ DEVICE, HOW CAN I DOWNLOAD THE APPLICATION?
®
A: Try downloading the application on the Amazon AppStore™. All WowWee
cannot use Google Play™.
applications are officially provided there for users who
Q: WHEN I T RY TO DOWNLOAD THE CHIP™ APP ON MY ANDROID™ PHONE, IT SAYS IT'S INCOMPATIBLE WITH MY DEVICE.
®
A: CHiP™ only works with devices which are Bluetooth
Generally our toys are expected to be compatible with most Android™ phones or tablets that are Bluetooth
Bluetooth® Low Energy) and running Android™ 4.4.4 (KitKat) or later.
The easiest way to test CHiP™ app compatibility on your Android™ device is to attempt to download the CHiP™ App. If your device is
not compatible, Google Play™ will not allow you to see, download, or install the app. If the app can download, install, and run correctly
on your device, we expect full compatibility.
Q: MY CHIP™ WON’T SHOW UP IN THE APP WHEN I TRY
TO CONNECT.
A: Make sure your CHiP™ is fully charged and is turned on, then
close the app and switch Bluetooth® on/off in your device
settings. If you're still having problems, try restarting your
device completely.
Q: MY CHIP™ TURNS ON , PLAYS A SOUND, THEN SWITCHES OFF
AND/OR CHIP™ TURNS OFF UNEXPECTEDLY DURING PLAY.
Smart Ready and running compatible operating systems.
Q: MY CHIP™ DISCONNECTS OF TEN AND/OR SEEMS TO
PAUSE OR RUN SLOW.
A: This is most likely caused by Bluetooth® interference. Ensure that
there are no other Bluetooth® devices connected or switched on
(especially audio devices), as these can cause interference which
can cause issues. If you are still having problems try turning your
device's WiFi off to reduce interference.
®
Smart Ready (also known as
Q: CAN I USE CHIP™ WITHOUT A COMPATIBLE SMART DEVICE?
A: CHiP™'s battery might be low or flat; try placing CHiP™
on the CHiP SmartBall™ for charging. If successful,
the CHiP SmartBall™'s LED indicator light will light up. If light
stays off, make sure nothing is interfering with the contacts,
then re-adjust CHiP™'s position and try again. Alternatively,
charge CHiP™ via the direct charge port.
Q: CAN I CONNECT ADDITIONAL ACCESSORIES TO CHIP™? Q: HOW DO I PAIR ANOTHER CHIP SMARTBAND™ TO CHIP™
A: Currently CHiP™ can support one CHiP SmartBall™, one
CHiP SmartBed™, and up to two CHiP SmartBands™. Future
updates may support additional accessories.
Q: CHIP™ DOES NOT A UTOMATICALLY GO TO
CHIP SMARTBALL™ TO RECHARGE WHEN BATTERIES
ARE LOW.
A: Ensure that CHiP™ has a clear line of sight to the
CHiP SmartBed ™. CHiP™ cannot navigate between rooms.
A: Yes. CHiP™ is designed to be used without a smart device
for normal play. For special functions or receiving rewards,
a compatible smart device is required.
OR REPLACE A LOST ACCESSORY?
A: Refer to the app or website.
Q: DOES CHIP™ WORK OUT SIDE OR IN BRIGHT SUNLIGHT?
A: CHiP™ is designed to work only indoors. Bright sunlight or
Ultra-Violet light can interfere temporarily with CHiP™'s functions.
• For a more in-depth FAQ, please refer to http://wow wee.com/CHiP™
Page 19

WARRANTY
WowWee® 90-Day Limited Warranty
WowWee’s warranty obligations for CHiP™ (this “Product”) are limited to the terms set forth below.
WowWee Group Limited (“WowWee”) warrants to the original end-user purchaser that this Product will be free from defects in materials and
workmanship under normal use for a period of 90 days from the date of retail purchase (the “Warranty Period”). This warranty is extended
only to the original end-user purchaser of a new product that was not sold “as is”.
If a defect arises:
(1) you may within 30 days from the date of retail purchase (or such other period specified by the return policies of the place of purchase)
return this Product to the place of purchase, together with the original proof of purchase and either the original box or the UPC code label
from the box, and this Product will be replaced or, in the event that a replacement for this Product is not available at the place of purchase,
either a refund of the purchase price for this Product or a store credit of equivalent retail value will be provided; or
(2) you may after the day that is 30 days from the date of retail purchase (or such other period specified by the return policies of the place of
purchase) and within the Warranty Period contact WowWee Customer Support to arrange for the replacement of this Product. In the event that
a replacement for this Product is not available this Product will be replaced by WowWee with a product of equivalent or greater retail value.
Not with standing the foregoing terms of this warranty, WowWee reserves the right at all times, at its sole option and discretion,
to refund to you the purchase price paid by you for this Product in full and final settlement of WowWee’s obligations under this warranty.
A purchase receipt or other proof of the date of retail purchase and purchase price is required in order to claim the benefit of this warranty.
If this Product is replaced, the replacement product becomes your property and the replaced Product becomes WowWee’s property. If the
place of purchase refunds the purchase price of this Product or issues a store credit of equivalent retail value, this Product must be returned to
the place of purchase and becomes WowWee’s property. If WowWee refunds the purchase price of this Product, this Product must be returned
to WowWee and becomes WowWee’s property.
EXCLUSIONS AND LIMITATIONS
This warranty covers the normal and intended use of this Product. This warranty does not apply: (a) to damage caused by accident, abuse,
unreasonable use, improper handling and care or other external causes not arising out of defects in materials or workmanship; (b) to damage
caused by service performed by anyone who is not an authorized representative of WowWee; (c) to any hardware, software or other add-on
components installed by the end-user; (d) if this Product has been disassembled or modified in any way; (e) to cosmetic damage, including
but not limited to scratches, dents or broken plastic, or normal wear and tear.
THIS WARRANTY GIVES YOU SPECIFIC LEGAL RIGHTS AND YOU MIGHT ALSO HAVE OTHER RIGHTS THAT VARY FROM STATE TO STATE.
WOWWEE’S RESPONSIBILITY FOR PRODUCT DEFECTS IS LIMITED TO THE REPLACEMENT OF THIS PRODUCT OR THE REFUND OF THE
PURCHASE PRICE FOR THIS PRODUCT. ALL EXPRESS AND IMPLIED WARRANTIES, INCLUDING BUT NOT LIMITED TO ANY IMPLIED WARRANTIES
AND CONDITIONS OF MERCHANTABILITY AND FITNESS FOR A PARTICULAR PURPOSE, ARE LIMITED IN TIME TO THE TERM OF THIS LIMITED
WARRANTY. NO WARRANTIES, WHETHER EXPRESS OR IMPLIED, WILL APPLY AFTER THE EXPIRATION OF THE LIMITED WARRANTY PERIOD.
If any term of this warranty is held to be illegal or unenforceable, the legality or enforceability of the remaining terms shall not be affected
or impaired.
EXCEPT AS PROVIDED IN THIS WARRANTY AND TO THE EXTENT PERMITTED BY LAW, WOWWEE IS NOT RESPONSIBLE FOR DIRECT,
SPECIAL, INCIDENTAL OR CONSEQUENTIAL DAMAGES HOWSOEVER CAUSED RESULTING FROM BREACH OF WARRANTY OR
CONDITION OR UNDER ANY OTHER LEGAL THEORY, INCLUDING BUT NOT LIMITED TO LOSS OF USE. THE FOREGOING LIMITATION
SHALL NOT APPLY TO DEATH OR PERSONAL INJURY CLAIMS, OR ANY STATUTORY LIABILITY FOR INTENTIONAL AND GROSS
NEGLIGENT ACTS AND/OR OMISSIONS.
SOME STATES DO NOT ALLOW THE EXCLUSION OR LIMITATION OF INCIDENTAL OR CONSEQUENTIAL DAMAGES, OR LIMITATIONS
ON HOW LONG AN IMPLIED WARRANTY LASTS, SO THESE LIMITATIONS MIGHT NOT APPLY TO YOU.
Valid only in U.S.A.
17
Page 20

Manufactured and distributed by © 2015 WowWee Group Limited.
Product names, designations, and logos are trademarks or registered
trademarks of WowWee Group Limited. All rights reserved.
Customer Service Website: www.wowweezone.com
We recommend that you retain our address for future reference.
Product and colors may vary.
Packaging printed in China.
WARNING! This product is not suitable for children under 3 years
because of small parts - choking hazard.
Apple, the Apple logo, iPhone, iPad, iPad mini, iPad Air, and iPod
touch are trademarks of Apple Inc., registered in the U.S. and other
countries. App Store is a service mark of Apple Inc., registered in the
U.S. and other countries.
Android and Google Play are trademarks of Google Inc.
Amazon and Amazon Appstore are trademarks of Amazon.com, Inc.
MADE IN CHINA
CAUTION
Changes or modifications not expressly approved by the party
responsible for compliance could void the user’s authority to operate
the equipment.
NOTE
This equipment has been tested and found to comply with the limits for
a class B digital device, pursuant to part 15 of the FCC rules. These
limits are designed to provide reasonable protection against harmful
interference in a residential installation. This equipment generates,
uses and can radiate radio frequency energy and, if not installed
and used in accordance with the instructions, may cause harmful
interference to radio communications.
However, there is no guarantee that interference will not occur
in a particular Installation. If this equipment does cause harmful
interference to radio or television reception, which can be determined
by turning the equipment off and on, the user is encouraged to try and
correct the interference by one or more of the following measures:
• Reorient or relocate the receiving antenna
• Increase the separation between the equipment and receiver
• Connect the equipment into an outlet on a circuit different from that
to which the receiver is connected
• Consult the dealer or experienced radio/TV technician for help
This Device complies with Part 15 of the FCC Rules. Operation is
subject to the following two conditions:
(1) This device may not cause harmful interference, and
(2) This device must accept any interference received,
including interference that may cause undesired operation.
This device complies with Industry Canada Licence-exempt RSS-210.
Operation is subject to the following two conditions:
(1) This device may not cause interference, and
(2) This device must accept any interference, including interference
that may cause undesired operation of the device.
WARNING! This equipment may experience difficulty and / or
memory loss when subjected to any electrostatic
discharge, radio frequency interference, or sudden
power surge / interruption. The user is encouraged
to reset the equipment should any of these occur.
WowWee Group Limited
Energy Plaza, 301A-C
92 Granville Road
T.S.T. East, Hong Kong
WowWee Canada Inc.
3700 Saint Patrick Street,
Suite 206,
Montreal, QC, H4E 1A2, Canada
For these purposes, the party responsible is:
WowWee USA Inc.
7855 Fay Avenue, Suite 310
La Jolla CA, USA 92037
1-800-310-3033
For more in-depth instructions, please refer to
http://wow wee.com/CHiP™
For warranty information, please visit
http://wow wee.com/information/warranty
0805US02TOP_IML
 Loading...