

WowWee Cinemin Slice User Manual
User manual
Guide d’utilisation
Manual del usuario
Item|Article|Articulo 8417


Table of Contents
EN
Chapter 1: At a glance 6
Main unit (back) 6
Main unit (front) 6
Remote controller 7
Accessories 7
Included 7
Chapter 2: Getting started 8
Power 8
Remote controller battery 8
Plugging in 8
Power status 8
Connections 9
Docking 9
Connections 10
Ports 10
Playing Content 10
Unit controls 11
ON/OFF 11
Select 11
Focus 11
Volume 11
Remote controller 12
ON/OFF 12
Orientation 12
Remote controller 13
Volume 13
Play/Pause/Stop 13
Back & Rewind/Next & Fast Forward/Repeat 13
Scrolling 13
Select 13
Menu 13
Chapter 3: Usage tips 14
Image projecting 14
Signal 14
Projection size 14
Handling 15
Cleaning 15
Brightness 15
Warmth 15
Closing the docking platform 15
Chapter 4: Technical details 16
Specications 16
Important safety information 17
Intended use statement 17
Warnings and cautions 17
Important battery information 17
Compliance 18
CE statement 18
RoHS statement 18
FCC statement 18
Chapter 5: Further information 19
Connect 19
Support 19
Warranty 20

Table des matières
FR
Chapitre 1 : Aperçu 21
Dispositif principal (arrière) 21
Dispositif principal (avant) 21
Télécommande 22
Accessoires 22
Compris 22
Chapitre 2 : Débuter 23
Alimentation 23
Pile de la télécommande 23
Branchement 23
État de l’alimentation 23
Connexions 24
Connexion 24
Connexions 25
Ports 25
Lecture de contenu 25
Commandes 26
ON/OFF 26
Select 26
Mise au point 26
Volume 26
Télécommande 27
ON/OFF 27
Sélection d’entrée 27
Orientation 27
Télécommande 28
Volume 28
Lecture/Pause 28
Précédent/Suivant/Répéter 28
Délement 28
Sélection 28
Menu 28
Chapitre 3 : Conseils d’utilisation 29
Projection d’image 29
Signal 29
Taille de la projection 29
Manipulation 30
Manipulation 30
Éclairage 30
Chaleur 30
Fermeture de la plateforme 30
Chapitre 4 : Détails techniques 31
Caractéristiques techniques 31
Renseignements importants
concernant la sécurité 32
Utilisation appropriée 32
Avertissements 32
Renseignements importants concernant
les piles 32
Conformité 33
Déclaration CE de conformité 33
Directive RoHS 33
Déclaration de la FCC 33
Chapitre 5: Renseignements
supplémentaires 34
Inscrivez-vous 34
Soutien technique 34
Garantie 35

Tabla de contenido
ESP
Capitulo 1: Visión general 36
Dispositivo principal (parte trasera) 36
Dispositivo principal (frente) 36
Control remoto 37
Accesorios 37
Incluidos 37
Capitulo 2: Empezar 38
Alimentación 38
Pilas del control remoto 38
Conexión 38
Estado de la alimentación 38
Conexiones 39
Conexiones 39
Conexiones 40
Puertos 40
Reproducción 40
Mandos 41
ON/OFF 41
Select 41
Enfoque 41
Volumen 41
Control remoto 42
ON/OFF 42
Selección de entrada 42
Orientación 42
Control remoto 43
Volumen 43
Reproducción/Pausar 43
Anterior/Siguiente/Repetir 43
Avance y retroceso 43
Seleccione 43
Menú 43
Capítulo 3: Cómo utilizar 44
Proyección de imagen 44
Señal 44
Tamaño de proyección 44
Manipulación 45
Manipulación 45
Luz 45
Calor 45
Cerrar la plataforma iPad 45
Capítulo 4: Detalles técnicos 46
Características técnicas 46
Información importante relativo
a la seguridad 47
Utilización conveniente 47
Advertencias 47
Información importante para las pilas 47
Conformidad 48
Declaración CE de conformidad 48
Directiva RoHS 48
Declaración de FCC 48
Capítulo 5: Información adicional 49
Inscribirse 49
Apoyo 49
Garantía 50
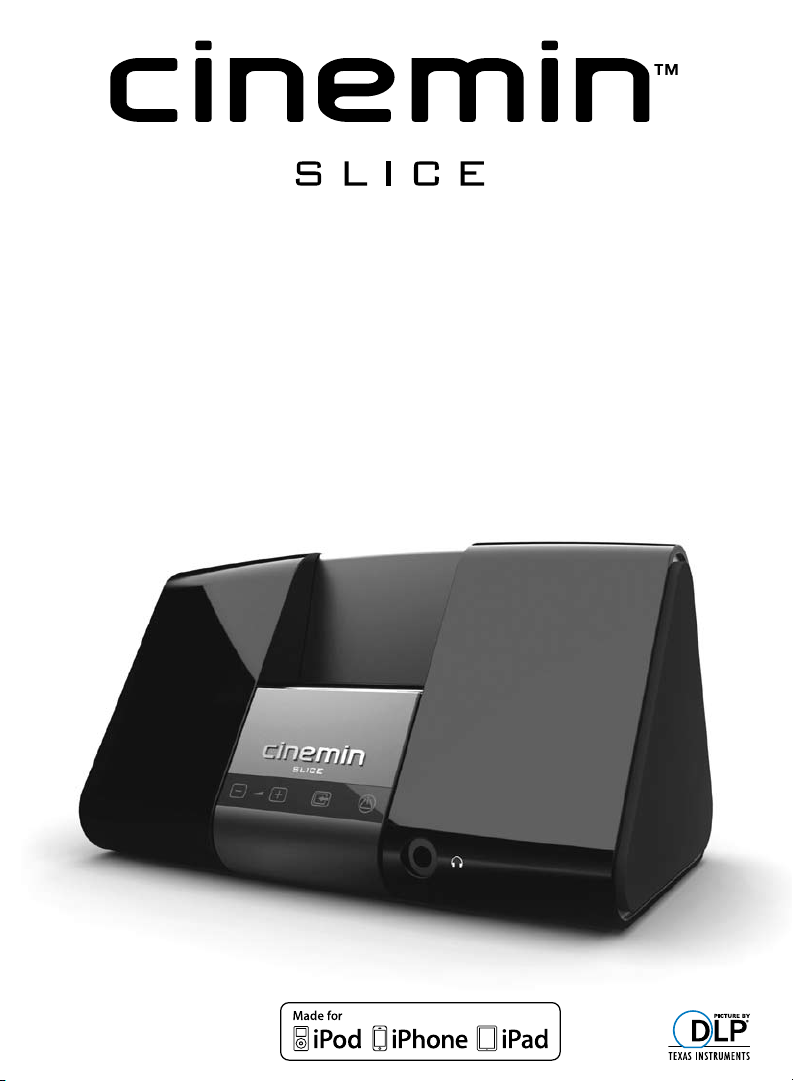
Chapter 1: At a glance
Cinemin Slice is a portable pico projector and audio dock that connects to your favorite
multimedia devices and splashes your movies, videos, photos, games and slides onto
walls and ceilings.
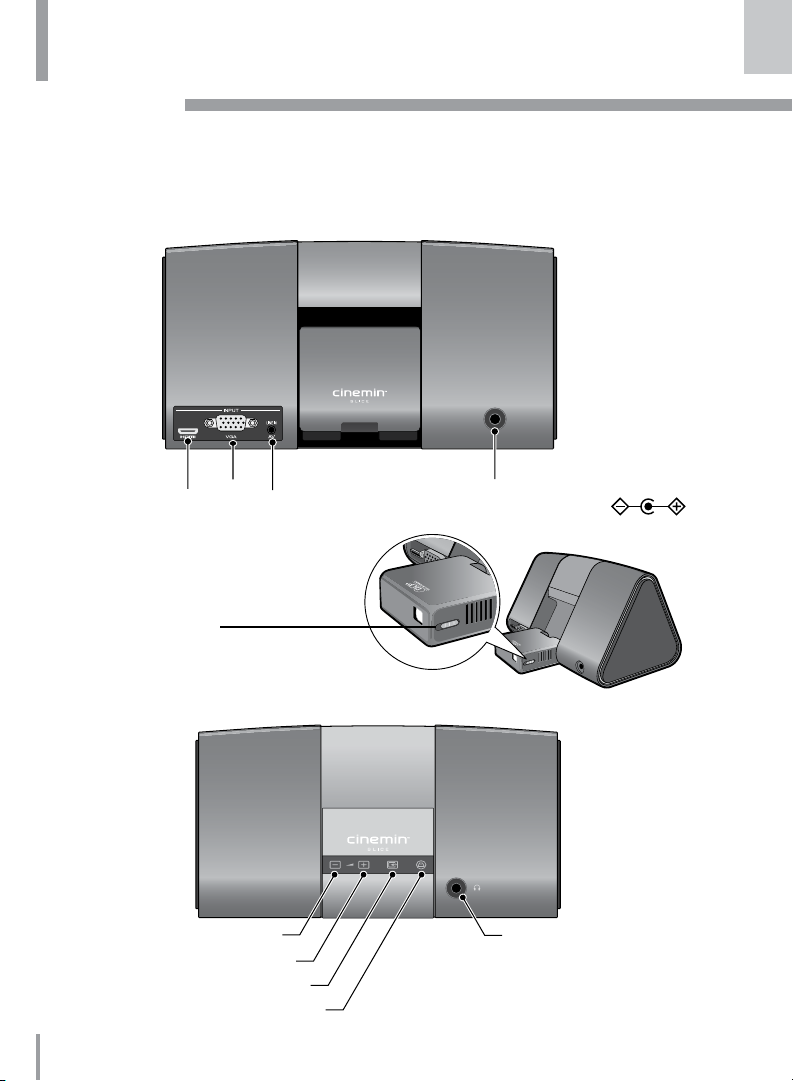
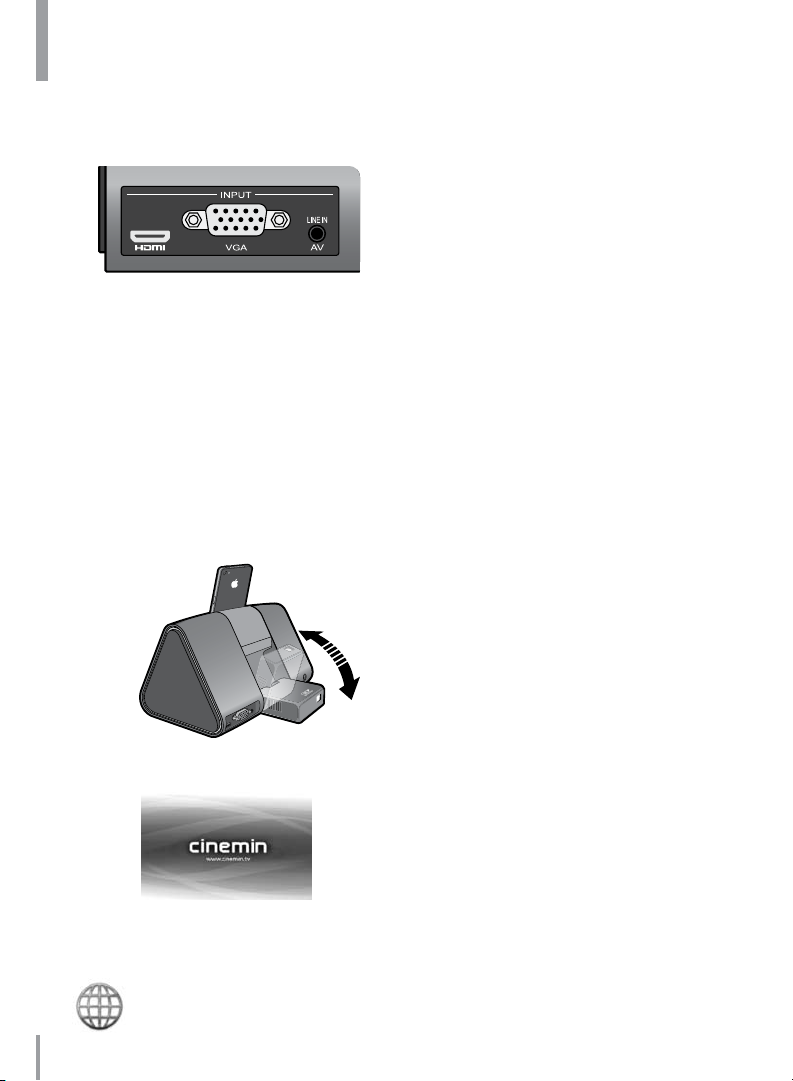
Main unit (back)
EN
HDMI
port
Focus slider
Main unit (front)
6
VGA
port
Volume down
Volume up
Input select
Power ON/OFF
AV and line
in port
AC/DC power
adapter port
Headphone jack*
*Headphone jack only works with HDMI
and AV line in.
DC 5V
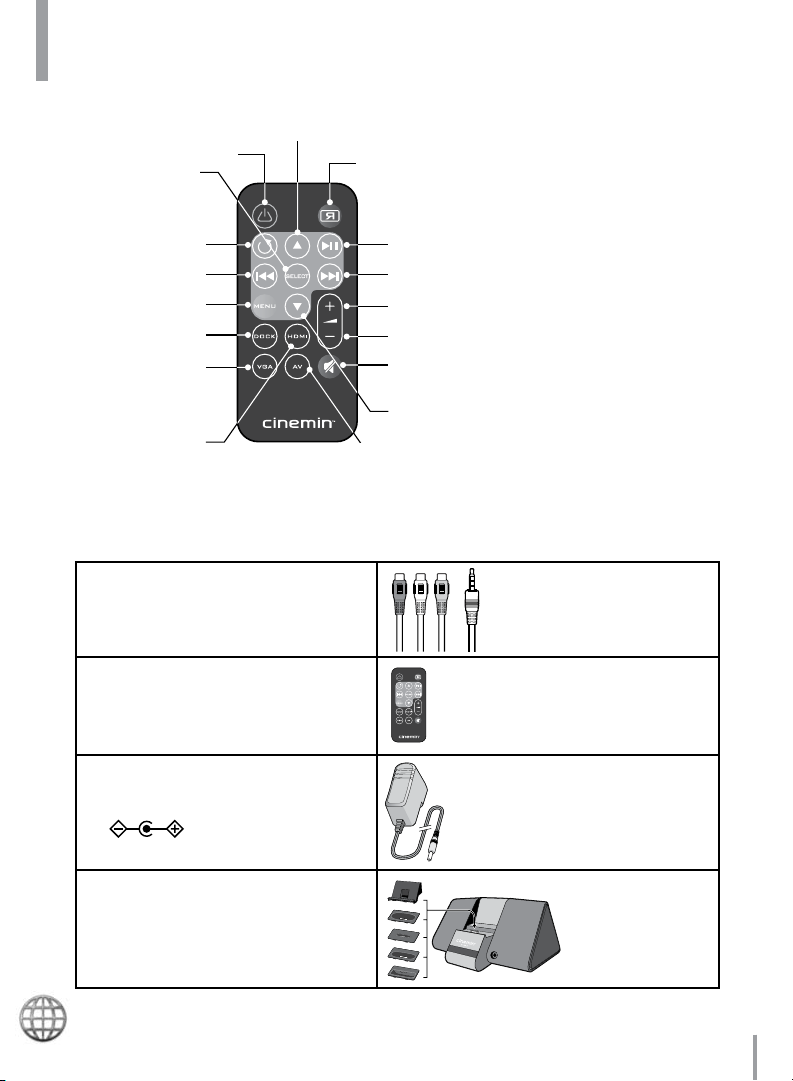
Remote controller
Power
Confirm item
selection in menu*
Scroll up
menu/screen*
Orientation
Repeat
Back/Rewind
Return to previous
menu/screen*
Dock input
VGA input
HDMI input
Accessories
Included
(1) Ø 3.5 mm to composite AV cable
(1) Infrared remote controller
(1) Button cell battery
(1) AC/DC power adapter with
multiple plugs
Play/Pause
Next/Fast forward
Volume up
Volume down
Mute
Scroll down menu/screen*
AV input
*These buttons do not function with the docked
media player
is on the home screen.
—iPhone, iPad or iPod Touch—when it
(5) Apple docking trays ([1] iPod®
Touch Gen 2, [1] iPod Nano Gen
4, [1] iPhone
[1] iPad
Visit www.cinemin.tv for other Slice accessories.
® 3G/iPhone® 3GS,
™ and [1] iPhone 4)
7Chapter 1: At a glance

Chapter 2: Getting started
Slice is ready to go, right out of the box. Simply plug it in, connect your media
player, switch it on and adjust the focus and volume.
Projector will only turn on when it is flipped out.
Power
Slice can be powered on and controlled from the unit itself as well as from the
battery-operated remote controller.
Remote controller battery
A button cell battery (CR-2025, 3V) is already inserted into the battery
compartment. Remove the paper strip to activate it.
Plugging in
Connect one end of the power cord to Slice.1.
Install the correct wall plug into the AC/DC adapter2.
Plug the AC/DC adapter into a wall power source.3.
The power indicator will turn yellow and Slice will be in standby mode.4.
Power status
The power button will display one of the following:1.
Other buttons in front of unit also display red when Slice is turned ON.
8
Red — Power ON A.
Yellow — Power OFF (standby mode)B.
Connections
Cinemin Slice works with a variety of devices that output video signals, including
most Apple iPhone/iPod/iPad products, digital video cameras, portable DVD
players, handheld game consoles, laptops/netbooks and some smartphones with
video output.
Slice includes a built-in 30-pin connector for docking only your iPhone, iPod or
iPad. Slice also features ports for HDMI, VGA and various AV inputs — such as a
standard composite adapter or specific proprietary connectors (sold separately).
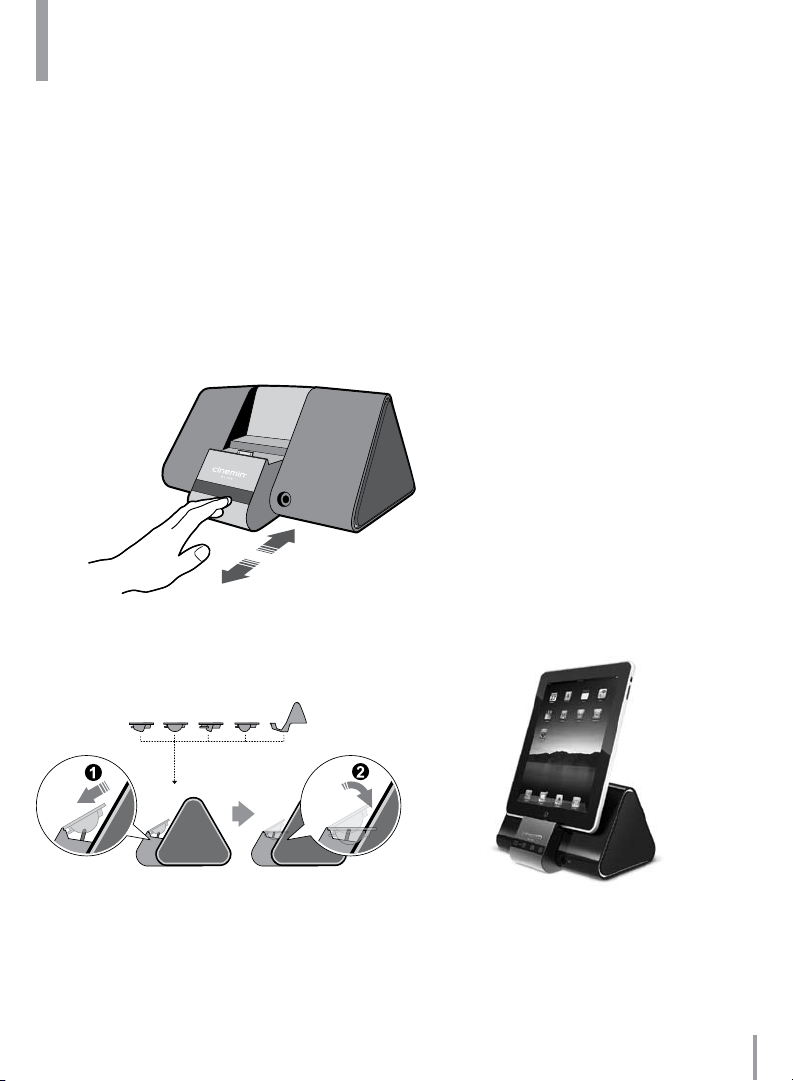
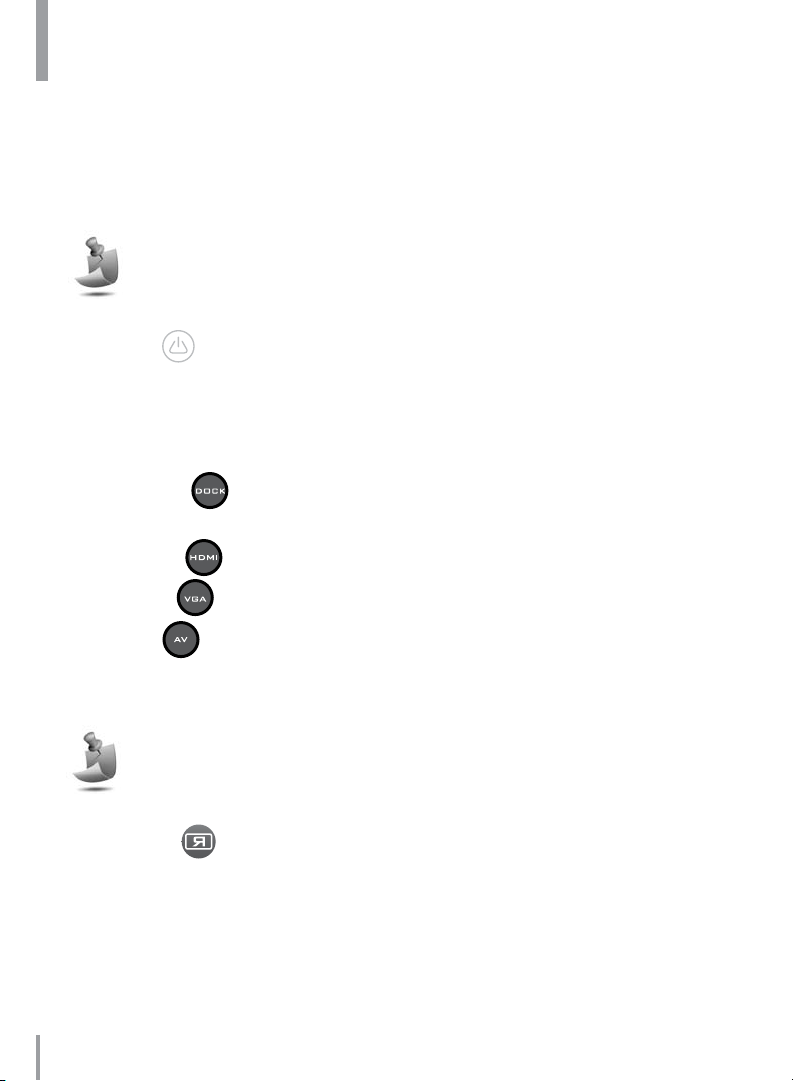
Docking
1. Press the front-middle part of Slice to eject the docking platform.
2. Gently and carefully insert the
docking tray that fits your Apple
media player. You will hear a
clicking sound when it is in place.
3. Place your Apple media player
into the docking tray.
9Chapter 2: Getting started
Connections
Ports
There are three external ports for connecting other AV media players to Slice.
Using the VGA port, connect your laptop or netbook to Slice and set 1.
it as an extended desktop with a monitor resolution of 854 x 480 and
a refresh rate of 60Hz. This will only display images. For audio, you
need to connect an audio cable or adapter to the line in port from your
laptop or netbook.
Using the HDMI port, connect your media player and, if required, set it 2.
to play externally.
Using the AV port, connect your media player and, if required, set it to 3.
play externally.
Playing content
Flip the projector cabinet out and position it at the desired projecting angle.1.
With Slice plugged in to a power source, press the power button ON. 2.
A Cinemin welcome screen will appear for about three seconds.
Connect and then turn on your personal media player. Press play to project 3.
the video signal, photo slideshow, application, desktop or other AV source.
Adjust the focus as needed.4.
Visit www.cinemin.tv for a list of common AV devices that connect with Slice.
10
Chapter 2: Getting started

Unit controls
A few simple controls make it easy to turn Slice ON and OFF, select an input
source, focus the screen image and adjust the speaker volume – directly on the
unit itself.
ON/OFF
Press this button to turn Slice ON or OFF.
Select
Press this button to select the input source. There are four options:
DOCK — For docking an iPhone/iPod/iPad. DOCK is the default setting.1.
HDMI — For connecting to HDMI sources, such as a DVR or DVD player.2.
VGA — For connecting to a personal computer.3.
AV — For connecting to devices via a red/yellow/white composite cable or 4.
an undocked 30-pin connector (sold separately).
Your last input selection will be used when powering up from standby mode.
“No Signal” will be displayed if the selected input source is not connected
and active.
Focus
Gently move the slider, located on the side of the flipped-out projector, forward and
backward to focus the projected image.
Volume
Press the button to increase Slice’s volume. Press the button to
decrease Slice’s volume. A volume bar will appear on-screen to display the
selected level. Audio level will reset only when the power from the AC/DC adapter is
disconnected. If Slice is simply turned OFF, audio levels will stay the same when it is
turned back ON.
11Chapter 2: Getting started
Remote controller
A few simple controls make it easy to turn Slice ON and OFF, select an input
source, focus the screen image, change orientation, navigate tracks and adjust
the speaker volume.
The play/pause, stop, back/rewind, next/fast forward and repeat buttons
only work with docked devices. For other media players, use the controls on
that device to navigate tracks.
ON/OFF
Press this button to turn Slice ON or OFF.
Input selection
These four buttons allow you to select your input source:
DOCK 1.
default setting.
HDMI 2.
VGA 3.
AV 4.
cable or an undocked 30-pin connector (both sold separately).
Your last input selection will be used when powering up from standby mode.
“No Signal” will be displayed if the selected input source is not connected
and active.
— For docking an iPhone/iPod/iPad. DOCK is the
— For connecting to HDMI sources.
— Typically for connecting to PCs.
— For connecting to devices via a red/yellow/white composite
Orientation
Press this button multiple times to mirror the projected image horizontally, vertically
or both. This is useful for rear-projection or for an alternate orientation on the
ceiling, for example.
12
Chapter 2: Getting started

Remote controller
Volume
Press the button to increase Slice’s volume. Press the button to
decrease Slice’s volume. Press
only when the power from the AC/DC adapter is disconnected. If Slice is simply
turned OFF, audio levels will stay the same when it is turned back ON.
to mute sound entirely. Audio level will reset
Play/Pause
Press to play or pause tracks on your docked media player.
Back & Rewind/Next & Fast Forward/Repeat
Press to go to the previous track or press and hold to rewind a track. Press
to jump forward to the next track or press and hold to fast forward a
track on your docked media player. Press
only once.
to repeat a track or to repeat track
Scrolling
Hold down to scroll up the menu and to scroll down the menu on your
docked media player. These buttons will not work if your docked media player is on
the home screen. You need to choose a music or video application first.
Select
Press to confirm menu item selection.
Menu
Press to return to the previous menu or screen.
13Chapter 2: Getting started
Chapter 3: Usage tips
Read this chapter to learn how best to project, position and handle your Slice.
Image projecting
Signal
After the Cinemin welcome screen has been displayed, Slice is ready to project the
signal it receives from your media player.
Ensure that your media player device has video-out functionality, as not all 1.
do (particularly some smartphone models). Check your media player’s
specs and settings.
Ensure that all cable connections — both with your media player and with 2.
Slice — are completely inserted.
Ensure that you have pressed play on your media player. Some content, 3.
such as photo slideshows and web videos, will project only when “played.”
Projection size
To increase the size of the projected image, move Slice away from the surface on
to which you are projecting. Adjust the focus as needed.
Distance from Slice to surface* Image size*
125-inches (335 cm) ~ 60-inches (~105 cm)
57-inches (145 cm) ~ 28-inches (~ 71 cm)
28-inches (71 cm) ~ 13-inches (~ 33 cm)
*Measurements are approximate.
To project vertically — for example, on to a ceiling — simply move the projector
hinge to a vertical angle. Adjust the focus as needed.
For best results, project on a white, unobstructed surface in a
dark or dimly lit room.
14
Handling
Cleaning
To clean your Slice, first ensure that it is turned OFF and the cables are
disconnected. Gently use a soft, dry, clean non-abrasive cloth to wipe dust from
Slice’s body and lens.
Do not use cleaning solvents or chemicals.
Brightness
Slice is a projector of bright light. Do not look directly into the light source or shine it
into another person’s face.
Warmth
The projector module of Slice may become warm to the touch after extended
periods of use. This is normal. Allow it to cool, or handle it along the edge, if
adjusting the angle while warm.
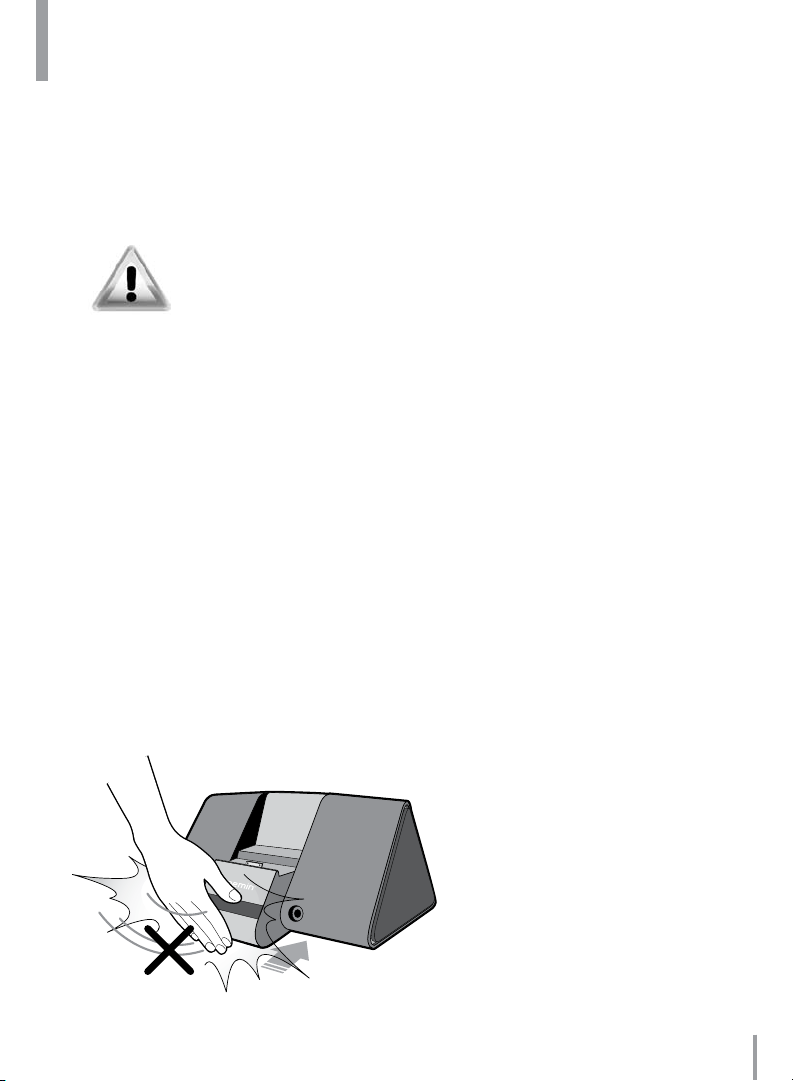
Closing the docking platform
The docking platform can be closed with the iPod and iPhone docking trays
installed, but the iPad docking tray must be removed first or it will not close.
Gently push the platform back into the unit. Slamming the platform can cause
it to break.
15Chapter 3: Usage tips
Chapter 4: Technical details
Consult this chapter for specs pertaining to brightness, resolution, ports and more,
as well as important notices and statements.
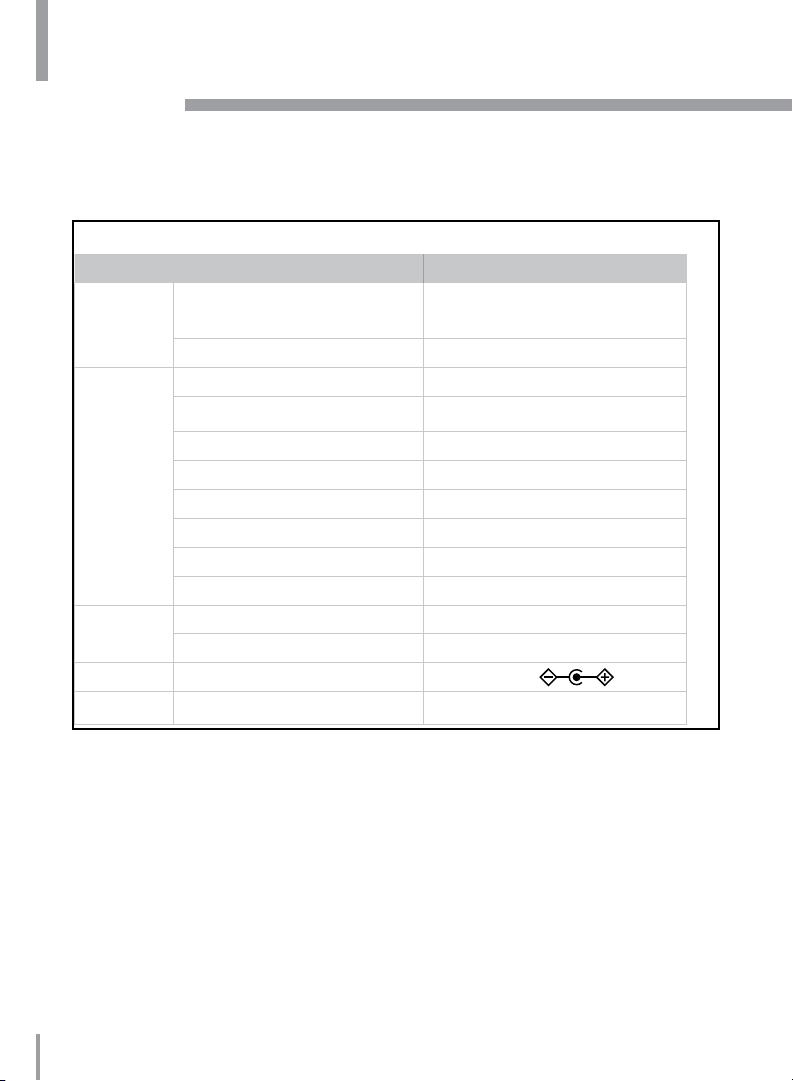
Specications
Feature Description
Size Dimension (LxWxH) 8.7 x 5 x 4.6 inches
(221 x 137 x 117 mm)
Weight 1.8-pounds (820 g)
Display Adjustable viewing angles approximately 0–90º
Projection technology DLP by Texas Instruments
Resolution 854 x 480 pixels
Contrast ratio 1000:1
Viewable image range 11–125 inches (28–317 cm)
Diagonal image size 5–60 inches (12.7–167cm)
Aspect ratio 16:9
Focus Manual
Audio Speaker 3W each
Headphone jack Ø 3.5 mm
Power AC/DC adapter DC 5V 3.6A
Power consumption 18W
16
 Loading...