

Wow Wee 8410 User Manual

Quick start guide
Guide de démarrage rapide
Guía de inicio rápido
Item | Article | Articulo 8410

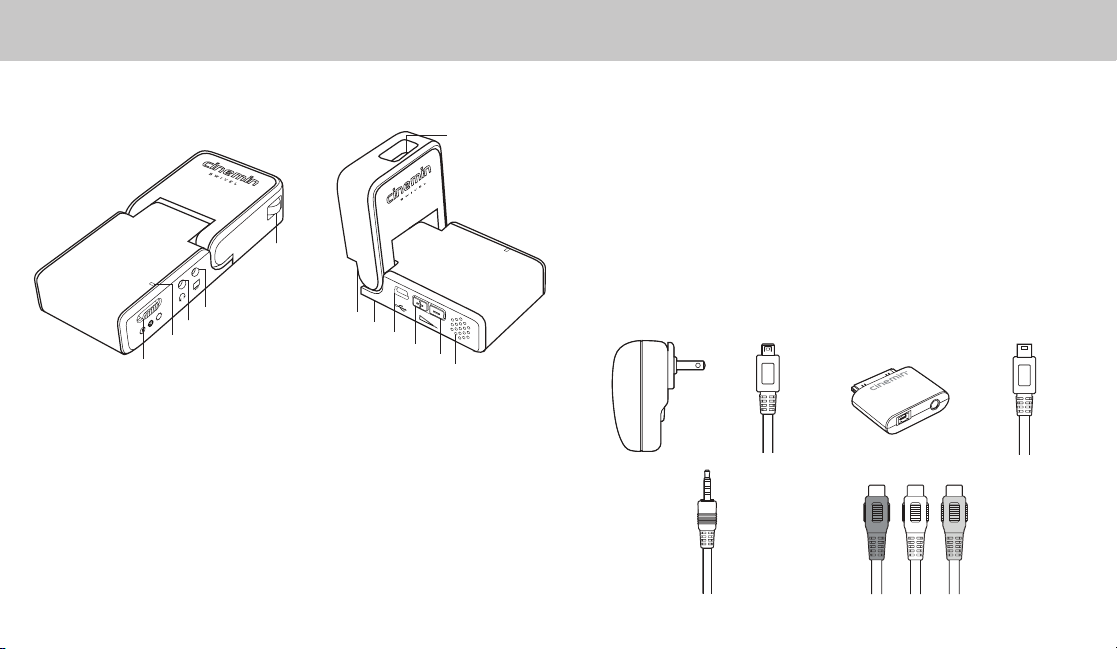
Overview
Cinemin Swivel pico projector
E
D
C
B
A
View from right side
Power switch with mirror image selection A.
(for back projection)
Battery status indicatorB.
3.5mm headphones portC.
3.5mm AV input portD.
Focus wheelE.
F
H
I
J
K
View from left side
0–90° hingeF.
LensG.
Battery compartment cover H.
(located underneath)
Mini USB port (for charging only)I.
Volume up button J.
Volume down button K.
SpeakerL.
Included accessories
1 x AC/DC power adapter (with multiple plugs)1.
1 x USB (A) to mini USB (B 2. – 5 pin) cable
G
L
(for connecting Swivel to AC/DC adaptor or computer for charging only)
1 x iPod/iPhone adaptor 3.
(with AV out and mini USB (B – 4 pin) port for connecting to computer)
1 x USB (A) to mini USB (B 4. – 4 pin) cable
(for connecting iPod/iPhone adaptor to computer for charging or syncing data to your iPod/iPhone)
1 x 3.5mm to 3.5mm cable 5.
(for connecting iPod/iPhone adaptor to Swivel)
1 x 3.5mm to AV composite cable 6.
(for connecting Swivel to a media player, for instance, a DVD player)
1 x 3.7 V rechargeable battery7.
1 x Soft case8.
1 x Quick start guide9.
1 2
3
4
2
5
6
Specifications
Feature Description
Size Dimension (LxWxH) 4.7 x 2.1 x 0.9 inches (120 x 52 x 22 mm)
Weight 172 g (~132 g without battery)
Display Adjustable viewing angles
Projection technology DLP by Texas Instruments
Resolution 480 x 320 pixels
Contrast ratio 1000:1
Viewable range 5–81 inches (12.7–206 cm)
Diagonal image size 6–60 inches (15.2–152 cm)
Aspect ratio 3:2
Power consumption 3 W
Focus Manual
Audio Speaker 0.5W monophonic
Headphone jack ø3.5 mm
Volume control
Power AC/DC adapter 5 V
Battery type 3.7 V / 1900 mAh
Battery life ≈140 min
0–90º
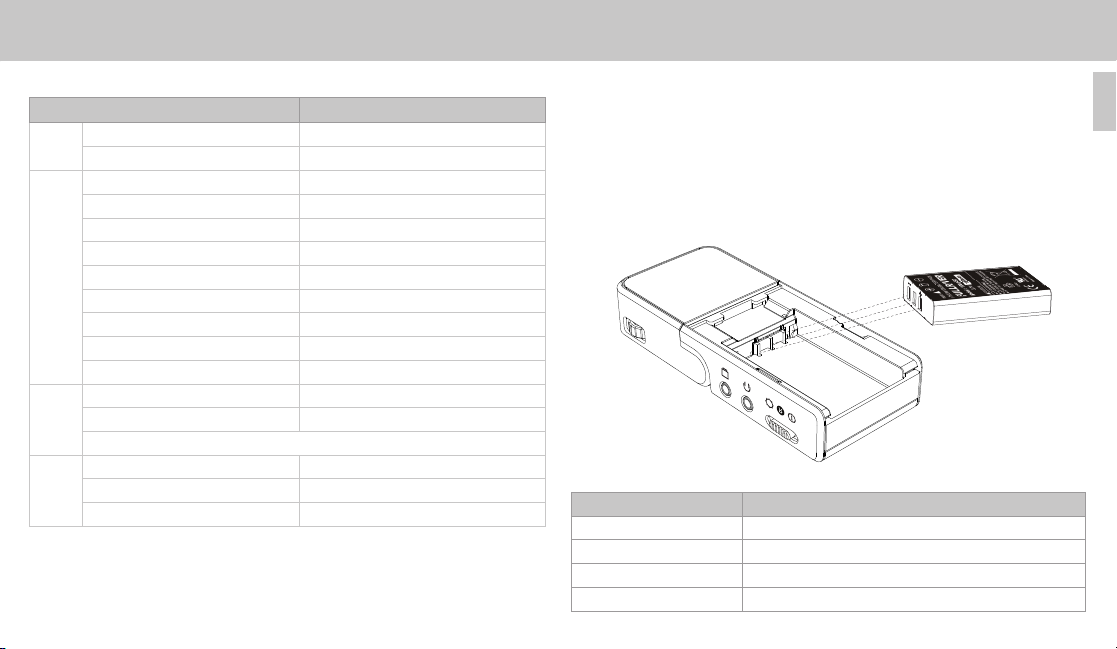
Inserting the battery
To insert the battery do the following:
Locate and open the battery compartment cover on Swivel.1.
Insert the battery according to the diagram. 2.
Ensure that the metal connectors align correctly.
Replace the battery compartment cover. 3.
NOTE: The battery will only recharge when the battery temperature is below 40°C (104° F).
Battery status indicator color Description
Blue In use
Blue (pulsing) In use (low battery)
Orange Charge complete
Orange (pulsing) Charging (power off)
EN
3

Getting started
To use your Swivel, follow the ste ps below:
Make sure Swivel is off. Remove the battery cover and insert the battery. 1.
Replace the battery cover.
Charge the battery by connecting Swivel to the AC/DC adaptor (or 2.
computer) using the USB cable.
The battery status indicator should pulse orange. When Swivel is fully
charged, the indicator will be solid orange. This takes about four hours.
To turn Swivel on, slide the power switch to On 3. .
Using the iPod/iPhone adaptor (if required) and/or other cable(s) (either 4.
included or sold separately), connect your personal media player
(not included) to Swivel.
Press play on your personal media player.5.
Adjust the focus, volume and projection angle as required.6.
IMPORTANT: Your personal media player TV output signal must be set to
NTSC in order to work with Swivel. Refer to the user manual for your personal
media player to learn how to change the settings.
4
Connecting your personal media device
You can connect Swivel in a number of different ways, depending on your setup.
Refer to the following sample arrangement, using Swivel and its included accessories.
AC/DC power adapter (with multiple plugs)1.
USB (A) to mini USB (B 2. – 5 pin) cable
(for connecting Swivel to AC/DC adaptor or computer for charging only)
iPod/iPhone adaptor 3.
(with AV out and mini USB (B – 4 pin) port for connecting to computer)
USB (A) to mini USB (B 4. – 4 pin) cable
(for connecting iPod/iPhone adaptor to computer for charging or syncing data to your iPod/iPhone)
3.5mm to 3.5mm cable 5.
(for connecting iPod/iPhone adaptor to Swivel)
3.5mm to AV composite cable 6.
(for connecting Swivel to a media player, for instance, a DVD player)
NOTE: To use the 3.5mm to AV composite cable, attach the AV connectors to your media player
(i.e. DVD player) and connect the 3.5mm jack to Swivel. You do not need the iPod/iPhone adaptor.
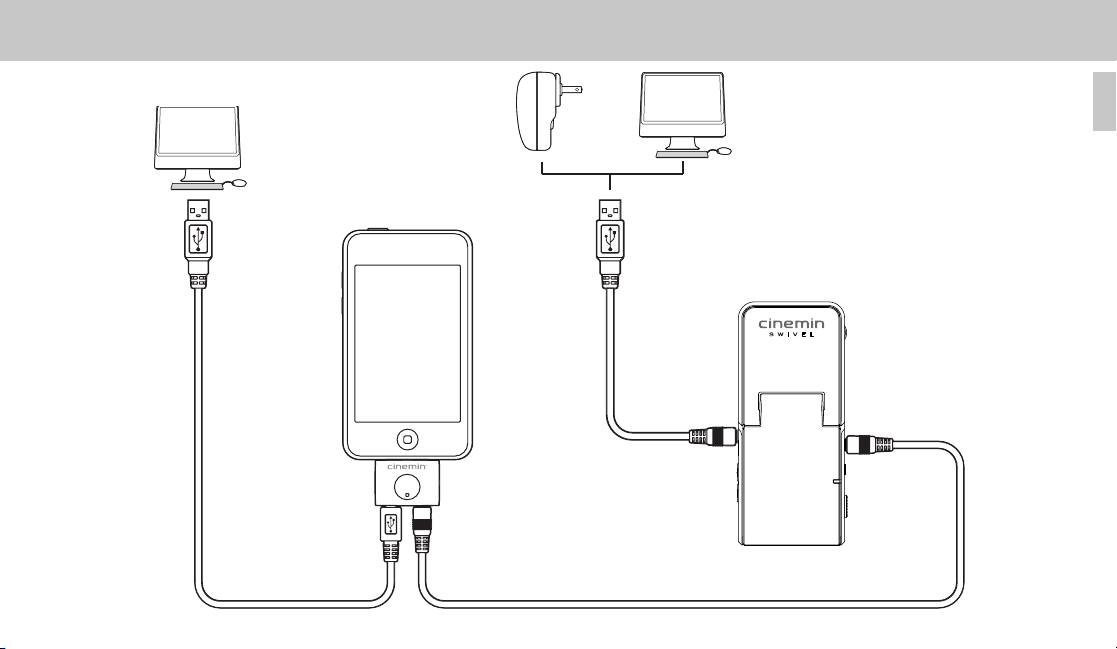
Sample configuration
PC or Mac
To PC or Mac
(for charging
or synchronizing)
4
1
3
PC or Mac
2
EN
5
5
Aperçu
Pico projecteur Cinemin Swivel
E
D
C
B
A
Vue du côté droit
F
H
G
I
J
K
L
Vue du côté gauche
Accessoires compris
Bloc d’alimentation c.a.-c.c. (avec connecteurs multiples)1.
Câble USB (A) à mini USB (B 2. – 5 broches)
(pour brancher Swivel au bloc d’alimentation ou à l’ordinateur pour charger seulement)
1 Adaptateur pour iPod / iPhone 3.
(avec sortie AV et port mini USB (B – 4 broches) pour brancher à l’ordinateur)
1 Câble USB (A) à mini USB (B 4. – 4 broches)
(pour brancher adaptateur iPod / iPhone à l’ordinateur pour le transfert ou la synchronisation de
données de votre iPod / iPhone)
Câble 3,5 mm à 3,5 mm 5.
(pour brancher iPod / iPhone à Swivel)
Câble composite AV de 3,5 mm 6.
(pour brancher Swivel à un lecteur multimédia, par exemple, un lecteur DVD)
1 bloc-piles rechargeable 3.7 V 7.
Étui souple8.
Guide de démarrage rapide9.
Interrupteur avec option image inverse A.
(pour la projection arrière)
Voyant de niveau de batterieB.
Sortie de 3,5 mm pour écouteursC.
Entrée AV de 3,5 mmD.
Mise au pointE.
6
Charnière 0–90° F.
LentilleG.
Couvercle du compartiment des batteries H.
(situé en-dessous)
Mini port USB I.
(seulement pour charger)
Bouton pour augmenter le volume J.
Bouton pour baisser le volume K.
Haut-parleurL.
1 2
5
3
4
6
 Loading...