

Wow Wee 8033 User Manual
User
manual
Item No. 8033

Copyrights and acknowledgements
Copyrights and acknowledgements
Skype, Skype logo and S logo are trademarks or registered trademarks of Skype Limited.
Microsoft, Windows and Windows NT are registered trademarks of Microsoft Corporation in the United
States and other countries.
Windows Vista is a trademark of the Microsoft group of companies.
Windows Live is a registered trademark of Microsoft Corporation.
Mac and Mac OS are trademarks of Apple Inc.
MPEG4
This product is licensed under the MPEG-4 visual patent portfolio license for the personal and noncommercial use of a consumer for (i) encoding video in compliance with the MPEG-4 VISUAL standard
(“MPEG-4 VIDEO”) and/or (ii) decoding MPEG-4 video that was encoded by a consumer engaged in a
personal or non-commercial activity and/or was obtained from a video provider license by MPEG LA to
provideMPEG-4 video. No license is granted or shall be implied for any other use. Additional information
including that relating to promotional, internal and commercial uses and licensing may be obtained from
MPEG LA, LLC. See HTTP://WWW.MPEGLA.COM.
All other nationally and internationally recognized trademarks and tradenames are hereby acknowledged.
2
© Copyright 2008 WowWee Group Ltd. All rights reserved.

3
Contents
Contents
Thank you for purchasing Rovio™ from WowWee™! . . . . . . . . . . . . . . . . . . . . . 6
Package contents ......................................................... 7
Getting started .....................................................10
Battery and power requirements ...........................................10
Rovio . . . . . . . . . . . . . . . . . . . . . . . . . . . . . . . . . . . . . . . . . . . . . . . . . . . . . . . . . . . . . . . . . . . . . . . . .10
Charging dock and TrueTrack™ Beacon . . . . . . . . . . . . . . . . . . . . . . . . . . . . . . . . . . . . . . . . . . .10
Assembling the charging dock ............................................. 10
Location ................................................................10
Assembling the charging dock ............................................. 11
Disassembling the charging dock .................................................12
Installing and charging the battery pack . . . . . . . . . . . . . . . . . . . . . . . . . . . . . . . . . . . . 13
Low battery ...................................................................14
Installing the Rovio Setup software ........................................15
PC users .......................................................................15
For advanced PC users . . . . . . . . . . . . . . . . . . . . . . . . . . . . . . . . . . . . . . . . . . . . . . . . . . . . . . . . . . 16
Mac users . . . . . . . . . . . . . . . . . . . . . . . . . . . . . . . . . . . . . . . . . . . . . . . . . . . . . . . . . . . . . . . . . . . . .17
Rovio basics ........................................................21
Rovio charging dock ......................................................21
TrueTrack Beacons . . . . . . . . . . . . . . . . . . . . . . . . . . . . . . . . . . . . . . . . . . . . . . . . . . . . . . . 22
Power switch LED light indicator ...........................................22
Rovio’s interface ......................................................... 22
Overview of the Rovio interface ......................................23
Using Rovio’s interface . . . . . . . . . . . . . . . . . . . . . . . . . . . . . . . . . . . . . . . . . . . . . . . . . . . 23
System requirements . . . . . . . . . . . . . . . . . . . . . . . . . . . . . . . . . . . . . . . . . . . . . . . . . . . . . . . . . . .23
Web browser supported features ..........................................23
Description of interface . . . . . . . . . . . . . . . . . . . . . . . . . . . . . . . . . . . . . . . . . . . . . . . . . . 24
Navigation controls. . . . . . . . . . . . . . . . . . . . . . . . . . . . . . . . . . . . . . . . . . . . . . . . . . . . . . . . . . . . .25
Camera controls ...............................................................26
Camera capture control .........................................................26
Headlight control . . . . . . . . . . . . . . . . . . . . . . . . . . . . . . . . . . . . . . . . . . . . . . . . . . . . . . . . . . . . . . 26
Auxiliary controls . . . . . . . . . . . . . . . . . . . . . . . . . . . . . . . . . . . . . . . . . . . . . . . . . . . . . . . . . . . . . . 27
Indicators . . . . . . . . . . . . . . . . . . . . . . . . . . . . . . . . . . . . . . . . . . . . . . . . . . . . . . . . . . . . . . . . . . . . .29
Settings .......................................................................30
Rovio online help ...............................................................36

4
Contents
Video display contextual menu ............................................36
Accessing the interface from your internal network ..................... 37
Setting up port forwarding . . . . . . . . . . . . . . . . . . . . . . . . . . . . . . . . . . . . . . . . . . . . . . . . . . . . . . 38
Using a domain name with Rovio ..................................... 39
Creating, saving and playing back paths . . . . . . . . . . . . . . . . . . . . . . . . . . . . . . . 41
Updating the Rovio rmware .........................................43
Restoring Rovio to factory defaults . . . . . . . . . . . . . . . . . . . . . . . . . . . . . . . . . . . 44
Caring for Rovio . . . . . . . . . . . . . . . . . . . . . . . . . . . . . . . . . . . . . . . . . . . . . . . . . . . . 45
Precautions . . . . . . . . . . . . . . . . . . . . . . . . . . . . . . . . . . . . . . . . . . . . . . . . . . . . . . . . . . . . . 45
Safety ..................................................................45
Use and handling . . . . . . . . . . . . . . . . . . . . . . . . . . . . . . . . . . . . . . . . . . . . . . . . . . . . . . . . 45
FAQs ..............................................................46
Appendix A . . . . . . . . . . . . . . . . . . . . . . . . . . . . . . . . . . . . . . . . . . . . . . . . . . . . . . . . 48
Rovio browser and platform compatibility . . . . . . . . . . . . . . . . . . . . . . . . . . . . . . . . . . 48
Appendix B . . . . . . . . . . . . . . . . . . . . . . . . . . . . . . . . . . . . . . . . . . . . . . . . . . . . . . . . 49
Terminology . . . . . . . . . . . . . . . . . . . . . . . . . . . . . . . . . . . . . . . . . . . . . . . . . . . . . . . . . . . . 49
Index ..............................................................50
Limited warranty . . . . . . . . . . . . . . . . . . . . . . . . . . . . . . . . . . . . . . . . . . . . . . . . . . . 52
Introduction
5
6
Introduction
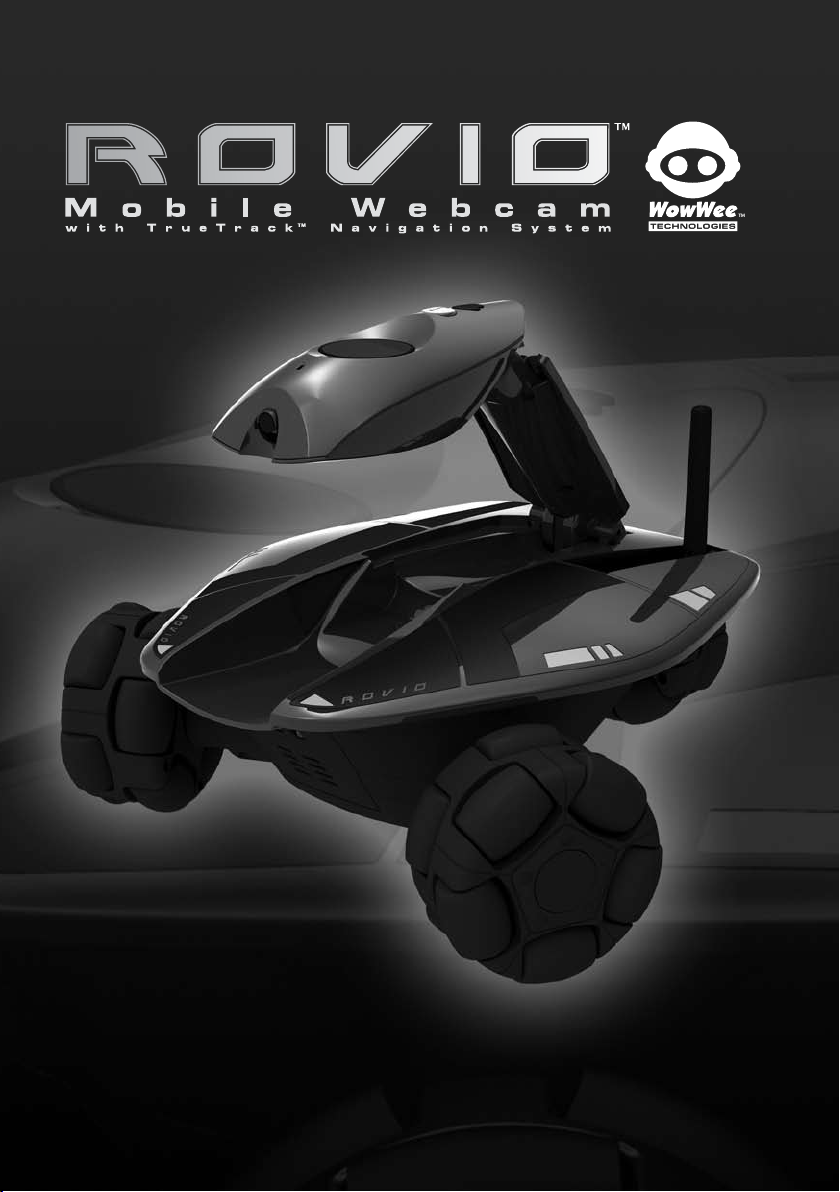
Thank you for purchasing Rovio™ from WowWee™!
With Rovio™, you will always be just a click away from the people and places that are
important to you. Rovio is the Wi-Fi equipped mobile webcam that enables you to
view and interact with its environment through streaming video and audio, wherever
it is! Easily control Rovio remotely 24/7 from anywhere in the world! Use any webequipped device: PC or Mac, cell phone, smartphone, PDA or even your video game
console.
The TrueTrack™ Navigation System allows you to use the Rovio interface to store
waypoints — with one click Rovio will automatically navigate itself to the chosen
point. Rovio’s built-in LED headlight will help you guide it even in dimly lit locations,
so you’ll always know what is going on at home or at the ofce. Rovio’s self-docking
function allows you to send Rovio back to the charging dock to recharge, with the
click of a button on your browser!
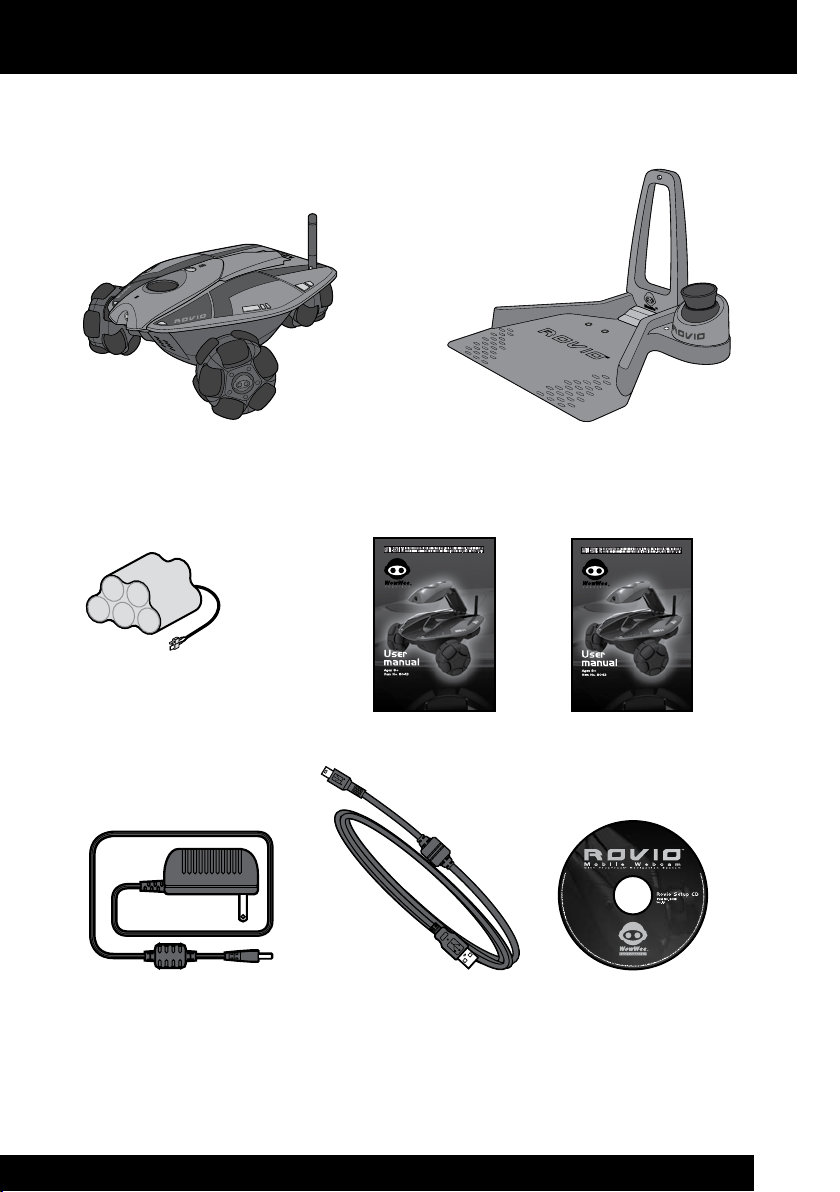
Package contents
This package contains the following:
Introduction
Package contents
1 x Rovio™
1 x 6 V 3000 mAH
NiMH rechargeable
battery pack
1 x 8 V AC/DC adapter
1 x Charging dock with built-in TrueTrack™ Beacon
1 x Mast
1 x Quick start
guide
1 x USB cable
1 x User manual
1 x Rovio Setup
CD
7

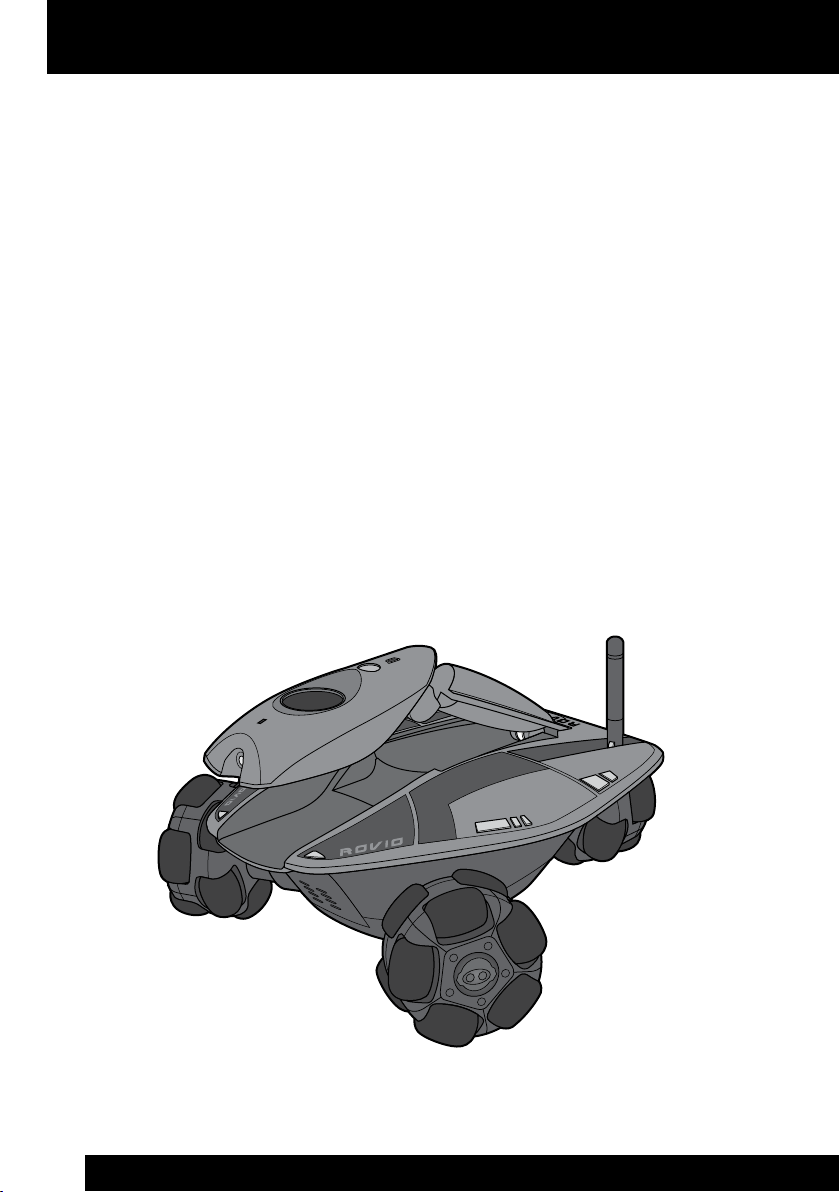
Quick overview
Rovio
Quick overview
Rovio
USB connector
Power button
with LED indicator
TrueTrack sensor
Microphone
Camera
IR sensors
Headlight
Speaker
Neck
Antenna
LED indicators
Omni-directional
wheels
Underside of Rovio
8
Battery compartment
Charging contacts
Charging dock
Charging contacts
8 V AC/DC adapter
Quick overview
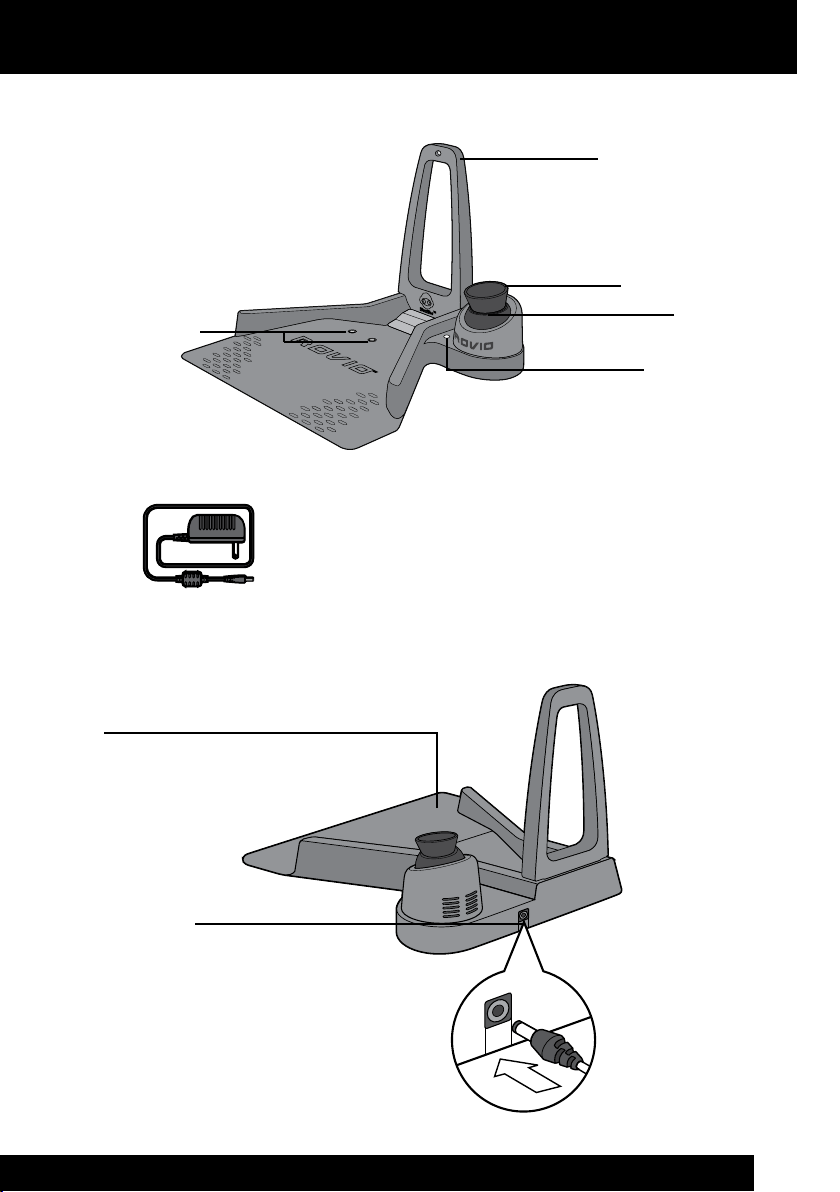
Charging dock
Charging dock mast
TrueTrack Beacon
Metal rim
LED indicator
Dock
Power connector
Back view of charging dock
(From power adapter)
9

Getting started
Battery and power requirements
Getting started
This section describes how to get your Rovio up and running.
Battery and power requirements
This section describes the battery and power requirements for Rovio and its charging
dock with built-in TrueTrack Beacon.
Rovio
Rovio uses a rechargeable 6 V NiMH battery pack (included).
Charging dock and TrueTrack™ Beacon
The charging dock with built-in TrueTrack™ Beacon requires power from an 8V AC/DC
adapter.
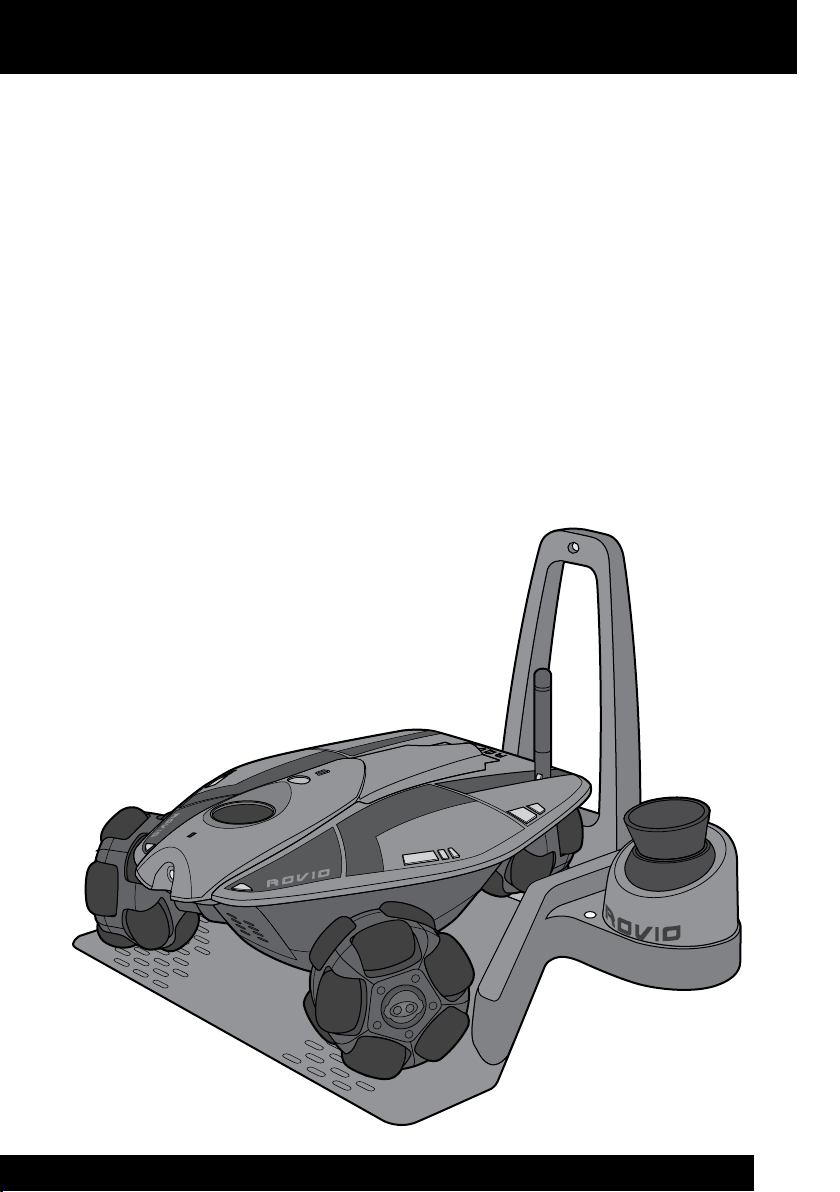
Assembling the charging dock
When you rst open the Rovio package the charging dock will be in two parts. You
will need to put the parts together and then set up the built-in TrueTrack Beacon.
10
Location
In order for Rovio to accurately self-dock, the charging dock should ideally be placed
where it will not be disturbed and preferably against a wall. Ideally, the room should
have a at ceiling no higher than about 10-12 feet (3-3.6 meters) with a clear space
onto which the built-in TrueTrack Beacon can project its infrared beams. Air vents,
large light panels or chandeliers, tall objects or furniture might prevent Rovio from
detecting the signal that is projected onto the ceiling.
Important power adapter information
Examine the AC/DC adapter regularly for damage to the cord, plug, enclosure and other parts.•
The AC/DC adapter is not a toy.•
Equipment liable to be cleaned with liquid are to be disconnected from the transformer •
before cleaning.
Getting started
Assembling the charging dock
Assembling the charging dock
To assemble the charging dock:
1. Place the charging dock on the oor in the room you want to use as Rovio’s
home base.
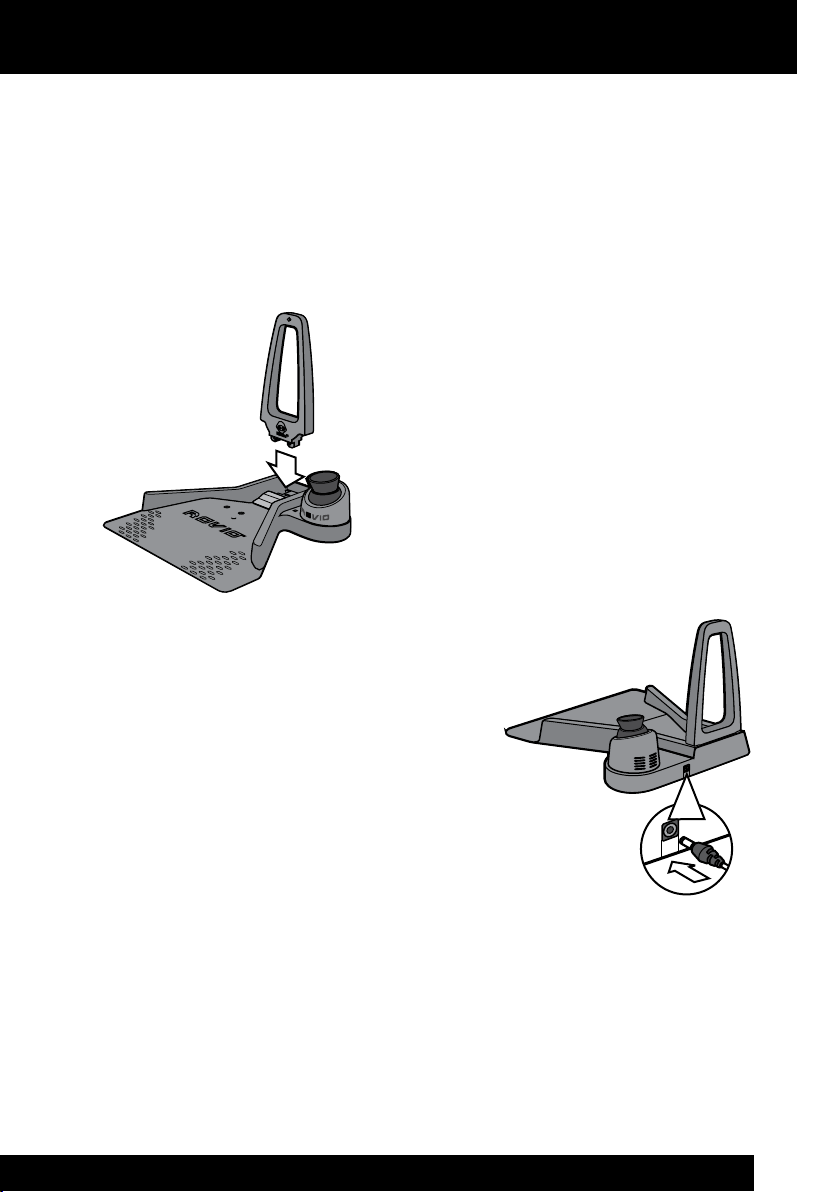
2. Attach the mast to the charging dock by slotting it into position as illustrated.
3. Plug the power cable into the port on the back
of the charging dock and then plug the power
adapter into the electrical outlet.
The LED indicator on the charging dock will
light up, and the TrueTrack Beacon attached to
the dock will light up red.
If the LED indicator on the base does not light
up, it means that there is a problem with the
connection between the mast and the base.
Unplug the power adapter, and detach the mast. To learn how, refer to the
section Disassembling the charging dock. Next, reattach the mast and then
reconnect the adapter.
If the Beacon is not lit, touch the metal rim on the Beacon and it will light up.
11

Getting started
Assembling the charging dock / Disassembling the charging dock
4. Two red dots will project light onto the ceiling. To optimize the signal, point
the red dots at the center of the ceiling away from unsmooth surfaces such as
lighting xtures, fans, air vents and corners.
NOTES:
The red dots are a guide to help you set up the charging dock. If the light turns
off while you are positioning the dots, touch the metal rim to reactivate it. During
normal operation the red light will not be lit.
In order for Rovio to be able to self-dock and recharge, you must power the charging
dock at all times.
12
Important battery information
Use only fresh batteries of the required size and recommended type.•
Rechargeable batteries are only to be charged under adult supervision.•
Respect the correct polarity, (+) and (-).•
Do not throw batteries into the re.•
The supply terminals are not to be short-circuited.•
Batteries should be replaced by adults.•
Remove batteries if the product is not going to be used for some time.•
This user manual should be kept because it contains important information.•
Disassembling the charging dock
To disassemble the charging dock:
1. Unplug the power cable from the back of the charging dock and from the
electrical outlet.
2. Turn the charging dock over and locate the two tabs that hold the mast in
place. Using two ngers, squeeze both tabs towards each other and remove
the mast
Getting started
Installing and charging the battery pack
Installing and charging the battery pack
Before you use your Rovio, you need to install and charge the battery pack.
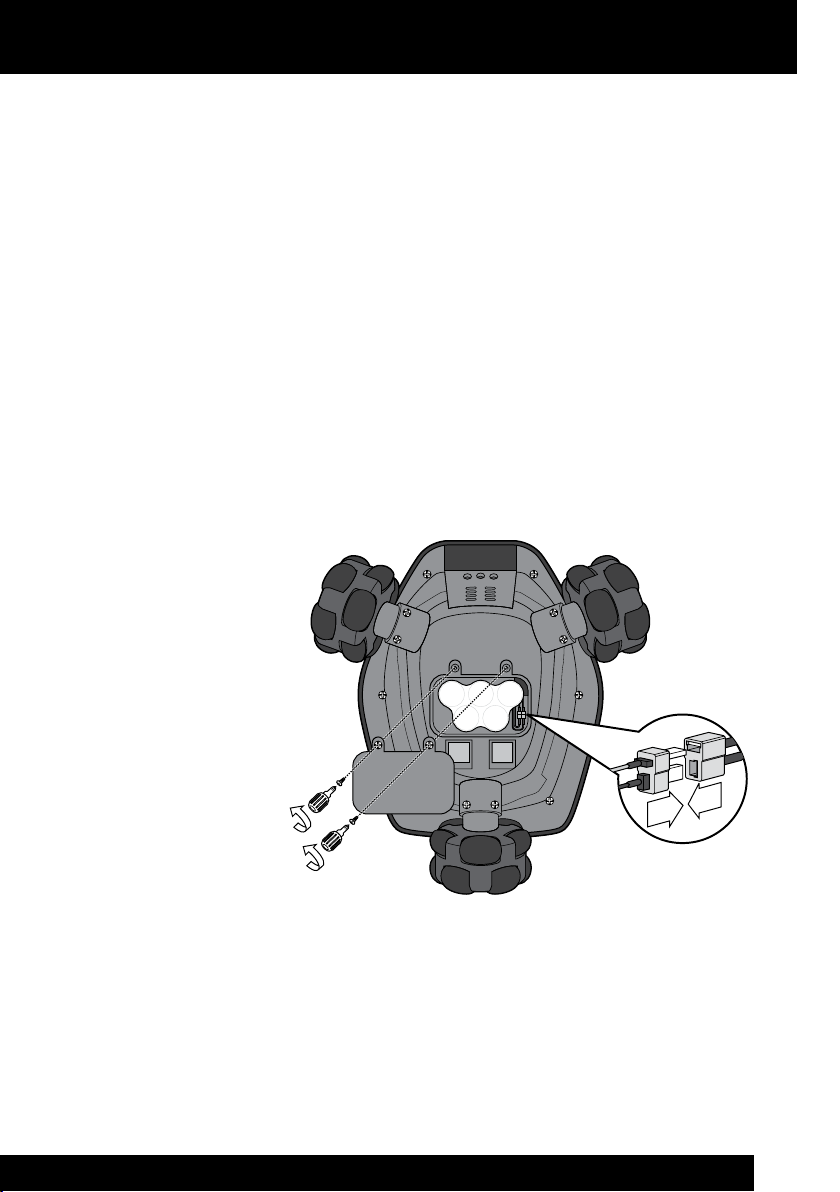
To install the batteries:
1. Locate and open the battery compartment door on the underside of Rovio.
2. Using a Phillips screwdriver (not included) loosen the two screws on the
battery compartment door and remove it.
3. Locate and note the orientation of the battery connector and connect it to the
battery. Insert and connect the battery according to the diagram in step 2.
4. Replace the battery compartment door and tighten the screws using the
screwdriver. Do not over-tighten.
13
Getting started
Installing and charging the battery pack
To charge the batteries:
1. Ensure that the power to the electrical outlet is turned on and that Rovio is
turned on by pressing the power button; Rovio’s LEDs will light up.
2. Place Rovio in its assembled charging dock as illustrated.
The LEDs on Rovio will pulse quickly to indicate that it has begun charging.
3. During charging, the LEDs on Rovio will pulse
slowly; a single charge takes approximately two
hours.
When Rovio has nished charging the LEDs will
remain lit. It is safe to leave Rovio on its charging
dock after the charge has completed.
Low battery
When Rovio’s batteries begin to run low, it will warn you with the following:
14
Rovio interface warning message.•
Power switch LED light indicator ashes green, orange or red (refer to the •
section Power switch LED light indicator).
If Rovio is in the same room as its charging dock and the interface indicates that it
has a navigation signal, it will automatically try to return to the charging dock when
its batteries are running low after you click on the low battery warning message.
Otherwise, you can send it back to its charging dock by clicking on the Home
button on the interface. Refer to the Auxiliary controls table in the Description of
interface section for details.
If you ignore the request to drive Rovio back to its charging dock and continue to use
it, Rovio will shut off automatically when its batteries are drained, and you might not
be able to drive it back to the charging dock to recharge.
NOTE: Rovio must detect the charging base before it can navigate home.

Configuring your Rovio the first time
Installing the Rovio Setup software
Configuring your Rovio the first time
Before you use Rovio for the rst time, you will need to congure your Rovio.
To install the Rovio Setup software, your computer set-up must have the following:
Windows XP™ or Window Vista™•
• USB connectivity
Wireless access point (WAP) device (for example, your wireless router) •
A CD/DVD drive•
A Wi-Fi card (for Ad hoc setup) •
NOTE: If you are a Mac user, refer to the subsection Mac users in the section Installing
the Rovio Setup software to learn how to congure Rovio without the Rovio Setup CD.
IMPORTANT: Rovio does not support WPA passwords on wireless access points;
it only supports WEP passwords. For instance, if your wireless router uses a WPA
password, you will need to change it to a WEP password. Refer to your
router’s user manual.
Please go to www.wowweesupport.com to check if a rmware update supporting
WPA has become available.
Installing the Rovio Setup software
This section describes setting up Rovio on PC and Mac computers.
PC users
NOTE: To run the Rovio Setup CD, you need a PC computer running Windows XP™ or
Windows Vista™ equipped with a CD drive.
To run the Rovio Setup:
1. Verify that your wireless router is turned on and working. Also ensure that
Rovio is fully-charged and ON.
2. Insert the Rovio Setup CD in your CD drive on your computer.
15

Configuring your Rovio the first time
Installing the Rovio Setup software
3. If Autoplay is enabled on your computer, the
Rovio Setup installation dialog will appear. If it
does not, locate the RovioSetup.exe le on the
CD and click on it to begin installation.
The Rovio Setup wizard will appear.
4. Follow the onscreen instructions for installing the Rovio Setup software.
NOTE: If you are using the Rovio Setup CD, you should not turn Rovio on while it is
connected to your computer via USB.
For advanced PC users
You can install the Rovio Setup software without the Rovio Setup CD (Ad hoc mode).
Note that you need a WiFi card on your PC. To do so:
NOTE: These instructions for advanced PC users can only be used to rst congure
Rovio or after you restore it to its default factory settings.
16
1. Ensure that Rovio is fully-charged and ON.
2. From your Windows Control Panel, select Network Connection or Network
and Sharing Center (Windows Vista), and then click on the option to create a
new connection.
3. Follow the onscreen instructions to create an advanced connection, that is,
you want to connect directly to another computer.
4. Connect to the ROVIO_WOWWEE network (Rovio’s default SSID).
5. In the Local Area Connection Properties dialog, select the TCP/IP option, and
then click on Properties.
The TCP/IP Properties option appears.
Configuring your Rovio the first time
Mac users
6. Select the option Use the following IP address and enter the following
information:
IP address 192.168.10.5
Subnet mask 255.255.255.0
Default gateway Leave blank
7. Once your Ad hoc connection is established, you can interface directly with
Rovio to change its settings from the Settings button (refer to the Settings
subsection in the Description of interface section). Enter http://192.168.10.18
in the address bar of your Internet browser.
Your Rovio is now congured to work on your internal network.
NOTES:
Once congured on your internal network, or if you have changed Rovio’s settings,
you can reset Rovio to Ad hoc mode via its interface.
You can congure Rovio to be accessible from an external network; follow the links in
the setup wizard for further details, refer to the WowWee Support site
(www.wowweesupport.com), or refer to the section Using Rovio from an external
network.
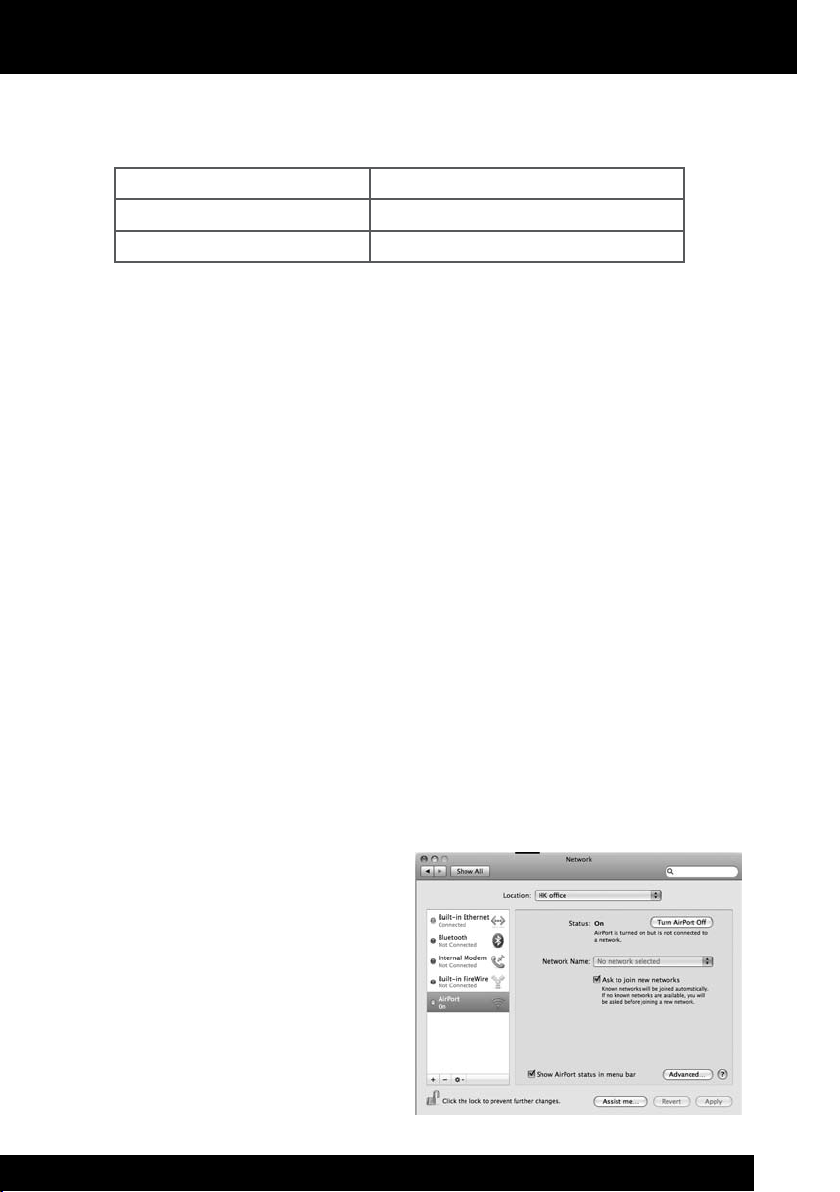
Mac users
If you are running a Mac you will need to congure your Rovio without the Rovio
Setup CD.
NOTE: You need to be logged in with administrative privileges.
To do so:
1. Verify that your AirPort is on and
connected to your wireless router
(this should also be turned on and
working). Ensure that Rovio is fully
charged and ON.
17
 Loading...