

Wouxun KG-805G User Manual
Wouxun
Two Way Radio
KG-805 Series
Owner’s Manual
GMRS Radio
KG-805G
Thank you for buying the KG-805 transceiver.
This radio offers a professional design,
enhanced features, solid performance and easy
accessibility. We think you will be pleased with
its high quality and reliability for your short
range radio communications.
FCCID: WVTWOUXUN08
Important Information
Caution:
Please read this manual before using, as it
includes important instructions for the safe
handling, use and operation of your radio.
Compliance:
This device complies with Part 15 of the FCC
Rules. Operation is subject to the following two
conditions:
(1) This device may not cause harmful
interference, and
(2) This device must accept any interference
received, including interference that may cause
undesired operation.
WARNING: MODIFICATION OF THIE DEVICE TO
RECEIVE CELLULAR RADIOTELEPHONE SERVICE
SIGNALS IS PROHIZBITED UNDER FCC RULES
AND FEDERAL LAW.
Radio Operation and EME Exposure:
Use only an antenna designed for use with this
radio and its operating frequencies.
Unauthorized modifications or attachments
may damage the radio and violate FCC rules.
DO NOT hold the antenna while the radio is in
use.
DO NOT attempt to use the radio with a
damaged antenna.
Safety and General Use:
DO NOT use external power connections or
batteries not specifically designed for or
approved for use with this radio.
DO NOT use the radio in potentially hazardous
areas or where there are potentially explosive
atmospheres (gas, dust, etc.).
DO NOT operate your radio while your vehicle is
being refueled or parked at a gas station.
FCC Licensing Information
The KG-805G operates on General Mobile Radio
Service (GMRS) frequencies according to the
Federal Communications Commission (FCC)
Rules in the United States. As such, a GMRS
license is required to transmit on these
frequencies. To obtain an FCC license for the
GMRS, please go to the FCC’s web site at
https://www.fcc.gov/wireless/support/fccform-605 and request FCC Form 605.
Unpacking and Checking Your
Equipment
Carefully unpack the radio. We recommend that
you identify the following items before
discarding the packing material. If any items are
missing or have been damaged during
shipment, please notify your dealer
immediately.
Included Accessories:
1 - KG-805G Radio
1 - High Gain Antenna
1 - Li-ion Battery Pack
1 - Desktop Charger
1 - Belt Clip
1 – Hand Strap
1 - Owner’s Manual
Description of Features
1. 22 GMRS Channels
2. 8 GMRS Repeater Channels
3. Output Power: Up to 4W
4. VOX
5. Calling Ring Function
6. 155 CTCSS/DCS Privacy Codes
7. Voice Prompts
8. Three Color Backlight Display
9. Multi-Display Modes
10. Alarm Function
11. Multiple Scanning Modes
12. Priority Scan Function
13. FM Radio w/ Frequency Display
14. High Capacity Li-ion Battery Pack
15. Intelligent Charger
16. Busy Channel Lockout
17. Multiple Display Modes at Power On
18. Low Voltage Prompt
19. Transmit Overtime Prompt
20. Key Lock
21. Channel Scan
22. Power Save
23. PC Programmable
24. IP55 Waterproof
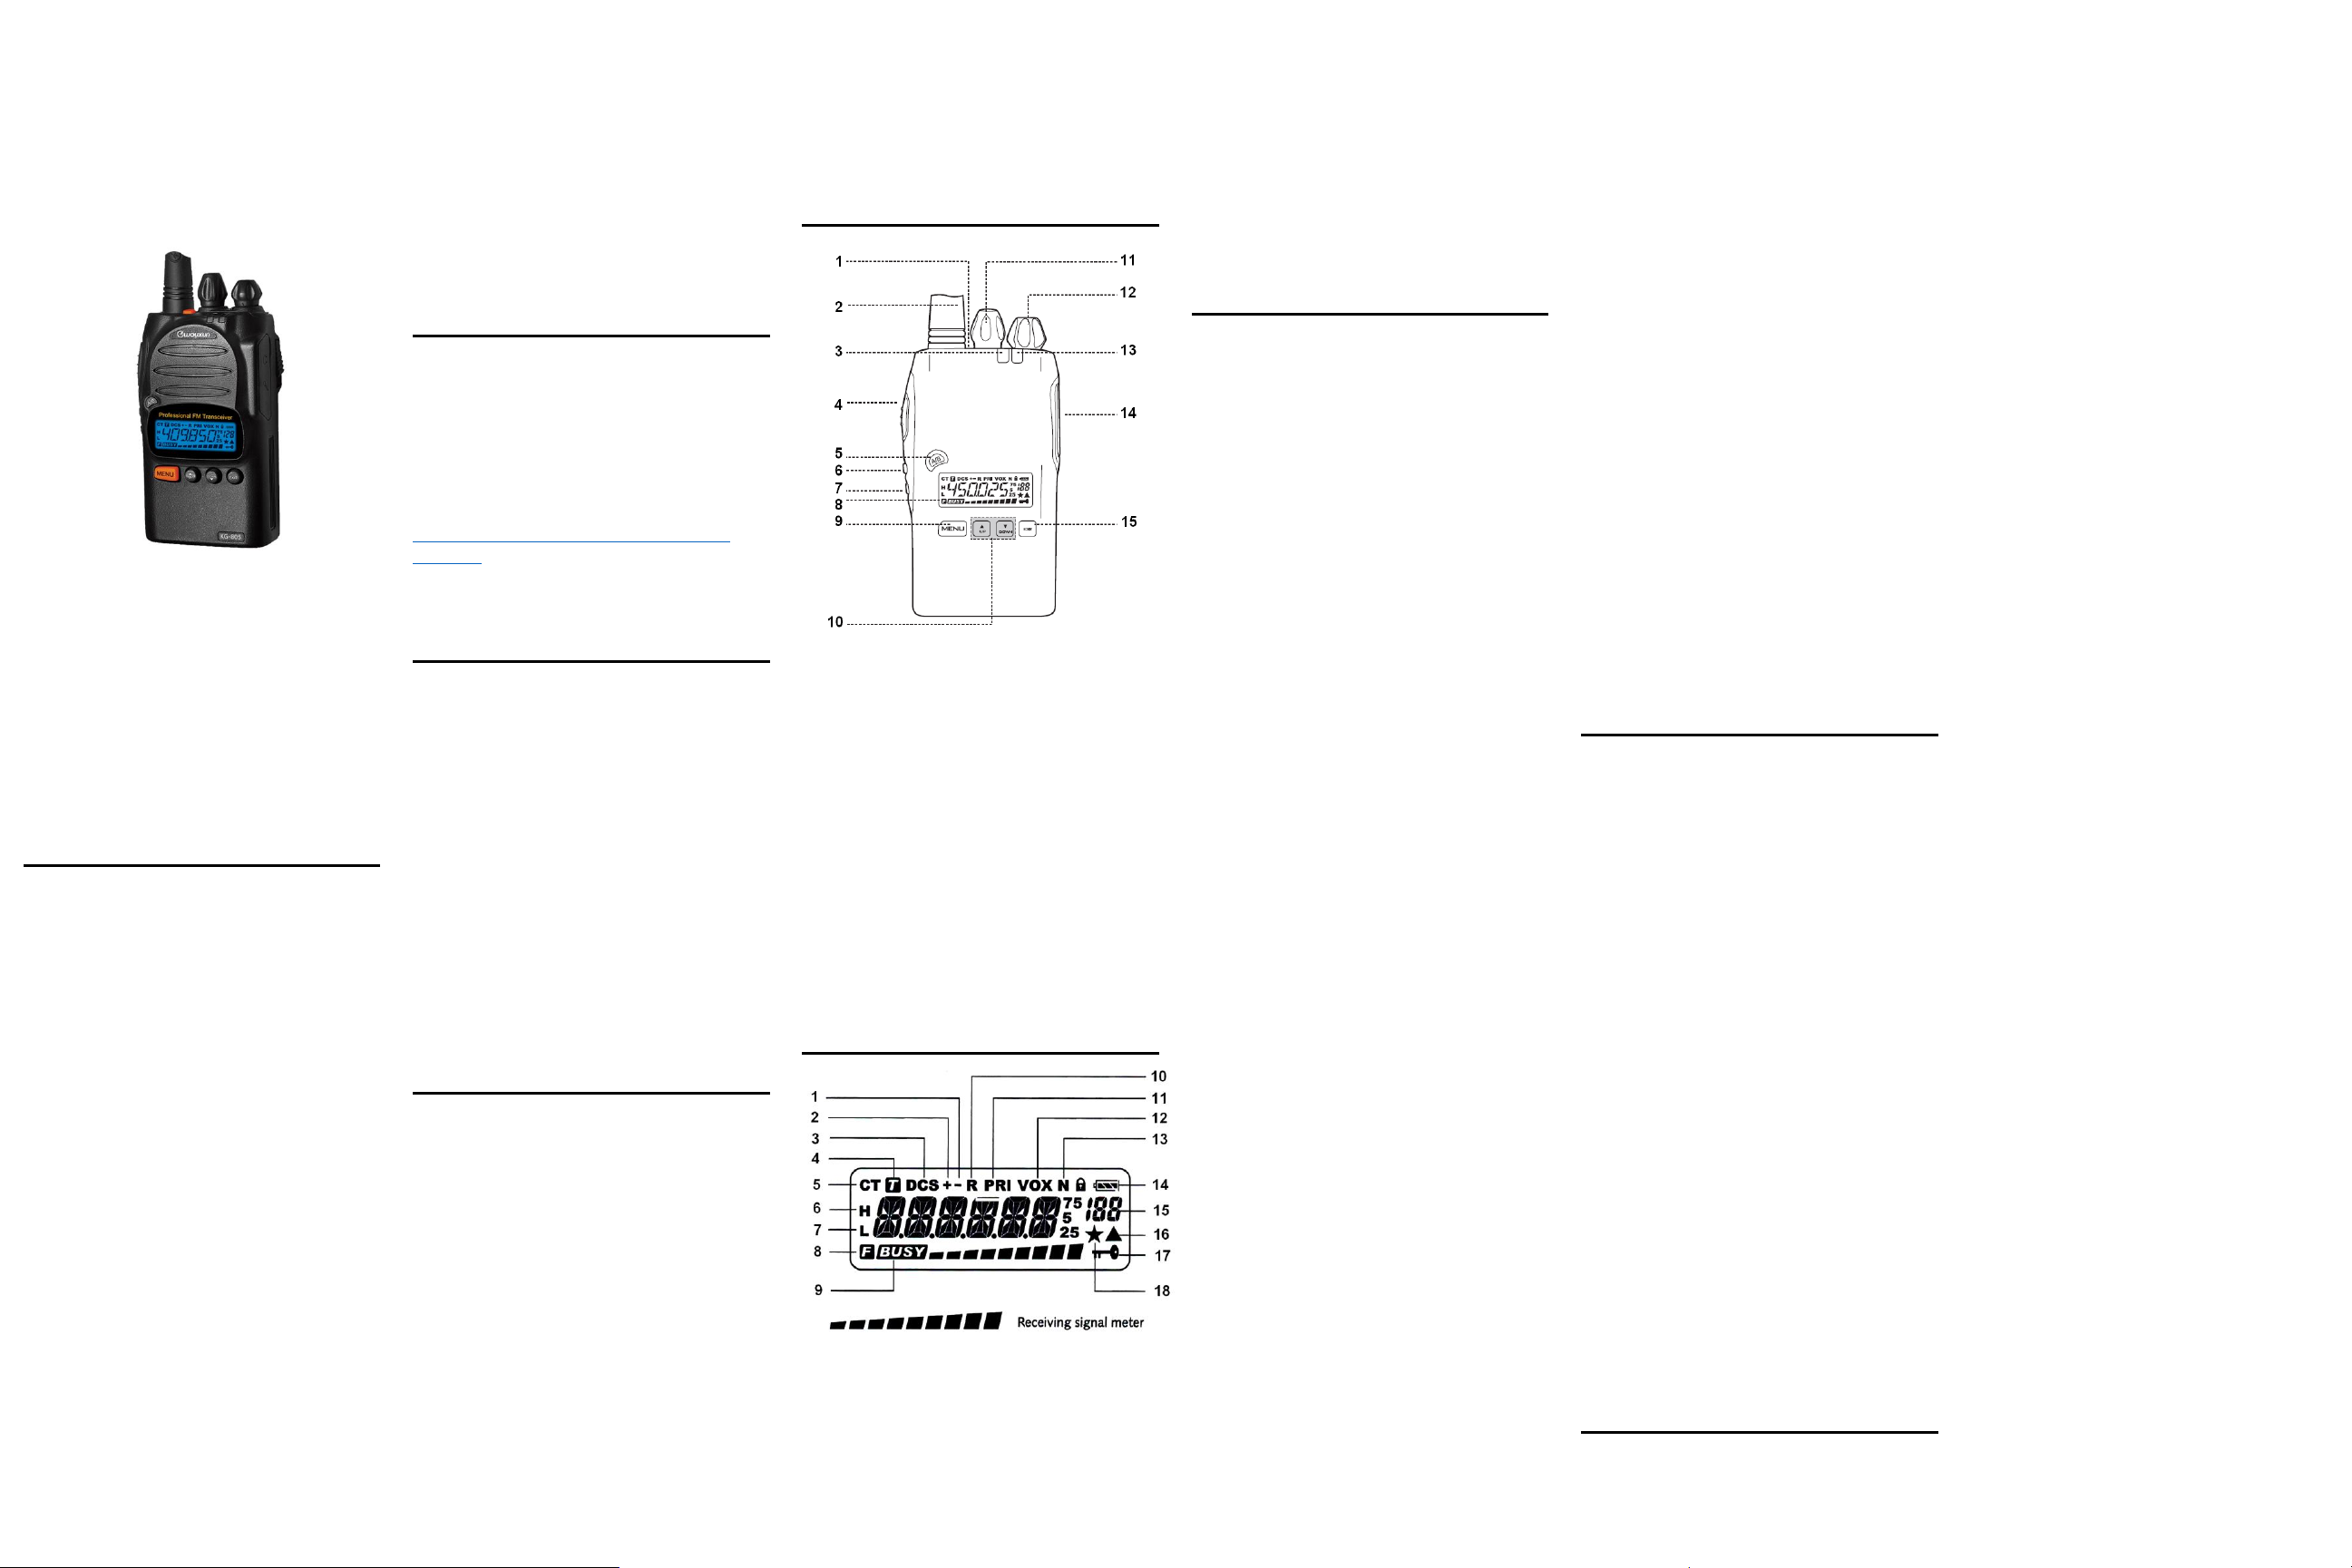
Radio Controls
1. Alarm/PF2
2. Antenna
3. Transmit LED
4. PTT Button
5. A/B Button
6. PF1
7. Monitor Button
8. LCD Display
9. Menu Button
10. Up/Down Buttons
11. Channel Knob
12. Power/Volume Knob
13. Receive LED
14. Audio/Accessory Port
15. Exit Button
LCD Display
1. Split (N/A)
2. Split (N/A)
3. DCS
4. DTMF (N/A)
5. CTCSS
6. High Power
7. Low Power
8. Menu Setting Mode
9. BCL
10. Reverse Frequency (N/A)
11. Priority Scan
12. VOX Transmit
13. Bandwidth Indicator
14. Battery Status
15. Menu / Channel Number
16. With Memory Channel
17. Key Lock
18. FM Radio Activated
Getting Started
Waterproof
The KG-805 is waterproof to IP55 standards. It is
dust resistant and rated to withstand water
projected by a nozzle (6.3 mm) against
enclosure from any direction for a limited
period. This radio is resistant to dust and water
only while the battery is properly installed and
locked in place with no gaps and the accessory
port is completely sealed with the accessory
port cover. Use of a headset or other accessory
will negate the dust and waterproofing features
of this radio. The KG-805 is NOT submersible.
Do not attempt to operate this radio if it has
been submerged.
The radio charger is NOT dust or waterproof.
Charge the radio only under dry conditions.
DO NOT charge the radio when it is wet.
DO NOT expose the radio and charger to wet
environments when charging.
Installing the battery
To install the Lithium-ion battery pack:
1. Be sure the radio is off.
2. Slide the battery pack down the back
off the radio until the three tabs on the
bottom of the battery slide into the
slots at the bottom of the radio.
3. Push forward on the battery until it is
securely locked in place on both sides.
Removing the battery
To remove the battery pack:
1. With your thumb and forefinger, slide
down the latches on each side of the
battery near the top of the battery
pack simultaneously
2. While holding down the latches, pull
the battery pack away from the radio.
Installing the antenna
The KG-805 includes an antenna with an SMA
female connector that is tuned for the GMRS
frequency range of your radio. After market
antennas may be used, provided they are tuned
for the GMRS.
Warning: To avoid injury, DO NOT attempt to
operate your radio if the antenna is damaged or
defective.
DO NOT attempt to operate your radio without
an antenna connected to the radio.
Transmitting without an antenna or a correctly
tuned antenna directly and properly connected
to the radio may damage the radio and void the
warranty.
Belt Clip
The belt clip attaches to the back of the battery
pack on the radio.
To install the belt clip, simply slide it down onto
the back of the battery until it snaps in place.
To remove the battery, depress the lock release
on the back of the belt clip, and while holding it
down, slide the belt clip up and away from the
battery.
Turning the Radio On and Off
Turn the radio on, turn the power/volume knob
clockwise until it clicks and the radio powers on.
To turn the radio off, turn the power/volume
knob counter-clockwise until it clicks and stops.
Adjusting the Volume
Turn the power/volume knob to adjust the
volume to the desired level.
Changing Channels
To change the channel, turn the channel knob
or press the UP/DOWN buttons to go to the
desired channel.
Basic Operation
Transmitting and Receiving
Note: to effectively communicate between your
stations or members of your group, all the
connecting radios must be using the same
channel and privacy (CTCSS or DCS) code.
1. To transmit, press and hold down the
PTT button on the side of the radio.
2. When transmission is finished, release
the PTT button to receive.
For best performance and clarity of
transmission, hold the radio upright with the
front of the radio facing you, hold it several
inches from your mouth and speak directly into
the microphone during transmission.
Scanning Channels
To activate Channel Scan, press and hold the
A/B button for two seconds until you hear “Scan
Begin”. To stop the scan, press and hold the A/B
button for two seconds until you hear “Scan
Stop” and the channel number on which it
stopped.
Backlight
Press the A/B button to turn the LCD and key
backlight on and off.
Menu Options
Setting Squelch Level (SQL-LE) – MENU 1
The squelch level function allows you to set the
threshold of the signal strength received. The
lower squelch settings allow a weaker signal to
be heard, a higher setting blocks out noise and
allows only stronger signals to be heard.
The squelch levels are adjustable from 0-9.
Setting it to 0 turns off squelch, while 9 is full
squelch. The default squelch level setting is 5.
Power Save (SAVE) – MENU 2
To reduce battery consumption, the SAVE
function cuts off power to the receiver
momentarily , then re-activates it to detect
signals If a signal is detected, the radio will be
activated immediately and exit from SAVE
mode.
To activate the SAVE function, Press MENU and
the UP/DOWN buttons to navigate to SAVE (3)
and press MENU to access the function. Then
press UP/DOWN to choose ON, and press
MENU to confirm. Press the EXIT button to exit
the menu.
Roger Beep (ROGER) – MENU 3
The KG-805 allows you to set a tone prompt at
the start of your transmission, at the end of
transmission, or both. The menu choices are
Beginning of Transmission (BOT), End of
Transmission (EOT), Both (BOTH) or None (OFF).
With the radio in Standby, Press MENU and the
UP/DOWN buttons and navigate to ROGER
(menu item 3). Press MENU, then press the
UP/DOWN buttons to choose Beginning of
Transmission (BOT), End of Transmission (EOT),
Both (BOTH) or None (OFF). Press MENU to
confirm, then press EXIT to return to standby
mode.
Timeout Timer (TOT) – MENU 4
To reduce battery consumption and protect the
radio from over transmission, the Timeout
Timer ends the transmission when the
transmission has exceeded a predetermined
time limit, after which the transmission is
interrupted. The timer can bet set in 40 levels
between 15 and 600 seconds, in 15 second
increments.
In standby, Press MENU and the UP/DOWN
buttons and navigate to TOT (menu item 4).
Press MENU to enter, and press the UP/DOWN
buttons to select the desired transmission level
from 15 to 6000. Press MENU to confirm your
choice, then press EXIT to return to standby
mode.
VOX Function (VOX) – MENU 5
Voice Operated Transmit (VOX) automatically
activates transmission when the radio detects a
voice or other noise. It allows for hands-free
operation when transmitting without physically
pushing the Push-To-Talk (PTT) switch to do so.
The KG-805 has 10 levels of sensitivity to detect
sound, from 1 (most sensitive) to 10 (least
sensitive). The higher the level, the more sound
is needed to activate VOX.

To activate VOX, press MENU and the
CH
FREQ
CH
FREQ
CH
FREQ
1
462.562
11
467.637
21
462.700
2
462.587
12
467.662
22
462.725
3
462.612
13
467.687
RPT15
462.550
4
462.637
14
467.712
RPT16
462.575
5
462.662
15
462.550
RPT17
462.600
6
462.687
16
462.575
RPT18
462.625
7
462.712
17
462.600
RPT19
462.650
8
467.562
18
462.625
RPT20
462.675
9
467.587
19
462.650
RPT21
462.700
10
467.612
20
462.675
RPT22
462.725
CTCSS
Hz
CTCSS
Hz
CTCSS.
Hz
1
67.0
18
118.8
35
183.5
2
69.3
19
123.0
36
186.2
3
71.9
20
127.3
37
189.9
4
74.4
21
131.8
38
192.8
5
77.0
22
136.5
39
196.6
6
79.7
23
141.3
40
199.5
7
82.5
24
146.2
41
203.5
8
85.4
25
151.4
42
206.5
9
88.5
26
156.7
43
210.7
10
91.5
27
159.8
44
218.1
11
94.8
28
162.2
45
225.7
12
97.4
29
165.5
46
229.1
13
100.0
30
167.9
47
233.6
14
103.5
31
171.3
48
241.8
15
107.2
32
173.8
49
250.3
16
110.9
33
177.3
50
254.1
17
114.8
34
179.9
DCS
CODE
DCS
CODE
DCS
CODE 1 D023N
36
D223N
71
D445N
2
D025N
37
D225N
72
D446N
3
D026N
38
D226N
73
D452N
4
D031N
39
D243N
74
D454N
5
D032N
40
D244N
75
D455N
6
D036N
41
D245N
76
D462N
7
D043N
42
D246N
77
D464N
8
D047N
43
D251N
78
D456N
9
D051N
44
D252N
79
D466N
10
D053N
45
D255N
80
D503N
11
D054N
46
D261N
81
D506N
12
D065N
47
D263N
82
D516N
13
D071N
48
D265N
83
D523N
14
D072N
49
D266N
84
D526N
15
D073N
50
D271N
85
D532N
16
D074N
51
D274N
86
D546N
17
D114N
52
D306N
87
D565N
18
D115N
53
D311N
88
D606N
19
D116N
54
D315N
89
D612N
20
D122N
55
D325N
90
D624N
21
D125N
56
D331N
91
D627N
22
D131N
57
D332N
92
D631N
23
D132N
58
D343N
93
D632N
24
D134N
59
D346N
94
D645N
25
D143N
60
D351N
95
D654N
26
D145N
61
D356N
96
D662N
27
D152N
62
D364N
97
D664N
28
D155N
63
D365N
98
D703N
29
D156N
64
D371N
99
D712N
30
D162N
65
D411N
100
D723N
31
D165N
66
D412N
101
D731N
32
D172N
67
D413N
102
D732N
33
D174N
68
D423N
103
D734N
34
D205N
69
D431N
104
D743N
35
D212N
70
D432N
105
D754N
UP/DOWN buttons and navigate to VOX (menu
item 5). Press MENU to enter, and press the
UP/DOWN buttons to select the desired
transmission level from 1 to 10. Press MENU to
confirm your choice, then press EXIT to return
to standby mode.
To deactivate VOX, press MENU and the
UP/DOWN buttons and navigate to VOX (menu
item 5). Press MENU to enter, and press the
UP/DOWN buttons to select OFF. Press MENU
to confirm your choice, then press EXIT to
return to standby mode.
Transmit Overtime Alarm (TOA) – MENU 6
You can set the KG-805 to display a prompt to
warn you when the transmit time limit set in
the Timeout Timer (TOT) is about to be
exceeded. The alarm has 10 levels, from 1 to 10.
To activate the Transmit Overtime Alarm, press
MENU and the UP/DOWN buttons and navigate
to TOA (menu item 6). Press MENU to enter,
and press the UP/DOWN buttons to select the
desired transmission level from 1 to 10. Press
MENU to confirm your choice, then press EXIT
to return to standby mode. The default level is
5.
To deactivate the Transmit Overtime Alarm,
press MENU and the UP/DOWN buttons and
navigate to TOA (menu item 6). Press MENU to
enter, and press the UP/DOWN buttons to
select OFF. Press MENU to confirm your choice,
then press EXIT to return to standby mode.
Voice Prompt (VOICE) – MENU 7
The KG-805 supports voice prompts in English
and Chinese languages. The default is English.
To choose the language, press MENU and the
UP/DOWN buttons and navigate to VOICE
(menu item 7). Press MENU to enter, and press
the UP/DOWN buttons to select English or
Chinese. Press MENU to confirm your choice,
then press EXIT to return to standby mode.
Beep Prompt (BEEP) – MENU 8
To activate or deactivate the Beep prompt,
press MENU and the UP/DOWN buttons and
navigate to BEEP (menu item 8). Press MENU to
enter, and press the UP/DOWN buttons to
select ON or OFF. Press MENU to confirm your
choice, then press EXIT to return to standby
mode. The default is ON.
Power On Message (PONMSG) – MENU 9
The KG-805 displays an initial message on the
screen for several seconds when powered on.
You can choose from three message options.
OFF flashes the full screen display, BATT-V
displays the battery voltage, and MSG displays
the message “WELCOM”. The default is OFF.
To choose the Power On message, press MENU
and the UP/DOWN buttons and navigate to
PONMSG (menu item 9). Press MENU to enter,
and press the UP/DOWN buttons to select OFF,
BATT-V or MSG. Press MENU to confirm your
choice, then press EXIT to return to standby
mode.
Busy Channel Lockout (BCL) – MENU 10
To prevent interference, The KG-805 can sound
an alarm if another radio is already transmitting
on same channel when the PTT is pressed. The
default is OFF.
Note: This item is available in the menu for
display only. It can be modified through
optional programming software.
Key Lock (AUTOLK) – MENU 11
The buttons on the KG-805 can be automatically
locked to prevent them from being accidentally
pressed. When the automatic key lock is
enabled, the buttons on the radio will
automatically locked within 15 seconds if there
is no operation while in standby. The default is
OFF.
To activate or deactivate the Automatic Key
Lock, press MENU and the UP/DOWN buttons
and navigate to AUTOLCK (menu item 11). Press
MENU to enter, and press the UP/DOWN
buttons to select ON or OFF. Press MENU to
confirm your choice, then press EXIT to return
to standby mode. The default is OFF.
Set Receiving CTCSS (R-CTC) – MENU 12
The KG-805 has 50 CTCSS tones and 105 DCS
codes for a total of 155 privacy code settings.
The default is OFF.
To set the receiving CTCSS tone for a channel,
go to the channel for which you want to set the
tone. In standby, Press MENU and the
UP/DOWN buttons and navigate to R-CTC
(menu item 12). Press MENU to enter, and press
the UP/DOWN buttons to select the desired
CTCSS tone. Press MENU to confirm your
choice, then press EXIT to return to standby
mode.
To deactivate the receiving CTCSS tone, go to
the channel. In standby, Press MENU and the
UP/DOWN buttons and navigate to R-CTC
(menu item 12). Press MENU to enter, and press
the UP/DOWN buttons to select OFF. Press
MENU to confirm your choice, then press EXIT
to return to standby mode.
Set Transmit CTCSS (T-CTC) – MENU 13
To set the transmit CTCSS tone for a channel, go
to the channel for which you want to set the
tone. In standby, Press MENU and the
UP/DOWN buttons and navigate to T-CTC
(menu item 13). Press MENU to enter, and press
the UP/DOWN buttons to select the desired
CTCSS tone. Press MENU to confirm your
choice, then press EXIT to return to standby
mode.
To deactivate the receiving CTCSS tone, go to
the channel. In standby, Press MENU and the
UP/DOWN buttons and navigate to T-CTC
(menu item 13). Press MENU to enter, and press
the UP/DOWN buttons to select OFF. Press
MENU to confirm your choice, then press EXIT
to return to standby mode.
Set Receiving DCS (R-DCS) – MENU 14
To set the receiving DCS code for a channel, go
to the channel for which you want to set the
code. In standby, Press MENU and the
UP/DOWN buttons and navigate to R-DCS
(menu item 14). Press MENU to enter, and press
the UP/DOWN buttons to select the desired
DCS tone. Press MENU to confirm your choice,
then press EXIT to return to standby mode.
To deactivate the receiving DCS code, go to the
channel. In standby, Press MENU and the
UP/DOWN buttons and navigate to R-DCS
(menu item 14). Press MENU to enter, and press
the UP/DOWN buttons to select OFF. Press
MENU to confirm your choice, then press EXIT
to return to standby mode.
Set Transmit DCS (T-DCS) – MENU 15
To set the transmit DCS code for a channel, go
to the channel for which you want to set the
code. In standby, Press MENU and the
UP/DOWN buttons and navigate to T-DCS
(menu item 15). Press MENU to enter, and press
the UP/DOWN buttons to select the desired
DCS tone. Press MENU to confirm your choice,
then press EXIT to return to standby mode.
To deactivate the transmit DCS code, go to the
channel. In standby, Press MENU and the
UP/DOWN buttons and navigate to T-DCS
(menu item 15). Press MENU to enter, and press
the UP/DOWN buttons to select OFF. Press
MENU to confirm your choice, then press EXIT
to return to standby mode.
Setting Scan Mode (SC-REV) – MENU 16
The KG-805 will pause channel scan when a
signal is detected on a specific channel. The
scan will resume or stop completely when the
signal is no longer detected, depending on the
scan mode you choose. The default is TO.
There are three scan modes.
TO – After detecting the signal on a channel, the
radio will resume scanning if no operation is
performed within 5 seconds.
CO – When a signal is detected, the radio stops
scanning and will resume scanning 3 seconds
after the signal disappears.
SE – When a signal is detected, scanning stops.
To choose the scan mode, press MENU and the
UP/DOWN buttons and navigate to SC-REV
(menu item 16). Press MENU to enter, and press
the UP/DOWN buttons to select TO, CO, or SE.
Press MENU to confirm your choice, then press
EXIT to return to standby mode.
Setting Function Key 1 (PF1) – MENU 17
The KG-805 has two function keys, one on the
side of the radio and one on top, both of which
are configurable in the menu. Programmable
Function Key 1 (PF1) can be configured to
perform one of three functions. RADIO allows
access to the built-in FM radio, SCAN accesses
the channel scan function, and LAMP controls
the backlight for the LCD display and keys. The
default is RADIO.
To choose the function of the PF1 key, press
MENU and the UP/DOWN buttons and navigate
to PF1 (menu item 17). Press MENU to enter,
and press the UP/DOWN buttons to choose
RADIO, SCAN, or LAMP. Press MENU to confirm
your choice, then press EXIT to return to
standby mode.
To deactivate the PF1 key, press MENU and the
UP/DOWN buttons and navigate to PF1 (menu
item 17). Press MENU to enter, and press the
UP/DOWN buttons to select OFF. Press MENU
to confirm your choice, then press EXIT to
return to standby mode.
Setting Alarm Button (PF2) – MENU 18
Programmable Function Key 2 (PF2) is an Alarm
button and is configured to sound an alarm
when pressed. This key can be disabled in the
radio.
To enable or disable the PF2 alarm button,
press MENU and the UP/DOWN buttons and
navigate to PF2 (menu item 18). Press MENU to
enter, and press the UP/DOWN buttons to
choose ALARM or OFF. Press MENU to confirm
your choice, then press EXIT to return to
standby mode.
Setting Display Mode (CH-MDF) – MENU 19
The KG-805 allows you to choose how to display
the label for each channel. You can select to
display the channel name (NAME), channel
number (CH), or the actual GMRS frequency for
the active channel (FREQ). The default is NAME.
To choose the display mode, press MENU and
the UP/DOWN buttons and navigate to CH-MDF
(menu item 19). Press MENU to enter, and press
the UP/DOWN buttons to choose CH, FREQ, or
NAME. Press MENU to confirm your choice,
then press EXIT to return to standby mode.
Set Standby Backlight (WT-LED) MENU 20
The KG-805 allows you to select one of three
customizable backlight colors. When the
backlight is activated while the radio is in
standby, the display backlight will activate in
color you choose. The choices are blue (BLUE),
purple (PURPLE) or orange (ORANGE). You can
also turn the backlight off when receiving a call.
To choose the receiving backlight color, press
MENU and the UP/DOWN buttons and navigate
to WT-LED (menu item 20). Press MENU to
enter, and press the UP/DOWN buttons to
choose BLUE, PURPLE, ORANGE, or OFF. Press
MENU to confirm your choice, then press EXIT
to return to standby mode.
Setting Receive Backlight (RX-LED) MENU 21
The KG-805 allows you to select one of three
customizable backlight colors during receive.
When the radio receives a signal, the display
backlight will activate in color you choose. The
choices are blue (BLUE), purple (PURPLE) or
orange (ORANGE). You can also turn the
backlight off when receiving a call.
To choose the receiving backlight color, press
MENU and the UP/DOWN buttons and navigate
to WT-LED (menu item 21). Press MENU to
enter, and press the UP/DOWN buttons to
choose BLUE, PURPLE, ORANGE, or OFF. Press
MENU to confirm your choice, then press EXIT
to return to standby mode.
Setting Transmit Backlight (TX-LED) MENU 22
The KG-805 allows you to select one of three
customizable backlight colors during transmit.
When the radio transmits a signal, the display
backlight will activate in color you choose. The
choices are blue (BLUE), purple (PURPLE) or
orange (ORANGE). You can also turn the
backlight off when receiving a call.
To choose the receiving backlight color, press
MENU and the UP/DOWN buttons and navigate
to WT-LED (menu item 22). Press MENU to
enter, and press the UP/DOWN buttons to
choose BLUE, PURPLE, ORANGE, or OFF. Press
MENU to confirm your choice, then press EXIT
to return to standby mode.
Editing Channel Name (CHNAME) – MENU 23
The KG-805 allows you to customize the name
of each channel. The channel name can consist
of 26 letters (A to Z) and 10 numerals (0-9) with
a maximum length of 6 characters. Selecting the
(-) symbol will leave a blank character (space).
To edit a channel name, press MENU and the
UP/DOWN buttons and navigate to CHNAME
(menu item 23). Press MENU to enter, press
EXIT to browse the channels, and press the
UP/DOWN buttons to choose the channel to
edit. Press the UP button to search and select
the desired letter or numeral you want to
change, then press the DOWN button to move
to the next character place and use the UP
button to search and select the desired letter or
numeral. Repeat the process until the sixth
character is edited. Press MENU to confirm your
choice, then press EXIT to return to standby
mode.
Channels and Frequencies
CTCSS Tones
DCS Codes
 Loading...