

www.presonus.com
English
PDA1000
1000W Class D Amplifier
Owner’s Manual
P1 P2 HPF SIGTEMP -3dB LIM CLIP NET
OUTPUT CONTROL
INPUT
AUDIO I/0
TM

Table of Contents
1 Overview — 1
1.1 Introduction — 1
1.2 About This Manual — 1
2 Application and Deployment — 2
2.1 Getting Started — 2
2.2 Cooling — 2
2.3 Important Safety Instructions — 2
3 Hookup — 4
3.1 Rear-Panel Connections and Controls — 4
3.2 Onboard Performance Monitoring — 4
3.3 Power — 5
3.3.1 Connecting Loop-Thru Power — 5
3.4 Connecting Multiple CDL Loudspeakers — 6
4 Networking Overview — 7
4.1 Selecting the Right Network Hardware — 7
4.2 Adding a Wireless Router — 7
4.3 Downloading Dante Controller — 7
5 Technical Information — 8
5.1 Specifications — 8
6 Warranty Information — 9
6.1 How Consumer Law Relates
To This Warranty — 9
1
1 Overview
1.1 Introduction
PDA1000
Owner’s Manual
1 Overview
1.1 Introduction
P1 P2 HPF SIGTEMP -3dB LIM CLIP NET
OUTPUT CONTROL
INPUT
AUDIO I/0
TM
Thank you for purchasing a WorxAudio® PDA1000 amplifier or PDA1000-equipped
loudspeaker. The PDA1000 is a heavy-duty 1000W Class D power amplifier with
robust onboard DSP that can be connected to a standard LAN network and remotely
controlled using WorxControl software for macOS® and Windows®. WorxControl
provides speaker-management tools that include compression, limiting, and
800 ms of delay. The locking Ethernet connection on the integrated PDA1000
power amplifier also provides audio networking capability via Dante. Dante’s
multi-channel digital media networking technology delivers near-zero latency
and synchronization and has been adopted by many pro-audio manufacturers,
facilitating the PDA1000’s interoperability with a wide range of equipment.
We encourage you to contact us with questions or comments regarding
this product. PreSonus Audio Electronics is committed to constant
product improvement, and we value your suggestions highly. We believe
the best way to achieve our goal of constant product improvement is by
listening to the real experts: our valued customers. We appreciate the
support you have shown us through the purchase of this product.
1.2 About This Manual
This manual covers hardware features and functions for the PDA1000
amplifier only. A separate wiring guide is also available from commercial.
presonus.com for use with passive WorxAudio loudspeakers. Separate
companion guides for the Worx Control application and recommended
Dante deployment guidelines are also available at PreSonus.com
We suggest that you use the manual to familiarize yourself with
the features, applications, and connection procedures for your
PDA1000 amplifier before trying to set up and operate it.
Thank you, once again, for buying our product. We are
confident that you will enjoy your PDA1000 amplifier!

2
2 Application and Deployment
2.1 Getting Started
PDA1000
Owner’s Manual
2 Application and Deployment
2.1 Getting Started
Before you begin, here are a few general rules of thumb:
• Always make sure your loudspeakers are powered off when making connections.
• Do not allow your inputs to clip. Watch the Clip LED on the back of your
loudspeaker. When this LED illuminates, it indicates that the analogto-digital converters are in danger of being overdriven. Overdriving
the converters causes digital distortion, which sounds terrible.
Your PA and attached equipment should be powered on in the following order:
1. Sound sources (keyboards, D.I. boxes, etc.) connected to your mixer
2. Mixer
3. PDA1000 amplifier or PDA1000-equipped Loudspeakers
When it’s time to power down, your system should be turned off in the reverse order.
2.2 Cooling
Whether installed in a rack or in a powered WorxAudio loudspeaker, PDA1000
amplifiers require a minimum of 6” (152.4 mm) clearance for cooling.
Do not restrict airflow to the rear of the speaker enclosure or rack.
CAUTION: To avoid overheating, do not install with the amplifier panels exposed
to direct sunlight. This can heat the amplifier module and reduce performance.
Install sunshades to avoid direct exposure. The maximum ambient temperature for full
performance should not exceed 104˚ F (40˚ C).
CAUTION: Do not install amplifiers where they will be exposed to rain or other
moisture. PDA1000-equipped loudspeakers and PDA1000 amplifiers are not
weatherproof. Protection from the elements must be provided in outdoor installations.
2.3 Important Safety Instructions
WARNING: Failure to observe the following safety precautions may result in
severe injury or death. Installations such as described in this guide should only be
attempted by a trained professional.
• Read these instructions.
• Keep these instructions.
• Heed all warnings.
• Follow all instructions.
• Before installing or suspending any PDA1000-equipped loudspeaker,
inspect all hardware, the enclosure, and associated equipment for damage.
Missing, corroded, or deformed components, or components without
correct load ratings, could significantly reduce the strength of the installation
or placement and should immediately be repaired or replaced.
• Always make sure that the structure the loudspeaker is to be
suspended from has been approved by the building or structural
engineer and will support the weight of all the components of the
speaker system including speakers, speaker cable, wire rope, etc.
• Consult a licensed professional structural engineer
regarding physical equipment installation.
• Do not suspend loudspeakers directly over people.
• Use only hardware that is rated for the load conditions of the
installation and that allows for a possible short-term, unexpected
overload. Never exceed the rating of the hardware or equipment.
• PreSonus strongly recommends that the system be inspected at

3
2 Application and Deployment
2.3 Important Safety Instructions
PDA1000
Owner’s Manual
least once a year and logged. If any sign of weakness or damage
is detected, remedial action should be taken immediately.
• All installation crew members must be trained for
loudspeaker rigging and mounting.
• Make sure that all relevant health and safety regulations are known, are
followed by the installation crew, and are in compliance with applicable
local laws. Local government offices can help with this information.
• Suspended installations must be completed or supervised by a certified rigger.
• The system should be designed so that it is a static suspension.
There should be no dynamic or shock loading.
• Personal protective equipment (hard hats, steel-toed footwear, safety
glasses, etc.) should be worn at all times by the installation crew.
• If called for in the design, make sure all installation personnel are trained to
work at height and have certifications for scissor lifts, theatrical hoists, etc.
• Make sure all lifting equipment (slings, span-sets, deck chain, scaffolding, etc.)
is in good working order. Thoroughly inspect all components prior to use.
• Inspect all the components associated with the project for damage before
assembly. Any parts with damage or suspected damage should not be used.
Contact the component manufacturer for replacement parts if necessary.
• Keep a tidy workplace. Do not leave tools, rigging items, etc., on top of
loudspeakers during installation. Loose items can fall and cause injury.
• Never leave the system unattended during the installation process. Make
sure that the workspace is isolated from public access. No one should
be allowed to pass beneath the loudspeakers during installation.
• Do not suspend any other components or loudspeakers from
WorxAudio loudspeakers other than the supported configurations.
• If secondary steel safeties are required, they should be installed once the
entire system is at operating height and before public access is allowed.

4
3 Hookup
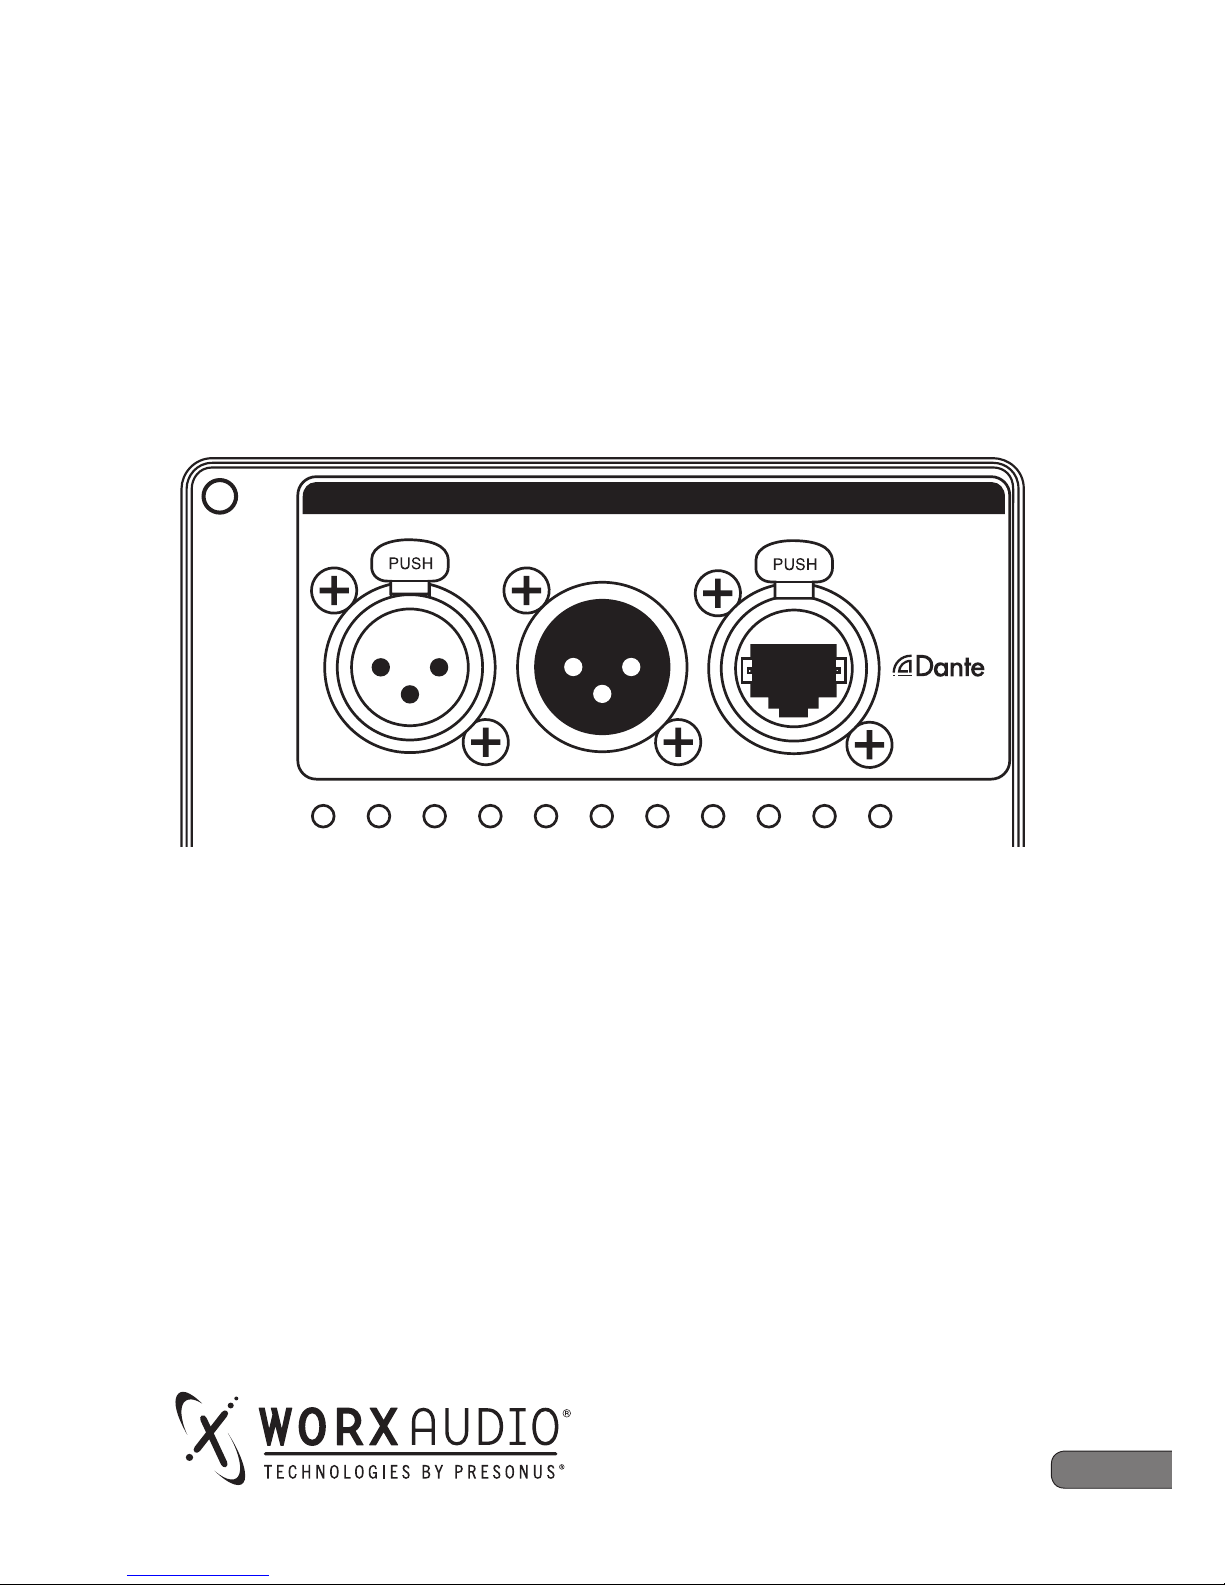
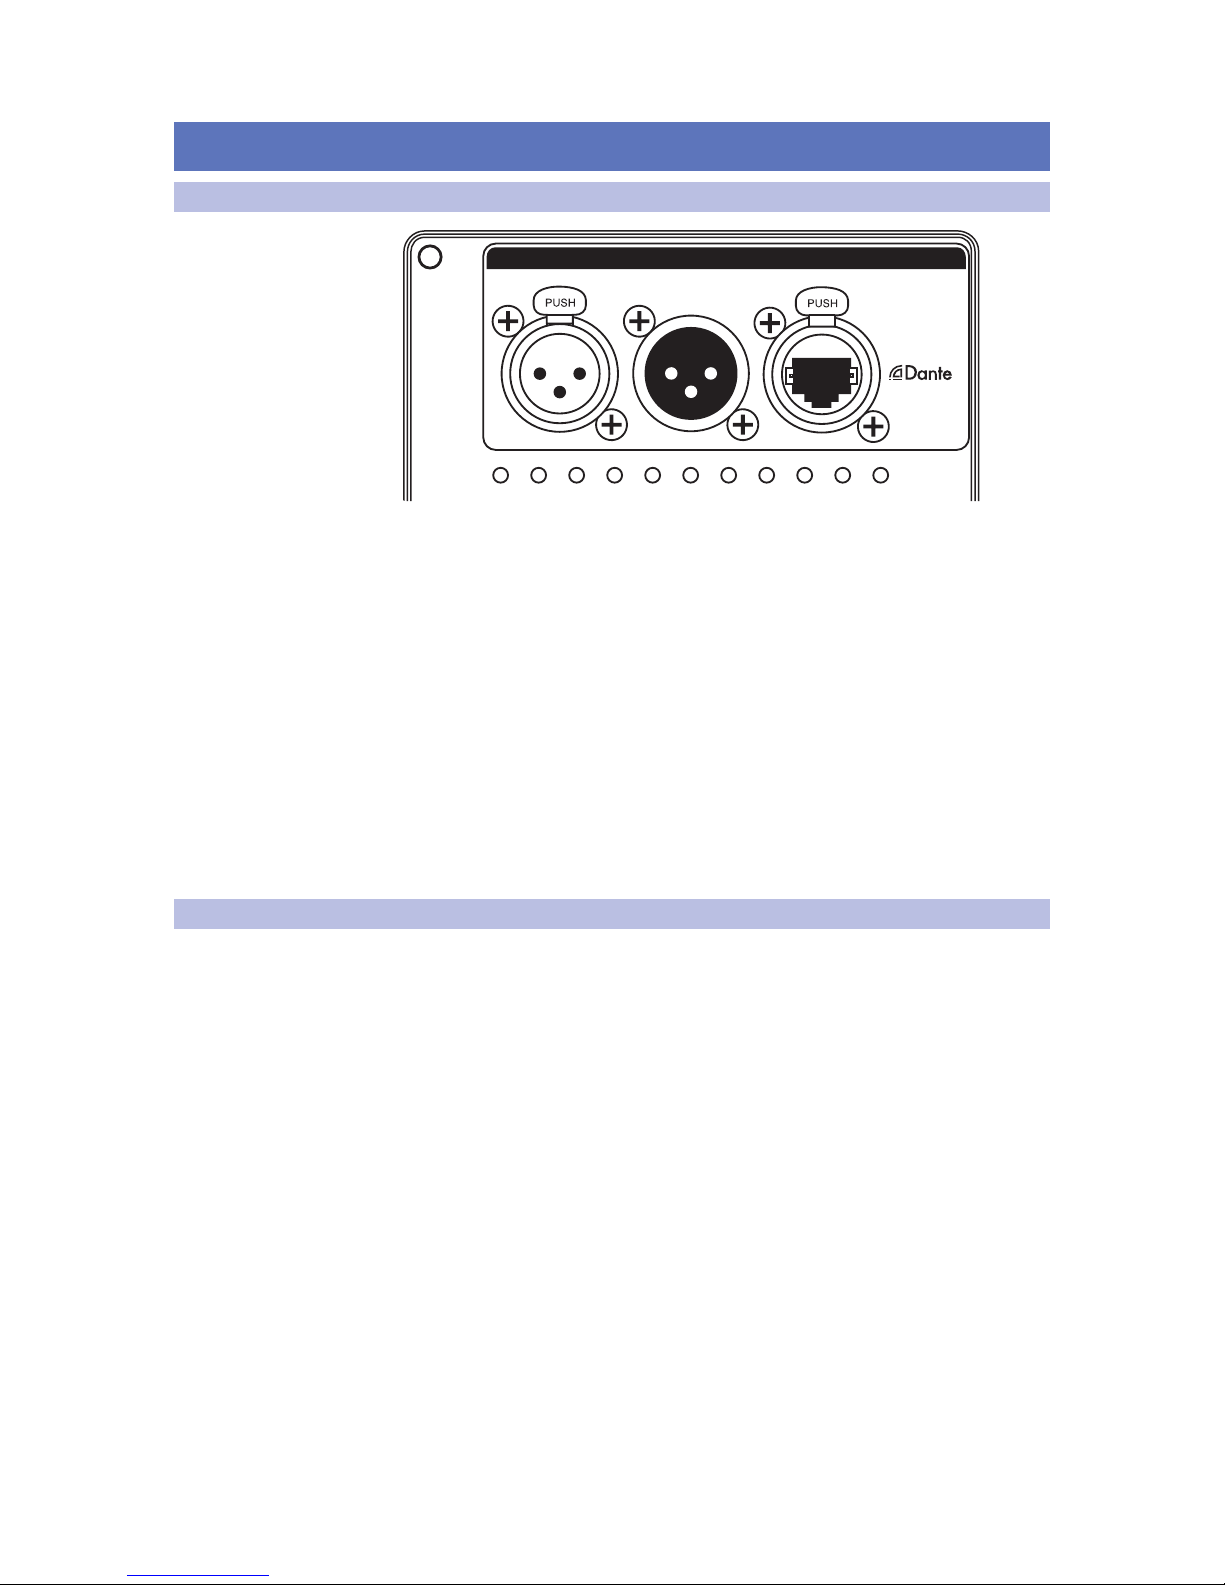
3.1 Rear-Panel Connections and Controls
PDA1000
Owner’s Manual
3 Hookup
3.1 Rear-Panel Connections and Controls
Line Input. This is a balanced XLR connection for line-level input. Use the Line input
to connect the loudspeaker to a StudioLive digital mixer or another mixing console,
either directly or through the Line out connector on a PDA1000 amplifier.
Direct Out. This is the Direct Out for the line input. Use this to connect to other
PDA1000 amplifiers. See Section 3.4 for a connection example.
Dante / Control. This locking Ethernet connection can be used for control via the
Worx Control application as well as Dante audio networking. A standard RJ45
connector may be used, but we recommend the protection provided by using the
mating male locking Ethernet connector. For more information on creating a wired
LAN network and using Dante, see the Worx Control Reference Manual.
Preset Toggle. This button toggles between Preset 1 and Preset 2. Please review the
WorxControl Software Reference Manual for information on the presets available for
each supported WorxAudio loudspeaker model.
High Pass Filter. This button enables/disables the 90 Hz High Pass Filter. When the
LED is illuminated, the 90 Hz High Pass Filter is active. When active, frequency
content below 90 Hz is removed.
3.2 Onboard Performance Monitoring
Performance Monitoring. These six LEDs display the
performance status of the internal amplifier:
• TEMP. The LED will illuminate when the internal temperature of the amplifier
module has exceeded the recommended operating limit (64˚ C).
• SIG. This LED illuminates when the input signal exceeds -50 dB.
• -3 dB. When this LED illuminates, the input signal has exceeded
-3 dB, and you are in danger of clipping the ADC.
• LIM. The protection limiter has been engaged when this indicator illuminates.
• CLIP. The clip LED illuminates when the input signal has
exceeded 0.5 dBFS, and the ADC is clipping, or when the amplifier
exceeds the maximum upper limit (load dependent).

5
3 Hookup
3.3 Power
PDA1000
Owner’s Manual
• NET. This LED has three states:
- Solid Red. Network not available.
- Solid Blue. Network available.
- Flashing Blue. Network packets are being sent or received.
Power User Tip: Never run your input levels higher than the channel inputs can
handle. If you overdrive the A/D converters, it will cause digital distortion (digital
clipping), which sounds terrible.
3.3 Power
AC Line Connection. PDA1000 amplifiers have a universal power supply that
accepts AC power input between 100 and 250 VAC at 50/60 Hz. Each loudspeaker is
supplied with an AC powerCON® power cord appropriate for the country of sale.
WARNING: Do not remove the center grounding prong or use a ground-lift
adapter, as this could result in electric shock.
WARNING: Connect the powerCON connector on the AC powerCON power
cord to the AC In connection on the amplifier before connecting the IEC
connection to the AC mains power source.
Power Thru. PDA1000 amplifiers provide loop-thru power. Using powerCON®
Loop-thru cables and an AC powerCON Power cord, you can power up to six CDLseries loudspeakers on a single 15 amp / 120V (8 am / 240V electrical circuit.
Loop-thru cable connectors are color coded as follows:
• Blue. AC In.
• Grey. AC Out.
Power Switch. This is the On/Off switch.
Power User Tip: If connecting multiple loudspeakers to the same electrical circuit,
make sure that adequate line current is available. Maximum current draw for each
CDL-series loudspeaker is 5.45 Amps.
WARNING: The power switch does not cut AC mains power from the loopthru cables. If AC mains power is connected to one PDA1000 amplifier,
electrical power will be present on all connected loop-thru cables.
3.3.1 Connecting Loop-Thru Power
1. Begin by inserting the grey powerCON connector on the loop-thru
cable into the grey AC Out connection on the power amplifier.
2. Once the cable is fully seated, twist the powerCON
connector clockwise to lock it into place.
3. Insert the blue powerCON connector into the blue AC In
connection on the other CDL-series power amplifier.
4. Once the cable is fully seated, twist the powerCON
connector clockwise to lock it into place.
Repeat Steps 1-4 for the other loudspeakers you’d like to power.
POWER
On/O

6
3 Hookup
3.4 Connecting Multiple CDL Loudspeakers
PDA1000
Owner’s Manual
3.4 Connecting Multiple CDL Loudspeakers
To AC Mains Audio Source
Blue
Blue
Blue
Note: AC powerCON jumper cables are sold separately.

7
4 Networking Overview
4.1 Selecting the Right Network Hardware
PDA1000
Owner’s Manual
4 Networking Overview
4.1 Selecting the Right Network Hardware
While Dante is compatible with standard network hardware, there are a few
basic requirements to keep in mind when choosing your network switch.
• Non-blocking layer-2 gigabit switch with a packet-forwarding rate of 1.488
Mpps per port. For example, if you purchase an 8-port switch, the packetforwarding rate would have to be 11.904 Mpps (1.488 Mpps x 8).
• Energy Efficient Ethernet (EEE), also known as Green Ethernet or IEEE 802.3az,
reduces power consumption when there isn’t much traffic on the network.
Unfortunately, this can lead to audio interruptions and can degrade clocking.
If your switch provides this feature, make sure that you can and do disable it.
• Most managed switches support Quality of Service (QoS). This allows
you to choose Dante clock synchronization as the highest priority and
audio data as the next-highest priority. This is especially important if
you are transferring large amounts of data over your Dante network
or if you are transferring non-Dante data over the same network.
• If you are using multiple switches on your Dante network, we recommend using
the same make and model to simplify setup and guarantee compatibility.
4.2 Adding a Wireless Router
Dante audio and routing cannot travel over a wireless network.
You can still wirelessly remote control your CDL-series loudspeakers
over a Dante network using Worx Control on your macOS or
Windows computer, but you’ll have to do a little more setup.
To connect a wireless router to your Dante network, you will need to purchase a
managed switch and dive into its configuration settings. Select the port to which
you’ve connected your wireless router and set Multicast Filtering to “On.” This will
stop the flow of Dante traffic to that port and allow it to be used for wireless remote
control of your loudspeakers. Do not connect Dante devices to the ports on a
wireless router. Please consult the documentation that came with your managed
switch for instruction about enabling Multicast Filtering on a specific port.
Because your loudspeakers are hardwired to the switch, no additional
setup is required to remote control them with Worx Control. Simply
connect your device to the wireless router network and launch Worx
Control. Complete instructions for Worx Control can be found in the
Worx Control Reference Manual, available at www.presonus.com.
4.3 Downloading Dante Controller
To connect your Dante network, you will need a macOS or Windows computer
with an Ethernet port and Audinate’s Dante Controller application.
Dante Controller is a free software application that allows you to route
audio and configure devices on a Dante network. Thanks to automatic
device discovery, one-click signal routing, and user-editable device and
channel labels, setting up a Dante network is relatively simple.
Dante Controller also provides essential device status information and
powerful real-time network monitoring, including device-level latency
and clock stability stats, multicast bandwidth usage, and customized
event logging, enabling you to identify and resolve network issues. You
can also back up, restore, move, and reuse Dante network configurations
using presets and can edit Dante routing configurations offline.
The Dante Controller application and associated documentation are
available at www.audinate.com/products/software/dante-controller.

8
5 Technical Information
5.1 Specifications
PDA1000
Owner’s Manual
5 Technical Information
5.1 Specifications
Amplifier Type Class D
Total System Power 2000W Peak, 1000W Program (500W RMS)
LF Driver Power 1000W Peak, 500W Program (250W RMS)
HF Driver Power 1000W Peak, 500W Program (250W RMS)
Input Line (XLR)
Output Direct Line Out (XLR)
Networking Dante™ (Audio and Control), Control (only) (Locking Ethernet)
Mains Connection powerCON® In and Out
User Controls Preset Select, HPF On/Off
Indicators Over Temperature, Signal, -3 dB, Limiter, Clip, Network Status

9
6 Warranty Information
6.1 How Consumer Law Relates To This Warranty
PDA1000
Owner’s Manual
6 Warranty Information
PreSonus’ warranty obligations for this hardware product
are limited to the terms set forth below:
6.1 How Consumer Law Relates To This Warranty
THIS WARRANTY GIVES YOU SPECIFIC LEGAL RIGHTS, AND YOU MAY HAVE OTHER
RIGHTS THAT VARY FROM STATE TO STATE (OR BY COUNTRY OR PROVINCE). OTHER
THAN AS PERMITTED BY LAW, PRESONUS DOES NOT EXCLUDE, LIMIT OR SUSPEND
OTHER RIGHTS YOU MAY HAVE, INCLUDING THOSE THAT MAY ARISE FROM THE
NONCONFORMITY OF A SALES CONTRACT. FOR A FULL UNDERSTANDING OF YOUR
RIGHTS YOU SHOULD CONSULT THE LAWS OF YOUR COUNTRY PROVINCE OR STATE.
PreSonus Products And EU Statutory Warranty
When you purchase PreSonus products, European Union consumer
law provides statutory warranty rights in addition to the coverage
you receive from the PreSonus limited warranty. A summary of the EU
Statutory Warranty and the PreSonus Limited Warranty is below:
EU Consumer Law PreSonus Limited Warranty
Repair or Replacement
Coverage For
Defects present when customer
takes delivery
Defects arising after customer takes delivery
Warranty Period
2 years (minimum) from original
date of purchase (unless superseded by PreSonus)
1 year from original date of purchase (unless superseded by PreSonus)
Cost of Coverage Provided at no additional cost Included at no additional cost
Who to contact to make
a claim
The seller PreSonus technical support for your region
What This Warranty Covers
PreSonus Audio Electronics, Inc., (“PreSonus”) warrants defects in material and
workmanship in PreSonus-branded products under normal use. This Limited
Warranty applies only to hardware products manufactured by or for PreSonus that
can be identified by the PreSonus trademark, trade name, or logo affixed to them.
Exclusions and Limitations
This warranty does not cover the following:
1. Damage caused by accident, abuse, improper installation, failure to
follow instructions in the applicable owner’s manual or improper
operation, rental, product modification, alteration, or neglect.
2. Damage from improper grounding, faulty wiring (AC and signal),
faulty equipment, or connection to a voltage range outside
published specifications (see applicable owner’s manual).
3. Damage to drivers or diaphragm assemblies found to have burnt voice
coils from over/under driving or signal surge from another device.
4. Damage occurring during shipment or improper handling.
5. Damage caused by repair or service performed by
persons not authorized by PreSonus.
6. Products on which the serial number has been altered, defaced, or removed.
7. Products purchased from an unauthorized PreSonus dealer (products
that have transferable warranties are excluded from this provision
provided the customer and the product are registered with PreSonus).

10
6 Warranty Information
6.1 How Consumer Law Relates To This Warranty
PDA1000
Owner’s Manual
Who This Warranty Protects
This Warranty protects only the original retail purchaser of the product
(products that have transferable warranties are excluded from this provision
provided the customer and the product are registered with PreSonus)
How Long This Warranty Lasts
The Warranty begins on the original date of purchase from
the retail purchaser, and the duration is as follows:
1-Year Limited Warranty
Product Category Model Transferable
Recording Interfaces AudioBox-, Studio-, Studio 192-, FireStudio™-, and Quantum-series No
Preamplifiers
ADL-series, BlueTube DP V2, DigiMax-series, RC500, Studio Channel,
and TubePre V2
No
StudioLive® Mixers AI-series, AR-series, Classic, and Series III No
Monitoring & Controlling
Central Station Plus, Ceres-series, Eris®-series, FaderPort™-series, HP-series,
Monitor Station V2, R-series, Sceptre®-series, Temblor®-series
No
Accessories Covers, Dolly, PRM1 mic, Sub Pole, breakout cables, power supplies, M10 Kit No
3-Years Limited Warranty
Product Category Model Transferable
Live Sound StudioLive AI 328, 312, 315, 18S Yes
6-Years Limited Warranty
Product Category Model Transferable
Live Sound
PreSonus AIR-series, CDL-series, and ULT-series loudspeakers
WorxAudio PDA-series amplifiers and powered loudspeakers
Yes
What PreSonus Will Do
PreSonus will repair or replace, at our sole and absolute option, products
covered by this warranty at no charge for labor or materials. If the product
must be shipped to PreSonus for warranty service, the customer must pay the
initial shipping charges. PreSonus will pay the return shipping charges.
How to Get Warranty Service (USA)
1. You must have an active user account with PreSonus and your hardware
must be on file with your account. If you do not have an account, please
go to https://my.presonus.com and complete the registration process.
2. Contact our Technical Support Department at (225) 216-7887 or log a
support ticket at: http://support.presonus.com. TO AVOID THE POSSIBILITY
OF SENDING IN A PRODUCT THAT DOES NOT HAVE A PROBLEM, ALL SERVICE
REQUESTS SHALL BE CONFIRMED BY OUR TECH SUPPORT DEPARTMENT.
3. The return authorization number, as well as shipping instructions, shall
be provided after your service request is reviewed and confirmed.
4. The product should be returned for service in the original product
packaging. Products may be shipped in a manufactured “flight” or “road”
style cases but PreSonus will NOT cover any shipping damage to these
cases. Products that are not shipped in the original product package or
a manufactured case may not receive a warranty repair, at PreSonus’ sole
discretion. Depending on the product model and the condition of your
original packaging, your product may not be returned to you in the original
packaging. The return shipping box may be a generic box that has been
fitted for that model tested if the original gift box is not available.

11
6 Warranty Information
6.1 How Consumer Law Relates To This Warranty
PDA1000
Owner’s Manual
How to Get Warranty Service (outside of USA)
1. You must have an active user account with PreSonus and your hardware
must be on file with your account. If you do not have an account, please
go to: https://my.presonus.com and complete the registration process.
2. Contact the Technical Support/Service Department for your
region at www.presonus.com/buy/international_distributors and
follow procedures provided by your PreSonus contact.
Limitation of Implied Warranties
ANY IMPLIED WARRANTIES, INCLUDING WARRANTIES OF
MERCHANTABILITY AND FITNESS FOR A PARTICULAR PURPOSE, ARE
LIMITED IN DURATION TO THE LENGTH OF THIS WARRANTY.
Some states, countries, or provinces do not allow limitations on how long
an implied warranty lasts, so the above limitation may not apply to you.
Exclusion of Damages
PRESONUS’S LIABILITY FOR ANY DEFECTIVE PRODUCT IS LIMITED TO THE
REPAIR OR REPLACEMENT OF THE PRODUCT, AT PRESONUS’S SOLE OPTION. IF
PRESONUS ELECTS TO REPLACE THE PRODUCT, THE REPLACEMENT MAY BE A
RECONDITIONED UNIT. IN NO EVENT WILL PRESONUS BE LIABLE FOR DAMAGES
BASED ON INCONVENIENCE, LOSS OF USE, LOST PROFITS, LOST SAVINGS, DAMAGE
TO ANY OTHER EQUIPMENT OR OTHER ITEMS AT THE SITE OF USE, AND, TO THE
EXTENT PERMITTED BY LAW, DAMAGES FOR PERSONAL INJURY, OR ANY OTHER
DAMAGES WHETHER INCIDENTAL, CONSEQUENTIAL OR OTHERWISE, EVEN IF
PRESONUS HAS BEEN ADVISED OF THE POSSIBILITY OF SUCH DAMAGES.
Some states, countries, or provinces do not allow limitations on how long
an implied warranty lasts, so the above limitation may not apply to you.
If you have any questions about this warranty or service received, please
contact PreSonus (USA) at +1-225-216-7887 or contact one of our authorized
international distributors at www.presonus.com/buy/international_distributors.
Product features, design, and specifications are subject to change without notice.

© 2018 PreSonus Audio Electronics, Inc. All Rights Reserved. PreSonus and WorxAudio are trademarks or registered trademarks of PreSonus Audio Electronics, Inc. Mac and Mac OS
are registered trademarks of Apple, Inc., in the U.S. and other countries. Windows is a registered trademark of Microsoft, Inc., in the U.S. and other countries. powerCON is a registered
trademark of Neutrik, in the U.S. and other countries. Dante is a registered trademark of Audinate. Other product names mentioned herein may be trademarks of their respective
companies. All specifications subject to change without notice...except the recipe, which is a classic.
Dinner is Served
Added bonus: PreSonus’ previously Top Secret recipe for…
Redfish Couvillion
Ingredients:
• ¼ C Vegetable oil
• ¼ C flour
• 1 onion diced
• 1 clove garlic minced
• 1 green pepper diced
• 3 celery stalks diced
• 1 14oz can diced tomatoes
• 1 bottle light beer
• 2 bay leaves
• 1 tsp thyme
• 2 lbs Redfish fillets
Cooking Instructions:
1. In a heavy saucepan or large skillet, heat oil on medium high and slowly add flour a tablespoon at a time to create a roux.
Continue cooking the roux until it begins to brown, creating a dark blond roux.
2. Add garlic, onions, green pepper, and celery to roux.
3. Sauté vegetables for 3-5 minutes until they start to soften.
4. Add tomatoes, bay leaves, thyme, and redfish. Cook for several minutes.
5. Slowly add beer and bring to a low boil.
6. Reduce heat and simmer uncovered for 30-45 minutes until redfish and vegetables are completely cooked, stirring occasionally. Break up redfish into bite size chunks and stir in. Add pepper or hot sauce to taste. Do not cover.
7. Serve over rice
Serves 6-8
While not one of Southeast Louisiana’s more famous dishes, Redfish Couvillion is a favorite way to serve our favorite Gulf fish.
Also known as Reds or Red Drum, Redfish is not only fun to catch, it’s also delicious!

18011 Grand Bay Ct. • Baton Rouge,
Louisiana 70809 USA• 1-225-216-7887
www.presonus.com
Part# 70-32000110-A
PDA1000
1000W Class D Amplifier
Owner’s Manual
P1 P2 HPF SIGTEMP -3dB LIM CLIP NET
OUTPUT CONTROL
INPUT
AUDIO I/0
TM
 Loading...