


WU650
Random orbital sander ENG
Exzenterschleifer D
Ponceuse orbitale F
Levigatrice Rotorbitale I
Lijadora roto-orbital ES
Lixadora orbital PT
Handpalm schuurmachine NL
Excentersliber DK
Epäkeskohiomakone FIN
Eksentersliper NOR
Excenterslip SV
Rastgele Orbital Zımparası TR
Τυχαιοποιημένο τροχιακό τριβείο GR
P06
P11
P16
P21
P26
P31
P36
P41
P46
P51
P55
P59
P64
M-13L-WU650-070305¸ÄFÓïCE´¦.indd 1 3/5/2007 4:08:07 PM

M-13L-WU650-070305¸ÄFÓïCE´¦.indd 2 3/5/2007 4:08:07 PM

M-13L-WU650-070305¸ÄFÓïCE´¦.indd 3 3/5/2007 4:08:07 PM

M-13L-WU650-070305¸ÄFÓïCE´¦.indd 4 3/5/2007 4:08:07 PM
A B C
D E F
G
M-13L-WU650-070305¸ÄFÓïCE´¦.indd 5 3/5/2007 4:08:09 PM

Random orbital sander ENG
TECHNICAL DATA
Rated volt 220V-240V~50Hz/60Hz
Rated power 300W
Rated no-load speed 5,000-12,000min
-1
Base Plate size ø125mm
Sanding paper size ø125mm
Orbital diameter 2.5mm
Double insulation
Machine weight 1.5Kg
NOISE AND VIBRATION DATA
A weighted sound pressure 83.9dB (A)
A weighted sound power 94.9dB (A)
Wear ear protection when sound pressure is over 85dB (A)
Typical weighted vibration 4.25m/s
2
ACCESSORIES
Sanding paper 1pc
Dust bag 1pc
Vacuum adaptor 1pc
Use sandpaper of the following size: Ø 125mm with 8 dust holes
We recommend that you buy all your accessories from the store where you purchased the
tool. Use good quality accessories marked with a well-known brand name. Choose the grade
according to the work you intend to undertake. Refer to the accessory packaging for further
details. Store personnel can also help and advise.
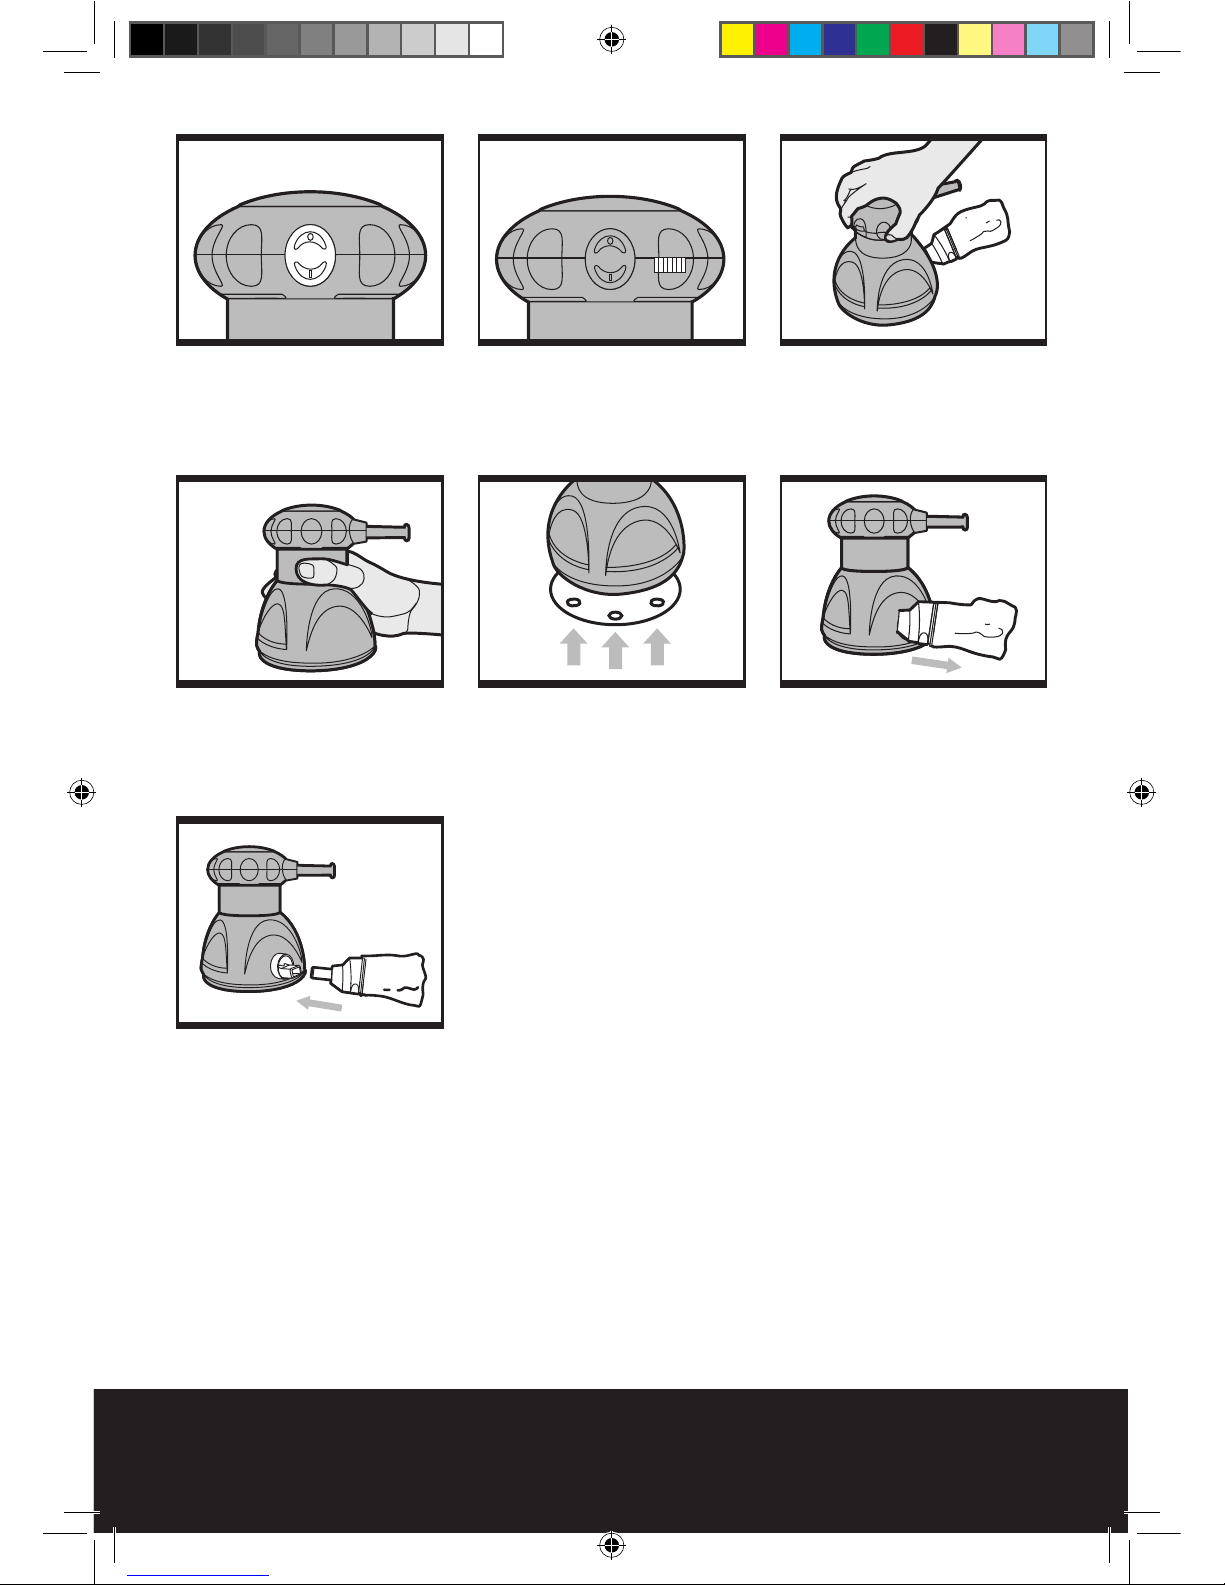
1. ON-OFF SWITCH
2. VARIABLE SPEED CONTROL
3. HAND GRIP AREA
4. HOOK AND LOOP SYSTEM
5. SANDING DISC PAD
6. DUST BAG
M-13L-WU650-070305¸ÄFÓïCE´¦.indd 6 3/5/2007 4:08:09 PM

Random orbital sander ENG
ADDITIONAL SAFETY RULES
FOR YOUR ORBITAL SANDER
1. Remove the plug from the socket before
carrying out any adjustment, servicing or
maintenance.
2. When an extension cable is required you
must ensure it has the correct ampere
rating for your power tool and is in a safe
electrical condition.
3. Ensure your mains supply voltage is same
as indicated on the rating plate.
4. Your tool is double insulated for additional
protection against a possible electrical
insulation failure within the tool.
5. Always check walls, floors and ceilings to
avoid hidden power cables and pipes.
6. After long working period external metal
parts and accessories could be hot.
7. If possible, ensure the work-piece is firmly
clamped to prevent movement.
8. Your orbital sander is a hand held tool, do
not clamp your finishing sander.
9. Before sanding, check the area is free of
nails, screws, etc.
10.Never stop the orbital sander by applying a
force to the base-plate.
11. Only use paper in good condition. Do not
use torn or worn paper.
12.Do not sand material containing asbestos
due to a health risk.
13.Do not eat or drink in the working area of
the sander.
14.Do not allow people to enter the working
area without wearing a dust mask.
15.Where possible, seal off the working area to
contain the dust for later removal.
16.Always wear a dust mask.
17.Your tool is designed for dry sanding only,
not wet sanding.
18.Your tool is designed for general purpose
light polishing of wood and metals.
19.Do not sand magnesium material due to the
risk of fire.
20.Wear eye protection when operating this
tool.
21.Always wear safety glasses or eye
shields when using the sander.
Everyday eyeglasses have only
impact-resistant lenses; they are not
safety glasses. Following this rule will
reduce the risk of serious personal injury.
22.Always wear a face mask or dust
mask. Following this rule will reduce the
risk of serious personal injury.
23.Always wear hearing protection
during extended periods of operation.
Following this rule will reduce the risk of
serious personal injury.
WARNING: Some dust particles
created by power sanding, sawing,
grinding, drill and other construction
jobs contain chemicals known to
cause cancer, birth defects or other
reproductive harm. Some examples of
these chemicals are:
Lead from lead-based paints.
Crystalline silica from bricks and cement and
other masonry products.
Arsenic and chromium from chemically
treated lumber.
Your risk from these exposures varies,
depending upon how often you do this type
of work.To reduce your exposure to these
chemicals:
Work in a well-ventilated area.
Work with approved safety equipment,
such as those dust masks that are specially
designed to bag microscopic particles.
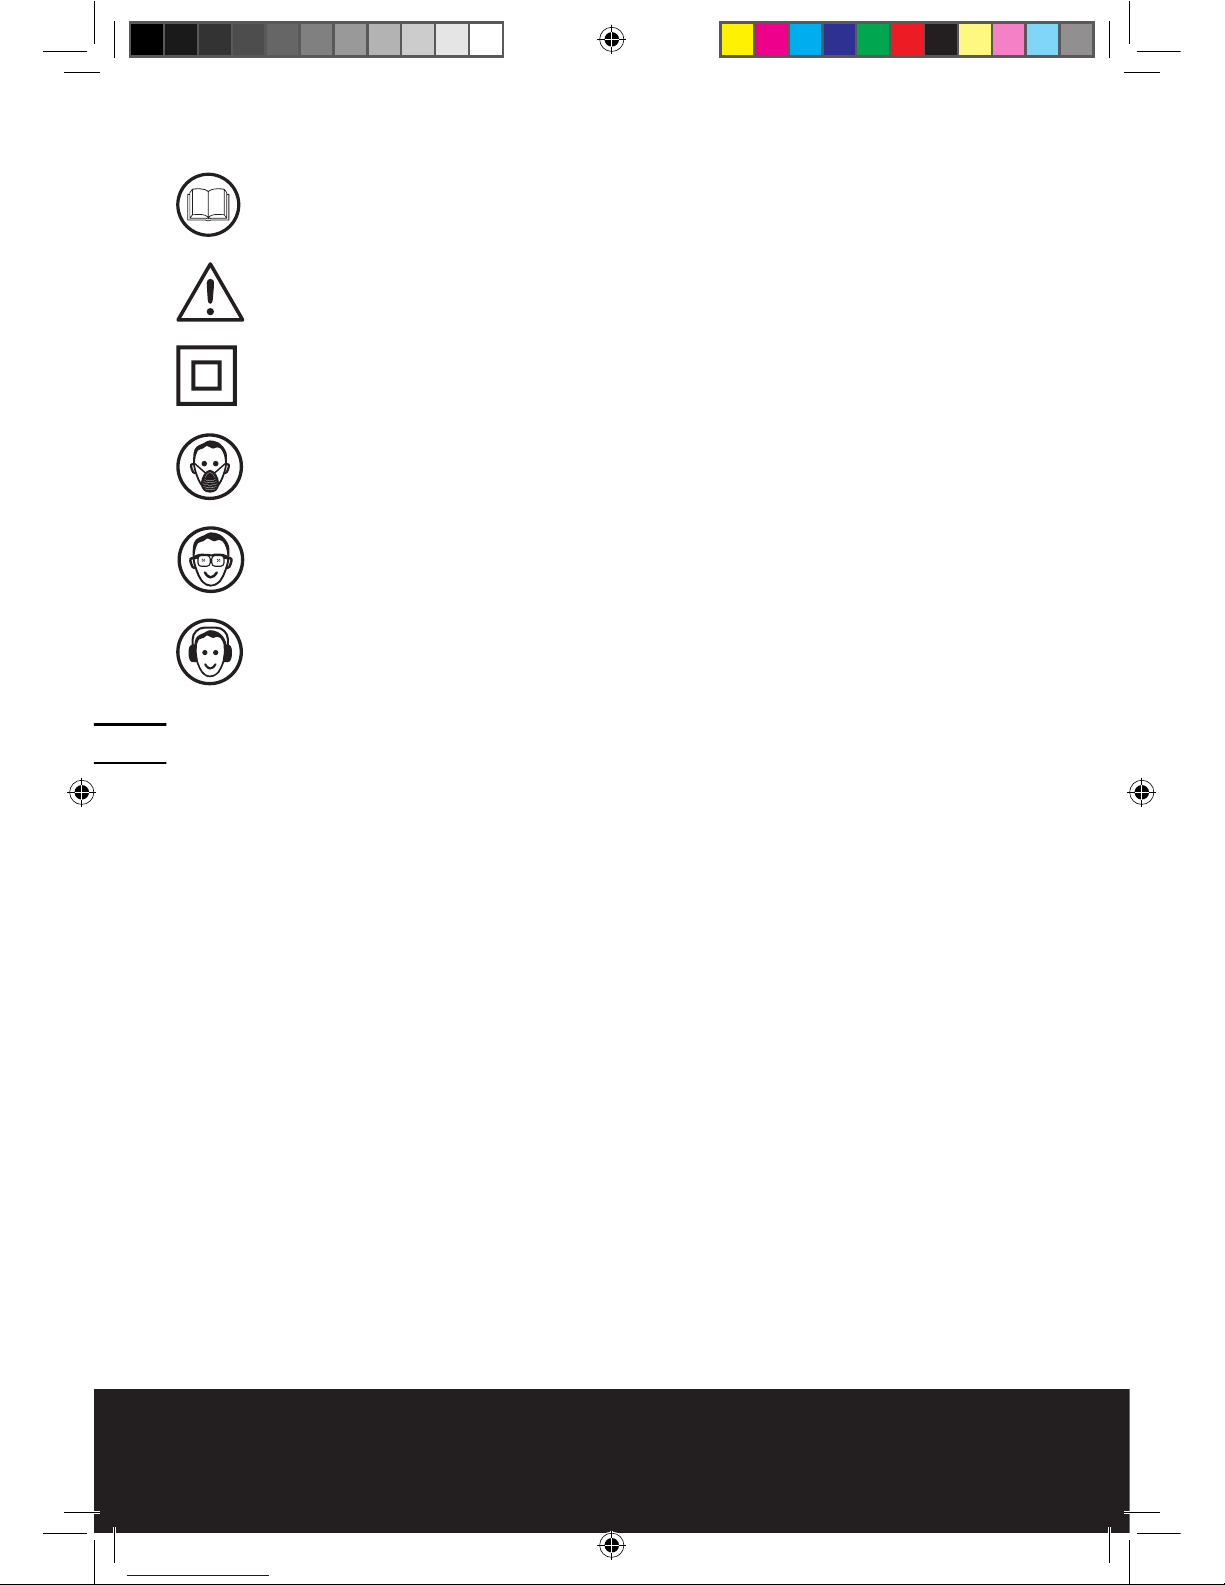
SYMBOLS
Read the manual
Warning
Double insulation
Wear dust mask
Wear eye protection
Wear ear protection
0706
M-13L-WU650-070305¸ÄFÓïCE´¦.indd 7 3/5/2007 4:08:10 PM

Random orbital sander ENG
OPERATING INSTRUCTIONS
1. ON/OFF SWITCH
To start your sander, depress the protective
cover over the switch at the position marked
”I”. To stop your sander, depress the protective
cover at the position marked “0” (See A).
2. VARIABLE SPEED CONTROL AND
FUNCTION
The unit is equipped with a variable speed
control. This allows you to adjust the speed in
order to achieve different finishes (See B).
3. HAND GRIP AREA
Your sander is designed to be held either
around the main housings (See D), or by the
top of the main housing (See C). When sanding
for long periods at a time, it is recommended
you periodically alternate between the two
holding positions.
4. CHANGING HOOK&LOOP SANDPAPER
The sandpaper and sanding disc are provided
with a hook and loop attachment system to
allow quick and easy changing of the sanding
and polishing accessories. Firstly, remove any
dust or other objects from the hook and loop
on the sanding disc and sandpaper. As the
sandpaper has dust extraction holes you must
align these with the holes in the sanding disc,
otherwise the dust extraction will not function.
To remove the sandpaper, lift one corner of the
paper and pull off from the sanding disc (See
E).
5. DUST BAG
Always operate your sander with the dust bag
fitted. For the best performance always empty
the dust bag in time. Open the zip and empty
the dust from the bag. To remove the bag (See
F). To refit the bag, firmly push the mounting
bracket into the location on the sander
housing (See G).
6. ORBITAL SANDING
Guide your sander parallel to the working
surface and move it in circles or in a cross
pattern. Do not tilt the tool in order to avoid
deep unwanted sanding marks. The amount of
material removed is determined by the speed
of the sanding disc and the grit size used. The
speed of the sanding disc diminishes relative
to the pressure applied to the tool. For faster
removal, do not increase pressure on the tool,
but use a coarser grit size.
7. SELECTING THE RIGHT GRADE OF
SANDPAPER
Different grades of sanding paper can be
purchased from good DIY shops. Available
grades are Coarse, Medium and Fine.
Use coarse grits to sand down rough finishes,
medium grit to smooth the work and fine grit
to finish off.
The higher the grade number, the finer the
grit. For rough work start with a low grade of
grit. (e.g. 60 grit) and change to a higher, finer
grade (e.g. 100 or 120 grit) for finishing. If you
use a fine grade for rough surfaces it will soon
clog and need changing.
It is best to make a trial run on a scrap piece
of material to determine the optimum grades
of sandpaper for a particular job.
8. PAD BRAKE
Your sander is equipped with a pad brake that
prevents over-speeding of the pad. If the tool
is lifted off the work surface while the motor
is running, the brake will limit pad rotation to
avoid unwanted sanding marks and gouges.
WORKING HINTS FOR YOUR
ORBITAL SANDER
If your power tool becomes too hot, especially
when used at low speed, set the speed to
maximum and run it with no load for 2-3
minutes to cool the motor. Avoid prolonged
usage at very low speeds. Always use sand
paper that is suitable for the material you want
to sand.
Always ensure the work-piece is firmly held or
clamped to prevent movement.
Any movement of the material may affect the
quality of the sanding finish.
Start your sander before sanding and turn it
off only after you stop sanding. For the best
results, sand wood in the direction of the
grain.
Do not start sanding without having the
sandpaper fitted.
Do not allow the sandpaper to wear away it
will damage the base-plate. The guarantee
does not cover base-plate wear and tear.
Use coarse grit paper to sand rough surfaces,
medium grit for smooth surfaces and
fine grit for the final surfaces. If necessary, first
make a test run on scrap material.
Use only good quality sandpaper.
The sandpaper controls the sanding efficiency,
not the amount of force you apply to the
M-13L-WU650-070305¸ÄFÓïCE´¦.indd 8 3/5/2007 4:08:11 PM
Random orbital sander ENG
tool. Excessive force will reduce the sanding
efficiency and cause motor overload.
Replacing the sandpaper regularly will
maintain optimum sanding efficiency.
MAINTENANCE
Your power tool requires no additional
lubrication or maintenance. There are no user
serviceable parts in your power tool. Never
use water or chemical cleaners to clean your
power tool. Wipe clean with a dry cloth.
Always store your power tool in a dry place.
Keep the motor ventilation slots clean. Keep all
working controls free of dust. If you see some
sparks flashing in the ventilation slots, this is
normal and will not damage your power tool.
ENVIRONMENTAL
PROTECTION
Waste electrical products should not
be disposed of with household waste.
Please recycle where facilities exist.
Check with your local authorities or retailer for
recycling advice.
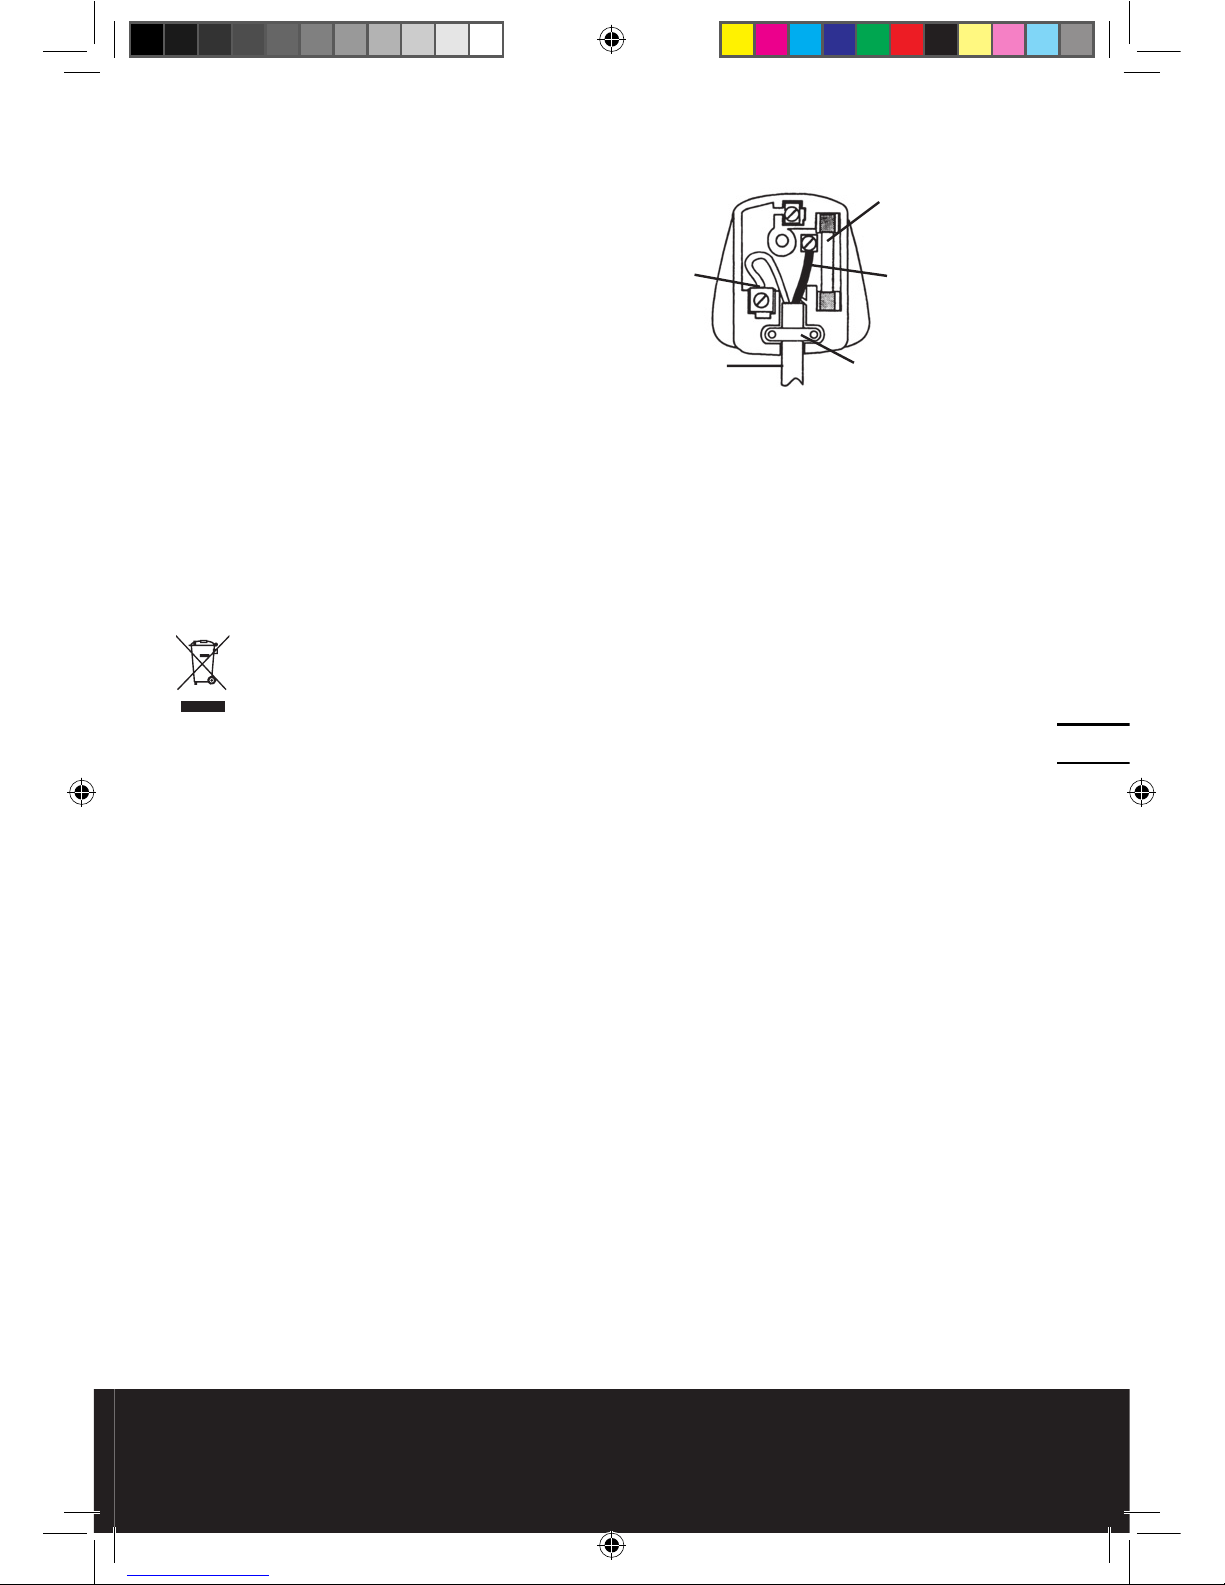
PLUG REPLACEMENT
If you need to replace the fitted plug then
follow the instructions below.
IMPORTANT
The wires in the mains lead are colored in
accordance with the following code:
Blue – Neutral
Brown – Live
As the colors of the wires in the mains lead of
this appliance may not correspond with the
colored markings identifying the terminals
in your plug, proceed as follows. The wire
which is colored blue must be connected to
the terminal which is marked with N. The wire
which is colored brown must be connected to
the terminal which is marked with L.
Warning: Never connect live or neutral wires
to the earth terminal of the plug. Only fit an
approved 13ABS1363/A plug and the correct
rated fuse.
Note: If a moulded plug is fitted and has to be
removed take great care in disposing of the
plug and severed cable, it must be destroyed
to prevent engaging into a socket.
Connect
Blue to N
(neutral)
Outer sleeve
firmly clamped
Cable grip
Brown L (live)
13 Amp fuse approved
to BS1362
0908
M-13L-WU650-070305¸ÄFÓïCE´¦.indd 9 3/5/2007 4:08:11 PM

Random orbital sander ENG
DECLARATION OF
CONFORMITY
we,
POSITEC Power Tools (Suzhou) Co., Ltd.
No. 11 Yangqing Road, Loufeng Area, Suzhou
Industrial Park, Jiangsu 215021, P. R. China
Declare that the product,
Description
WORX Random Orbit Sander
Type
WU650
Complies with the following Directives,
EC Machinery Directive 98/37/EC
EC Low Voltage Directive
73/23/EEC amended by 93/68/EEC
EC Electromagnetic Compatibility Directive
89/336/EEC amended by 93/68/EEC
Standards conform to
EN55014-1
EN61000-3-3
EN55014-2
EN60745-1
EN61000-3-2
EN60745-2-4
2006/01/01
Jacky Zhou
POSITEC Quality Manager
M-13L-WU650-070305¸ÄFÓïCE´¦.indd 10 3/5/2007 4:08:12 PM

Exzenterschleifer D
TECHNISCHE DATEN
Nennspannung 220V-240V~50Hz/60Hz
Nennleistung 300W
Leerlaufnenndrehzah 5,000-12,000min
-1
Größe der Basisplatte ø125mm
Größe des Schleifpapiers ø125mm
Schwingkreis-Durchmesser 2.5mm
Zweifach isoliert
Gewicht 1.5Kg
LÄRMPEGEL UND VIBRATIONEN
Gewichteter Schalldruck 83.9dB (A)
Gewichtete Schallleistung 94.9dB (A)
Tragen Sie bei einem Schalldruck über 85 dB(A) einen Gehörschutz
Typischer gewichteter Vibrationswert 4.25m/s
2
ZUBEHÖRTEILE
Sandpapier 1Stück
Staubbeutel 1Stück
Staubsaugeradapter 1Stück
Benutzen Sie Sandpapier folgender Größe: Ø 125 mm mit 8 Staublöchern
Wir empfehlen Ihnen, sämtliche Zubehörteile beim selben Fachhändler zu beziehen, bei dem
Sie auch Ihr Elektrowerkzeug gekauft haben. Verwenden Sie nur hochwertige Zubehörteile von
namhaften Herstellern. Die Güteklasse muss entsprechend der Anwendung gewählt werden.
Weitere Informationen finden Sie auf der Verpackung der Zubehörteile. Auch Ihr Fachhändler
berät Sie gerne.
1. SCHALTER AN-AUS
2. VARIABLE GESCHWINDIGKEITSKONTROLLE
3. HANDGRIFFBEREICH
4. STECK-DREH-VORRICHTUNG
5. SCHLEIFSCHEIBE
6. STAUBBEUTEL
1110
M-13L-WU650-070305¸ÄFÓïCE´¦.indd 11 3/5/2007 4:08:12 PM
Exzenterschleifer D
ZUSÄTZLICHE
SICHERHEITSHINWEISE
FÜR IHREN
EXCENTERSCHLEIFER
1. Ziehen Sie den Stecker aus der Steckdose,
ehe Sie Einstellungsänderungen, Reparaturoder Wartungsarbeiten durchführen.
2. Versichern Sie sich bei Verwendung eines
Verlängerungskabels, dass das Kabel
der für das Werkzeug vorgeschriebenen
Nennleistung entspricht und sich in einem
funktionsfähigen Zustand befindet.
3. Kontrollieren Sie, ob die Netzspannung
der auf dem Typenschild angegebenen
Spannung entspricht.
4. Ihr Werkzeug ist schutzisoliert. Bei einem
etwaigen internen Kurzschluss sind Sie
sicher vor einem elektrischen Schlag
geschützt.
5. Prüfen Sie vor dem Arbeiten in Wänden
und Decken den genauen Verlauf von
Stromkabeln oder Rohrleitungen.
6. Zugängliche Metallteile und Zubehörteile
können nach längerem Gebrauch sehr heiß
sein.
7. Stellen Sie sicher, dass das Werkstück, falls
möglich, fest eingespannt ist, so dass es
nicht verrutschen kann.
8. Ihre Kreis-Schleifmaschine ist ein
Handwerkzeug, klemmen Sie Ihren
Feinschleifer nicht ein.
9. Überprüfen Sie, ob die Arbeitsfläche von
Nägeln, Schrauben, usw. befreit ist.
10. Stoppen Sie den Schleifer nicht, indem Sie
ihn fest auf die Bodenplatte drücken.
11. Benutzen Sie nur Schleifpapier, dass in
einem guten Zustand ist. Benutzen Sie kein
gerissenes oder abgenutztes Papier.
12. Schleifen Sie kein asbesthaltiges Material,
um einem Gesundheitsrisiko vorzubeugen.
13. Essen und trinken Sie nicht in dem
Arbeitsbereich des Schleifers.
14. Es ist verboten, den Arbeitsbereich ohne
Staubmaske zu betreten.
15. Versiegeln Sie, falls möglich, den
Arbeitsbereich, um den Staub für eine
spätere Beseitigung zu bündeln.
16. Tragen Sie immer eine Staubmaske.
17. Das Werkzeug ist nur für Trockenschleifen
geeignet, nicht für Nassschleifen.
18. Das Gerät ist hauptsächlich zum leichten
Polieren von Holz und Metall geeignet.
19. Schleifen Sie aufgrund von Feuergefahr
kein magnesiumhaltiges Material.
20. Tragen Sie eine Schutzbrille, wenn Sie das
Gerät benutzen.
21. Tragen Sie beim Arbeiten mit der
Excenterschleifer immer einen
geeigneten Augenschutz. Normale
Brillen haben lediglich schlagfeste
Gläser, KEINE Sicherheitsgläser. Eine
Beachtung dieser Vorschrift vermindert die
Unfallgefahr.
22.Verwenden Sie stets eine Atem- oder
Staubmaske. Eine Beachtung dieser
Vorschrift vermindert die Unfallgefahr.
23.Tragen Sie bei längeren Arbeiten
immer einen Gehörschutz. Eine
Beachtung dieser Vorschrift vermindert die
Unfallgefahr.
WARNUNG: Bestimmte Stäube, die
bei Schleif-, Säge-, Schmirgel-, Bohrund ähnlichen Arbeiten am Bau anfallen,
können Substanzen enthalten, die Krebs
verursachen oder das Erbgut schädigen.
Hierzu zählen unter anderem:
Blei aus Farben und Lacken auf Bleibasis.
Kristallines Silikat aus Ziegeln und Zement
sowie weiteren Baustoffen.
Arsen und Chrom aus chemisch behandelten
Hölzern.
Die durch solche Aussetzungen bedingten
Risiken für die Gesundheit unterscheiden sich
je nach Häufigkeit, mit der solche Tätigkeiten
stattfinden. Um die Aussetzung zu diesen
chemischen Substanzen herabzusetzen:
Führen Sie alle Arbeiten in gut belüfteten
Bereichen durch.
Tragen Sie zugelassene Schutzausrüstungen
wie z. B. Atemmasken, die speziell für das
Herausfiltern kleinster Staubteilchen ausgelegt
sind.
M-13L-WU650-070305¸ÄFÓïCE´¦.indd 12 3/5/2007 4:08:13 PM

Exzenterschleifer D
1312
SYMBOLS BEDIENUNGSANLEITUNG
1. SCHALTER AN/AUS
Drücken Sie die Schutzabdeckung über dem
Schalter auf die Position mit der Markierung
“I”, um den Schleifer zu starten. Drücken Sie
die Schutzabdeckung über dem Schalter auf
die Position mit der Markierung “0”, um den
Schleifer zu stoppen (siehe A).
2. FUNKTION DER VARIABLEN GESCHWI
NDIGKEITSKONTROLLE
Das Gerät ist mit einer variablen Geschwind
igkeitskontrolle ausgestattet. Somit können
Sie die Geschwindigkeit verstellen, um
verschiedene Ausführungen zu erreichen.
3. HANDGRIFFBEREICH
Der Schleifer ist so konstruiert, dass Sie ihn
um das Gehäuse herum (siehe D) oder an der
Oberseite des Gehäuses (siehe C) festhalten
können. Wenn Sie für längere Zeit schleifen,
empfehlen wir einen periodischen Wechsel
zwischen beiden Haltepositionen.
4. SCHLEIFPAPIER WECHSELN
(KLETTVERSCHLUSS-VORRICHTUNG)
Schleifpapier und Schleifscheibe sind mit
einer Klettverschluss-Vorrichtung ausgestattet,
welches einen schnellen und einfachen
Wechsel des Schleif- und Polierzubehörs
zulässt. Entfernen Sie zuerst Staub und
andere Objekte von der Vorrichtung auf der
Schleifscheibe und dem Sandpapier. Da das
Schleifpapier Löcher für die Staubextraktion
hat, müssen Sie diese Löcher passend zu den
Löchern auf der Schleifscheibe ausrichten.
Andernfalls funktioniert die Staubextraktion
nicht. Um das Schleifpapier zu entnehmen,
heben Sie eine Ecke des Papiers an und ziehen
Sie es von der Schleifscheibe (siehe E).
5. STAUBBEUTEL
Benutzen Sie den Schleifer immer mit
eingebautem Staubbeutel. Entleeren Sie den
Staubbeutel rechtzeitig, um ein optimales
Schleifergebnis zu erzielen. Öffnen Sie den
Verschluss und entleeren Sie den Staub aus
dem Beutel. Entnehmen Sie den Beutel (siehe
F). Um den Beutel wieder einzusetzen, drücken
Sie die Halteklammern in die Position am
Schleifergehäuse (siehe G).
6. KREISSCHLEIFEN
Führen Sie den Schleifer parallel zu
Arbeitsoberfläche und bewegen Sie ihn
Bedienungsanleitung lesen
Warnung
Schutzisolation
Schutzmaske tragen
Schutzbrille tragen
Gehörschutz tragen
M-13L-WU650-070305¸ÄFÓïCE´¦.indd 13 3/5/2007 4:08:14 PM

Exzenterschleifer D
1514
in Kreisen oder in einem Kreuzmuster.
Neigen Sie den Schleifer nicht zur Seite,
um ungewünschte Schleifspuren zu
vermeiden. Die Menge des abgeschliffenen
Materials hängt von der Körnung und der
Geschwindigkeit ab. Die Geschwindigkeit wird
geringer, je mehr Druck Sie auf den Schleifer
ausüben. Benutzen Sie zum schnelleren
Schleifen eine größere Körnung. Üben Sie zu
diesem Zweck nicht mehr Druck auf das Gerät
aus.
7. PASSENDES SCHLEIFPAPIER WÄHLEN
Schleifpapier mit verschiedener Körnung
ist in Baumärkten erhältlich. Es gibt die
Körnungsgrade grob, mittel und fein.
Nutzen Sie eine grobe Körnung, um raue
Oberflächen zu bearbeiten, eine mittlere
Körnung, um die Oberfläche zu glätten und
eine feine Körnung für den Abschluss.
Je höher die Gradnummer, desto feiner
die Körnung. Starten Sie bei rauen Arbeiten
mit einem kleinen Körnungsgrad (z.B. 60)
und wechseln Sie dann zu einem höheren,
feineren Grad (z.B. 100 oder 120) für den
Abschluss. Wenn Sie einen feinen Grad für
raue Oberflächen benutzen, wird das Papier
beschädigt und Sie müssen es wechseln.
Am besten starten Sie einen Testlauf auf
einem Reststück des Materials, um den
optimalen Körnungsgrad für bestimmte
Arbeiten zu bestimmen.
8. BREMSE
Ihr Schleifer ist mit einem Bremse ausgestattet,
der verhindert, dass sich die Scheibe zu schnell
dreht. Wenn das Werkzeug von der Oberfläche
genommen wird, während der Motor läuft,
wird die Bremse die Drehung begrenzen, um
unerwünschte Rillen und Schleifspuren zu
vermeiden.
ARBEITSHINWEISE
FÜR IHREN
EXCENTERSCHLEIFER
Wenn der Schleifer zu heiß wird, speziell
bei geringer Geschwindigkeit, stellen Sie
die Geschwindigkeit auf die maximale
Höhe und lassen Sie ihn für 2-3 Minuten im
Leerlauf laufen, um den Motor zu kühlen.
Vermeiden Sie zu lange Arbeiten bei geringer
Geschwindigkeit.
Benutzen Sie Schleifpapier, das zu dem
Material passt, das Sie bearbeiten wollen.
Vergewissern Sie sich, dass das Arbeitsstück
fest eingespannt ist, damit es sich nicht
bewegt.
Wenn sich das Arbeitsstück bewegt, kann dies
die Qualität des Abschlusses beeinträchtigen.
Schalten Sie den Schleifer vor dem Schleifen
ein und stoppen Sie ihn, nachdem Sie mit
dem Schleifen aufgehört haben. Schleifen Sie
Holz in Richtung der Holzfaser, um ein gutes
Ergebnis zu erhalten.
Schleifen Sie nicht, ohne das Schleifpapier
eingesetzt zu haben.
Achten Sie darauf, dass das Schleifpapier sich
nicht zu stark abnutzt. Sonst beschädigt es die
Basisplatte. Die Garantie deckt nicht Abnutzung
oder Risse der Basisplatte ab.
Nutzen Sie eine grobe Körnung, um raue
Oberflächen zu bearbeiten, eine mittlere
Körnung, um die Oberfläche zu glätten und
eine feine Körnung für den Abschluss. Führen
Sie, falls möglich, einen Testlauf auf einem
Reststück durch.
Benutzen Sie nur Schleifpapier guter Qualität.
Das Papier ist zuständig für die Schleifeffizienz,
nicht die Kraft, die Sie auf den Schleifer
ausüben. Zu viel ausgeübte Kraft reduziert
die Schleifeffizienz und verursacht eine
Überlastung des Motors. Regelmäßiges
Ersetzen des Sandpapiers erhält die optimale
Schleifeffizienz.
WARTUNG
Ihr Werkzeug benötigt keine zusätzliche
Schmierung oder Wartung. Es enthält keine
Teile, die Sie warten müssen. Reinigen
Sie Ihr Werkzeug niemals mit Wasser oder
chemischen Reinigungsmitteln. Wischen Sie
es mit einem trockenen Tuch sauber. Lagern
Sie Ihr Werkzeug immer an einem trockenen
Platz. Halten Sie die Lüftungsschlitze sauber.
Gelegentlich sind durch die Lüftungsschlitze
hindurch Funken zu sehen. Dies ist normal und
wird Ihr Werkzeug nicht beschädigen.
UMWELTSCHUTZ
Elektroprodukte dürfen nicht mit dem
normalen Haushaltsmüll entsorgt
werden, sondern sollten nach
Möglichkeit zu einer Recyclingstelle gebracht
werden. Ihre zuständigen Behörden oder
Ihr Fachhändler geben Ihnen hierzu gerne
M-13L-WU650-070305¸ÄFÓïCE´¦.indd 14 3/5/2007 4:08:14 PM

1514
Exzenterschleifer D
1514
Auskunft.
KONFORMITÄTSERKLÄRUNG
Wir,
POSITEC Power Tools (Suzhou) Co., Ltd.
No. 11 Yangqing Road, Loufeng Area, Suzhou
Industrial Park, Jiangsu 215021, P. R. China
erklären hiermit, dass unser Produkt
Beschreibung
WORX Exzenterschleifer
Typ
WU650
den Bestimmungen der folgenden Richtlinien
entspricht:
EC Maschinenrichtlinie 98/37/EC
EC Niederspannungsrichtlinie
73/23/EEC geändert durch 93/68/EEC
EC EMV-Richtlinie
89/336/EEC geändert durch 93/68/EEC
Werte nach
EN55014-1
EN61000-3-3
EN55014-2
EN60745-1
EN61000-3-2
EN60745-2-4
2006/01/01
Jacky Zhou
POSITEC Qualitätsleiter
M-13L-WU650-070305¸ÄFÓïCE´¦.indd 15 3/5/2007 4:08:15 PM

Ponceuse orbitale F
1716
FICHE TECHNIQUE
Tension nominale 220V-240V~50Hz/60Hz
Puissance nominale 300W
Vitesse a vide nominale 5,000-12,000min
-1
Taille de la plaque de base ø125mm
Taille du papier de verre ø125mm
Diamètre orbital 2.5mm
Double insulation
Poids 1.5Kg
DONNEES SUR LE BRUIT ET LES VIBRATIONS
Niveau de pression sonore mesurée 83.9dB (A)
Niveau de puissance sonore mesurée 94.9dB (A)
Porter un casque anti-bruit si la pression sonore est supérieure à 85dB(A)
Valeur de vibration mesurée 4.25m/s
2
ACCESSOIRES
Papier de verre 1pc
Sac à poussière 1pc
Adaptateur pour aspirateur de poussière 1pc
Utilisez du papier de verre de la taille suivante:
Ø 125mm avec 8 orifices à poussière
Nous recommandons d’acheter tous les accessoires dans le magasin où l’outil a été acheté.
Utiliser des accessoires de bonne qualité et de marque. Se reporter à l’emballage pour de plus
amples informations. Le personnel du magasin peut apporter aide et conseils.
1. COMMUTATEUR ON-OFF (Marche - Arrêt)
2. CONTROL A VITESSE VARIABLE
3. POIGNEE
4. SYSTEME AUTO-AGRIPPANT
5. PATIN DE DISQUE DE PONÇAGE
6. SAC A POUSSIERE
M-13L-WU650-070305¸ÄFÓïCE´¦.indd 16 3/5/2007 4:08:15 PM
1716
Ponceuse orbitale F
1716
CONSIGNES DE SECURITE
SUPPLEMENTAIRES
POUR VOTRE PONCEUSE
ORBITALE
1. Débrancher la prise avant d’effectuer des
réglages, des réparations ou d’entretenir
l’outil.
2. Lorsqu’une rallonge est nécessaire,
s’assurer que l’ampérage est adapté à
l’outil motorisé et qu’elle est en bon état.
3. S’assurer que la source de puissance à
utiliser est la même que celle indiquée sur
la plaque signalétique de l’outil.
4. L’outil possède une double isolation
pour une meilleur protection contre les
éventuelles défaillances d’isolation à
l’intérieur de votre outil.
5. Toujours vérifier les murs, les sols et
plafonds afin de découvrir d’éventuels
câbles et tuyaux cachés.
6. A la suite de longues périodes de travail, les
parties externes métalliques et accessoires
pourraient être chauds.
7. Si possible, assurez-vous que la pièce à
travailler est fermement bloquée pour
éviter qu’elle bouge.
8. Votre ponceuse orbitale est un outil à main,
ne bloquez pas votre ponceuse de finition.
9. Avant de poncer, vérifiez que la zone ne
comporte pas de clous, vis, etc.
10. N’arrêtez jamais la ponceuse orbitale en
appliquant une force sur la plaque de base.
11. N’utilisez que du papier en bon état. Ne pas
utiliser de papier déchiré ou usé.
12. En raison de risques pour la santé, ne pas
poncer de matériau contenant de l’amiante.
13. Ne pas manger ou boire dans la zone de
travail de la ponceuse.
14. Ne pas permettre à des personnes d’entrer
dans la zone de travail sans porter de
masque anti-poussière.
15. Quand c’est possible, scellez la zone de
travail pour contenir la poussière en vue de
l’éliiminer ultérieurement.
16.Portez toujours un masque anti-poussière.
17. Votre outil est conçu pour du ponçage à
sec seulement, non pas pour du ponçage
humide.
18. Votre outil est conçu pour un polissage
léger à usage général de bois et métaux.
19. En raison de risques d’incendie, ne pas
poncer de matériau en magnésium.
20.Portez une protection pour les yeux en
utilisant cet outil.
21.Toujours porter des lunettes de
protection ou un masque lors de
l’utilisation d’une scie va-et-vient.
Les lunettes normales possèdent
seulement des verres résistants aux
impacts; ce ne sont pas des lunettes
de protection. Suivre cette règle réduira
le risque de blessures corporelles.
22.Toujours porter un masque facial
ou un masque anti-poussière. Suivre
cette règle réduira le risque de blessures
corporelles.
23.Toujours porter un casque anti-bruit
pendant de longues périodes de
travail. Suivre cette règle réduira le risque
de blessures corporelles.
AVERTISSEMENT: Certaines
particules de poussières générées
par les travaux de ponçage, sciage,
meulage, perçage ou autres travaux de
constructions contiennent des produits
chimiques responsables de cancer,
fausse-couches et autres anomalies
reproductives. Voici quelques uns de ces
produits chimiques:
Le plomb provenant des peintures à base de
plomb.
Le silice cristallisé provenant des briques, du
ciment et autres produits de maçonnerie.
L’arsenic et le chrome des pièces de bois
traitées.
Le risque dû à ces expositions varie en
fonction de la fréquence de travaux de ce type.
Pour réduire les risques d’exposition à ces
produits chimiques:
Travailler dans une zone bien aérée .
Travailler muni de l’équipement de
sécurité réglementaire tel que les masques
anti-poussières qui filtrent les particules
microscopique.
M-13L-WU650-070305¸ÄFÓïCE´¦.indd 17 3/5/2007 4:08:16 PM
Ponceuse orbitale F
1918
SYMBOLS INSTRUCTIONS
D’OPERATION
1. COMMUTATEUR ON/OFF (MARCHE/
ARRÊT)
Pour démarrer votre ponceuse, relâchez le
couvercle de protection sur le commutateur
sur la position de marquage « I ». Pour arrêter
votre ponceuse, relâchez le couvercle de
protection sur la position de marquage « 0 »
(voir fig. A).
2. CONTROLE ET FONCTION A VITESSE
VARIABLE
L’unité est équipée d’un contrôle à vitesse
variable. Ceci vous permet d’ajuster la vitesse
afin d’obtenir des finitions différentes (Voir fig.
B).
3. POIGNEE
Votre ponceuse est conçue pour être tenue
soit autour du logement principal (voir fig.
D), soit par le sommet du logement principal
(voir fig. C). Lorsque vous poncez pendant des
périodes prolongées, il est conseillé d’alterner
périodiquement entre les deux positions de
maintien.
4. CHANGEMENT DU PAPIER DE VERRE
AUTO-AGRIPPANT
Le papier de verre et le disque de ponçage
sont fournis avec un système de fixation
auto-agrippant pour permettre de changer
rapidement et facilement les accessoires de
ponçage et de polissage. Tout d’abord, retirez
la poussière et autres objets du système autoagrippant sur le disque de ponçage et le papier
de verre. Comme le papier de verre comporte
des orifices d’extraction de la poussière, il
faut les aligner sur les orifices du disque de
ponçage, sans quoi l’extraction de la poussière
ne fonctionnera pas. Pour retirer le papier de
verre, soulevez un coin du papier et retirez le
disque de ponçage (voir fig. E).
5. SAC A POUSSIERE
Opérez toujours votre ponceuse avec le sac
de poussière installé. Pour une meilleure
performance, videz toujours le sac à poussière
à temps. Ouvrez la glissière et videz la
poussière du sac. Pour retirer le sac (voir fig.
F). Pour remettre le sac, poussez fermement
sur le support de fixation à l’endroit du
logement de la ponceuse (voir fig. G).
Lire le manuel
Avertissement
Double isolation
Porter un masque anti-poussière
Porter des lunettes de protection
Porter un casque anti-bruit
M-13L-WU650-070305¸ÄFÓïCE´¦.indd 18 3/5/2007 4:08:17 PM

1918
Ponceuse orbitale F
1918
6. PONÇAGE ORBITAL
Guidez votre ponceuse parallèlement à la
surface de travail et déplacez-la en cercles ou
dans un déplacement croisé. Pour éviter des
marques de ponçages profondes indésirables,
ne faites pas basculer l’outil. La quantité de
matériau retiré se détermine par la vitesse du
disque de ponçage et la taille du grain utilisé.
La vitesse du disque de ponçage diminue en
fonction de la pression appliquée sur l’outil.
Pour un retrait plus rapide, n’augmentez pas la
pression sur l’outil, mais utilisez une taille de
grain plus grosse.
7. SELECTION DE LA BONNE GROSSEUR
DE GRAIN POUR LE PAPIER DE VERRE
On peut acheter des papiers de verre à
grosseurs de grain différentes dans de bons
magasins de bricolage. Les grosseurs de grain
disponibles sont Gros, Moyen et Fin.
Utilisez de gros grains pour poncer des
finitions dures, des grains moyens pour
égaliser le travail et des grains fins pour
terminer le travail.
Plus le numéro de taille de grains est grand,
plus le grain est fin. Pour un travail brut,
démarrez avec un grain de grosse taille. (par
ex. taille de grain 60) et changez pour un grain
plus fin (par ex. taille de grain 100 ou 120) pour
la finition. Si vous utilisez un grain fin pour
des surfaces rugueuses, il sera rapidement
colmaté et devra être changé.
Il vaut mieux effectuer un essai sur un
matériau de pièce de déchet pour déterminer
les tailles de grain optimales de papier de
verre pour un travail spécifique.
8. FREIN A PATIN
Votre ponceuse est équipée d’un frein à patin
qui empêche le patin de s’emballer. Si l’outil
est soulevé de la surface de travail pendant
que le moteur tourne, le frein limitera la
rotation du patin pour éviter des marques et
des balafres de ponçage indésirables.
ASTUCES POUR
TRAVAILLER AVEC VOTRE
PONCEUSE ORBITALE
Si votre outil électrique chauffe trop, surtout
quand vous l’utilisez en vitesse lente, réglez
la vitesse au maximum et faites-le tourner
sans charge pendant deux ou trois minutes
pour refroidir le moteur. Evitez une utilisation
prolongée avec des vitesses très lentes.
Toujours utiliser du papier de verre qui
convient au matériau que vous voulez poncer.
Assurez-vous que la pièce à travailler est
fermement maintenue ou bloquée pour éviter
qu’elle bouge.
Tout mouvement du matériau risque d’affecter
la qualité de la finition du ponçage.
Démarrez votre ponceuse avant de poncer et
ne l’éteignez qu’après avoir arrêté de poncer.
Pour de meilleurs résultats, poncez du bois
dans le sens du grain.
Ne démarrez pas le ponçage sans avoir
assemblé du papier de verre.
Ne laissez pas le papier de verre s’user sous
peine d’abîmer la plaque de base. La garantie
ne couvre pas l’usure de la plaque de base.
Utiliser un papier à gros grains pour poncer
des surfaces rugueuses, à grains moyens
pour des surfaces lisses et à grains fins pour
les surfaces finales. Si nécessaire, effectuez
d’abord un essai sur un matériau de déchet.
N’utilisez que du papier de verre de bonne
qualité.
C’est le papier de verre qui contrôle l’efficacité
du ponçage, non la quantité de force que
vous appliquez sur l’outil. Une force excessive
réduira l’efficacité du ponçage et entraînera
une surcharge du moteur. Un remplacement
régulier du papier de verre maintiendra une
efficacité de ponçage maximale.
ENTRETIEN
L’outil motorisé ne requiert pas de graissage
ou d’entretien supplémentaire. Il n’y a pas de
pièces réparables par l’utilisateur dans cet
outil. Ne jamais utiliser d’eau ou de nettoyants
chimiques pour nettoyer l’outil. Nettoyer
avec un chiffon sec. Toujours conserver l’outil
motorisé dans un endroit sec. Maintenir les
fentes de ventilation du moteur propres.
Empêcher que les commandes de marche
soient couvertes de poussière. Il est normal
que des étincelles soient visibles dans les
fentes de ventilation, cela n’endommagera pas
l’outil motorisé.
PROTECTION DE
L’ENVIRONNEMENT
Les déchets d’équipements électriques
et électroniques ne doivent pas être
déposés avec les ordures ménagères.
M-13L-WU650-070305¸ÄFÓïCE´¦.indd 19 3/5/2007 4:08:18 PM
Ponceuse orbitale F
Ils sont collectés pour être recyclés dans des
centres spécialisés. Consultez les autorités
locales ou votre revendeur pour obtenir
des renseignements sur l’organisation de la
collecte.
DECLARATION DE
CONFORMITE
Nous,
POSITEC Power Tools (Suzhou) Co., Ltd.
No. 11 Yangqing Road, Loufeng Area, Suzhou
Industrial Park, Jiangsu 215021, P. R. China
Déclarons ce produit,
Description
WORX Ponceuse Orbitale
Modèle
WU650
Est conforme aux directives suivantes :
Directive européenne machine 98/37/CE
Directive européenne sur les basse tension
73/23/CEE amendée par 93/68/CEE
Directive européenne sur la comptabilité
électromagnétique
89/336/CEE amendée par 93/68/CEE
Et conforme aux normes :
EN55014-1
EN61000-3-3
EN55014-2
EN60745-1
EN61000-3-2
EN60745-2-4
2006/01/01
Jacky Zhou
Responsible qualité POSITEC
M-13L-WU650-070305¸ÄFÓïCE´¦.indd 20 3/5/2007 4:08:18 PM

2120
Levigatrice Rotorbitale I
2120
DATI TECNICI
Tensione nominale 220V-240V~50Hz/60Hz
Potenza nominale 300W
Velocità nominale a vuoto 5,000-12,000min
-1
Dimensioni piastra ø125mm
Dimensioni foglio abrasivo ø125mm
Diametro orbitale 2.5mm
Doppio isolamento
Peso 1.5Kg
DATI SULLA RUMOROSITÀ E SULLE VIBRAZIONI
Pressione acustica ponderata A 83.9dB (A)
Potenza acustica ponderata A 94.9dB (A)
Indossare protezione per le orecchie quando la pressione acustica è superiore a 85dB(A)
La vibrazione ponderata tipica è di 4.25m/s
2
ACCESSORI
Foglio abrasivo 1
Sacco raccoglipolvere 1
Adattatore aspirazione 1
Usare carta abrasiva delle seguenti dimensioni: Ø 125mm con 8 fori
Si raccomanda di acquistare tutti gli accessori nello stesso negozio in cui è stato acquistato
l’attrezzo. Usare accessori di buona qualità e di marca conosciuta. Scegliere la grana in base al
lavoro che si vuole eseguire. Fare riferimento alla confezione dell’accessorio per altri dettagli. Il
personale del negozio può aiutarvi e consigliarvi.
1. INTERRUTTORE ACCENSIONE / SPEGNIMENTO
2. CONTROLLO VELOCITÀ VARIABILE
3. AREA DELL’IMPUGNATURA
4. SISTEMA DI ATTACCO “HOOK & LOOP”
5. DISCO DI LEVIGATURA
6. SACCO RACCOGLIPOLVERE
M-13L-WU650-070305¸ÄFÓïCE´¦.indd 21 3/5/2007 4:08:19 PM

Levigatrice Rotorbitale I
2322
NORME DI SICUREZZA
SUPPLEMENTARI
RELATIVE ALL’USO DELLA
LEVIGATRICE ORBITALE
1. Rimuovere la spina dalla presa di corrente
prima di eseguire qualsiasi regolazione,
riparazione o manutenzione.
2. In caso di utilizzo di un cavo prolunga,
verificare sempre il corretto amperaggio
rispetto all’elettroutensile e che sia in buone
condizioni.
3. Assicurarsi che la tensione elettrica sia
uguale a quella indicata sull’etichetta.
4. L’attrezzo ha un doppio isolamento per
la protezione da possibili guasti al suo
interno.
5. Controllare sempre pareti, pavimenti e
soffitti per evitare tubature e cavi nascosti.
6. Dopo periodi prolungati d’attività, le parti
metalliche esterne e gli accessori possono
diventare caldi.
7. Se possibile, assicurarsi che il pezzo in
lavorazione sia fissato con morsetti per
prevenirne il movimento.
8. La levigatrice orbitale è un attrezzo
da manovrare a mano; non fissare la
levigatrice ai morsetti.
9. Prima della levigatura, controllare che l’area
sia libera da chiodi, viti, eccetera.
10. Non fermare mai la levigatrice orbitale
applicando una forza eccessiva sulla
piastra.
11. Usare solamente carta in buone condizioni.
Non usare carta strappata o usata.
12. Non levigare materiali che contengono
amianto in quanto pericolosi per la salute.
13. Non mangiare né bere nell’area di lavoro
della levigatrice.
14. Non consentire a nessuno di accedere
all’area di lavoro senza indossare una
mascherina antipolvere.
15. Dove possibile, isolare l’area di lavoro per
contenere la polvere e rimuoverla in un
secondo tempo.
16. Indossare sempre una mascherina
antipolvere.
17. L’attrezzo è progettato esclusivamente per
la levigatura a secco, e non per la levigatura
ad acqua.
18. L’attrezzo è progettato per leggere
lucidature a scopo generico di legno e
metalli.
19. Per evitare il rischio d’incendio, non
levigare materiali a base di magnesio.
20. Indossare occhiali per la protezione degli
occhi quando si usa questo attrezzo.
21.Indossare sempre occhiali o maschere
protettive quando si usa la levigatrice.
Gli occhiali da vista hanno solo lenti
resistenti agli impatti, NON sono
occhiali di protezione. Attenendosi a
questa regola si riducono i rischi di lesioni
personali.
22.Indossare sempre una maschera per
la protezione del viso oppure una
mascherina antipolvere. Attenendosi a
questa regola si riducono i rischi di lesioni
personali.
23.Indossare sempre protezione per le
orecchie quando di usa l’attrezzo
per periodi prolungati. Attenendosi a
questa regola si riducono i rischi di lesioni
personali.
AVVISO: alcune particelle di
polvere creata dalla levigatura,
segatura, macinatura, trapanatura – ed
altre operazioni espletate nei cantieri
– contengono prodotti chimici conosciuti
per provocare tumori, anomalie del
feto umano o altri danni relativi alla
riproduzione. Esempi di questi prodotti
chimici sono:
Piombo delle pitture a base di piombo.
Cristalli di silicio dei mattoni, del cemento e
altri prodotti di muratura.
Arsenico e cromo delle tubature trattate
chimicamente.
Il rischio di queste esposizioni varia in base a
quanto spesso si fa questo tipo di lavoro.
Per ridurre l’esposizione a questi prodotti
chimici:
Lavorare in un’area ben ventilata.
Lavorare con attrezzature di sicurezza
approvate, come mascherine antipolvere
progettate in modo particolare a filtrare
particelle microscopiche.
M-13L-WU650-070305¸ÄFÓïCE´¦.indd 22 3/5/2007 4:08:20 PM
 Loading...