

Page 1

Hedge Trimmer EN
Coupe haie F
Cortasetos ES
P 05
P 11
P 18
WG206
HELPLINE NUMBER
1-866-354-WORX (9679)
HELPLINE NUMBER
www.worxyardtools.com
Page 2

Page 3

Page 4
A B C
D E F
Page 5

Hedge Trimmer EN
0504
TECHNICAL DATA
Rated voltage 120 V ~ 60 Hz
Rated power 3.5 A
Rated no load speed 3200 /min
Cutting length 20”
Cutting diameter 3/4”
Machine weight 6.6 lbs
Protection class / II
ACCESSORY
Safety guard 1pc
Blade sheath 1pc
We recommend that you purchase your accessories from the same store that sold you the tool.
Use good quality accessories marked with a well-known brand name. Choose the type according
to the work you intend to undertake. Refer to the accessory packaging for further details. Store
personnel can assist you and offer advice.
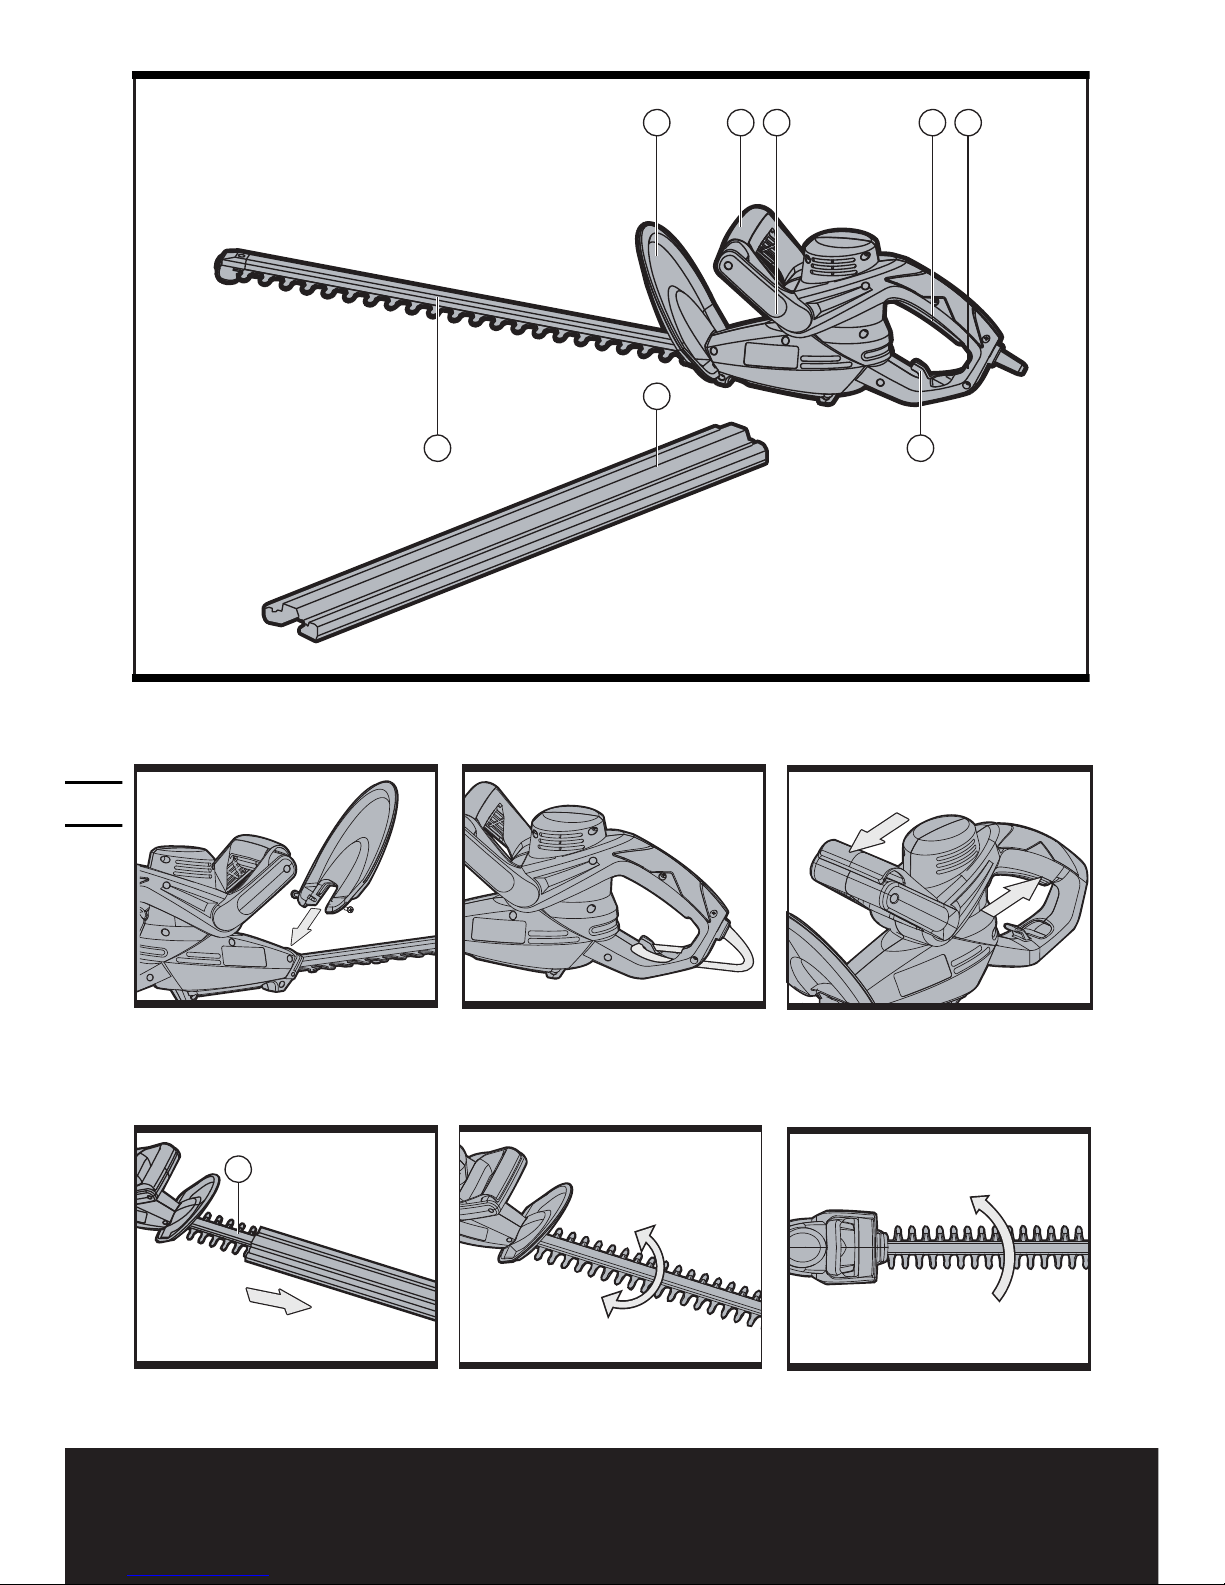
1. REAR HANDLE
2. SWITCH LEVER
3. FRONT HANDLE
4. FRONT HANDLE SWITCH LEVER
5. SAFETY GUARD
6. BLADE
7. BLADE SHEATH
8. CORD RETENTION CLIP
Page 6

Hedge Trimmer EN
0706
SAFETY INSTRUCTIONS
WARNING! Read all safety warnings
and all instructions. Failure to follow
the warnings and instructions may result in
electric shock, fire and/or serious injury.
FOR ALL HEDGE TRIMMERS
1) Avoid Dangerous Environment – Don’t
use hedge trimmer in damp or wet
location.
2) Don’t Use In Rain.
3) Keep Children Away – All visitors
should be kept at a distance from work
area.
4) Dress Properly – Do not wear loose
clothing or jewelry. They can be caught in
moving parts. Use of rubber gloves and
substantial footwear is recommended
when working outdoors. Wear protective
hair covering to contain long hair.
5) Use Safety Glasses – Always use face
or dust mask if operation is dusty.
6) Ground Fault Circuit Interrupter
(GFCI) protection should be provided
on the circuit(s) or outlet(s) to
be used for the hedge trimmer.
Receptacles are available having built-in
GFCI protection and may be used for this
measure of safety.
7) Use Right Appliance – Do not use
appliance for any job except that for which
it is intended.
8) WARNING! To reduce the risk of
electric shock, use only with an
extension cord intended for outdoor use,
such as SW-A, SOW-A, STW-A, STOW-A,
SJW-A, SJOW-A, SJTW-A or SJTOW-A.
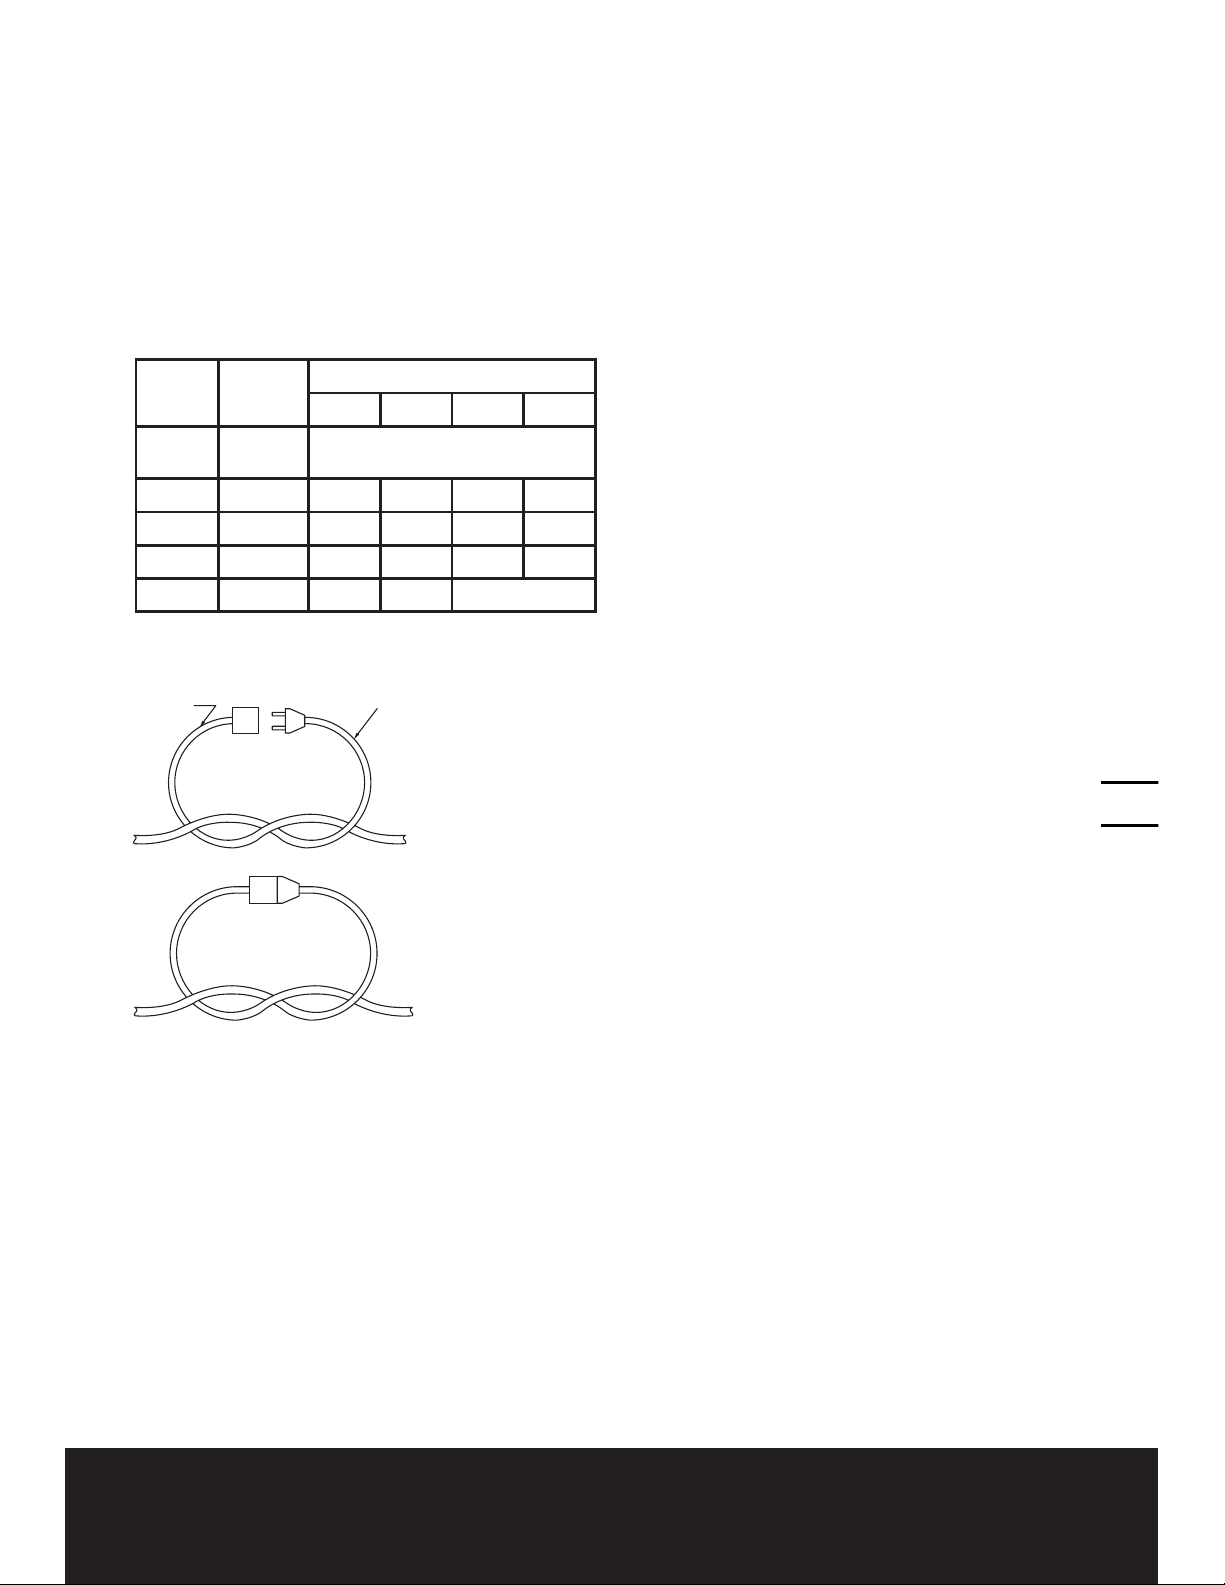
9) Extension Cord – Make sure your
extension cord is in good condition. When
using an extension cord, be sure to use
one heavy enough to carry the current
your product will draw. An undersized
extension cord will cause a drop in line
voltage resulting in loss of power and
overheating. Table 1 shows the correct
size to use depending on cord length and
nameplate ampere rating. If in doubt,
use the next heavier gage. The smaller
the gage number, the heavier the cord. To
reduce the risk of disconnection of hedge
trimmer cord from the extension cord
during operating:
i ) Make a knot as shown in Figure 1, or
ii) Use the cord retention clip as shown in
Fig B
10) Avoid Unintentional Starting – Don’t
carry plugged-in hedge trimmer with
finger on switch. Be sure switch is off
when plugging in.
11) Don’t Abuse Cord – Never carry hedge
trimmer by cord or yank it to disconnect
from receptacle. Keep cord from heat, oil,
and sharp edges.
12) DANGER! Risk of Cut - Keep Hands
Away From Blades - Keep both hands on
handles when power is on.
13) Don’t Force Hedge Trimmer – It will do
the job better and with less risk of injury
at the rate for which it was designed.
14) Don’t Overreach – Keep proper footing
and balance at all times.
15) Stay Alert – Watch what you are doing.
Use common sense. Do not operate
hedge trimmer when you are tired.
16) Disconnect Hedge Trimmer
– Disconnect the hedge trimmer from the
power supply when not in use, before
servicing, when changing accessories
such as blades, and the like.
17) Store Idle Hedge Trimmer Indoors
– When not in use, hedge trimmer should
be stored indoors in dry, and high or
locked-up place – out of reach of children.
18) Maintain Hedge Trimmer With Care
– Keep cutting edge sharp and clean
for best performance and to reduce the
risk of injury. Follow instructions for
lubricating blades. Inspect hedge trimmer
cord periodically, and if damaged, have it
repaired by an authorized service facility.
Inspect extension cords periodically and
replace if damaged. Keep handles dry,
clean, and free from oil and grease.
19) Check Damaged Parts – Before further
use of the hedge trimmer, a guard or
other part that is damaged should be
carefully checked to determine that it will
operate properly and perform its intended
Page 7
0706
Hedge Trimmer EN
0706
function. Check for alignment of moving
parts, binding of moving parts, breakage
of parts, mounting, and any other
condition that may affect its operation.
A guard or other part that is damaged
should be properly repaired or replaced
by an authorized service center unless
indicated elsewhere in this manual.
Table 1 Minimum gauge for extension
cords
Figure 1 Method of securing cord set
ADDITIONAL SAFETY
RULES
1. Use the Hedge trimmer only in daylight or
good artificial light.
2. Know how to stop the Hedge trimmer
quickly in an emergency.
3. Never hold the Hedge trimmer by the
guard.
4. Never operate the Hedge trimmer with
damaged guards or without guard in place.
Ampere
rating
Volts
120 V
Total length of cord in feet
25 50 100 150
more
than
not more
than
AWG
0 6 18 16 16 14
6 10 18 16 14 12
10 12 16 16 14 12
12 16 14 12
Not Recommended
5. Remove the plug from power supply
before passing the hedge trimmer to
another person.
6. Avoid operating while people especially
children are nearby.
7. Whilst using the Hedge trimmer always
be sure of a safe and secure operating
position.
8. Keep hands and feet away from the cutting
blades at all times and especially when
switching on the motor.
9. Do not use step ladders while operating
the Hedge trimmer.
10. Remove the plug from the power supply:
- before leaving the Hedge trimmer
unattended for any period,
- before cleaning a blockage,
- before checking, cleaning or working on
the appliance,
- if you hit an object. Do not use your Hedge
trimmer until you are sure that the entire
Hedge trimmer is in a safe operating
condition,
- if the Hedge trimmer starts to vibrate
abnormally, check immediately. Excessive
vibration can cause injury,
- before passing to another person.
11. Do not expose to rain. Do not operate your
Hedge trimmer on a wet hedge.
12. Always ensure the hand guard supplied
is fitted before using the Hedge trimmer.
Never attempt to use an incomplete
machine or one fitted with an unauthorized
modification.
13. Check cutting blades regularly for damage,
and if damaged repair immediately.
14. Keep cord away from the cutting area;
check the cord for damage before starting
work.
15. Do not start the Hedge trimmer with the
blade cover fitted.
16. Take care not to overload the Hedge
trimmer and do not use it on jobs for
which it is not intended, i.e. you are
allowed to use the Hedge trimmer only to
cut hedges, shrubs and perennials.
17. Always be sure of your footing when using
steps and when using your hedge trimmer.
18. Never run when using your hedge
trimmer.
CORD
SET
APPLIANCE CORD
(A) tie cord as shown
(B) connect plug and
receptacle
Page 8

Hedge Trimmer EN
0908
19. Heavy duty gloves should always be worn
when using the Hedge trimmer.
20. Be careful during adjustment of placing
your fingers between moving blades and
fixed parts of the machine.
21. During transportation and storage of the
Hedge trimmer, keep the blades covered at
all times with the blade sheath.
22. The use of a Residual Current Device
(R.C.D.) with a tripping current of not more
than 30mA is recommended.
23. Do not try to grasp or remove hedge
clippings when the hedge trimmer is
running. Only remove hedge clippings
when the appliance is switched off and
disconnected from the power supply.
24. Carry the hedge trimmer at the handle
while the cutter blade is not running.
Always ensure guard supplied is fitted
when transporting or storing the hedge
trimmer. Careful operation reduces the
injury by the cutter blade.
25. Keep power cord away from the cutting
area. Be aware that during operation the
cable may be covered in hedge clippings
and could be cut inadvertently.
OPERATING INSTRUCTIONS
NOTE: Before using the tool, read the
instruction book carefully.
WARNING! Do not use the product
without fitting the guard.
1. ASSEMBLY OF THE GUARD (See Fig A)
Insert the guard into the slot as illustrated in
Fig A, and use two screws to fix the guard
securely.
2. POWER CORD RETENTION CLIP (See
Fig B)
For strain relief of the power cord, form a loop
of the end of the cord and bring it through the
opening in the handle. Wrap the loop around
the retention clip.
3. STARTING AND STOPPING (See Fig C)
BEFORE STARTING YOUR HEDGE
TRIMMER
Remove blade sheath (7) as illustrated in Fig D.
TO START YOUR HEDGE TRIMMER
There are two switch levers fitted in your
Hedge trimmer (2&4).
Simultaneously depress both switch levers for
the product to start. Depress and hold the front
switch lever (4) and rear switch lever (2).
TO STOP YOUR HEDGE TRIMMER
Move Hedge trimmer away from cutting area
before stopping.
To stop, release one of the switch levers.
WARNING: If any parts are missing,
damaged or broken, do not operate your
Hedge trimmer until all damaged parts have
been replaced or repaired. Failure to do so
could result in serious personal injury.
4. HOW TO USE YOUR HEDGE TRIMMER
Inspect the area to be cut before each use,
remove objects which can be thrown or
become entangled in the cutting blades.
Always hold the Hedge trimmer with both
hands and with the blade away from you
before turning it on.
Always keep the power cord behind the
Hedge trimmer when in use. Do not place
it over the hedge that you are trimming
Page 9

0908
Hedge Trimmer EN
0908
where it may be cut by the blade.
When trimming new growth, use a wide
sweeping action so that the stems are fed
directly into the blade.
Allow the cutting blades to reach full speed
before entering the material to be cut.
Always work going away from people and
solid objects such as walls, large stones, trees,
vehicles etc.
If the blade stalls, immediately stop the Hedge
trimmer. Disconnect the Hedge trimmer from
the power supply and clear the jammed debris
from the cutting blades.
Wear gloves when trimming thorny or prickly
growth.
Move the Hedge trimmer to feed the branches
directly into the blade cutting edges.
Do not try to cut stems that are too large to
feed into the cutting blade.
TOP CUTTING (See E)
Use a wide sweeping motion. A slight
downward tilt of the cutting blades in the
direction of motion gives the best cutting
results.
SIDE CUTTING (See F)
When trimming the sides of the hedge, begin
at the bottom and cut upwards, tapering
the hedge inward at the top. This shape will
expose more of the hedge, resulting in a more
uniform growth.
WARNING: Check extension cords
before each use. If damaged replace
immediately. Never use your tool with a
damaged cord since touching the damaged
area could cause electrical shock resulting in
serious injury.
If the supply cord is damaged, it should be
replaced by a local approved Service Center.
Take care not to expose this tool to rain.
MAINTENANCE
CLEANING
Disconnect from power supply. Using a soft
brush-remove debris from all air intakes and
cutting blade.
Wipe over surface of your Hedge trimmer with
a dry cloth.
WARNING! Never use water for
cleaning your Hedge trimmer. Do
not clean with chemicals, including gas, or
solvents as this can damage your hedge
trimmer.
LUBRICATING THE CUTTING BLADE
For easier operation and longer life, lubricate
the cutting blades before and after each use.
Before lubricating, make sure your Hedge
trimmer is disconnected from the power
supply. Apply a light household oil so that it
runs between the two blades.
Your trimmer should be stopped, disconnected
and oiled occasionally during use.
AT THE END OF THE CUTTING SEASON
Clean your Hedge trimmer thoroughly.
Check that all nuts and bolts are secure.
Visually inspect the Hedge trimmer for any
worn or damaged parts.
TO STORE YOUR HEDGE TRIMMER
Store the hedge trimmer in a secure, dry place
out of the reach of children. Do not place other
objects on top of the machine.
WARRANTY STATEMENT
30 DAY Satisfaction Guarantee
If for any reason you are dissatisfied with any
WORX product, you can return the product,
along with proof of purchase, within 30 days
for a full refund.
If your WORX product becomes defective due
to faulty materials or workmanship within the
specified warranty period of;
• 24 months for DIY and light trade use, from
the date of purchase.
We guarantee to repair or replace all defective
parts free of charge, repair products subject
to fair wear and tear, free of charge, or at our
discretion, replace the unit free of charge
to ensure minimum inconvenience to the
customer. Your warranty is subject to the
following conditions:
• Proof of purchase date and a valid receipt is
produced.
• The product has not been misused.
Page 10

Hedge Trimmer EN
• The product has not been used for
Professional purposes.
• Unauthorized persons have not attempted
repairs.
• The product has not been used for hire
purposes.
• The product has not sustained damage
through foreign objects, substances or
accidents.
• Damage is not a result of tting non-
approved accessories.
To claim the guarantee, you will need to
submit proof of purchase to the seller or an
authorized repair agent.
You can check the location of your nearest
authorized repair agent by contacting us at:
Positec USA, Inc.
Charlotte, NC 28216 USA
PHONE: 1-866-354-WORX (9679)
This warranty does not apply to accessories.
This warranty applies only to the original
purchaser and may not be transferred.
All repairs and replacement tools will be
covered by the limited warranty for the
balance of the warranty period from the date
of the original purchase.
All repairs must use genuine spare parts.
Page 11

011010
Coupe haie F
1110
DONNÉES TECHNIQUES
Voltage assigné 120 V ~ 60 Hz
Courant assigné 3.5 A
Vitesse à vide 3200 /min
Longueur de découpe 20”
Diamètre de coupe 3/4”
Poids 6,6 lbs
Double isolation / II
ACCESSOIRES
Garde de sécurité 1
Couvercle de lame 1
Nous vous recommandons d’acheter tous vos accessoires du même magasin qui vous a vendu
l’outil. N’utilisez que des accessoires de bonne qualité de marque renommée. Choisissez le type
d’outil approprié au travail que vous désirez entreprendre. Pour de plus amples renseignements,
consultez l’emballage de l’accessoire. Le personnel du magasin peut également vous conseiller.
1. POIGNÉE ARRIÈRE
2. LEVIER DU COMMUTATEUR
3. POIGNÉE AVANT
4. LEVIER DE DÉMARRAGE SUR LA POIGNÉE AVANT
5. GARDE DE SÉCURITÉ
6. LAME
7. COUVERCLE DE LAME
8. RÉDUCTEUR DE TENSION DU CÂBLE
Page 12

Coupe haie F
1312
CONSIGNES DE SÉCURITÉ
AVERTISSEMENT: Lisez et assimilez
toutes les instructions. Le non-
respect des instructions ci-après peut entraîner
un risque de choc électrique, d’incendie et/ou
de blessures graves.
a) POUR TOUS LES TAILLE-HAIES
1) Évitez les environnements
dangereux. N’utilisez pas le taille-haie
dans des locations humides ou mouillées.
2) N’utilisez pas sous la pluie.
3) Tenez les enfants éloignés. Tous les
visiteurs devraient se tenir éloignés de
l’aire de travail.
4) Habillez-vous convenablement. Ne
portez pas des vêtements lâches ou
des bijoux. Ils peuvent se prendre dans
les pièces en mouvement. L’utilisation
de gants de caoutchouc et chaussures
épaisses est recommandée lors de
travaux extérieurs. Portez une protection
pour cheveux afin de contenir les cheveux
longs.
5) Utilisez des lunettes de sécurité
Toujours porter un masque pour le visage
ou pour la poussière si l’opération est
poussiéreuse.
6) Un disjoncteur différentiel devrait
être utilisé sur le(s) circuit(s) et
prise(s) murale(s) destinée(s) à
l’appareil de jardinage. Des prises
de défaut à la terre sont disponibles et
peuvent être utilisées également.
7) Utilisez le bon appareil. N’utilisez pas
l’appareil pour tout autre travail que pour
celui auquel il est destiné.
8) AVERTISSEMENT! Afin de réduire
le risque de choc électrique, utilisez
seulement avec une rallonge électrique
destinée à un usage extérieur, tel que les
rallonges de types SW-A, SOW-A, STW-A,
STOW-A, SJW-A, SJOW-A, SJTW-A. ou
SJTOW-A.
9) Rallonge électrique! Assurez-vous
que votre rallonge électrique est en bon
état. Lorsque vous utilisez une rallonge
électrique, assurez-vous qu’elle puisse
soutenir l’intensité du courant demandé
par votre produit. Une rallonge électrique
trop petite cause une baisse de la tension
d’alimentation, entraînant une perte de
puissance et une surchauffe. Le tableau
1 montre le calibre approprié en fonction
de la longueur de la rallonge électrique
et de l’ampérage indiqué sur la plaque
signalétique. Dans le doute, utilisez le
calibre supérieur. Plus le calibre est petit,
plus la rallonge électrique est grosse. Afin
de réduire le risque de déconnexion de
l’appareil et de la rallonge électrique alors
qu’il est en fonction :
i ) Faites un nœud tel qu’illustré en Figure 1
ii) Utilisez une courroie de retenue ou les
connecteurs décrits dans ce manuel.
10) Évitez les démarrages non
intentionnels. Ne transportez pas les
taille-haie alors qu’ils sont connectés
et que vous avez le doigt sur le
commutateur. Soyez certain que le
commutateur est en position « OFF »
lorsque connecté.
11) Ne soumettez pas le cordon
d’alimentation électrique à des abus.
Ne jamais transporter le taille-haie par son
cordon d’alimentation électrique ou lui
donner un coup sec afin de le déconnecter
de la prise d’alimentation. Tenez le cordon
d’alimentation électrique éloigné de la
chaleur, l’huile, et les arêtes tranchantes.
12) DANGER! Risques de coupures - Gardez
les mains éloignées des lames, gardez les
deux mains sur la poignée lorsqu’il est
alimenté.
13) Ne forcez pas votre taille-haie. Il va
faire un meilleur travail et avec moins de
risques de blessure en travaillant au taux
de charge pour lequel il a été conçut.
14) N’essayez pas d’utiliser l’appareil
hors de votre portée normale. Gardez
votre équilibre et les pieds bien ancrés au
sol.
15) Restez alerte. Faites attention à ce
que vous faites. Utilisez votre bon sens.
N’utilisez pas l’appareil lorsque vous êtes
fatigué.
16) Déconnectez votre taille-haie.
Déconnectez le taille-haie de la source
Page 13

1312
Coupe haie F
1312
Table 1 Grosseur minimum de fil pour
cordons prolongateurs
Figure 1 Méthode pour sécuriser la
rallonge électrique
RÈGLES ADDITIONNELLES
DE SÉCURITÉ
1. Utilisez le taille-haie seulement à la lumière
du jour ou sous un bon éclairage artificiel.
2. Sachez comment arrêter le taille-haie lors
d’une situation d’urgence.
3. Ne jamais tenir le taille-haie par la garde.
4. Ne jamais opérer le taille-haie avec une
garde endommagée ou sans la garde en
place.
5. Enlevez la fiche de l’alimentation avant de
le passer à une autre personne.
6. Évitez d’opérer alors qu’il y a des gens aux
alentours, spécialement des enfants.
d’alimentation lorsqu’il n’est pas en
utilisation, avant d’en faire l’entretien, lors
du changement d’accessoires tels que
lames, et autres accessoires du même
genre.
17) Gardez le taille-haie à l’intérieur
lorsqu’il n’est pas utilisé
fréquemment. Lorsqu’il est inutilisé,
le taille-haie devrait être entreposé à
l’intérieur dans un endroit sec, élevé et
gardé sous clef, hors de la portée des
enfants.
18) Entretenez le taille-haie avec soins.
Gardez les arêtes de coupe aiguisées et
propres pour une meilleure performance
et risque réduit de blessure. Suivez les
instructions pour lubrifier et changer
les accessoires. Inspectez le cordon
d’alimentation électrique du taille-haie
périodiquement, et si endommagé,
faites le réparer par un dépôt de
service autorisé. Inspectez les cordons
prolongateurs périodiquement et
remplacez si endommagés. Gardez les
poignées sèches, propres, et libres d’huile
et de graisse.
19) Vérifier les pièces endommagées.
Avant d’employer le taille-haie, une garde
ou autre pièce endommagée devrait être
soigneusement vérifiée afin de déterminer
qu’elle fonctionnera correctement et
exécutera la fonction pour laquelle
elle a été conçue. Vérifier l’alignement
des parties mobiles, leur pincement, la
brisure de pièces, montage, et toute autre
condition qui peut affecter son opération.
Une garde ou autre pièce endommagée
devrait être correctement réparée ou
remplacée par un centre de service
autorisé à moins d’avis contraire ailleurs
dans ce manuel.
013
RALLONGE
ÉLECTRIQUE
CORDON ÉLECTRIQUE DE L’APPAREIL
(A) ATTACHEZ LA
RALLONGE ÉLECTRIQUE
TEL QU’ILLUSTRÉ
(B) CONNECTEZ
FICHE ET PRISE
Caractéristiques
assignées
d’ampérage
Volts
120 V
Longueur totale du cordon
prolongateur, en pieds
25 50 100 150
plus de pas
plus de
AWG
0 6 18 16 16 14
6 10 18 16 14 12
10 12 16 16 14 12
12 16 14 12 Déconseillé
NOTE : Seules les parties applicables de la table ont
besoin d’être considérées.
Page 14

Coupe haie F
1514
7. Alors que vous utilisez le taille-haie soyez
toujours certain d’une position d’opération
sûre et sécuritaire.
8. Gardez les mains et les pieds éloignés des
couteaux en tout temps et spécialement
lorsque vous démarrez le moteur.
9. N’utilisez pas d’escabeau lorsque vous
opérez le taille-haie.
10. Enlevez la fiche de l’alimentation.
- avant de laisser le taille-haie sans
surveillance pour n’importe quelle période
de temps.
- avant de nettoyer un blocage,
- avant de vérifier, nettoyer ou travailler sur
l’appareil.
- si vous frappez un objet. N’utilisez pas votre
taille-haie jusqu’à ce que vous soyez certain
que votre taille-haie est en une condition
sécuritaire d’opération.
- si le taille-haie commence à vibrer
anormalement. Vérifiez immédiatement.
Des vibrations excessives peuvent causer
des blessures.
- avant de le passer à une autre personne.
11. Ne l’exposez pas à la pluie. N’opérez pas
votre taille-haie sur une haie mouillée.
12. Assurez-vous toujours que la garde de
main fournie est bien intégrée au taille-haie
avant de l’utiliser. Ne tentez jamais d’utiliser
une machine incomplète ou comportant
une modification non autorisée.
13. Vérifiez régulièrement les lames de
coupe pour tout dommage possible
et, si endommagées, réparez-les
immédiatement.
14. Gardez le cordon d’alimentation électrique
éloigné de l’aire de coupe ; inspectez le
cordon d’alimentation électrique pour tout
dommage possible avent de débuter le
travail.
15. Ne démarrez pas le taille-haie avec le
couvercle des lames posé.
16. Prenez soin de ne pas surcharger le taille-
haie et ne l’utilisez pas pour de travaux
pour lesquels il n’a pas été conçut. e.g. vous
pouvez utiliser le taille-haie seulement pour
tailler des haies, arbustes et pluriannuels.
17. Soyez toujours certain de votre posture
lorsque vous utilisez des marches et que
vous utilisez le taille-haie.
18. Ne courrez jamais lorsque vous utilisez
votre taille-haie.
19. Des gants très résistants devraient toujours
êtres utilisés lorsque vous utilisez le taillehaie.
20. Faites attention, durant l’ajustement, de
ne pas placer vos doigts entre les lames
mobiles et les pièces fixes de la machine.
21. Durant le transport et l’entreposage du
taille-haie, gardez les lames couvertes
en tout temps avec les lames dans l’étui
d’entreposage.
22. L’usage d’un dispositif de détection de
courant de fuite est recommandé, avec un
seuil de déclenchement de 30 milliampères.
23. Ne tentez pas de saisir ou enlever des
coupures de haie lorsque le taille-haie est
en marche. Enlevez les coupures de haie
seulement lorsque l’appareil est commuté
à « OFF » et déconnecté de la source
d’alimentation.
24. Transportez le taille-haie par la poignée
lorsque les lames ne sont pas en fonction.
Assurez-vous toujours que la garde fournie
est bien intégrée au taille-haie lorsque
vous le transportez ou l’entreposez. Une
opération prudente réduit les blessures
produites par la lame de coupe.
25. Gardez les mains et les pieds hors de
l’aire de coupe. Soyez averti que durant
son opération le cordon d’alimentation
électrique peut être couvert de coupures de
haie et ainsi peut être coupé par mégarde.
Page 15

1514
Coupe haie F
1514
INSTRUCTIONS
D’UTILISATION
REMARQUE: Avant d’utiliser cet outil,
assurez-vous de lire attentivement le
manuel d’utilisation.
AVERTISSEMENT! N’utilisez pas
ce produit sans installer la garde de
sécurité.
1. ASSEMBLAGE DES ÉLÉMENTS DE LA
GARDE (Voir Fig A)
Insérez la garde dans la fente telle qu’illustrée
par la fig. A, utilisez deux vis afin de fixer la
garde de façon sécuritaire.
2. DÉTENTE DU CÂBLE D’ALIMENTATION
(Voir Fig B)
Pour la détente du câble, formez une boucle à
l’extrémité du câble d’extension, passez-le à
travers l’ouverture au niveau de la poignée et
suspendez la détente au niveau de la poignée.
3. DÉMARRAGE ET ARRÊT (Voir Fig C)
AVANT DE DÉMARRER VOTRE TAILLEHAIE
Enlevez le couvercle de la lame (7) tel
qu’illustré par la Fig. D.
POUR DÉMARRER VOTRE TAILLE-HAIE
Il y a deux leviers de commutateur intégrés
dans votre taille-haie (2 & 4).
Les deux leviers de commutation doivent être
pressés pour que le produit démarre. Pressez
et tenez le levier avant de commutation (4) et
pressez le levier arrière de commutation (2).
POUR ARRÊTER VOTRE TAILLE-HAIE
Éloignez le taille-haie de l’aire de coupe avant
d’arrêter.
Pour arrêter, relâchez un des leviers de
commutation.
AVERTISSEMENT: Si n’importe quelle
pièce est manquante, endommagée ou
cassée, n’opérez pas votre taille-haie tant que
toutes les pièces endommagées n’ont pas
été remplacées ou réparées. Le manquement
à cette directive pourrait avoir comme
conséquence des blessures sérieuses.
4. COMMENT VOUS SERVIR DE VOTRE
TAILLE-HAIE
Inspectez au préalable la zone à tailler, retirez
les objets qui risquent d’être projetés ou de se
coincer dans les lames.
Toujours tenir le taille-haie avec les deux
mains et avec la lame éloignée de vous avant
de le démarrer.
Gardez toujours le cordon d’alimentation
électrique derrière vous lorsque vous
vous en servez. Ne le placez pas pardessus la haie là où il peut être coupé.
Lorsque vous taillez des nouvelles pousses,
utilisez une action à grand balayage de façon à
ce que les tiges soient alimentées directement
dans la lame.
Permettez aux lames d’atteindre leur pleine
vitesse avant de couper.
Lorsqu’en opération, gardez les lames
coupantes éloignées des gens et objets tels
que murs, grosses pierres, arbres, véhicules,
etc.
Si la lame gèle en position, arrêtez
immédiatement le taille-haie. Déconnectez la
source d’alimentation avant de tenter d’ôter
des débris pris dans les lames.
Portez des gants lorsque vous coupez des
pousses avec des épines ou des aiguilles.
Déplacez le taille-haie de façon à insérer les
branches directement dans les lames.
Ne tentez pas de couper des tiges trop larges
pour les lames de coupe.
COUPE DE DESSUS (Voir E)
Utilisez une motion large de balayage. Une
petite inclinaison des lames vers le bas,
dans la direction du mouvement, donne les
meilleurs résultats.
COUPE DE CÔTÉ (Voir F)
Lorsque vous coupez les côtés de la haie,
commencez au bas et coupez vers le haut, en
effilant la haie vers l’intérieur au haut de la
haie. Cette forme va exposer plus de la haie,
résultant en une pousse plus uniforme.
AVERTISSEMENT: Vérifiez le cordon
prolongateur avant utilisation. Si
endommagé, remplacez immédiatement.
N’utilisez jamais votre outil avec un cordon
d’alimentation électrique endommagé, car cela
pourrait causer un choc électrique et résulterait
en des blessures graves.
Page 16

Coupe haie F
1716
suite à des matériaux fautifs ou main d’œuvre
fautive, en dedans de la période spécifiée de
garantie de ;
• 24 mois pour usage personnel et usage
commercial léger, à compter de la date
d’achat.
Nous garantissons de réparer ou remplacer
sans frais toutes pièces défectueuses, ainsi
que de réparer le produit sujet à un usage
normal; sans frais, ou à notre discrétion,
remplacer l’unité sans frais afin d’assurer le
minimum d’inconvénients au client. Votre
garantie est sujette aux conditions suivantes :
• Preuve de la date d’achat et un reçu valide
d’achat.
• Le produit n’a pas été utilisé à des ns autres
que celles pour lesquelles il a été conçu.
• Le produit n’a pas été utilisé à des ns
professionnelles.
• Des personnes non autorisées n’ont pas tenté
d’effectuer des réparations.
• Le produit n’a pas été utilisé à des ns de
location.
• Le produit n’a pas subi de dommage causé
par des substances ou objets étrangers, ou
accidents.
• Le dommage au produit n’est pas le résultat
d’y avoir posé des accessoires non approuvés.
Pour réclamer la garantie, il vous faudra
soumettre une preuve d’achat au vendeur ou
agent autorisé à effectuer les réparations.
Vous pouvez obtenir les coordonnées de votre
agent autorisé à effectuer des réparations, le
plus rapproché de vous, en nous contactant à :
Positec USA, Inc.
Charlotte, NC 28216
PHONE: 1-866-354-WORX (9679)
Cette garantie ne s’applique pas aux
accessoires.
Cette garantie s’applique seulement à
l’acheteur original et ne peut être transférée.
Toutes les réparations et outils de
remplacement seront couverts par la garantie
limitée pour la balance de la période de
Si le cordon d’alimentation électrique est
endommagé, il devrait être remplacé par un
centre de service approuvé.
N’exposez pas l’outil à la pluie.
ENTRETIEN
NETTOYAGE
Déconnectez de la source d’alimentation.
Utilisez une brosse douce et enlever les débris
de tous les trous d’aération et de la lame de
coupe.
Nettoyez la surface avec un linge sec.
AVERTISSEMENT! N’utilisez jamais
d’eau afin de nettoyer votre taille-haie.
Ne nettoyez pas avec des produits chimiques,
incluant le pétrole ou des solvants, car cela
peut endommager votre taille-haie.
LUBRIFICATION DES LAMES DE COUPE
Pour une opération plus aisée et une durée
prolongée, lubrifiez les lames de coupe avant
et après chaque usage. Avant la lubrification,
assurez-vous que votre taille-haie est
déconnecté de la source d’alimentation.
Appliquez de l’huile entre les deux lames.
Votre taille-haie devrait être arrêté, déconnecté
et lubrifié occasionnellement pendant usage.
À LA FIN DE LA SAISON DE COUPE
Nettoyez complètement votre taille-haie.
Vérifier que tous les écrous et boulons sont
apprêtés.
Inspectez visuellement le taille-haie pour
toutes pièces usées ou endommagées.
POUR ENTREPOSER VOTRE TAILLE-HAIE
Entreposez le taille-haie dans un endroit sec,
hors d’atteinte des enfants. Ne déposez aucun
objet sur l’outil.
ÉNONCÉ DE GARANTIE
Satisfaction de garantie de 30 jours
Si pour quelque raison que ce soit vous
n’êtes pas satisfait de n’importe quel produit
WORX, vous pouvez retourner le produit avec
preuve d’achat en dedans de 30 jours pour un
remboursement complet.
Si votre produit WORX devient défectueux
Page 17

1716
Coupe haie F
1716
garantie, à compter de la date d’achat original.
Toutes les réparations doivent utiliser des
pièces de rechange originales.
Page 18

Cortasetos ES
1918
DATOS TÉCNICOS
Voltios 120 V ~ 60 Hz
Corriente nominal 3,5 A
Velocidad sin carga 3200 /min
Longitud de corte 20”
Diámetro de corte 3/4”
Peso 6,6 libras
Doble aislamiento / II
ACCESSORY
Guarda protectora de seguridad 1pc
Funda de la hoja de corte 1pc
Le recomendamos que compre todos los accesorios en la tienda donde adquirió la herramienta.
Use accesorios de buena calidad una marca bien conocida. Seleccione los que más convengan
al trabajo que intenta hacer. Consulte el empaque de los accesorios para obtener más detalles. El
personal de la tienda también puede ayudarle y aconsejarle.
1. MANGO TRASERO
2. PALANCA DEL INTERRUPTOR
3. MANGO DELANTERO
4. PALANCA DEL INTERRUPTOR DEL MANGO FRONTAL
5. GUARDA PROTECTORA DE SEGURIDAD
6. HOJA DE CORTE
7. FUNDA DE LA HOJA DE CORTE
8. PRENSACABLE
Page 19

1918
Cortasetos ES
1918
INSTRUCCIONES DE
SEGURIDAD
¡ADVERTENCIA!: Lea y comprenda
todas las instrucciones. El no seguir
todas las instrucciones a continuación puede
dar lugar a descargas eléctricas, incendios y/o
daños corporales serios.
a) PARA TODAS LAS HERRAMIENTAS
1) Evite ambientes peligrosos. No utilice
el cortasetos en lugares húmedos o
mojados.
2) No trabaje bajo la lluvia.
3) Mantenga alejados a los niños.
Todos los visitantes deben mantenerse a
distancia del área de trabajo.
4) Vístase apropiadamente. No use ropas
sueltas o alhajas, ya que pueden quedar
atrapadas en las piezas móviles. Cuando
se trabaja al aire libre se recomienda
el uso de guantes de goma y calzado
resistente. Emplee protección adecuada
para contener el cabello largo.
5) Utilice gafas de seguridad. Emplee
siempre máscara para la cara o máscara
anti-polvo en operaciones donde se emite
mucho polvo.
6) La protección de interruptores de
circuito con polo a tierra (GFCI) debe
ser proporcionada en todos los circuitos
o tomacorrientes a ser empleados para
herramientas de jardinería. Se encuentran
disponibles receptáculos con protección
incorporada GFCI que pueden utilizarse
para esta medida de seguridad.
7) Utilice la herramienta correcta.
Emplee la herramienta únicamente para la
finalidad para la cual fue diseñada.
8) ¡ADVERTENCIA! Para reducir
el riesgo de descarga eléctrica,
utilice únicamente cables prolongadores
diseñados para uso al aire libre, del tipo
SW-A, SOW-A, STW-A, STOW-A, SJW-A,
SJOW-A, SJTW-A o SJTOW-A.
9) ¡Cable prolongador! Cerciórese de que
su cable prolongador esté en buenas
condiciones. Asegúrese de utilizar un
prolongador lo suficientemente resistente
como para soportar la corriente que
requiere su producto. Un cable pequeño
causará una caída de corriente en la
línea de voltaje, dando por resultado
recalentamiento y pérdida de potencia.
La Tabla 1 muestra el calibre correcto a
utilizar, dependiendo de la longitud del
cable y del amperaje indicado en la placa
de identificación. En caso de duda, utilice
el tamaño mayor siguiente. Cuanto menor
es el calibre, mayor es la capacidad del
cable. A fin de evitar la desconexión del
cable de la herramienta del prolongador
durante el funcionamiento:
i ) Haga un nudo como se muestra en la
Figura 1
ii) Utilice una de las bandas de sujeción
del enchufe-receptáculo o conectores
descritos en este manual.
10) Evite el arranque accidental. No
transporte el cortasetos enchufado con
el dedo en el interruptor. Cerciórese de
que el interruptor esté apagado cuando
enchufe la máquina.
11) No abuse del cable. Nunca transporte el
cortasetos por el cable ni tire de éste para
desconectarlo del tomacorriente. Proteja
el cable del calor, el aceite y los bordes
agudos.
12) ¡PELIGRO! Riesgo de corte. Mantenga
las manos alejadas de las hojas de
corte. Cuando la herramienta esté en
funcionamiento, mantenga las manos
sobre los mangos.
13) No fuerce la herramienta. Hará un
trabajo mejor y más seguro a la velocidad
para la cual fue diseñada.
14) No fuerce su cortasetos. Manténgase
firme y con buen equilibrio en todo
momento.
15) Permanezca alerta. Ponga siempre
atención en lo que está haciendo.
Utilice el sentido común. No opere la
herramienta cuando esté cansado.
16) Desconecte su cortasetos. Cuando
no se encuentre en uso, antes de
hacer mantenimiento o al cambiar
accesorios tales como hojas de corte o
similares, desenchufe el cortasetos del
tomacorriente.
Page 20

Cortasetos ES
2120
17) Guarde los cortasetos que no usa
en lugares cerrados. Cuando no se
encuentran en uso, los cortasetos deben
guardarse en un lugar seco, elevado o
cerrado con llave, lejos del alcance de los
niños.
18) Mantenga el cortasetos con cuidado.
Conserve los bordes cortantes limpios
y bien afilados, a fin de obtener el
mejor rendimiento y reducir los riegos
de lesiones. Siga las instrucciones
para la lubricación y el cambio de
accesorios. Examine periódicamente
el cable de la herramienta y si está
dañado hágalo reparar por un agente
autorizado. Examine periódicamente los
prolongadores y sustitúyalos si están
dañados. Mantenga los mangos secos,
limpios, y libres de aceite y grasa.
19) Verifique si hay piezas dañadas.
Las guardas protectoras u otras partes
dañadas deben revisarse cuidadosamente
antes de cualquier uso futuro del
cortasetos, a fin de determinar si
funcionarán correctamente y realizarán
la función prevista. Verifique que las
piezas móviles se encuentren alineadas
y correctamente ajustadas, que no
haya rotura de piezas, de montaje o
cualquier otra condición que pueda
afectar su funcionamiento. Una guarda
protectora u otra pieza que se encuentre
dañada debe ser reparada o sustituida
correctamente en un centro de servicio
autorizado, a menos que en este manual
de instrucciones se indique lo contrario.
Tabla 1 - Calibre mínimo para los cables
prolongadores
Figura 1 Método para asegurar el cable
prolongador
REGLAS ADICIONALES DE
SEGURIDAD
1. Utilice el cortasetos únicamente de día o
con buena luz artificial.
2. Sepa cómo detener rápidamente el
cortasetos ante una emergencia.
3. Nunca sostenga el cortasetos por la guarda
protectora.
4. Nunca utilice el cortasetos con las guardas
protectoras dañadas o fuera de lugar.
5. Desconecte el enchufe del tomacorriente
antes de ceder el cortasetos a otra
persona.
6. Evite trabajar cuando otras personas,
especialmente niños, se encuentran en las
proximidades.
7. Cuando usa el cortasetos cerciórese de
hacerlo en condiciones apropiadas de
seguridad.
8. Mantenga en todo momento manos y pies
lejos del área de corte y especialmente
cuando encienda el motor.
9. No utilice escaleras mientras maneja el
cortasetos.
10. Retire el enchufe del tomacorriente:
- antes de abandonar el cortasetos durante
cierto período.
- antes de limpiar una obstrucción,
- antes de revisar, limpiar o reparar la
herramienta.
- si golpeó un objeto. No utilice su
Amperaje
Voltaje
120 V
Longitud total del cable en metros
25 50 100 150
mayor
de
no mayor
de
AWG
0 6 18 16 16 14
6 10 18 16 14 12
10 12 16 16 14 12
12 16 14 12
No recomendado
NOTA - Sólo las partes aplicables de la Tabla deben ser
tenidas en cuenta.
(B) CONECTE EL
ENCHUFE Y EL
RECEPTÁCULO
CABLE
PROLONGADOR
CABLE DE LA HERRAMIENTA
(A) ATE LOS CABLES
COMO SE MUESTRA
Page 21

2120
Cortasetos ES
2120
cortasetos hasta no cerciorarse de hacerlo
en condiciones apropiadas de seguridad.
- si el cortasetos comienza a vibrar en forma
anormal. Verifique inmediatamente, ya
que la vibración excesiva puede causar
lesiones.
- antes de cederlo a otra persona.
11. No exponga la unidad a la lluvia ni la haga
funcionar sobre setos mojados.
12. Antes de usar el cortasetos, asegúrese
siempre de que la guarda protectora
provista esté colocada. Nunca intente
utilizar una máquina incompleta o con una
modificación no autorizada.
13. Inspeccione regularmente las hojas de
corte para verificar si están dañadas; en
ese caso, repárelas inmediatamente.
14. Mantenga el cable lejos del área de corte;
al comenzar el trabajo, inspeccione el
cable para verificar si está dañado.
15. No encienda el cortasetos si la hoja de
corte tiene la funda puesta.
16. Cuide de no sobrecargar el cortasetos ni
utilizarlo en trabajos para los cuales no
está diseñado. Esto significa que sólo
puede utilizarlo para cortar setos, arbustos
y plantas perennes.
17. Tenga sumo cuidado de no tropezar
al manejar su cortasetos o al utilizar
escaleras.
18. Nunca corra cuando use su cortasetos.
19. Siempre deben emplearse guantes
resistentes toda vez que se use el
cortasetos.
20. Durante el ajuste, tenga cuidado de colocar
sus dedos entre las hojas de corte y las
piezas fijas de la máquina.
21. Durante el transporte y almacenamiento
del cortasetos, mantenga las hojas de
corte siempre cubiertas con la funda
correspondiente.
22. Se recomienda el uso de un dispositivo
de corriente residual (R.C.D.) con una
corriente no superior a los 30mA.
23. No intente tocar o extraer los recortes
de seto cuando el cortasetos está
funcionando. Hágalo recién cuando la
herramienta esté apagada y desconectada
del tomacorriente.
24. Cuando la hoja de corte no está
funcionando, el cortasetos debe ser
transportado por el mango. Asegúrese
siempre de que la guarda protectora
provista esté colocada al transportar o
almacenar el cortasetos. Una operación
cuidadosa reduce las lesiones causadas
por la hoja de corte.
25. Mantenga el cable alejado del área de
corte. Tenga en cuenta que durante el
funcionamiento el cable puede quedar
cubierto por los recortes de seto y podría
ser cortado inadvertidamente.
Page 22

Cortasetos ES
2322
podrían ser arrojados o atorarse en las hojas
de corte.
Sostenga siempre la cortadora con ambas
manos, y con la hoja alejada de Ud. antes
encender la máquina.
Conserve siempre el cable eléctrico
detrás de la herramienta en uso. No lo
coloque sobre el seto, ya que puede
resultar cortado.
Cuando corte césped nuevo, hágalo mediante
un movimiento de barrido amplio, de modo
que los tallos entren directamente en la hoja
de corte.
Deje que las hojas de corte alcancen la
velocidad máxima antes de cortar.
Cuando maneje la máquina mantenga las
hojas de corte alejadas de las personas y de
objetos tales como paredes, piedras grandes,
árboles, vehículos, etc.
Si la hoja de corte se atasca, apague
inmediatamente la herramienta. Desconéctela
del tomacorriente antes de intentar extraer los
deshechos atascados entre las hojas.
Use guantes cuando corte material espinoso.
Mueva el cortasetos para dirigir las ramas
directamente hacia las hojas de corte.
No intente cortar tallos demasiado grandes
para la hoja de corte.
CORTE SUPERIOR (Véase E)
Utilice un movimiento de barrido amplio. Los
mejores resultados se obtienen inclinando las
hojas de corte levemente hacia abajo y en la
dirección del movimiento.
CORTE LATERAL (Véase F)
Cuando pode los laterales del seto,
comience desde el suelo y corte hacia arriba,
estrechando el interior del seto en la parte
superior. Este tipo de corte dejará expuesta
una mayor superficie del seto, dando por
resultado un crecimiento más uniforme.
ADVERTENCIA: Verifique el estado
del cable prolongador antes del uso. Si
está dañado reemplácelo inmediatamente.
Nunca utilice su herramienta con un cable
dañado, pues esto podría causar una descarga
eléctrica, resultando en lesión seria.
Si el cable eléctrico está dañado, debe
ser reemplazado en un centro de servicio
autorizado. No exponga la herramienta a la
lluvia.
INSTRUCCIONES DE USO
NOTA: Antes de usar la herramienta, lea
atentamente el manual de instrucciones.
¡ADVERTENCIA! No utilice el producto
sin colocar la guarda.
1. MONTAJE DE LA GUARDA
PROTECTORA (Véase Fig. A)
Inserte la guarda en la ranura como se ilustra
en la fig. A, utilice dos tornillos para fijar la
guarda protectora en forma segura.
2. ALIVIO DE TENSIÓN DEL CABLE DE
SUMINISTRO ELÉCTRICO (Véase Fig. B)
Para un alivio de tensión del cable, forme un
lazo con el extremo del cable de extensión,
hágalo pasar por la abertura del mango y
colóquelo en el aliviador de tensión ubicado
en la empuñadura.
3. ENCENDIDO Y APAGADO (Véase Fig.
C)
ANTES DE ENCENDER SU CORTASETOS
Retire la funda de la hoja de corte (7) como se
ilustra en la Fig. D.
PARA ENCENDER SU CORTASETOS
Su cortadora posee dos palancas de
interruptor (2&4).
Para que el producto arranque, ambas
palancas deben ser presionadas. Por lo tanto,
presione y sostenga la palanca delantera del
interruptor (4) y presione la palanca trasera del
interruptor (2).
PARA DETENER SU CORTASETOS
Antes de detenerlo, aleje el cortasetos del área
de corte.
Para parar, suelte una de las palancas del
interruptor.
ADVERTENCIA: Si faltan piezas, o
están dañadas o rotas, no utilice su
cortadora hasta que se hayan sustituido o
reparado todas las piezas dañadas. La falta
de acatamiento a esta regla podría dar lugar a
daños corporales serios.
4. CÓMO UTILIZAR SU CORTASETOS
Inspeccione el área que desea cortar antes de
utilizar la herramienta. Retire los objetos que
Page 23

2322
Cortasetos ES
2322
Tenga cuidado de no exponer esta herramienta
a la lluvia.
ANTENIMIENTO
LIMPIEZA
Desconecte del tomacorriente. Use un cepillo
suave para remover los deshechos de todas
las tomas de aire y hojas de corte.
Limpie la superficie con un paño seco.
¡ADVERTENCIA! Nunca utilice agua
para limpiar su cortadora. No limpie
con productos químicos, incluyendo gasolina,
o solventes, ya que esto puede dañar su
cortadora.
LUBRICACIÓN DE LA HOJA DE CORTE
Para un funcionamiento más sencillo y
mayor vida útil, lubrique las hojas de corte
antes y después de cada uso. Antes de
lubricar, cerciórese de que su cortadora esté
desconectada del tomacorriente. Aplique
aceite entre las dos hojas de corte.
Debe detener su cortadora, desconectarla y
engrasarla de vez en cuando durante el uso.
AL TÉRMINO DE LA TEMPORADA DE
PODA
Limpie a fondo su cortadora.
Compruebe que todas las tuercas y pernos
permanezcan asegurados.
Examine visualmente la herramienta para
comprobar si existen piezas gastadas o
dañadas.
CÓMO GUARDAR SU CORTASETOS
Almacene el cortasetos en un lugar seguro,
seco y fuera del alcance de los niños. No
coloque otros objetos sobre la máquina.
DECLARACIÓN DE
GARANTÍA
Garantía de Satisfacción por 30 DÍAS
Si por algún motivo Ud. no queda satisfecho
con cualquiera de los productos WORX,
puede solicitar el reembolso de su dinero
devolviendo el producto conjuntamente con
su factura de compra dentro de los 30 días.
Si su producto WORX presenta algún defecto
debido a fallas en sus materiales o mano
de obra dentro de un período de garantía
especificado en:
• 24 meses para uso en bricolaje o uso
comercial ligero, a partir de la fecha de
compra.
Garantizamos la sustitución libre de cargo de
todas las partes defectuosas, la reparación
de los productos afectados por el desgaste
y deterioro normal, o a nuestro criterio, el
reemplazo de la unidad sin cargo alguno a fin
de asegurar la mínima inconveniencia para el
cliente. Su garantía está sujeta a las siguientes
condiciones:
• Se presenta comprobante de la fecha de
compra y un recibo válido.
• El producto no ha sido maltratado.
• El producto no ha sido usado con nes
profesionales.
• Personas no autorizadas no han intentado
efectuar reparaciones.
• El producto no ha sido arrendado.
• El producto no ha estado sujeto a daños
causados por objetos extraños, sustancias o
accidentes.
• El daño no es resultado de la instalación de
accesorios no aprobados.
Para efectuar los reclamos pertinentes,
Ud. deberá remitir la factura de compra al
vendedor o a un centro de servicio autorizado.
Puede consultar el centro de servicio
autorizado más cercano contactándonos en:
Positec USA, Inc.
Charlotte, NC 28216 USA
PHONE: 1-866-354-WORX (9679)
Esta garantía no es aplicable a los accesorios.
Esta garantía es aplicable sólo al comprador
original y no puede ser transferida.
Todas las reparaciones y herramientas de
repuesto serán cubiertas por la garantía
limitada por el resto del período de garantía
desde la fecha original de compra.
Page 24

Cortasetos ES
En todas las reparaciones deben emplearse
piezas de repuesto originales.
Page 25

2524 2524
Page 26

Page 27

Page 28

Designed in Italy. Made in China
Conçu en Italie. Fabriqué en Chine
Diseñado en Italia. Fabricado en China
 Loading...