

Page 1

P07
P15
P24
WG151
HELPLINE NUMBER
1-866-354-WORX (9679)
HELPLINE NUMBER
2-in-1 Cordless Li-ion Grass Trimmer/Edger EN
Taille-haie/tondeuse 2 en 1 sans fi l Li-ion F
Podadora / bordeadora de césped sin cables “2 en 1” con batería de iones de litio
ES
Page 2

Page 3

Page 4
17
b
a
B
A
C
8
9
6
7
4
3
2
10
5
1
Page 5
19
18
17
c
d
16
b
a
F
G
B
E
H1
A
D
C
H2
I J1 J2
K L M1
Page 6
19
18
16
11
12
13
14
15
20
21
F
G
E
H1
D
H2
I J1 J2
K L M1
M2 N O1
O2
P
Q
Page 7

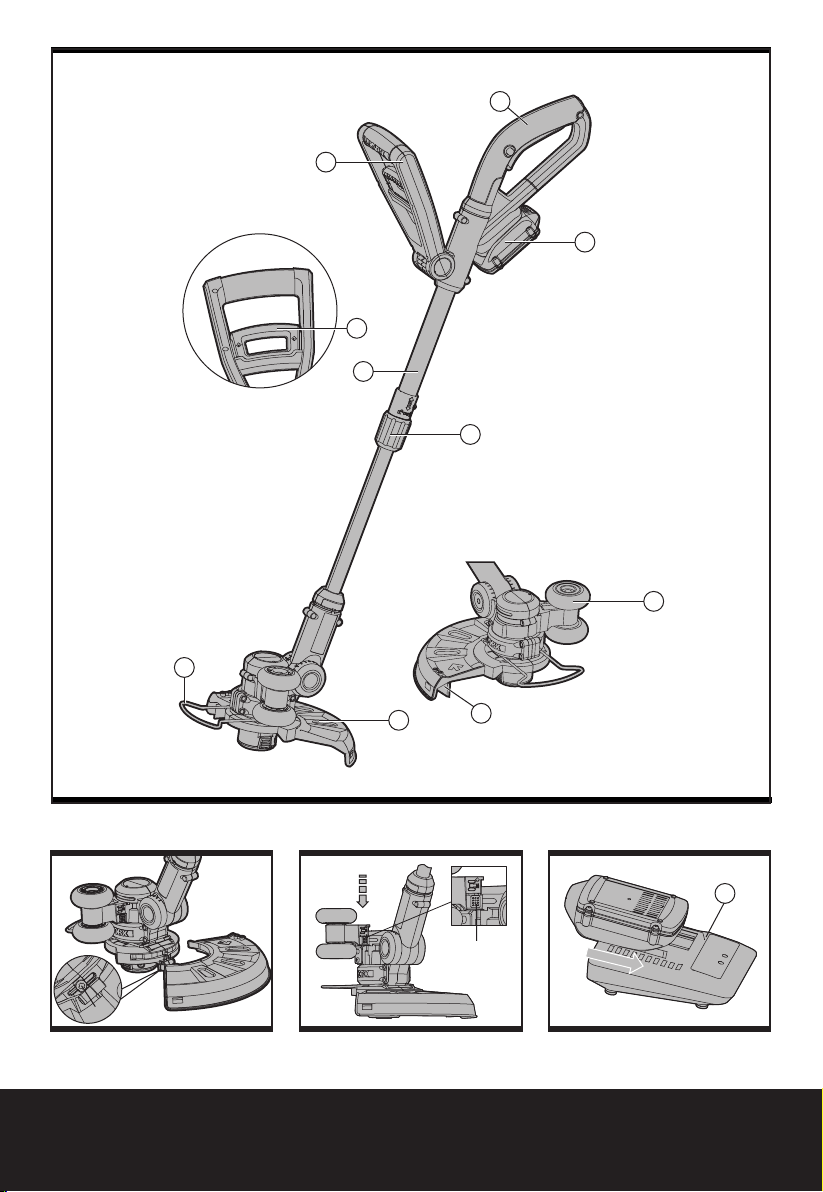
1. REAR HANDLE
2. AUXILIARY HANDLE
3. TELESCOPIC SHAFT
4. LOCKING COLLAR
5. AUXILIARY HANDLE LOCKING LEVER
6. SAFETY GUARD
7. FLOWER GUARD
8. EDGER WHEEL
9. LINE CUTTER
10. BATTERY PACK
11. TRIMMER HEAD COVER (See Fig M2)
12. CAP RELEASE LATCH (See Fig M2)
13. SPOOL (See Fig M2)
14. TRIMMER HEAD (See Fig M2)
15. EYELET (See Fig M2)
16. LINE FEED BUTTON (See Fig M1)
17. CHARGER (See Fig C)
18. CHARGED INDICATOR LIGHT (GREEN) (See Fig D)
19. CHARGING INDICATOR LIGHT (RED) (See Fig D)
20. WALL MOUNT BRACKET, TOOL (See Fig N)
21. WALL MOUNT BRACKET, CHARGER (See Fig N)
76
2-in-1 Cordless Li-ion Grass Trimmer/Edger EN
Page 8

2-in-1 Cordless Li-ion Grass Trimmer/Edger EN
98
TECHNICAL DATA
Voltage 18V
No load speed 8500/min
Cutting diameter 10”(250mm)
Line diameter 0.065”(1.65mm)
Machine weight 5.4lbs(2.4kg)
ACCESSORIES
Safety guard 1
Charger 1
Battery pack 1
Edger wheel 1
Wall mounts 2
We recommend that you purchase your accessories from the same store that sold you the tool.
Use good quality accessories marked with a well-known brand name. Choose the type according
to the work you intend to undertake. Refer to the accessory packaging for further details. Store
personnel can assist you and offer advice.
Page 9

98
98
2-in-1 Cordless Li-ion Grass Trimmer/Edger EN
SAFETY INSTRUCTIONS
WARNING! When using electric
gardening appliances, basic safety
precautions should always be followed to
reduce the risk of fire, electric shock, and
personal injury, including the following:
WARNING: Read all instructions
FOR ALL APPLIANCES
1) Avoid Dangerous Environment - Don’t use
appliances in damp or wet locations.
2) Don’t Use In Rain.
3) Keep Children Away - All visitors should be
kept at a distance from work area.
4) Dress Properly - Do not wear loose
clothing or jewelry. They can be caught in
moving parts. Wear protective clothing;
use of rubber gloves, long pants, long
sleeved shirt and substantial footwear is
recommended when working outdoors.
Wear protective hair covering to contain
long hair.
5) Use Safety Glasses - Always use face or
dust mask if operation is dusty.
6) Use Right Appliance - Do not use appliance
for any job except that for which it is
intended.
7) Avoid Unintentional Starting - Don’t carry
plugged-in appliance with finger on switch.
Be sure switch is off when plugging in.
8) Don’t Force Appliance - It will do the job
better and with less likelihood of a risk of
injury at the rate for which it was designed.
9) Don’t overreach - Keep proper footing and
balance at all times.
10) Stay Alert - Watch what you are doing. Use
common sense. Do not operate appliance
when you are tired.
11) Store Idle Appliances Indoors - When not in
use, appliances should be stored indoors
in dry, and high or locked-up place - out of
reach of children.
12) Maintain Appliance With Care - Keep
cutting edge sharp and clean for best
performance and to reduce the risk of
injury. Follow instructions for lubricating
and changing accessories. Inspect
appliance cord periodically, and if
damaged, have it repaired by an authorized
service facility. Inspect extension cords
periodically and replace if damaged. Keep
handles dry, clean, and free from oil and
grease.
13) Check Damaged Parts - Before further use
of the appliance, a guard or other part that
is damaged should be carefully checked
to determine that it will operate properly
and perform its intended function. Check
for alignment of moving parts, binding of
moving parts, breakage of parts, mounting,
and any other condition that may affect
its operation. A guard or other part that is
damaged should be properly repaired or
replaced by an authorized service center
unless indicated elsewhere in this manual.
INSTRUCTION MANUAL FOR BATTERY –
OPERATED GARDENING APPLIANCES
1. The instruction manual for all battery-
operated gardening appliances shall contain
the following or equivalent instructions:
1) Do not charge appliance in rain, or in wet
locations.
2) Do not use battery-operated appliance in
rain.
3) When replacing batteries, all batteries
should be replaced at the same time.
Mixing fresh and discharged batteries
could increase internal cell pressure and
rupture the discharge battery(ies). (Applies
to products employing more than one
separately replaceable primary battery.)
4) When inserting batteries into this product,
the proper polarity or direction must be
observed. Reverse insertion of batteries
can result in leakage or explosion. (Applies
to product employing more than one
separately replaceable primary battery.)
5) Avoid Unintentional Starting – Do not
insert battery with finger on switch. Be sure
switch is off when inserting battery.
6) Remove or disconnect battery before
servicing, cleaning or removing material
from the gardening appliance.
2. The instruction manual for all battery-
operated products employing a detachable or
separable battery shall contain the following
or equivalent instructions:
1) Use only the following type and size
battery(ies): WA3512, WA3513
Page 10
2-in-1 Cordless Li-ion Grass Trimmer/Edger EN
1110
2) Do not dispose of the battery(ies) in a
fire. The cell may explode. Check with
local codes for possible special disposal
instructions.
3) Do not open or mutilate the battery(ies).
Released electrolyte is corrosive and may
cause damage to the eyes or skin. It may
be toxic if swallowed.
4) Exercise care in handling batteries in order
not to short the battery with conducting
materials such as rings, bracelets, and
keys. The battery or conductor may
overheat and cause burns.
SAVE THESE INSTRUCTIONS
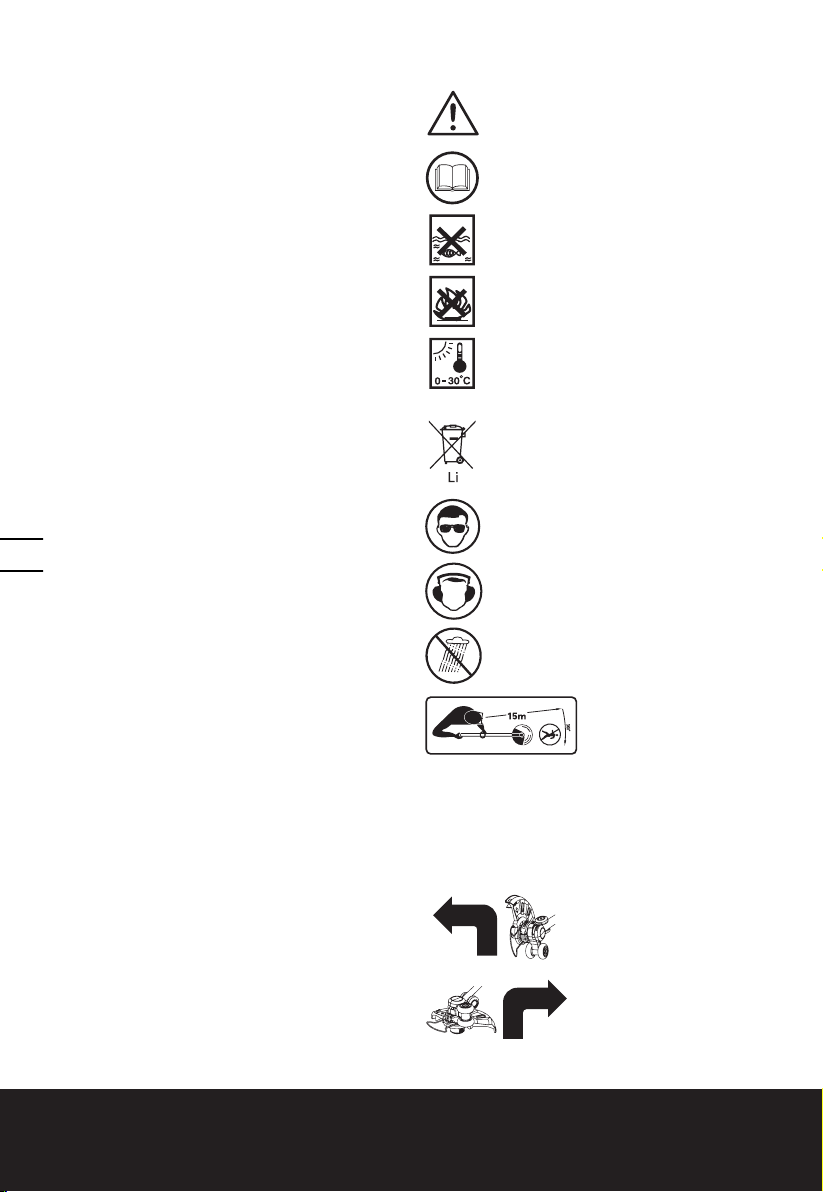
SYMBOLS
Warning
Read the manual
Do not expose to rain or water
Do not burn
Always charge the battery pack
between temperatures 32°F(0°C)
to 86°F(30°C)
Do not dispose of batteries,
Return exhausted batteries to
your local collection or recycling
point
Wear eye protection
Wear ear protection
To avoid possibility of electric
shock, do not use in damp or wet
conditions
Keep all other people,
including children, pets and
bystanders outside the 15
meters hazard zone; stop the
trimmer immediately if you are
approached.
Edging
Trimming
Page 11
1110
1110
2-in-1 Cordless Li-ion Grass Trimmer/Edger EN
ASSEMBLY
1. ASSEMBLY OF THE SAFETY GUARD
(See Fig A)
Fix the safety guard to the trimmer head
making sure the sides are located into the
grooves on the trimmer head.
Secure the safety guard onto the trimmer
head with the screw (a) provided.
2. ASSEMBLE OF THE EDGER WHEEL
(See Fig B)
Insert the edger wheel assembly onto grooves
of cutting head. Make sure the groove of the
wheel is locked in the metal plate.
Press the release button (b) on the wheel and
pull out to take off the wheel.
OPERATION INSTRUCTIONS
WARNING! The charger and battery
pack are specially designed to work
together so do not attempt to use any other
devices. Never insert or allow metallic objects
into your charger or battery pack connections
because of an electrical failure and hazard will
occur.
1. BEFORE USING YOUR CORDLESS
GRASS TRIMMER
Your battery pack is UNCHARGED and you must
charge once before use.
The battery charger supplied is matched to the
Li-ion battery installed in the machine. Do not
use another battery charger.
2. CHARGING YOUR BATTERY PACK
The Li-ion battery is protected against deep
discharging. When the battery is empty, the
machine is switched off by means of a protective
circuit: The trimmer head no longer rotates.
In a warm environment or after heavy use, the
battery pack may become too hot to permit
charging. Allow time for the battery to cool
down before recharging.
Slide the battery pack into the charger to make
the connections. The green light (18) will be
off and the red light (19) will illuminate to
show charging has started. When charging is
completed the green light (18) will illuminate
while the red light (19) is off.
NOTE:
This charger is designed to detect some
problems that can arise with battery pack. (see
table below)
Red Flashing
Green Off
Red ON
Green Off
Green ON
Red Off
Green
Flashing
Red Off
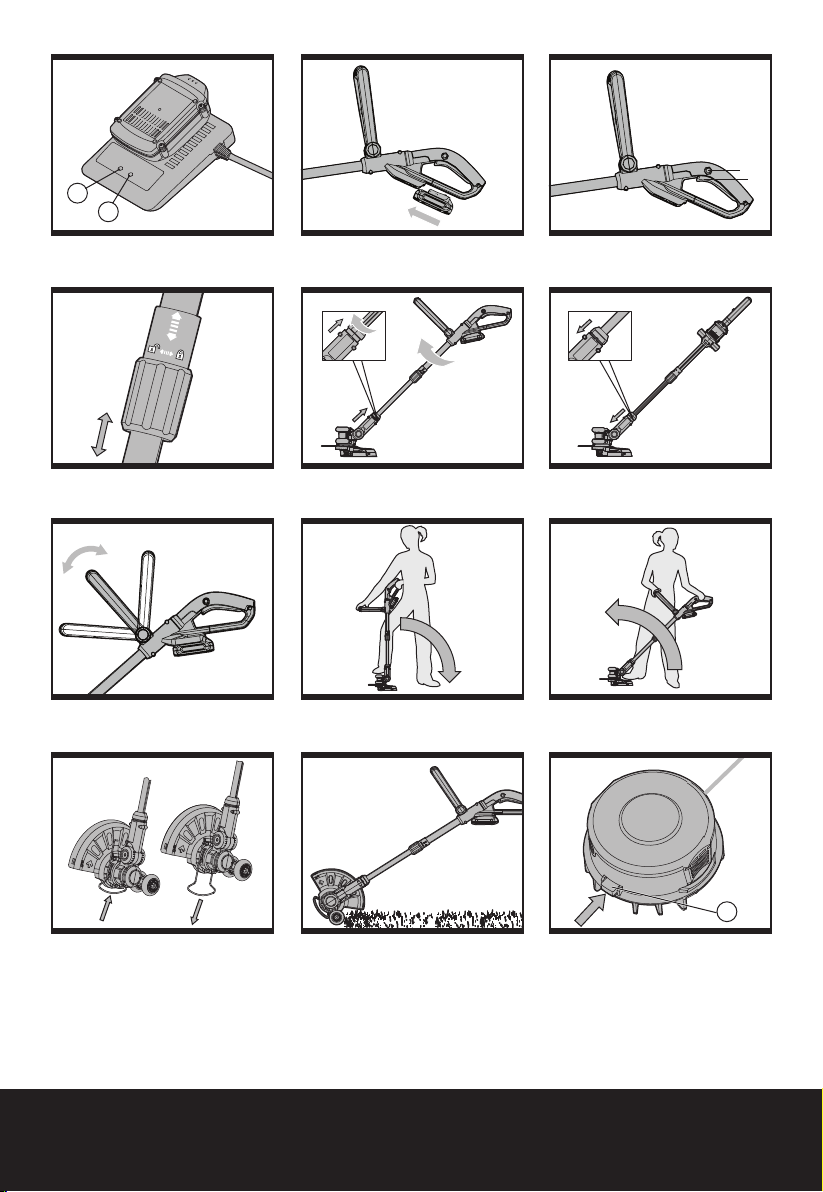
4. TO REMOVE OR INSTALL BATTERY
PACK (See Fig E)
Depress the battery release button to
release battery pack from your trimmer.
After recharging, insert the battery pack into
trimmer’s battery port. A simple push and
slight pressure will be sufficient.
5. SAFETY ON/OFF SWITCH (See Fig F)
Your switch is locked off to prevent accidental
starting. Depress lock off button (c) then on/off
switch (d) and release lock off button (c). Your
switch is now on. To switch off, just release the
on/off switch.
WARNING! The cutting head
continues to rotate after the
trimmer has been switched off; wait until
it has completely stopped then lay down
the tool.
Defective battery, after precharge 30 minutes with trickle
current, the total battery
voltage is still less than 10.0V
(When charging 18V battery
pack).
Charging
Power On and Fully Charged
The temperature of battery
pack is less than 32°F (0°C) or
more than 113°F (45°C)
3. HOW TO CHARGE YOUR BATTERY (See
Fig C&D)
Connect the battery charger to the power
supply and the green light (18) will illuminate.
6. ADJUSTMENT OF THE TELESCOPIC
SHAFT (See Fig G)
Unscrew the locking collar (4) in the direction
Page 12

2-in-1 Cordless Li-ion Grass Trimmer/Edger EN
1312
indicated to unlock.
Adjust the length of the telescopic shaft to the
most comfortable length.
Tighten the lower locking collar.
7. MAIN HANDLE ROTATION (See Fig
H1&H2)
Holding the lower housing then pull upward
the shaft, then rotate 90 degree clockwise,
then release, the shaft will be locked in
position automatically.
8. ADJUSTMENT OF AUXILIARY HANDLE
(See Fig I)
Pull up the auxiliary handle locking lever (5).
Hold the lever and rotate the auxiliary handle
to the most comfortable and balanced
position.
Release the lever, your auxiliary handle has
been locked.
9. ADJUSTMENT OF THE TRIMMER
HEAD ANGLE TO THE SHAFT (See Fig
J1&J2)
Adjust the trimmer head angle downwards,
Put your one foot on the motor house, then
grip the main handle, apply adequate force to
adjust, as shown in Fig J1.
Adjust the trimmer head angle upwards, Put
your one foot on the safety guard, then grip
the main handle, apply adequate force to
adjust, as shown in Fig J2.
10. SPACER GUARD (See Fig K)
Push the flower guard in and out into place
before trimming, as shown in Figure K. Make
sure the flower guard is locked firmly in place.
ensure debris is thrown away from you. Without
bending over, keep line near and parallel to the
ground (perpendicular when edging) and not
crowded into material being cut.
WARNING: Make sure that line is
fed out before operation. Make sure
motor is up to full speed before trimming
or edging.
WARNING: Use only 0.065”(1.65mm)
cutting line, diameter line. Other sizes of
line will not feed properly and will result in
improper cutting head function or can cause
serious injury. Do not use other material
such as wire, string, rope, etc. Wire can break
off during cutting and become a dangerous
projectile that can cause serious injury.
Trimming
Hold the bottom of the trimmer head about
3.25”(8 cm) above the ground and at an angle.
Allow only the tip of line to make contact. Do
not force trimmer line into work area.
Edging (See Fig L)
Holding the lower housing then pull upwards
the shaft, then rotate 90 degree clockwise. (Fig
H1)
Adjust trimmer head angle to be the lowest
horizontal setting. Then position the wheel on
the ground for edge mode. The guard has two
white line guides to indicate the cutting line
position. Align these marks with the edge of
your lawn.
While edging, allow the tip of the line to make
contact. Do not force the line. The rotation
wheel helps protect the unit and keeps the
unit from contacting the ground. Take extra
caution while edging as objects can be thrown
from the trimmer line.
AUTOMATIC LINE FEED SYSTEM
OPERATION
WARNING:
protection. Never lean over the trimmer
head. Rocks or debris can ricochet or be thrown
into eyes and face and cause blindness or other
serious injury. When operating unit, check for
the following:
Wear eye protection and heavy clothing. Hold
front handle with one hand and auxiliary handle
with the other hand. Keep unit below waist
level. Work only from your right to your left to
Always wear the eye
When initially switching on the trimmer, a
small length of line is fed out.
A ‘clattering’ noise will be heard when the
lines hit the line cutter. DO NOT BE ALARMED
this is quit normal. After about 5 seconds the
line will be cut to the correct length and the
noise will reduce as the motor receives full
speed.
If the noise of the line being cut can’t be
heard, more line will need to be fed out.
To feed more line, it is first necessary to allow
Page 13

1312
1312
2-in-1 Cordless Li-ion Grass Trimmer/Edger EN
the trimmer to stop completely, then restart,
allowing the motor to reach full speed.
Repeat above until you hear the lines hitting
against the line cutter. (Do not repeat this
procedure more than 6 times)
TO MANUALLY FEED THE LINE (See Fig
M1)
If required, line can be feed out manually
To operate, press and release manual line feed
button (16), while gently pulling out the line
until it is long enough to reach the line cutter.
If the line extends past the line cutter, too
much line has been fed out.
If too much line is fed out, remove the spool
cap and turn spool counter-clockwise until the
line is at the desired length.
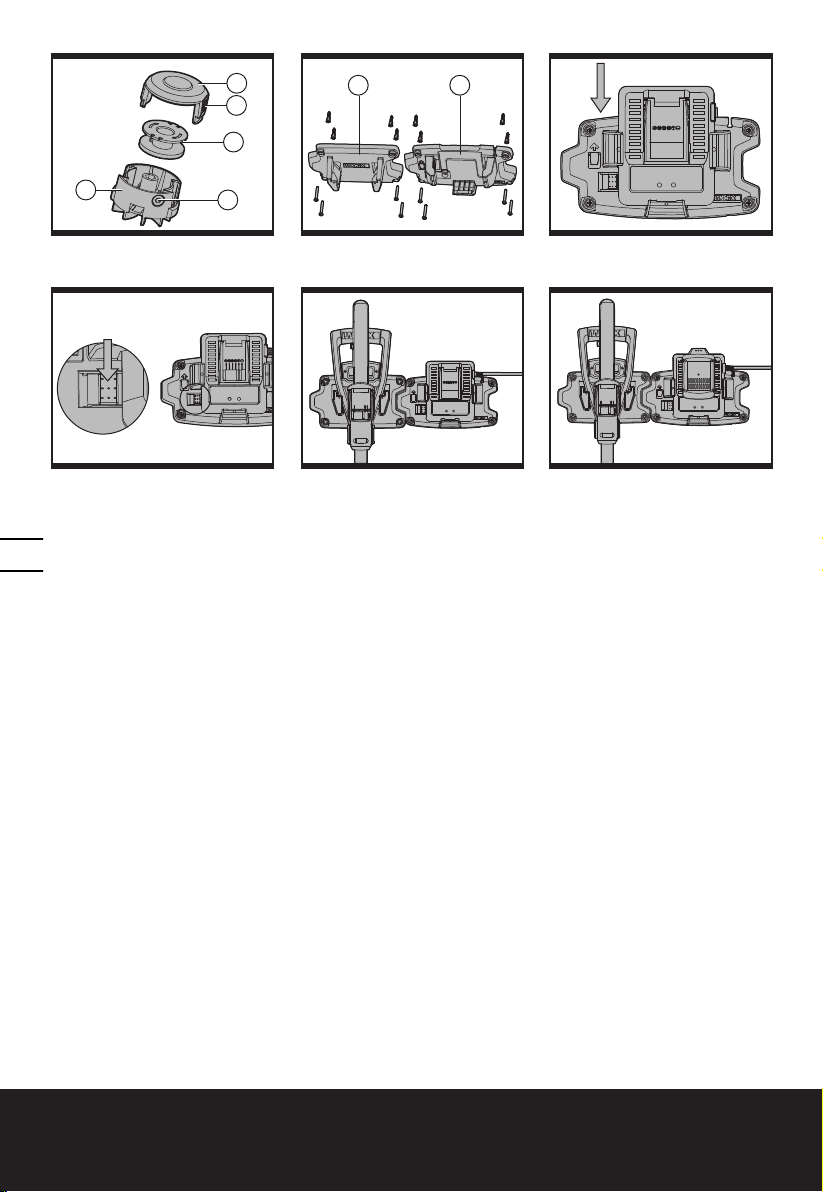
TO REMOVE THE CAP (See Fig M2)
Press and hold in the two latches (12).
Pull cap away from the spool holder
When refitting the spool cap.
Keep all areas of the cap and spool holder
clean.
Replace the cap, pressing firmly down towards
the spool holder to ensure cap is fully located
into position.
Check that the cap is correctly fitted by trying
to remove it without depressing the two
latches.
TO REPLACE CUT LINE.
For your convenience it is recommended you
buy spool and line assembly.
To fit spool and line assembly:
Remove old spool.
Place new spool into cap with cut out areas
of the spool in line with eyelet.
Release line from cleat and feed line through
eyelet.
Refit the cap.
To fit nylon line only:
WARNING! Take approximately 15ft
(4.5m) of line. Insert 5/8”(15mm )of
line into the spool holes and wind line in the
direction of the arrows on the top of the spool.
Your Trimmer is designed to use only line
with a maximum diameter of 0.065” /
1.65mm.
IMPORTANT: Leave approximately 4”
(100mm) of line unwound and place into cleat.
Care should be taken to ensure that the line is
neatly coiled on the spool. Failure to do so will
impair the efficiency of the automatic line feed.
Then fit spool as described in “To fit spool
and line complete”.
STORING YOUR GRASS
TRIMMER
A) ASSEMBLY OF THE WALL MOUNT
BRACKETS (See Fig N)
Before you attach the wall-mount brackets
to the wall, make sure to check the charger
cable length to the wall socket. Attach the
wall-mount bracket to the wall with the screws
provided.
Tighten all the screws securely. Carefully check
the bracket after mounting to make sure that
no movement can occur during use.
WARNING: Always make sure your
wall-mount bracket is securely mounted
to the wall. Failure to do so could result in an
accident, resulting in possible serious personal
injury.
B) MOUNTING CHARGER TO BRACKET
(See Fig O1&O2)
To attach the charger onto the wall-mount
bracket, insert the charger into the slots in the
bracket.
To remove the charger from the bracket, press
the release button and push the charger out
of the slots. Be careful not to pinch your
finger.
C) STORING YOUR GRASS TRIMMER
(See Fig P)
Adjust the auxiliary handle position close to
the main handle and lower it into the bracket,
now the grass trimmer can be stored into the
wall mount bracket as illustrated.
D) WALL-MOUNT CHARGING (See Fig Q)
The charger can be attached in the wall-mount
brackets. The battery pack can be charged
inside the wall-mount bracket.
Store in a dry place where your trimmer and
Page 14

charger are protected from damage.
MAINTENANCE
After use, disconnect the battery from the
mains and check for damage.
Your power tool requires no additional
lubrication or maintenance. There are no user
serviceable parts in your power tool. Never
use water or chemical cleaners to clean your
power tool. Wipe clean with a dry cloth.
Always store your power tool in a dry place.
Keep the motor ventilation slots clean. Keep all
working controls free of dust.
WARRANTY STATEMENT
If your WORX tool becomes defective due
to faulty materials or workmanship within a
period of 2 years from the date of purchase,
we guarantee to:
• Replaceorrepairalldefectiveparts,freeof
charge, or,
• Repairproductsfreeofcharge,or,
• Replacetheunitwithaneworre-
conditioned unit, free of charge.
If your WORX battery becomes defective due
to faulty materials or workmanship within
a period of 12 months from the date of
purchase, we guarantee to:
• Replaceorrepairalldefectiveparts,freeof
charge, or,
• Repairproductsfreeofcharge,or,
• Replacetheunitwithaneworre-
conditioned unit, free of charge.
WORX warranty is subject to the following
conditions:
• Theproducthasnotbeenmisused,abused,
neglected, altered, modified or repaired
by anyone other than an authorized WORX
service center.
• Theproducthasbeensubjectedtofairwear
and tear.
• OnlygenuineWORXaccessoriesandparts
have been used on or with the product
• Theproducthasnotbeenusedfortrade,
professional or commercial purposes
• Theproducthasnotsustaineddamage
through foreign objects, substances or
accidents.
WORX warranty does not cover;
• Componentsthataresubjecttonaturalwear
and tear caused by use in accordance with
operating instructions.
• Unauthorizedorimpropermaintenanceor
handling
• Toolandorbatteryfailurecausedbythe
use of non WORX branded accessories and or
parts
For claims, please contact the WORX Helpline.
You will need to submit a proof of purchase in
the form of a valid receipt that displays date
and place of purchase.
WORX Helpline 1-866-354-WORX (9679)
This guarantee statement does not replace but
is in addition to your statutory rights.
This warranty does not apply to accessories
supplied with the tool.
This warranty applies only to the original
purchaser and may not be transferred.
All repairs and product replacements will
be covered by the limited warranty for the
balance of the warranty period from the date
of the original purchase.
30 Days Satisfaction Guarantee
If you are not completely satisfied with the
performance of your WORX tool, simply return
it within 30 days. It must be returned in its
original packaging complete as purchased,
including accessories and any items provided
free of charge to the point of purchase for a
full refund or exchange. A valid receipt that
displays the date and place of purchase must
be provided.
2-in-1 Cordless Li-ion Grass Trimmer/Edger EN
Page 15

1. POIGNÉE ARRIÈRE
2. GARDE DE SÉCURITÉ
3. MANCHE TÉLESCOPIQUE
4. BOUTON INFÉRIEUR D’AJUSTEMENT
5. DÉGAGEMENT DE POIGNÉE
6. GARDE DE SÉCURITÉ
7. GARDE D’ESPACEMENT
8. ROUE DE COUPE-BORDURES
9. COUPEUR DE CORDON DE COUPE
10. BLOC-PILES
11. COUVERCLE DE LA TÊTE DE COUPE (Voir Fig M2)
12. MÉCANISME DE DÉVERROUILLAGE DU COUVERCLE (Voir Fig M2)
13. BOBINE (Voir Fig M2)
14. TÊTE DE COUPE (Voir Fig M2)
15. OEILLET (Voir Fig M2)
16. BOUTON D’ALIMENTATION DU CORDON DE COUPE (Voir Fig M1)
17. CHARGEUR (Voir Fig C)
18. TÉMOIN LUMINEUX VERT (PILE CHARGÉE) (Voir Fig D)
19. TÉMOIN LUMINEUX ROUGE (PILE EN CHARGE) (Voir Fig D)
20. SUPPORT DE MONTAGE MURAL (Voir Fig N)
21. SUPPORT DE MONTAGE MURAL (Voir Fig N)
1514 1514
Taille-haie/tondeuse 2 en 1 sans fil Li-ion F
Page 16

Taille-haie/tondeuse 2 en 1 sans fil Li-ion F
1716
DONNÉES TECHNIQUES
Tension nominale 18V
Vitesse a vide nominale 8500/min
Diamètre de coupe 10po(250mm)
Diamètre de cordon de coupe 0.065po(1.65mm)
Poids de la machine 5.4lb (2.4kg)
ACCESSOIRES
Garde de sécurité 1
Chargeur 1
Bloc-piles 1
Roue de coupe-bordures 1
Installation murale 2
Nous recommandons d’acheter tous les accessoires dans le magasin où l’outil a été acheté.
Utiliser des accessoires de bonne qualité et de marque. Choisir le type d’accessoire en fonction
du travail à réaliser. Se reporter à l’emballage pour de plus amples informations. Le personnel du
magasin peut apporter aide et conseils.
Page 17

1716
1716
Taille-haie/tondeuse 2 en 1 sans fil Li-ion F
CONSIGNES DE SÉCURITÉ
AVERTISSEMENT! Lors de l’utilisation
d’appareils électriques de jardinage,
des précautions de base doivent être
observées afin de réduire les risques de feu,
choc électrique, et blessure grave, incluant ce
qui suit:
AVERTISSEMENT! Lisez et assimilez
toutes les instructions.
POUR TOUS LES APPAREILS
1) Évitez les environnements dangereux.
N’utilisez pas les appareils dans des
locations très humides ou mouillées.
2) N’utilisez pas sous la pluie.
3) Tenez les enfants éloignés. Tous les
visiteurs devraient se tenir éloignés de
l’aire de travail.
4) Habillez-vous convenablement. Ne portez
pas des vêtements lâches ou des bijoux.
Ils peuvent se prendre dans des pièces
en mouvement. L’utilisation de gants de
caoutchouc et chaussures épaisses est
recommandée lors de travaux extérieurs.
Portez une protection pour cheveux afin de
contenir les cheveux longs.
5) Utilisez des lunettes de sécurité Toujours
porter un masque pour le visage ou pour la
poussière si l’opération est poussiéreuse.
6) Utilisez le bon appareil. N’utilisez pas
l’appareil pour tout autre travail que pour
celui auquel il est destiné.
7) Évitez les démarrages non intentionnels.
Ne transportez pas les appareils alors qu’ils
sont connectés et que vous avez le doigt
sur le commutateur. Soyez certain que
le commutateur est en position « OFF »
lorsque connecté.
8) Ne forcez pas l’appareil. Il va faire un
meilleur travail et avec moins de risques de
blessure en travaillant au taux de charge
pour lequel il a été conçut.
9) N’essayez pas d’utiliser l’appareil hors
de votre portée normale. Gardez votre
équilibre et les pieds bien ancrés en tout
temps.
10) Restez alerte. Faites attention à ce que vous
faites. Utilisez le bon sens. N’utilisez pas
l’appareil lorsque vous êtes fatigué.
11) Entreposez à l’intérieur les appareils
qui ne sont pas utilisés fréquemment.
Lorsqu’inutilisés, les appareils devraient
êtres entreposés à l’intérieur dans un
endroit sec, élevé et gardé sous clef, hors
de la portée des enfants.
12) Entretenez les appareils avec soins. Gardez
les arêtes de coupe aiguisées et propres
pour une meilleure performance et risque
réduit de blessure. Suivez les instructions
pour lubrifier et changer les accessoires.
Inspectez le cordon d’alimentation
électrique de l’appareil périodiquement,
et si endommagé, faites le réparer par un
dépôt de service autorisé. Inspectez les
cordons prolongateurs périodiquement
et remplacez si endommagés. Gardez les
poignées sèches, propres, et libres d’huile
et de graisse.
13) Vérifier les pièces endommagées. Avant
d’employer l’appareil, une garde ou
autre pièce endommagée devrait être
soigneusement vérifiée afin de déterminer
qu’elle fonctionnera correctement et
exécutera la fonction pour laquelle elle a
été conçue. Vérifier l’alignement des parties
mobiles, leur pincement, la brisure de
pièces, montage, et toute autre condition
qui peut affecter son opération. Une garde
ou autre pièce endommagée devrait être
correctement réparée ou remplacée par un
centre de service autorisé à moins d’avis
contraire ailleurs dans ce manuel.
INSTRUCTIONS ADDITIONNELLES DE
SÉCURITÉ POUR LE TAILLE BORDURE À
BATTERIES.
1. Le mode d’emploi pour tous les appareils
de jardinage fonctionnant avec des batteries
doit contenir les instructions suivantes ou des
instructions équivalentes:
1) Ne chargez pas l’outil sous la pluie, ou
dans des endroits mouillés.
2) N’utilisez pas des outils alimentés à piles
sous la pluie.
3) Lorsque vous remplacez les batteries,
remplacez-les toutes à la fois. Mélanger
des batteries rechargées et des batteries
déchargées peut augmenter les risques
de pression interne des cellules et de
rupture de la (des) batterie(s) déchargée(s)
Page 18

Taille-haie/tondeuse 2 en 1 sans fil Li-ion F
1918
(s’applique aux produits fonctionnant avec
plus d’une batterie primaire remplaçable).
4) Lorsque vous insérez les batteries dans ce
produit, veillez à respecter la polarité ou le
sens d’insertion. Des batteries mal insérées
ou inversées peuvent provoquer une fuite
ou une explosion. (s’applique aux produits
fonctionnant avec plus d’une batterie
primaire remplaçable.)
5) Evitez les démarrages accidentels –
N’insérez pas la batterie avec le doigt posé
sur l’interrupteur. Assurez-vous d’avoir
éteint l’appareil lorsque vous insérez la
batterie.
6) Enlevez ou déconnectez les piles avant
l’entretien, nettoyage ou enlèvement de
matériel de l’outil de jardinage.
2. Le mode d’emploi pour tous les produits
fonctionnant avec une batterie détachable
ou séparable doit contenir les instructions
suivantes ou des instructions équivalentes :
1) Utilisez seulement des piles de type ou
grosseurs suivants: WA3512, WA3513
2) Ne disposez pas des piles en les jetant dans
feu. La cellule peut exploser. Vérifiez les
réglementations locales pour de possibles
instructions spéciales de disposition.
3) N’ouvrez pas et ne mutilez pas la(les)
pile(s). L’électrolyte qui peut s’en échapper
est corrosif et peut causer des dommages
à vos yeux ou à votre peau. Il peut être
toxique si avalé.
4) Lorsque vous manipulez des piles, faites
attention de ne pas les court-circuiter
avec des matériaux conducteurs tels que
bagues, bracelets, et clefs. La pile ou le
conducteur peut surchauffer et causer des
brûlures.
CONSERVEZ CES INSTRUCTIONS
SYMBOLES
Avertissement
Lisez le manuel
Ne pas exposez pas à la pluie et
à l’eau
Ne pas jeter au feu
Rechargez toujours la pile dans les
limites de température ambiante
de 0ºC à 30ºC (32ºF à 86ºF)
Ne jetez pas les piles au rebut.
Retournez les au service de
recyclage ou de collecte de votre
localité
Portez des lunettes de sécurité
Portez des lunettes de sécurité
Afin d’éviter la possibilité de
choc électrique, n’utilisez pas
dans des conditions mouillées ou
d’humidité élevée.
Gardez tous les gens, incluant
enfants, animaux de compagnie
et spectateurs, hors de la zone
de danger de 15 mètres. Arrêtez
le travail immédiatement si vous
êtes approché.
Tonte de bordure
Tonte
Page 19

1918
1918
Taille-haie/tondeuse 2 en 1 sans fil Li-ion F
ASSEMBLAGE
1. CONNEXION DE LA GARDE DE
SÉCURITÉ (Voir Fig A)
Glissez la garde de sécurité sur la tête de
coupe en employant les cannelures de la tête
de coupe.
Sécurisez la garde de sécurité en utilisant la
vis fournie à cet effet, localisé à l’intérieure de
la garde.
2. ASSEMBLER LA ROUE DE TAILLE (Voir
Fig B)
Insérez la roue de taille dans les rainures de
la tête de coupe. Assurez-vous que la roue est
bloquée dans le plateau en métal.
Appuyez sur le bouton de déblocage (b) de la
roue et tirez sur la roue pour la sortir.
INSTRUCTIONS
D’OPÉRATION
AVERTISSEMENT: Le chargeur et le
bloc-piles ont été conçus spécifiquement
pour travailler ensemble, alors ne tentez
pas d’utiliser d’autres dispositifs. Ne
jamais insérer ou permettre que des objets
métalliques soient introduits dans les bornes
de connections de votre chargeur ou blocpile, parce qu’une défaillance électrique et un
danger vont se produire.
1. AVANT D’UTILISER VOTRE TAILLEBORDURE SANS FIL
Votre bloc-pile n’est PAS CHARGÉ. If faut donc
le recharger une fois avant d’utiliser l’outil.
Le chargeur de batterie fourni s’adapte à
la batterie au Lithium ion installée dans
l’appareil. Ne pas utiliser d’autre chargeur de
batterie.
2. CHARGEMENT DE VOTRE BLOC-PILES
La batterie au Lithium ion est protégée contre
une décharge importante. Lorsque la batterie
est vide, la machine s’éteint grâce à un circuit
de protection. La poignée de l’outil s’arrête de
tourner.
Dans un environnement chaud ou après une
utilisation prolongée, le pack de la batterie est
trop chaud pour permettre un chargement.
Laisser la batterie se refroidir un moment
avant de recharger.
3. COMMENT CHARGER VOTRE BLOCPILES (Voir Fig C&D)
Branchez le chargeur et sa lumière verte
s’allumera. Glissez la batterie dans le chargeur
pour les connecter ensemble. La lampe
témoin verte (18) s’éteint et la lampe témoin
rouge (19) s’allume pour indiquer le début de
la charge. Lorsque la charge est terminée, la
lampe témoin verte (18) s’allume alors que la
lampe témoin rouge (19) s’éteint.
REMARQUE:
Ce chargeur est conçu pour détecter certains
problèmes qui pourraient arriver avec la
batterie. (consultez le tableau ci-dessous)
Rouge
clignotant
Vert éteint
Rouge
Allumé
Vert éteint
Vert
Allumé
Rouge éteint
Vert
clignotant
Rouge éteint
4. RETRAIT/RÉINSTALLATION DE LA
BATTERIE (Voir Fig E)
Enfoncez le système de verrouillage de la
batterie et retirez la batterie de l’outil. Une
fois rechargée, replacez la batterie dans son
emplacement. Une simple pression d’insertion
sera suffisante.
5. COMMUTATEUR DE SÉCURITÉ « ON/
OFF » (Voir Fig F)
Votre commutateur est verrouillé afin de
prévenir les démarrages accidentels. Appuyez
Batterie défectueuse. Après
avoir préchargé durant
quelques minutes, la tension
de la batterie est toujours
inférieure à 10.0V (pour
Batterie au 18V).
Batterie en charge
Alimentation allumée,
batterie pleine
La température de la batterie
est inférieur à 32°F (0°C) ou
supérieure à 113°F (45°C)
Page 20

Taille-haie/tondeuse 2 en 1 sans fil Li-ion F
2120
sur le bouton de déverrouillage (c), ensuite
le commutateur « ON/OFF » (d) et relâchez
le commutateur de déverrouillage (c). Votre
commutateur est maintenant « ON ». Pour
commuter à « OFF », relâchez le commutateur
« ON/OFF ».
AVERTISSEMENT: La tête
coupante continue de tourner
après avoir éteint l’alimentation de la
tondeuse, attendez que le moteur soit
complètement arrêté pour coucher
l’outil.
6. AJUSTEMENT DE LA HAUTEUR (Voir
Fig G)
Dévissez le bouton inférieur d’ajustement
(4), prolongez le manche télescopique, puis
resserrez.
7. ROTATION DE LA POIGNÉE
PRINCIPALE (Voir Fig H1&H2)
Tenez le boîtier inférieur puis tirez l’axe vers
le haut et faites tourner à 90° dans le sens des
aiguilles d’une montre (Voir Fig H1), relâchez,
l’axe se bloquera automatiquement en
position. (Voir Fig H2)
8. AJUSTEMENT DE LA POIGNÉE
AUXILIAIRE (Voir Fig I)
Tirez le levier de relâchement (5), tournez la
poignée auxiliaire à la position désirée, et
relâchez.
9. AJUSTEMENT DE LA TÊTE DE COUPE
(Voir Fig J1&J2)
Orientez l’angle de la tête de coupe vers le
bas. Posez un pied sur le carter du moteur,
saisissez la poignée, et utilisez une force
adéquate pour régler de la manière indiquée
sur la Fig J1.
Orientez l’angle de la tête de coupe vers le
vers le haut. Posez un pied sur la protection de
sécurité, et utilisez une force adéquate pour
régler de la manière indiquée sur la Fig. J2.
10. CONNEXION DE LA GARDE
D’ESPACEMENT (Voir Fig K)
Enfoncez et sortez la garde d’espacement de
façon à la mettre en place avant de procéder à
la coupe, de la manière indiquée sur la figure
K. Assurez-vous que la garde d’espacement
est correctement fixée.
INSTRUCTIONS
D’UTILISATION
AVERTISSEMENT:
lunettes de sécurité et des vêtements
protecteurs afin d’éviter que des roches et
débris vous frappent ou vous causent de
sérieuses blessures. Utilisez vos deux mains
pour opérer le taille-bordure et tenez l’unité en
bas du niveau de votre taille. Afin de mieux
assurer que les débris sont jetés loin de votre
corps, travaillez seulement de droite à gauche.
Pour des résultats optimums de tonte et de
bordures tout en gardant votre confort, gardez
la tête de coupe parallèle au terrain lorsque
vous tondez (perpendiculaire, lorsque pour des
bordures). Lorsque vous tondez, assurez-vous
de garder suffisamment de distance entre le
cordon de coupe et le sol.
AVERTISSEMENT: Soyez certain que
du cordon de coupe est alimenté
avant d’opérer le taille-bordure. Assurezvous que le moteur a atteint sa pleine
vitesse avant de tondre.
AVERTISSEMENT: Utilisez seulement
un cordon de coupe de 0.065po (1.65
mm) de diamètre. D’autres grosseurs de
cordon de coupe ne feront pas correctement
dans la tête de coupe et pourraient causer de
sérieuses blessures. Ne jamais utiliser d’autres
matériaux tels que fils, ficelle ou corde, parce
qu’ils peuvent casser durant la tonte et causer
de sérieuses blessures.
Tonte
Tenez le bas de la tête de coupe
approximativement 3.25po(8 cm) cm audessus du sol et à angle. Permettez seulement
à la pointe du cordon de coupe de faire
contact. Ne forcez pas le cordon de coupe
dans l’aire de travail.
Tonte de bordure (Voir Fig L)
Tenez le boîtier inférieur puis tirez l’axe vers
le haut et faites tourner à 90° dans le sens des
aiguilles d’une montre. (Fig H1)
Ajustez l’angle de la tête de coupe de façon
à ce qu’elle soit directement en ligne avec le
Toujours porter des
Page 21

2120
2120
Taille-haie/tondeuse 2 en 1 sans fil Li-ion F
manche (horizontale). Mettez la roue sur le
sol afin de commencer la tonte en bordure, en
utilisant les lignes blanches de guidage pour
indiquer la position de coupe à la bordure de
votre pelouse.
Lors de la tonte de bordure, permettez à la
pointe du cordon de coupe de faire contact.
Ne forcez pas le cordon de coupe. La roue
empêche l’unité de toucher le sol. Soyez extra
vigilant lorsque vous tondez en bordure car
des objets peuvent être jetés hors de la ligne
de bordure.
SYSTÈME AUTOMATIQUE
D’ALIMENTATION DU CORDON DE
COUPE
Lorsqu’initialement vous démarrez le taillebordure, une petite longueur de cordon de
coupe est alimentée vers l’extérieur.
Un bruit de « clappement » va être entendu
pour un court laps de temps. Cela est normal
et est causé par le cordon de coupe en train
d’être coupé par le coupeur de cordon de
coupe. Une fois que le cordon de coupe
est coupé à la bonne longueur, le bruit de
clappement va cesser et le moteur du taillebordure va tourner à pleine vitesse.
Pour donner plus de cordon de coupe,
arrêtez complètement le taille-bordure, puis
redémarrez, permettant au moteur d’atteindre
sa pleine vitesse. Répétez cela jusqu’à ce que
vous entendiez le bruit de « clappement » du
coupage du cordon de coupe. Ne répétez pas
cette procédure plus de 6 fois.
ALIMENTATION MANUELLE DU CORDON
DE COUPE (Voir Fig M1)
Pressez et relâchez le bouton d’alimentation
manuelle du cordon de coupe, tout en tirant
doucement sur le cordon de coupe jusqu’à ce
qu’il atteigne le coupeur de cordon de coupe.
Lorsque la quantité voulue de cordon de
coupe est sortie, tirez doucement sur le
deuxième cordon de coupe (il n’est pas
nécessaire d’appuyer à nouveau sur le bouton
d’alimentation manuelle du cordon de coupe).
Si le cordon de coupe dépasse le coupeur de
cordon de coupe, trop de cordon de coupe a
été sorti.
Si trop de cordon de coupe est sorti, enlevez
le couvercle de la bobine et cliquez la bobine
en sens inverse des aiguilles d’une montre,
jusqu’à ce que le cordon de coupe soit à la
longueur désirée.
ENLÈVEMENT DU COUVERCLE (Voir Fig
M2)
Appuyez et tenez les deux verrous (12).
Enlevez le couvercle du support de la bobine.
Gardez le couvercle et le support de la bobine
libres de débris.
Pour remettre le couvercle, pressez-le
fermement vers le support de la bobine.
CHANGEMENT DE LA BOBINE DU
CORDON DE COUPE
En premier enlevez le couvercle et retirez la
vieille bobine.
Placez la nouvelle bobine dans le couvercle et
assurez-vous que la bobine est enlignée
avec les œillets du taille-bordure.
Passez un cordon de coupe au travers de
l’œillet, puis répétez pour le deuxième cordon
de coupe.
Libérez le cordon de coupe du serre-cordon et
passez-le au travers de l’oeillet.
Rattachez le couvercle.
Pour embobiner le cordon de coupe
manuellement
AVERTISSEMENT! Prenez
approximativement 15 pieds (4.5 m) de
cordon de coupe. Insérez 5/8po(15 mm) de
cordon de coupe dans les trous de la bobine et
enroulez le cordon de coupe dans la direction
des flèches indiquée sur le dessus de la
bobine.
Votre taille-bordure est conçu pour utiliser
seulement un cordon de coupe ayant un
diamètre de 0.065po/1.65mm.
IMPORTANT - Laissez approximativement
4po(100 mm) de cordon de coupe et placez-le
dans le serre-cordon. Répétez pour la section
inférieure de la bobine.
Assurez-vous que le cordon de coupe est
bobiné avec soins sur la bobine. Un manque à
faire cela va altérer l’efficacité du fournisseur
automatique de cordon de coupe.
Ensuite installez la bobine tel que décrit
précédemment dans « Changement de la
bobine de cordon de coupe ».
Page 22

Taille-haie/tondeuse 2 en 1 sans fil Li-ion F
2322
RANGEMENT DE VOTRE
TAILLE-BORDURE
A) ASSEMBLAGE DU SUPPORT MURAL
(Voir Fig N)
Avant de fixer le support mural du chargeur,
assurez vous que sa fiche puisse rejoindre une
prise de courant. Faites le montage en utilisant
les cinq vis fournies.
Serrez bien les cinq vis. Vérifiez ensuite que le
support ne se déplacera pas dû aux vibrations
lors du fonctionnement.
AVERTISSEMENT: Assurez-vous
toujours que le support mural est
solidement retenu au mur autrement il
pourrait se produire un accident à risque élevé
de blessures graves.
B) MONTAGE MURAL DU CHARGEUR
(Voir Fig O1&O2)
Pour attacher le chargeur sur le support mural,
insérez les pattes du chargeur dans les fentes
du support et poussez le chargeur vers la
gauche. Assurez-vous que les pattes sont bien
insérées dans les fentes. (Voir Fig O1)
Pour retirer le chargeur du support, appuyez
sur le bouton de relâche etpoussez le chargeur
hors des fentes. (Voir Fig O2). Faite attention
de ne pas piéger votre doigt.
C) RANGER VOTRE TAILLE-BORDURE
(Voir Fig P)
Réglez la poignée auxiliaire près de la poignée
principale et insérez-la dans le support; le taille
bordure peut alors être rangé dans le support
mural tel qu’illustré.
D) RECHARGE AU MUR (Voir Fig Q)
Le chargeur se fixe à l’intérieur du support
mural. Le bloc-piles se recharge en installation
murale.
Pour protéger votre taille-bordure contre
la détérioration causée par l’humidité,
entreposez le dans un endroit sec.
déterminer si elle a des dommages.
Votre outil électrique ne requiert pas de
lubrification additionnelle ou entretien. À
l’intérieur de votre outil électrique, il n’y a
pas de pièces qui peuvent être entretenues
par l’usager. Les taille-borduress électriques
devraient être réparés seulement par un dépôt
de service qualifié utilisant seulement des
pièces et accessoires recommandés par le
manufacturier. Ne jamais utiliser d’eau ou des
nettoyants chimiques pour nettoyer votre outil.
Nettoyez à propre avec un linge sec. Toujours
entreposer votre outil électrique dans un
endroit sec hors d’atteinte des enfants. Gardez
les fentes de ventilation du moteur propres.
Gardez tous les contrôles de l’appareil libres
de poussière.
DÉCLARATION DE
GARANTIE
Si votre outil WORX devient défectueux suite à
un défaut de matériaux ou de fabrication dans
un délai de 2 ans à compter de la date d’achat,
nous garantissons que nous:
• Remplaceronsourépareronstoutesles
pièces défectueuses, sans aucun frais, ou,
• Répareronslesproduitsgratuitement,ou
• Remplaceronsl’appareilavecunneuf
ou une nouvelle unité reconditionnée,
gratuitement.
Si votre batterie WORX devient défectueuse
suite à un défaut de matériaux ou de
fabrication dans un délai de 12 mois à compter
de la date d’achat, nous garantissons que
nous:
• Remplaceronsourépareronstoutesles
pièces défectueuses, sans aucun frais, ou,
• Répareronslesproduitsgratuitement,ou
• Remplaceronsl’appareilavecunneuf
ou une nouvelle unité reconditionnée,
gratuitement.
La garantie WORX est soumise aux conditions
ENTRETIEN
Après usage, déconnectez la machine
de l’alimentation et examinez-la afin de
suivantes :
• Leproduitn’apasétémalutilisé,maltraités,
négligé, altéré, modifié ou réparé par
quelqu’un d’autre qu’un centre de service
Page 23

2322
2322
Taille-haie/tondeuse 2 en 1 sans fil Li-ion F
agréé WORX.
• Leproduitaétésoumisàuneusure
normale.
• SeulementdesaccessoiresetpiècesWORX
d’origine ont été utilisés sur ou avec le produit
• Leproduitn’apasétéutiliséàdesns
professionnelles ou commerciales
• Leproduitn’apassubidedommagespar
des objets étrangers, des substances ou
accidents.
La garantie WORX ne couvre pas;
• Lescomposantsquisontsoumisà
l’usure naturelle causée par l’utilisation
conformément aux instructions de
fonctionnement.
• Unentretienouunmaniementmauvaisou
non autorisé
• Outilet/oubatteriedéfectueuxcausépar
l’utilisation d’accessoires et/ou pièces qui ne
sont pas de la marque WORX
Pour des réclamations, contacter la ligne
téléphonique de WORX. Vous devrez présenter
une preuve d’achat sous la forme d’un reçu
valide qui affiche la date et le lieu d’achat.
Ligne téléphonique de WORX 1-866-354WORX (9679)
date et le lieu d’achat doit être fourni.
Cette déclaration de garantie ne se substitue
pas mais s’ajoute à vos droits statutaires.
Cette garantie ne s’applique pas aux
accessoires fournis avec l’outil.
Cette garantie ne s’applique qu’à l’acheteur
d’origine et peut ne pas être transférer.
Toutes les réparations et tous les
remplacements de produit seront couverts par
la garantie limitée pour le reste de la période
de garantie à partir de la date d’achat initial.
Garantie de satisfaction de 30 jours
Si vous n’êtes pas entièrement satisfait de
la performance de votre WORX outil, il suffit
de le retourner dans les 30 jours. Il doit
être retourné dans son emballage d’origine
complet acheté, y compris les accessoires
et les articles fournis gratuitement, au point
d’achat pour un remboursement ou un
échange total. Un reçu valide qui affiche la
Page 24

Podadora / bordeadora de césped sin cables
“2 en 1” con batería de iones de litio ES
2524
1. MANGO TRASERO
2. MANGO AUXILIAR
3. MANGO TELESCÓPICO
4. PERILLA INFERIOR DE AJUSTE
5. LIBERADOR DEL MANGO
6. GUARDA PROTECTORA DE SEGURIDAD
7. GUARDA ESPACIADORA
8. RUEDA BORDEADORA
9. CUCHILLA DEL HILO
10. PAQUETE DE BATERIAS
11. CUBIERTA DEL CABEZAL DE CORTE (Ver Fig M2)
12. PESTILLO PARA EXTRACCIÓN DE LA TAPA (Ver Fig M2)
13. BOBINA (Ver Fig M2)
14. CABEZAL DE CORTE (Ver Fig M2)
15. OJAL (Ver Fig M2)
16. BOTÓN DE ABASTECIMIENTO DEL HILO (Ver Fig M1)
17. CARGADOR (Ver Fig C)
18. LUZ INDICADORA DE CARGA COMPLETA (VERDE) (Ver Fig D)
19. LUZ INDICADORA DE CARGA (ROJA) (Ver Fig D)
20. SOPORTE PARA EL MONTAJE EN LA PARED (Ver Fig N)
21. SOPORTE PARA EL MONTAJE EN LA PARED (Ver Fig N)
Page 25

2524
2524
Podadora / bordeadora de césped sin cables
“2 en 1” con batería de iones de litio ES
DATOS TÉCNICOS
Voltaje nominal 18 V
Velocidad nominal sin carga 8500rpm
Diámetro de Corte 10”(250mm)
Diámetro del Hilo 0.065”(1.65mm)
Peso de la máquina 5.4 libras (2.4kg)
ACCESORIOS
Guarda protectora de seguridad 1
Cargador 1
Batería 1
Rueda bordeadora 1
Montaje de pared 2
Recomendamos que usted compre todos los accesorios en el mismo lugar donde adquirió
la herramienta. Use accesorios de buena calidad e identificados con una marca reconocida.
Refiérase a la sección “consejos de trabajo” de este manual o al empaque del accesorio para
más detalles. El personal de la tienda también puede ser de ayuda.
Page 26

Podadora / bordeadora de césped sin cables
“2 en 1” con batería de iones de litio ES
2726
INSTRUCCIONES DE
SEGURIDAD
¡ADVERTENCIA! Cuando se emplean
herramientas eléctricas para jardinería,
siempre deben seguirse ciertas pautas básicas
de seguridad a fin de reducir el riesgo de
incendio, descarga eléctrica o lesión seria,
incluyendo las siguientes:
¡ADVERTENCIA! Lea y comprenda todas
las instrucciones.
PARA TODAS LAS HERRAMIENTAS
1) Evite ambientes peligrosos. No utilice
las herramientas en lugares húmedos o
mojados.
2) No trabaje bajo la lluvia.
3) Mantenga alejados a los niños. Todos los
visitantes deben mantenerse a distancia
del área de trabajo.
4) Vístase apropiadamente. No use ropas
sueltas o alhajas, ya que pueden quedar
atrapadas en las piezas móviles. Cuando
se trabaja al aire libre se recomienda el uso
de guantes de goma y calzado resistente.
Emplee protección adecuada para contener
el cabello largo.
5) Utilice gafas de seguridad. Emplee siempre
máscara para la cara o máscara anti-polvo
en operaciones donde se emite mucho
polvo.
6) Utilice la herramienta correcta. Emplee la
herramienta únicamente para la finalidad
para la cual fue diseñada.
7) Evite el arranque accidental. No transporte
la herramienta enchufada con el dedo en el
interruptor. Cerciórese de que el interruptor
esté apagado cuando enchufe la máquina.
8) No fuerce la herramienta. Hará un trabajo
mejor y más seguro a la velocidad para la
cual fue diseñada.
9) No se extralimite. Manténgase firme y con
buen equilibrio en todo momento.
10) Permanezca alerta. Ponga siempre atención
en lo que está haciendo. Utilice el sentido
común. No opere la herramienta cuando
esté cansado.
11) Guarde las herramientas que no usa en
lugares cerrados. Cuando no se encuentran
en uso, las herramientas deben guardarse
en un lugar seco, elevado o cerrado con
llave, lejos del alcance de los niños.
12) Mantenga la herramienta con cuidado.
Conserve los bordes cortantes limpios y
bien afilados, a fin de obtener el mejor
rendimiento y reducir los riegos de
lesiones. Siga las instrucciones para la
lubricación y el cambio de accesorios.
Examine periódicamente el cable de la
herramienta y si está dañado hágalo
reparar por un agente autorizado. Examine
periódicamente los prolongadores y
sustitúyalos si están dañados. Mantenga
los mangos secos, limpios y libres de
aceite y grasa.
13) Verifique las piezas dañadas. Las guardas
protectoras u otras partes dañadas deben
verificarse cuidadosamente antes de
cualquier uso futuro de la herramienta,
a fin de determinar si funcionarán
correctamente y realizarán la función
prevista. Compruebe que las piezas
móviles se encuentren alineadas y
correctamente ajustadas, que no haya
rotura de piezas, de montaje o cualquier
otra condición que pueda afectar su
funcionamiento. Una guarda protectora u
otra pieza que se encuentre dañada debe
ser reparada o sustituida correctamente en
un centro de servicio autorizado, a menos
que en este manual de instrucciones se
indique lo contrario.
INSTRUCCIONES ADICIONALES DE
SEGURIDAD PARA BORDEADORA DE
CÉSPED A BATERÍAS
1. El manual de instrucciones de cualquier
aparato de jardinería que funcione con
baterías debe contener las siguientes
instrucciones u otras equivalentes:
1) No cargue el artefacto en la lluvia, o en
lugares húmedos.
2) No use artefactos a batería bajo la lluvia.
3) Si se sustituyen las baterías, deberán
reemplazarse todas a la vez. La mezcla
de baterías nuevas y descargadas podría
elevar la presión de las células internas
y provocar la ruptura de la(s) batería(s)
de descarga. (Aplicable a productos que
empleen más de una batería principal
Page 27

2726
2726
Podadora / bordeadora de césped sin cables
“2 en 1” con batería de iones de litio ES
sustituible de forma independiente).
4) Durante la inserción de las baterías en
este producto debe respetarse la polaridad
o dirección correcta. Si se insertan las
baterías en dirección opuesta podría
producirse una fuga o explosión. (Aplicable
a productos que empleen más de una
batería principal sustituible de forma
independiente.)
5) Evite un encendido accidental – No inserte
la batería con el dedo colocado en el
interruptor. Al insertar la batería, asegúrese
de que el interruptor esté en la posición de
apagado.
6) Saque o desconecte la batería antes de
reparar, limpiar o remover material del
artefacto de j ardinería.
2. El manual de instrucciones de cualquier
aparato que funcione con baterías y emplee
una batería desmontable o independiente
debe contener las siguientes instrucciones u
otras equivalentes:
1) Use únicamente el siguiente tipo y tamaño
de baterías: WA3512, WA3513
2) No tire las baterías al fuego. Pueden llegar
a explotar. Consulte los códigos locales
para obtener instrucciones especiales de
desecho.
3) No abra ni mutile las baterías. El electrolito
que se puede liberar es corrosivo y puede
provocar daños a los ojos o la piel. Puede
ser tóxico si se traga.
4) Tenga cuidado al manipular la batería para
no hacer un cortocircuito con materiales
conductores como anillos, brazaletes y
llaves. La batería o el conductor pueden
recalentarse y causar quemaduras.
INSTRUCCIONES DE SEGURIDAD
SÍMBOLOS
Advertencia
Lea el manual
No exponer a la lluvia ni al agua
No arrojar al fuego
Cargue siempre la batería de
batería bajo temperaturas de
entre 0º - 30ºC (32º - 86ºF)
No arroje las baterías. Devuelva
las baterías agotadas para su
recolección local o llévelas a
algún centro de reciclado.
Emplee protección ocular
Emplee protección auditiva
Para evitar el riesgo de descarga
eléctrica, no utilice en ambientes
húmedos o mojados
Mantenga a todas las demás
personas, incluyendo niños,
animales y visitantes a 15 metros
de la zona de peligro. Detenga
inmediatamente la bordeadora si
alguien se le aproxima.
Bordeado
Desmalezado
Page 28

Podadora / bordeadora de césped sin cables
“2 en 1” con batería de iones de litio ES
2928
ENSAMBLE
1. CONEXIÓN DE LA GUARDA DE
SEGURIDAD (Ver Fig A)
Deslice la guarda de seguridad sobre el
cabezal de corte empleando las ranuras del
cabezal.
Ajuste la guarda de seguridad con el tornillo
suministrado, localizado en el interior de la
guarda.
3. CÓMO CARGAR EL PACK DE BATERÍA
(Ver Fig C&D)
Conecte el cargador de la batería a la fuente
de alimentación; se iluminará la luz verde.
Deslice la batería en el cargador para realizar
las conexiones. Se apagará la luz verde (18)
y se encenderá la luz roja (19) para indicar
que se inició la carga. Cuando se complete
la carga, se encenderá la luz verde (18) y se
apagará la luz roja (19).
2. MONTAJE DE LA RUEDA
BORDEADORA (Ver Fig B)
Inserte la rueda bordeadora en los surcos del
cabezal de corte. Asegúrese de que el surco
de la rueda queda bloqueado en la placa
metálica.
Presione el botón de liberación (b) de la rueda
y tire para extraer la rueda.
INSTRUCCIONES DE
FUNCIONAMIENTO
ADVERTENCIA: Tanto el cargador
como el pack de batería están diseñados
para operar conjuntamente, de modo que no
debe utilizarse ningún otro dispositivo. Nunca
inserte objetos metálicos en las conexiones
del cargador o del pack de batería, pues
incurriría en peligro de avería eléctrica.
1. ANTES DE USAR SU
DESMALEZADORA INHALÁMBRICA
Su batería está DESCARGADA y debe cargarla
antes de usarla.
El cargador de batería suministrado está
diseñado para la batería de Li-Ion instalada
en la herramienta. No utilice otro cargador de
baterías.
2. CARGA DEL PACK DE BATERÍA
La batería de Li-Ion está protegida contra
descargas excesivas. Cuando la batería está
agotada, la herramienta se desconecta a
través de un circuito de protección: El soporte
de la herramienta deja de girar.
En un ambiente caluroso o luego de mucho
uso, la batería puede calentarse demasiado
como para aceptar carga. Permita que se
enfríe antes de cargarla.
NOTA:
Este cargador se encuentra diseñado para
detectar algunos problemas que podrían
surgir con la batería. (Consulte la tabla que
aparece a continuación).
Luz roja
parpadeando
Luz verde
apagada
Luz roja
encendida
Luz verde
apagada
Luz verde
encendida
Luz roja
apagada
Luz verde
parpadeando
Luz roja
apagada
4. PARA EXTRAER O INSTALAR LA
BATERÍA (Ver Fig E)
Presione la traba de liberación de la batería
y extráigala de la herramienta. Luego de la
recarga, deslice la batería en el puerto para la
batería de la herramienta. Basta con deslizarla
y ejercer una leve presión.
5. INTERRUPTOR DE SEGURIDAD DE
ENCENDIDO/APAGADO (Ver Fig F)
Su interruptor se encuentra trabado para
prevenir el arranque accidental. Presione
Batería defectuosa. Luego
de una precarga de algunos
minutos con corriente por
goteo, el voltaje total de la
batería sigue siendo inferior a
10.0V (para Bloque de baterías
de 18v).
Carga
Batería encendida y con carga
completa
La temperatura de la batería
es inferior a 32°F (0°C) o
superior a 113°F (45°C)
Page 29

2928
2928
Podadora / bordeadora de césped sin cables
“2 en 1” con batería de iones de litio ES
el botón de traba (c), luego el botón de
encendido/apagado (d) y suelte el botón de
traba (c). Su interruptor se encuentra ahora
en posición de encendido. Para apagar la
herramienta simplemente suelte el interruptor
de encendido/apagado.
ADVERTENCIA: La cabeza de corte
continúa girando luego de haber
apagado la bordeadora. Espere a que se
detenga y luego suelte la herramienta.
6. AJUSTE DE LA ALTURA (Ver Fig G)
Desatornille la perilla inferior de ajuste (4) y
extienda el mango telescópico, luego vuelva
a ajustar.
7. ROTACIÓN DEL MANGO PRINCIPAL
(Ver Fig H1&H2)
Sostenga la carcasa inferior, tire hacia arriba
de la barra y gírela 90 grados hacia la derecha
(Ver Fig H1). La barra quedará libre y se
bloqueará automáticamente en la nueva
posición. (Ver Fig H2)
8. AJUSTE DEL MANGO AUXILIAR (Ver
Fig I)
Tire de la palanca de liberación del mango (5),
gire el mango auxiliar a la posición deseada
y suelte.
9. AJUSTE DEL ÁNGULO DEL CABEZAL
DE CORTE (Ver Fig J1&J2)
Ajuste el ángulo del cabezal de corte hacia
abajo. Coloque un pie sobre la carcasa del
motor, sostenga el mango principal y aplique
la fuerza adecuada para realizar el ajuste,
como indica la Fig. J1.
Ajuste el ángulo del cabezal de corte hacia
arriba. Coloque un pie sobre la guarda de
seguridad, sostenga el mango principal y
aplique la fuerza adecuada para realizar el
ajuste, como indica la Fig. J2.
10. CONEXIÓN DE LA GUARDA
ESPACIADORA (Ver Fig K)
Presione la guarda espaciadora hacia dentro y
hacia fuera antes de comenzar a cortar, como
se muestra en la Figura K. Asegúrese de que
la guarda espaciadora queda bloqueada con
firmeza.
FUNCIONAMIENTO
ADVERTENCIA:
ocular y ropa resistente a fin de evitar
golpes de piedras o deshechos que podrían
causarle lesión ocular u otras heridas serias.
Utilice ambas manos para manejar la
bordeadora y mantenga la unidad por debajo
del nivel de la cintura. Trabaje únicamente
de derecha a izquierda para asegurarse de
que los deshechos son arrojados lejos de Ud.
Para un desmalezado y bordeado óptimos sin
perder su comodidad, mantenga el cabezal
de corte paralelo al suelo cuando efectúe
desmalezado (perpendicular en operación de
bordeado). Durante el desmalezado, asegúrese
de mantener suficiente distancia entre el hilo de
corte y el suelo.
ADVERTENCIA: Asegúrese de
que haya abastecimiento del hilo
de corte antes del funcionamiento.
Cerciórese de que el motor se
encuentre a máxima velocidad antes del
desmalezado.
ADVERTENCIA: Emplee únicamente
hilo de corte de 0.065”(1.65mm)mm
de diámetro. Otros tamaños no serán
abastecidos apropiadamente en el cabezal de
corte y podrían causar lesiones serias. Nunca
emplee otros materiales tales como alambre,
cordón o soga, ya que podrían romperse
durante la operación de corte y causar
lesiones serias.
Desmalezado
Sostenga la parte inferior del cabezal de corte
en ángulo y a unos 3.25”(8 cm) cm por encima
del suelo. Permita que sólo el extremo del hilo
haga contacto. No fuerce el hilo de corte en el
área de trabajo.
Bordeado (Ver Fig L)
Sostenga la carcasa inferior, tire hacia arriba
de la barra y gírela 90 grados hacia la derecha.
(Fig H1)
Ajuste el ángulo del cabezal de corte de
modo que quede en línea recta con el mango
telescópico (horizontal). Coloque la rueda
sobre el suelo para comenzar el bordeado,
empleando las guías blancas del hilo para
indicar la posición de corte en el borde del
césped.
Mientras esté bordeando, permita que el
Siempre use protección
Page 30

Podadora / bordeadora de césped sin cables
“2 en 1” con batería de iones de litio ES
3130
extremo del hilo haga contacto. No fuerce
el hilo. La rueda ayuda a proteger la unidad
del contacto con el suelo. Tome mayores
precauciones cuando se encuentre en
operación de bordeado, ya que ciertos objetos
podrían ser arrojados desde el hilo de corte.
SISTEMA AUTOMÁTICO DE
ABASTECIMIENTO DEL HILO
Cuando se enciende la cortadora se abastece
una pequeña longitud de hilo.
Se escuchará un golpeteo durante unos
segundos. Esto es normal y se produce
cuando la cuchilla corta el hilo. Una vez que
el hilo ha sido cortado a la longitud correcta,
el golpeteo se detendrá y el motor de la
bordeadora alcanzará la velocidad máxima.
Para abastecer mayor longitud de hilo,
detenga completamente la máquina y
luego vuelva a arrancarla, dejando que el
motor alcance la máxima velocidad. Reitere
esta operación hasta escuchar el golpeteo
producido por el corte del hilo (No repita este
procedimiento más de 6 veces).
ABASTECIMIENTO MANUAL DEL HILO
(Ver Fig M1)
Presione y afloje el botón de abastecimiento
manual de hilo (16) mientras tira suavemente
de los hilos hasta que estos lleguen a la
cuchilla.
Cuando se ha abastecido la longitud requerida
de hilo, tire suavemente del segundo hilo
(no es necesario presionar nuevamente el
botón de abastecimiento manual). Si el hilo
se extiende más allá de la cuchilla, se ha
suministrado demasiado.
En tal caso, retire la tapa de la bobina y mueva
la bobina en sentido counter-horario hasta
lograr la longitud de hilo deseada.
REMOCIÓN DE LA TAPA (Ver Fig M2).
Presione y sostenga los dos pestillos (12).
Retire la tapa del soporte de la bobina.
Mantenga la tapa y el soporte de la bobina
libres de deshechos
Para volver a colocar la tapa presione
firmemente en dirección al soporte de
la bobina. Verifique que la tapa quede
correctamente instalada, tratando de retirarla
sin presionar los dos pestillos.
Cambio de la bobina de hilo
Primeramente saque la tapa y retire la bobina
vieja.
Coloque la bobina nueva dentro de la tapa,
asegurándose de alinear la bobina con
los ojales de la bordeadora.
Abastezca hilo a través del ojal y luego repita
el procedimiento con el segundo hilo.
Suelte hilo del taco y abastezca hilo a través
del ojal.
Reinstale la tapa.
Para enrollar manualmente el hilo
¡ADVERTENCIA! Tome
aproximadamente 4.5 metros de hilo e
inserte 15 mm dentro de uno de los orificios
de la parte superior de la bobina. Enrolle el
hilo en la dirección de las flechas sobre la
parte superior de la bobina.
Su cortadora está diseñada para el empleo
de hilos de un diámetro máximo de
0.065”/1.65mm. Emplee hilo de nylon
únicamente.
IMPORTANTE - Siempre enrolle 4”(100mm)
el hilo comenzando por la parte superior de la
bobina.
Debe ponerse especial cuidado en asegurarse
de que el hilo esté prolijamente enrollado
alrededor de la bobina. De lo contrario, se
deteriorará la eficiencia del abastecimiento
automático de hilo.
Luego instale la bobina tal como se describe
más arriba en “Cambio de la bobina de
hilo”.
ALMACENAMIENTO DE LA
BORDEADORA DE CÉSPED
A) ENSAMBLE DEL SOPORTE PARA
MONTAJE EN LA PARED (Ver Fig N)
Antes de fijar el soporte para montaje en la
pared, compruebe la longitud del cable del
cargador hasta el tomacorriente. Coloque el
soporte para montaje en pared utilizando los
cinco tornillos provistos para tal fin.
Apriete firmemente los cinco tornillos. Revise
cuidadosamente el soporte luego de su
montaje, a fin de cerciorarse de que no ocurra
Page 31

3130
3130
Podadora / bordeadora de césped sin cables
“2 en 1” con batería de iones de litio ES
ningún movimiento durante el uso.
ADVERTENCIA: Asegúrese siempre de
que el soporte esté fijado con firmeza a
la pared. De lo contrario, podría generarse un
accidente, causando daños corporales serios.
B) MONTAJE DEL CARGADOR Y EL
SOPORTE (Ver Fig O1&O2)
Para colocar el cargador en el soporte de
pared, inserte las patas del cargador en las
ranuras del soporte y empuje el cargador
hacia la izquierda, verificando que las patas
estén completamente insertadas en las
ranuras.
Para quitar el cargador del soporte, presione
el botón de liberación y empuje el cargador
hacia afuera de las ranuras. Ten cuidado de
no hacer dano a dedo.
C) ALMACENAMIENTO DE LA
BORDEADORA DE CÉSPED (Ver Fig P)
Ajuste el mango auxiliar cerca del mango
principal y luego insértelo en las ranuras.
De esta manera, la bordeadora podrá ser
colocada en el soporte para montaje en la
pared como muestra la ilustración.
D) CARGA EN EL MONTAJE DE PARED
(Ver Fig Q)
El cargador puede adosarse al soporte del
montaje de pared. El bloque de baterías puede
cargarse dentro de dicho soporte.
Conserve su cortadora en un lugar seco, a
resguardo de cualquier daño.
MANTENIMIENTO
Luego del uso, desconecte la máquina del
tomacorriente y verifique si hay daños.
Su herramienta eléctrica no requiere de
lubricación ni mantenimiento adicional. No
posee piezas en su interior que puedan ser
reparadas por el usuario. Las cortadoras
eléctricas deben ser reparadas exclusivamente
por personal autorizado. Utilice repuestos y
accesorios recomendados únicamente por el
fabricante. Nunca emplee agua o productos
químicos para limpiar su herramienta. Use
simplemente un paño seco. Guarde siempre
su herramienta en un lugar seco y fuera del
alcance de los niños. Mantenga limpias las
ranuras de ventilación del motor. Mantenga
todos los controles de funcionamiento libres
de polvo.
DECLARACIÓN DE
GARANTÍA
Si su herramienta WORX presenta algún
problema derivado de un defecto de
materiales o mano de obra durante un
periodo de 2 años a partir de la fecha de
compra, se garantiza:
• Lasustituciónoreparaciónsincargode
todas las piezas defectuosas,
• Lareparacióndetodoslosproductossin
cargo, o
• Lasustitucióndelaunidadsincargopor
una nueva o reacondicionada.
Si su batería WORX presenta algún problema
derivado de un defecto de materiales o mano
de obra durante un periodo de 12 meses a
partir de la fecha de compra, se garantiza:
• Lasustituciónoreparaciónsincargode
todas las piezas defectuosas,
• Lareparacióndetodoslosproductossin
cargo, o
• Lasustitucióndelaunidadsincargopor
una nueva o reacondicionada.
La garantía de WORX se encuentra sujeta a las
siguientes condiciones:
• Elproductonodebehabersidosometido
a mal uso, abuso, negligencia, alteración,
modificación o reparación por parte de
cualquier entidad ajena a la red de centros de
asistencia autorizados por WORX.
• Elproblemanodebeserproductodel
desgaste y deterioro naturales.
• Debenhaberseutilizadoúnicamente
piezas y accesorios originales de WORX en el
producto o en conjunto con el mismo.
• Elproductonodebehabersidoutilizado
con fines empresariales, profesionales o
comerciales.
• Elproductonodebehaberrecibidodaños
Page 32

provocados por objetos extraños, sustancias
de cualquier tipo o accidentes.
Su garantía de WORX no cubre:
• Aquelloscomponentessometidosal
desgaste y deterioro naturales derivados
de su funcionamiento de acuerdo con las
instrucciones de uso.
• Operacionesdemantenimientoo
manipulación incorrectas o no autorizadas.
• Fallosdelaherramientaolabatería
provocados por el uso de accesorios o piezas
de marcas ajenas a WORX.
Si desea realizar una reclamación, póngase en
contacto con la línea de asistencia de WORX.
Deberá enviar una prueba de compra en forma
de recibo válido de venta en el que figure la
fecha y el lugar de compra.
Línea de asistencia de WORX: 1-866354-WORX (9679)
Esta declaración de garantía no sustituye sus
derechos legales, sino que los complementa.
Esta garantía no es aplicable a los accesorios
suministrados con la herramienta.
Esta garantía solo es aplicable al comprador
original y no puede ser transferida.
Todas las reparaciones y sustituciones de
productos quedarán cubiertas un periodo de
garantía limitada equivalente al periodo de
garantía restante desde la fecha de compra
original.
Garantía de satisfacción de 30 días
Si no se encuentra completamente satisfecho
con el funcionamiento de su herramienta
WORX, puede devolverla antes de 30 días.
Deberá hacerlo dentro de su embalaje original
íntegro, tal y como la adquirió, e incluir con
ella los accesorios y artículos suministrados
de forma gratuita, dirigiéndose al punto
de compra para solicitar su reembolso o
sustitución. Deberá entregar también un
recibo válido en el que aparezcan la fecha y el
lugar de la compra.
Podadora / bordeadora de césped sin cables
“2 en 1” con batería de iones de litio ES
Page 33

3332
Page 34

Page 35

Page 36

Designed in Italy. Made in China
Conçu en Italie. Fabriqué en Chine
Diseñado en Italia. Fabricado en China
Copyright © 2009, Positec. All Rights Reserved.
 Loading...