

Page 1

SAFETY AND OPERATING MANUAL
ORIGINAL INSTRUCTIONS
2-in-1 Grass Trimmer/Edger WG119E
Page 2

Page 3

1
11
2
3
4
5
6
7
10
98
Page 4

2
1
A B
12
C
D
1
3
2
E1 E2
2
1
2
Push down
1
the collar
2
Pull the shaft
1
Page 5
1
2
E3 E4
E5
E6
F1 F2
Pull the collar
1
2
Rotate the
shaft 180°
Page 6

F3
G
H
2
1
J K
One click!
I
15
17
13
14
16
Page 7

L
M
N
O
Page 8

1. ON/OFF SWITCH
2. AUXILIARY HANDLE
3. HANDLE ROTATION LOCKING MECHANISM
HEIGHT ADJUSTMENT LOCKING MECHANISM
4.
5. TELESCOPE TUBE
6. CUTTING HEAD ADJUSTMENT BUTTON
7. MOTOR HOUSING
8. FLOWER GUARD
9. CUTTING HEAD
10. SAFETY GUARD
11. EXTENSION CORD HOLDER
12. LINE CUTTER (See B)
13. LINE FEED BUTTON (See G)
14. CUTTING HEAD COVER (See I)
15. CAP RELEASE LATCH (See I)
16. SPOOL (See I)
17. EYELET (See I)
8
Not all the accessories illustrated or
described are included in standard delivery.
TECHNICAL DATA
Type WG119E (1-designation of machinery,
representative of Grass Trimmer)
Rated voltage 220-240V~50/60Hz
Power 550W
No load speed 8900/min
Max. cutting diameter 30cm
Diameter of line 1.65mm
Line length 2x5m
Weight 2.4kg
Protection class
NOISE DATA
A weighted sound pressure LpA = 84dB(A)
K
pA
A weighted sound power L
Wear ear protection
VIBRATION INFORMATION
Typical weighted vibration ah = 2.7m/s²
Uncertainty K = 1.5m/s²
WARNING! The vibration emission value
during actual use of the power tool can differ
from the declared value depending on the ways in
which the tool is used dependant on the following
examples and other variations on how the tool is used:
How the tool is used and the materials being cut or
drilled.
The tool being in good condition and well maintained
Using the correct accessory for the tool and ensuring it
is sharp and in good condition.
The tightness of the grip on the handles and if any anti
vibration accessories are used.
And the tool is being used as intended by its design
and these instructions.
This tool may cause hand-arm vibration
syndrome if its use is not adequately managed.
WARNING! To be accurate, an estimation of
exposure level in the actual conditions of use
should also take account of all parts of the operating
cycle such as the times when the tool is switched off
and when it is running idle but not actually doing the
job. This may significantly reduce the exposure level
over the total working period.
Helping to minimise your vibration exposure risk.
ALWAYS use sharp chisels, drills and blades
Maintain this tool in accordance with these instructions
and keep well lubricated (where appropriate)
If the tool is to be used regularly then invest in anti
vibration accessories.
Avoid using tools in temperatures of 10
Plan your work schedule to spread any high vibration
tool use across a number of days.
ACCESSORIES
/II
Flower guard 1
Auxiliary handle 1
Safety guard 1
Spool (WA0007) 1
We recommend that you purchase your accessories
from the same store that sold you the tool. Refer to
the accessory packaging for further details. Store
personnel can assist you and offer advice.
0
C or less
3.0dB(A)
= 96dB(A)
wA
2-in-1 Grass Trimmer/Edger WG119E
Page 9

PRODUCT SAFETY
GENERAL SAFETY
WARNINGS
WARNING: Read all
safety warnings and all
instructions. Failure to follow
the warnings and instructions
may result in electric shock, fire
and/or serious injury.
these instructions to use the
machine, local regulations
may restrict the age of the
operator.
c) Keep in mind that the
operator or user is
responsible for accidents or
hazards occurring to other
people or their property.
Save all warnings and
instructions for future
reference.
If the supply cord is damaged,
it must be replaced by the
manufacturer, its service agent
or similarly qualified persons in
order to avoid a hazard.
IMPORTANT
READ CAREFULLY BEFORE
USE
KEEP FOR FUTURE
REFERENCE
SAFE OPERATING
PRACTICES
1. Training
a) Read the instructions
carefully. Be familiar with the
controls and the correct use
of the machine.
b) Never allow children,
persons with reduced
physical, sensory or mental
capabilities or lack of
experience and knowledge
or people unfamiliar with
2. Preparation
a) Before use check the
supply and extension cord
for signs of damage or
aging. If the cord becomes
damaged during use,
disconnect the cord from
the supply immediately.
DO NOT TOUCH THE CORD
BEFORE DISCONNECTING
THE SUPPLY. Do not use
the machine if the cord is
damaged or worn.
b) Keep extension cords away
from moving hazardous
parts to avoid damages to
the cords which can lead to
contact with live parts.
c) Before use, always visually
inspect the machine for
damaged, missing or
misplaced guards or shields.
d) Never operate the machine
while people, especially
children, or pets are nearby.
3. Operation
a) Keep supply and extension
cords away from cutting
9
2-in-1 Grass Trimmer/Edger WG119E
Page 10

means.
b) Wear eye protection, log
trousers and stout shoes at
all times while operating the
machine.
c) Avoid using the machine
in bad weather conditions
especially when there is a
risk of lightning.
d) Use the machine only in
daylight or good artificial
light.
e) Never operate the machine
with damaged guards or
shields or without guards or
shields in place.
f) Switch on the motor only
when the hands and feet
10
are away from the cutting
means.
g) Always disconnect the
machine from the power
supply (e.G. Remove the
plug from the mains)
1) Whenever the machine is
left unattended;
2) Before clearing a blockage;
3) Before checking, cleaning
or working on the machine;
4) After striking a foreign
object;
5) Whenever the machine
starts vibrating abnormally.
h) Take care against injury to
feet and hands from the
cutting means.
i) Always ensure that the
ventilation openings are kept
clear of debris.
j) Never fit metal cutting
elements.
k) Always be sure of your
footing on slopes.
l) Walk, never run.
m)Not overreach and keep the
balance at all times.
n) Not to touch moving
hazardous parts before the
machine is disconnected
from the mains and the
moving hazardous parts
have come to a complete
stop.
4. Maintenance and storage
a) Disconnect the machine
from the power supply (e.G.
Remove the plug from the
mains) before carrying out
maintenance or cleaning
work.
b) Use only the manufacturer’s
recommended replacement
parts and accessories.
c) Inspect and maintain the
machine regularly. Have the
machine repaired only by an
authorized repairer.
d) When not in use, store the
machine out of the reach of
children.
5. Recommendation
The machine should be
supplied via a residual
current device (rcd) with a
tripping current of not more
than 30mA.
2-in-1 Grass Trimmer/Edger WG119E
Page 11

SYMBOL
Read operator’s manual
Keep bystanders away
Wear eye and ear protection
Do not expose to rain
Disconnect the mains plug if
the cord becomes damaged or
entangled.
Double insulation
Waste electrical products
must not be disposed of with
household waste. Please recycle
where facilities exist. Check with
your local authorities or retailer
for recycling advice.
Edging
Trimming
Unlock
Wear protective gloves
OPERATING INSTRUCTIONS
NOTE: Before using the tool, read the
instruction book carefully.
Intended Use
The machine is intended for the cutting of grass and
weeds under bushes, as well as on slopes and edges
that cannot be reached with the lawn mower.
WARNING! To avoid injury from unexpected
starting or electrical shock during assembly or
adjustment, do not plug the power cord into a source
of power.
Action Figure
Assembly
Assembling Safety Guard
WARNING: Make Sure the
Safety Switch is Locked
Off to Prevent Accidental
Starting.
Assembling auxiliary handle See Fig. C
Operation
ON/OFF Switch
WARNING! The cutting head
continues to rotate after the
trimmer has been switched off;
wait until it has completely
stopped then lay down the tool.
Trimming
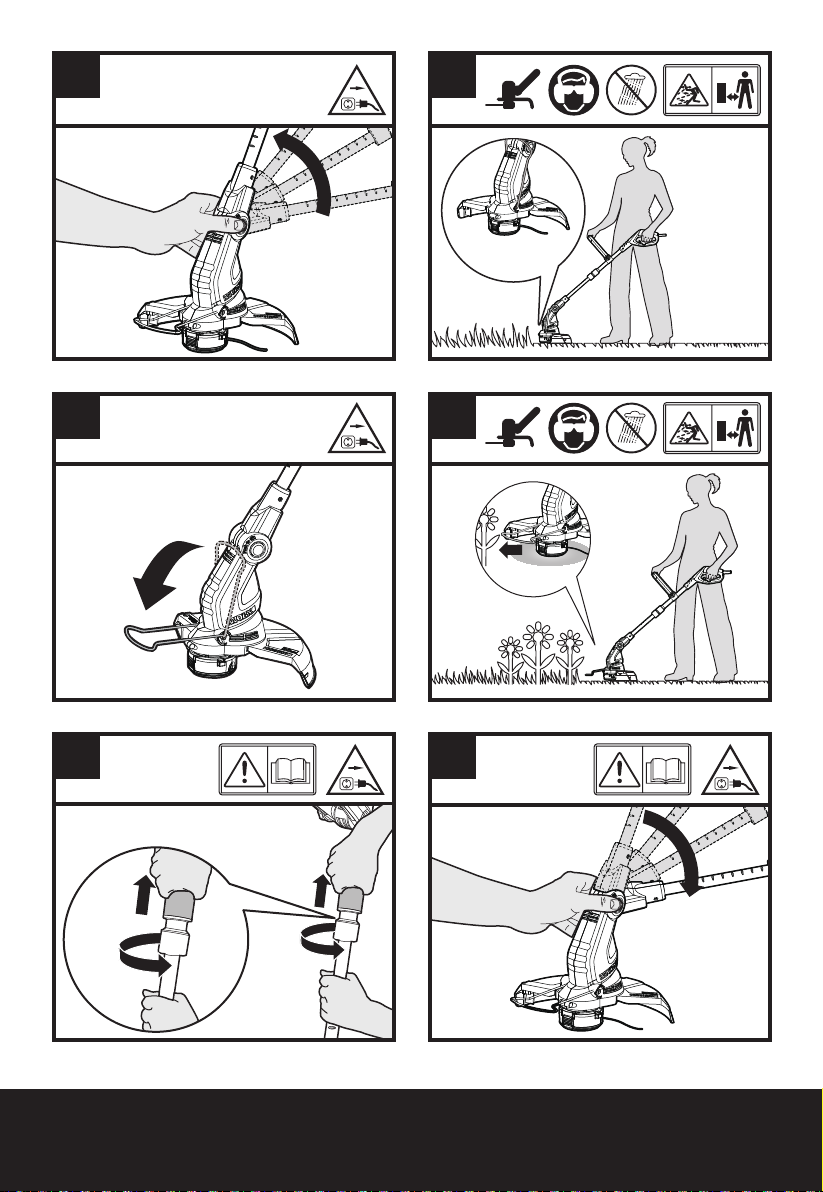
Adjusting the Height See Fig. E1
Adjusting the Auxiliary Handle See Fig. E2
Adjusting the Trimmer Head See Fig. E3
Trimming See Fig. E4
Using the Flower Guard See Fig. E5, E6
Edging
WARNING! Always switch
the machine off and remove
plug from power source before
adjusting.
Changing the tool into the Edging
mode
Note: The trimmer head will only
rotate in one direction
Edging See Fig. F3
Manually feeding the line See Fig. G
Removing the Cap See Fig. H
Cutting Head See Fig. I
See Fig. A, B
See Fig. D
See Fig. F1, F2
11
2-in-1 Grass Trimmer/Edger WG119E
Page 12

Changing the line spool See Fig. J, K
Manually winding the line
See Fig. L, M,
N, O
OPERATION INSTRUCTIONS
1. AUTOMATIC LINE FEED SYSTEM
When initially switching on the trimmer, a small
length of line is fed out.
A ‘clattering’ noise will be heard for a short time. This
is normal and is caused by the line being cut by the
line cutter. Once the line is cut to the correct length,
the ‘clattering’ noise will stop and the trimmer motor
will run at full speed.
To feed more line, stop the trimmer completely, then
restart, allowing the motor to reach full speed. Repeat
this until you hear the ‘clattering’ noise of the line
cutting. (Do not repeat this procedure more than 6 times)
2. MANUALLY FEEDING THE LINE (See Fig. G)
Press and release manual line feed button (13), whilst
gently pull out the lines until the lines reaches the
line cutter.
When the required amount of line is fed out, gently
pull on the second line (there is no need to press the
manual line feed button again). If the line extends
past the line cutter, too much line has been fed out.
12
If too much line is fed out, remove the cutting head
cover and rotate the spool anti-clockwise until the
line is at the desired length.
Removing the Cap (See Fig. H)
Press and hold in the two latches (15).
Pull the Cutting Head Cover away from the Cutting
Head. Keep the cap and spool holder clean from
debris. To replace the cap, press it firmly towards the
spool holder. Ensure that it is correctly connected
by trying to remove it without depressing the two
latches.
Changing the Line Spool (See Fig. J, K)
First take off the cap and remove the old spool. Place
new spool into cutting head. Feed one line through
the eyelet, then repeat for second line (See Fig. K).
Release line from cleat on the Spool. Reattach the
cap.
WARNING! Your Trimmer is designed to only
use line with a maximum diameter of
1.65mm. Only use nylon line.
IMPORTANT - Always wind the line onto the
upper section of the spool first.
3. MANUALLY WINDING THE LINE (See Fig. L,
M, N, O)
Take approximately 5m line and insert 15mm of
line into one of the holes in the upper section of the
spool (See Fig. L). Wind the line in the direction of the
arrows on the top of the spool (See Fig. M, N).
Leave approximately 100mm of line unwound and place
it into the cleat. Repeat on the lower section of spool.
Care should be taken to ensure that the line is neatly
coiled on the spool (See Fig. O). Failure to do so will
impair the efficiency of the automatic line feed.
Then fit the spool as described above in “Changing
the Line Spool”.
MAINTENANCE
Remove the plug from the socket before
carrying out any adjustment, servicing or
maintenance.
There are no user serviceable parts in your lawn
trimmer. Never use water or chemical cleaners to
clean your lawn trimmer. Wipe clean with a dry cloth.
Always store your lawn trimmer in a secure, dry
place out of the reach of children. Keep the motor
ventilation slots clean. Keep all working controls
free of dust. If you see some sparks flashing in the
ventilation slots, this is normal and will not damage
your lawn trimmer. Do not place other objects on the
product.
If the supply cord is damaged, it must be replaced
by the manufacturer, its service agent or similarly
qualified persons in order to avoid a hazard.
2-in-1 Grass Trimmer/Edger WG119E
Page 13

TROUBLESHOOTING
WARNING: Switch the machine off and remove plug from power source before investigating any fault.
Problems Possible Causes Corrective Action
Trimmer fails to
operate.
Trimmer runs
intermittently.
Excessive
vibrations/
noise.
Machine does
not cut.
Auto feed does
not work
No power
Power source socket faulty
Motor is broken.
Internal wiring of machine damaged.
Motor is broken.
On/Off switch defective.
Machine defective.
Line spool is not wound well.
Line broken.
Motor is broken (speed is too low).
Grass entangled around cutting head.
Cutting line is not wound well.
The line is tangled.
Line is used up.
Check power
Use another socket
Contact Service Agent.
Contact Service Agent.
Contact Service Agent.
Contact Service Agent.
Contact Service Agent.
Rewind the line. See “MANUALLY WINDING
THE LINE” (Fig. L, M, N, O).
Replace the line.
Contact Service Agent.
Remove grass.
Manually feed the line, if still cannot feed out,
remove the Spool out and rewind the line.
Replace with a new spool of line.
13
2-in-1 Grass Trimmer/Edger WG119E
Page 14

ENVIRONMENTAL
firmly clamped
PROTECTION
Waste electrical products must not be disposed
of with household waste. Please recycle where
facilities exist. Check with your local authorities
or retailer for recycling advice.
PLUG REPLACEMENT (ONLY
FOR REWIRABLE PLUG OF
UK & IRELAND)
If you need to replace the fitted plug then follow the
instructions below.
IMPORTANT
The wires in the mains lead are colored in
accordance with the following code:
BLUE =NEUTRAL
Brown = Live
As the colors of the wires in the mains lead of this
appliance may not correspond with the colored
markings identifying the terminals in your plug,
proceed as follows. The wire which is colored blue
must be connected to the terminal which is marked
with N. The wire which is colored brown must be
connected to the terminal which is marked with L.
WARNING! Never connect live or neutral wires to
the earth terminal of the plug. Only fit an approved
14
13ABS1363/A plug and the correct rated fuse.
NOTE: If a moulded plug is fitted and has to be
removed take great care in disposing of the plug
and severed cable, it must be destroyed to prevent
engaging into a socket.
13 Amp fuse approved
to BS1362
Connect
Blue to N
(neutral)
Outer sleeve
Brown L (live)
Cable grip
DECLARATION OF
CONFORMITY
We,
Positec Power Tools (Europe) Ltd,
PO Box 6242, Newbury, RG14 9LT, UK
Declare that the product,
Description Electric Lawn trimmer/edger
trimmer
Type WG119E (1-designation of machinery,
representative of Lawn Trimmer and Edge
Trimmer)
Function Cutting grass and similar soft
vegetation and for trimming grass edges
Complies with the following Directives,
2006/42/EC, 2014/30/EU, 2011/65/EU,
2000/14/EC amended by 2005/88/EC
2000/14/EC amended by 2005/88/EC:
- Conformity Assessment Procedure as per
Annex VI
- Measured Sound Power Level
95.2dB(A)
- Declared Guaranteed Sound Power Level
96dB(A)
The notified body involved
Name: Intertek Testing & Certification Ltd
(notified body 0359)
Address: Davy Avenue, Knowlhill, Milton
Keynes, MK5 8NL
Standards conform to
EN 60335-1 EN 50636-2-91
EN 62233 EN ISO 3744
EN 55014-1 EN 55014-2
EN 61000-3-2 EN 61000-3-3
The person authorized to compile the technical file,
Name: Russell Nicholson
Address: Positec Power Tools (Europe)Ltd,
PO Box 6242, Newbury, RG14 9LT, UK
Suzhou 2016/11/28
Allen Ding
Deputy Chief Engineer, Testing & Certification
2-in-1 Grass Trimmer/Edger WG119E
Page 15

Page 16

After-sales Service and Application
At www.worx.com you can order spare parts or
arrange the collection of a product in need of servicing
or repair.
Tel. Service: 0345 202 9679
E-Mail: customerservices@worxtools.com
www.worx.com
Copyright © 2016, Positec. All Rights Reserved.
AR01268801
 Loading...