

Page 1

SAFETY AND OPERATING MANUAL
2-in-1 Grass Trimmer/Edger WG118E
Page 2

GENERAL SAFETY
WARNINGS
WARNING!When using the machine
the safety rules must be followed.
For your own safety and bystanders please
read these instructions before operating the
machine. Please keep the instructions safe for
later use.
SAVE THESE INSTRUCTIONS
This grass trimmer is designed for cutting
grass and similar soft vegetation and for
trimming grass edges in private and hobby
garden areas which are not accessible with a
lawnmower.
The device is not allowed to be used in public
gardens, parks, sports centres or at roadsides
as well as in agriculture and forestry.
This lawn trimmer is not allowed to be used
for cutting or chopping:
- Hedges, shrubs and bushes,
- Flowers,
- In terms of composting.
Otherwise, there is a risk of injury.
This appliance is not intended for use by
persons (including children) with reduced
2
physical, sensory or mental capabilities, or
lack of experience and knowledge, unless they
have been given supervision or instruction
concerning use of the appliance by a person
responsible for their safety.
Children should be supervised to ensure that
they do not play with the appliance.
If the supply cord is damaged, it must be
replaced by the manufacturer, its service
agent or similarly qualified persons in order to
avoid a hazard.
ADDITIONAL SAFETY
REqUIREMENTS FOR YOUR
LAWN TRIMMER
1. Before use check the supply and extension
cord for signs of damage or aging. If
the cord becomes damaged during use,
disconnect the cord from the supply
immediately. DO NOT TOUCH THE CORD
BEFORE DISCONNECTING THE SUPPLY.
Do not use the appliance if the cord is
damaged or worn.
2. Read the instructions carefully. Be familiar
with the controls and proper use of the
equipment.
3. Keep extension cord away from cutting
elements.
4. Wear eye protection.
5. Never allow children or people unfamiliar
with these instructions to use the trimmer.
6. Avoid using the trimmer, while people,
especially children or pets, are nearby.
7. Use the trimmer only in daylight or good
artificial light.
8. Never operate the trimmer with damaged
guards or shields or without guards or
shields in place.
9. Switch on the motor only when the hands
and feet are away from the cutting means.
10. Never fit metal cutting elements.
11. Use only the manufacturer’s recommended
replacement parts and accessories.
12. Always disconnect the trimmer from
the mains when leaving the trimmer
unattended.
13. Disconnect the trimmer from the mains
before carrying out maintenance or
cleaning work.
14. Inspect and maintain the trimmer regularly.
Have the trimmer repaired only by an
authorized repairer.
15. Take care against injury from the blade(s)
fitted for trimming the filament line length.
After extending new cutter line, always
return the trimmer to its normal operating
position before switching on.
16. Always ensure that the ventilation
openings are kept clear of debris.
17. When not in use, store the trimmer out of
the reach of children.
18. Wear protective glasses or goggles;
19. Before using the machine and after any
impact, check for signs of wear or damage
and repair as necessary;
20. Never operate the machine with damaged
guards or without the guards in place;
21. Keep hands and feet away from the cutting
means at all times and especially when
switching on the motor;
2-in-1 Grass Trimmer/Edger WG118E
Page 3
22. Take care against injury from any device
fitted for trimming the filament line length.
After extending new cutter line always
return the machine to its normal operating
position before switching on;
23. Never fit metal cutting elements;
24. Always ensure that ventilation openings
are kept clear of debris.
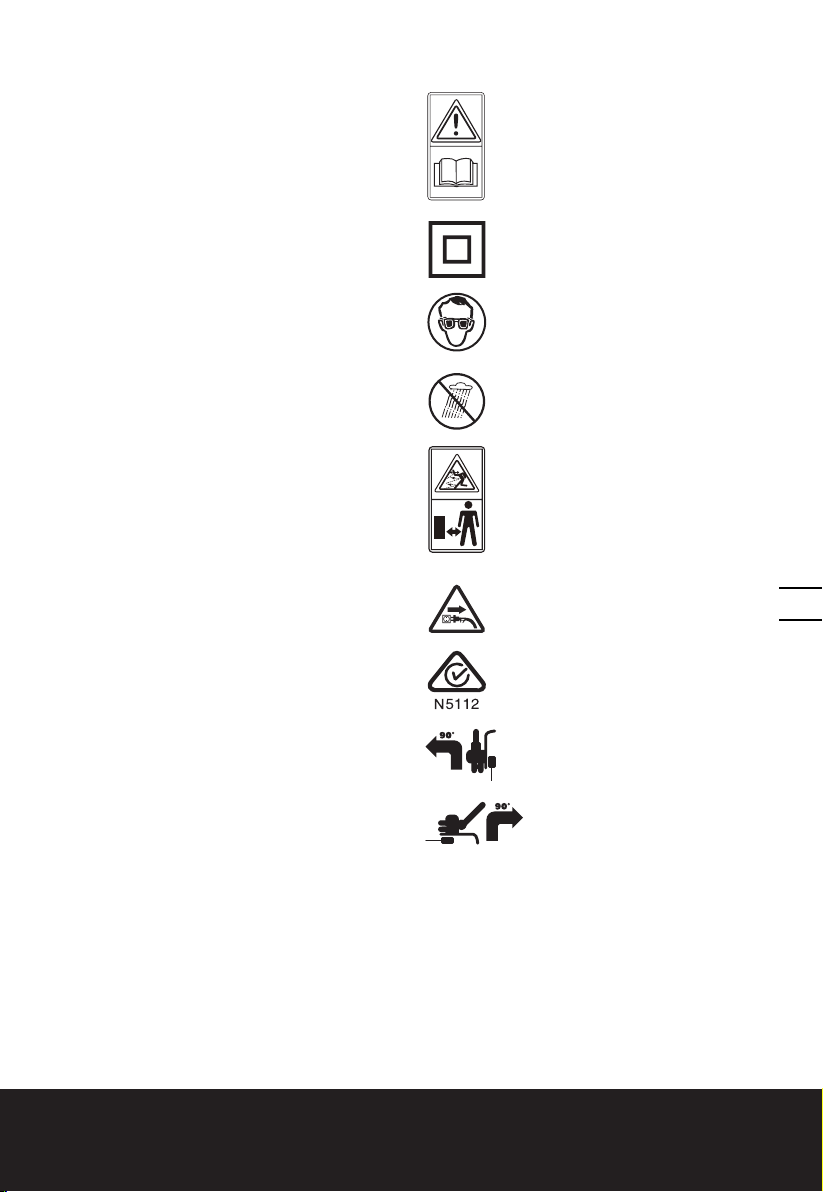
SYMBOLS
Read instruction sheet
MAINTENANCE
a) After use, disconnect the machine from the
mains and check for damage;
b) When not in use store the machine out of
the reach of children;
c) Mains powered trimmers should only be
repaired by an authorised repairer;
d) Use only manufacturers recommended
replacement parts and accessories.
WARNINGS:
- WARNING: Cutting elements continue to
rotate after the motor is switched off,
- Keep extension cords away from cutting
elements;
It is recommended that appliances should be
supplied via a residual current device (RCD)
with a tripping current of not more than 30mA.
Double insulation
Wear eye protection
Do not expose to moisture.
Keep bystanders away.
Disconnect the mains plug if the
cord is damaged or entangled.
RCM approval mark
Edging
3
Trimming
2-in-1 Grass Trimmer/Edger WG118E
Page 4
7
6
3
1
2
4
5
10
9
4
2-in-1 Grass Trimmer/Edger WG118E
8
Page 5

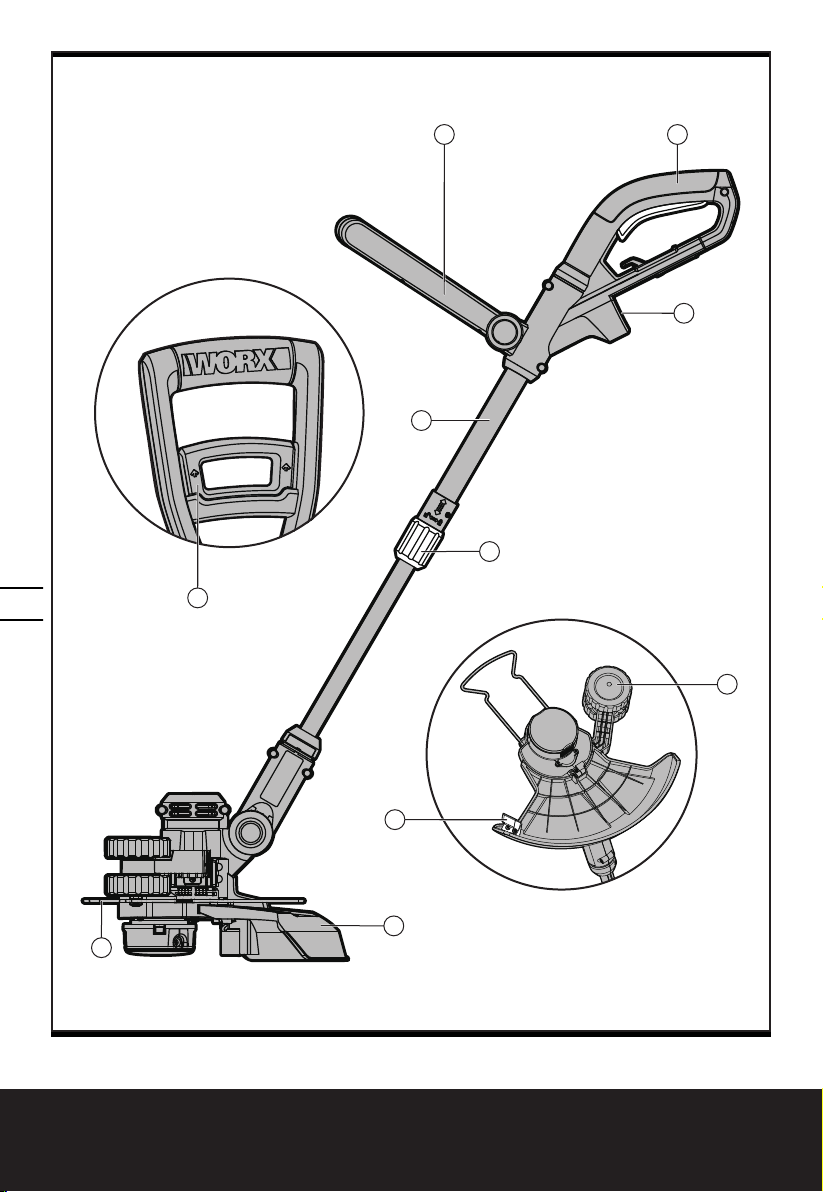
1. REAR HANDLE
2. PLUG INSERT
3. LOCKING COLLAR
4. SAFETY GUARD
5. SPACER GUARD
6. TELESCOPIC SHAFT
7. AUXILIARY HANDLE
8. EDGER WHEEL
9. LINE CUTTER
10. AUXILIARY HANDLE LOCKING LEVER
11. CUTTING HEAD COVER (See Fig. K )
12. CAP RELEASE LATCH (See Fig. K)
13. SPOOL (See Fig. K)
14. CUTTING HEAD (See Fig. K)
15. EYELET (See Fig. K)
16. LINE FEED BUTTON (See Fig. J )
Not all the accessories illustrated or described are included in standard delivery.
5
2-in-1 Grass Trimmer/Edger WG118E
Page 6

TECHNICAL DATA
Rated voltage 220–240V~50/60Hz
Power 550W
No load speed 8900/min
Cutting diameter 30cm
Line diameter 1.65mm
Line length 2*5m
Machine weight 2.8kg
ACCESSORY
Safety guard 1
Auxiliary handle 1
Edger wheel 1
Spacer guard 1
We recommend that you purchase your accessories from the same store that sold you the tool.
Use good quality accessories marked with a well-known brand name. Choose the type according
to the work you intend to undertake. Refer to the accessory packaging for further details. Store
personnel can assist you and offer advice.
6
2-in-1 Grass Trimmer/Edger WG118E
Page 7

ASSEMBLY
E1
E2
F
H1
H2
I
1. ASSEMBLY OF THE SAFETY GUARD (See Fig. A)
Remove the screw from the Safety Guard (4) and fit the
guard to the trimmer head; align the guard so it slides
into the slots located on the trimmer head. Turn the tool
over and secure the Safety Guard onto the trimmer
head with the screw (a) provided.
2. ASSEMBLY OF THE EDGER WHEEL
(See Fig. B)
With the tool right side up, slide the Edger Wheel (8)
assembly onto the metal plate located on the side of the
trimmer head. Make sure the grooves of the Edger Wheel
assembly lock onto the metal plate; you will hear it click
into place.
To remove the wheel assembly, press the release button
(b) on the wheel and pull the wheel assembly upward.
OPERATING INSTRUCTIONS
WARNING: The cutting head continues to
rotate after the trimmer has been switched
off. Wait until it stops before laying the trimmer
down.
• Always wear eye protection. Never lean over the
trimmer head. Rocks or debris can ricochet or be
thrown into the eyes and face and cause blindness
or other serious injury.
• Hold front handle with one hand and auxiliary
handle with the other hand. Keep unit below waist
level. Work only from your right to your left to
ensure debris is thrown away from you. Without
bending over, keep line near and parallel to the
ground (perpendicular when edging) and not
crowded into material being cut.
• Before operating, make sure both trimmer lines
are extended. When trimming, make sure motor is
running at full speed.
• Use only 1.65mm diameter cutting line. Other line
sizes will not properly feed in the trimmer head
and could cause serious injury. Never use other
materials such as wires, string or rope, as this may
break off during cutting and cause serious injury.
a
A
b
B
7
C
1. SPACER GUARD
Push the Flower Guard (5) in when edging and pull
it out before trimming, as shown in Fig C. Before
trimming or edging make sure the Flower Guard is
locked firmly in position.
2-in-1 Grass Trimmer/Edger WG118E
Page 8

2. ADJUSTMENT OF THE TELESCOPIC SHAFT
H1
H2
I
15
K
L1
L2
b
a
A
B
C
D
E1
E2
F
G
H1
16
H2
I
J
(See Fig. D)
Unscrew the Locking Collar (3) clockwise to unlock, as
indicated. Adjust the length of the Telescopic Shaft (6)to
the most comfortable length. Tighten the Locking Collar
counter-clockwise to lock, as indicated.
3. MAIN HANDLE ROTATION
First, hold down the lower housing with your foot and
pull upward on the Telescopic Shaft (6). Then rotate
the Telescopic Shaft clockwise 90 degrees (See Fig.
E1) and release; the Shaft will be locked in position
automatically (See Fig. E2).
4. ADJUSTING THE AUXILIARY HANDLE
(See Fig. F)
E1
Pull up the Auxiliary Handle Locking Lever (10).
Hold the lever and rotate the Auxiliary Handle (7) to the
most comfortable and balanced position (See Fig. F).
Release the lever, your Auxiliary Handle has been
locked.
8
E2
F
2-in-1 Grass Trimmer/Edger WG118E
Page 9

5. ATTACHING EXTENSION CORD(See Fig. G)
E1
E2
F
G
H1
16
H2
I
J
15
K
L1
L2
L3
15
11
12
13
14
K
L1
L2
L4
RIGHT
WRONG
An extension cord retainer is built into the Rear Handle
(1) that prevents the cord from coming unplugged.
To use this feature, simply double the extension
cord about (203mm from the end, forming a small
loop. Insert this loop into the slot on the back of the
handle. Hook the end of the loop over the tab. Gently
tug on the cord to insure that it is firmly retained in
the trimmer’s handle. Plug the receptacle end of the
extension cord into the Plug Insert (2) in the trimmer.
6. ADJUSTMENT OF TRIMMER HEAD ANGLE
To adjust the trimmer head angle downwards, put
one foot on the motor housing, then grip the Rear and
Auxiliary handles, and apply adequate force to adjust,
as shown in Fig. H1.
To adjust the trimmer head angle upwards, put one
foot on the Safety Guard (4), then grip the Rear and
Auxiliary handles and apply adequate force to adjust,
as shown in Fig. H2.
7. USING THE ON/OFF TRIGGER
Press and hold the on/off trigger to start the trimmer.
Release to stop.
8.TRIMMING
Hold the bottom of the trimmer head just above the
ground and at a slight angle. Allow only the tip of line
to make contact with the grass. Let the trimmer line
work at its own pace; do not force the trimmer line into
the work area.
9. EDGING (See Fig. I)
First, rotate the Rear Handle (1) 90 degree clockwise (See
“Main Handle Rotation”, Fig. E1&E2).
Adjust the trimmer head angle to be the lowest horizontal
setting (See “Adjustment of the Trimmer Head Angle”, Fig
H1). Then position the Edger Wheel (8) on the ground for
edge mode (See Fig. I). There are two white lines, located
on each end of the Safety Guard (4), that show the cutting
plane of the trimmer line. Align these marks with the
edge of your lawn.
While edging, allow the tip of the line to make contact.
Do not force the line. The wheel helps to prevent the
unit from touching the ground. Take extra caution while
edging as objects can be thrown from the trimmer line.
10. AUTOMATIC LINE FEED SYSTEM
When initially switching on the trimmer, a small length
of line is fed out.
H1
H2
I
9
2-in-1 Grass Trimmer/Edger WG118E
Page 10

H1
H2
I
J
15
11
12
13
14
K
L1
L2
L3
L4
RIGHT
WRONG
L4
RIGHT
WRONG
15
16
11
12
13
14
A ‘clattering’ noise will be heard for a short time. This
is normal and is caused by the line being cut by the
line cutter. Once the line is cut to the correct length, the
‘clattering’ noise will stop and the trimmer motor will
run at full speed.
To feed more line, stop the trimmer completely, then
restart, allowing the motor to reach full speed. Repeat
this until you hear the ‘clattering’ noise of the line
cutting. (Do not repeat this procedure more than 6
times).
11. MANUALLY FEEDING THE LINE (See Fig. J)
Press and release the Line Feed Button (16) (See Fig. J)
whilst gently pulling out on one of the lines until it has
reached the line cutter.
When the required amount of line is fed out, gently pull
on the second line (there is no need to press the Line
Feed Button again). If the line extends past the line
cutter, too much line has been fed out.
If too much line is fed out, remove the spool cap and
click the spool counter-clockwise until the line is at the
desired length.
10
K
L1
12. REMOVING THE CAP
Press and hold in the two Cap Release Latches (12) (See
Fig K).
Pull the Cutting Head Cover (11) away from the Cutting
Head (14). Keep the Cutting Head Cover and the inside
of the Cutting Head clean from debris. To replace the
Cutting Head Cover, press it firmly onto the spool
holder. Ensure that it is correctly connected by trying
to remove it without depressing the two Cap Release
Latches.
13. CHANGING THE LINE SPOOL
First take off the Cutting Head Cover (11) and remove
the old Spool (13). Place the new Spool onto the
Cutting Head (14). Feed one line through the Eyelet
(15), and then repeat for the second line. Reattach the
Cutting Head Cover.
WARNING! our Trimmer is designed to only
use line with a maximum diameter of 0.065
(1.65mm”. Only use nylon line.
IMPORTANT - Always wind the line onto the
upper section of the spool first.
14. TO MANUALLY WIND LINE
Take approximately 5m of line and insert 15mm of line
into one of the holes in the upper section of the Spool
(13) (See Fig L1). Wind the line in the direction of the
arrows on the top of the Spool. Repeat process with
2-in-1 Grass Trimmer/Edger WG118E
Page 11

separate piece of line on lower section of Spool (See
15
11
12
13
14
K
L1
L3
L4
RIGHT
WRONG
Fig. L2 & L3).
Leave approximately 100mm of line unwound and
place it into the cleat. Repeat on the lower section of
the Spool.
Care should be taken to ensure that the line is neatly
coiled on the Spool (See Fig L4). Failure to do so will
impair the efficiency of the automatic line feed.
Then fit the Spool as described above in “Changing
the Line Spool”.
MAINTENANCE
After use, disconnect the machine from the electrical
outlet and check for damage. Your trimmer requires
no additional lubrication or maintenance. There are no
user serviceable parts in your trimmer. Electric powered
trimmers should only be repaired by an authorized
repairer. Use only manufacturers recommended
replacement parts and accessories.
Never use water or chemical cleaners to clean your
trimmer. Wipe clean with a dry cloth. Always store
your trimmer in a dry place out of the reach of children.
Keep the motor ventilation slots clean. If you see some
sparks flashing in the ventilation slots, this is normal
and will not damage your trimmer.
L2
RIGHT
WRONG
11
L4
2-in-1 Grass Trimmer/Edger WG118E
Page 12

Copyright © 2013, Positec. All Rights Reserved.
2GGT12CPK11002A0
 Loading...