

Page 1

INSTALLATION GUIDE
GUIDE D'INSTALLATION
GUÍA DE INSTALACIÓN
Page 2

Page 3

Installation guide EN P04
Guide d'installation F P20
Guía de instalación ES P36
Page 4

4
EN
How to install your Landroid®M
The installation of the Landroid®M is easy. Depending on the size of your garden, the entire process only
takes a short amount of time. If your are like us, you hate having to waste your precious free time mowing
your lawn. The Landroid
®
M will prove to be your best investment eliminating the need to mow your lawn
ever again.
You can watch the installation demo video at www.worxlandroid.com.
The Landroid®M loves to mow
It is designed to mow often, maintaining a healthier and better looking lawn than ever before. Depending on the
size of your lawn, the Landroid
®
M may be programmed to operate at any time or frequency with no restrictions. It
is here to work for you.
Page 5
5
EN
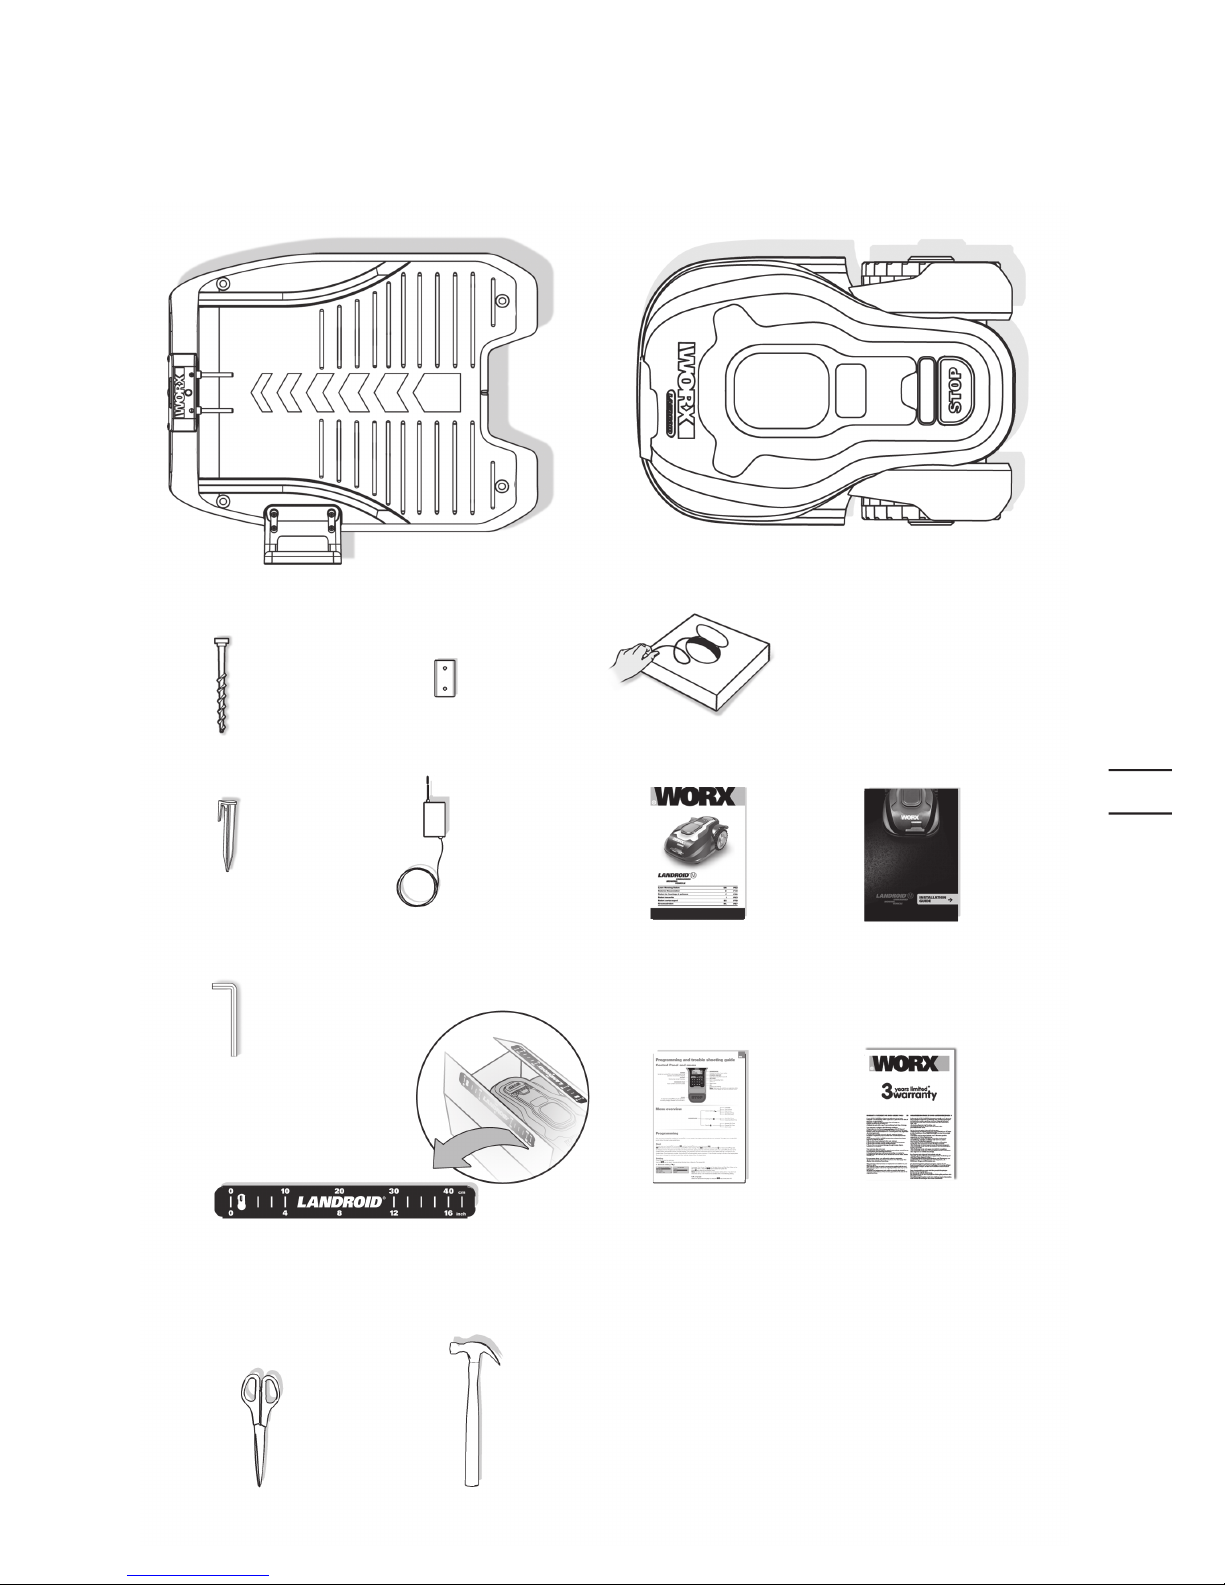
In the box
Preparation
Tools Needed
Distance gauge
Hex key
Scissors Hammer
Landroid
®
MCharging base
Base fixing
nails
Wire pegs
Boundary
wire reel
Owner’s manual
Warranty
statement
Installation
guide
Spare blades
Power Adaptor
Programming and
trouble shooting
guide
Page 6

6
EN
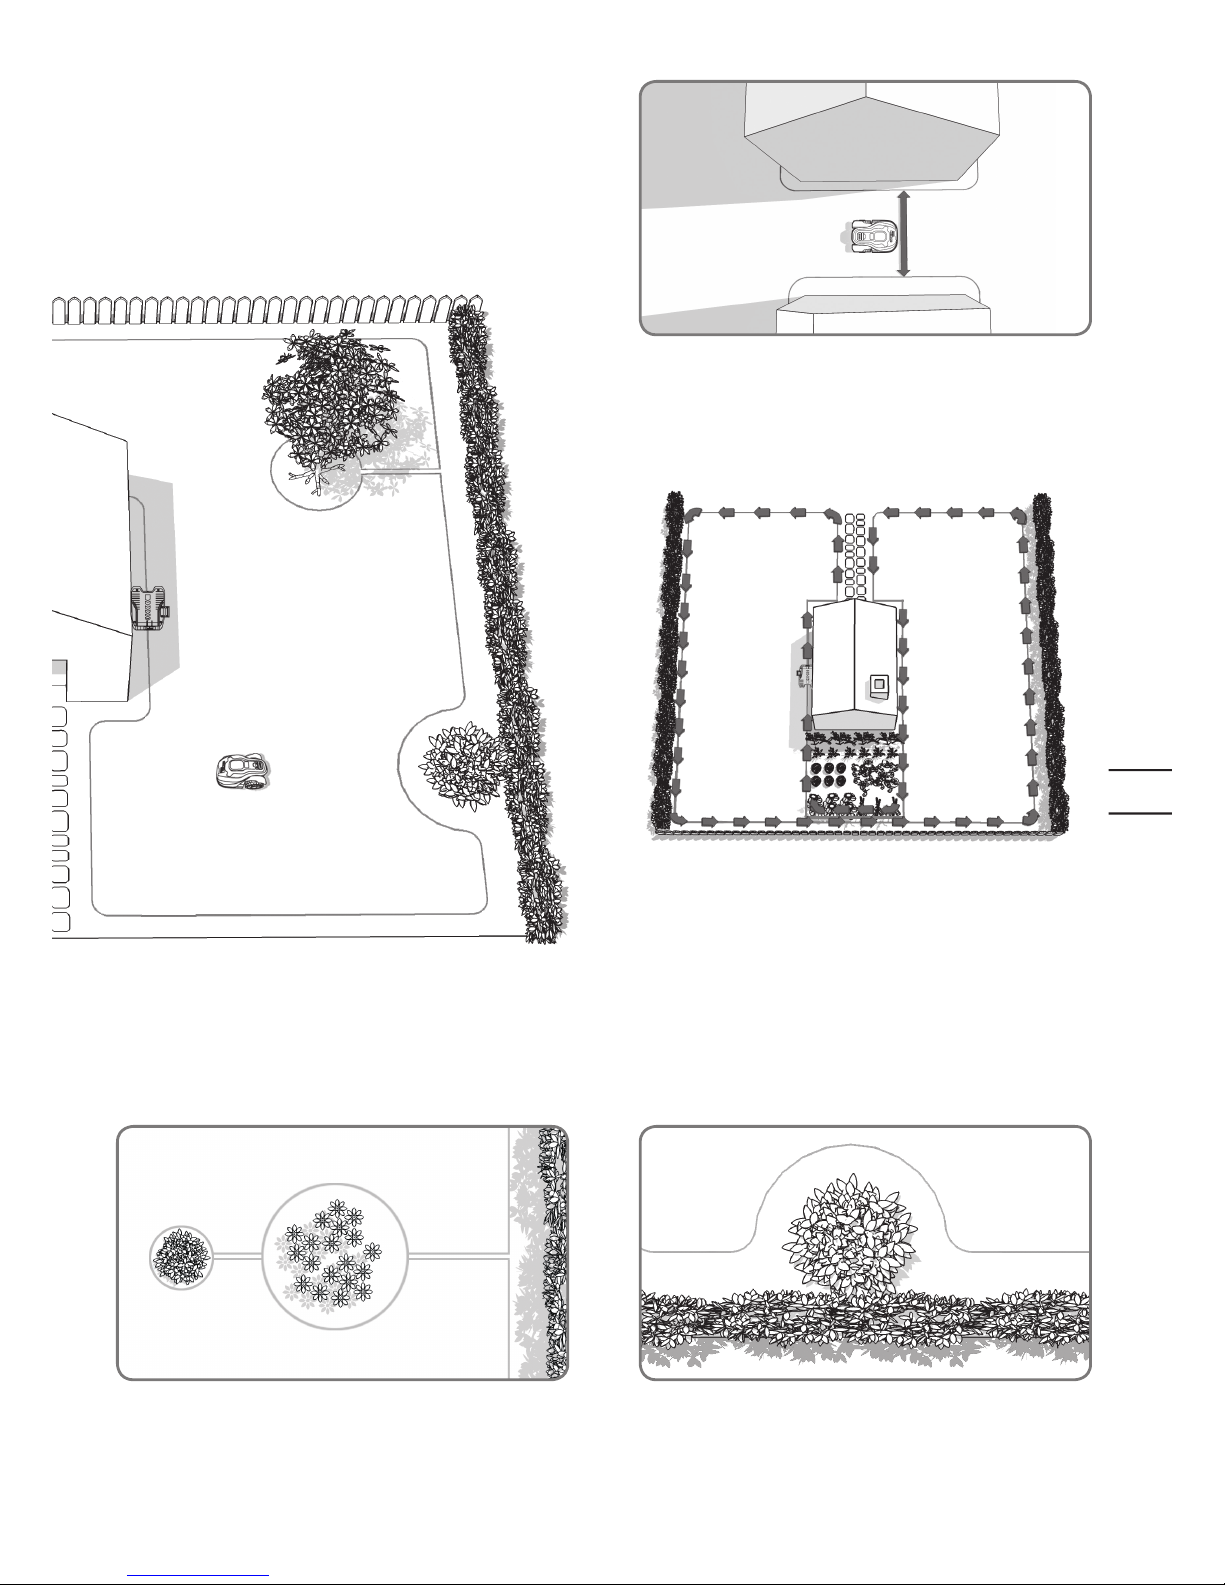
Landroid®M's new home-your garden
Let's start by having a closer look at Landroid®M's new home—your lawn—highlighting the areas where it
can safely go and areas it’s best for Landroid
®
M to avoid.
When hitting any obstacle that’s rigid, stable and taller than
6 inches—such as a wall or a fence—your Landroid
®
M will
simply stop and re-direct away from the obstacle.
Obstacles that can be hit
Stones that are heavy enough not to be moved by your
Landroid
®
M can be safely hit. However, if any stone has an
inclined surface that your Landroid
®
M can climb, you should
either remove it or exclude from the working area.
Stones
If your driveway is level with your lawn, without any protruding
surface, the Landroid
®
M can freely run over it. If you'd like the
Landroid
®
M to avoid it, then only a 4 inches* space between the
Boundary Wire and the driveway is needed. If it’s covered with
gravel, you should not allow the Landroid
®
M to travel over it,
using the distance gauge in this case, keeping a 14 inches* space
between the boundary wire and the driveway.
*This is the recommended distance. Use the provided
distance gauge to ensure proper installation.
Driveways
You certainly don’t want your Landroid®M to mow your flowers,
or fall into the water. These areas should be avoided.
Flowerbeds, ponds, pools...
Page 7

7
EN
20°
If there are roots emerging from the ground, this area should be
avoided in order not to damage the roots.
Trees
In the case of large bumps or dips, please consider if the blades
could touch the ground; if this is the case, either make the
inclines smoother or exclude those areas from your Landroid
®
M’s
operation.
Depressions and bumps
Your Landroid®M has the ability to safely climb slopes up to 20°,
so just avoid anything steeper than this.
Slopes
The Upper Boundary Wire should NOT be placed on slopes
steeper than 20°. The Upper Boundary Wire should have a
distance of at least 14 inches between any obstacles. The Lower
Boundary Wire should NOT be placed on slopes steeper than
15°. The Lower Boundary Wire should have a distance of at least
18 inches between any obstacles when it is positioned on a slope
that is 15°.
Placement of Boundary Wire on slopes
Upper boundary wire
Lower boundary wire
Lower boundary
Wire
10°-20°
<
15°
14inches
18inches
Page 8

8
EN
Marking out Landroid®M’s
territory within your garden
The charging base should be placed along a straight line-allow 6 ft
at both the front and the back. If possible, place the charging base
in the shade-batteries are better recharged in a cool place.
First of all, locate the best spot for the charging base, taking
into account where your nearest outdoor electricity socket is.
The charging base has a 50ft power cord.
NOTE: Make sure the adaptor and the electrical socket are
kept in a dry area at all times.
An island is an area that sits inside your lawn where you don't
want Landroid
®
M to go. The boundary wire starts from the
mowing boundary, goes straight to the island, around it and
back to the boundary as shown by the arrows on the picture.
Make sure it is on a flat area, clear of any obstacles.
Your Landroid®M needs to know where to mow. This is why you have to mark its working area with a boundary wire
that will form an invisible fence. This wire will also guide your Landroid
®
M to its charging base.
If your neighbor also uses a Landroid
®
M, then you must keep
a space of at least 6ft between your Boundary Wire and your
neighbors.
Please be aware that your Landroid®M will not be able to receive
a signal from the Boundary Wire beyond the distance of 60 ft.
6
ft
6
ft
Page 9
9
EN
A forbidden area that's close to the mowing boundary should
be a part of the boundary itself, as shown in the picture.
If your lawn has two or more separate areas connected to each
other by means of a corridor, this should be at least 3 ft wide.
In the case of two islands that are close to each other, it would be
convenient to lay out the wire as illustrated above.
The Landroid
®
M can travel freely over the boundary wire in
between the islands and the mowing boundary.
If your lawns are not connected by a corridor that's wide enough,
then you'll have to pick your Landroid
®
M up and move it to the other
lawn. Landroid
®
M will mow this lawn no problem, but you'll have to
bring it back to the charging base when the battery runs out.
3ft
Page 10
10
EN
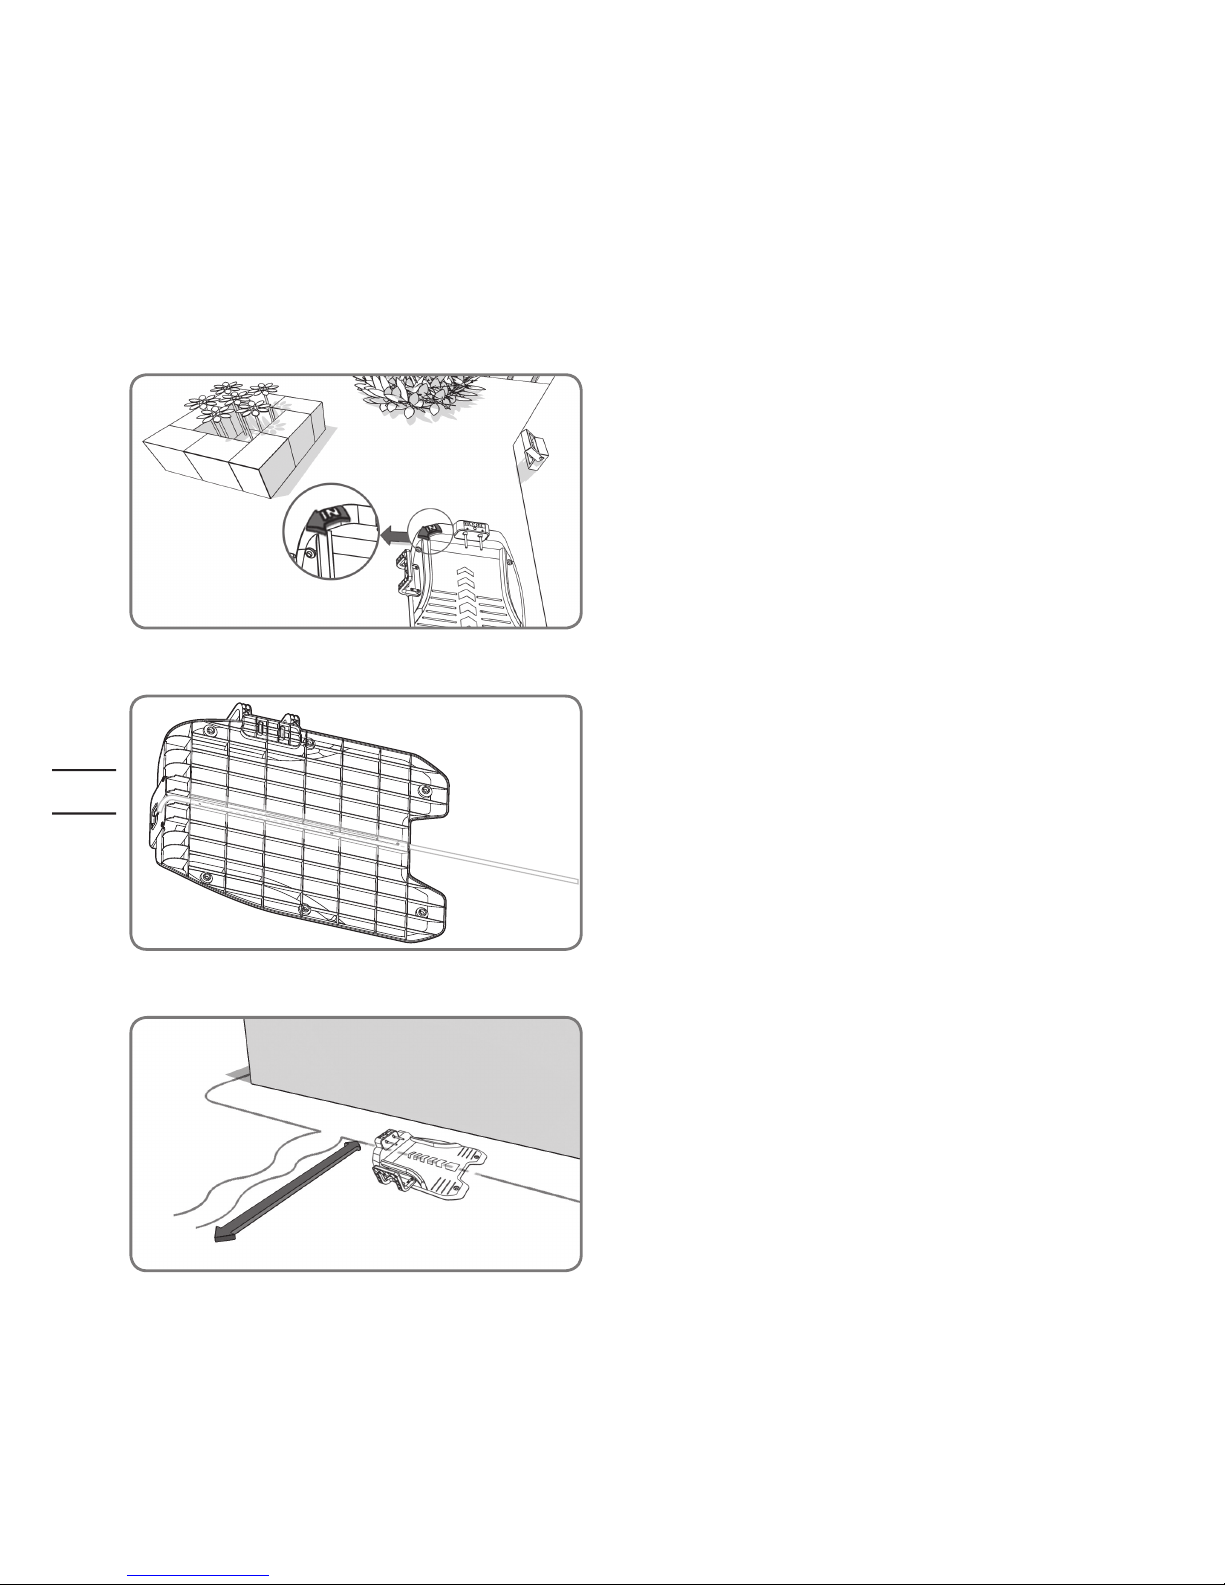
Place the Charging Base in its designated spot, without fixing it
permanently. The “IN” arrow should be oriented so that it indicates
the inside of your lawn.
Pegging your boundary wire
Installation
We recommend that you first mow the lawn where the wire is to be laid using a normal lawn mower or a
grass trimmer. This ensures that the wire is laid as close to the ground as possible so the Landroid
®
M does not
accidentally cut the wire. The boundary wire is powered with a very low voltage so that it is totally safe to human
beings and pets.
1
Feed the boundary wire through the tunnel underneath the
charging base.
Leaving about 3 ft in length of extra wire, start from the rear
of your charging base and begin pegging the wire along the
boundary. When you’ve finished laying the wire along the
boundary back to the charging base, leave another meter of
extra wire and then cut it.
2
3
3
ft
Page 11

11
EN
When making an island with the boundary wire, follow the path as
shown. The wire should run from the perimeter to outline the defined
island and then return back to the perimeter. The boundary wire in
between the island and perimeter should be laid close together
and held in place by the same wire peg. During operation, the
Landroid
®
M will be able to freely pass over this part of the wire.
Ensure the Boundary Wire is perfectly straight in each corner.
6
5
When laying the boundary wire,
use the distance gauge to keep
a 14 inches* space between the
wire and the boundary. However,
in the case of an obstacle that is
level with ground and safe for the
Landroid
®
M to run over, such as a
driveway or sidewalk, then only a
4”* space is needed.
Each wire peg should be placed
around 2.5ft apart
Knock the wire pegs tight to
the ground with the help of the
hammer, although avoid putting
too much pressure on the wire.
Keep the boundary wire straight
and tight between the pegs, there
should not be any slack wire.
* This is the recommended
distance. Use the provided
distance gauge to ensure proper
installation.
4
2.5ft
2.5ft
2.5ft
2.5ft
14inches
14inches
4inches4inches
14
inches
Page 12

12
EN
Connect the base to the boundary wire
Cut the end of the wire to a length that’s appropriate convenient
for reaching the clamps.
Strip the two ends of the wire.
1
When connecting to the charging base there will be an IN-wire
and an OUT-wire, as shown.
Connect the IN-wire to the red clamp of the charging base and
the OUT-wire to the black clamp.
Then close the cover.
2
IN
IN
IN
OUT
OUT
OUT
Page 13

13
EN
You can now permanently fix the charging base on the ground
by tightening the supplied Base Fixing Nails with the supplied
Hex key.
NOTE: Make sure the IN-wire is running straight through
the tunnel underneath the charging base.
3
Turn on and test the installation
Connect the power cord to the adaptor and then to the AC
electrical socket, the LED on the charging base will turn on. If
the LED is off, please refer to the Trouble shooting guide.When
connecting, align the notch on the power cord connector (a)
with the groove on the adaptor connector (b).
Make sure to only screw or unscrew the highlighted piece of
the connector.
If the green light does not come on, then check the power
connections.
In case the power cord is within the working area, you may bury
it as needed.
4
Place your Landroid®M inside the
working area, a few feet from the
back of the charging base.
1
This is the exciting part where you can turn your Landroid®M on for the first time.
a
b
Page 14

14
EN
09:00pm
Wed. 6-8-2012
7:00am ~ 12:00am
M T W T F S S
09:00pm
Wed. 6-8-2012
7:00am ~ 12:00am
M T W T F S S
09:00pm
Wed. 6-8-2012
7:00am ~ 12:00am
M T W T F S S
09:00pm
Wed. 6-8-2012
7:00am ~ 12:00am
M T W T F S S
09:00pm
Wed. 6-8-2012
7:00am ~ 12:00am
M T W T F S S
Open the panel cover, press
power button,
then input the default PIN
0000.
Press the
key and close
the control panel cover: your
Landroid
®
M will now
find its way to the charging base.
Watch the Landroid
®
M as
it returns to the charging
base and modify the
positioning of the boundary
wire if necessary. When the
Landroid
®
M successfully
returns to the charging base,
this means the installation has
been successfully completed!
Now your Landroid
®
M will
start to fully charge.
2
•
If your Landroid®M is
outside its territory, it will
not move and the display
will indicate ”outside
the boundary” error.
Just move it inside its
territory and repeat
step 2.
• If your
Landroid®M
is
inside its territory but the
display says “
outside
the boundary
” and the
LED is on, it means you
clamped the boundary
wire ends incorrectly.
Just reverse them.
• Your Landroid®M should
always remain switched
on. If you ever need to
turn it off, then make sure
you place it within its
boundary area before you
switching it back on again.
• Should your
Landroid
®
M stop
operating unexpectedly,
just press its ON/OFF
key to ON, correct the
problems, press Start
button.
NOTE: If your Landroid
®
M is in the charging base during a time you have programmed it to mow, press STOP, then simply
press the Start button to proceed with mowing.
NOTE: Please refer to the Programming and Troubleshooting Guide for more information.
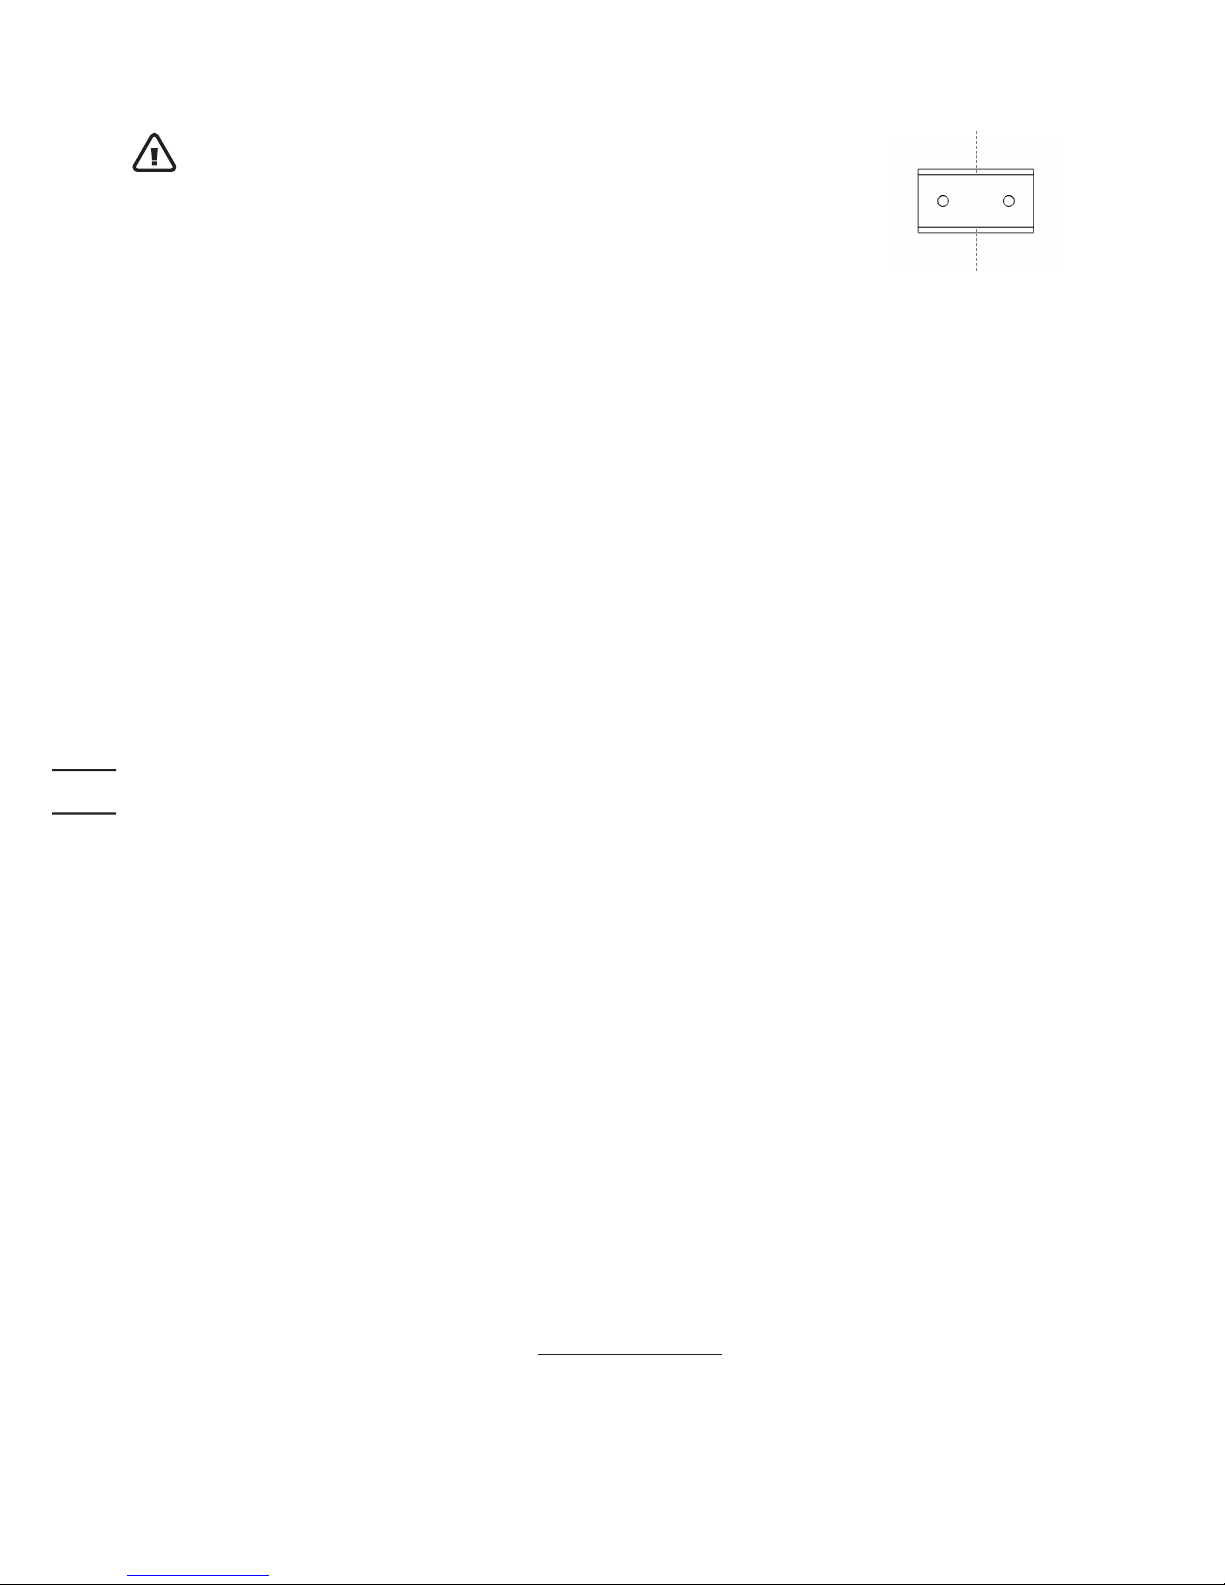
Warning
Page 15

15
EN
mm
20
30
40
50
60
W
h
e
n
b
l
a
d
e
d
i
s
c
i
n
v
e
r
t
e
d
,
r
e
a
d
t
h
i
s
d
i
a
l
.
mm
20
30
40
50
60
09:00pm
Wed. 6-8-2012
7:00am ~ 12:00am
M T W T F S S
Programming
Having finished the installation, it is now time to program the Landroid®M when you want it to go to work by using the keypad
display shown below. Please refer to the Programming and Troubleshooting Guide included in the packaging.
Ready to go?
The Landroid®M is designed for maintaining your grass at a perfect length during the season, but is not designed for deforesting a jungle.
Before starting it for the first time,
1. You should mow your lawn to the desired height.
2. Make sure the operating area is clear from objects such as toys and branches...
3. Adjust the cutting height to its maximum level for the first mow and then adjust to your preferred lawn grass height.
Next Spring, let your Landroid
®
M start mowing early, when the grass is still short, so that you can avoid a preliminary grass cut.
Page 16
16
EN
Keep it sharp
Always wear gloves when adjusting the blades.
The Landroid
®
M does not cut grass like other mowers. Its Blades are razor sharp on all 4 edges and
spin in both directions for maximum cutting capacity. Each blade of your Landroid
®
M has 4 cutting
edges. Depending on the frequency the Landroid
®
M mows your lawn, the cutting blades will need
to be flipped/rotated periodically for a new cutting edge. If your Landroid
®
M is programmed to mow
the lawn every day then the cutting blades will need to be rotated monthly for the best mowing
results. Each cutting blade will last up to 4 months when it is programmed to mow every day. When
the cutting blades are dull and worn out, they should be replaced with the spare blades provided with
your Landroid
®
M. Spare blades are also available at your nearest WORX retailer.
Maintenance
Your Landroid®M is engineered and built to stay outdoors regardless of adverse conditions. Just
periodically clean its deck from grass clipping build ups and your Landroid
®
M will mow for you
trouble-free, year after year, season after season. Donn’t wash the machine with high pressure squirt
gun. This may cause damage of the battery or the machine.
Winter storage
Even though it is tough, we would recommend that you store your Landroid®M in your shed or garage
during the Winter. Before storing it, give your Landroid
®
M a full recharge that will preserve its battery
from damage. You can then disconnect the plug of the charging base. A good tip to prolong the life of
the battery is to periodically re-charge it during the Winter. We'd also suggest that you cover the base
with a nylon sheet in Winter time.
Safety
Your Landroid®M is safe to human beings and pets. First of all, there’s a large clearance between the
outer border of the machine and the blades. Moreover, the tilt sensors will instantly stop the blades if
the unit is lifted from the ground.
Security
Your Landroid®M is protected by a PIN code. This PIN code prevents unauthorised people from being
able to use it. Once it’s taken outside its territory, it will not be possible to re-start it by anyone who
does not know the PIN code. This also means that you will not be able to start your Landroid
®
M if
you forget your PIN code! We strongly recommend that you write your PIN code here for future
reference. Even better, register your Landroid
®
M online at www.worxlandroid.com and record your
PIN code there. You'll be able to access your PIN code online any time.
1
3
2
4
Page 17

17
EN
Fault symptoms
If your Landroid®M does not work correctly, follow the trouble shooting guide below. If the fault persists, contact your dealer. Refer
to the Owner's Manual for Landroid
®
M component information.
Symptom Cause Action
Landroid
®
M turns on, but
the Blade Disc does not
move.
Landroid
®
M is searching for the Charging
Base.
This is normal, the Landroid
®
M needs to recharge, the
Blade Disc does not rotate while it is searching for the
Charging Base automatically.
Landroid
®
M vibrates.
Blades may be damaged. Check condition of
the Blade Disc.
Check the Blades, and replace them if damaged.
Clean the debris or foreign objects on the blades and
blade disc.
Grass is being cut
unevenly.
Landroid
®
M does not work enough hours
per day.
Add more hours to the mowing time.
Mowing area is too big.
Try decreasing the size of the mowing area or adding
more hours to the mowing time.
Blades are dull.
Change all the Blades and screws in order to balance
the Blade Disc.
The cutting height is set too low for the
length of the grass.
Raise the cutting height and then gradually lower.
Grass or other object has wrapped around
the blade disc.
Check the Blade Disc and remove the grass or other
object.
There is a build-up of grass in the Blade Disc
or Motor Frame Box.
Make sure the Blade Disc rotates easily. If needed, you
may take off the Blade Disc and then remove the debris.
See How to Clean.
The LED light on the
Charging base does not
turn on.
There is no power.
Check that the power cord is connected properly and
that the power source is sufficient.
Green light flashing on
charging base.
The Boundary Wire isn’t connected.
Check that the Boundary Wire has been connected
correctly or that it has not been broken off.
The charging time is far
more than 2h.
Poor connection caused by debris on the
Charging Strip.
Clean the Contact Pins located on the Charging Base
and the Charging Strip on the Landroid
®
M using a cloth.
The charging protection program has
activated due to high temperature.
Place the charging base in a shady area or wait until the
temperature has cooled down.
The mower does not
charge.
There is no power.
Check that the power cord is connected properly and
that the power source is sufficient.
The Boundary Wire isn’t connected.
Check that the Boundary Wire has been connected
correctly or that it has not been broken off.
Does not operate correctly while manually
charging.
Connect the charger base while the machine is off.
Before the LED light of the charging base turns green
from red, press ON/OFF Key to start charging. It is ok
when the screen display ”charging”.
Landroid
®
M is starting to
have shorter run-times
between charges.
Something is clogged in the Blade Disc.
Take off the Blade Disc and clean it.
The grass is too high and too thick.
Landroid
®
M is shaking heavily.
Check the Blade Disc and Blade, remove the grass or
other object.
The battery may be exhausted or old. Replace a new battery.
Landroid
®
M is not operating
at the correct time.
The clock is not set to the correct time. Set the clock.
The times set of the Landroid
®
M to start and
stop mowing are incorrect.
Change the time settings for the mower to start and
stop.
Landroid
®
M can not
correctly dock with the
Charging Base.
Environmental influences. Restart the Landroid
®
M.
The Green light on the
Charging Base turns
ON before charging is
complete.
The charging base is overheating, the LCD
will display “Over temperature”.
Place the charging base in a shady area or wait until the
temperature has cooled down.
The Landroid
®
M is on standby mode as it is
not the programmed working time.
It’s normal.
Page 18

18
EN
The Landroid®M is running
out of the boundary wire
area. Landroid
®
M can’t
mow some area in the
marked zone, sometimes
go back or rotate when
close to this area.
The boundary wire of another Landroid
®
M or
another branded robotic mower is positioned
too closely.
Ensure your Landroid
®
M Boundary Wire has at least 2 m
of spacing between the neighboring boundary wire.
The boundary wire has been installed with
sharp corners.
Check the boundary wire to ensure the corners are
smooth.
Electric current may leak in the joint between
boundary wires due to a broken or wet
connection.
Re-wrap the joint between boundary wires to ensure a
complete and waterproof connection
There is leakage of electric current in the
wire due to a broken insulation layer.
Re-wrap the damaged insulation layer to ensure a
complete and waterproof boundary wire.
The cutting area is far more than the
declared area.
Divide your lawn to separated areas, and mow them
respectively.
Landroid
®
M wheels skid or
wheels rip the grass up.
Landroid®M cover is stuck by branches and
followers, which may result in skipping when
it hits obstacles.
Make sure to clear up the branches or followers inside
Landroid
®
M’s cover, and surround the branches or
followers as an island to avoid further damage.
Rain or irrigation makes the grass wet. Please mow the grass when the grass is dry.
The Landroid
®
M exits the
boundary wire due to high
speed when going down a
hill.
The Boundary Wire is placed on a slope
steeper than 15°.
Reposition the Boundary Wire away from slopes that
are steeper than 15°. Please refer installation manual for
details.
Write your PIN code here:
Page 19

19
EN
Page 20

20
F
Comment installer votre Landroid®M
L'installation du Landroid®M est facile. Selon la taille de votre jardin, l'ensemble du processus ne prend que
peu de temps. Si vous êtes comme nous et que vous détestez passer votre précieux temps libre à tondre
de votre pelouse. Le Landroid
®
M sera votre meilleur investissement car il vous évite de tondre votre pelouse
régulièrement.
La vidéo de démonstration d'installation est disponible sur www.worxlandroid.com.
Landroid®M, la tondeuse idéale
Elle est conçue pour tondre souvent, et conserver une pelouse plus saine et plus belle. Selon la taille de
votre pelouse, la tondeuse Landroid
®
M peut être programmée pour fonctionner en tout temps ou fréquence
sans aucune restriction. Elle travaille à votre place.
Page 21

21
F
Contenu de la boîte
Préparation
Outils nécessaires
Écartomètre du fil de délimitation
Clé hexagonale
Ciseaux Marteau
Landroid
®
MStation de charge
Clous de
fixation
Piquets-fils
Bobine du fil de
délimitation
Manuel de
l'utilisateur
Déclaration de
garantie
Guide
d'installation
Lames de
rechange
Adaptateur
secteur
Guide de
programmation et
de dépannage
Page 22

22
F
Le nouveau domicile de votre
Landroid
®
M: le jardin
Examinons de plus près le nouveau domicile du Landroid®M: la pelouse, en mettant en évidence les zones
où il peut fonctionner en toute sécurité et les zones à éviter.
Lorsque le Landroid®M heurte un obstacle rigide, stable et
supérieur à 6 pouces-comme un mur ou une clôture, il s'arrête
tout simplement et s'en éloigne.
Obstacles
Les pierres lourdes ne pouvant être déplacées par votre
Landroid
®
M peuvent être heurtées sans risque. Toutefois, si la
pierre a une surface inclinée sur laquelle votre Landroid
®
M peut
grimper, vous devez soit la retirer ou l'exclure de la zone de travail.
Pierres
Si votre allée est au niveau de votre pelouse, sans surface saillante,
le Landroid
®
M peut librement y fonctionner. Si vous souhaitez que
le Landroid
®
M l'évite, alors il faut laisser un espace de 4 pouces*
entre le fil de délimitation et l'allée.
Si elle est couverte de gravier, le Landroid®M ne doit pas y
fonctionner. Dans ce cas, veuillez utiliser la jauge d'espacement, en
gardant un espace de 14 pouces* entre le fil de délimitation et l'allée.
* Il s'agit de la distance recommandée. Utilisez la jaune
d'espacement fournie pour garantir l'installation appropriée.
Allées
Vous ne voulez certainement pas que votre Landroid®M tonde
vos fleurs, ou tombe à l'eau. Ces zones doivent être évitées.
Parterres de fleurs, étangs, piscines...
Page 23

23
F
20°
Si des racines sortent du sol, il convient d'éviter cette zone afin
de ne pas endommager les racines.
Arbres
Dans le cas des grosses bosses ou des creux, veuillez vérifier
si les lames peuvent toucher le sol; si c'est le cas, il faut rendre
les pentes lisses ou exclure ces endroits des zones de travail de
votre Landroid
®
M.
Creux et bosses
Votre Landroid®M a la capacité de monter en toute sécurité des
pentes jusqu'à 20°, il convient donc d'éviter toute pente plus
raide que cela.
Pentes
Le fil de délimitation supérieur ne doit PAS être placé sur des
pentes plus raides que 20°. Le fil de délimitation supérieur
doit disposer d'une distance d'au moins 14 pouces entre les
obstacles. Le fil de délimitation inférieur ne doit PAS être placé
sur des pentes plus raides que 15°. Le fil de délimitation inférieur
doit disposer d'une distance d'au moins 18 pouces entre. les
obstacles lorsqu'il est positionné sur une pente de 15°.
Placement de fil de délimitation sur les pentes
Fil de délimitation supérieur
Fil de délimitation
inférieur
Fil de délimitation
inférieur
10°-20°
<
15°
14pouces
18pouces
Page 24

24
F
Délimitationde la zone de travail
du Landroid®M dans votre jardin
La station de charge doit être placée le long d'une ligne
droite, il convient de laisser six pieds à l'avant et à l'arrière. Si
possible, placez la station à l'ombre, car les batteries sont mieux
rechargées dans un endroit frais.
Pour commencer, il faut trouver le meilleur endroit pour la station de
charge, en tenant compte de l'emplacement de votre prise de courant
extérieure la plus proche. La station de charge dispose d'un cordon
d'alimentation d'une longueur de 50 pieds.
REMARQUE: Assurez-vous que l'adaptateur et la prise électrique sont
toujours dans un endroit sec.
Une île est une zone à l'intérieur de votre pelouse où vous
interdisez l'accès au Landroid
®
M. Le fil de délimitation va de
la limite de tonte, directement jusqu'à l'île, contourne l'île et
retourne à la limite, comme indiqué par les flèches sur la photo.
Assurez-vous que la surface est plane et sans obstacles.
Votre Landroid®M doit savoir où tondre. Raison pour laquelle vous devez marquer sa zone de travail à l'aide du fil de
délimitation qui formera une barrière invisible. Ce fil guidera également votre Landroid
®
M vers sa station de charge.
Si vos voisins utilisent également un Landroid
®
M, alors vous
devez garder un espace d'au moins 6 pieds entre votre fil de
délimitation et le leur.
Gardez à l'esprit que votre Landroid®M ne pourra pas recevoir un
signal du fil de délimitation au-delà de la distance de 60 pieds.
6
pi
6
pi
Page 25

25
F
La zone interdite proche de la limite de tonte devrait faire partie
de ladite limite, comme indiqué dans l'image.
Si le gazon possède deux ou plusieurs zones distinctes reliées au
moyen d'un couloir, ce dernier doit avoir au moins 3 pi de large.
In the case of two islands that are close to each other, it would be
convenient to lay out the wire as illustrated above.
The Landroid
®
M can travel freely over the boundary wire in
between the islands and the mowing boundary.
Si vos pelouses ne sont pas reliées par un couloir assez large, alors
il faudra déplacer votre Landroid
®
M et le poser sur l'autre pelouse.
Le Landroid
®
M tondra ce gazon sans problème, mais vous devrez
le ramener à la station de charge à l'épuisement de la batterie.
3pi
Page 26

26
F
Placez la station de charge à l'endroit prévu, sans la fixer de façon
permanente. La flèche « ENTRÉE » doit être orientée de manière à
indiquer l'intérieur de votre pelouse.
Fixation des piquets du fil de délimitation
Installation
Il est recommandé de commencer par tondre la pelouse où le fil sera installé à l'aide d'une tondeuse ordinaire ou
d'un coupe-gazon. De cette manière, le fil est disposé aussi près que possible du sol et le Landroid
®
M ne peut pas
le couper accidentellement. Le fil de délimitation est alimenté avec une tension très faible, il est donc sans risque
pour les êtres humains et les animaux domestiques.
1
La bobine du fil de délimitation se trouve sous la station de
charge.
Laissez environ 3 pieds de longueur de fil supplémentaire, à
partir de l'arrière de votre station de charge et commencer à
fixer les piquets du fil le long de la limite. Lorsque vous avez
terminé de placer le fil le long de la limite vers la station de
charge, laissez un autre mètre de fil supplémentaire, puis
coupez-le.
2
3
3
pi
Page 27

27
F
Lorsque vous créez une île avec le fil de délimitation, suivez le
chemin indiqué. Le fil doit partir du périmètre pour contourner l'île
définie et ensuite retourner au périmètre. Les fils de délimitation
entre l'île et le périmètre doivent être rapprochés et maintenus en
place par le même piquet. Pendant le fonctionnement, le Landroid
®
M
passera aisément sur cette partie du fil.
Assurez-vous que le fil de délimitation est parfaitement tendu à
chaque c oin.
6
5
Lors de la disposition du fil de
délimitation, utilisez la jauge
d'espacement pour conserver un
espace de 14 pouces* entre le fil
et la limite. Toutefois, dans le cas
d'un obstacle au niveau du sol,
sans danger pour le Landroid
®
M,
comme une allée ou un trottoir, un
espace de 4 po* est nécessaire.
Les piquets-fils doivent être
espacés d'environ 2,5 pi
Enfoncez les piquets dans le sol à
l'aide du marteau, évitez d'exercer
trop de pression sur le fil. Assurezvous que le fil de délimitation est
tendu et serré entre les piquets, il
ne doit pas être lâche.
* Il s'agit de la distance
recommandée. Utilisez la jaune
d'espacement fournie pour
garantir l'installation appropriée.
4
2.5pi
2.5pi
2.5pi
2.5pi
14pouces
14pouces
4pouces4pouces
14
pouces
Page 28

28
F
Raccordement de la station au fil de
délimitation
Coupez l'extrémité du fil à une longueur appropriée pour atteindre
les pinces.
Dénudez les deux extrémités du fil.
1
Lors du raccordement à la station de charge, vous verrez des
fils ENTRÉE et SORTIE, comme illustré. Connectez les fil
ENTRÉE et SORTIE respectivement aux pinces rouge et noire
de la station.
Ensuite, fermez le couvercle.
2
ENTRÉE
ENTRÉE
ENTRÉE
SORTIE
SORTIE
SORTIE
Page 29

29
F
Vous pouvez désormais fixer de manière permanente la station
de charge au sol en serrant les clous de fixation fournis à l'aide
de la clé hexagonale.
REMARQUE: Assurez-vous que le fil ENTRÉE fonctionne
directement à travers le tunnel sous la station de charge.
3
Mise en route et installation d'essai
Branchez le cordon d'alimentation à l'adaptateur, puis à la prise
électrique AC, le voyant de la station de charge s'allume. Si le
voyant est éteint, veuillez-vous référer au guide de dépannage.
Lors du raccordement, alignez l'encoche du connecteur
du cordon d'alimentation (a) à la rainure du connecteur
d'adaptateur (b).
Assurez-vous de visser ou dévisser uniquement la pièce en
surbrillance du connecteur.
Si le voyant vert ne s'allume pas, vérifiez les raccordements
électriques.
Si le cordon d'alimentation se trouve dans la zone de travail,
vous pouvez l'enfouir comme désiré.
4
Placez votre Landroid®M à
l'intérieur de la zone de travail, à
quelques pieds de l'arrière de la
station de charge.
1
C'est la phase la plus exaltante durant laquelle vous mettez votre Landroid®M en marche la première fois.
a
b
Page 30

30
F
09:00pm
Wed. 6-8-2012
7:00am ~ 12:00am
M T W T F S S
09:00pm
Wed. 6-8-2012
7:00am ~ 12:00am
M T W T F S S
09:00pm
Wed. 6-8-2012
7:00am ~ 12:00am
M T W T F S S
09:00pm
Wed. 6-8-2012
7:00am ~ 12:00am
M T W T F S S
09:00pm
Wed. 6-8-2012
7:00am ~ 12:00am
M T W T F S S
Ouvrez le couvercle du
panneau, appuyez sur le
bouton d'alimentation, veuillez
entrer le code PIN par défaut:
0000.
Appuyez sur le
bouton
et remettez le couvercle du
panneau de commande: Votre
Landroid
®
M va maintenant
retrouver son chemin vers sa
station de charge. Observez le
Landroid
®
M lorsqu'il retourne
à la station de charge et
modifier le positionnement du
fil de délimitation si nécessaire.
Lorsque le Landroid
®
M
retourne avec succès à la
station de charge, cela signifie
que l'installation est réussie !
À présent, votre Landroid
®
M
commence à charger.
2
• Si votre Landroid®M
est en dehors de sa
portée, il ne bougera pas
et l'affichage indiquera
l'erreur «outside the
boundary». (En dehors
du périmètre) Il suffit de
le ramener à l'intérieur
de sa portée et répétez
l'étape 2.
•
Si votre
Landroid®M
est à l'intérieur de sa
portée, mais l'affichage
indique «
outside the
boundary
»
(En dehors
du périmètre)
et le voyant
est allumé, cela signifie
que le raccordement
des extrémités du fil
de délimitation est
inapproprié. Il suffit de
les inverser.
• Votre Landroid®M doit
toujours rester allumé. Si
vous souhaitez l'éteindre,
alors assurez-vous de
le placer dans sa zone
de travail avant de le
remettre en marche.
• Si votre Landroid
®
M
cesse de fonctionner
inopinément, appuyez
simplement sur la touche
ON/OFF pour le mettre
en marche, et résoudre
les problèmes, puis
appuyez sur le bouton
Start.
REMARQUE: Si votre Landroid
®
M est sur la station de charge au moment programmé de tonte, appuyez sur STOP, puis
appuyez simplement sur le bouton (Start) Démarrer pour procéder à la tonte.
REMARQUE : Veuillez-vous référer au guide de programmation et de dépannage pour plus d'informations
Avertissement
Page 31

31
F
mm
20
30
40
50
60
W
h
e
n
b
l
a
d
e
d
i
s
c
i
n
v
e
r
t
e
d
,
r
e
a
d
t
h
i
s
d
i
a
l
.
mm
20
30
40
50
60
09:00pm
Wed. 6-8-2012
7:00am ~ 12:00am
M T W T F S S
Programmation
À la fin de l'installation, vous pouvez programmer les heures de travail du Landroid®M à l'aide de l'écran du clavier ci-dessous.
Veuillez-vous référer au guide de programmation et de dépannage fourni avec l'appareil.
Démarrage
Le Landroid®M est conçu pour garder votre gazon à une hauteur parfaite au cours de la saison, mais il n'est pas utile pour déboiser une jungle.
Avant le démarrage initial,
1. Vous devez tondre votre pelouse à la hauteur désirée.
2. Assurez-vous que la zone de travail est dégagée d'objets tels que des jouets et des branches...
3. Réglez la hauteur de coupe à son niveau maximum pour la première tonte puis ajustez à votre hauteur de pelouse préférée.
Au début du printemps suivant, laissez votre Landroid®M effectuez la tonte, quand l'herbe est encore courte, pour vous éviter une
tonte de gazon préliminaire.
Page 32

32
F
Affûtage
Il faut toujours porter des gants lors de l'affûtage des lames.
Le Landroid®M ne coupe pas l'herbe comme les autres tondeuses. Ses lames sont d'une netteté
remarquable sur toutes les quatre arêtes et tournent dans les deux directions pour une capacité de coupe
maximale. Chaque lame de votre Landroid
®
M possède quatre arêtes de coupe. En fonction de la fréquence
à laquelle le Landroid
®
M tond votre pelouse, les lames de coupe devront être retournées/pivotées de façon
périodique pour obtenir de nouvelle arête de coupe. Si votre Landroid
®
M est programmé pour tondre la
pelouse tous les jours, alors les lames de coupe devront être tournées mensuellement pour de meilleurs
résultats de tonte. Chaque lame de coupe peut durer jusqu'à 4 mois lorsqu'elle est programmée pour
tondre tous les jours. Lorsque les lames de coupe sont ternes et usées, elles devraient être remplacées par
les lames de rechange fournies avec votre Landroid
®
M. Les lames de rechange sont également disponibles
chez votre revendeur WORX le plus proche.
Entretien
Votre Landroid®M est conçu et fabriqué pour rester à l'extérieur, indépendamment des mauvaises conditions
atmosphériques. Il suffit de nettoyer régulièrement le châssis pour le débarrasser des accumulations d'herbe
et votre Landroid
®
M coupera votre gazon, sans problème, année après année, saison après saison. Ne lavez
pas la machine à l'aide d'un pistolet à eau haute pression. Cela pourrait endommager la batterie ou la machine.
Stockage hivernal
Ainsi, même si cela n'est pas évident, il est recommandé de stocker votre Landroid®M dans votre hangar ou
un garage pendant l'hiver. Avant de le ranger, il convient de faire une charge complète de votre Landroid
®
M
qui lui permettra de préserver sa batterie contre les dommages. Vous pouvez alors débrancher la fiche de la
station de charge. Pour prolonger la durée de vie de la batterie, il est conseillé de la recharger périodiquement
au cours de l'hiver. Nous vous suggérons de couvrir la station avec une feuille de nylon pendant l'hiver.
Sécurité
Votre
Landroid®M
est sans risque pour les êtres humains et les animaux domestiques. Tout d'abord, il existe un
jeu important entre le bord extérieur de la machine et les lames. En outre, les capteurs d'inclinaison arrêteront
instantanément les lames lorsque la machine est soulevée du sol.
Sécurité
Votre Landroid®M est protégé par un code PIN. Ce code PIN empêche les personnes non autorisées d'utiliser la
tondeuse. Lorsqu'il est hors de sa zone de travail, il ne peut être redémarré par les personnes ignorant le code
PIN. Cela implique aussi qu'il vous sera impossible de démarrer votre Landroid
®
M si vous oubliez votre code
PIN ! Nous vous recommandons vivement de noter votre code PIN pour référence ultérieure. Il serait préférable
d'enregistrer votre Landroid
®
M en ligne ainsi que le code PIN à l'adresse www.worxlandroid.com. Vous aurez
accès à votre code PIN en ligne à tout moment.
1
3
2
4
Page 33

33
F
Symptômes de défauts
Si votre Landroid®M ne fonctionne pas correctement, suivez les instructions du guide de dépannage ci-dessous. Si le problème
persiste, contactez votre revendeur. Reportez-vous au manuel de l'utilisateur pour les informations sur les composants Landroid
®
M.
Symptôme Cause Action
Le Landroid
®
M s’allume,
mais le disque des lames
ne bouge pas.
Le Landroid
®
M est à la recherche de la
station de charge.
C’est normal, le Landroid
®
M doit charger, le disque des
lames ne tourne pas lorsque l'appareil recherche sa
station de charge automatiquement.
Le Landroid
®
M vibre.
Les lames peuvent être endommagées.
Vérifiez l'état du disque des lames.
Vérifiez les lames et remplacez-les si elles sont
endommagées. Enlevez les débris ou objets étrangers
sur les lames et le disque des lames.
L'herbe est coupée de
manière irrégulière.
Le Landroid
®
M ne fonctionne pas assez
d'heures par jour.
Ajoutez plus d'heures au temps de tonte
La surface de tonte est trop vaste.
Diminuez la surface de tonte ou ajoutez plus d'heures au
temps de tonte.
Les lames sont ternes.
Changez toutes les lames et les vis afin d'équilibrer le
disque des lames.
La hauteur de coupe est réglée sur basse
pour la hauteur de l'herbe.
Augmentez la hauteur de coupe, puis réduisez-la
progressivement.
L'herbe ou d'autres objets sont enroulés
autour du disque des lames.
Vérifiez le disque des lames et retirez-y l'herbe ou tout
autre objet.
Il y a une accumulation d'herbes dans le
disque des lames ou sur le boîtier du moteur.
Assurez-vous que le disque tourne aisément. Si
nécessaire, vous pouvez retirer le disque des lames puis
enlever les débris. Voir la partie Nettoyage.
Le voyant de la station de
charge ne s'allume pas.
Absence d'alimentation.
Vérifiez que le cordon d'alimentation est correctement
connecté et que la source d'alimentation est suffisante.
Voyant vert clignotant sur
la station de charge.
Le fil de délimitation n'est pas connecté.
Vérifiez que le fil de délimitation est connecté
correctement ou qu'il n'a pas été rompu.
Le temps de charge est
supérieur à 2h.
Mauvais raccordement causé par des débris
sur la bande de charge.
Nettoyez les bornes de contact de la station de charge
et la bande de charge située sur le Landroid
®
M à l'aide
d'un chiffon.
Le programme de protection de charge est
activé en raison d'une température élevée.
Placez la station de charge dans une zone ombragée ou
attendez que la température baisse.
La tondeuse ne charge pas.
Absence d'alimentation.
Vérifiez que le cordon d'alimentation est correctement
connecté et que la source d'alimentation est suffisante.
Le fil de délimitation n'est pas connecté.
Vérifiez que le fil de délimitation est connecté
correctement ou qu'il n'a pas été rompu.
Ne fonctionne pas correctement lors de la
charge manuelle.
Connectez la station de charge lorsque la machine est
à l'arrêt. Avant que le voyant de la station de charge ne
passe du rouge au vert, appuyez sur le bouton ON/OFF
pour lancer la charge. L'opération de charge est en cours
lorsque l'écran affiche « charging » (en charge).
Le Landroid
®
M a des
temps de fonctionnement
plus courts entre les
charges.
Un objet est coincé dans le disque des
lames.
Retirez le disque et nettoyez-le
L'herbe est trop haute et trop épaisse.
Le Landroid
®
M secoue fortement.
Vérifiez le disque des lames ainsi que les lames et
retirez-y l'herbe ou tout autre objet.
La batterie est probablement épuisée ou
vieille.
Placez une nouvelle batterie.
Le Landroid
®
M ne
fonctionne pas à l'heure
prévue.
L'horloge n’est pas réglée à l'heure correcte. Réglez l'horloge.
Les heures définies sur le Landroid
®
M pour
le démarrage et l'arrêt de la tonte sont
erronées.
Modifiez les paramètres de temps de démarrage et
d'arrêt de la tondeuse.
Le Landroid
®
M ne s'amarre
pas correctement à sa
station de charge.
Influences environnementales. Redémarrez le Landroid
®
M.
Page 34

34
F
Notez votre code PIN ici:
Le voyant vert de la station
de charge s'allume avant la
fin de la charge.
La station de charge surchauffe, l'écran LCD
affiche « Over temperature » (Surchauffe).
Placez la station de charge dans une zone ombragée ou
attendez que la température baisse.
Le Landroid
®
M est en mode veille car ce
n'est pas l'heure de travail programmée.
C'est normal.
Le Landroid
®
M fonctionne
hors de la zone du fil de
délimitation. Le Landroid
®
M
ne peut pas tondre
une partie dans la zone
marquée, parfois il va en
arrière ou tourne lorsqu'il
est près de cette zone.
Le fil de délimitation d'un autre Landroid
®
M
ou d'une tondeuse robot d'une autre marque
est positionné trop près.
Assurez-vous que le fil de délimitation de votre
Landroid
®
M a au moins 2 m de distance avec le fil du
voisin.
Le fil de délimitation a été installé avec des
angles vifs.
Vérifiez le fil de délimitation pour vous assurer que les
coins sont arrondis.
Le courant électrique peut s'échapper dans
le joint entre les fils de délimitation en raison
d'une connexion rompue ou humide.
Enveloppez à nouveau le joint entre les fils de
délimitation pour assurer une connexion complète et
étanche.
Il existe un courant de fuite dans le fil à
cause d'une couche d'isolation rompue.
Enveloppez à nouveau la couche d'isolation
endommagée pour obtenir un fil de délimitation complet
et étanche.
La zone de coupe est supérieure à la
superficie déclarée.
Divisez votre pelouse en zones distinctes et faites-les
tondre respectivement.
Les roues du Landroid
®
M
dérapent ou déchirent
l'herbe.
Le couvercle du Landroid
®
M est coincé
par des branches, ce qui peut causer des
dérapages lorsqu'il heurte des obstacles.
Veuillez enlever les branches à l'intérieur du couvercle
du Landroid
®
M, et entourez les branches comme une île
pour éviter d'autres dommages.
La pluie ou l'arrosage rendent l'herbe
humide.
Veuillez tondre le gazon lorsque l'herbe est sèche.
Le Landroid
®
M sort de la
portée du fil de délimitation
en raison de la vitesse
élevée lorsqu'il dévale une
colline.
Le fil de délimitation est placé sur une pente
avec une inclinaison supérieure à 15°.
Repositionnez le fil de délimitation loin des pentes
dont l'inclinaison est supérieure à 15°. Veuillez-vous au
référer manuel d'installation pour plus de détails.
Page 35

35
F
Page 36

36
ES
Cómo instalar su Landroid®M
La instalación del Landroid®M es sencilla. Dependiendo del tamaño de su jardín, el proceso completo
sólo toma muy poco tiempo. Si usted es como nosotros, debe odiar desperdiciar su preciado tiempo libre
cortando su césped. El Landroid
®
M probará ser su mejor inversión eliminando la necesidad de cortar su
césped nunca más.
Puede ver el vídeo de demostración de instalación en www.worxlandroid.com.
El Landroid®M ama cortar el césped
Está diseñado para podar a menudo, manteniendo un césped más saludable y mejor apariencia que nunca
antes. Dependiendo del tamaño de su césped, el Landroid
®
M se puede programar para operar en cualquier
momento o frecuencia sin restricciones. Está aquí para trabajar para usted.
Page 37

37
ES
Contenido
Preparación
Herramientas necesarias
Calibrador de distancia
de alambre de límite
Llave hexagonal
Tijeras Martillo
Landroid
®
MBase de carga
Clavos de
fijación de base
Patas de
alambre
Carrete de alambre
de límite
Manual del
propietario
Declaración de
garantía
Guía de
instalación
Aspas de
repuesto
Adaptador de
energía
Guía de programación
y solución de
problemas
Page 38

38
ES
El nuevo hogar de Landroid®M –
su jardín
Comencemos por ver más de cerca el nuevo hogar del Landroid®M —su césped— delimitando las áreas
donde puede ir con seguridad y las áreas que es mejor que evite el Landroid
®
M.
Cuando golpee cualquier obstáculo que sea rígido, estable y
más alto a 6 pulgadas —tal como una pared o una cerca— su
Landroid
®
M simplemente se detendrá y se redirigirá lejos del
obstáculo.
Obstáculos que pueden ser golpeados
Las piedras que sean suficiente pesadas para no ser movidas
por su Landroid
®
M pueden ser golpeadas con seguridad. Sin
embargo, si cualquier piedra tiene una superficie inclinada que
pueda subir su Landroid
®
M, debe retirarla o excluirla del área
de trabajo.
Piedras
Si su entrada de cochera está nivelada con su césped, sin ninguna
superficie sobresaliente, el Landroid
®
M puede operar libremente
sobre ella. Si desea que el Landroid
®
M la evite, entonces sólo se
necesita un espacio de 4 pulgadas*entre el alambre de límite y la
entrada de la cochera. Si está cubierta con grava, no debe permitir
que el Landroid
®
M pase sobre ella, usando el calibrador de distancia
para realizar el espacio en este caso, manteniendo un espacio de
14 pulgadas* entre el alambre de límite y la entrada de la cochera.
* Ésta es la distancia recomendada. Use el calibrador de distancia
incluido para asegurar la instalación adecuada.
Entradas de cochera
En realidad no desea que su Landroid®M pode sus flores, o
caiga dentro de agua. Se deben evitar estas áreas.
Canteros, estanques, piscinas...
Page 39

39
ES
20°
Si hay raíces que emerjan del suelo, se debe evitar esta área para
no dañar las raíces.
Árboles
En el caso de protuberancias o hundimientos grandes, por favor
considere si las aspas podrían tocar el suelo; si éste es el caso,
haga las inclinaciones más uniformes o excluya tales áreas de la
operación de su Landroid
®
M.
Hundimientos y protuberancias
Su Landroid®M tiene la capacidad de subir inclinaciones hasta de
20°, así que evite cualquier inclinación mayor a esto.
Inclinaciones
El Alambre de límite superior NO se debe colocar en inclinaciones
mayores a 20°. El Alambre de límite superior debe tener una
distancia de por lo menos 14 pulgadas entre cualquier obstáculo.
El Alambre de límite inferior NO se debe colocar en inclinaciones
mayores a 15°. El Alambre de límite inferior debe tener una
distancia de por lo menos 18 pulgadas entre cualquier obstáculo
cuando se coloque sobre una inclinación que tenga 15°.
Colocación de alambre de límite en inclinaciones
Alambre de límite superior
Alambre de límite
inferior
Alambre de
límite inferior
10°-20°
<
15°
14 pulgadas
18pulgadas
Page 40

40
ES
Marcado del territorio del
Landroid®M dentro de su jardín
La base de carga se debe colocar a lo largo de una línea recta—
permita 6 pies tanto al frente como en la parte trasera. Si es
posible, coloque la base de carga en la sombra—las baterías
cargan mejor en un lugar fresco.
En primer lugar, localice el mejor punto para la base de carga, tomando
en cuenta dónde se encuentra el tomacorriente para exteriores más
cercano. La base de carga tiene un cable de energía de 50 pies.
NOTA: Asegúrese que el adaptador y el receptáculo eléctrico se
mantengan en una área seca en todo momento.
Una isla es una área que se encuentra dentro de su césped
donde no desea que entre el Landroid
®
M. El alambre de límite
comienza desde el límite de poda, va directo a la isla, alrededor
de ésta y de regreso al límite como se muestra por las flechas
de la imagen.
Asegúrese que esté sobre una área plana, libre de cualquier obstáculo.
Su Landroid®M necesita saber dónde podar. Por eso necesita marcar su área de trabajo con un alambre de límite que
formará una cerca invisible. Este alambre también guiará a su Landroid
®
M a su base de carga.
Si su vecino también usa un Landroid
®
M, entonces debe
mantener un espacio de por lo menos 6 pies entre su Alambre
de límite y el de su vecino.
Por favor asegúrese que su Landroid
®
M no pueda recibir una
señal del Alambre de límite más allá de la distancia de 60 pies.
6
pies
6
pies
Page 41

41
ES
Una área prohibida que está cerca al límite de podado debe ser
parte del mismo límite, como se muestra en la imagen.
Si su césped tiene dos o más áreas separadas conectadas entre
sí por medio de un corredor, debe tener por lo menos 3 pies de
ancho.
En el caso que dos islas estén cerca entre sí, sería conveniente
distribuir el cable como se ilustra anteriormente.
El Landroid
®
M puede viajar libremente sobre el alambre de límite
entre las islas y el límite de podado.
Si su césped no está conectado por un corredor que sea lo
suficiente ancho, entonces tendrá que levantar su Landroid
®
M y
moverlo al otro césped. Landroid
®
M ahora podará este césped sin
problema, pero tendrá que regresarlo a la base de carga cuando se
agote la batería.
3pies
Page 42

42
ES
Coloque la Base de carga en su punto designado, sin fijarlo de forma
permanente. La flecha “IN” debe estar orientada de forma que
indique el interior de su césped.
Colocación de alambre de límite
Instalación
Recomendamos que primero pode el césped donde se colocará el alambre con una podadora normal o una
segadora. Esto asegura que el alambre se coloque tan cerca al suelo como sea posible de forma que el Landroid
®
M
no corte accidentalmente el alambre. El alambre de límite es alimentado por muy bajo voltaje de forma que es
completamente seguro para personas y mascotas.
1
Coloque el alambre de límite a través del túnel debajo de la
base de carga.
Dejando aproximadamente 3 pies de longitud de alambre
adicional, comience desde la parte trasera de su base de carga
y comience a colocar el alambre con espigas a lo largo del
límite. Cuando termine de colocar el alambre a lo largo del límite
de regreso a la base de carga, deje otros 3 pies de alambre
adicional y córtelo.
2
3
3
pies
Page 43

43
ES
Cuando realice una isla con el alambre de límite, siga la trayectoria
como se muestra. El alambre debe correr desde el perímetro para
marcar la isla definida y después regresar al perímetro. El alambre de
límite entre la isla y el perímetro debe colocarse cerca y mantenerse
en su lugar por la misma clavija de alambre. Durante la operación, el
Landroid
®
M podrá pasar libremente sobre esta parte del alambre.
Asegúrese que el Alambre de límite esté perfectamente recto en
cada esquina.
6
5
Cuando coloque el alambre
de límite, use el calibrador de
distancia para mantener un
espacio de 14 pulgadas* entre el
alambre y el límite. Sin embargo,
en el caso de un obstáculo que
esté nivelado con el suelo y sea
seguro para que el Landroid
®
M
opere sobre él, tal como una
entrada de cochera o acera,
entonces sólo se necesita un
espacio de 4 pulgadas*.
Cada clavija de alambre se debe
colocar aproximadamente a 2.5
pies entre cada una.
Golpee las clavijas al suelo con la
ayuda del martillo, aunque evite
poner demasiada presión sobre
el alambre. Mantenga el alambre
de límite recto y apretado entre
las clavijas, no debe haber ningún
alambre holgado.
* Ésta es la distancia
recomendada. Use el calibrador
de distancia incluido para asegurar
la instalación adecuada.
4
2.5pies
2.5pies
2.5pies
2.5pies
14pulgadas
14pulgadas
4pulgadas4pulgadas
14
pulgadas
Page 44

44
ES
Conectar la base al alambre de límite
Corte el extremo del alambre a una longitud que sea
conveniente para alcanzar los sujetadores.
Descubra los dos extremo del alambre.
1
Cuando conecte a la base de carga habrá un alambre IN
(entrada) y un alambre OUT (salida), como se muestra. Conecte
el alambre IN al sujetador rojo de la base de carga y el alambre
OUT al sujetador negro.
Después cierre la cubierta.
2
ENTRADA
ENTRADA
ENTRADA
SALIDA
SALIDA
SALIDA
Page 45

45
ES
Ahora puede fijar de forma permanente la base de carga
sobre el suelo al apretar los Clavos de fijación de la base
incluidos con la llave hexagonal incluida.
NOTA: Asegúrese que el alambre IN esté colocado recto a
través del túnel debajo de la base de carga.
3
Encienda y pruebe la instalación
Conecte el cable de energía al adaptador y después al
receptáculo eléctrico CA, el LED en la base de carga se
encenderá. Si el LED está apagado, por favor consulte la guía
de Solución de problemas.Cuando lo conecte, alinee la ranura
sobre el conector del cable de energía (a) con la ranura sobre el
conector del adaptador (b).
Asegúrese de sólo atornillar o desatornillar la pieza resaltada del
conector.
Si la luz verde no se enciende, entonces revise las conexiones
de energía.
En el caso que el cable de energía esté dentro del área de
trabajo, puede enterrarlo conforme se necesite.
4
Coloque su Landroid®M dentro
del área de trabajo, a unos
cuantos pies desde la parte
posterior de la base de carga.
1
Ésta es la emocionante parte cuando puede encender su Landroid®M por primera vez.
a
b
Page 46

46
ES
09:00pm
Wed. 6-8-2012
7:00am ~ 12:00am
M T W T F S S
09:00pm
Wed. 6-8-2012
7:00am ~ 12:00am
M T W T F S S
09:00pm
Wed. 6-8-2012
7:00am ~ 12:00am
M T W T F S S
09:00pm
Wed. 6-8-2012
7:00am ~ 12:00am
M T W T F S S
09:00pm
Wed. 6-8-2012
7:00am ~ 12:00am
M T W T F S S
Abra la cubierta del tablero,
presione el botón de
encendido, ingrese el NIP
predeterminado 0000.
Presione la tecla
y cierre la
cubierta del tablero de control:
Su Landroid
®
M ahora
encontrará su camino a la
base de carga. Observe el
Landroid
®
M conforme regrese
a la base de carga y modifique
la colocación del alambre de
límite si es necesario. Cuando
el Landroid
®
M regrese con
éxito a la base de carga,
¡significa que la instalación
se completó con éxito! Ahora
su Landroid
®
M comenzará a
cargar completamente.
2
• Si su Landroid®M
está fuera de su
territorio, no se moverá
y la pantalla indicará
el error ”outside the
boundary” (Fuera de
límite). Sólo muévalo
dentro de su territorio y
repita el paso 2.
•
Si su
Landroid®M
está
dentro de su territorio
pero la pantalla dice
”outside the boundary”
(Fuera de límite)
y el LED
está encendido, significa
que conectó lo extremos
del alambre de límite de
manera incorrecta. Sólo
inviértalos.
• Su Landroid®M siempre
debe permanecer
conectado. Si alguna
vez necesita apagarlo,
entonces asegúrese de
colocarlo dentro de su
área de límite antes de
volver a encenderlo.
• Si su Landroid
®
M deja de
operar inesperadamente,
sólo presione su tecla
ON/OFF a ON, corrija los
problemas, y presione el
botón Start.
NOTA: Si su Landroid
®
M está en la base de carga durante una hora que programó para que podara, presione STOP, y vuelva a
presionar el botón Start (Inicio) para continuar con la poda.
NOTA: Por favor consulte la Guía de programación y solución de problemas para mayor información
Advertencia
Page 47

47
ES
mm
20
30
40
50
60
W
h
e
n
b
l
a
d
e
d
i
s
c
i
n
v
e
r
t
e
d
,
r
e
a
d
t
h
i
s
d
i
a
l
.
mm
20
30
40
50
60
09:00pm
Wed. 6-8-2012
7:00am ~ 12:00am
M T W T F S S
Programación
Al terminar la instalación, ahora es momento de programar el Landroid®M cuando desee que vaya a trabajar usando la pantalla de
teclado mostrada a continuación. Por favor consulte la Guía de programación y solución de problemas incluida en el empaque.
¿Listo para iniciar?
El Landroid®M está diseñado para mantener su césped en una longitud perfecta durante la temporada, pero no está diseñado para
deforestar una selva. Antes de arrancarlo por primera vez,
1. Debe podar su césped a la altura deseada.
2. Asegúrese que el área de operación esté libre de objetos tales como juguetes y ramas..
3. Ajuste la altura de corte a su nivel máximo para la primera poda y después ajuste a la altura de césped que prefiera.
La siguiente primavera, permita que su Landroid®M comience a podar antes, cuando el césped todavía esté corto, de forma que
pueda evitar un corte de césped preliminar.
Page 48

48
ES
Manténgalo afilado
Ssiempre use guantes cuando ajuste las aspas.
El Landroid
®
M no corta césped como otras podadoras. Sus Aspas son afiladas en los 4 bordes y giran en
ambas direcciones para una máxima capacidad de corte. Cada aspa de su Landroid
®
M tiene 4 bordes de
corte. Dependiendo de la frecuencia que el Landroid
®
M pode su césped, las aspas de corte necesitarán
voltearse/girarse periódicamente para un nuevo borde de corte. Si su Landroid
®
M está programado
para podar el césped todos los días entonces las aspas de corte se necesitan girar mensualmente
para mejores resultados de corte. Cada aspa de corte durará hasta 4 meses cuando esté programada
para podar cada día. Cuando las aspas de corte estén romas y desgastadas, se deben reemplazar con
las aspas de repuesto incluidas con su Landroid
®
M. También hay aspas de repuesto disponibles en su
minorista WORX más cercano.
Mantenimiento
Su Landroid®M está diseñado y fabricado para permanece en exteriores sin importar las condiciones
adversas. Sólo limpie periódicamente su cubierta de acumulación de recortes de césped y su Landroid
®
M
podará libre de problemas, año tras año, temporada tras temporada. No lave la máquina con pistola de
chorro de alta presión. Esto puede causar daño a la batería o la máquina.
Almacenamiento en invierno
Aunque es resistente, recomendaríamos que almacene su Landroid®M en su cobertizo o cochera durante
el invierno. Antes de almacenarlo, cargue su Landroid
®
M completamente para preservar su batería contra
daño. Entonces puede desconectar el enchufe de la base de carga. Un buen consejo para prolongar la vida
de la batería es recargarla periódicamente durante el invierno. También sugerimos que cubra la base con
una hoja de nylon durante el invierno.
Seguridad
Su Landroid®M es seguro para personas y mascotas. Antes que nada, hay un espacio grande entre el
borde exterior de la máquina y las aspas. Además, los sensores de inclinación detendrán de inmediato las
aspas si la unidad se levanta del suelo.
Protección
Su Landroid®M está protegido por un código NIP. Este código NIP evita que personas no autorizadas
puedan usarlo. Una vez que sale de su territorio, no será posible que alguien que no conoce el código
NIP vuelva a encenderlo. ¡Esto también significa que no podrá arrancar su Landroid
®
M si olvida su código
NIP! Recomendamos ampliamente que escriba su propio código NIP aquí para referencia futura. Incluso
mejor, registre su Landroid
®
M en línea en www.worxlandroid.com y registre su código NIP ahí. Usted
podrá tener acceso a su código NIP en línea en cualquier momento.
1
3
2
4
Page 49

49
ES
Síntomas de falla
Si su Landroid®M no funciona correctamente, siga la guía de solución de problemas a continuación. Si la falla continúa, póngase en
contacto con su Distribuidor. Consulte el Manual del propietario respecto a información de componentes del Landroid
®
M.
Síntoma Causa Acción
Landroid
®
M se enciende,
pero el Disco de aspa no se
mueve
Landroid
®
M busca la Base de carga.
Esto es normal, el Landroid
®
M necesita recargarse, el
Disco de aspa no gira mientras está buscando la Base
de carga automáticamente.
El Landroid
®
M vibra
Las aspas pueden estar dañadas. Revise la
condición del Disco de aspa.
Revise as Aspas, y reemplácelas si están dañadas.
Limpie los desechos u objetos extraños sobre las aspas
y el disco de aspa.
El césped se corta
irregularmente
Landroid
®
M no funciona suficientes horas al
día.
Agregue más horas al tiempo de podado
El área de podar es muy grande.
Intente disminuir el tamaño del área de podar o agregar
más horas al tiempo para podar
Las aspas no tienen filo.
Cambie todas las Aspas y los tornillos para balancear el
Disco de aspa.
La altura de corte está ajustada en bajo para
la longitud del césped.
Levante la altura de corte y bájela gradualmente
Se atoró césped u otro objeto alrededor del
disco de aspa.
Revise el Disco de aspa y retire el césped u otro objeto.
Hay acumulación de césped en el Disco de
aspa o la caja del marco del motor
Asegúrese que el Disco de aspa gire fácilmente. Si se
necesita, puede retirar el Disco de aspa y retirar los
desechos. Vea Cómo limpiar
La luz LED en la Estación
de carga no se enciende
No hay energía
Revise que el cable de energía esté conectado
adecuadamente y que la fuente de energía sea
suficiente
Parpadea la luz verde en la
base de carga
El Alambre de límite no está conectado
Revise que el Alambre de límite se haya conectado
correctamente o que no se haya roto
El tiempo de carga es
mucho mayor a 2h.
Conexión deficiente causada por desechos
en la Franja de carga.
Limpie las clavijas de contacto ubicadas en la Base de
carga y la franja de carga en el Landroid
®
M con una tela
El programa de protección de carga se activó
debido a alta temperatura
Coloque la base de carga en una área sombreada o
espere hasta que baje la temperatura.
La podadora no carga
No hay energía
Revise que el cable de energía esté conectado
adecuadamente y que la fuente de energía sea
suficiente.
El Alambre de límite no está conectado
Revise que el Alambre de límite se haya conectado
correctamente o que no se haya roto
No opera correctamente mientras carga
manualmente
Conecte la base del cargador mientras la máquina esté
apagada. Antes que la luz LED de la base de carga
cambie de verde a roja, presione la tecla ON/OFF para
comenzar a cargar. Está bien cuando la pantalla muestra
”charging” (cargando).
Landroid
®
M comienza a
tener tiempo de operación
más cortos entre cargas
Hay algo atorado en el Disco de aspa
Retire el Disco de aspa y límpielo
El césped está demasiado alto y demasiado grueso.
Landroid
®
M vibra pesadamente.
Revise el Disco de aspa y el aspa, y retire el césped u
otro objeto.
La batería puede estar agotada o ser vieja Reemplace con una batería nueva.
Landroid
®
M no funciona en
el tiempo correcto.
El reloj no está ajustado a la hora correcta Ajuste el reloj
Los tiempos ajustados del Landroid
®
M para
comenzar y dejar de podar son incorrectos
Cambie los ajustes de tiempo para que la podadora
inicie y deje de operar
Landroid
®
M no se puede
acoplar correctamente con
la Base de carga
Influencias ambientales Vuelva a arrancar el Landroid
®
M
Page 50

50
ES
Escriba su código NIP aquí:
La luz Verde en la Base de
carga se enciende antes
que se complete la carga
La base de carga se sobrecalienta, la pantalla
LCD mostrará “Over temperature” (Sobre
temperatura)
Coloque la base de carga en una área sombreada o
espere hasta que baje la temperatura
Landroid
®
M está en modo de espera ya que
no es el tiempo de operación programado.
Es normal
El Landroid
®
M está
saliendo del área del
alambre de límite.
Landroid
®
M no puede
podar alguna área en la
zona marcada, a veces
regresa y gira cuando está
cerca de esta área.
El alambre de límite de otro Landroid
®
M
o podadora robótica de otra marca está
colocado demasiado cerca.
Asegúrese que el alambre de límite de su Landroid®M
tenga por lo menos 2 m de espacio entre el alambre de
límite cercano.
El alambre de límite se instaló como
esquinas cerradas.
Revise el alambre de límite para asegurar que las
esquinas sean uniformes.
La corriente eléctrica se puede fugar en la
unión entre los alambres de límite debido a
una conexión rota o húmeda.
Vuelva a envolver la unión entre los alambres de límite
para asegurar una conexión completa y a prueba de
agua
Hay una fuga de corriente eléctrica en el
alambre debido a una capa de aislamiento
rota.
Vuelva a envolver la capa de aislamiento dañada para
asegurar un alambre de límite completo y a prueba de
agua.
El área de corte es mucho mayor que el área
declarada.
Divida su césped en áreas separadas, y pódelas por
separado.
Las ruedas del Landroid
®
M
se patinan o arrancan el
césped.
La cubierta del Landroid
®
M está atorada por
ramas y seguidores, lo que puede resultar en
deslizamiento cuando golpea obstáculos.
Asegúrese de limpiar las ramas o seguidores dentro
de la cubierta del Landroid
®
M, y rodee las ramas y
seguidores como una isla para evitar daño adicional.
La lluvia o riego humedecen el césped. Por favor pode el césped cuando esté seco.
El Landroid
®
M sale del
alambre de límite debido
a alta velocidad cuando va
cuesta abajo
El Alambre de límite está colocado en una
pendiente mayor a 15°.
Vuelva a colocar el Alambre de límite lejos de
pendientes mayores a 15°. Por favor consulte el manual
de instalación respecto a detalles.
2CLM81BPK12000A0
Page 51

Page 52

www.worxlandroid.com
 Loading...