

Page 1

LCD/LED 3280W CURVED
Page 2

Operation Instructions
Thank you for purchasing this monitor, a high-resolution multi-scan color monitor.
Please read this guide thoroughly before installation.
FCC RADIO FREQUENCY INTERFERENCE STATEMENT
WARNING: (FOR FCC CERTIFIED MODELS)
This monitor has bee n tes ted a nd f ound c omp li ant w ith the limit s for a Cl ass B dig it al dev i ce,
pursuant to part 15 of the FCC Rules. These limits are designed to provide proper
protection against harmful interference to a residential installation. This monitor generates,
uses, and can radiat e r adi o freq ue nc y ener gy. Harm ful i nterference to radio communication
may be led as a r esult if it‘s not proper ly installed and used. H owever, ther e i s no guarantee
that interference will not occur in a particular installation. If this monitor does cause serious
interference to radio or television reception, resetting the monitor may determine it.
Moreover, users are encouraged to correct interference by doing one or more of the
following:
Reorient or relocate the receiving antenna.
Move the monitor and the receiver further away from each other.
Connect the monit or i n to a n outlet on a circuit dif f er en t fro m that to which the receiver i s
connected.
Consult your local dealer or an qualified technician.
FCC Warning:
To assure a continued FCC compliance, a user must use a grounded power supply cord
and the provided shielded video interface cable with bonded ferrite cores. Also, any
unauthorized changes or modifications to this monitor would void the user‘s authority to
operate this device.
Note: If necessary, shielded interface cables and AC power cord must be used to meet the
emission level limits.
Page 3

Content
Safety Precautions ............................................................................................................... 1
First Setup ........................................................................................................................... 2
Quick Installation ................................................................................................................. 3
Installing the LCD Monitor .................................................................................................... 4
Front View of the Product .................................................................................................... 6
Rear View of the Product ..................................................................................................... 7
Using On Screen Display (OSD) Functions ......................................................................... 8
Supporting Timing Modes .................................................................................................. 11
Technical Information......................................................................................................... 12
Care and Maintenance....................................................................................................... 13
Troubleshooting ................................................................................................................. 13
Page 4

Safety Precautions
This monitor is manufactur ed and test ed on a g r ound pri nci pl e that a us er ’ s sa fety comes
first. However, improper use or installation may result danger to the monitor as well as to
the user. Careful ly go over the foll ow ing WARN INGS be fore i nst allati on and kee p this g ui de
handy.
WARNINGS:
This monitor should be operated only at the correct power sources indicated on the
label on the rear end of the monitor. If you’re unsure of the power supply in your
residence, consult your local dealer or power company.
Do not try to repair the monitor yourself as it contains no user-servi ceabl e parts. The
monitor should only be repaired by a qualified technician.
Do not remove the monitor cabinet. There is high-voltage parts inside that may cause
electric shock to human bodies, even when the power cord is disconnected.
Stop using the monitor if the cabinet is damaged. Have it checked by a service
technician.
Put your monitor only in a clean, dry environment. Unplug the monitor immediately if
gets wet and consult your service technician.
Always unplug the monitor before cleaning it. Clean the cabinet with a clean, dry cloth.
Apply non-ammonia based cleaner onto the cloth, not directly onto the glass screen.
Keep the monitor away from magnetic objects, motors, TV sets, and transformer.
Do not place heavy objects on the cable or power cord.
For PLUGGABLE EQUIPMENT, the Socket-outlet shall be installed near the
equipment and shall be easily accessible.
For displays with glossy bezels the user should consider the placement of the displays
as the bezel may cause disturbing reflections from surrounding light and bright
surfaces.
According to WEEE regulation, this monitor can't be handled as normal trash in
Europe when it is out of usage. Please refer to the recycle information from our
website to handle it.
www.wortmann.de
1
Page 5

First Setup
Congratulation for purchasing this monitor of high performanc e!
This monitor comes with the following accessories:
AC Power cord ● DisplayPort cable (20 pin)
Audio cable ● User’s guide
Warranty card ● Quick start guide
2
Page 6
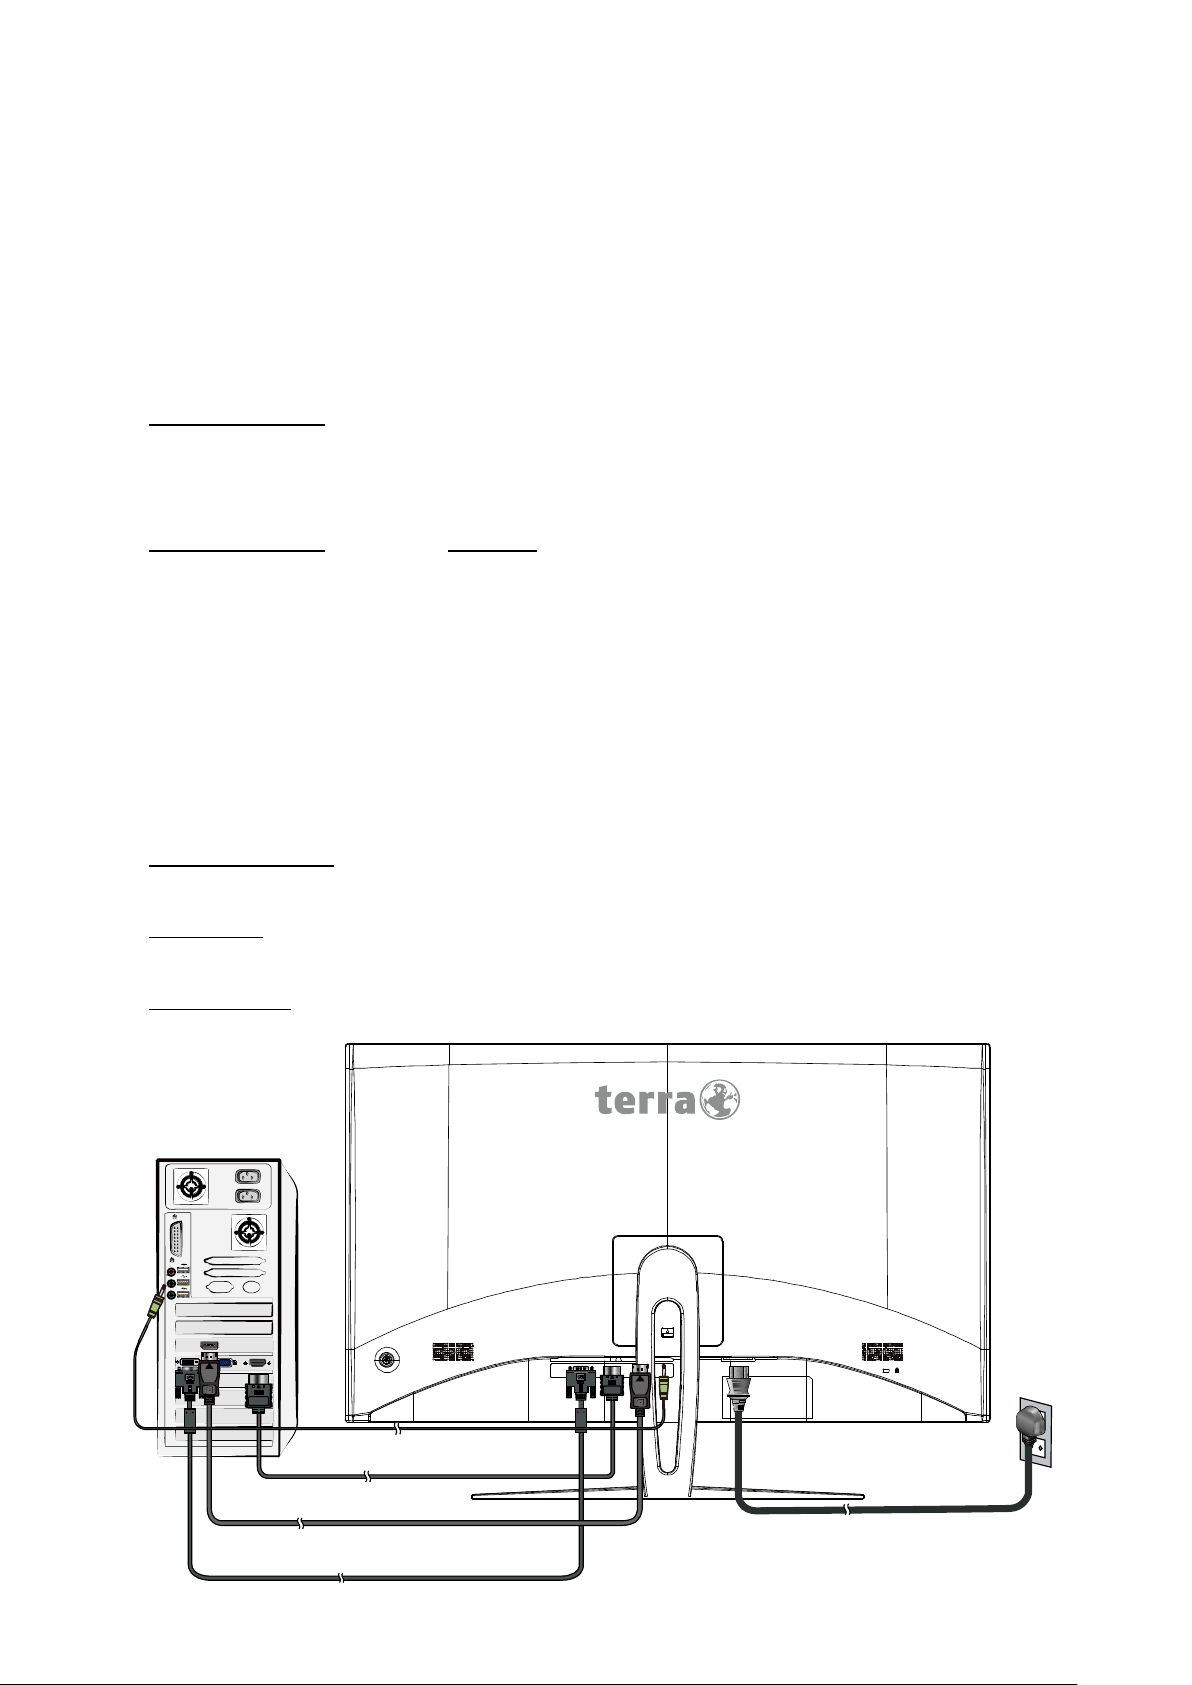
Quick Installation
Audio cable
PC
DisplayPort cable
1. Conne ct Video cable (DisplayPort cable)
Make sure both monitor and computer are powered OFF.
Connect the DisplayPort cable from DisplayPort output of computer to the DisplayPort
input of the monitor.
Or connect HDMI cable *Optional
Connect the HDMI cable from HDMI output of computer to the HDMI input of the
monitor.
Important note: Make sure that the graphic card supports the full resolution
(2560x1440) via HDMI!
Or connect DVI cable *Optional
Connect the DVI cable from DVI output of computer to the DVI input of the monitor.
Important note: Use a DVI dual-link cable and Make sure that the graphic card
supports the full resolution (2560x1440) via DVI!
2. Connect Power cord
Connect the power cord to a properly grounded AC outlet, then to the monitor.
3. Conne ct Audio cable
Connect the Audio cable from Audio output of computer to the Audio input of the
monitor.
4. Power-ON computer and monitor
Power-ON the computer, then Power-ON the monitor.
5. Windows users: Setting the Timing Mode (Resolution and Refresh Rate)
Example: 2560 x 1440 @ 144 Hz
Resolution Right-click on the Windows desktop > Display Settings > Advanced Display
Settings. Set the resolution.
Refresh Rate (vertical frequency) See your graphic card’s user guide for instructions.
Example:
HDMI cable
DVI cable
Power cable
3
Page 7

Installing the LCD Monitor
Installing the Stand Base
1. Place the monitor face down on a soft cloth or cushion on a table.
2. Fit the two tabs on the upper part of the stand to the groove on the back of the monitor
and push the snaps until it into place then released.
3. Install the s t and base to the stand, then tighten the scr ew that fixes the stand base t o the
stand.
Note: To secure or release a screw, a screwdriver or a coin is required.
4
Page 8

Disconnecting the Stand Ba s e
1. Place the monitor face down on a soft cloth or cushion on a table.
2. Release the screw that fixes the stand base to the stand, then pull the stand base
backward away from the stand.
3. Push the snaps and hold the stand, lift the stand up and away from the monitor.
Note: To secure or release a screw, a screwdriver or a coin is required.
5
Page 9

Front View of the Product
►
Confirm Select
LED Indicator
❶ ❷
Power ON/OFF (press the butt on)
◄ OSD Menu On/Off
❶
▲ Scroll Up/ Increase
▼ Scroll Down/ Decrease
❷
6
Page 10

Rear View of the Product
❶
❷
❶
❷ ❸ ❹ ❺
DVI input (DVI-D 24 pin)
HDMI input (HDMI 19 pin)
❸
❹
❺
DisplayPort input (DisplayPort 20 pin)
Audio input
Power input
7
Page 11

Using On Screen Display (OSD) Functions
Confirm the Select
●
Picture Quality Setting
Audio
Other
Resolution: 2560x1440@144Hz
Power ON/OFF (press the butt on)
◄
►
▲
▼
When in OSD menu, press more than 3 seconds to switch display power
off
Display main menu
Exit from OSD menu
Manual adjust mode selec t for DVI, HDMI, DisplayPort mode
Select the desired item when in OSD menu
OSD Lock (when not in OSD menu, Press more than 5 seconds)
Select the desired item when in OSD menu
When not in OSD menu, directly enters the Brightness menu
Power Lock (when not in OSD menu, Press more than 5 seconds)
Main Menu
Input Source DVI
Brightness/Contrast HDMI
Color Setting DisplayPort
Display
InputSource: DisplayPort
Short Cuts Function from t he butt on( s )
Input Source: When Input Source is pressed, change Input signal to DVI, HDMI or
DisplayPort.
8
Page 12

Brightness/Contrast: To manually adjust the Brightness, Contrast and DCR.
Brightness: To adjust the luminance of the video.
▲: increase brightness, ▼: decrease brightness.
Contrast: To adjust the foreground white level of screen image.
▲: increase contrast, ▼: decrease contrast.
DCR: To detect the distribution of the visual signals inputs, and create an
optimized contrast. Press ► key to adjust the DCR On or Off.
Color Setting: To select the color for improving brightness and color saturation between
Gamma, Picture Mode, Color Temperature and Anti Blue Light.
Gamma: To adjust the Gamma value, low gamma values display whitish images and
high gamma values display blackish images.
Picture Mode: Provides an optimum display environment depending on the
contents displayed. It contains 4 user-selectable presets.
Standard is for general windows environment and monitor default setting.
Photo optimized for displaying outdoor scenery images.
Movie optimized for movie and video environment.
Game optimized for PC game environment.
Color Temperature: To adjust the default picture color. It contains 4 user-selectable
presets.
Warm: Adds green to screen image for a darker color.
Normal: Adds red to screen image for warmer white and richer red.
Cool: Adds blue to screen image for cooler white.
User: Individual adjust men ts for Red (R), Green (G), Blue (B).
1. Press button ► to select the desired color.
2. Press ▼ or ▲ button to adjust selected color.
Anti Blue Light: Decreases the bl ue l ight emitted fro m the dis play to reduce the ri sk o f
blue light exposure to your eyes.
Picture Quality Setting: According to the overall image quality configuration.
Sharpness: To adjust the clarity of a non-WQHD Resolution (2560x1440) signal with
▼ or ▲ button.
Over Drive: Allows the user to change the Over Drive strength. Improve the quality of
the motion pictures.
FreeSync: To control support FreeSync. Press ► key to adjust the FreeSync On or
Off.
Display: To manually adjust the Aspect Ratio.
Aspect Ratio: To select the video mode from Full Screen, 4:3 or 1:1
Full Screen: To select full-screen size image.
4:3: To select 4:3 image size.
1:1: To select 1:1 image size.
9
Page 13

Audio: To adjust the audio f uncti o ns .
Volume: To adjust the volume of speaker output.
Audio Source: To select where the audio source comes from Line-In, HDMI or
DisplayPort.
Other: To set up Language, OSD H-Position, OSD V-Position, OSD Transparency, OSD
Time Out, OSD Rotation, Resolution note and Reset.
Language: To allow users to choose from available languages.
OSD H-Position: To horizontally adjust the OSD position.
▲: move OSD to the right, ▼: move OSD to the left.
OSD V-Position: To vertically adjust the OSD position.
▲: move OSD to the right, ▼: move OSD to the left.
OSD Transparency: To adjust the transparency of the OSD background.
OSD Time Out: To automatically turn off On Screen Display (OSD) after a
preset period of time.
OSD Rotation: Rotat e s the OSD by Normal/90/180/270 degrees.
Resolution note: When PC resolutio n not on 256 0x1440 will send a message remind.
Press ► key to adjust the Resolution note On or Off .
Reset: To recall factory settings for Video & Audio controls.
Press button ► to select the Reset menu option.
10
Page 14

Supporting Timing Modes
480i
720p
480p
1080i
576i
1080p
576p
VGA 720 x 400 @ 70Hz
VGA 640 x 480 @ 60Hz
MAC 640 x 480 @ 67Hz
VESA 640 x 480 @ 72Hz
VESA 640 x 480 @ 75Hz
VESA 800 x 600 @ 56Hz
VESA 800 x 600 @ 60Hz
VESA 800 x 600 @ 72Hz
VESA 800 x 600 @ 75Hz
MAC 832 x 624 @ 75Hz
VESA 1024 x 768 @ 60Hz
VESA 1024 x 768 @ 70Hz
VESA 1024 x 768 @ 75Hz
VESA 1280 x 960 @ 60Hz
VESA 1152 x 864 @ 75Hz
MAC 1152 x 870 @ 75Hz
VESA 1280 x 1024 @ 60Hz
VESA 1280 x 1024 @ 75Hz
VESA 1440 x 900 @ 60Hz
VESA 1440 x 900 @ 75Hz
VESA 1600 x 1200 @ 60Hz
VESA 1680 x 1050 @ 60Hz
VESA 1920 x 1080 @ 60Hz
VESA 2560 x 1440 @ 60Hz
VESA 2560 x 1440 @ 144Hz
*ONLY SUPPORT HDMI / Di s playPort SOURCE
Warning: Do not set the graphic card in your computer to exceed these maximum refresh
rates. Doing so may result in permanent damage to your monitor.
11
Page 15

Technical Information
Technical Specification
LCD Panel
Power Management
Displayable Resolution
Pixel Dimension 0.2724 x 0.2724 mm
LCD Display Color 16.7M
Active Display Area 697.334 mm x 392.256 mm
Temperature
Compliance CE, WEEE
Power Input Voltage AC100-240 V
Speaker 3W x 2
80 cm (31.5") Curvature 1800R
VESA DPMS compatible
Off Mode, < 0.5 W
WQHD 2560 x 1440 max.
Vertical Frequency 144Hz max.
Operating: 0°C ~ + 40°C
Storage: -20°C ~ + 60°C
12
Page 16

Care and Maintenance
Care
Avoid exposing y our monitor di rectl y to sunli ght or oth er he at s ource . Plac e y our m onito r
away from the sun to reduce glare.
Put your monitor in a well ventilated area.
Do not place any heavy things on top of your monitor.
Make certain your monitor is installed in a clean and moisture-free area.
Keep your monitor away from magnets, motors, transformers, speakers, and TV sets.
Note
Move the monitor out of the package and take off the plastic bag and Polystyrene Foam.
Adjust the tilt of the screen for an optimum seating and viewing position.
Safety Tips
If smoke, abnormal noise or odor came out from your monitor, caution you should
remove the power cord immediately and call your service center.
Never remove the rear cover of your monitor cabinet. The display unit inside contains
high-voltage parts and may cause electric shock to human bodies.
Never try to repair your monitor yourself. Always call your service center or a qualified
technician to fix it.
Troubleshooting
No power
Make sure AC power cord is securely connected to the power adapter and the power
supply is firmly connected to the monitor.
Plug another electrical device into the power outlet to verify that the outlet is supplying
proper voltage.
Make sure all signal cables are installed.
Power on but no screen image
Make sure the video cable supplied with the monitor is tightly secured to the video
output port on back of the computer. If not, tightly secure it.
Adjust brightness.
Wrong or abnormal colors
If any colors (red, green, blue) are missing, check the video cable to make sure it is
securely connected. Loose or broken pins in the cable connector could cause an
improper connection.
Connect the monitor to another computer.
13
Page 17

WEEE Statement
Wichtige Recyclinginformation
Das Gerät darf nach dem Ende der Nutzungszeit nicht mit dem Restmüll entsorgt werden.
Bitte führen Sie es zur umweltgerechten Entsorgung den kommunalen
Altgeräte-Sammelstellen zu.
Für weitere Informationen wenden Sie sich bitte an die unten stehende Adresse.
Important Information for Recycling
This warning sign of trash bin indicates that the objects are not allowed to be disposed as
general refuse. Please follow the local act and carry out further disposal with refuse
recycling and collecting
system in your Country
or District.
Please contact the address below for more information on recycling.
Informations importantes relatives au recyclage
En fin de vie, cet appareil ne dois pas étre jeté aux ordures ménagères.
Veuillez respecter les réglementations locales et rester en conformité avec le système de
collecte et de recyclage des ordures en vigueur dans votre région.
Pour plus d'information sur le recyclage, veuillez contacter vo tre ce ntre de recyclage agréé.
Votre attitude quand au recyclage améliorera l'avenir de la planète et créera un
environnement de vie de qualité pour les générations futures.
Wortmann
AG
Bredenhop 20
D-32609 Hüllhorst
Tel. +49 (0) 5744 / 944-0
Fax +49 (0) 5744 / 944-444
www.wortmann.de
info@wortmann.de
Page 18

GENERAL PUBLIC LICENSE (GPL) - VER.2
Lizenzinformation Open Source Software/GPL Sourcecode
Dieses Produkt enthält Software, die von Dritten stammt, darunter
auch Software, die unter der GNU General Public License Version
2 (“GPLv2”) und der GNU Lesser Genberal Public License, Version
1.2 (LGPLv2.1) lizenziert ist. Solche Programmbestandteile werden
nachfolgend als „Programm“ oder „Program“ bezeichnet.
Schriftliches Angebot des GPL/LGPL Sourcecodes
Wir werden gegen Erstattung der Kosten für den Datenträger
und den Versand des Datenträgers auf Nachfrage jedermann den
Sourcecode der GPL- und LGPL-Bestandteile der Software auf einer
CD-ROM oder einem ähnlichen Datenträger übersenden. Dieses
Angebot ist gültig für einen Zeitraum von drei Jahren ab Erwerb des
Produktes.
Bei Nachfragen im Zusammenhang mit GPLv2 und LGPLv2.1: Bitte
richten Sie alle GPL/LGPL-Nachfragen an die nachfolgend angegebene Adresse. Wir weisen darauf hin, dass unter der angegebenen
Adresse kein technischer Support geleistet wird.
LICENSE STATEMENT / GPL CODE STATEMENT
This product includes software code developed by third parties,
including software code subject to the GNU General Public License
Version 2 (“GPLv2”) and the GNU Lesser Genberal Public License,
Version 1.2 (LGPLv2.1). These parts of the software are hereinafter
referred to as „the or this Program “
WRITTEN OFFER FOR GPL/LGPL SOURCE CODE
We will provide everyone upon request the applicable GPL and LGPL
source code files via CD-ROM or similar storage medium for a nominal cost to cover shipping and media charges as allowed under the
GPL/LGPL. This offer is valid for 3 years.
GPLv2 and LGPLv2.1 inquiries: Please direct all GPL/LGPL inquiries
to the following address. Note that technical support inquiries will
not be supported at the below address.
WORTMANN AG
- GPL ANFRAGE -
Bredenhop 20
32609 Hüllhorst
Deutschland
NO WARRANTY
This program is distributed in the hope that it will be useful, but
WITHOUT ANY WARRANTY; without even the implied warranty of
MERCHANTABILITY or FITNESS FOR A PARTICULAR PURPOSE. See
the GNU General Public License for more details.
IN NO EVENT UNLESS REQUIRED BY APPLICABLE LAW OR AGREED TO
IN WRITING WILL ANY COPYRIGHT HOLDER, OR ANY OTHER PARTY
WHO MAY MODIFY AND/OR REDISTRIBUTE THE PROGRAM AS
PERMITTED ABOVE, BE LIABLE TO YOU FOR DAMAGES, INCLUDING
ANY GENERAL, SPECIAL, INCIDENTAL OR CONSEQUENTIAL DAMAGES ARISING OUT OF THE USE OR INABILITY TO USE THE PROGRAM
(INCLUDING BUT NOT LIMITED TO LOSS OF DATA OR DATA BEING
RENDERED INACCURATE OR LOSSES SUSTAINED BY YOU OR THIRD
PARTIES OR A FAILURE OF THE PROGRAM TO OPERATE WITH ANY
OTHER PROGRAMS), EVEN IF SUCH HOLDER OR OTHER PARTY HAS
BEEN ADVISED OF THE POSSIBILITY OF SUCH DAMAGES.
GNU GENERAL PUBLIC LICENSE
Version 2, June 1991
Copyright (C) 1989, 1991 Free Software Foundation, Inc. 51 Franklin Street, Fifth Floor, Boston, MA
02110-1301, USA
Everyone is permitted to copy and distribute verbatim copies of this license document, but changing
it is not allowed.
Preamble
The licenses for most software are designed to take away your freedom to share and change it.
By contrast, the GNU General Public License is intended to guarantee your freedom to share and
change free software--to make sure the software is free for all its users. This General Public License applies to most of the Free Software Foundation’s software and to any other program whose
authors commit to using it. (Some other Free Software Foundation software is covered by the GNU
Lesser General Public License instead.) You can apply it to your programs, too. When we speak of
free software, we are referring to freedom, not price. Our General Public Licenses are designed
to make sure that you have the freedom to distribute copies of free software (and charge for this
service if you wish), that you receive source code or can get it if you want it, that you can change the
software or use pieces of it in new free programs; and that you know you can do these things. To
protect your rights, we need to make restrictions that forbid anyone to deny you these rights or to
ask you to surrender the rights. These restrictions translate to certain responsibilities for you if you
distribute copies of the software, or if you modify it. For example, if you distribute copies of such a
program, whether gratis or for a fee, you must give the recipients all the rights that you have. You
must make sure that they, too, receive or can get the source code. And you must show them these
terms so they know their rights.
We protect your rights with two steps: (1) copyright the software, and (2) offer you this license
which gives you legal permission to copy, distribute and/or modify the software. Also, for each
author’s protection and ours, we want to make certain that everyone understands that there is no
warranty for this free software. If the software is modified by someone else and passed on, we want
its recipients to know that what they have is not the original, so that any problems introduced by
others will not reflect on the original authors‘ reputations. Finally, any free program is threatened
constantly by software patents. We wish to avoid the danger that redistributors of a free program
will individually obtain patent licenses, in effect making the program proprietary. To prevent this, we
have made it clear that any patent must be licensed for everyone’s free use or not licensed at all.
The precise terms and conditions for copying, distribution and modification follow.
TERMS AND CONDITIONS FOR COPYING, DISTRIBUTION AND MODIFICATION
0. This License applies to any program or other work which contains a notice placed by the
copyright holder saying it may be distributed under the terms of this General Public License. The
„Program “, below, refers to any such program or work, and a „work based on the Program “means
either the Program or any derivative work under copyright law: that is to say, a work containing
the Program or a portion of it, either verbatim or with modifications and/or translated into another
language.
(Hereinafter, translation is included without limitation in the term „modification “.) Each licensee is
addressed as „you “. Activities other than copying, distribution and modification are not covered by
this License; they are outside its scope. The act of running the Program is not restricted, and the
output from the Program is covered only if its contents constitute a work based on the Program
(independent of having been made by running the Program). Whether that is true depends on what
the Program does.
1. You may copy and distribute verbatim copies of the Program‘s source code as you receive it, in
any medium, provided that you conspicuously and appropriately publish on each copy an appropri-
ate copyright notice and disclaimer of warranty; keep intact all the notices that refer to this License
and to the absence of any warranty; and give any other recipients of the Program a copy of this
License along with the Program.
You may charge a fee for the physical act of transferring a copy, and you may at your option offer
warranty protection in exchange for a fee.
2. You may modify your copy or copies of the Program or any portion of it, thus forming a work ba-
sed on the Program, and copy and distribute such modifications or work under the terms of Section
1 above, provided that you also meet all of these conditions:
a) You must cause the modified files to carry prominent notices stating that you changed the
files and the date of any change.
b) You must cause any work that you distribute or publish, that in whole or in part contains or is
derived from the Program or any part thereof, to be licensed as a whole at no charge to all third
parties under the terms of this License.
c) If the modified program normally reads commands interactively when run, you must cause
it, when started running for such interactive use in the most ordinary way, to print or display an
announcement including an appropriate copyright notice and a notice that there is no warranty
(or else, saying that you provide a warranty) and that users may redistribute the program under
these conditions, and telling the user how to view a copy of this License. (Exception: if the Program itself is interactive but does not normally print such an announcement, your work based
on the Program is not required to print an announcement.)
These requirements apply to the modified work as a whole. If identifiable sections of that work
are not derived from the Program, and can be reasonably considered independent and separate
works in themselves, then this License, and its terms, do not apply to those sections when
you distribute them as separate works. But when you distribute the same sections as part of
a whole which is a work based on the Program, the distribution of the whole must be on the
terms of this License, whose permissions for other licensees extend to the entire whole, and
thus to each and every part regardless of who wrote it.
Thus, it is not the intent of this section to claim rights or contest your rights to work written
entirely by you; rather, the intent is to exercise the right to control the distribution of derivative
or collective works based on the Program.
In addition, mere aggregation of another work not based on the Program with the Program (or
IT. MADE IN GERMANY.
Artikel-Nr.: 8001047, Stand 08/2015
Page 19

with a work based on the Program) on a volume of a storage or distribution medium does not
bring the other work under the scope of this License.
3. You may copy and distribute the Program (or a work based on it, under Section 2) in object code
or executable form under the terms of Sections 1 and 2 above provided that you also do one of the
following:
we use this doubled UL to get the sub-sections indented, while making the bullets as unobvious as
possible.
a) Accompany it with the complete corresponding machinereadable source code, which must
be distributed under the terms of Sections 1 and 2 above on a medium customarily used for
software interchange; or,
b) Accompany it with a written offer, valid for at least three years, to give any third party, for
a charge no more than your cost of physically performing source distribution, a complete
machine-readable copy of the corresponding source code, to be distributed under the terms of
Sections 1 and 2 above on a medium customarily used for software interchange; or,
c) Accompany it with the information you received as to the offer to distribute corresponding
source code. (This alternative is allowed only for noncommercial distribution and only if you
received the program in object code or executable form with such an offer, in accord with Subsection b above.) The source code for a work means the preferred form of the work for making
modifications to it. For an executable work, complete source code means all the source code
for all modules it contains, plus any associated interface definition files, plus the scripts used
to control compilation and installation of the executable. However, as a special exception, the
source code distributed need not include anything that is normally distributed (in either source
or binary form) with the major components (compiler, kernel, and so on) of the operating system on which the executable runs, unless that component itself accompanies the executable.
If distribution of executable or object code is made by offering access to copy from a designated
place, then offering equivalent access to copy the source code from the same place counts as
distribution of the source code, even though third parties are not compelled to copy the source
along with the object code.
4. You may not copy, modify, sublicense, or distribute the Program except as expressly provided
under this License. Any attempt otherwise to copy, modify, sublicense or distribute the Program is
void, and will automatically terminate your rights under this License. However, parties who have
received copies, or rights, from you under this License will not have their licenses terminated so
long as such parties remain in full compliance.
5. You are not required to accept this License, since you have not signed it. However, nothing else
grants you permission to modify or distribute the Program or its derivative works. These actions
are prohibited by law if you do not accept this License. Therefore, by modifying or distributing the
Program (or any work based on the Program), you indicate your acceptance of this License to do so,
and all its terms and conditions for copying, distributing or modifying the Program or works based
on it.
6. Each time you redistribute the Program (or any work based on the Program), the recipient
automatically receives a license from the original licensor to copy, distribute or modify the Program
subject to these terms and conditions. You may not impose any further restrictions on the reci-
pients‘ exercise of the rights granted herein. You are not responsible for enforcing compliance by
third parties to this License.
7. If, as a consequence of a court judgment or allegation of patent infringement or for any other
reason (not limited to patent issues), conditions are imposed on you (whether by court order, agreement or otherwise) that contradict the conditions of this License, they do not excuse you from the
conditions of this License. If you cannot distribute so as to satisfy simultaneously your obligations
under this License and any other pertinent obligations, then as a consequence you may not distribute the Program at all. For example, if a patent license would not permit royalty-free redistribution of the Program by all those who receive copies directly or indirectly through you, then the only
way you could satisfy both it and this License would be to refrain entirely from distribution of the
Program.
If any portion of this section is held invalid or unenforceable under any particular circumstance, the
balance of the section is intended to apply and the section as a whole is intended to apply in other
circumstances.
It is not the purpose of this section to induce you to infringe any patents or other property right
claims or to contest validity of any such claims; this section has the sole purpose of protecting the
integrity of the free software distribution system, which is implemented by public license practices.
Many people have made generous contributions to the wide range of software distributed through
that system in reliance on consistent application of that system; it is up to the author/donor to
decide if he or she is willing to distribute software through any other system and a licensee cannot
impose that choice. This section is intended to make thoroughly clear what is believed to be a
consequence of the rest of this License.
8. If the distribution and/or use of the Program is restricted in certain countries either by patents
or by copyrighted interfaces, the original copyright holder who places the Program under this
License may add an explicit geographical distribution limitation excluding those countries, so that
distribution is permitted only in or among countries not thus excluded. In such case, this License
incorporates the limitation as if written in the body of this License.
9. The Free Software Foundation may publish revised and/or new versions of the General Public
License from time to time. Such new versions will be similar in spirit to the present version, but
may differ in detail to address new problems or concerns.
Each version is given a distinguishing version number. If the Program specifies a version number of
this License which applies to it and „any later version “, you have the option of following the terms
and conditions either of that version or of any later version published by the Free Software Foundation. If the Program does not specify a version number of this License, you may choose any version
ever published by the Free Software Foundation.
10. If you wish to incorporate parts of the Program into other free programs whose distribution
conditions are different, write to the author to ask for permission. For software which is copyrighted
by the Free Software Foundation, write to the Free Software Foundation; we sometimes make
exceptions for this. Our decision will be guided by the two goals of preserving the free status of all
derivatives of our free software and of promoting the sharing and reuse of software generally.
NO WARRANTY
11. BECAUSE THE PROGRAM IS LICENSED FREE OF CHARGE, THERE IS NO WARRANTY FOR
THE PROGRAM, TO THE EXTENT PERMITTED BY APPLICABLE LAW. EXCEPT WHEN OTHERWISE
STATED IN WRITING THE COPYRIGHT HOLDERS AND/OR OTHER PARTIES PROVIDE THE PROGRAM
„AS IS “WITHOUT WARRANTY OF ANY KIND, EITHER EXPRESSED OR IMPLIED, INCLUDING,
BUT NOT LIMITED TO, THE IMPLIED WARRANTIES OF MERCHANTABILITY AND FITNESS FO R
A PARTICULAR PURPOSE. THE ENTIRE RISK AS TO THE QUALITY AND PERFORMANCE OF THE
PROGRAM IS WITH YOU. SHOULD THE PROGRAM PROVE DEFECTIVE, YOU ASSUME THE COST OF
ALL NECESSARY SERVICING, REPAIR OR CORRECTION.
12. IN NO EVENT UNLESS REQUIRED BY APPLICABLE LAW OR AGREED TO IN WRITING WILL
ANY COPYRIGHT HOLDER, OR ANY OTHER PARTY WHO MAY MODIFY AND/OR REDISTRIBUTE THE
PROGRAM AS PERMITTED ABOVE, BE LIABLE TO YOU FOR DAMAGES, INCLUDING ANY GENERAL,
SPECIAL, INCIDENTAL OR CONSEQUENTIAL DAMAGES ARISING OUT OF THE USE OR INABILITY
TO USE THE PROGRAM (INCLUDING BUT NOT LIMITED TO LOSS OF DATA OR DATA BEING REN-
DERED INACCURATE OR LOSSES SUSTAINED BY YOU OR THIRD PARTIES OR A FAILURE OF THE
PROGRAM TO OPERATE WITH ANY OTHER PROGRAMS), EVEN IF SUCH HOLDER OR OTHER PARTY
HAS BEEN ADVISED OF THE POSSIBILITY OF SUCH DAMAGES.
END OF TERMS AND CONDITIONS
How to Apply These Terms to Your New Programs
If you develop a new program, and you want it to be of the greatest possible use to the public, the
best way to achieve this is to make it free software which everyone can redistribute and change
under these terms.
To do so, attach the following notices to the program. It is safest to attach them to the start of each
source file to most effectively state the exclusion of warranty; and each file should have at least the
“copyright” line and a pointer to where the full notice is found.
<one line to give the program‘s name and a brief idea of what it does.>
Copyright (C) <year> <name of author>
This program is free software: you can redistribute it and/or modify it under the terms of the
GNU General Public License as published by the Free Software Foundation, either version 3 of
the License, or (at your option) any later version.
This program is distributed in the hope that it will be useful, but WITHOUT ANY WARRANTY;
without even the implied warranty of MERCHANTABILITY or FITNESS FOR A PARTICULAR
PURPOSE. See the GNU General Public License for more details.
You should have received a copy of the GNU General Public License along with this program.
If not, see <http://www.gnu.org/licenses/>.
Also add information on how to contact you by electronic and paper mail.
If the program does terminal interaction, make it output a short notice like this when it starts in an
interactive mode:
<program> Copyright (C) <year> <name of aut hor>
This program comes with ABSOLUTELY NO WARRANTY; for details type `show w ‘.
This is free software, and you are welcome to redistribute it under certain conditions;
type `show c ‘for details.
The hypothetical commands `show w ‘and `show c ‘should show the appropriate parts of the General Public License. Of course, your program‘s commands might be different; for a GUI interface, you
would use an “about box”.
You should also get your employer (if you work as a programmer) or school, if any, to sign a “copyright disclaimer” for the program, if necessary. For more information on this, and how to apply and
follow the GNU GPL, see <http://www.gnu.org/licenses/>.
The GNU General Public License does not permit incorporating your program into proprietary
programs. If your program is a subroutine library, you may consider it more useful to permit linking
proprietary applications with the library. If this is what you want to do, use the GNU Lesser General
Public License instead of this License. But first, please read <http://www.gnu.org/philosophy/whynot-lgpl.html>
IT. MADE IN GERMANY.
Artikel-Nr.: 8001047, Stand 08/2015
Page 20

 Loading...