

Page 1

®
WorldSpace
Digital Receiver
model wssr-11
User’s Guide
Page 2

2
CO N T E N T S
W E L C O M E T O THE W O R L D S PA C ETMB R O A D C A ST E X P E R I E N C E 4
F E AT U R E S . . . . . . . . . . . . . . . . . . . . . . . . . . . . . . . . . . . . . . . . . . . . . . . . . . . . . . . . . . . . . . . . . . . . . . 4
YOU R WO R L D S PA C E R E C E IV E R AT A G L A N C E . . . . . . . . . . . . . . . . . . . . . .5
T O P A ND F RO NT OF TH E RE CE I VE R . . . . . . . . . . . . . . . . . . . . . . . . . . . . . . . . . . . . . . . . . . . . . . . . . . . . . . . . . . . .5
L E F T SI D E OF TH E RE C E IV ER . . . . . . . . . . . . . . . . . . . . . . . . . . . . . . . . . . . . . . . . . . . . . . . . . . . . . . . . . . . . . . . . . . . .6
R I G H T SI D E OF T HE R EC EI VE R . . . . . . . . . . . . . . . . . . . . . . . . . . . . . . . . . . . . . . . . . . . . . . . . . . . . . . . . . . . . . . . . . . 6
QU I C K ST A R T. . . . . . . . . . . . . . . . . . . . . . . . . . . . . . . . . . . . . . . . . . . . . . . . . . . . . . . . . . . . . . . . . . 7
A N T E N NA POSIT I O N A N D DIR E C T IO N . . . . . . . . . . . . . . . . . . . . . . . . . . . . . . . . 8
AN T E N N A P OINTI N G GU I DE . . . . . . . . . . . . . . . . . . . . . . . . . . . . . . . . . . . . . . . . . . . . . . 9
U S I N G Y O U R REC E I V ER . . . . . . . . . . . . . . . . . . . . . . . . . . . . . . . . . . . . . . . . . . . . . . . . . .1 0
P O WE R . . . . . . . . . . . . . . . . . . . . . . . . . . . . . . . . . . . . . . . . . . . . . . . . . . . . . . . . . . . . . . . . . . . . . . . . . . . . . . . . . . . . . . . . . . . . . . . .1 0
Using AC powe r . . . . . . . . . . . . . . . . . . . . . . . . . . . . . . . . . . . . . . . . . . . . . . . . . . . . . . . . . . . . . . . . . . . . . . . . . . . . . . . . . . . .10
Using batteries . . . . . . . . . . . . . . . . . . . . . . . . . . . . . . . . . . . . . . . . . . . . . . . . . . . . . . . . . . . . . . . . . . . . . . . . . . . . . . . . . . . .10
SW I T C HI NG O N YOUR RECE IV ER . . . . . . . . . . . . . . . . . . . . . . . . . . . . . . . . . . . . . . . . . . . . . . . . . . . . . . . . . . . . . .1 1
P OIN TI NG T H E ANT EN NA . . . . . . . . . . . . . . . . . . . . . . . . . . . . . . . . . . . . . . . . . . . . . . . . . . . . . . . . . . . . . . . . . . . . . . . .1 1
RE C EI V I NG W O R L D S P AC E . . . . . . . . . . . . . . . . . . . . . . . . . . . . . . . . . . . . . . . . . . . . . .1 2
U SIN G LE AR N TO F IN D BR O ADCA ST C H A N N E L S. . . . . . . . . . . . . . . . . . . . . . . . . . . . . . . . . . . . . . . . . .1 2
LEARN M o d e . . . . . . . . . . . . . . . . . . . . . . . . . . . . . . . . . . . . . . . . . . . . . . . . . . . . . . . . . . . . . . . . . . . . . . . . . . . . . . . . . . . . . . . .12
EX TEND E D LEARN M o d e. . . . . . . . . . . . . . . . . . . . . . . . . . . . . . . . . . . . . . . . . . . . . . . . . . . . . . . . . . . . . . . . . . . . . . . .12
SELE CT IN G B ROAD CA ST C H A N N E L S . . . . . . . . . . . . . . . . . . . . . . . . . . . . . . . . . . . . . . . . . . . . . . . . . . . . . . . .1 2
SELEC TI NG S E R VIC E CO M P O N E N T S W IT H IN A BR OAD CA ST C H A N N E L. . . . . . . . . . . .1 3
P R ES E T S MO D E : STORING , SE LE CT I N G, AN D DE LE TI N G
B R O A D C A S T C H A N N E L S . . . . . . . . . . . . . . . . . . . . . . . . . . . . . . . . . . . . . . . . . . . . . . . . . .1 3
S TOR IN G BR O ADC A ST C H A N N E L S . . . . . . . . . . . . . . . . . . . . . . . . . . . . . . . . . . . . . . . . . . . . . . . . . . . . . . . . . . . .1 3
S E LEC TI NG S T O R E D BRO AD CAST C H A N N E L S . . . . . . . . . . . . . . . . . . . . . . . . . . . . . . . . . . . . . . . . . . . .1 4
D EL ETI NG S TO R E D BROADCAST C HANN EL S FRO M TH E PR ES E T L I S T . . . . . . . . . . . .1 4
Page 3

E N C RY P T E D C H AN N E L S . . . . . . . . . . . . . . . . . . . . . . . . . . . . . . . . . . . . . . . . . . . . . . . . . .1 4
D I S P L AYI NG Y OU R 1 6–D IGI T RECEI VE R ID . . . . . . . . . . . . . . . . . . . . . . . . . . . . . . . . . . . . . . . . . . . . . . . .1 4
PAS SWO R D . . . . . . . . . . . . . . . . . . . . . . . . . . . . . . . . . . . . . . . . . . . . . . . . . . . . . . . . . . . . . . . . . . . . . . . . . . . . . . . . . . . . . . . . . .1 5
Entering passwor d mode . . . . . . . . . . . . . . . . . . . . . . . . . . . . . . . . . . . . . . . . . . . . . . . . . . . . . . . . . . . . . . . . . . . . . .1 5
Completing the password entry pro c e s s . . . . . . . . . . . . . . . . . . . . . . . . . . . . . . . . . . . . . . . . . . . . . . . .1 5
Clearing the entire password list . . . . . . . . . . . . . . . . . . . . . . . . . . . . . . . . . . . . . . . . . . . . . . . . . . . . . . . . . .1 6
P C CO N N E C T I O N . . . . . . . . . . . . . . . . . . . . . . . . . . . . . . . . . . . . . . . . . . . . . . . . . . . . . . . . . . . .1 6
A LT E R N A TIV E AN T E N NA OPTIO N S . . . . . . . . . . . . . . . . . . . . . . . . . . . . . . . . . . . .1 7
S ELECT IN G ALT E R N AT IV E AN TE NN A O PT ION S . . . . . . . . . . . . . . . . . . . . . . . . . . . . . . . . . . . . . . . . . . . .1 7
MA I N T EN A N C E, S A F E TY , AND H A ND LIN G PR EC A U T I O N S. . . . . .1 8
M A I N T E N A N C E . . . . . . . . . . . . . . . . . . . . . . . . . . . . . . . . . . . . . . . . . . . . . . . . . . . . . . . . . . . . . . . . . . . . . . . . . . . . . . . . . . . . . .1 8
S A F E T Y P RE C A U T I O N S . . . . . . . . . . . . . . . . . . . . . . . . . . . . . . . . . . . . . . . . . . . . . . . . . . . . . . . . . . . . . . . . . . . . . . . . . .1 8
H A NDL IN G PR E C A U T I O N S . . . . . . . . . . . . . . . . . . . . . . . . . . . . . . . . . . . . . . . . . . . . . . . . . . . . . . . . . . . . . . . . . . . . . .1 8
T R O U B L ES H O O TIN G GU I DE . . . . . . . . . . . . . . . . . . . . . . . . . . . . . . . . . . . . . . . . . . . .1 9
3
F R E Q U E N T LY A S K ED QUE S T I O N S . . . . . . . . . . . . . . . . . . . . . . . . . . . . . . . . . . . .2 0
A D D I T I O N A L I N F O R M AT I O N . . . . . . . . . . . . . . . . . . . . . . . . . . . . . . . . . . . . . . . . . . . .2 2
T E C H N I CA L S P E C I F I C AT I O N S . . . . . . . . . . . . . . . . . . . . . . . . . . . . . . . . . . . . . . . . . . . . . . . . . . . . . . . . . . . . . . . . . .2 2
W A R R A N T Y I N FORM AT I O N . . . . . . . . . . . . . . . . . . . . . . . . . . . . . . . . . . . . . . . . . . . . . . . . . . . . . . . . . . . . . . . . . . . . . .2 2
L EG A L N OT I C E S . . . . . . . . . . . . . . . . . . . . . . . . . . . . . . . . . . . . . . . . . . . . . . . . . . . . . . . . . . . . . . . . . . . . . . . . . . . . . . . . . . . .2 2
N OT E S . . . . . . . . . . . . . . . . . . . . . . . . . . . . . . . . . . . . . . . . . . . . . . . . . . . . . . . . . . . . . . . . . . . . . . . .2 3
Page 4

4
W E L C OM E T O THE W O R L D S PA C ETMB R O A D C A ST E X P E R I E N C E
C o n g ratulations on your purchase of this fine Wo r l d Sp a c e digital re c e i ve r. It is
an exciting way to re c e i v e Wo r l d Sp a c e Satellite Radio almost anywhere in Africa, the
Middle East, Southern Eu rope, Asia and Latin America*. And the variety is tre m e ndous! In your region, you get dozens of Wo r l d Sp a c e Satellite Radio services, including some of the most respected international b r oadcasters, and important local and
regional pro g ramming, plus unique music and audio arts services produced just for
you, the Wo r l d Sp a c e l i s t e n e r.
By adding a Wo r l d Sp a c e PC Adaptor
into your personal computer! Wo r l d Sp a c e D i rect Media assembles the best of the
Internet and custom pro g ramming from marquee content developers and delivers it
d i rectly to your PC. No telephone connection needed! No network congestion. Just a
clear digital signal and a small monthly fee puts select web content as near as yo u r
k e y b o a rd and mouse.
For assistance with your purchase or additional information on available subscription
s e rvices, please contact your local Wo r l d Sp a c e d i s t r i b u t o r, go to www.worldspace.com
and visit the customer service section, or email us at customerserv i c e @ w o r l d s p a c e . c o m .
Thank you for choosing Wo r l d Sp a c e.
We hope you will enjoy countless hours of informative, entertaining, and enlightening
p ro g rams from around the world.
* *
to your re c e i ve r, you can also plug exc i t e m e n t
F E AT U R E S
The Wo r l d Sp a c e digital re c e i ver is light and t ra n s p o rtable, and filled with
e xciting feature s :
• Re c e i ves directly the Wo r l d Sp a c e Satellite Radio service throughout the va s t
satellite cove rage are a s .
• 10 memory presets for fast access to your favorite channels
• Indoor and outdoor use
• Last Channel Memory Re c a l l
• St e reo output for headphones or for speakers with external amplifier
• Data port for the Wo r l d Sp a c e D i rect Media serv i c e
• Detachable Wo r l d Sp a c e w a t e r- resistant antenna
• B a t t e r y operated (size “C” or type R14 batteries)
• AC powering option
*
The AmeriStarTMsatellite is scheduled to launch in 2001.
**
WorldSpace PC Adaptor sold separately.
Page 5
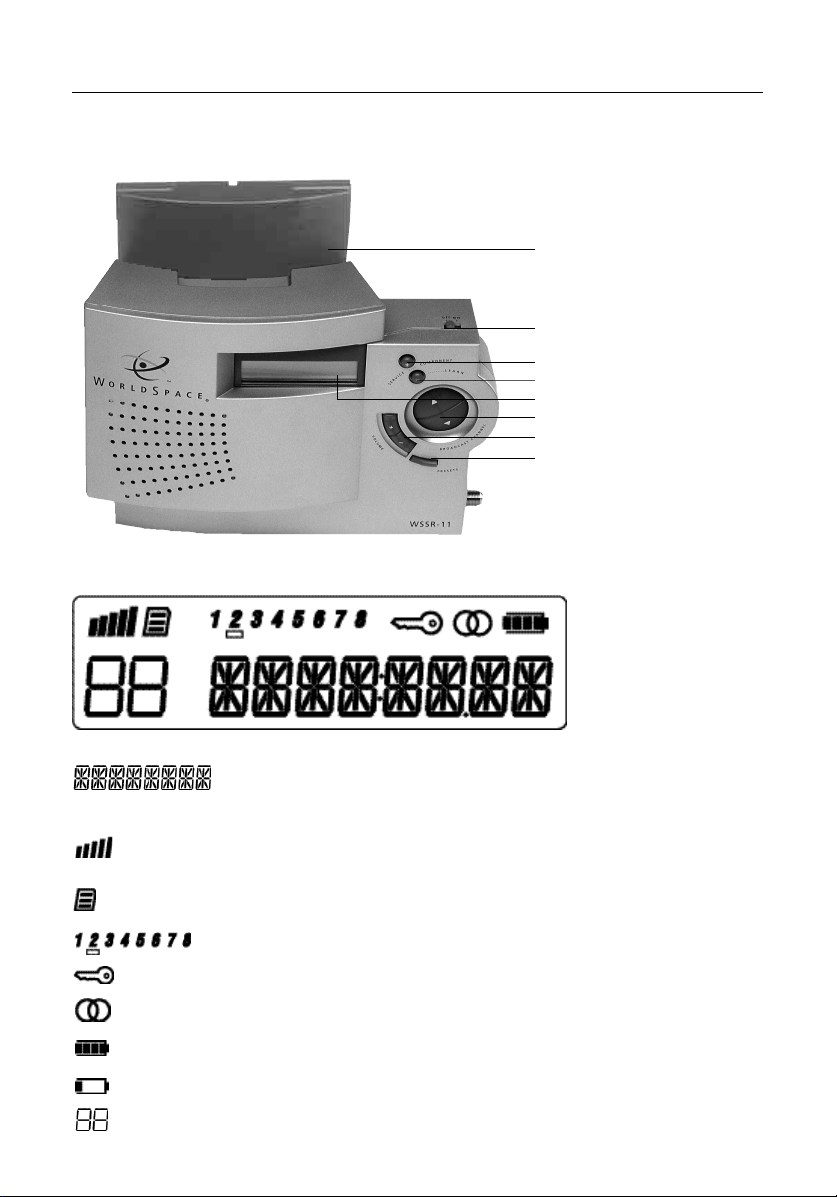
YOU R W O R L D S PA C E R E C E IV E R AT A G LANCE
Top and Front of the Rec e i ve r
Antenna
(folded and stored
in Antenna Pocket)
ON/OFF
SERVICE COMPONENT +
SERVICE COMPONENT- / LEARN
LCD Panel
BROADCAST CHANNEL ▲/▼
VOLUME +/- (ranges from 0–34)
PRESETS
L C D PA N E L
5
S h ows broadcast channel channel (BC) number, service name
status, carrier number, etc.
S h ows re c e i ved satellite signal strength (More bars indicate
better re c e p t i o n )
Indicates preset mode is on
Indicates number of service components within the selected BC
Indicates selected BC is encrypted and accessed by subscription only
Indicates stereo re c e p t i o n
Batteries fully charg e d
Batteries need re p l a c e m e n t
Indicates broadcast channel preset number
Page 6
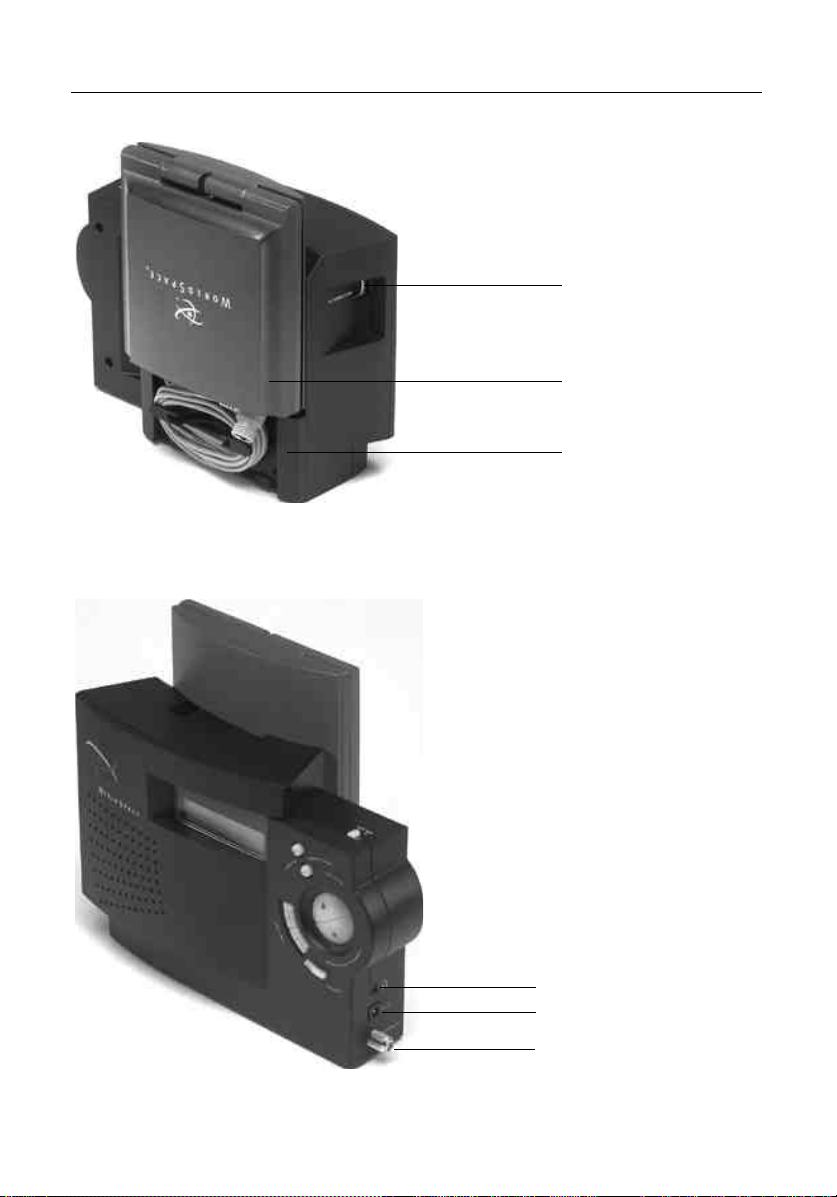
6
Left Side of the R ec e i ve r
R i ght Side of t h e R ec e i ve r
PC CONNECTION
Jack for connecting to
a PC with a WorldSpace PC
Adaptor (PC Adaptor
kit sold separately)
Antenna
Antenna Pocket/
Battery Cover
Stereo/Headphone Jack
DC IN Jack for external
power supply
ANTENNA IN WorldSpace satellite
signal antenna jack
Page 7
Q U I C K S TA R T
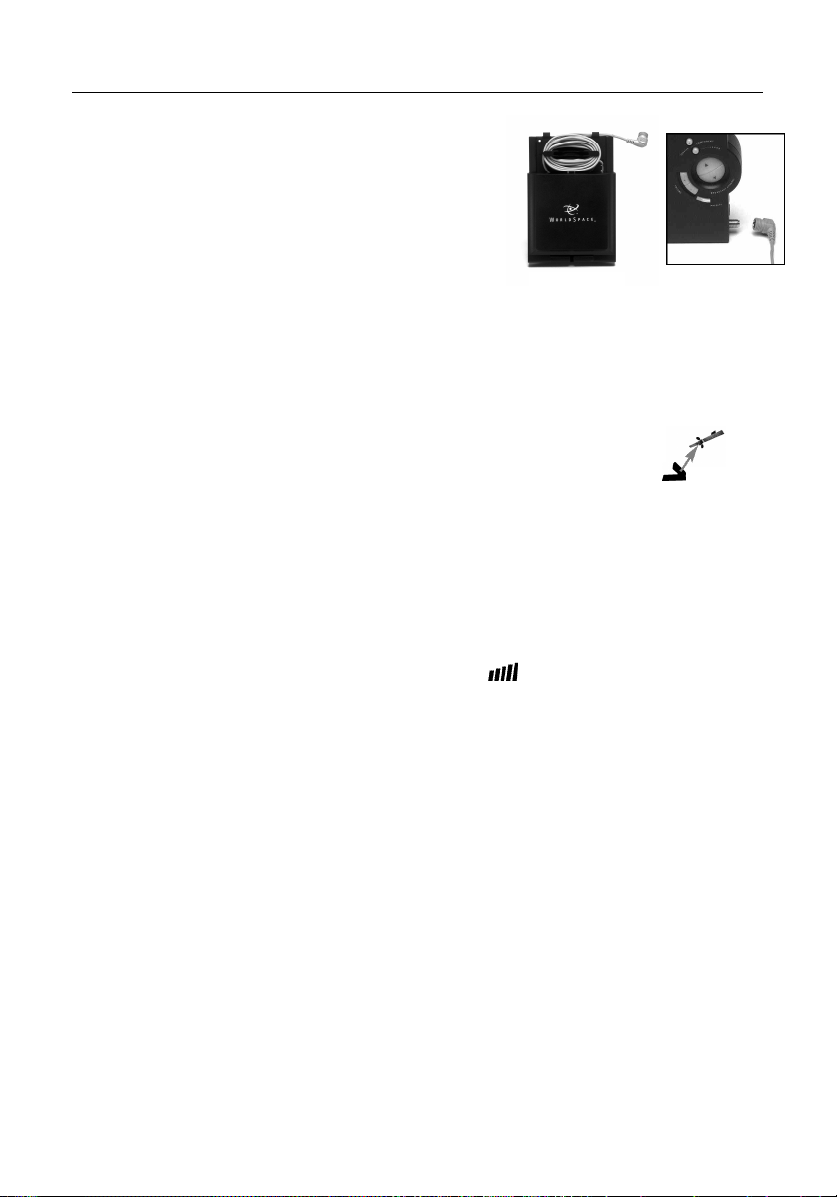
1 ) Remove the Wo r l d Sp a c e antenna from its pocket
and unwrap the cable.
2 ) Connect the antenna cable to the ANTENNA IN jack
on the right-hand side of the receiver.
3 ) Connect power adaptor to receiver and to a mains
power supply. Or, remove battery cover from the
back of the receiver and insert 3 size “C” or type
R14 batteries. Replace battery cover.
4 ) Place the Wo r l d Sp a c e antenna on a horizontal surface near a window or outdoors
in such a way that there are no obstructions such as tall trees, buildings, or walls
between the antenna and the satellite.
5 ) Turn the receiver on. The power switch is located on the top panel.
6 ) Point the antenna’s flat front face at the satellite. Consult the ANTENNA
POINTING GUIDE on the following pages for the necessary Antenna
Position and Direction for your location.
7 ) Once antenna is pointed correctly, press and hold the LEARN button for 2 seconds
and release. On releasing the button, the LEARN mode begins scanning for available
WorldSpace carriers* in your area. Scanning takes about one minute; LCD panel
displays a list of carrier numbers. Once completed, available carriers and their
broadcast channels are stored, and the first available broadcast channel will play.**
8) Refine the antenna pointing by rotating, tilting and moving antenna back and forth
to maximize the number of signal strength bars displaying on the LCD panel.
Five bars indicate the strongest signal strength.
9) Use BROADCAST CHANNEL ▲/▼ buttons for channel selection.
1 2
7
NOTE: As you perform the LEARN mode, be sure LCD panel displays signal stre n g t h
bars indicating signal re c e p t i o n .
AN T E N N A PO SI T I ON AND DIREC T I ON
As with all media delivered by satellite, WorldSpace signals travel in a direct line from
the satellite to your re c e i ver antenna. This path must be unobstructed so that the antenna
can receive these transmissions.
* Carriers are an efficient technology used to tra n s p o rt multiple broadcast channels. See Question & Answe r, page 21 for details.
** If LEARN mode does not find available Wo r l d Sp a c e b roadcast channels, run the EX TEND ED LEARN mode. See page 12 .
Page 8
8
ANTENNA POSITION
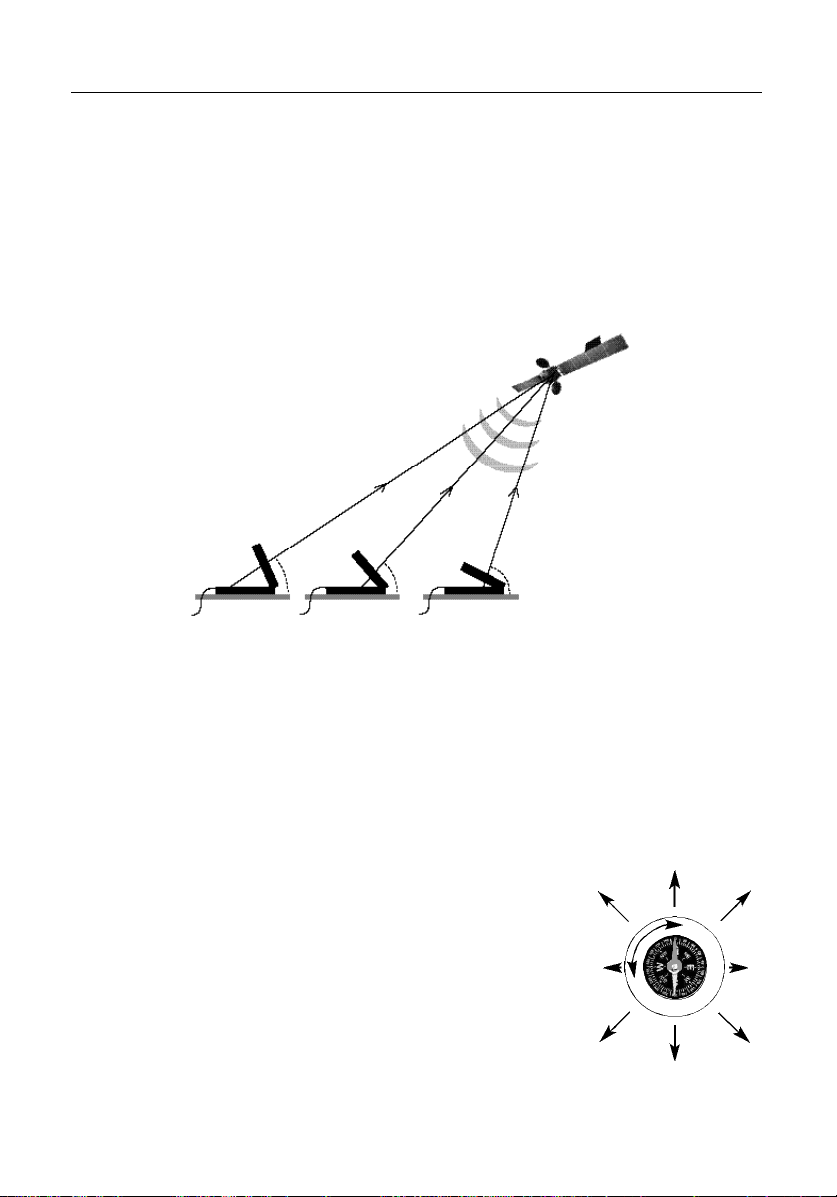
“Antenna Position” refers to the angle above the horizon to which you should point
the antenna .
The antenna can be put in three positions: LOW, MIDDLE, and HIGH.
In the LOW position you put the antenna in pointing angle of less than 45º.
In the MIDDLE postion it is put in an angle between 45º and 70º.
In the HIGH position the pointing angle is 70º or greater.
SATELLITE
ANTENNA POSITION
HORIZONTAL SURFACE
LOW
Less than 45
˚
MIDDLE
–70
45
˚
HIGH
or greater
˚
70
˚
ANTENNA DIRECTION
"Antenna Direction" refers to the direction (north, east, etc.) the flat face of the antenna
should point. With the help of the supplied compass, select the desired pointing dire c t i o n
for the antenna.
U SING THE CO M P A S S
1) Place the compass on the picture at right, and align it
in such a way that the N on the compass is in the same
N O R T H
E S T
W
O R T H
N
N
position as the North on the picture.
2) Turn the paper and the compass at the same time until
the red side of the compass needle points to N(orth).
3) Refer to the ANTENNA POINTING GUIDE on the next
page to select the correct Antenna Direction for your
E S T
W
region.
NOTE: Please make sure that the compass is not placed
on top of or near metal plates or material as this may
alter the position of the needle.
O U T HWE S T
S
O U T H
S
O R T HEA S T
E
O U T HEA S T
S
A S T
Page 9
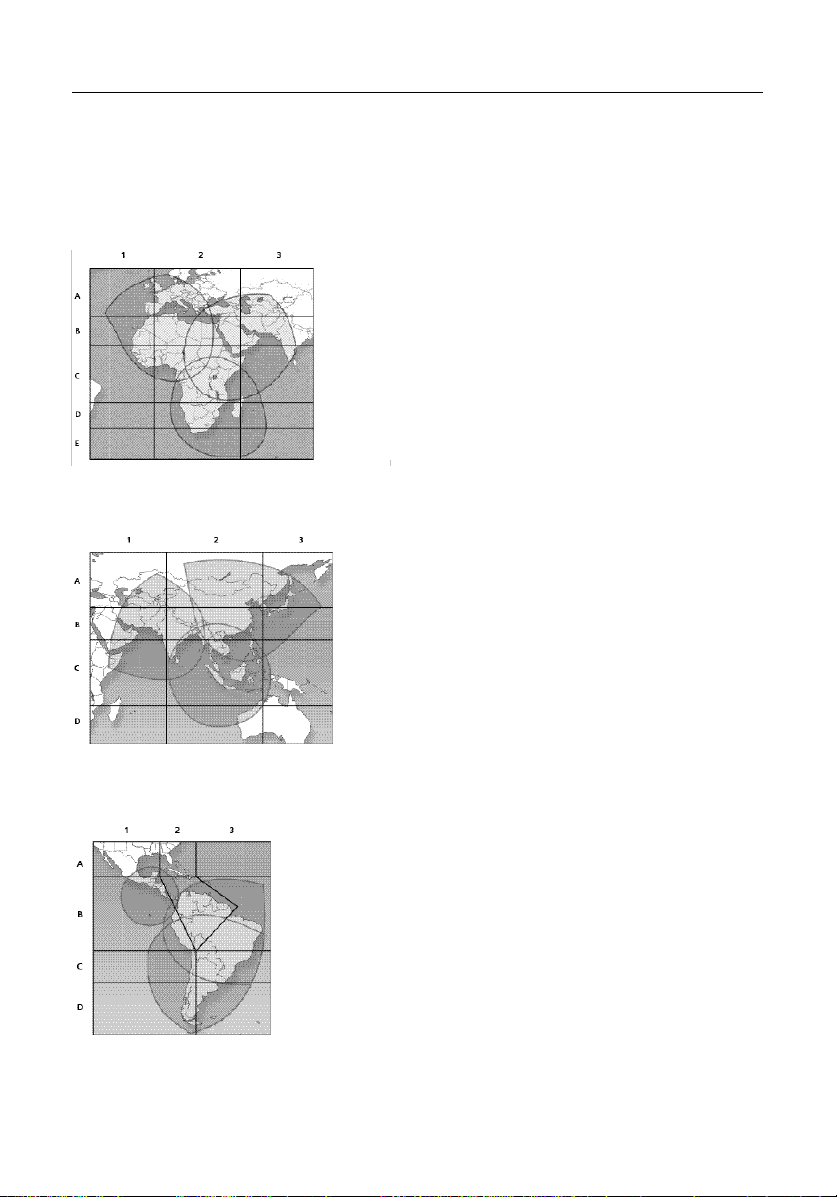
A N T E N NA PO IN T IN G GUIDE
NOTE: Antenna Position and Direction are approximate guides. If you are near a re g i o n
b o rd e r, please adjust antenna accordingly for your maximum signal re c e p t i o n .
9
A F R I S TA R
West Be am Carriers
54, 59
South B eam Carriers
A S I A S TA R
West Bea m Carriers
75, 80
A M E R I S TA R
West Beam Carriers
54, 59
t m
East Be am Carriers
43, 48
t m
East Be am Carriers
South Beam Carriers
54, 59
t m
East Beam C a r r i e r s
6 5 ,70
South Beam Carriers
43, 48
33, 38
43, 48
Region Antenna Antenna
A1 Low Southeast
A2 Low South
A3 Low Southwest
B1 Middle Southeast
B2 Middle South
B3 Low Southwest
C1 Middle East
C2 High Any
C3 Middle West
D1 Middle Northeast
D2 Middle North
D3 Low Northwest
E2 Low North
Region Antenna Antenna
A1 Low Southeast
A2 Low South
A3 Low Southwest
B1 Middle Southeast
B2 Middle South
B3 Middle Southwest
C1 Middle East
C2 High Any
C3 Middle West
D2 Middle North
Region Antenna Antenna
A1 Middle South
A2 Middle Southwest
B1 High North
B 2 M i d d l e West, Nort h we s t
B3 Low West
C1 Middle Northwest
C3 Low Northwest
D1 Low North
D3 Low Northwest
Position Direction
Position Direction
Position Direction
For more information and questions please visit our Web site at
w w w . w o r l d s p a c e . c o m .
Page 10
10
USI N G YO U R REC E I V E R
P O WE R
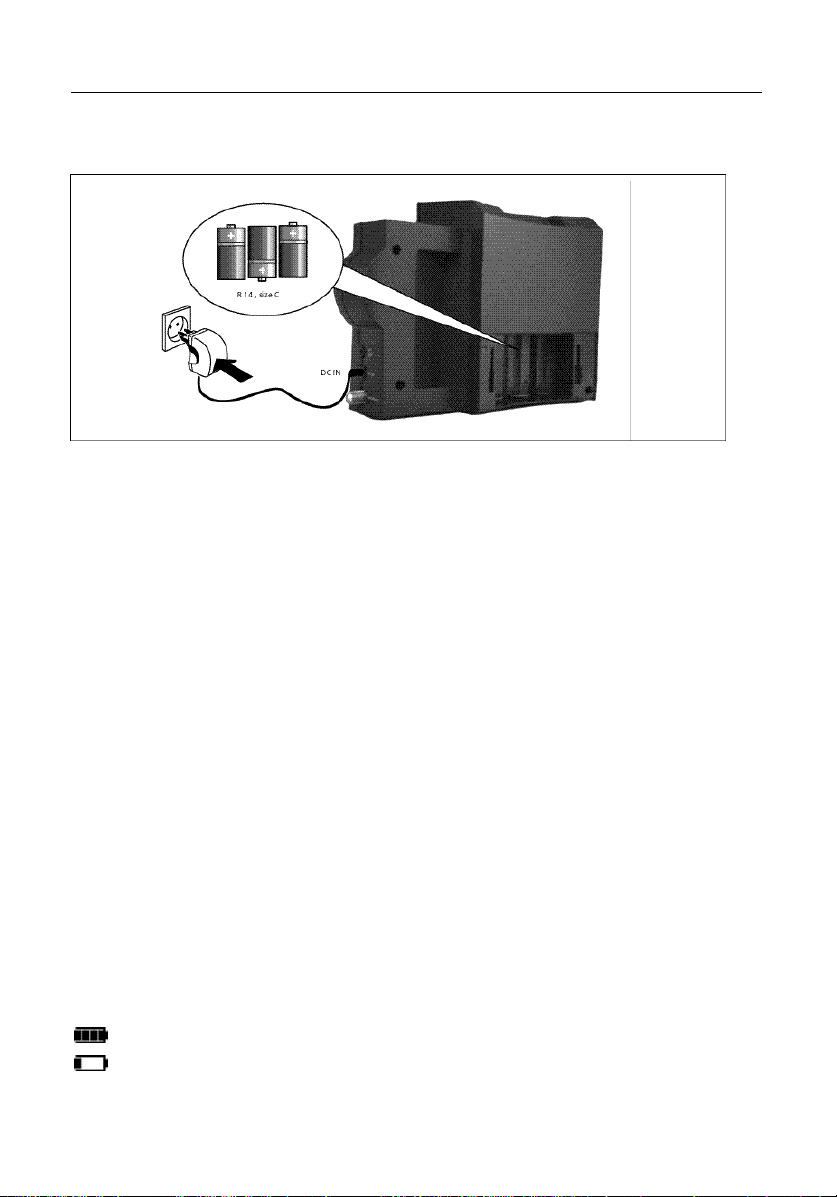
Using AC powe r
The Wo r l d Sp a c e re c e i ver operates on alternating current (AC) powe r. Use an AC powe r
adaptor that will operate from your mains and deliver 4.5 – 6.0 volts DC with minimum 500 mA output current (adaptor included).
To use AC powe r, insert the adaptor into the DC IN jack on the right-hand side of the
re c e i ver and plug the adaptor into a wall outlet. Make sure the voltage setting of the
adaptor corresponds to the local voltage.
To change over from AC power to battery powe r, re m ove the plug from the DC IN
jack. Always disconnect the adaptor from the wall outlet when not in use.
Using batteries
The re c e i ver can also operate on battery power using t h ree size “C” or type R14
batteries. To install the batteries:
1 ) Re m ove antenna. Re m ove battery cover which also serves as the Wo r l d Sp a c e
antenna pocket, by releasing cover latch and sliding the cover dow n .
2) I n s e rt the batteries. Be certain to match the polarities (+/-) as show n .
3) Replace the battery cove r.
When you switch the re c e i ver power on (the power switch is on the top panel of the
re c e i ver), the front LCD panel indicates the state of the batteries:
Batteries full
Batteries need re p l a c e m e n t
Page 11

SW I T CHIN G ON YO U R R E C E I V ER
Switch on the re c e i ver by sliding the switch on the top of the re c e i ver to the
‘ O n’ p o s i t i o n .
P O INTING THE ANTENNA
1) Re m ove the antenna from its pocket and unwind the cable.
2) Connect the antenna cable plug to the AN TENNA IN jack on the side
of the re c e i ve r.
3) Place the antenna on a horizontal surface near a window or outdoors in such
a way that there are no obstacles between the antenna and the satellite.
4) Point the antenna’s flat front face at the satellite. Consult the AN TENNA POIN TIN G
GUIDE for the necessary Antenna Position and Direction for your location
(pages 7–9 of this User’s Guide).
5) Once antenna is pointed corre c t l y, the LCD panel displays signal strength bars,
indicating satellite signal is being re c e i ve d .
NOTE: As with all media delive r ed by satellite, Wo r l d Sp a c e signals tra vel in a dire c t
line from the satellite to your re c e i ver antenna. This path must be unobstructed
so that the antenna can re c e i ve these tra n s m i s s i o n s .
1 1
Page 12
12
RE C EI V I NG W O R L D S P AC E
By running the LEARN mode, your Wo r l d Sp a c e re c e i ver automatically scans and
s t o res all Wo r l d Sp a c e carriers and their broadcast channels available in your are a .
We strongly recommend that you run the LEA RN mode the first time you turn on
the re c e i ver and when the re c e i ver is moved to a new country or re g i o n .
U SING LEA R N MODE TO FIND BROADCA ST C H A N N E L S
LEARN M o d e
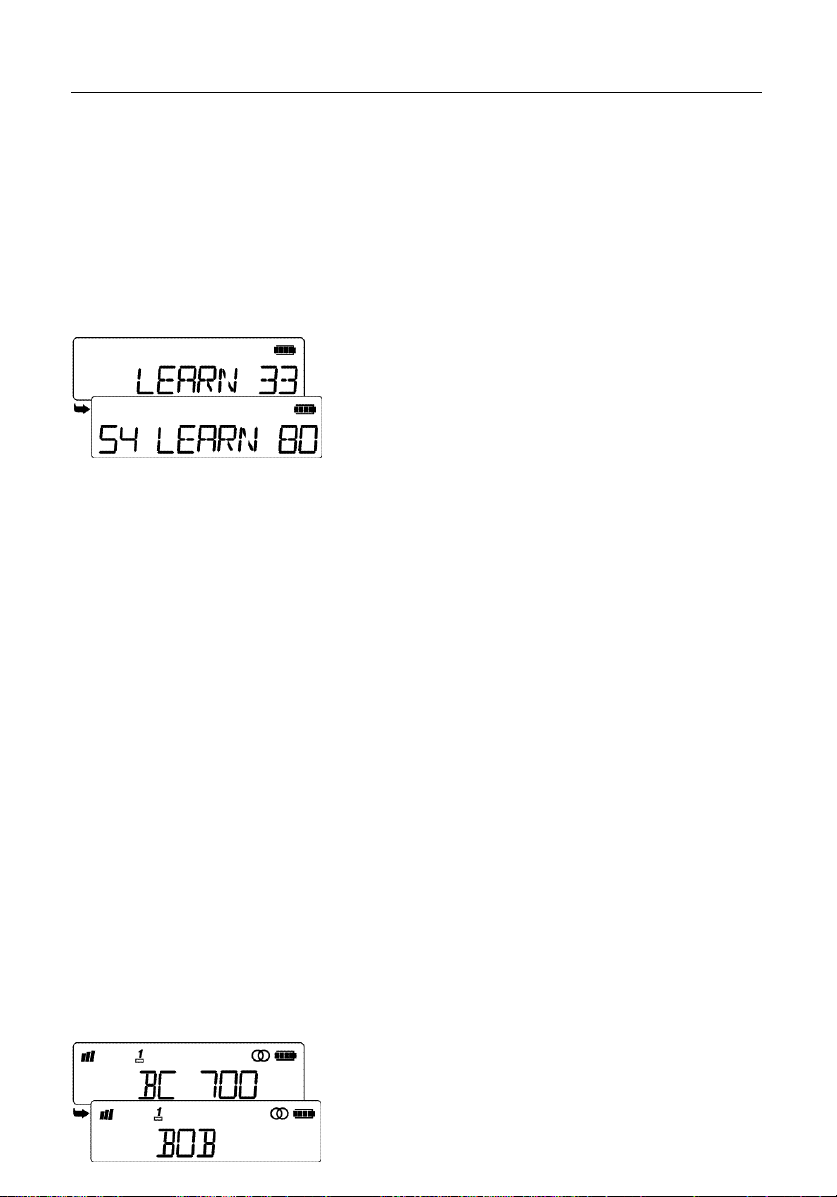
• Press and hold the LEA R N button for 2 seconds and re l e a s e .
• The LCD panel shows “LEARN”. On releasing the button, the LEARN mode begins
scanning for available carriers in your area. This process takes one minute. Once
completed, the first available BC will play.
NOTE: If the LEARN mode does not find the Wo r l d Sp a c e carriers and bro a d c a s t
channels available in your area, run the EX TEND E D LEARN m o d e
NOTE: As you perform the LEARN mode, be sure LCD panel displays signal stre n g t h
bars indicating signal re c e p t i o n .
EX TENDED LE ARN M o d e
• Press and hold the LEA RN button for 5 seconds and re l e a s e .
• The EX TEND ED LEARN Mode is necessary should Wo r l d Sp a c e launch additional
satellites or install repeater services. Visit our Website at w w w . w o r l d s p a c e . c o m
for updates.
NOTE: The LEARN and EX TEND ED LEARN modes will not reset or clear the
channel pre s e t s .
SELECTING BROADCA S T CHANNELS (BC s )
You can select BCs sequentially by pressing the B ROA D CAST C H A N N E L ▲/▼ b u t t o n s .
When selecting a BC, the LCD panel shows first its number followed shortly by its
channel name. After selecting the last BC of a carrier, pressing ▲ will automatically
s c roll to the first BC of the next carrier. T h e
same is true when the first BC is selected and
you press ▼.
Page 13
SELECTING SERVICE CO M P O N E N T S W I TH I N A BR OA D C AS T C H A N N E L
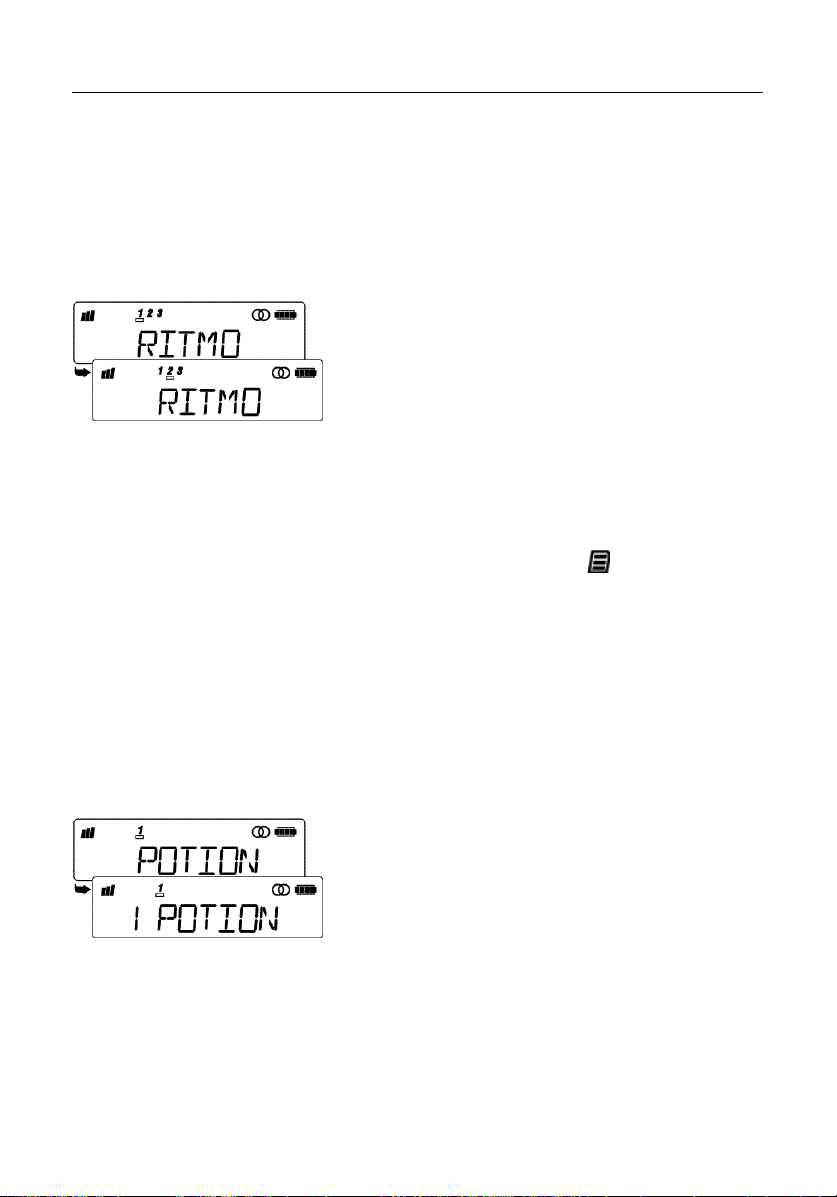
Some broadcast channels may have more than one service component. In this case,
use the S E RVICE CO M P O N E N T + / - buttons to scroll and select the desired serv i c e
c o mponent of that broadcast channel. For instance, if the “RI TMO” channel decided
to broadcast in more than one language on multiple service components and yo u
wanted to hear one of the alternative languages, you would select the appro p r i a t e
s e r vice component using the S E RVICE CO M P O N E N T + / - b u t t o n s.
P R ES E T S MOD E: S T O R I NG , SELEC T I N G, A N D D EL ET I N G
B R O A D C A ST C H A N N E L S
The P RESET mode can be switched on and off by briefly pressing the P R E S E T S b u t t o n .
If the P RESET mode is switched on the LCD panel indicates the symbol.
STORING BROADCAST C H A N N E L S
You can store up to 10 of your favorite BCs in the re c e i ve r ’s memory. To store a BC :
13
1) Make sure the P RESET mode is switched off.
2) Select the BC you wish to store .
3) Press and hold the P R E S E TS button for 2 seconds.
The current BC is now stored in the next free position in the preset list. The pre s e t
number is shown on the LCD panel before the name.
NOTE: If the preset list is full, the LCD panel will show “MEM F ULL ” .
Page 14
1 4
SELECTI NG ST O R ED B RO AD C A ST C H A N N E L S
1) Briefly press the P R E S E TS button to switch on the P R ESET mode. T h e
symbol appears on the LCD panel.
2) S c roll through stored stations sequentially by pressing the B ROA D CAST C H A N N E L
▲/▼ b u t t o n s .
DELETING STO R ED BRO AD CAST CHAN NE LS F R OM T H E P R E S E T L I S T
1) Switch on P RESET m o d e .
2) Select the BC you wish to delete from the preset list.
3) Press and hold the P R E S E TS button for 2 seconds. The current channel is
e rased from the preset list. The LCD panel will no longer show the preset
number before the channel name.
4) After the channel is erased the re c e i ver automatically switches the P RESET
mode off.
When selecting a channel, the re c e i v er verifies that the channel is not alre a d y
s t o red. If a channel is already stored, its memory location number appears on the
LCD panel in front of the channel name, and it will not be stored a second time.
E N C RY P T E D C HA NN E L S
Depending on your region, some or all channels are encrypted for audio subscriptionbased listening. If you select a channel that is encrypted, a key symbol appears
on the LCD panel and no audio is heard. To access these channels a password must
be entered. Your re c e i ver has a unique ID number that is re q u i red for the distributor
to set up your subscription. Contact your nearest Wo r l d Sp a c e distributor for
m o re information about subscription-based services or visit our Website at
w w w.worldspace.com.
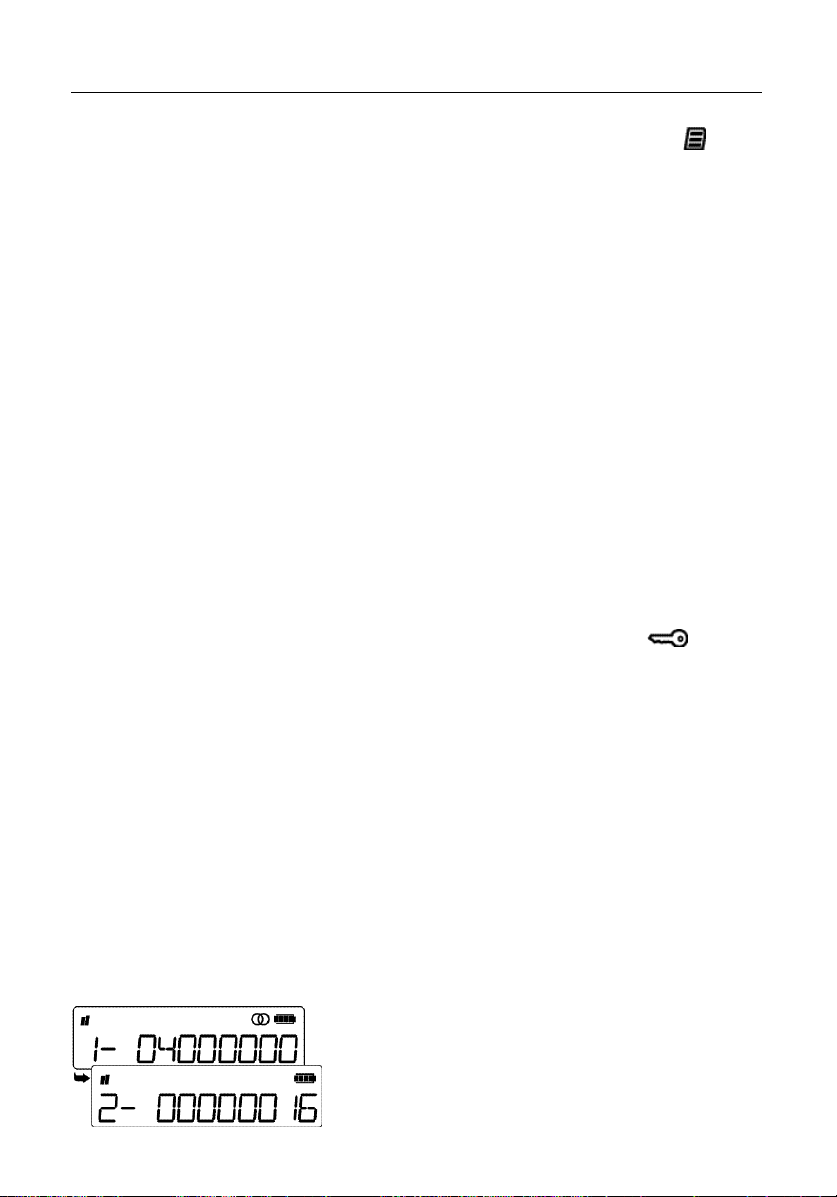
D I S P L AY IN G YO U R 16 – D I G IT RECEIVER ID
1) Press and hold the S E RVICE CO M P O N E N T + (plus) button more than 5 seconds.
After 2 seconds, the re c e i ver enters PASSWORD EN T RY mode. After 5 seconds,
the re c e i ver enters RE C EI V E R ID mode and the LCD panel shows “1–” followe d
by the first 8 digits of the re c e i v er ID .
2) Press the S E RVICE CO M P O N E N T + button. “2–” followed by the remaining
8 digits of the re c e i ver ID appear on the LCD panel.
Page 15
1 5
PAS S WO R D
You will be issued a password that is unique to your re c e i ver and cannot be used
with another re c e i ve r. Pa s s w o rds are entered once and then stored. This password
remains stored and valid for the whole subscription period. A password is either 22
or 25 digits in length. The re c e i ver can store up to 8 passwords for different services.
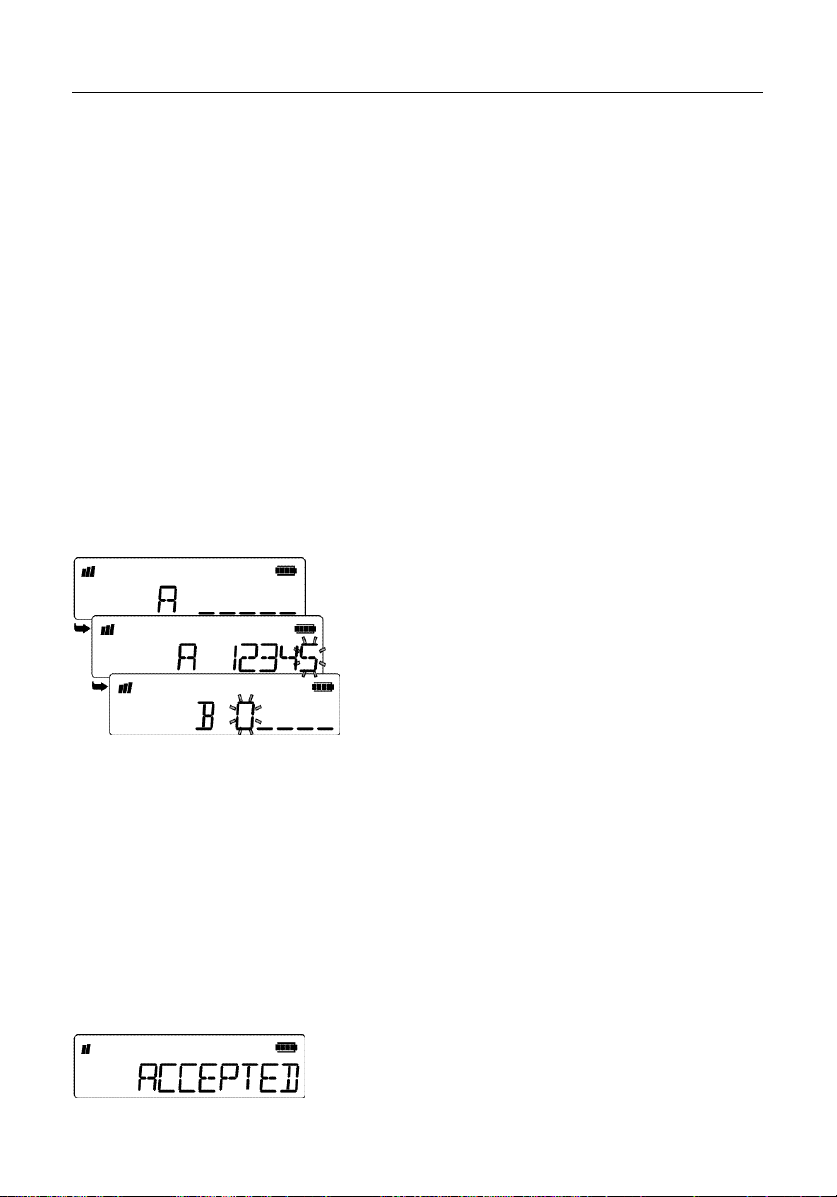
Entering password mode:
1) Press and hold the S E RVICE CO M P O N E N T + button for more than 2 seconds.
The LCD panel shows “A _ _ _ _ _”. The blinking cursor indicates your
c u r rent position.
2) Enter the first 5 digits.
Enter the first digit by using the B ROA D CAST C H A N N E L ▲/▼ buttons
to scroll through digits (0–9). When the proper digit is in the field, use the
S E RVICE CO M P O N E N T + and – buttons to move the cursor to the left or right.
3) After you have entered the fifth digit, press the S E RVICE CO M P O N E N T + b u t t o n
to move to the next scre e n .
The LCD panel shows “B _ _ _ _ _.”
4) Enter the next 5 digits.
As you complete each screen, press the S E RVICE CO M P O N E N T + button to move
to the next screen. When you are finished, you will have completed five scre e n s ,
“Ax x x x x ” t h rough “Exxxxx”. If you we re given a 22-digit password, leave the last
3 digits of scre e n “ Exx _ _ _” blank.
Completing the password entry pro c e s s
To end the password entry pro c e s s :
1) Press and hold the S E RVICE CO M P O N E N T + button for more than 2 seconds.
“ C HE C KING” appears on the LCD panel as the password is being verified. If the
p a s s w o rd is correct, the LCD panel will show “ACC EP TED” for 3 seconds.
Page 16
1 6
2) When an encrypted station is selected, the re c e i ver will automatically searc h
for the necessary password. If the password is found in the memory, you will
be able to hear the encrypted channel.
Re m a r k s :
• During password verification, all buttons will be unava i l a b l e .
• If the re c e i ver is tuned to a decrypted BC, that channel will be muted
during ve r i f i c a t i o n .
• If the password list is full, the oldest password is re p l a c e d .
Clearing the entire password list
To clear the entire password list:
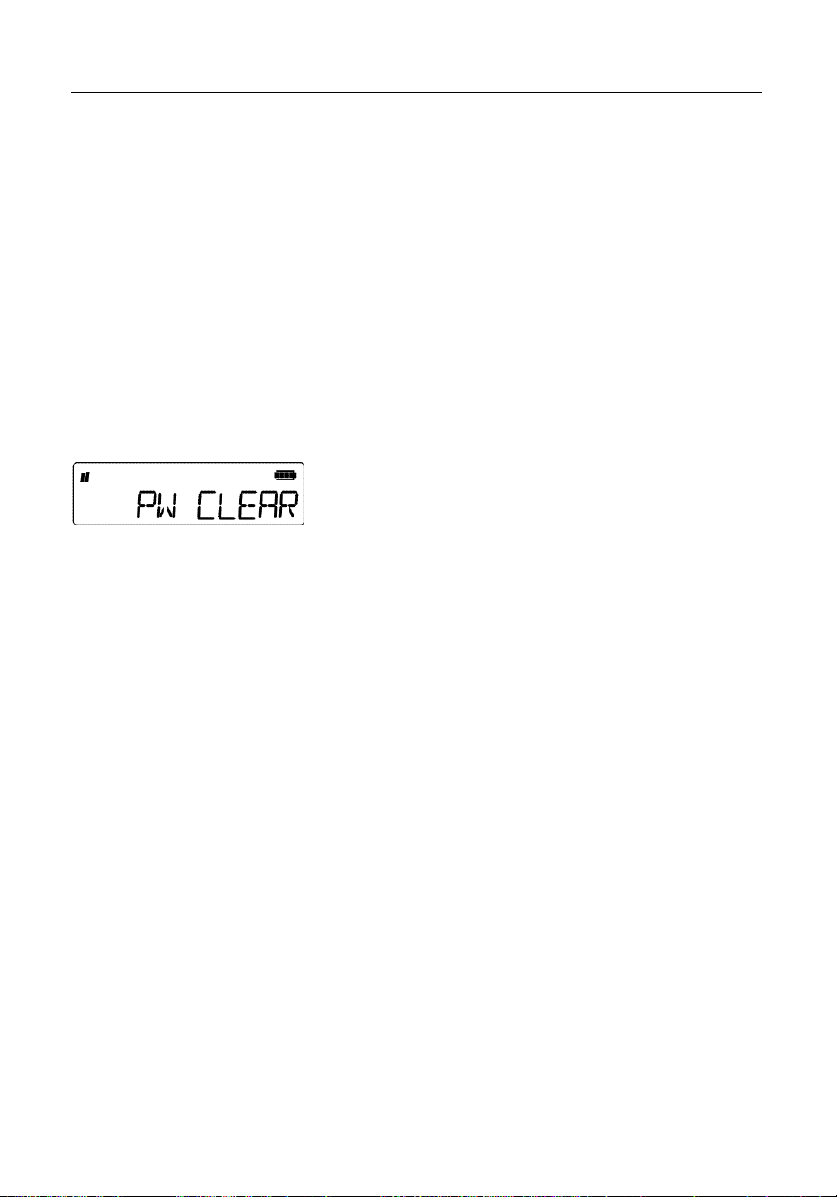
1) Press and hold the S E RVICE CO M P O N E N T + button for more than 10 seconds.
The LCD panel will show “PW CLEAR”.
2) Press the S E RVICE CO M P O N E N T + button once to complete the password clearing
p rocess and confirm that all passwords are cleare d .
NOTE: To cancel the password clearing process, press any button other than
S E RVICE CO M P O N E N T +, or switch off the re c e i ve r.
P C C O N NE C TI O N
The PC CO N NE C TION jack on the left side of your re c e i ver is a port to a new type of
multimedia service. With a Wo r l d Sp a c e PC Adaptor*, you can connect your re c e i ve r t o
your personal computer (using its serial port or USB connector) and re c e i ve the
Wo r l d Sp a c e D i rect Media service, an exciting new way to re c e i ve select web content
d i rect from satellite. Being a Wo r l d Sp a c e D i rect Media subscriber is like having a
p e r s o n a l i zed CD - ROM delive r ed into your PC eve ry day. You interact with the content
that you download, use it on your schedule, and surf from one area of interest to
a n o t h e r. No telephone connection needed!
Wo r l d Sp a c e D i rect Media offers you choice, quality, speed, and re l i a b i l i t y. C o n t a c t
your nearest Wo r l d Sp a c e distributor for more information and how to subscribe, or visit
our Website at w w w . w o r l d s p a c e . c o m.
*
WorldSpace PC Adaptor sold separately
Page 17
A LT E R N A TIV E AN TE N N A OP TI ON S
A LINEAR antenna is supplied with your receiver. Alternatively, you may use a WorldSpace
CIRCULAR antenna, or a LINEAR Yagi antenna with 2.3 volts LNA (Low Noise Amplifier).
You may also have an in-house CABLE-connected outdoor antenna. Optional a n t e n n a s ,
L NAs and in-house installation are available separa t e l y . When changing antennas you will
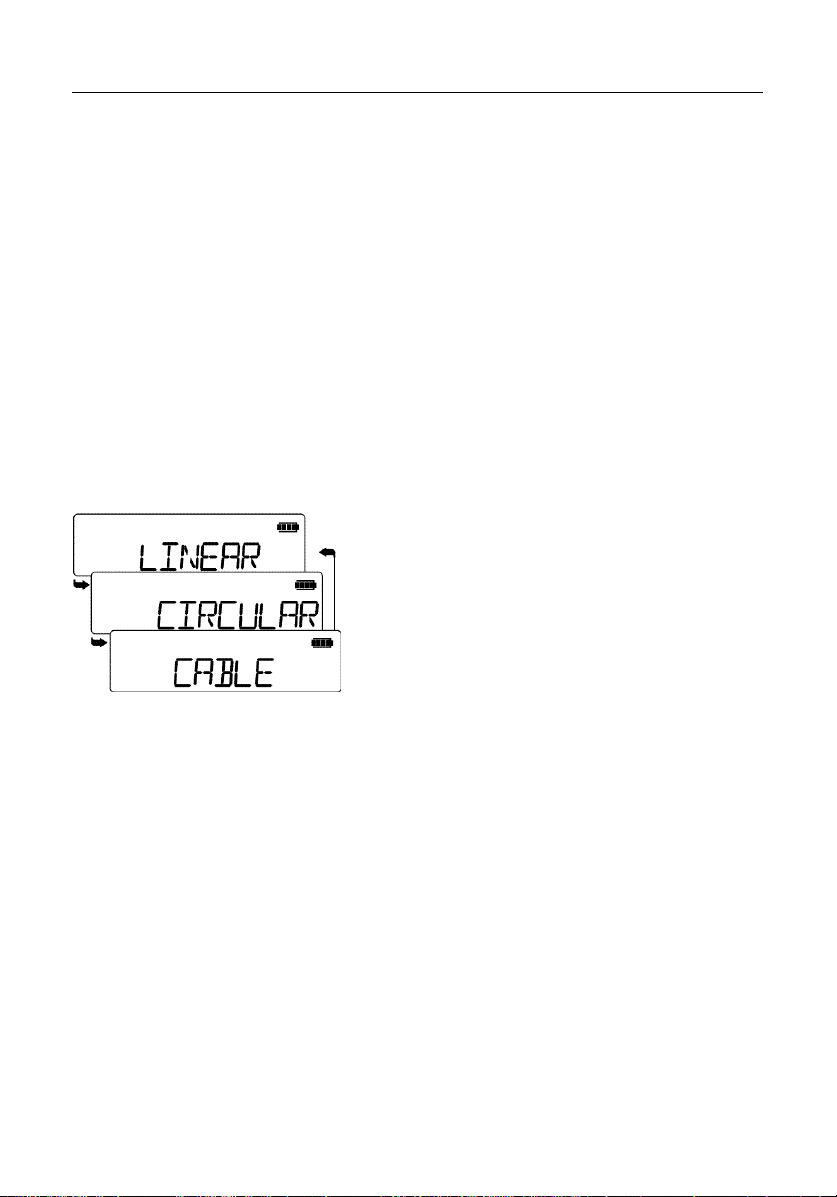
need to select the appropriate antenna mode: LINEAR, CIRCULAR, or CABLE.
NOTE: receivers are factory-set for the LINEAR antenna mode for the supplied antenna.
SELECTING ALT E R N A TIVE ANTENNA OPTIONS
1) While pressing the S E RVICE CO M P O N E N T + button, switch ON the receiver.
The LCD panel will display the antenna mode.
2) Scroll up or down using the B ROA D C AST C H A N N E L ▲/▼ buttons. “LINEAR ”,
“C IRC ULAR ”, and “CA BLE ” display on the LCD panel.
3) When the desired antenna mode is displayed, press the PRESETS key to select it.
17
In LINEAR mode the antenna voltage supply is 3.0 volts. This mode is suited for the
linear antenna provided with the receiver, or a Yagi antenna with 2.3V LNA.
In C I RC ULAR mode the antenna voltage supply is 2.4 or 3.0 volts. This mode is suited for
a circular (patch) antenna. In this mode, the receiver will automatically select the voltage.
In CA BLE mode the antenna voltage supply in the receiver switches off. This mode is for
an in-house cable installation with separate voltage supply for an active outdoor antenna.
NOTE: All antennas options re q u i re an unobstructed line-of-site to the Wo r l d Sp a c e s a t e l l i t e
so that the antenna can receive the transmissions.
Page 18

1 8
MA INTE N AN C E , SA F E T Y, AND H A N DL ING PR E CA U T I O N S
MA I N T E N A N C E
• Use a soft damp cloth to clean the re c e i ver housing.
• N e ver use cleaning agents that contain alcohol, methylated spirits, ammonia
or abra s i ve s .
S A F E T Y PR E C A U T I O N S
CAUTION: TO REDUCE THE R ISK OF ELECTRIC SHOCK, DO NOT OPEN OR R EMOVE RECEIVER
CASING, EXCEPTFOR BATTERY COVER. NO USER SERVICEABLE PARTS ARE INSIDE.
REFER SERVICING TO QUALIFIED SERVICE PERSONNEL ONLY.
• Do not continue to use the re c e i ver if performance is abnormal.
• During lightning, unplug any power cord connecting the re c e i ver to a wall outlet.
If the re c e i ver is being used outdoors, stop using the re c e i ver and store the
re c e i ver and the Wo r l d Sp a c e antenna indoors.
• Use only the specified battery type. Never combine new and old batteries or
d i f f e rent types of batteries to avoid possible injury.
• I n s e rt the batteries as directed, with the correct polarity (+/-).
• D i s c h a rged batteries should be re m oved from the re c e i ver immediately and
disposed of pro p e r l y. If the re c e i ver is not in use for long periods, re m ove the
batteries from the re c e i ver even if they are new.
Wo r l d Sp a c e accepts no responsibility for damage due to leaking batteries.
HANDLING PRECA U T I O N S
WARNING: TO REDUCE THE RISK OF F IRE OR E LECTRIC SHOCK, DO NOT EXPOSE THIS APPLIANCE OR
ITS ACCESSORIES TO RAIN OR MOISTURE.
• Do not immerse in water or use in bathtub, showe r, or swimming pool. Electrical
shock could result. Do not allow the re c e i ver to become wet from rain or splashes.
• Do not expose the re c e i ver to extreme tempera t u re s .
• Do not expose the re c e i ver to direct sunlight, extreme heat, or high humidity.
Do not place it near heat sources, water, or in a sandy or dusty place.
• Do not drop the re c e i ver or cause damage to the cabinet.
• When the re c e i ver is not used for an extended period, unplug from the wall outlet.
• When unplugging the optional power supply from the wall outlet or the re c e i ve r,
g rasp the plug, and not the cord .
Page 19
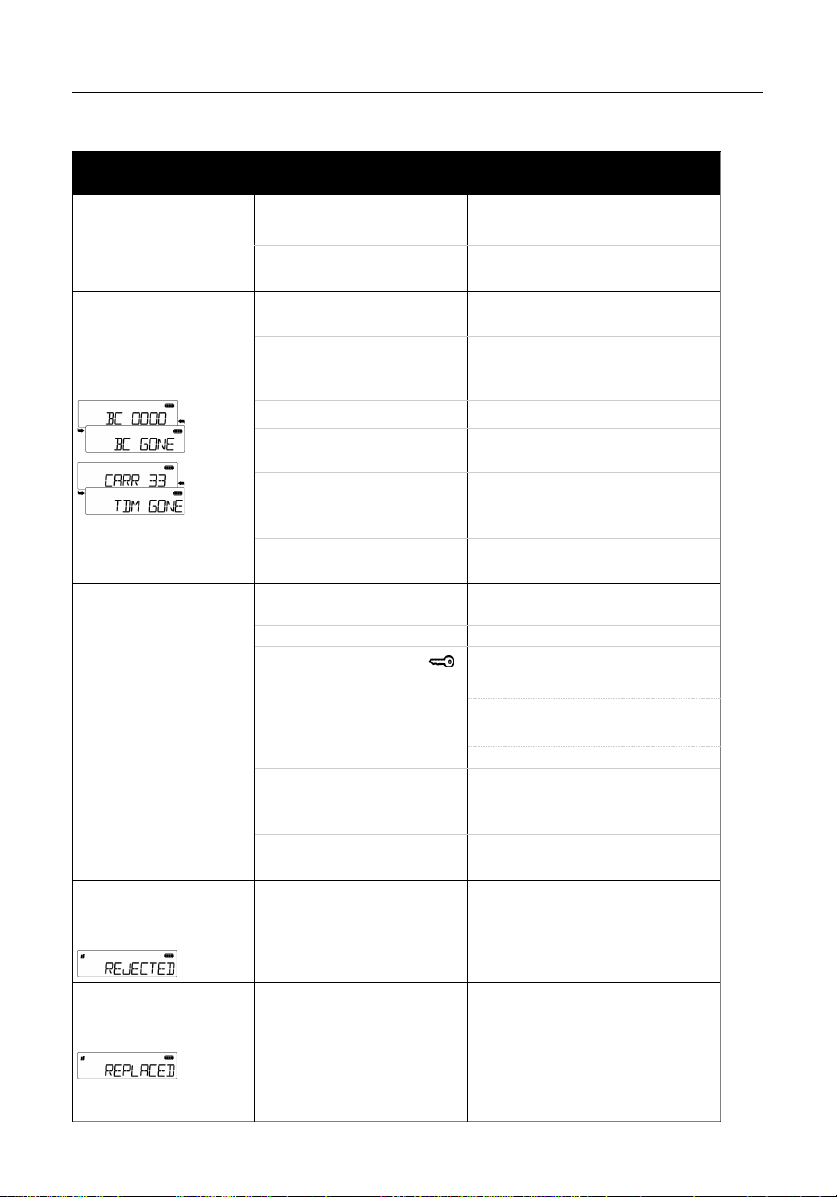
T R O U B L ES H O O TIN G GU ID E
P r o b l e m P o s s i b l e C a u s e R e m e d y
The receiver does Power supply not connected Check the power supply
not switch on. properly. connection.
Batteries not properly Ensure that the batteries
positioned or are empty. a re new and correctly insert e d .
The receiver does not Antenna pointing is not correct. Check “Antenna Pointing Guide”
receive WorldSpace. (see page 4–5).
(LCD panel may There is an obstacle between Set the antenna up in open-air or
show “ BC GONE” the antenna and the satellite. w i n d ow for line-of-sight and to
or “T DM GONE ” ) m i n i m i ze interfere n c e .
Antenna cable is not inserted. Check the cable connections.
The channel location Perform the LEARN mode again
has changed. to find the new BC location.
The channel is temporarily Contact your nearest WorldSpace
not available customer service representative,
see WorldSpace Offices list
Receiver has moved to another Perform the LEARN mode again
country or region. to find the BC.
The receiver receives the Headphones are plugged in. Listen via headphones or pull
WorldSpace signal but no headphones out of the receiver.
sound is heard. Volume is set too low. Adjust the volume.
The LCD panel shows the A password has to be entered to
symbol which means that the access this encrypted station
station is encrypted.
Contact your nearest WorldSpace
distributor to subscribe.
Select another BC.
Selected BC is for DATA. Contact your nearest WorldSpace
distributor to subscribe.
Select another BC.
The receiver has a Switch the receiver off and on
synchronization problem. again to reset completely.
When I enter my pass- The password is incorre c t . Confirm the password and reenter it.
word, the LCD panel If you still receive the “REJECTED”
reads “REJECTED”. message, contact your WorldSpace
distributor.
1 9
When I enter my pass- T h e re was already a password This is normal. No further action
word, the LCD panel for the same service in the is required.
reads “REPLACED”. password list.
Page 20
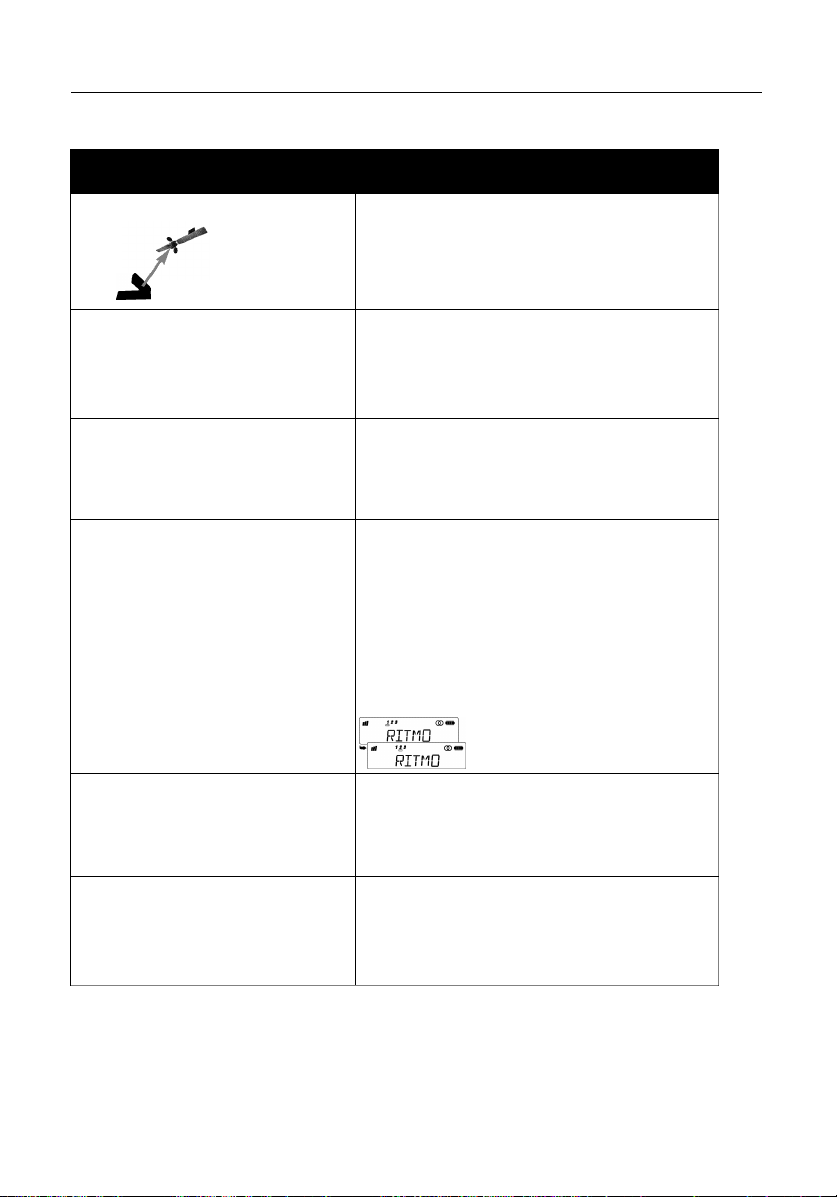
2 0
F R E Q U E N T LY AS K E D QUE S T I O N S
Q u e st i o n A n s w e r
What is line-of-sight? Line-of-sight means the receiver’s satellite antenna
Why is line-of-sight needed As with all satellite broadcasting, WorldSpace
for satellite reception? transmissions travel directly from the satellite
What do the BROADCAST CHANNEL Allow listeners to scroll through available BCs. In
▲/▼ buttons do? P RESET mode, these buttons take you to the next
What is a service component? A service component is a separate program within
Is a service component always Some broadcasters may use a service component
an audio channel? to transfer data other than audio. In that case, no
Do all broadcast channels have Yes. All broadcast channels have at least one service
service components? component. Some have more, up to eight service
has a direct and clear path to where the Wo r l d S p a c e
satellite is located in the sky.
to your receiver antenna. This path must be
unobstructed so that the antenna can receive
these transmissions.
or the previous stored channel. In PASSWORD entry
mode, you increase or decrease the current digit by
pressing these buttons.
a BC. One BC can have as many as eight service
components. The LCD panel on your receiver shows
how many service components are available for the
selected broadcast channel. For instance, if the
“RITMO” channel decided to broadcast in more
than one language on multiple service components
and you wanted to hear one of the alternative
languages, you would select the appropriate
service component.
sound will be audible upon selection of that service
component and the LCD panel shows “DATA” every
2 seconds.
components. The LCD panel displays the number
of available service components for the selected
b roadcast channel.
Page 21

Q u e st i o n A n s w e r
What do the S E RVICE CO M P O N E N T +/- A l l ow listeners to scroll through a broadcast channel’s
buttons do? available service components. Press the S E RVICE
CO M P O N E N T + and S E RVICE CO M P O N E N T - buttons
to scroll forward and backward, re s p e c t i ve l y , thro u g h
available service components.
These buttons have some additional features.
Press the S E RVICE CO M P O N E N T + button and hold
it 2 seconds to enter PASS W ORD EN T RY mode.
Once in PASS WORD EN T RY mode, press S E RVICE
CO M P O N E N T + again to move to the next password
field screen. Press S E RVICE CO M P O N E N T - to return
to previous field screens.
Press the S E RVICE CO M P O N E N T + button and hold
it 5 seconds to enter RECEIVER ID mode. Once in
RECEIVER I D mode, press S E RVICE CO M P O N E N T +
again to see the second 8 digits of the receiver ID.
What is Last Channel Memory Recall? If the re c e i ver remains tuned to a broadcast channel
for at least 10 seconds, this broadcast channel
and volume level are stored. When the receiver is
switched off and on again, the receiver will tune to
that last broadcast channel.
What is a carrier? A carrier is an efficient technology used by the
Wo r l d S pace satellites to tra n s p o rt multiple Wo r l d Sp a c e
b roadcast channels. Each Wo r l d S pace satellite has
t h ree beams, and each beam has two carriers. Each
carrier contains multiple broadcast channels. After the
LEARN or EXTENDED LEARN mode has been scanned
and automatically stored all carriers available in yo u r
region, you will have access to all these carriers’
b roadcast channels.
2 1
When I use the LEARN mode, the LCD WorldSpace uses, and the WorldSpace receiver
panel displays a series of numbers. What recognizes, a predefined carrier list
is the significance of these numbers? (numbers 33, 38, 43, 48, 54, 59, 75, 80). The
When I use the E XTENDED LEARN mode, The EXTENDED LEARN mode scans all carriers
the LCD panel displays a series of from 0–81 for available broadcast channels and
numbers. What is the significance of service components in your region and stores them.
these numbers? This mode can be used any time, but is only
LEARN mode searches through these predefined
carriers to find the available broadcast channels
and service components for your region and
stores them.
n e c e s s a ry should WorldSpace launch additional
satellites or install repeater services.
Page 22

2 2
A D D I T I O N A L I N F O R M AT I O N
T E C H N I CA L S P E C I F I C AT I O N S
BROA D CAST SYSTEM Wo r l d S p a c eTMs y s t e m
FREQUENCY RANGE L band (1453.384–1490.644 MHz)
MODULATION QPSK
AUDIO CODING MPEG 2/Layer 3
ANTENNA Linear Patch antenna with 1 metre extension cable
TERMINALS Antenna input: F-type/50
POWER SOURCE Batteries: 3 x size “C” or type R14
GENERAL Dimensions (l x h x d): 220 x 150 x 90 mm
ACCESSORIES/OPTIONS AC power adaptor
*
Power supply input: DC 5.5 V, 5.0 x 1.7mm ø
Headphones: 3.5 mm stereo jack
External Data: digital data out for PC connection
AC with adaptor: (50/60 Hz, 4.5–6.0 volts DC,
minimum 500 mA, plus-pole to the
center pin)
Weight: 680 grams without batteries
antenna extension cable
Wo r l d S p a c e PC Adaptor for Direct Media service
WA R R A N T Y
Wo r l d Space warranties this digital re c e i ve r, model WSSR-11, against any defect arising fro m
faulty material or workmanship for a period of one ye a r. This warranty is not valid in any of the
f o l l owing eve n t s :
• Technical Assistance Card is not fully completed and returned to a Wo r l d Space office within
10 days of consumer purc h a s e .
• Instructions given in the User’s Guide are not strictly followe d .
• Defects occur as a result of improper or reckless use or handling.
• Work or servicing is performed on this re c e i ver by a non-authorized dealer.
• Modifications or alterations are performed on any of the circuits of the re c e i ve r.
• The re c e i ve r ’s 18-digit serial number is tampered with or re m oved from re c e i ve r.
L EG A L N OT I C E S
Wo r l d Space, AmeriSt a r, AfriSt a r, and AsiaStar are re g i s t e red trademarks of
Wo r l d Space Corporation. All rights re s e rve d .
© 2001 WorldSpace Corporation.
* NOTE: Specifications are subject to change without notice.
Page 23

N OT E S
2 3
Page 24

2 4
N OT E S
 Loading...