

Worldlawn WY33N11BS, WY33N11BSE, WY33N13BSE, WY33N11HD, WY33N11HDE Operator's Manual
...
Worldlawn Power Equipment, Inc.
422 Turnbull Canyon Road City of Industry CA 91744
Toll Free Number:1-866-9-Mowers(1-866-966-9377)
Operator’s Manual
R
Commercial / Residential
33″Mower
●
Service Information
●
Maintenance
●
Mower Operation
●
Adjustments & Repairs
●
Warranty

Service Information
WORLDLAWN 33” COMMERCIAL RESIDENTIAL MOWER
SERVICE AND REPAIR PARTS INFORMATION
If you have questions, problems, need an Operator’s or Parts
Manual, please contact your local Worldlawn authorized
dealer or call the Factory. When calling or writing, please
provide the Model and Serial Number of your Mower.
WORLDLAWN POWER EQUIPMENT INC.
Phone: ……………………………………(626)934-8552
Fax: ………………………………………(626)934-8162
E-mail: Worldlawnmower@adelphia.net
Some of the pictures will vary between models but they
usually depict similar information.
MODEL NUMBERS 33” MOWERS
MODEL ENGINE STARTER
WY33N11BS B&S10.5HP Intek I/C Recoil
WY33N11BSE B&S11.5 HP Intek I/C Electric
WY33N13BS B&S13HP Intek I/C Recoil
WY33N13BSE B&S13HP Intek I/C Electric
WY33N11HD Honda GXV340 Recoil
WY33N11HDE Honda GXV340 Electric
WY33N13HD Honda GXV390 Recoil
WY33N13HDE Honda GXV390 Electric
WY33N13KW Kawasaki FH381V Recoil
WY33N13KWE Kawasaki FH381V Electric
Factory specified replacement parts for your Mower are
available from either your local worldlawn authorized dealer
or by calling the Factory.
Contact your local Worldlawn or Engine authorized dealer or
call the Factory where local laws require the Mower to have
a Spark Arrester Muffler.
For engine information, contact your nearest authorized
Engine Service Dealer. Look in the Yellow Pages under
“Engine-Gasoline.” The Engine Warranty is covered by the
Engine Manufacturer’s Limited Warranty.
Record (See FIG.1)
Model No.
Serial No.

Table of Contents
TABLE OF CONTENTS
SAFETY INFORMATION
Equipment Safety and Training……………..………………………………………... 1
Preparation to Mow…………………………………………………………………... 1
Operating the Mower ……………………………………………………………........ 1
MAINTENANCE
Maintenance and Storage…………………………………………………………....... 1
Initial Assembly……………………………………………………………………..... 2
Blade Care……………………………………………………………………………. 2
Daily Maintenance……………………………………………………………………. 2
Safety decals………………………………………………………………………….. 2
MOWER OPERATION
Operation……………………………………………………………………………... 3
Starting the engine……………………………………………………….……..…….. 3
Stopping the engine…………………………………………………………………... 3
Blades and wheels drives………………………………………………………........... 3
ADJUSTMENTS AND REP AIRS
Adjustments and Repairs………………………………………………………........... 4
Blade Replacement…………………………………………………………………… 3
Blade Spindle Belt Replacement……………………………………………………... 4
Blade Brake Pad Replacement……………………………………………………….. 4
Blade Drive Belt Replacement……………………………………………………….. 4
Transmission Drive Belt Replacement……………………………………………….. 5
Wheel Drive Belt Replacement………………………………………………………. 5
Wheel Drive Controls Adjustment…………………………………………………… 5
Wheel Brake Adjustment……………………………………………………………... 6
Blade Drive Lever Adjustment……………………………………………………….. 6
Shift Control Rod Adjustment………………………………………………………... 6
Cutting Height Adjustment…………………………………………………………… 6
ECECTRICAL SCHEMATIC
Wiring Harness Diagram……………………………………………………………... 8
ACCESSORY
Nylon Grass Catcher…………………………………………………………………. 9
WARRANTY
Warranty Information………………………………………………………………… 10
NOTES
Notes………………………………………………………………………………….. 11

Safety Information
1
RULES FOR SAFE OPERATION
LOOK FOR THIS SYMBOL TO POINT OUT IMPORTANT
SAFETY PRECAUTIONS. IT MEANS ATTENTION!
BECOME ALERT! YOUR SAFETY IS INVOLVED.
EQUIPMENT SAFETY AND TRAINING
● READ the OPERATOR’S Manual Carefully. Be
thoroughly familiar with the controls and the proper use of
the Mower.
● NEVER allow children to operate or ride on the Mower.
Do not allow adults to operate the Mower without proper
instruction.
● KEEP the area of operation clear of all by standers,
particularly small children and pets.
● DO NOT operate the Mower if under the influence of
alcohol, medication or when tired or ill.
PREPARATION TO MOW
● THOROUGHLY inspect the area where the Mower is to
be used and remove all stones, sticks, wires, bones and other
foreign objects.
● DO NOT operate the Mower when barefoot or wearing
open sandals. Always wear appropriate footwear.
● CHECK the fuel before starting the engine. Do not fill the
Gasoline Tank indoors or when the Engine is running .Wait
until the Engine has cooled for several minutes after running.
Clean off any spilled gasoline before starting the engine.
● KEEP
the Blade Drive Lever in the disengaged position and
shift the Transmission into neutral before starting the engine.
Never make a height adjustment or any Mower adjustment
while the engine is running.
● NEVER operate the Mower in wet grass. Always be sure
of your footing; keep a firm hold on the handles and walk;
never run.
OPERATING THE MOWER
● ALWAYS wear safety goggles or safety glasses with side
shields when operating the Mower.
● DO NOT change the Engine Governor setting or over
speed the engine.
● DO NOT put hands or feet near or under rotating parts.
Keep clear of the discharge opening at all times.
● TEST the operation of Blade Drive Lever before each use.
If Blades rotate longer than three seconds after the controls
are disengaged, stop the Engine and immediately contact
your local Worldlawn authorized dealer or call the factory
for instructions. DO NOT use the Mower until the
mechanism is repaired.
● MAKING TURNS :The Mower turns easily by squeezing
the right of left lever.
● WAT C H for traffic and STOP the Mower Blade when
crossing gravel drives, walks or roadways.
● MOW only in daylight or in good artificial light.
Always run the Engine at the fast speed setting for best
mowing performance.
● STOP the Engine, after striking a foreign object,
disconnect the spark plug wire, thoroughly inspect the
Mower for any damage and repair the damage before
restarting and operating the Mower.
If the Mower should start to vibrate abnormally, STOP the
Engine, disconnect the spark plug wire, and check
immediately for the cause. Vibration is generally a warning
of trouble.
● STOP the Engine whenever you leave the Mower, or
during cleaning, repairing or inspecting. Make certain the
Blades and all moving parts have stopped. Disconnect the
spark plug wire, and keep the wire away from the plug to
prevent accidental starting.
● MOW across the face of slopes; never up and down.
Exercise extreme caution when changing direction on slopes.
Do not mow on slopes (with an incline of more than 15°).
Exceeding the maximum safe operating angle may cause
tipping and loss of Mower control.
● ALWAYS mow with all Covers in place and the Discharge
Chute in the down position except if an optional Grass
Catcher is completely installed.
● DO NOT touch Engine parts which may be hot from
operation. Allow parts to cool completely before inspecting,
cleaning, adjusting, refueling or repairing the Mower.
● Shut off the Fuel Valve at the bottom of the Tank
before transporting the Mower on a trailer, FIG10.
Failure to do so may cause flooding of the Carburetor due to
road vibration.
USE THE FOLLOWING MAINTENANCE
PROCEDURES TO KEEP YOUR MOWER IN
GOOD OPERATING CONDITION
MAINTENANCE AND STORAGE
● CHECK the Blade and Engine Mounting Bolts at frequent
intervals for proper tightness.
● KEEP all Nuts, Bolts and Screws tight to be sure the
equipment is in safe working condition.
● NEVER store the Mower with gasoline in the Tank inside
a building where fumes may reach an open flame or spark.
Allow the Engine to cool before storing in any enclosure.
Store gasoline in a cool, well vented area, and only in an
approved container.
● Keep MOWER Blades sharp. Use Caution, wear gloves
and eye protection when servicing and sharpening Blades.
To reduce fire hazard, keep the engine free of grass, leaves,
debris and grease.
Maintenance
2
● Check the tires for proper pressure.
Front caster tires 20psi.
Rear tires 20psi.
● Drain and refill the Transmission Oil yearly—use one pint
of SAE 30. FIG 9 & FIG 15.
● Grease all pivots daily, or more often as needed,
depending on operating conditions.
● Use only Worldlawn
®
original equipment replacement
parts. “WILL FIT” parts could present a safety hazard
and void the warranty.
INITIAL ASSEMBLY
The Handlebars and Control Linkages may not be
completely installed on the Mower and Connectors may be
disengaged. Attach the Handlebars with two bolts on each
side as shown in FIG 9. Attach Throttle Cable to the Engine
as shown in FIG 1 and in the Engine Operating &
Maintenance Instructions. Each of the Control Rods must be
connected as shown in FIG 3 & 10. Follow the instructions
to properly adjust each of the controls. The Fuel Line should
be connected to the Engine Fuel Filter and attached to the
Engine with one Tie. Tighten the Fuel Clamp Screw FIG 1.
Attach the Discharge Chute FIG 7. Attach the LH & RH
Front Caster Wheel Arm Assembly to the Mower Deck with
4 bolts in each Arm.
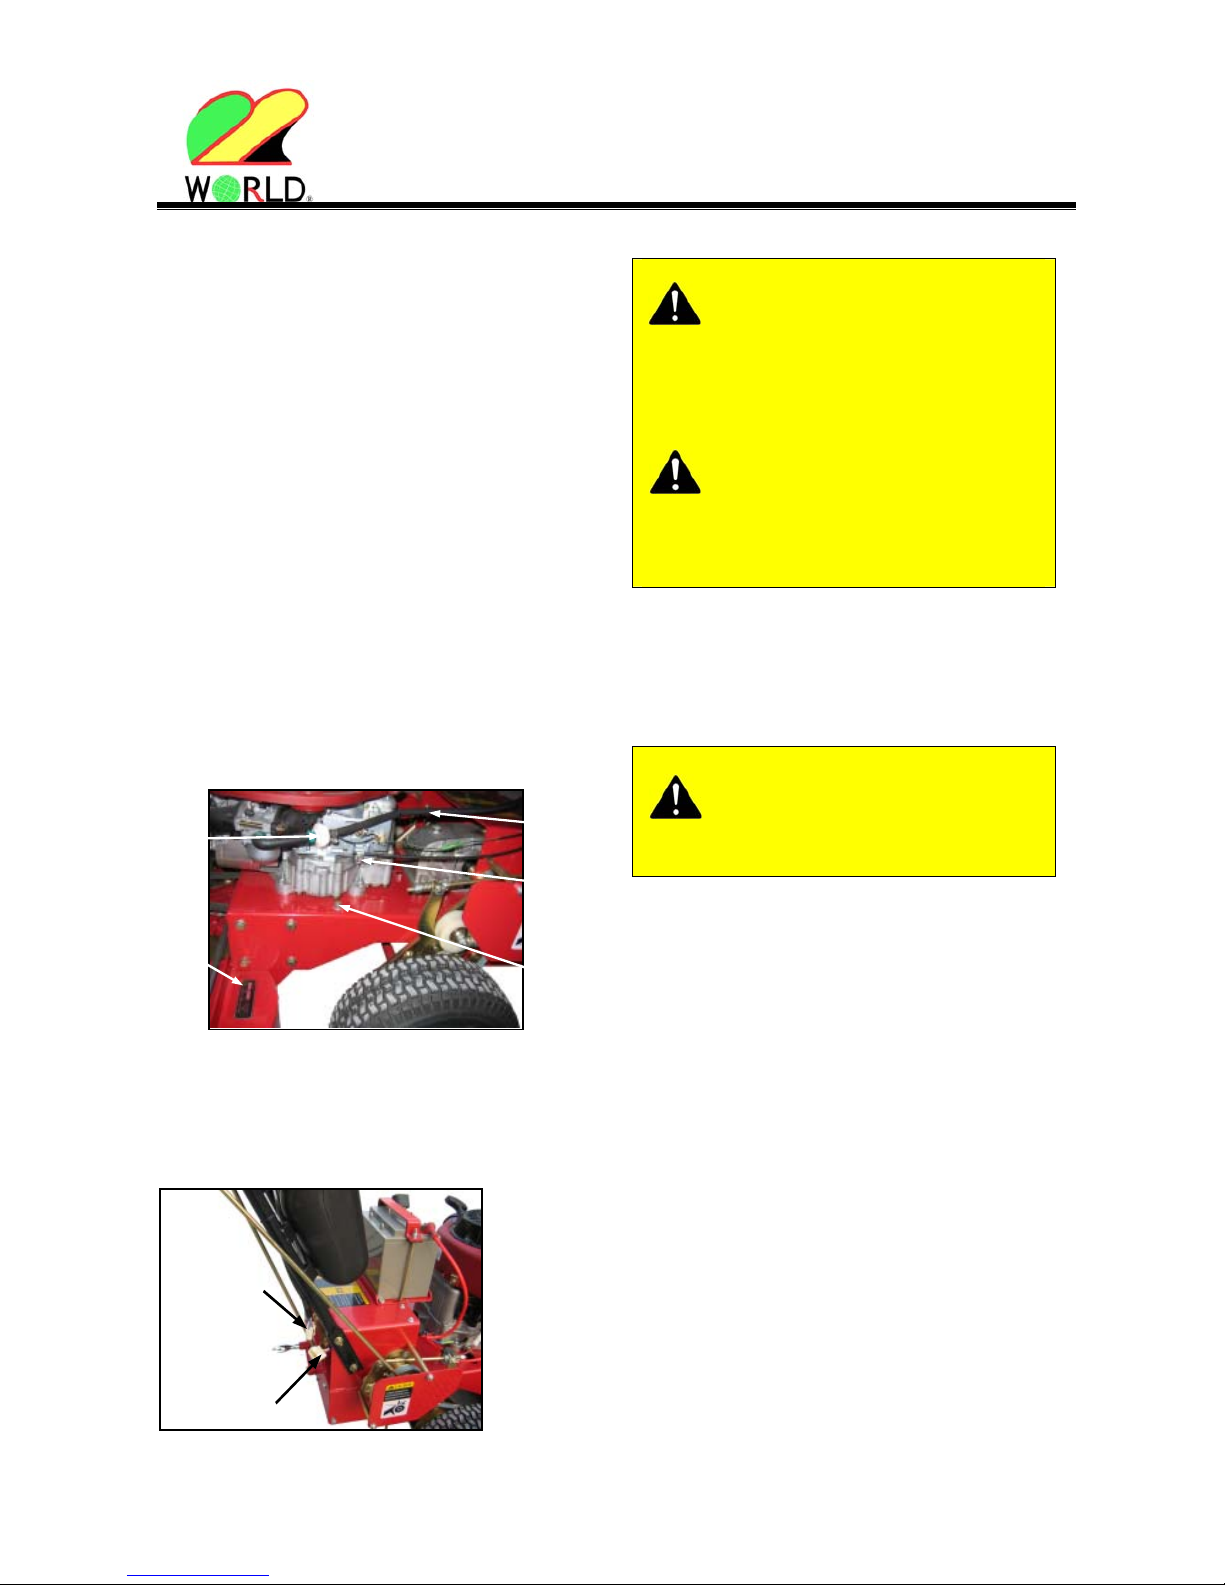
FIG 1 Throttle and Fuel Line Attachment
( The positions of Fuel Filter And Throttle Cable
Attachment are a bit different on different models of B&S.)
For the Electric Start Mower, FIG 2, plug the Connector A
on the Handlebar into the Connector B on the Engine Frame,
refer to the Wiring Harness Diagram, page 8.
Connector A
Connecter B
FIG 2 Electric Start Controls
To prevent personal injury or Mower damage, do
not attempt to start the Engine until the Handlebars and
Control Rods are properly installed, checked for proper
operation and you have read and understood the safety,
controls and operation of the Mower.
Shut off Engine and Disconnect the Spark Plug
Wire, and keep the wire away from the plug to prevent
accidental starting before making any Inspections, Repairs
or Adjustments (Except Carburetor)
REFER to the Engine Operating & Maintenance Instructions
for the following Engine Service Information:
● Safety ● Starting and Stopping
● Engine Information ● Maintenance
● Oil ● Adjustments
● Fuel & Starting Info. ● Parts and Service & Storage
● Warranty Information
Tipping mower for service
When servicing the underside of the Mower,
make sure Mower is securely blocked up to prevent it from
falling and injuring anyone.
Tie
Fuel
Filter
Throttle
Cable
Attachment
BLADE CARE
For best results keep Mower Blades sharp. The Blades can
be sharpened with a few strokes of a file or dressed on a
grinding wheel. DO NOT attempt to sharpen Blades while
on the Mower.
1. When sharpening the Blades take care to maintain Blade
balance. Check for proper balance before reinstalling.
Replacing bent or damaged Blades.
2. To ensure good cutting performance, install new Blades at
the start of each mowing season.
DAILY MAINTENANCE
1. Make sure all Nuts and Bolts are tight and Pins securely in
place. Especially make certain the Engine and Blade
Bolts/Nuts are tightened properly.
2. Pressure wash to remove grease, spilled oil, accumulated
dirt and clippings from around belts and underside of
Mower.
3. Grease Fittings are provided on important parts requiring
lubrication. See FIGS 3 & 10.
SAFETY DECALS
Make certain that all Safety Decals on the Mower are kept
clean and in good condition. For Replacement, please refer
to the Parts Catalog that accompanied the Mower.
Model
Plate
Engine
Pulley Belt
Guard Nut
 Loading...