

Page 1
Installation Instructions for Verano™
!
!
#1500149 - Rev E
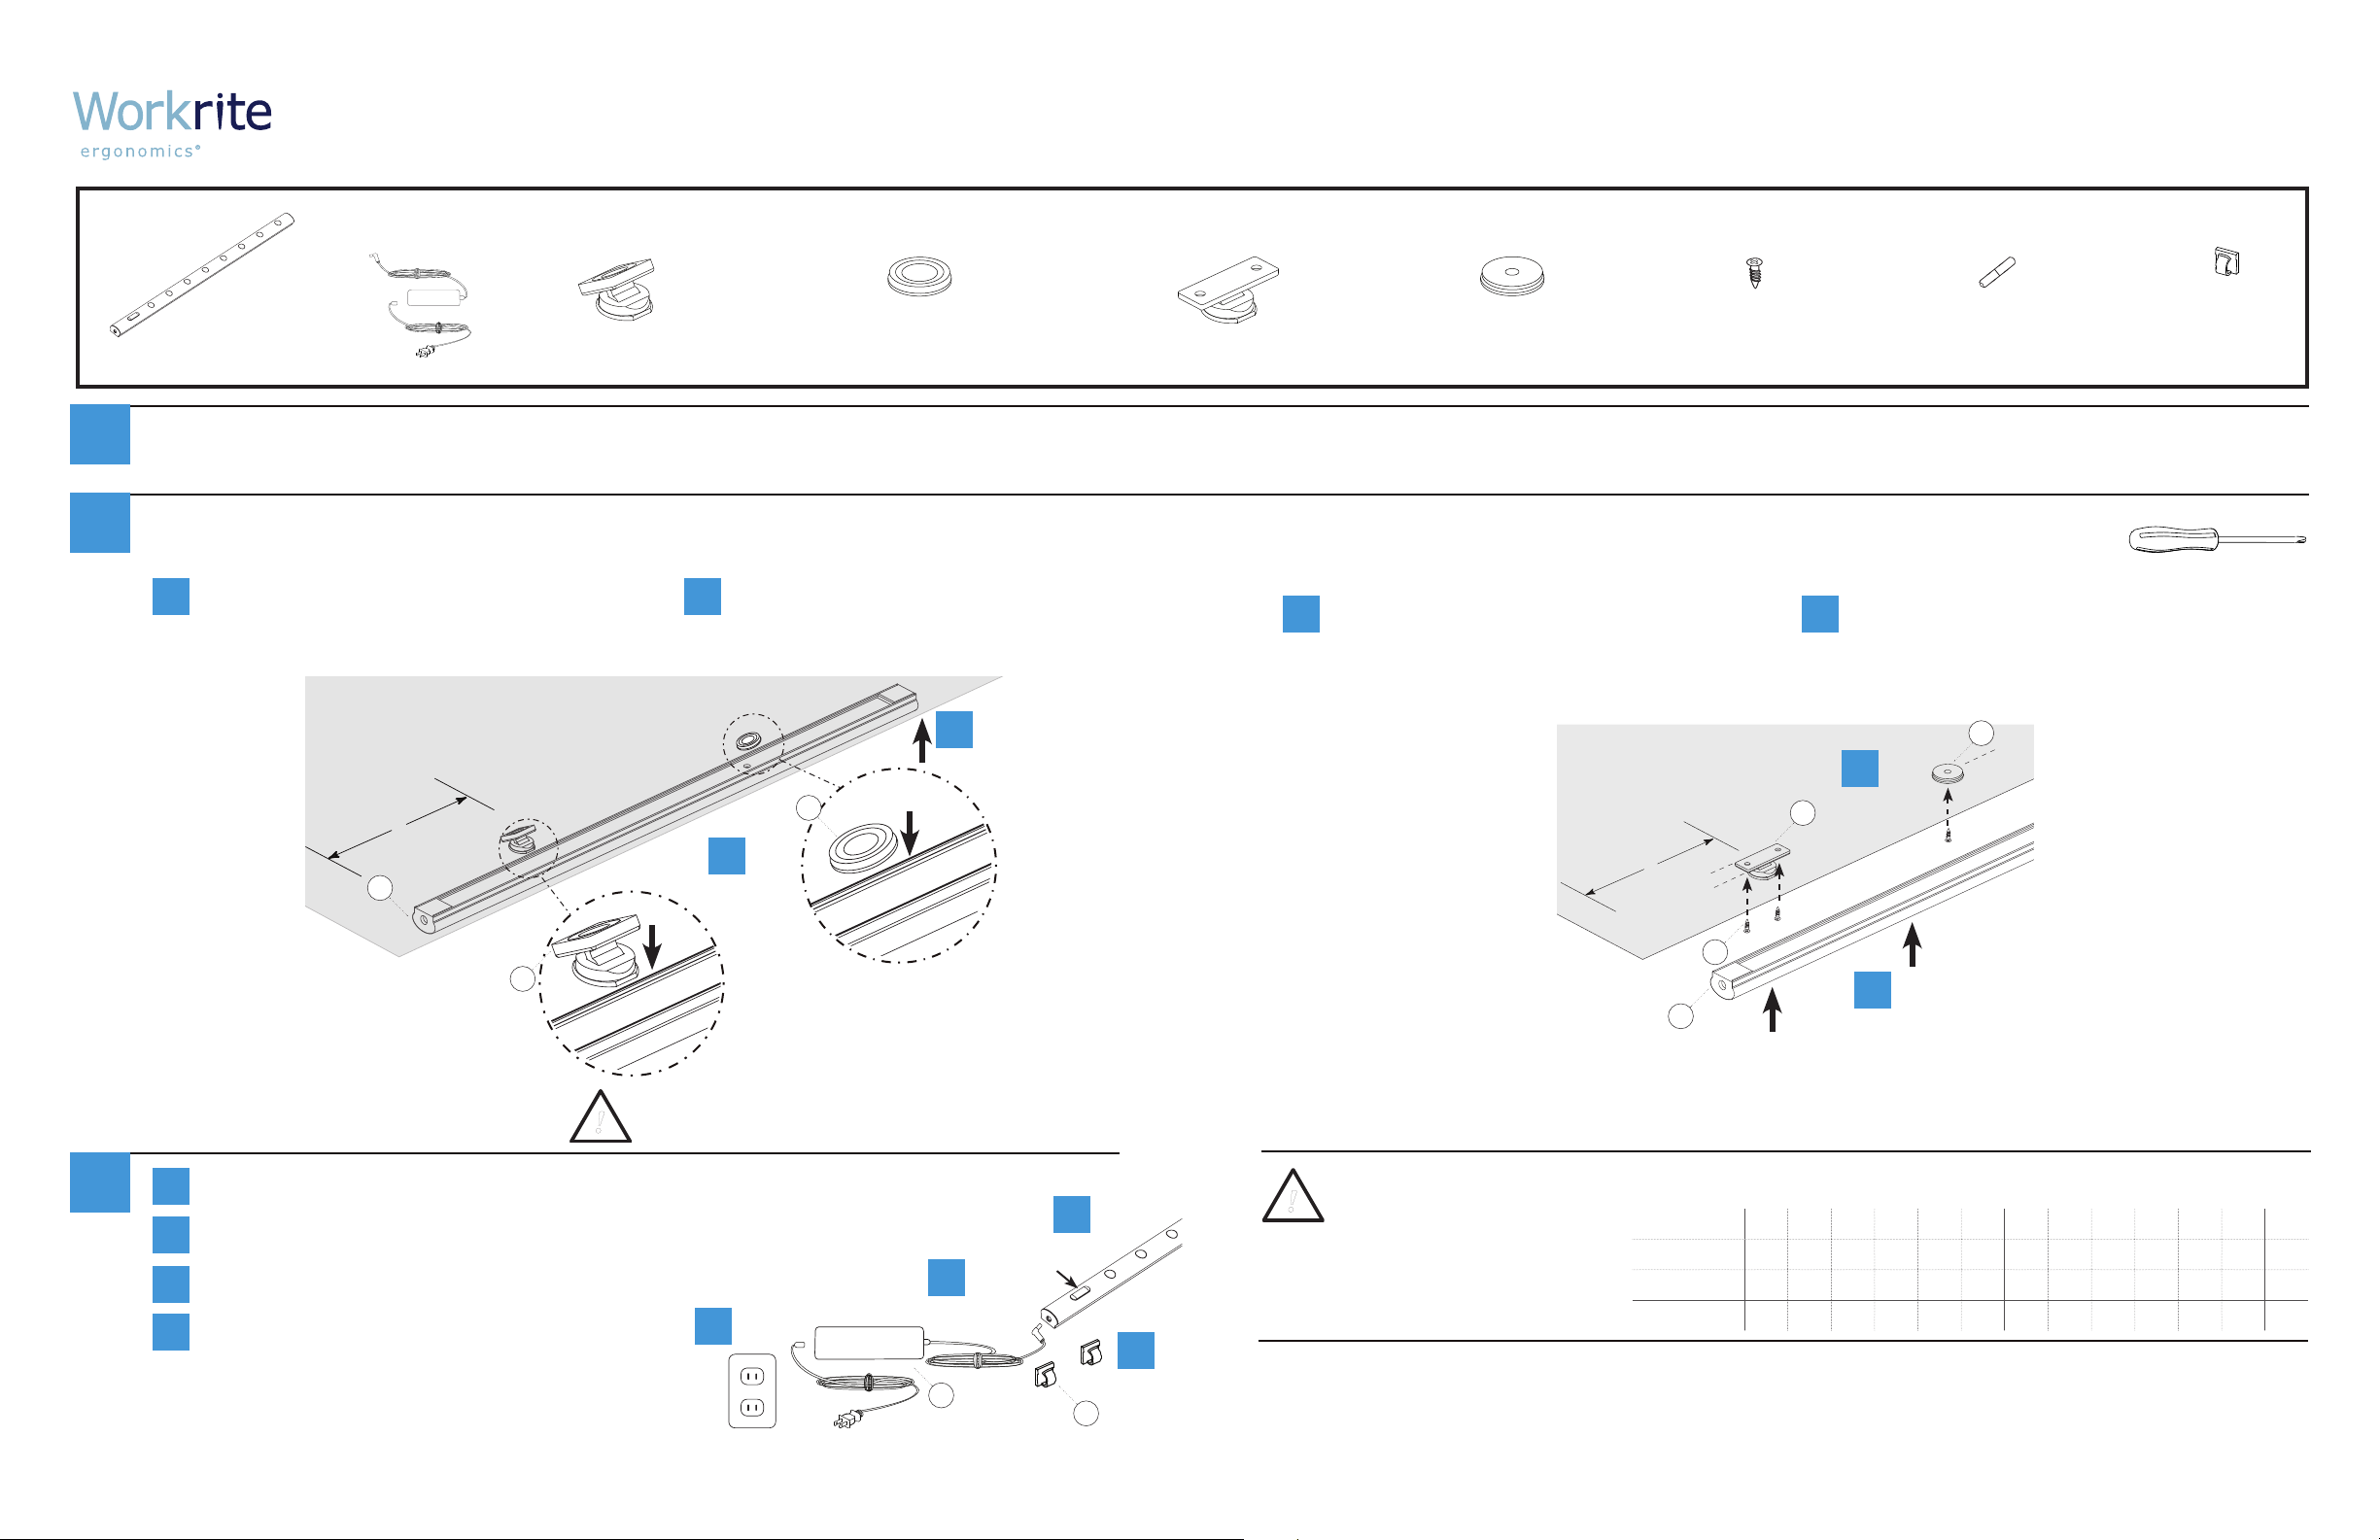
Verano Installation Instructions — single unit, or parent unit of daisy chain
(see reverse for child unit installation)
Light Fixture
A
Qty: 1 C
Transformer
B
Qty: 1
Max 4.0A output
Rotating Magnetic Mounts
Qty: 3 E
Fixed Magnetic Mounts
D
Qty: 4 F
Rotating Wood Mounts
Qty: 3
Fixed Wood Mounts
Qty: 3
M4 Wood Screws
G
Qty: 9
Determine if light will be afxed to a metal or wood cabinet and follow the appropriate step below.
1
If installing parent unit of daisy chain, be sure to position parent unit so that it can be connected to the additional unit with its supplied jumper cable.
Metal cabinet mounting:
2
Snap Magnetic Mounts (C or D) onto back
a
rail. For Rotating Mounts, orient at sides
of Magnetic Mounts with the length of the
Verano.
Under-Cabinet
1" - 6"
v a r.
A
Attach Light Fixture (A) to metal under-
b
cabinet. Magnets will hold Verano in place.
Place lamp on
b
under-cabinet
D
“SNAP”
a
OR
“SNAP”
C
Align at side
with back rail
Press down to
snap into rail
Wood cabinet mounting:
Note: You will need a Phillips-head screwdriver to complete this step.
Attach Wood Mounts (E or F) to underside
a
of cabinet with Wood Screws. (G). If using
3 mounts, be sure they are positioned in a
straight line.
Under-Cabinet
Align mounts parallel
to edges of cabinet
1" - 6"
v a r.
G
A
b
E
“SNAP”
Power Connector
H
Qty: 1
Snap Light Fixture (A) onto mounts to hold
in place.
F
Cable Clips
I
Qty: 2
a
OR
“SNAP”
b
Note: All mount options allow xture to slide from side to side - mounts can be positioned up to 6” from edge of xture.
Plug transformer (B) into wall
3
Workrite Ergonomics | 800.959.9675 www.workriteergo.com
a
Plug power cord into Verano unit end
b
Press power button on Verano to turn on/off.
c
Use Cable Clips (I) as needed to secure cord.
d
a
Plug in
Plug in
b
B
Plug in
On/Off
c
d
I
Replacement parts
Daisy Chain Jumper Cords, 24” ................................................................................................ VER-DC24
Daisy Chain Jumper Cords, 48” ................................................................................................ VER-DC48
Max 4.0A (12 volt) transformer ................................................................................................ VER-T45
Verano hardware pack (contains qty 3 each of parts C, E and F, 4 of D, and qty 9 of G) .................. VER-HDWR
CAUTION – To reduce the
risk of re, electric shock
or injury to persons refer
to the chart at right for
maximum daisy-chained
units:
Maximum Daisy-chained units: Number of xtures within same chain with 4.0A
12V transformer
VER-24 1 1 2 1 1 2 2 3
VER-36 1 1 2 1 2 1 3
VER-48 1 1 2 1 1
Total/Chain 2 2 2 2 2 2 3 3 3 3 3 3 4
4
Page 2
Installation Instructions for Verano™
!
!
#1500149 - Rev E
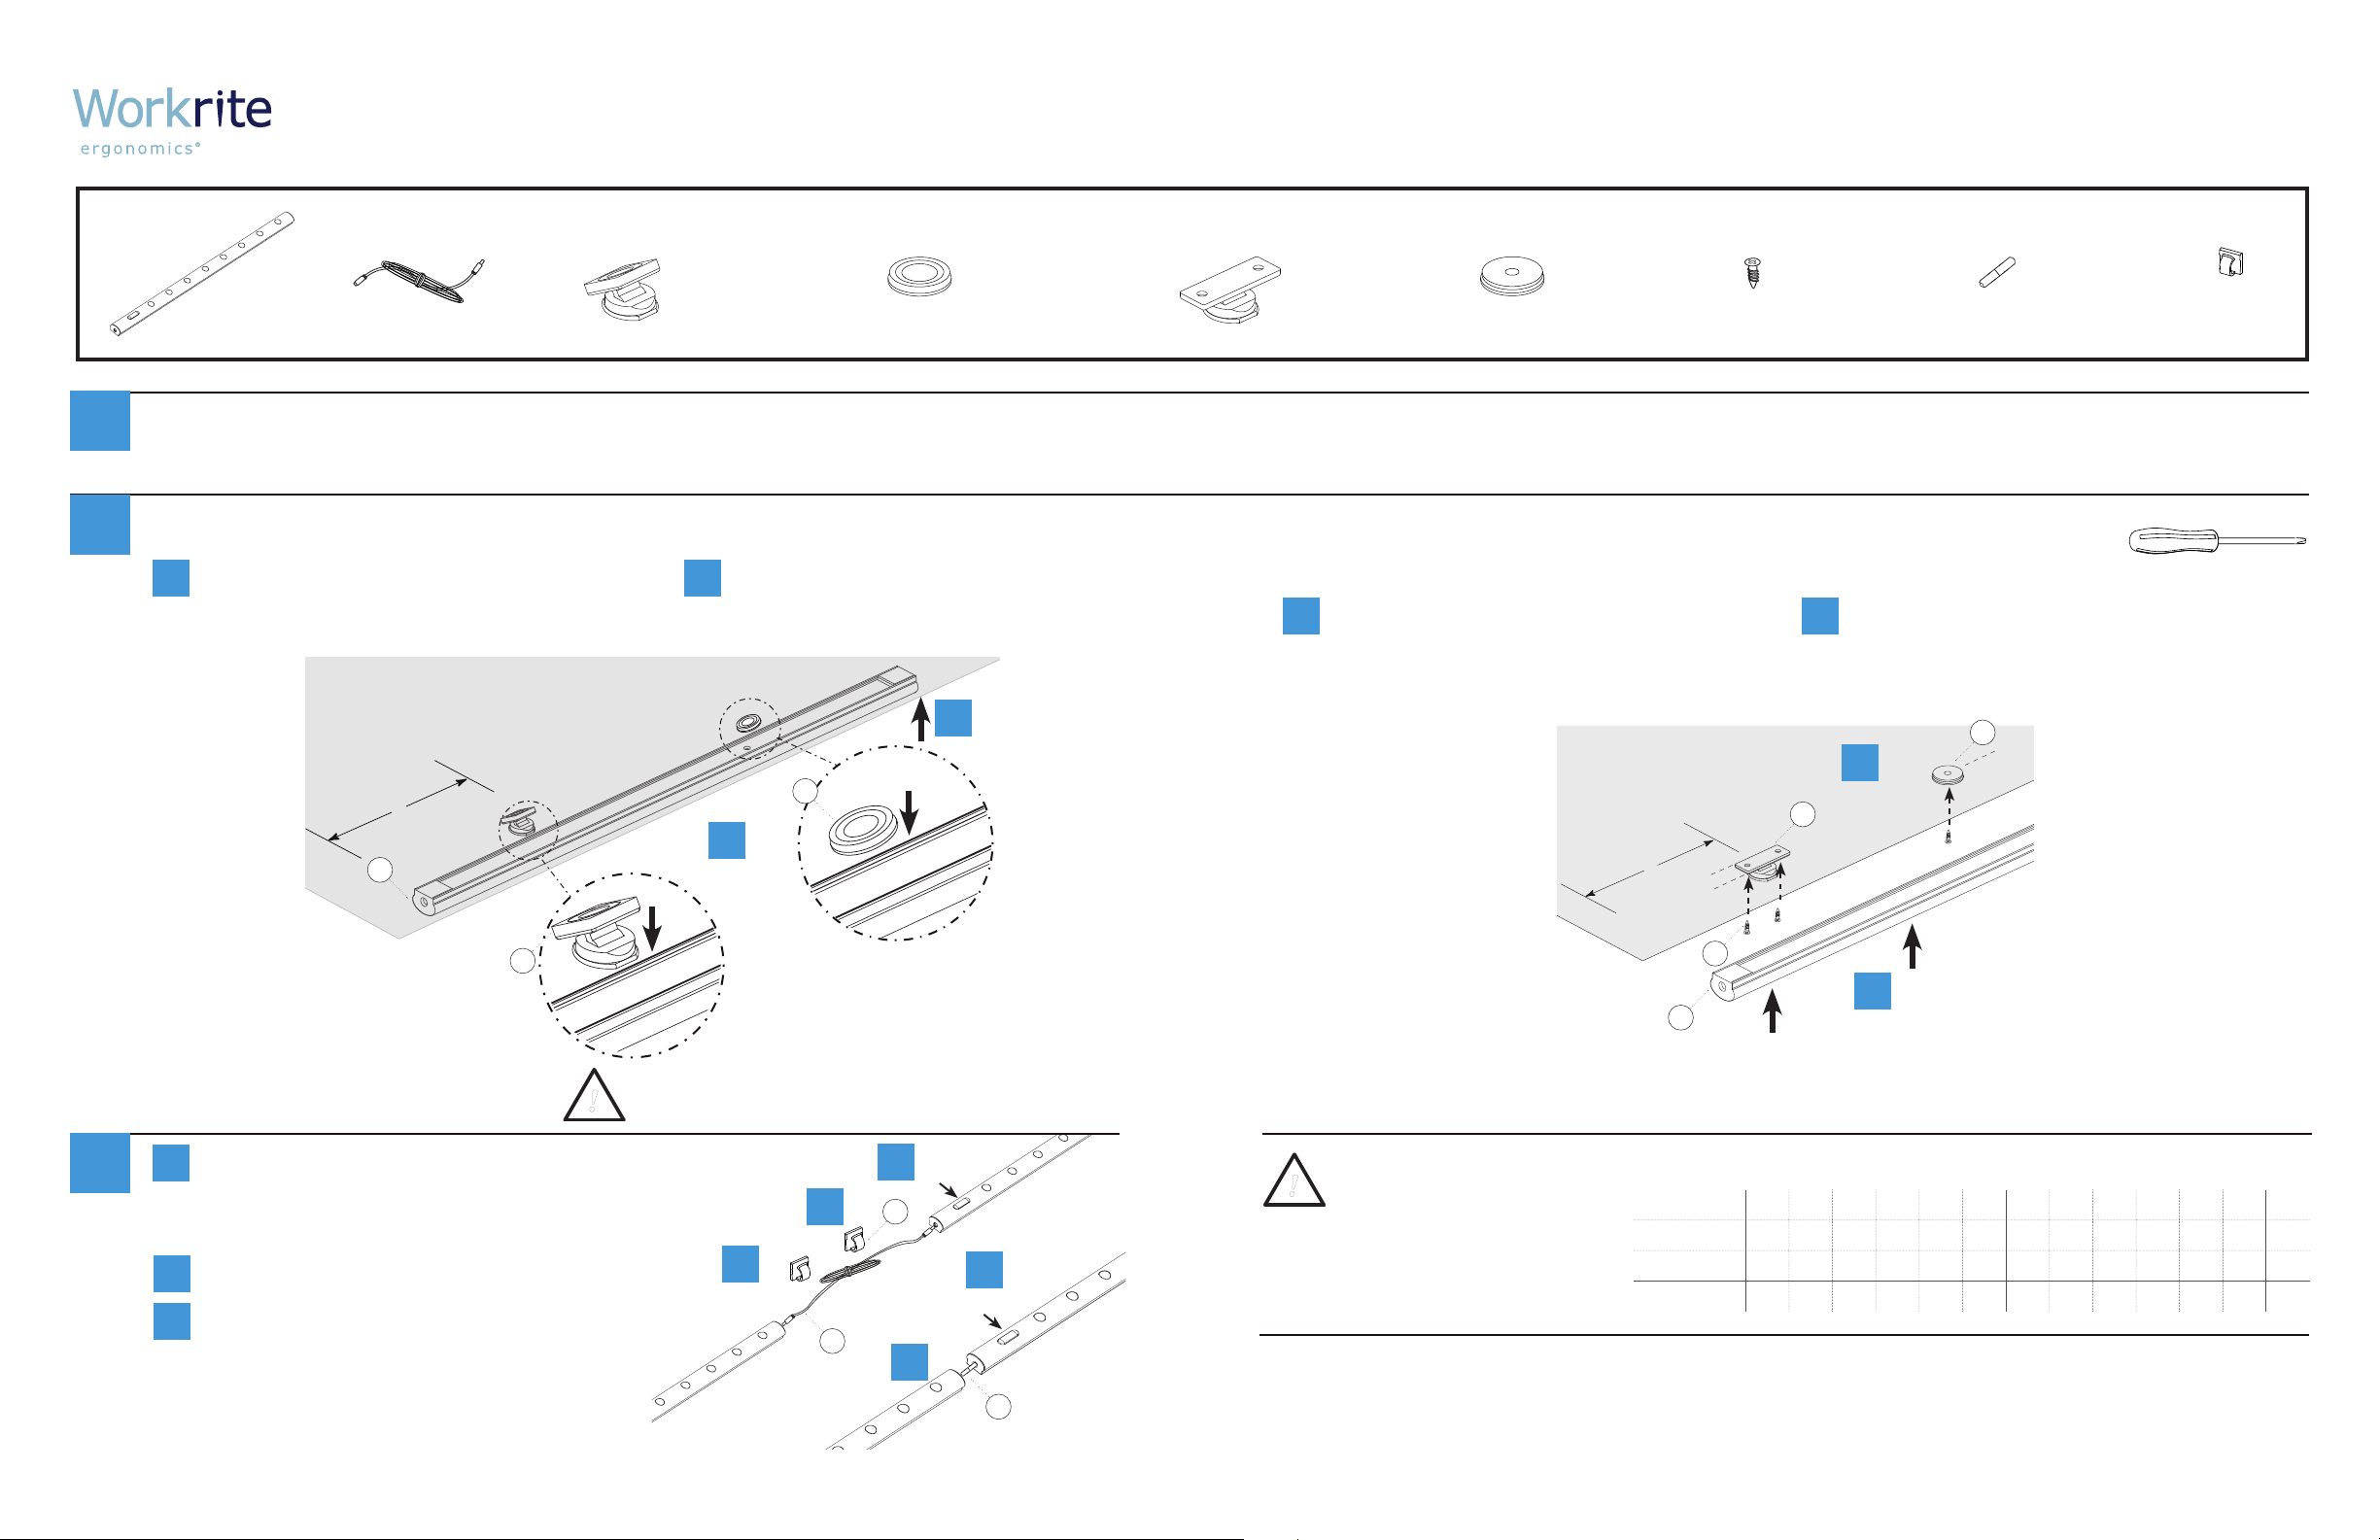
Verano Installation Instructions — child daisy chain units
(see reverse for single or parent unit installation)
Light Fixture
A
Qty: 1 C
Jumper Cable
B
Qty: 1
Rotating Magnetic Mounts
Qty: 3 E
Fixed Magnetic Mounts
Qty: 4 F
Rotating Wood Mounts
Determine if light will be afxed to a metal or wood cabinet and follow the appropriate step below.
1
Be sure to position daisy-chained unit so that it can be connected to the previous unit with its supplied jumper cable.
Metal cabinet mounting:
2
Snap Magnetic Mounts (C or D) onto back
a
rail. For Rotating Mounts, orient at sides
of Magnetic Mounts with the length of the
Verano.
Under-Cabinet
1" - 6"
v a r.
A
C
“SNAP”
Attach Light Fixture (A) to metal under-
b
cabinet. Magnets will hold Verano in place.
Place lamp on
under-cabinet
b
D
“SNAP”
a
OR
Align at side
with back rail
Press down to
snap into rail
Fixed Wood Mounts
Qty: 3D
Qty: 3 G
M4 Wood Screws
Qty: 9 H
Power Connector
Qty: 1
Cable Clips
I
Qty: 2
Wood cabinet mounting:
Note: You will need a Phillips-head screwdriver to complete this step.
Attach Wood Mounts (E or F) to underside
a
of cabinet with Wood Screws. (G). If using
3 mounts, be sure they are positioned in a
straight line.
Under-Cabinet
Align mounts parallel
to edges of cabinet
1" - 6"
v a r.
G
“SNAP”
A
Snap Light Fixture (A) onto mounts to hold
b
in place.
F
a
E
OR
“SNAP”
b
Note: All mount options allow xture to slide from side to side - mounts can be positioned up to 6” from edge of xture.
Connect daisy-chained Verano unit to previous unit
3
Workrite Ergonomics | 800.959.9675 www.workriteergo.com
a
with the supplied Jumper Cable (B), or use Power
Connector (H) to join two xtures together. Plug
power cord into Verano unit end.
Press power button on Verano to turn on/off.
b
Use Cable Clips (I) as needed to secure cord.
c
c
a
Plug in
B
b
I
OR
a
On/Off
Plug in
b
On/Off
H
Replacement parts
Daisy Chain Jumper Cords, 24” ................................................................................................ VER-DC24
Daisy Chain Jumper Cords, 48” ................................................................................................ VER-DC48
Max 4.0A (48 watt) transformer ............................................................................................... VER-T45
Verano hardware pack (contains qty 3 each of parts C, E and F, 4 of D, and qty 9 of G) ................... VER-HDWR
CAUTION – To reduce the
risk of re, electric shock
or injury to persons refer
to the chart at right for
maximum daisy-chained
units:
Maximum Daisy-chained units: Number of xtures within same chain with 4.0A
12V transformer
VER-24 1 1 2 1 1 2 2 3
VER-36 1 1 2 1 2 1 3
VER-48 1 1 2 1 1
Total/Chain 2 2 2 2 2 2 3 3 3 3 3 3 4
4
 Loading...