

Page 1
v. 3.0
User Manual / Instrucciones de Usuario
MULTIPLAYER 3R
Page 2

Page 3
1. Read instructions - All the safety and operating instructions
should be read before the unit is operated.
2. Retain instructions - The safety and operating instructions
should be retained for future reference.
3. Heed warnings - all warnings on the unit and in the
operating instructions should be adhered to.
4. Follow instructions - All operations and other instructions
should be followed.
5. Water & Moisture - The unit should not be used near
water, for example, near a bathtub, washbowl, kitchen
sink, laundry tub, in a wet basement, or near a swimming
pool, etc.
6. Carts & Stands - The unit should be used only with a cart
or stand that is recommended by the manufacturer.
A unit and cart combination should be moved
with care.
Quick stops, excessive force, and uneven
surfaces may cause the unit and cart combination
to overturn.
7. Grounding or Polarization - Precautions should be taken
so that the grounding or polarization is not defeated.
8. Ventilation - The unit should not be situated so that its
location or position does not interfere with its proper
ventilation. For example, the unit should not be situated
on a bed, sofa, rug, or similar surface, that may block the
ventilation openings; or placed in a built-in installation,
such as a bookcase or cabinet that may impede the flow
of air through the ventilation openings.
9. Heat - The unit should be situated away from heat sources
such as radiators, stoves, or other appliances that produces
heat.
This symbol, wherever used,alerts you to
the presence of un-isulated and dangerous
voltages within the product enclosure.
These are voltages that may be sufficient to
constitute the risk of electric shock.
This symbol, wherever used, alerts you to
important operating and maintenance
instructions. Please read.
GRAPHICAL SYMBOLS EXPLANATION
TO REDUCE THE RISK OF ELECTRIC SHOCK, DO NOT REMOVE COVER
(OR BACK) NO USER SEVICEABLE PARTS INSIDE. REFER SERVICING
TO QUALIFIED PERSONNEL.
TO REDUCE THE RISK OF FIRE OR ELECTRIC SHOCK, DO NOT EXPOSE
TO RAIN OR HUMIDITY. DO NOT REMOVE COVER. THIS PRODUCT IS
NOT INTENDED FOR USE OTHER THAN STATED.
WARNING:
WARNING:
10. Power Sourcers - The unit should be connected to a
power supply only of the type described in the operating
instructions or as marked on the unit.
11. Power Cord Protection - Power supply cord should be
routed so that they are not likely to be walked on or
pinched by items placed upon or against them, paying
particular attention to cords at plugs, convenience
receptacles, and the point where they exit the unit.
12. Cleaning - The unit should be cleaned only as
recommended by the manufacturer.
13. Nonuse Periods - The power cord of the unit should be
unplugged from the outlet when left unused for a long
period of time.
14. Object and Liquid entry - Care should be taken so that
objects do not fall into and liquids are not spilled into the
inside of the unit.
15. Damage Requiring Service - The unit should be serviced
by qualified service personnel when:
A. The power supply cord or the plug has been damaged;
or
B. Objects have fallen, or liquid has been spilled into the
unit; or
C. The unit has been exposed to rain; or
D. The unit does not appear to operate normally or
exhibits a marked change in performance.
E. The unit has been dropped, or the cabinet damaged.
16. Servicing - The user should not attempt to service the
unit beyond those means described in the operating
instructiuons. All other servicing should be referred to
qualified personnel.
PAG. 1
User Manual/Manual de Instrucciones MULTIPLAYER 3R
EN
Page 4
Overview
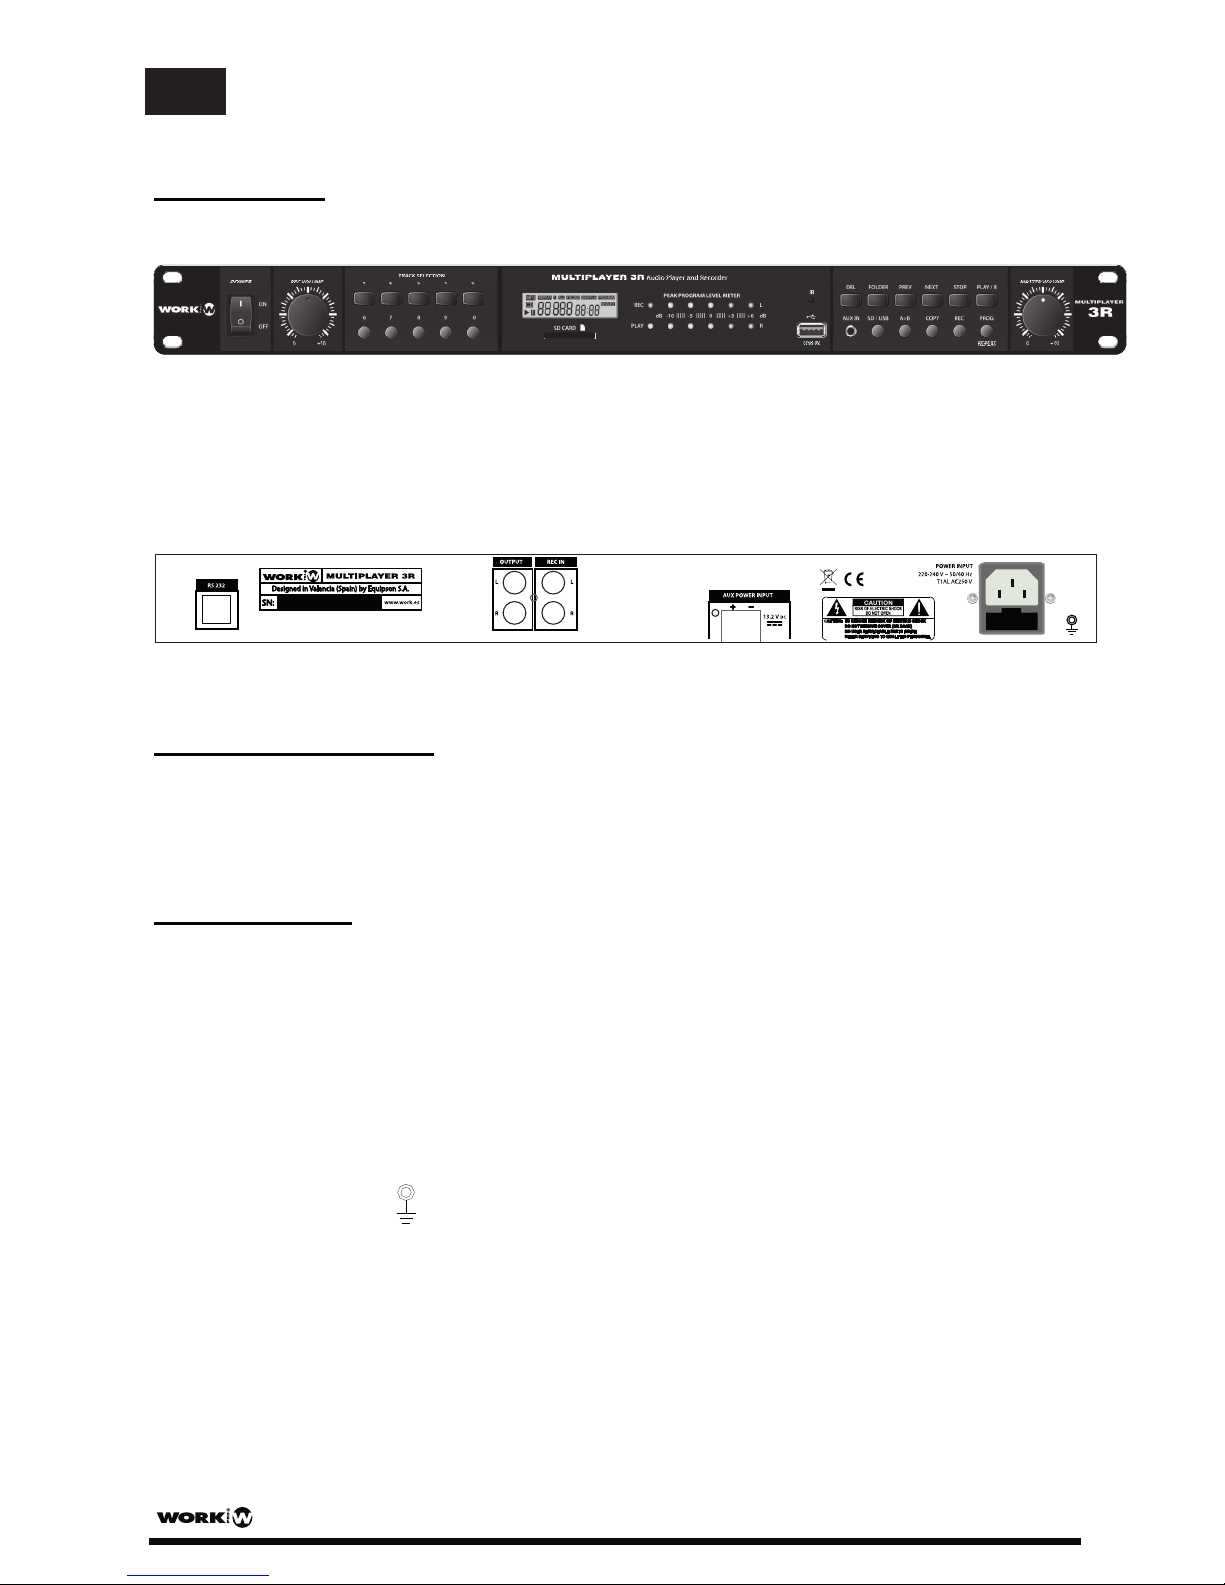
Frontal View:
Rear View:
Included Accessories:
RCA-RCA (L-R) Audio cable x 2
AC mains supply cable x 1
Remote Control x 1
INSTALLATION:
1. Connect RCA-RCA cables to OUTPUT Terminal and REC IN Terminal.
2. Connect AC Mains Supply cable between IEC socket and adequate AC 230V 50/60Hz outlet.
(if it is necessary) Connect DC Power Cord in DC13.2V Terminals.
3. Connect RS232 Socket at rear side.
4. Connect to Ground
PAG. 2
User Manual/Manual de Instrucciones MULTIPLAYER 3R
EN
Page 5
USB & SD CARD READER & RECORDER
Features
- Recording through the Line-in is storage to a USB or SD Card directly.
- Offers USB and SD Card function of each replication.
- Recording format: MP3.
- Playing format: MP3, WMA.
- Accept the capacity of 128MB to 16G USB or SDHC Card.
- Adjustable recording quality, provide choice of,128 and 192 Kbps with 44.1 KHz.
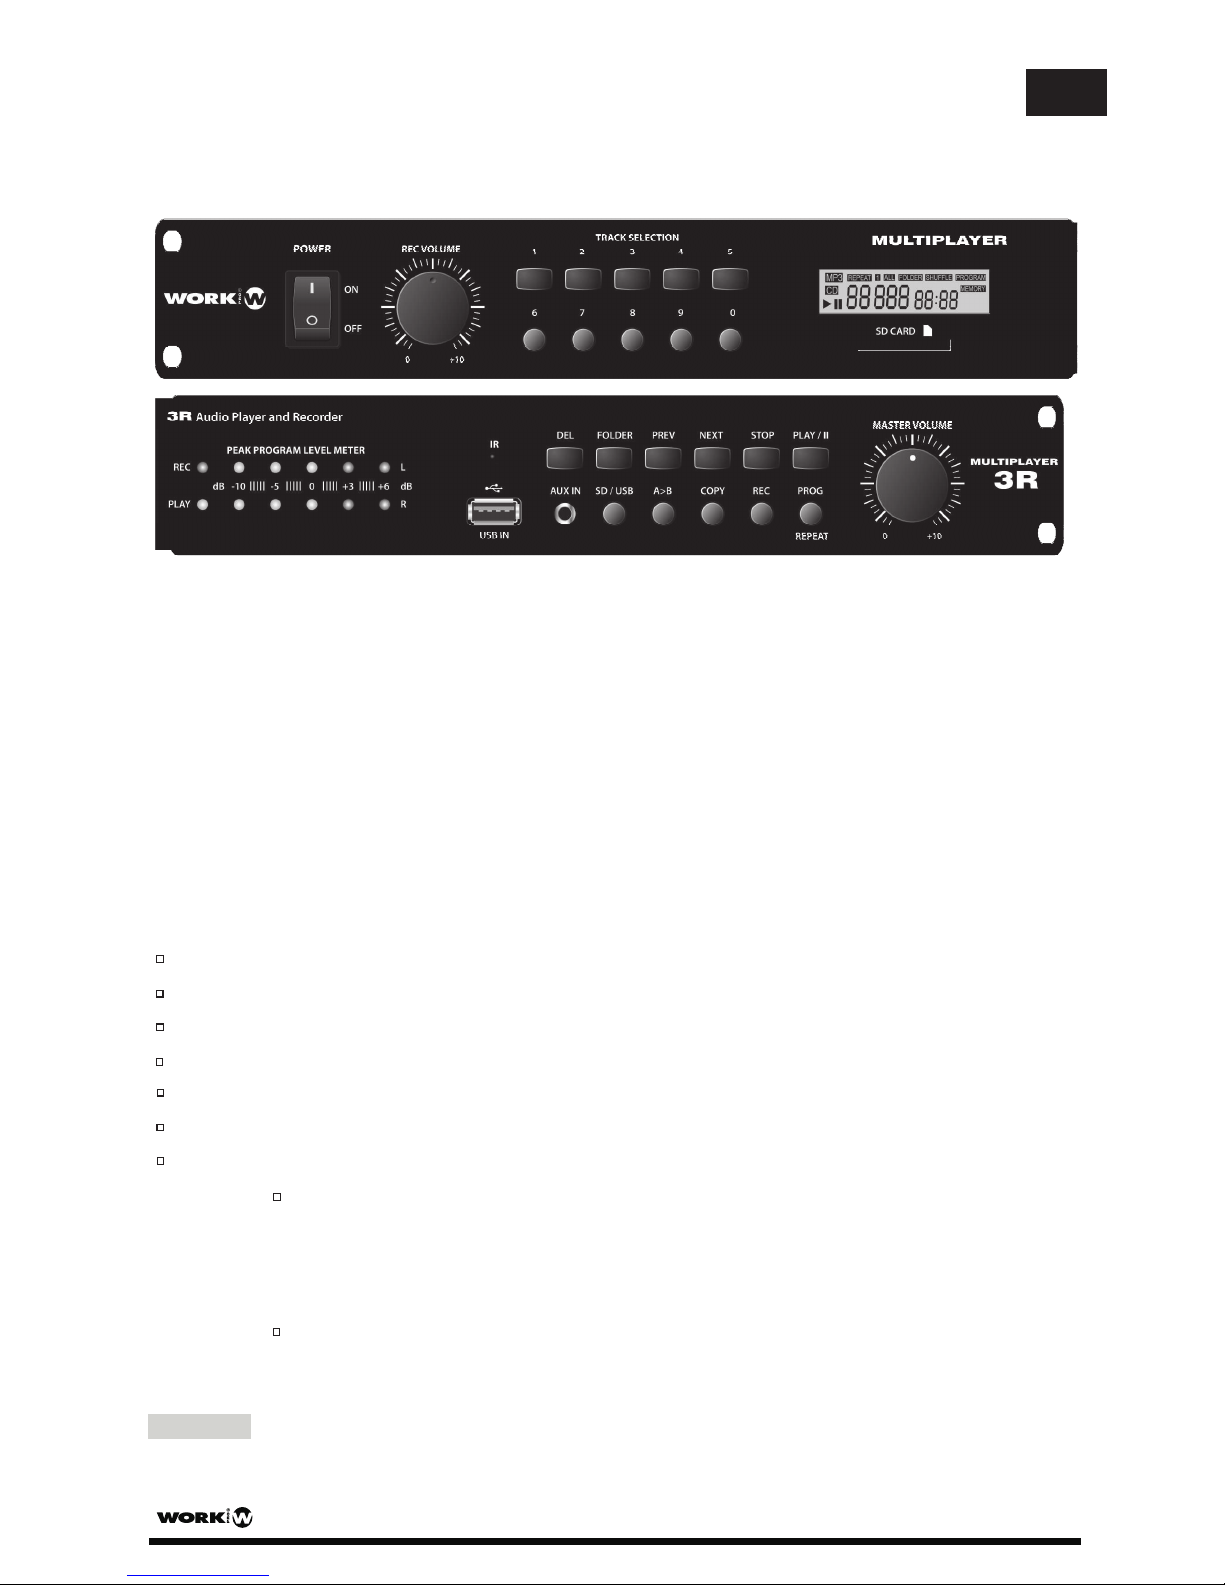
Operation and function of the use of panel description
POWER : Switching power on / off.
VOLUME : Volume control button, turning to adjust the volume
USB socket : To insert a USB storage device
SD CARD socket : To insert a SD CARD
AUX Input : Connect audio source like MP3 player or similar
0~9 Numeral keys : Selecting the tracks or folder.
FOLDER : Folder selection key and adjust the recording quality
Select folder
Press FOLDER button, LCD screen display, then PREV or NEXTbutton with
the numbers 0 to 9 button to select the directory . Double-click cancel the search
and in the LCD screen, "F" disappears
Recording quality adjustment: Pressing FOLDER button more than 3 seconds can
choose the recording quality. Press PREV or NEXT key to select 128Kbps or
192Kbps.
Recording
REC: Recording function key, need to use this key when record through the Line in (REC IN)
PAG. 3
User Manual/Manual de Instrucciones MULTIPLAYER 3R
EN
Page 6
Recording level can be adjusted by using “REC VOLUME” button. “PEAK PROGRAM
LEVEL METER” LED will show the recording level.
When USB and SD Card are both in the device :
- Press the REC button. LCD display flashing to indicate will be recorded (to USB or SD).
- Use USB / SD button to select the option to record to USB or SD card.
- Press REC to start to record, LCD starts to flashing indicated that they are recording.
- Press STOP button to stop recording.
When only single USB or SD Card in the device
- Press REC to begin recording, LCD starts to flash and indicating that they are
recording, press STOP button to stop recording.
Sound recording through the REC function keys are saved in the directory folder REC
- To Play REC track in folder: press FOLDER button, LCD displays “ “. Use PREV or F.F
WD button to select the directory REC, press PLAY / II to start playing.
- The track number in the REC Folder will start from “REC 001 “, and increase gradually.
Therefore if want to check the recording file after finish record, the song will be
recorded at the last track in the REC folder.
COPY: Copy function key. It has to operate copy function in STOP status when use this key for
USB Copy to SD or SD Copy to USB.
Press STOP key, the device should be at stop mode
Insert USB and SD Card, use USB / SD button to select the device you want to copy using
any of the following options:
Copy single:
Press PREV , F. WD button or 0 ~9 Numerals key toselect tracks then
press COPY button to start copying
Copy the multi-tracks or multi-directories:
- Can select the tracks and store the tracks in the Memory program first (for PROG
feature instruction, please refer to PROG)
- Press COPY button to copy the tracks stored in the Program, if the copy to SD,
LCD display will flash SD and indicates that it is recording to the SD card.
Copy the whole directory:
- Press FOLDER button, when LCD displays “ F “, use PREV button & NEXTto
select the folder you want to copy
- Press COPY key to start to copy the selected directory. If copy to SD, LCD display
will flash SD and indicates that it is recording to the SD card.
- The tracked recorded through COPY function are stored in the folder “CPY”.
- To Play folder “CPY” of the tracks, press FOLDER button, LCD display shows “F”,
then press PREV keys F. WD button to select the directory CPY and press PLAY / II to
start playing.
- Copy function is copying without folder. For example, if you wants to copy 5 tracks
in 3 folders (total 15 tracks) and there will be stored to CPY001 ~ CPY015
PAG. 4
User Manual/Manual de Instrucciones MULTIPLAYER 3R
EN
Page 7
If copy a new song after it, it will be storage at CPY016.
A B: Section Repeat Play
Press once to start playing the beginning of memory.
Press again to stop at the end of memory area. The device repeats to play memory area.
Press it again to stop playing.
USB / SD Playing
PLAY/II :Play and pause, press to play, play again to pause.
STOP :Press to stop playing
USB / SD : 。Select to use US or SD CARD
REPEAT /PROG :Press to select Repeat or Program memory function
Repeat function : Need to operate in the playing mode
- Press once, LCD screen displays "REP", will repeatedly playback currently playing
track.
- Press twice, LCD screen displays " REP F
", will repeat the entire folder is currently
being played.
- Press 3rdtimes, LCD screen displays "REP ALL", will be repeated play all tracks.
- Press 4thtimes, cancel repeat playback function. The words on LCD screen will be
eliminated.
Memory function: Need to operate in the stop-play mode, can be memories up to 99
songs
- Single or multi-tracks memory:
Press the STOP button to stop playback.
Press PROG / REPEAT button, LCD screen displays PROGRAM. Select
desired songs by using number keys 0 to 9, PREV key or NEXT key.
Press PROG / REPEAT button to store 1
st
song, LCD display shows “00 01”
for the 1stsong. Press << PROG / REPEAT >> again for storing 2ndsong;
LCD display shows “00 02”. Start over above process for storing mode
songs. Press PLAY / II memory to play the tracks stored in the P rogram.
- Whole folder memory:
Press the STOP function keys to stop playback
Press PROG / REPEAT button, LCD screen display shows , press thePROG
FOLDER button with the number of combination of keys or PREV keys F. WD
button to select the folder
Press PROG to store selected folder. To store more folders, repeat above steps.
Press PLAY / II button to start play memorized folders.
To memorize multi-folders or multiple tracks, repeat above steps.
LCD will display shows FULL when stored 99 songs
PAG. 5
User Manual/Manual de Instrucciones MULTIPLAYER 3R
EN
Page 8
To cancel program feature, keep pressing PROG button until LCD display PROG
disappeared
PREV : Backwards. Press to backward to last track. Press for 3seconds to fast
reverse the track
NEXT : Forward. Press to forward to next track. Press for 3 seconds to fast
forward the track
IR sensor : Infrared remote control eye.
DEL: Delete single / folder / all of the files.
Delete current playing track, can be operated under “Stop” mode or during
“Playing” mode
Press DEL button, LCD displays flash DEL FILE, reminding you to delete the file, and
then press DEL to confirm the deletion, LCD display shows DEL END.
Delete a folder: To delete the specified folder, press FOLDER butt on to select the
folder you want to delete, click the DEL, LCD display flashes DEL FOLDER ,
reminding whether you want to delete the folder, and then press DEL again to confirm
the deletion, LCD displays , the folder is removedDEL END
Delete all the files: In the stop-play mode operation
- Press the Stop button
- Long DEL key to more than 5 seconds
- LCD display shows to confirm whether you want to delete all the files" "DEL ALL
- Then press DEL key again to delete all the files
- To cancel delete function, just wait for LCD stops flashing and cancellation of delete
function
PAG. 6
User Manual/Manual de Instrucciones MULTIPLAYER 3R
EN
Page 9
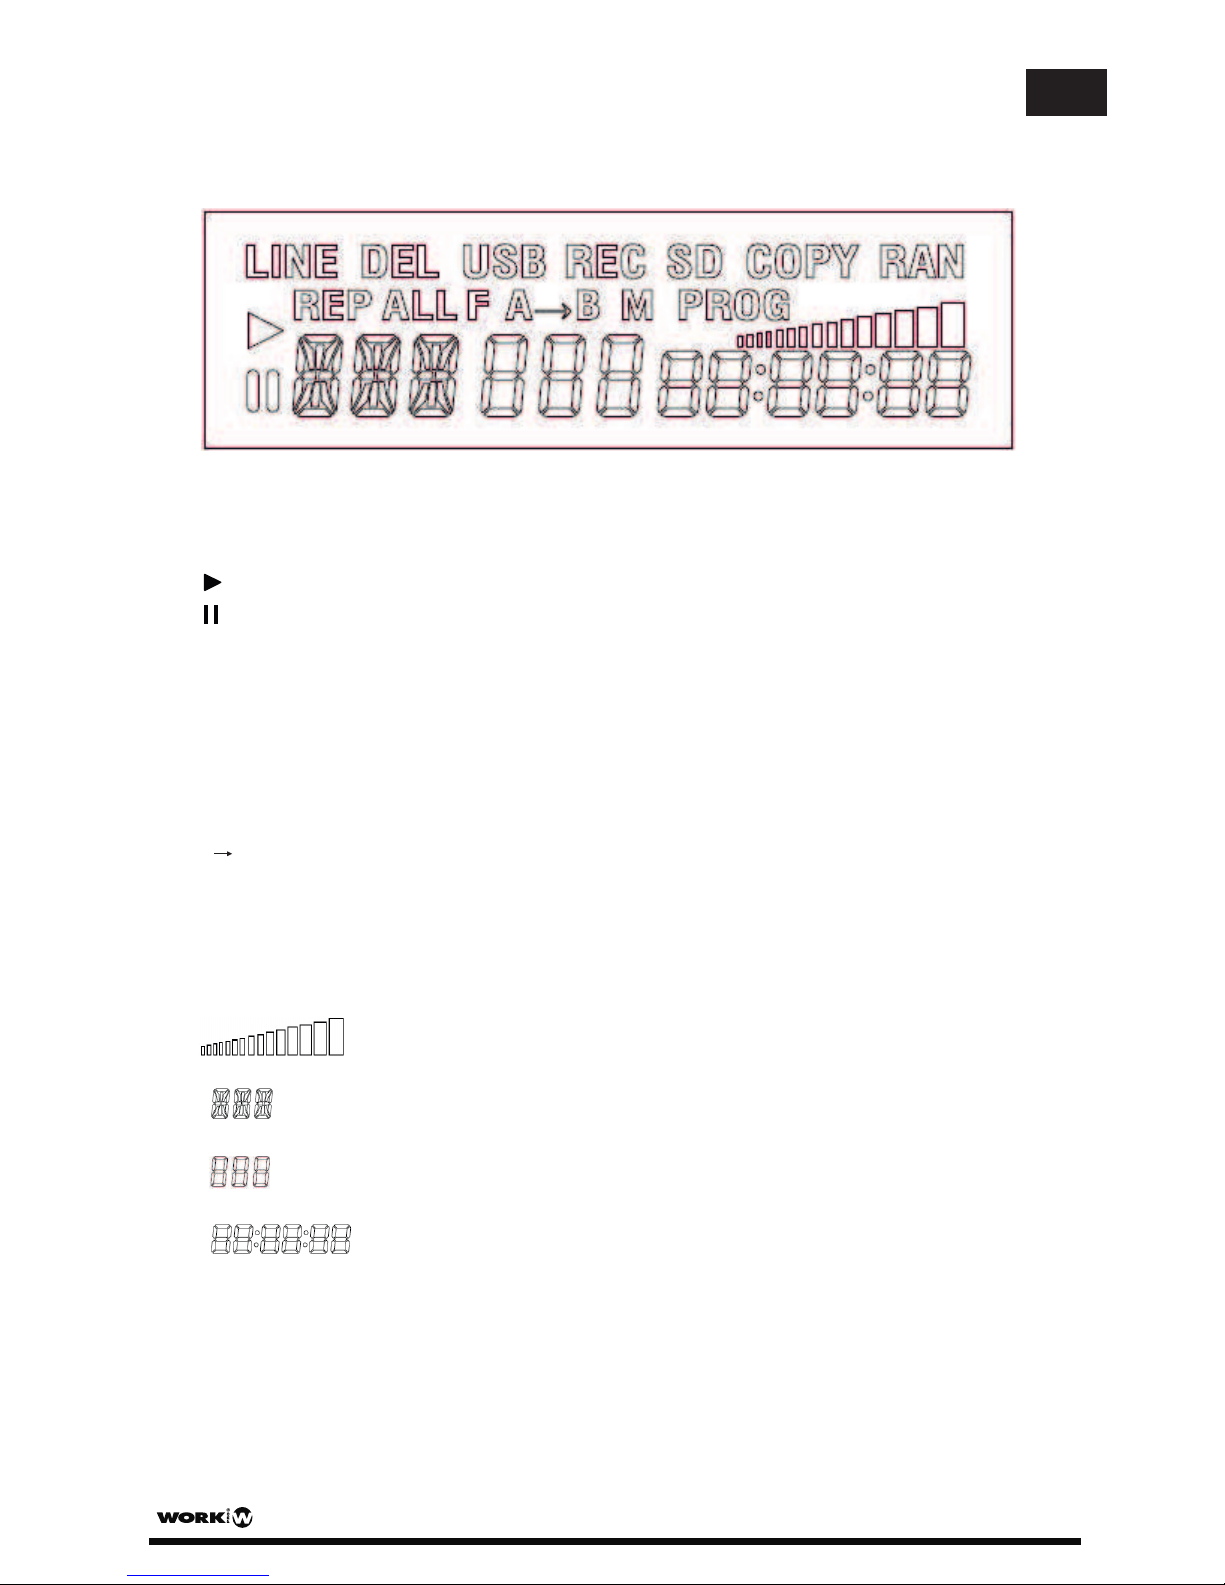
LCD Display::::
LINE :Line in audio source
DEL :When using delete function
:In playing mode
:Pausing
REP :Repeatedly playing the single track
REPALL peat all tracks:Re
REP F :Repeat specific folder
RAN :Playback in random order
PROG :When operate to program tracks.
M :Mute function
A B :When repeat playing a specific section
USB :When use USB function
SD :When use SD card function
COPY :When operate copy function
REC :When operate recording function
:The volume display, total 15 sections.
:Under the MP3 mode, it will appear the folder numbers.
:Display the current playing track.
splay the time for the current playing track.:Di
PAG. 7
User Manual/Manual de Instrucciones MULTIPLAYER 3R
EN
Page 10
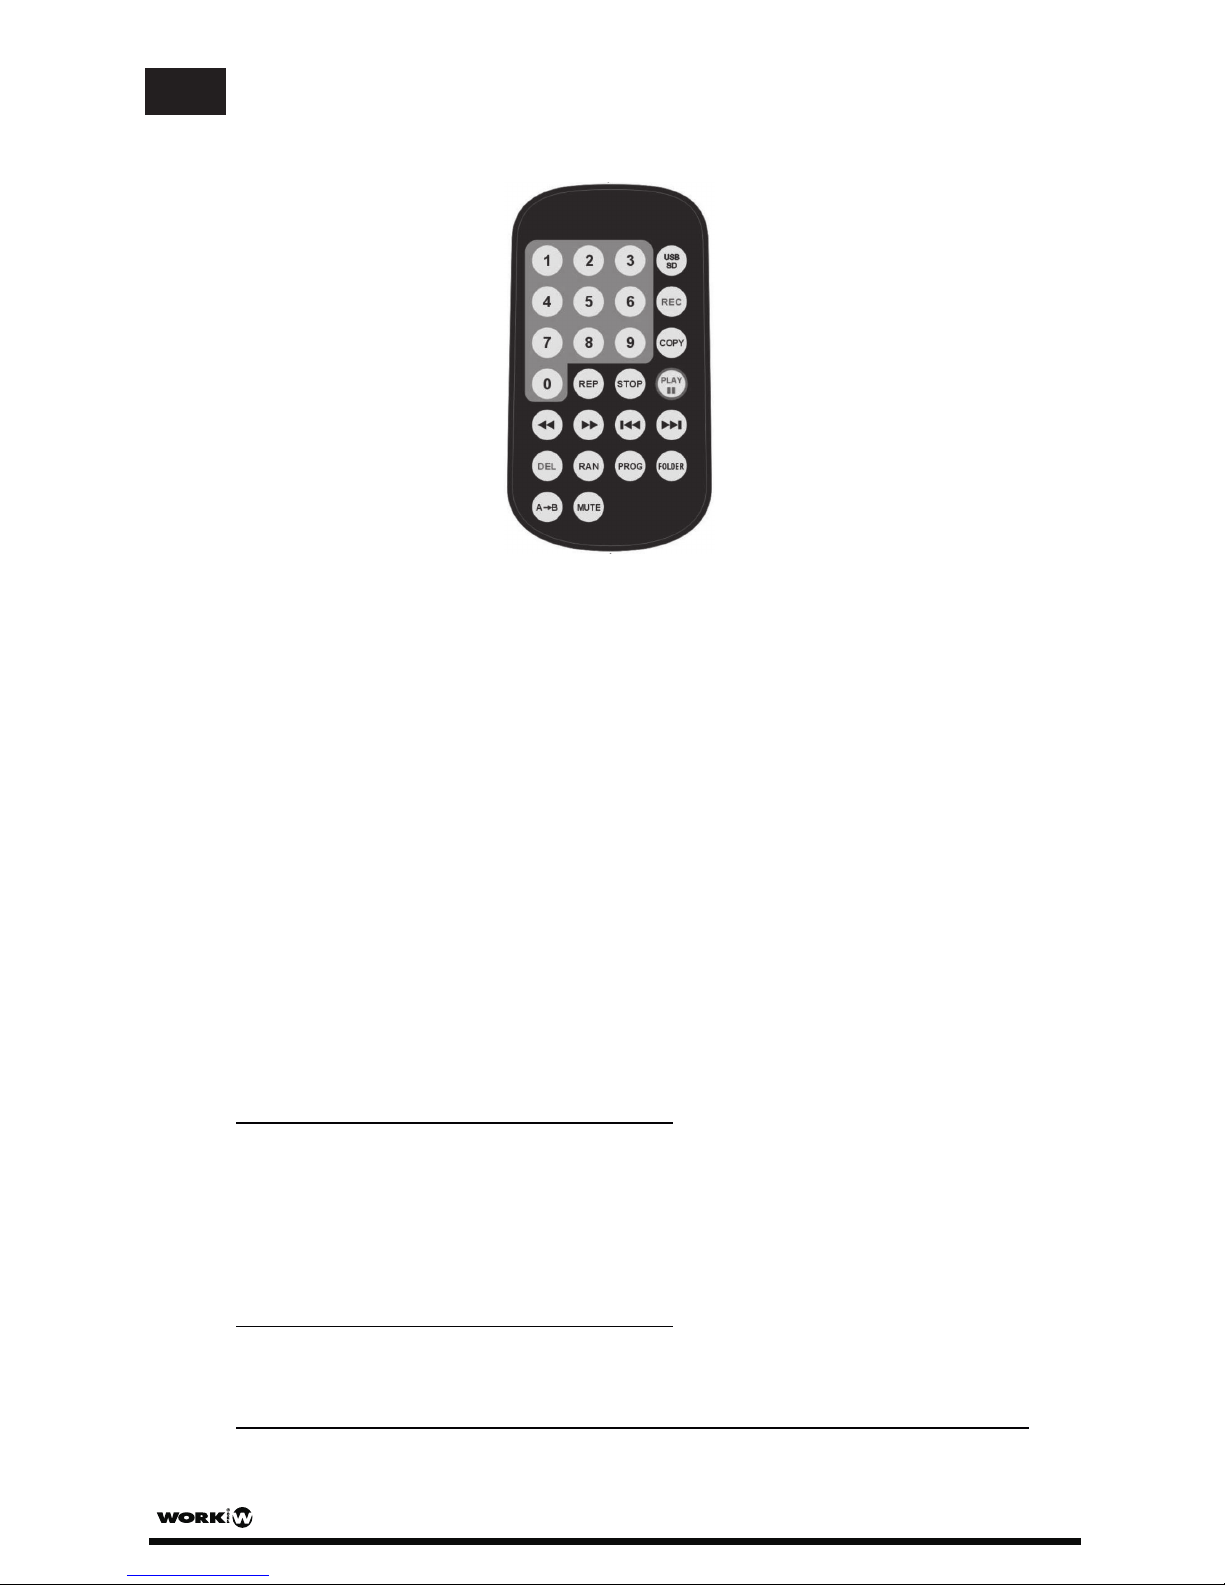
REMOTE CONTROLLER FUNCTIONS
The remote controller shall be appointed to the receiving hole of frontal side. The optimal receiving
distance is 3 meters. The batteries ( model CR2025 3V ) shall be put into the remote controller.
FOLDER Folder selection key and adjust the recording quality:
Select folder
- Press FOLDER button, LCD screen display , then PREV or NEXT button with
the numbers 0 to 9 button to select the directory . Double-click the Cancel catalog
select, LCD screen, "F" disappears
Recording quality adjustment: Press FOLDER button more than 3 seconds can
choose the recording quality. Press PREV or NEXT key to select 128Kbps or
192Kbps.
Numeral 0 ~ 9 : Select the track from numerals and press PLAY / II to play.
USB / SD Switching for USB or SD mode.:
REC Recording function buttom, use for LINE IN recording.:
When USB and SD Card are both in the device :
- Press the REC button. LCD display flashing to indicate will be recorded to USB or SD.
- Use USB / SD button to select the option to record to USB or SD card.
- Press REC to start to recording, LCD starts to flashing indicated that they are
recording
- Press STOP button to stop recording.
When only single USB or SD Card in the device
- Press REC to begin recording, LCD starts to flash and indicating that they are
recording, press STOP button to stop recording.
Sound recording through the REC function keys are saved in the directory folder REC
- To Play REC track in folder: press FOLDER button, LCD display . Use PREV or NEXTF
PAG. 8
User Manual/Manual de Instrucciones MULTIPLAYER 3R
EN
Page 11
button to select the directory REC, press PLAY / II to start playing.
- The track number in the REC Folder will start from “REC 001", and increase gradually.
Therefore if want to check the recording file after finish record, the song will be
recorded at the last track in the REC folder.
COPY: Copy function key. It has to operate copy function in STOP status when use this
key for USB Copy to SD or SD Copy to USB.
Press STOP key, the device should be at stop mode
Insert USB and SD Card, use USB / SD button to select the device you want to copy the
source of any of the following options
Copy single: Press PREV , NEXTbutton or 0 ~9 Numerals key to select tracks then
press COPY button to start copying
Copy the multi-tracks or multi-directories:
- Can select the tracks and store the tracks in the Memory Program first (for PROG
feature instruction, please refer to PROG)
- Press COPY button to copy the tracks stored in the Program, if the copy to SD,
LCD display will flash SD and indicates that it is recording to the SD card.
Copy the whole directory:
- Press FOLDER button, when LCD displays “ F “, use PREV button & NEXT to
select the folder you want to copy
- Press COPY key to start to copy the selected directory. If copy to SD, LCD display
will flash SD and indicates that it is recording to the SD card.
- The tracked recorded through COPY function are sotred in the folder “CPY”
- To Play folder “CPY” of the tracks, press FOLDER button, LCD displays “ ” thenF
press PREV keys F. WD button to select the directory CPY and press PLAY / II to
start playing.
- Copy function is copying without folder. For example, if wants to copy each 5
tracks in 3 folders (total 15 tracks) and there wil l be storage to CPY001 ~ CPY015
at the CPY folder after copying. If copy a new song after it, it will be storage at
CPY016.
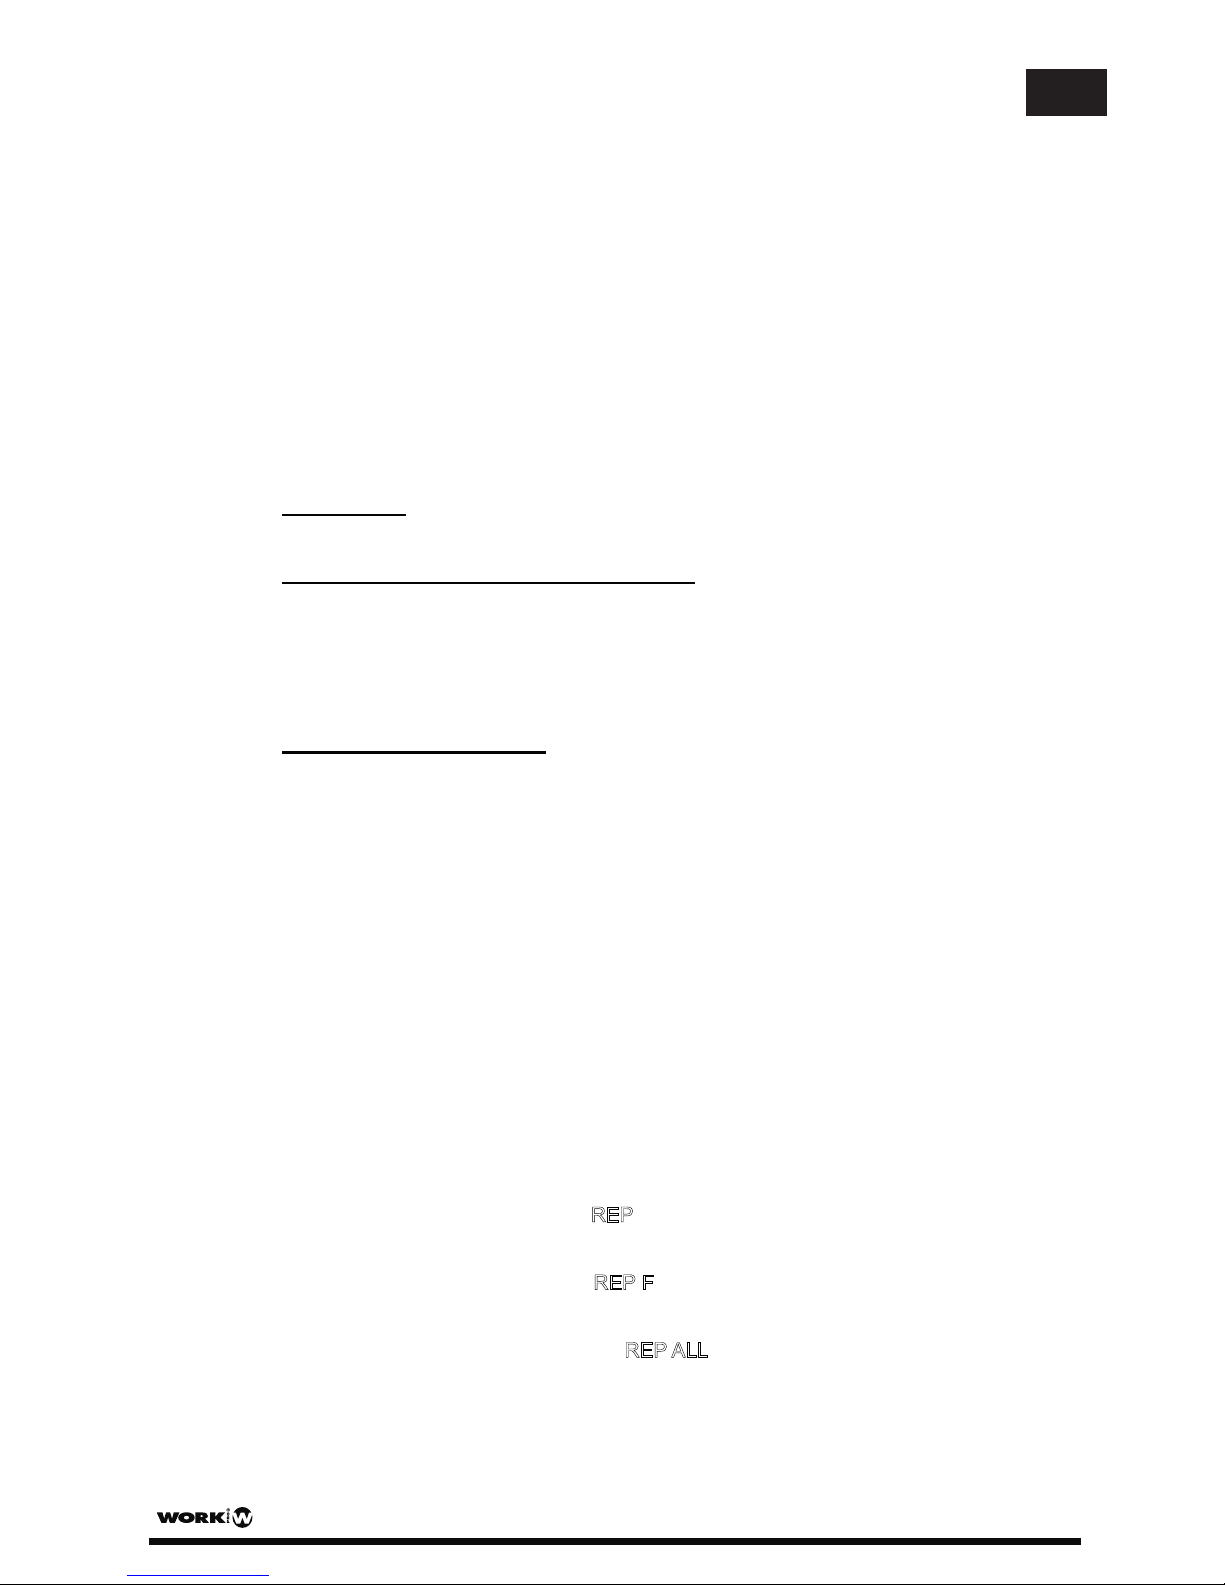
REP
::
:Repeat function : Need to operate in the playing mode
- Press once, LCD screen displays "
REP", will repeatedly playback currently playing
track.
- Press twice, LCD screen displays "REP F", will repeat the entire directory is currently
being played
- Press 3rdtimes, LCD screen displays "REP ALL ", will be repeated play all tracks.
- Press 4thtimes, cancel repeat playback function. The words on LCD screen will be
eliminated.
PROG Memory function: Need to operate in the stop-play mode, can be memories up to
99 songs
PAG. 9
User Manual/Manual de Instrucciones MULTIPLAYER 3R
EN
Page 12
- Single or multi-tracks memory:
Press the STOP button to stop playback.
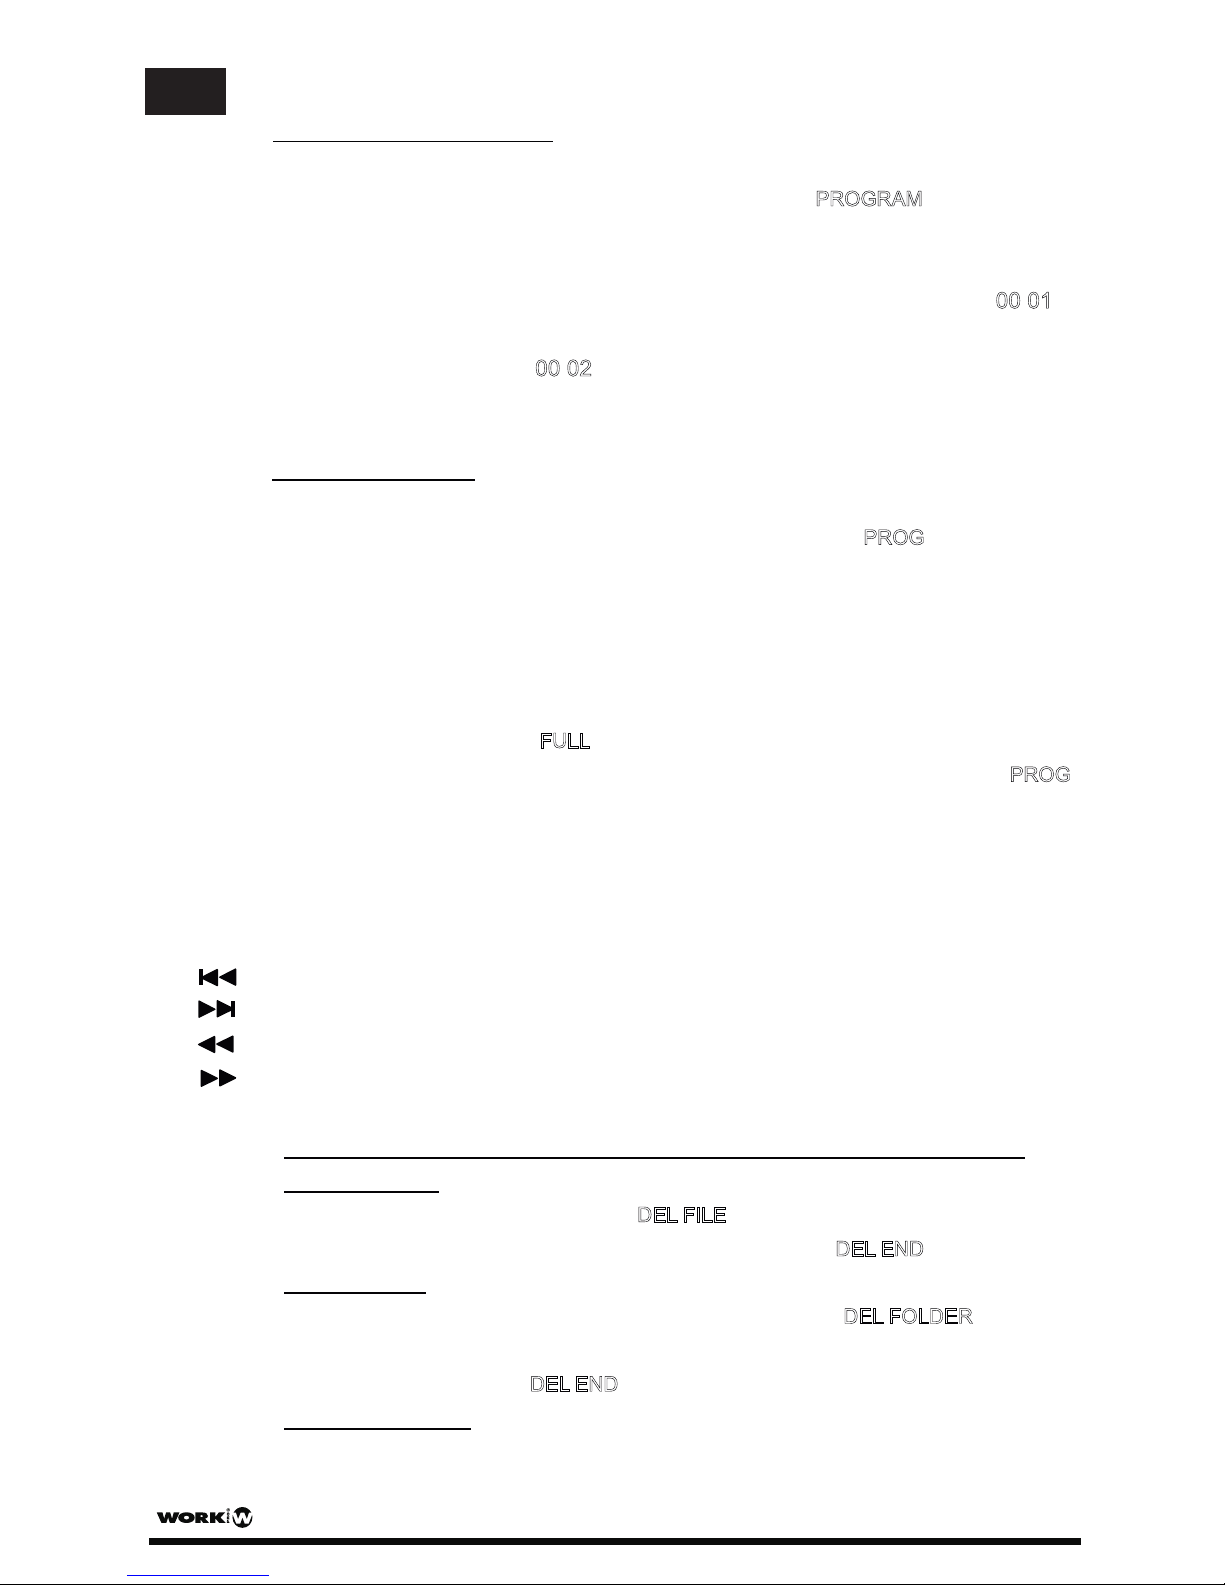
Press PROG / REPEAT button, LCD screen displays . SelectPROGRAM
desired songs by using FOLDER button and number keys 0 to 9 and PREV key or
NEXT key.
Press PROG / REPEAT button to store 1
st
song, LCD display shows “ ”00 01
for the 1stsong. Press << PROG / REPEAT >> again for storing 2ndsong;
LCD display shows “ ”. Start over above process for storing more00 02
songs. Press PLAY / II memory to play the tracks stored in the Program.
- Whole folder memory:
Press the STOP function keys to stop playback
Press PROG / REPEAT button, LCD screen display shows PROG, press the
FOLDER button with the number of combination of keys or PREV keys F. WD
button to select the folder
Press PROG to store selected folder. To store more folders, repeat above steps.
Press PLAY / II button to start play memorized folders.
To memorize multi-folders or multiple tracks, repeat above steps
LCD will display shows when stored 99 songsFULL
To cancel program feature, keep pressing PROG button until LCD displays PROG
disappeared
Play programmed tracks: direct press the number keys 0 to 9. For example:
play the 45thtracks, simply press number keys 4 & 5
STOP :Press to stop playing
:Press to backward to previous track
:Press to forward to next track
:Press to fast reverse the playback. Press again tocancel fast reversing
:Press to fast forward the playback. Press again tocancel the fast forwarding
DEL:Delete single / folder / all of the files.
Delete current playing track, can be operated under “Stop” mode or during
“Playing” mode
Press DEL button, LCD displays flash DEL FILE, reminding you to delete the file, and
then press DEL to confirm the deletion, LCD display shows .DEL END
Delete a folder: To delete the specified folder, press FOLDER butt on to select the
folder you want to delete, click the DEL, LCD display flashes DEL FOLDER ,
reminding whether you want to delete the folder, and then press DEL again to confirm
the deletion, LCD displays , the folder is removedDEL END
Delete all the files:
In the stop-play mode operation
- Press the Stop button
- Long DEL key to more than 5 seconds
PAG. 10
User Manual/Manual de Instrucciones MULTIPLAYER 3R
EN
Page 13
- LCD display shows to confirm whether you want to delete all the files" "DEL ALL
- Then press DEL key again to delete all the files
- To cancel delete function, just wait for LCD stops flashing and cancellation of delete
function
RAN :Press to play the tracks in a random order. Press again to cancel.
PLAY / II :Play and pause, press to play, play again to pause
MUTE ::::Press to mute, press again to back to normal playing
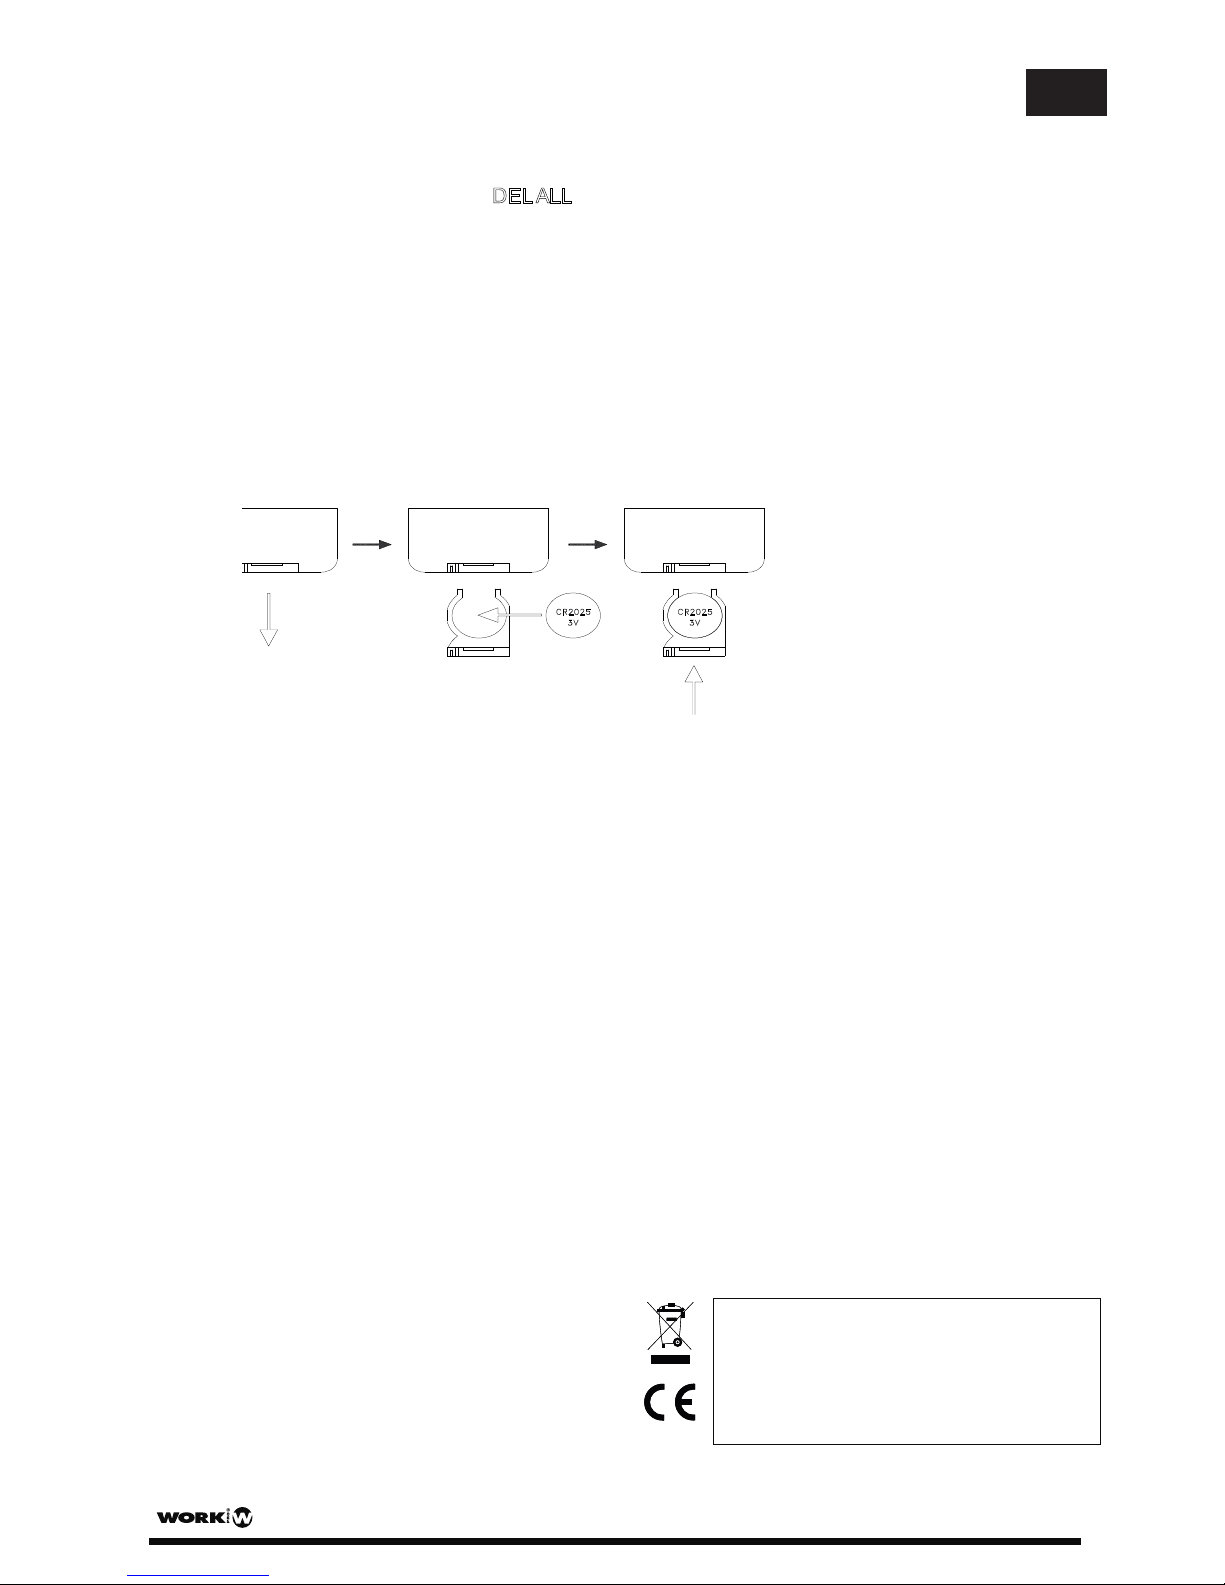
Battery installation of the remote controller
1. To open up the battery cover (on the back side of the remote controller), Press down
the cap and slide it from the left to the right, then to pull it out.
2. Pl a new battery (battery type: CR2025 3V, w/its positive upward).ace
3. Reverse the actions stated in the statement 1.
PAG. 11
User Manual/Manual de Instrucciones MULTIPLAYER 3R
This symbol on the product or on its packaging indicates that this product
shall not be treated as household waste. Instead it shall be handed over to
the applicable collection point for the recycling of electrical an electronic
equipment. By ensuring this product is disposed of correctly, you will help
prevent potential negative consequences for the environment and human
health, which could otherwise be caused by inappropriate waste handling
of this product. The recycling of materials will help to conserve natural
resources. For more detailed information about recycling of this product,
please contact your local city office, your household waste disposal service
or the shop where you purchased the product.
This symbol on the product or on its packaging indicates that this product
shall not be treated as household waste. Instead it shall be handed over to
the applicable collection point for the recycling of electrical an electronic
equipment. By ensuring this product is disposed of correctly, you will help
prevent potential negative consequences for the environment and human
health, which could otherwise be caused by inappropriate waste handling
of this product. The recycling of materials will help to conserve natural
resources. For more detailed information about recycling of this product,
please contact your local city office, your household waste disposal service
or the shop where you purchased the product.
EN
Page 14
PAG. 12
User Manual/Manual de Instrucciones MULTIPLAYER 3R
EN
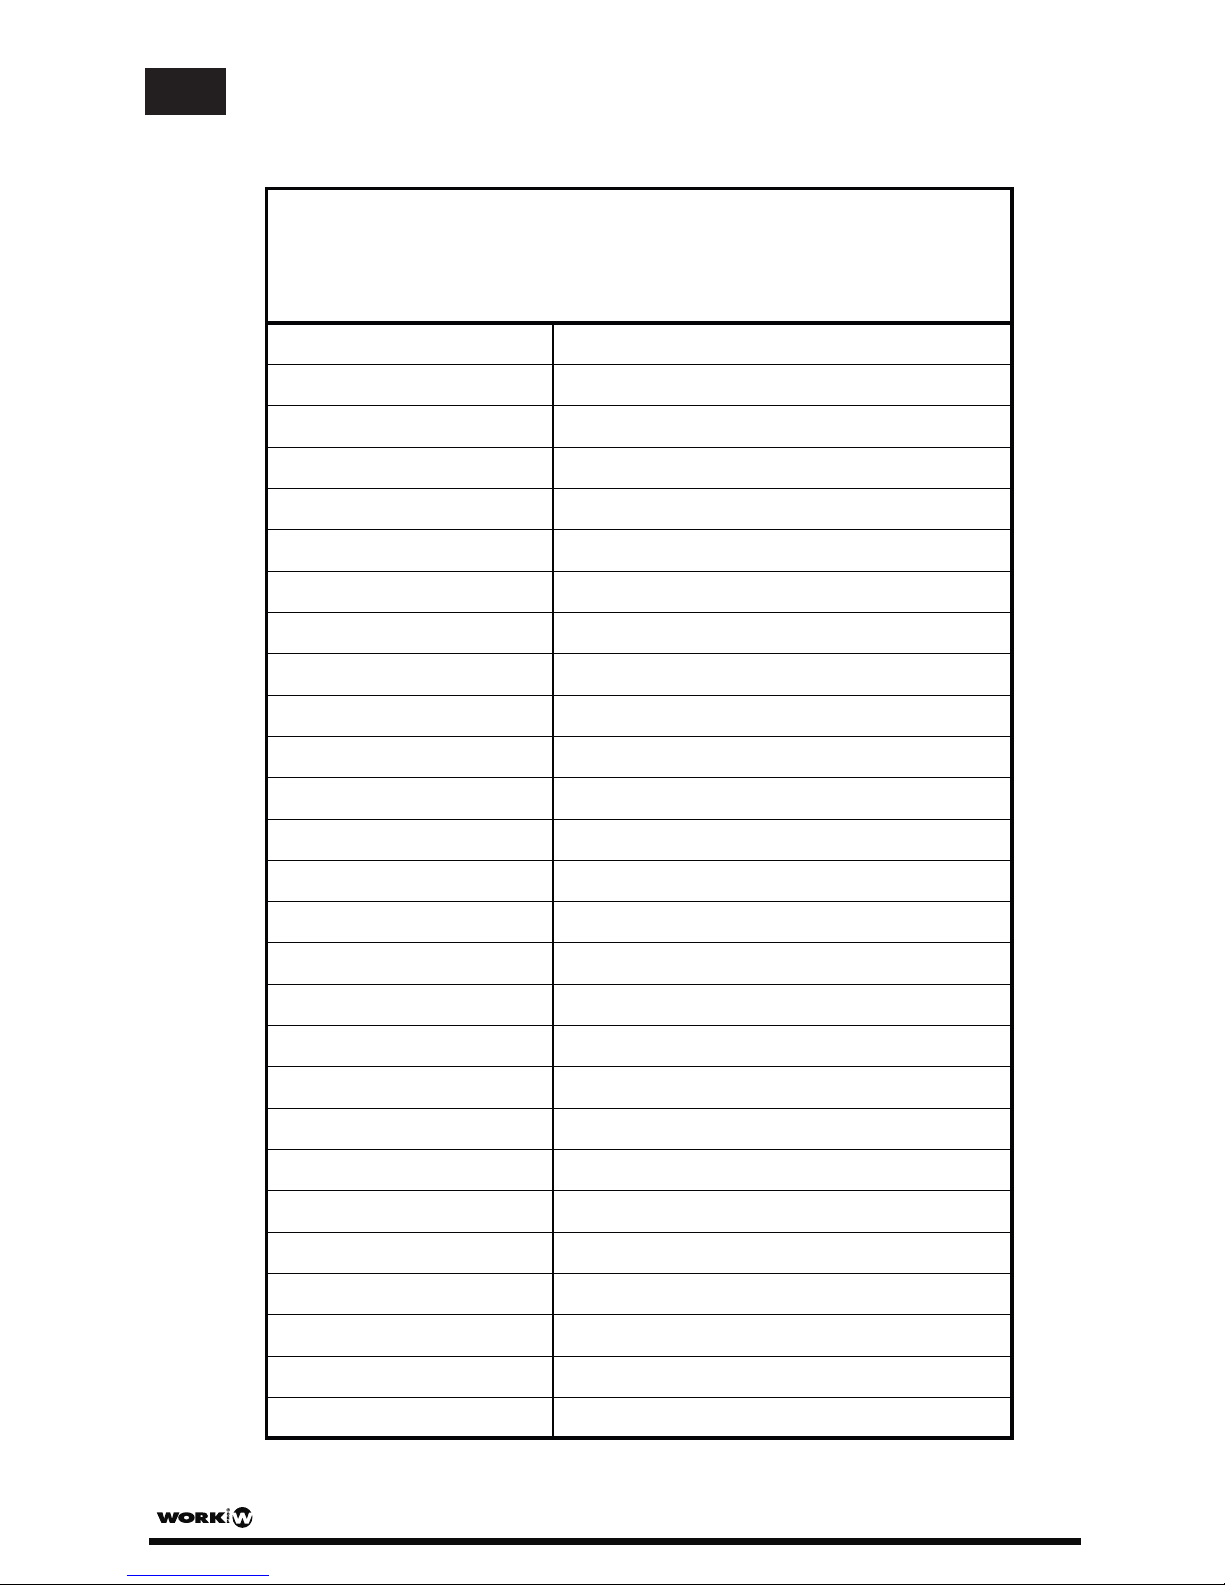
RS232 – REC Command Code
The communication between computer and unit is UART. The parameter are:
Start Bit : 1 Data Bits : 8
Stop bit : 1 Parity bit : none
Baud : 19200 Command code format: HEX
Function Button Command Code
0x06
0x07
KEY_PLAY 0x01
0x02
0x03
0x0A
KEY_STOP
KEY_NEXT
KEY_PREVIOUS
KEY_PROG
KEY_REPEAT
KEY_RANDOM
KEY_REC
0x04
0x05
KEY_DELETE
KEY_COPY
0x0B
0x0C
0x0E
0x0F
KEY_AB
KEY_MUTE
KEY_FUNCTION
KEY_FOLDER
KEY_9
KEY_8
0x15
0x16
0x17
0x18
0x19KEY_7
KEY_6
KEY_5
0x1A
0x1B
0x1C
0x1D
KEY_4
KEY_3
KEY_2
KEY_1
0x1E
0x1F
KEY_0
KEY_FB
KEY_FF
0x20
0x21
0x22
Page 15
1. Lea las instrucciones - Todas las instrucciones de
seguridad y manejo deben ser leídas antes de hacer
funcionar la unidad.
2. Conserve las instrucciones - Estas instrucciones deben
ser conservadas para futuras referencias.
3. Respete los avisos - Todos los avisos en la unidad y el
manual deben ser tenidos en cuenta.
4. Sigua las instrucciones . Todas las instrucciones deben
ser seguidas.
5. Agua y humedad - La unidad no debe ser usada cerca
de agua, por ejemplo bañeras, fregaderos, o lugares
húmedos como piscinas.
6- Bandejas y carros - La unidad sólo debe ser usada con
una bandeja o carro de transporte recomendado por el
fabricante.
La unidad y el carro deben ser movidos con
cuidado.
Paradas bruscas, excesiva fuerza o superficies poco
firmes pueden causar la caída de la unidad.
7. Polarización y toma de tierra - Deben tomarse
precauciones para la correcta polarización y toma a
tierra de la unidad.
8. Ventilación - La unidad debe estar situada en una
posición que no interfiera con la adecuada ventilación.
Por ejemplo, la unidad no debe ser situada sobre una
cama, sofá o superficie similar que pueda bloquear las
salidas de ventilación o en un recinto como muebles o
estanterías que mpidan el flujo de aire.
9. Calor - La unidad debe ser situada apartada de fuentes
de calor como radiadores, estufas u otras aplicaciones
que generen calor.
TO REDUCE THE RISK OF ELECTRIC SHOCK, DO NOT REMOVE COVER
(OR BACK) NO USER SEVICEABLE PARTS INSIDE. REFER SERVICING
TO QUALIFIED PERSONNEL.
PARA REDUCIR EL RIESGO DE FUEGO O DESCARGA ELECTRICA, NO
EXPONGA LA UNIDADA LA LLUVIA O HUMEDAD, NO RETIRE LAS TAPAS.
ESTE PRODUCTO NO ESTADISEÑADO PARA USARSE DE OTRAMANERA
QUE LA ESPECIFICADA
WARNING:
ATENCION:
10. Fuentes de alimentación - La unidad deben ser conectada a
una fuente de alimentación del tipo descrito en el manual y
marcado en la unidad.
11- Protección del cable de alimentación - Este cable no debe ser
colocado de tal manera que pueda ser pisado o pinzado por
personas u objetos dem alrededor, prestando especial atención
al cable y conectores y en el punto donde abandona la unidad.
12. Limpieza - La unidad debe ser limpiada sólo como recomienda
el fabricante.
13. Periodo sin usar - El cable debe ser desconectado de la red
cuando no vaya usarse durante un largo periodo de tiempo.
14. Entrada de objetos o líquido - Debe tener cuidado ante la caída
de objetos o líquidos dentro del la unidad.
15. Daños que requieren servicio - La unidad debe ser comprobada
por técnicos especializados cuando:
A. El cable de alimentación o conector hayan sido dañados, o
B. Han caído objetos o líquidos dentro de la unidad, o
C. La unidad ha sido expuesta a la lluvia, o
D. La unidad no parezca funcionar con normalidad o exhiba un
marcado cambio de rendimiento.
E. La unidad haya caído o se ha dañado la carcasa.
16. Comprobaciones - El usuario no debe tratar de hacer funcionar
la unidad más allá de lo descrito en este manual. Todas las
demás comprobaciones deben ser llevadas a cabo por técnicos
especializados.
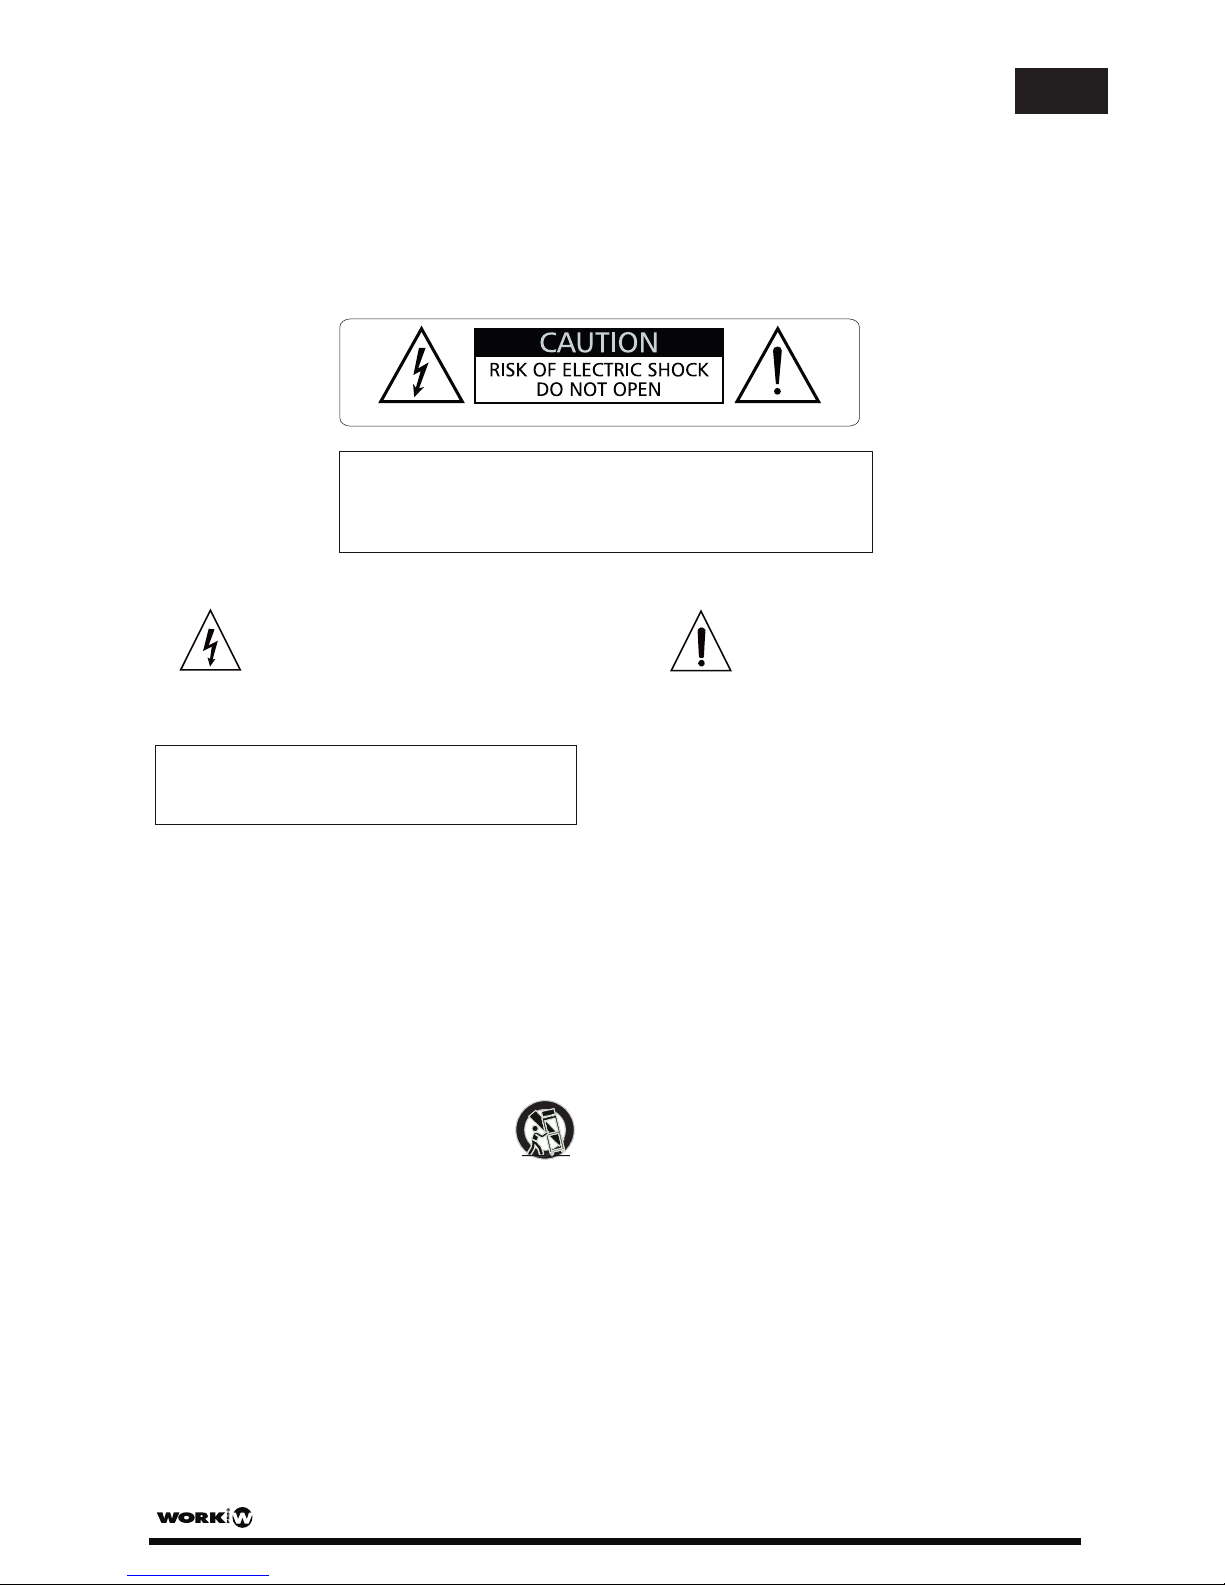
Este símbolo, cuando se use, le alerta de la
presencia de una tensión peligrosa y no aislada
con el producto cerrado. Este voltaje puede
ser suficiente para constituir un riesgo de
descarga eléctrica.
EXPLICACION DE LOS SIMBOLOS GRAFICOS
Este simbolo, cuando se usa, le alerta de una
instrucción de uso o mantenimiento importante.
Por favor léala.
ENES
PAG. 13
User Manual/Manual de Instrucciones MULTIPLAYER 3R
Page 16
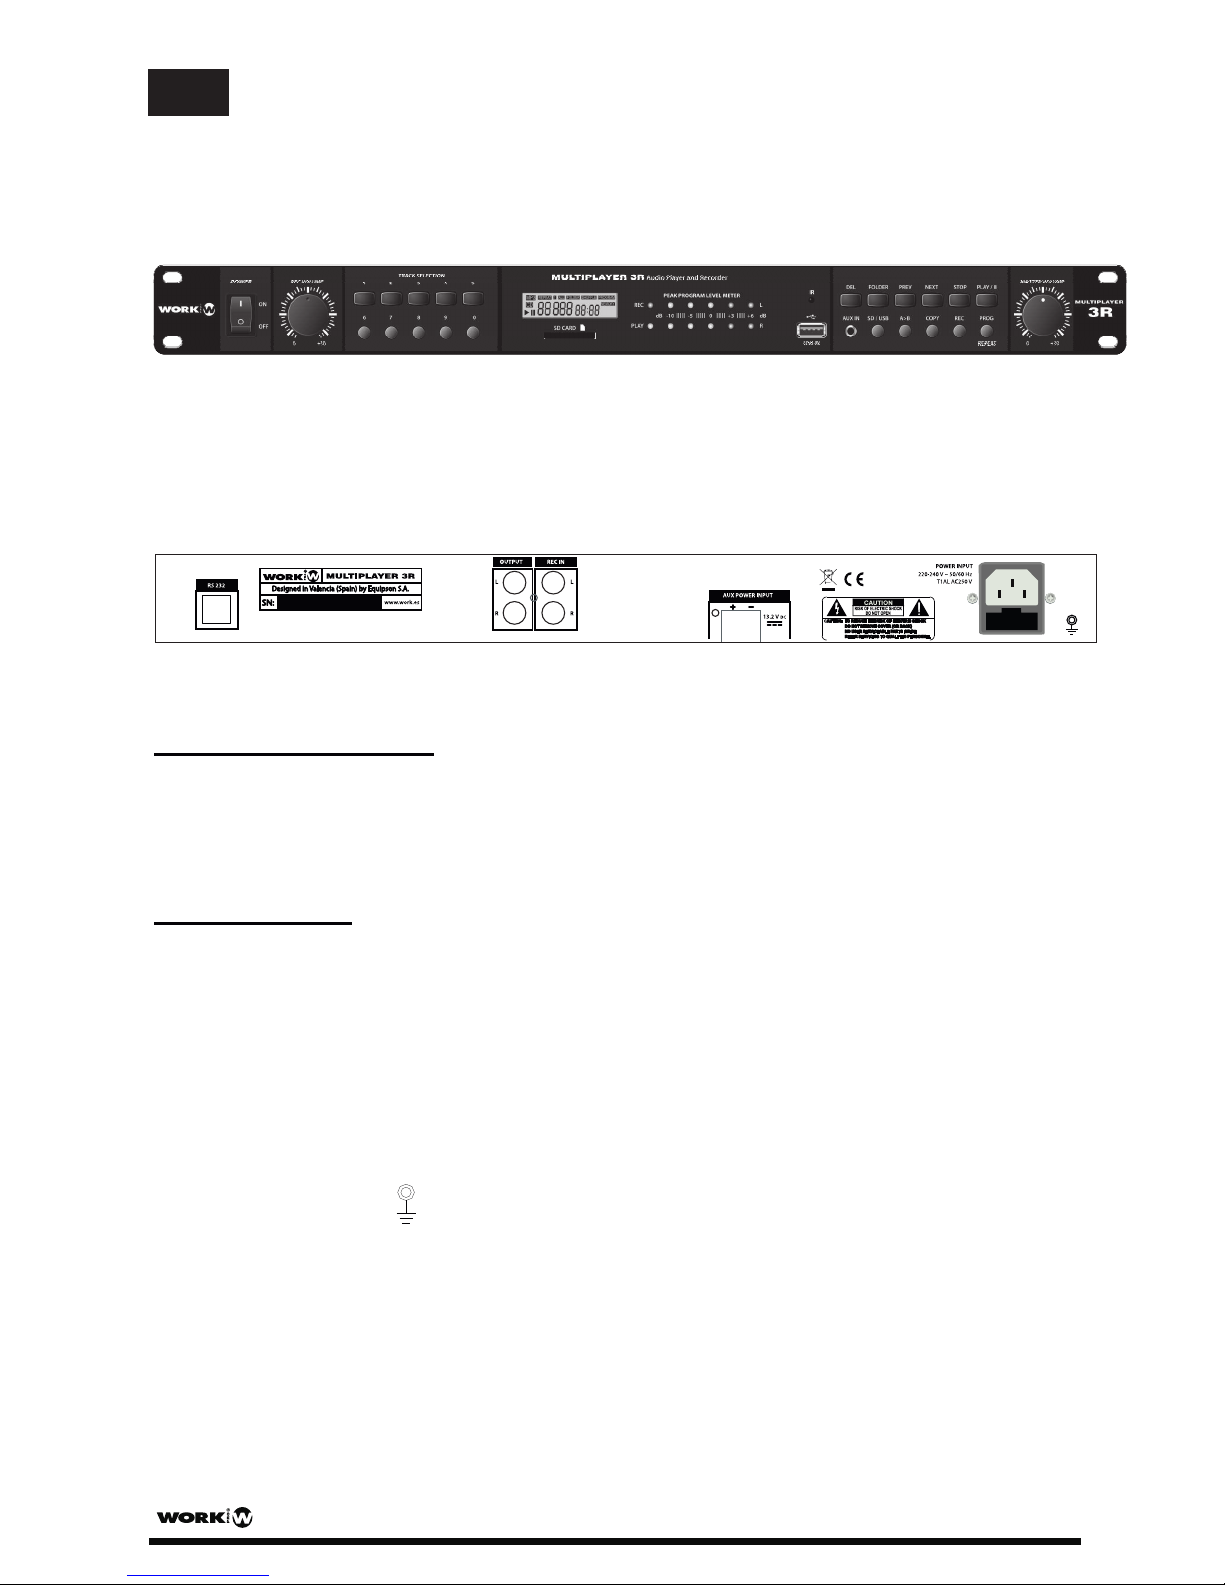
Vista Frontal:
Vista Trasera:
Accesorios incluidos:
Cable de audio (L-R) RCA-RCA x 2
Cable alimentación AC x 1
Control Remoto x 1
INSTALACION:
1. Conecte los cables RCA-RCA a los terminales OUTPUT y REC IN.
2. Conecte el cable de alimentación AC entre el conector IEC y una toma adecuada AC 230V
50/60 Hz (Si es necesaqrio) Conecte el cable de alimentación DC en los terminales DC 13.2V
3. Conecte la toma RS 232 del panel trasero.
4. Conecte la masa
PAG. 14
User Manual/Manual de Instrucciones MULTIPLAYER 3R
ES
Page 17
LECTOR USB/SD Y GRABADOR
Características
- Grabación a través de la entrada Line (REC IN) para su almacenamiento en USB o tarjeta SD.
- Ofrece función de replicación tanto de dispositivo USB como SD.
- Formato de Grabación: MP3
- Formato de reproducción: MP3, WMA.
- Acepta capacidad de 128MB a 16G USB o tarjeta SDHC.
- Calidad de la grabación ajustable, permite elegir entre 128 y 192 Kbps con 44.1 kHz.
Manejo y Funciones
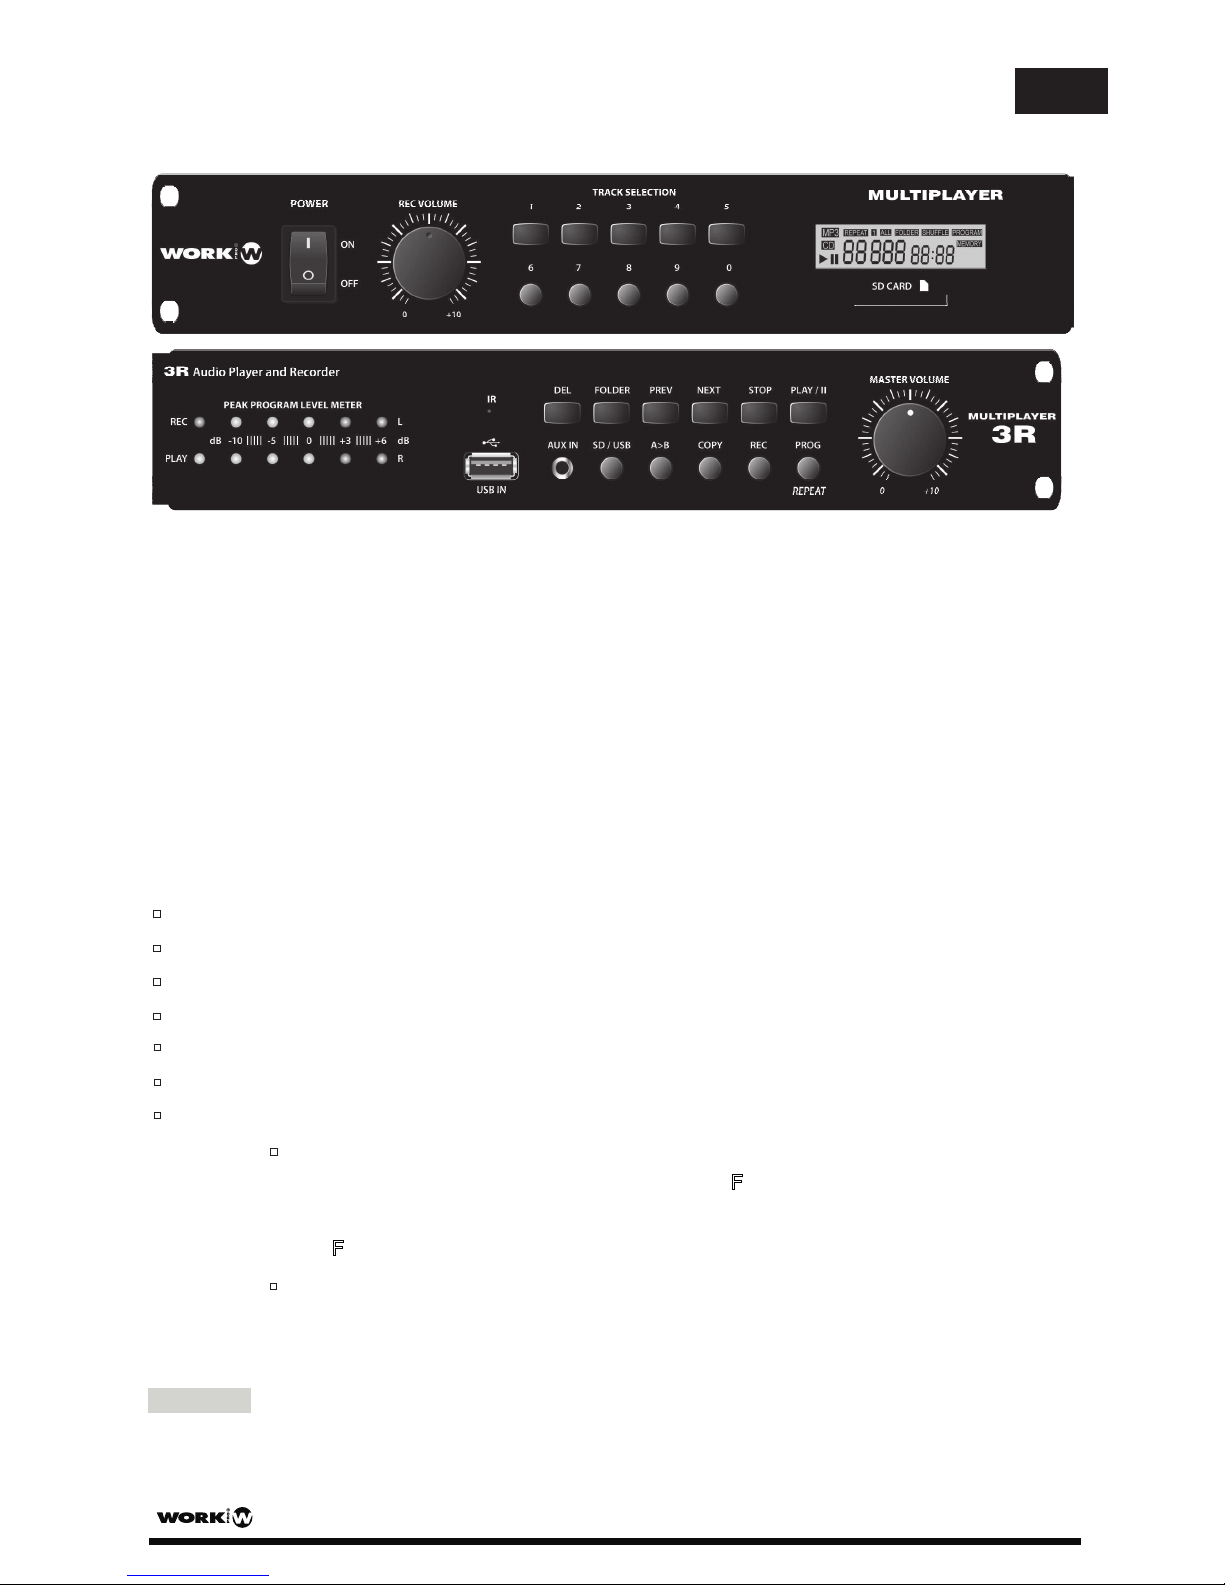
POWER : Permite encender/apagar la unidad.
VOLUME : Control de volumen, gírelo para ajustar el volumen.
Puerto USB : Inserte un dispositivo USB
Slot SD : Inserte una tarjeta SD
AUX Input : Conecte una fuente de audio como un reproductor MP3 o similar
Teclas numéricas 0~9 : Selecciona la pista o la carpeta
FOLDER : Tecla de selección de carpeta y ajuste de la calidad de grabación
Selección de Carpeta
Presione la tecla FOLDER, la pantalla muestra “ ”, entonces pulse las teclas PREV/NEXTF
junto con los números 0 a 9 para seleccionar la carpeta. Doble click cancela la búsqueda
y la “ ” de la pantalla desaparece.F
Ajuste de la calidad de grabación: Presionando FOLDER más de 3 segundos puede elegir
la calidad de la grabación. Presione PREV o NEXT para seleccionar 128Kbps o 192 Kbps.
192Kbps.
Grabación
REC: Tecla de función grabación, necesita usar esta tecla cuando grabe a través de la toma
REC IN.
PAG. 15
User Manual/Manual de Instrucciones MULTIPLAYER 3R
ENES
Page 18
El nivel de grabación puede ser ajustaqdo usando la tecla “REC VOLUME”. El vúmetro
“PEAK PROGRAM LEVEL METER” mostrará el nivel de la grabación.
Cuando tanto USB o SD están presentes
- Presione la tecla REC. La pantalla parpadeará indicando que está grabando (a un USB o SD)
- Use la tecla USB/SD para seleccionar la opción donde grabar (USB o SD).
- Presione REC para empezar a grabar, la pantalla parpadea indicando que está grabando.
- Presione la tecla STOP para para la grabación.
Cuando sólo un dispositivo (USB o SD) está presente
- Presione >REC para comenzar a grabar, la pantalla parpadea e indica que está grabando
Presione STOP para detener la grabación.
La grabación de audio a través de la función REC se guarda en la carpeta REC
- Para ejecutar una pista grabada: Presione FOLDER, en pantalla aparece “F” use PREV/NEXT
para seleccionar la carpeta REC. Presione PLAY/II para ejecutar.
- El número de pista en la carpeta REC comienza con “REC 001" y se incrmenta gradualmente
Así pues, si quiere compruebar el fichero después de grabarlo, la pista se habrá grabado
con el último número en la carpeta..
COPY: Tecla de función copia. Funciona con la unidad en estado STOP y se usa para copiar desde
un USB a un SD y viceversa.
Presione la tecla STOP, la unidad para al modo de detención (stop)
Inserte un USB y una tarjeta SD, use la tecla USB/SD para seleccionar el dispositivo que quiere
copiar y siga estas instrucciones:
Copia single:
Presione PREV/NEXT o los números 0-9 para seleccionar la pista que desea
copiar, luego presione COPY para comenzar la copia.
Copia multipista o multi-carpetas:
- Dede antes seleccionar las pistas y almacenarlas en la memoria (para función PROG
diríjase a su apartado)
- Presione la tecla COPY para copiar las pistas guardadas en la memoria, si copia a un SD
en la pantalla parpadeará “SD” indicando donde se produce la grabación.
Copia del directorio completo:
- Presione la tecla FOLDER, la pantalla muestra “ ”, use las teclas PREV/NEXT paraF
seleccionar la carpeta que quiere copiar.
- Presione la tecla COPY para copiar la carpeta seleccionada. Si copia a un SD, en la
pantalla parpadea “SD” para indicar que está grabando en uan tarjeta SD..
- Las pistas grabadas a través de la función COPY se almacena en la carpeta “CPY”
- Para ejecutar la carpeta “CPY”, presione la tecla FOLDER, la pantalla muestra “F”
presione entonces las teclas PREV/NEXT para seleccionar el directorio CPY y presione
PLAY/II para comenzar la ejecución.
- La función Copy copia sin carpetas. Por ejemplo, si queremos copiar 5 pistas en 3
carpetas (total 15 pistas), se grabarán en CPY001 a CPY 015. Si copia una nueva pista
grabará como CPY016.
PAG. 16
User Manual/Manual de Instrucciones MULTIPLAYER 3R
ES
Page 19
A B: Ejecución en modo Repeat
Presione una vez para comenzar a ejecutar el inicio de la memoria.
Presione otra vez para parar al final del área de memoria. El dispositivo repite el área de
memoria seleccionada.
Presione otra vez para detener la ejecución.
Reproducción USB / SD
PLAY/II :Play y pause, presione para ejecutar, presione otra vez para pausar
STOP :Presione para detener la ejecución
USB / SD :Seleccione para utilizar el puerto USB o el slot SD
REPEAT /PROG :Presione para seleccionar Repeat o función de memoria de programa
Función Repeat: Necesita funcionar en modo ejecución
- Presione una vez, la pantalla muestra "REP”, el cual ejecutará repetidamente esa pista
- Presione dos veces, la pantalla muestra " REP F”, repetirá la carpeta completa que está
siendo ejecutada
- Presione 3 veces, la pantalla muestra"REP ALL” y repetirá todas las pistas.
- Press 4thtimes, cancel repeat playback function. The words on LCD screen will be
eliminated.
Función Memory: Necesita funcionar en modo stop-play, puede memorizar hasta
99 pistas.
- Memoria single o Multi-tracks:
Presione STOP para detener la ejecución
Presione STOP para detener la ejecución
Presione PROG / REPEAT , la pantalla muestra . SeleccionePROG
Presione PROG / REPEAT , la pantalla muestra . Presione la tecla FOLDERPROG
la pista deseada usando las teclas 0 a 9, PREV o NEXT key.
Presione PROG / REPEAT para guardar la 1ª pista, la pantalla muestra “00 01"
para la 1ª pista. Presione >>PROG/REPEAT>> otra vez para guardar la 2ª pista;
La pantalla muestra “00 02".m Siga el mismo proceso para guardar más pistas.
Presione PLAY / II para ejecutar las pistas guardadas en Program
- Memoria de la carpeta completa:
y seleccione la carpeta con las teclas 0-9 o PREV y NEXT
Presione PROG para guardar la carpeta seleccionada. Para guardar más carpetas
Presione PLAY / II para comenzar a ejecutar la carpeta memorizada
repita los pasos anteriores.
Para memorizar varias carpetas o pistas repita los pasos anteriores
La pantalla muestra FULL cuando se almacenan 99 pistas.
PAG. 17
User Manual/Manual de Instrucciones MULTIPLAYER 3R
ENES
Page 20
Para cancelar un programa, mantenga presinado PROG hasta que en la pantalla
desaparezca la palabra .PROG
PREV : Atrás. Presione para volver a la anterior pista. Presione 3 segundos para un
retroceso rápido.
NEXT : Adelante. Presione para ir a la siguiente pista. Presione 3 segundos para un
avance rápido
Sensor IR : Sensor infrarrojo para el mando remoto
DEL: Borra la pista/carpeta o todos los ficheros
Borrar la pista actual funciona bajo modo “Stop” o durante el modo
“Playing”
Presione DEL, en la pantalla parpadea DEL FILE, recordando que va a borrar un fichero
entonces presione DEL para confirmar el borrado, la pantalla muestra DEL END.
Borrar una carpeta
: Para borrar una carpeta específica , presione FOLDER para
seleccionar la carpeta que desea borrar, la pantalla LCD muestra DEL FOLDER,
recordando que quiere borrar una carpeta, entonces presione DEL para confirmar
el borrado, la pantalla LCD muestra , la carpeta ha sido borrada.DEL END
Borrar todos los ficheros:
En modo Stop-play
- Pressione la tecla Stop
- presione DEL durante 5 segundos
- La pantalla muestra para confirmar que quiere borrar todos los ficheros" "DEL ALL
- presione DEL de nuevo para borrar todos los ficheros
- Para cancelar la función de borrado, espere a que la pantalla deje de parpadear
PAG. 18
User Manual/Manual de Instrucciones MULTIPLAYER 3R
ES
Page 21
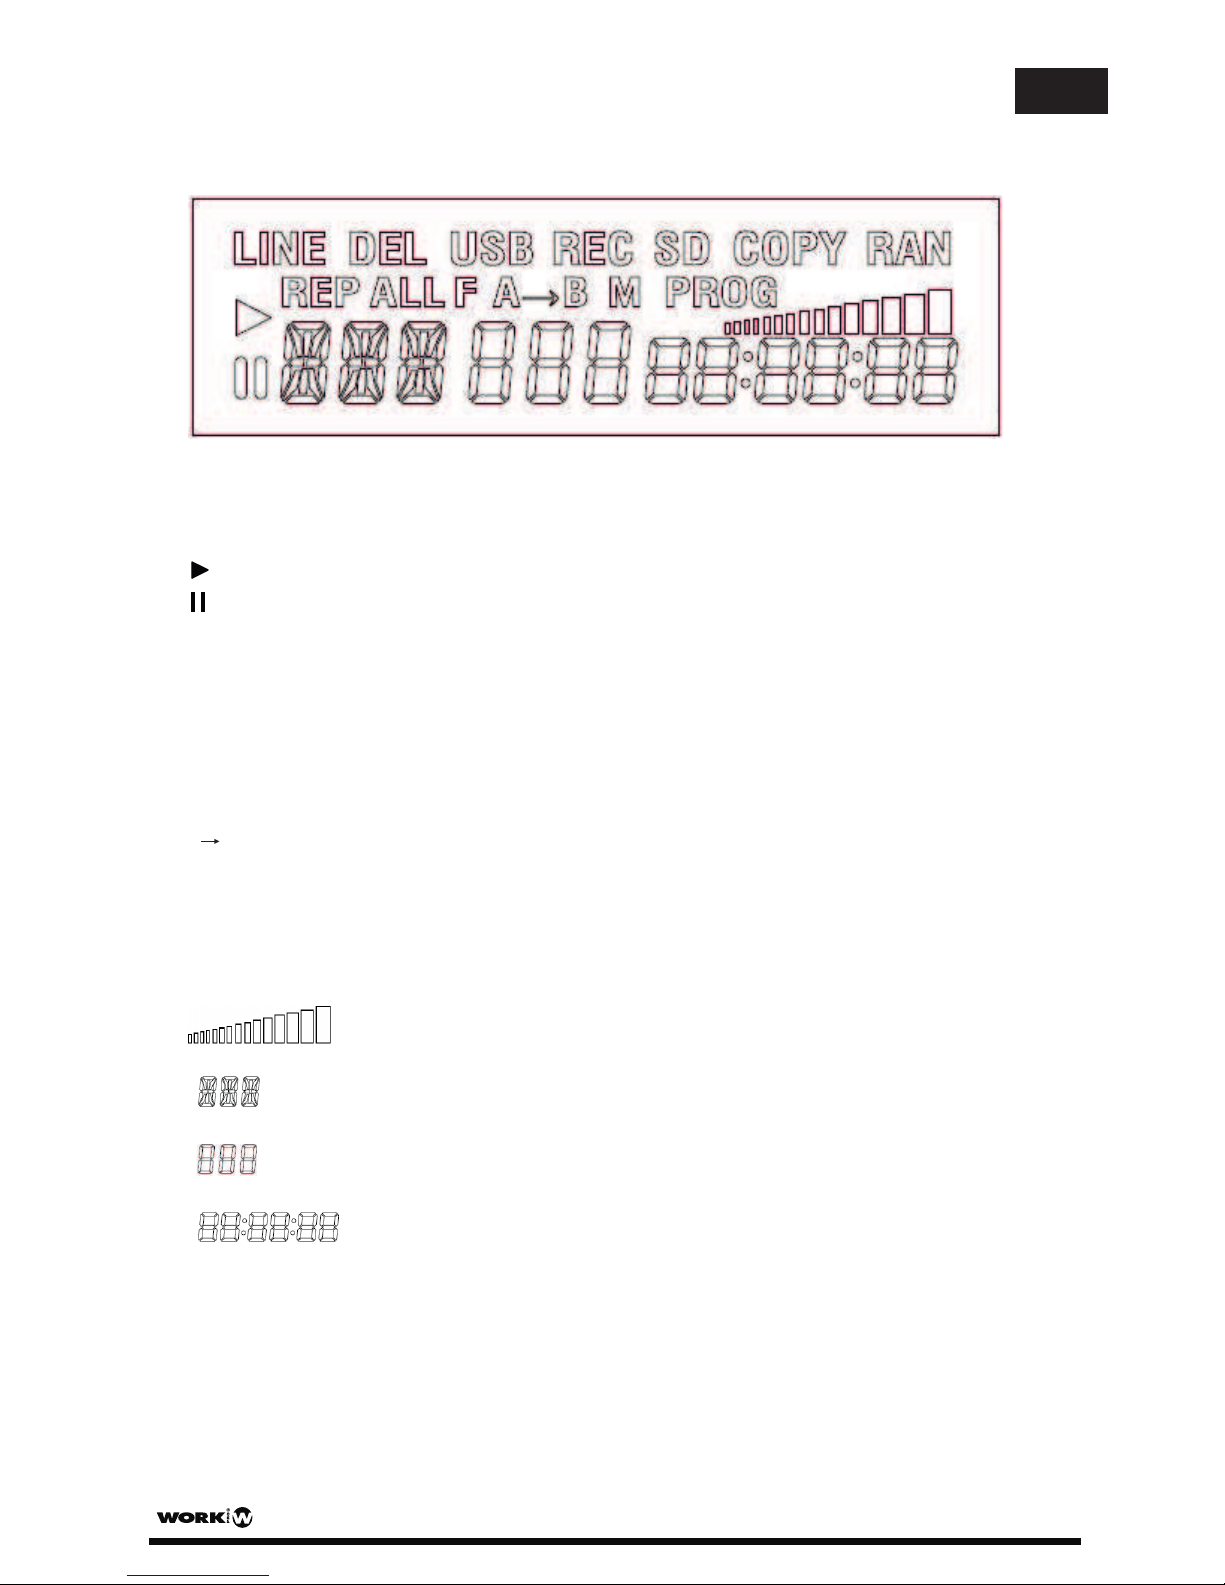
Pantalla LCD::::
LINE :Fuente de audio Line in
DEL :Cuando usa la función delete (borrar)
:Modo play
:Pausa
REP :Ejecuta repetidamente una pista
REPALL Repite todas las pistas:
REP F :Repite una carpeta específica
RAN :Ejecución en modo aleatorio
PROG :Cuando funciona el programador de pistas
M :Función Mute
A B :Cuando repite la ejecución de una sección específica
USB :Cuando usa la función USB
SD :Cuando usa la función SD
COPY :Cuando opera la función copia
REC :Cuando opera la función grabación
:muestra el volumen, total 15 secciones
:En modo MP3, aparecerá el número de carpetas.
:Muestra la pista en ejecución
Muestra el tiempo de la pista en ejecución:
PAG. 19
User Manual/Manual de Instrucciones MULTIPLAYER 3R
ENES
Page 22
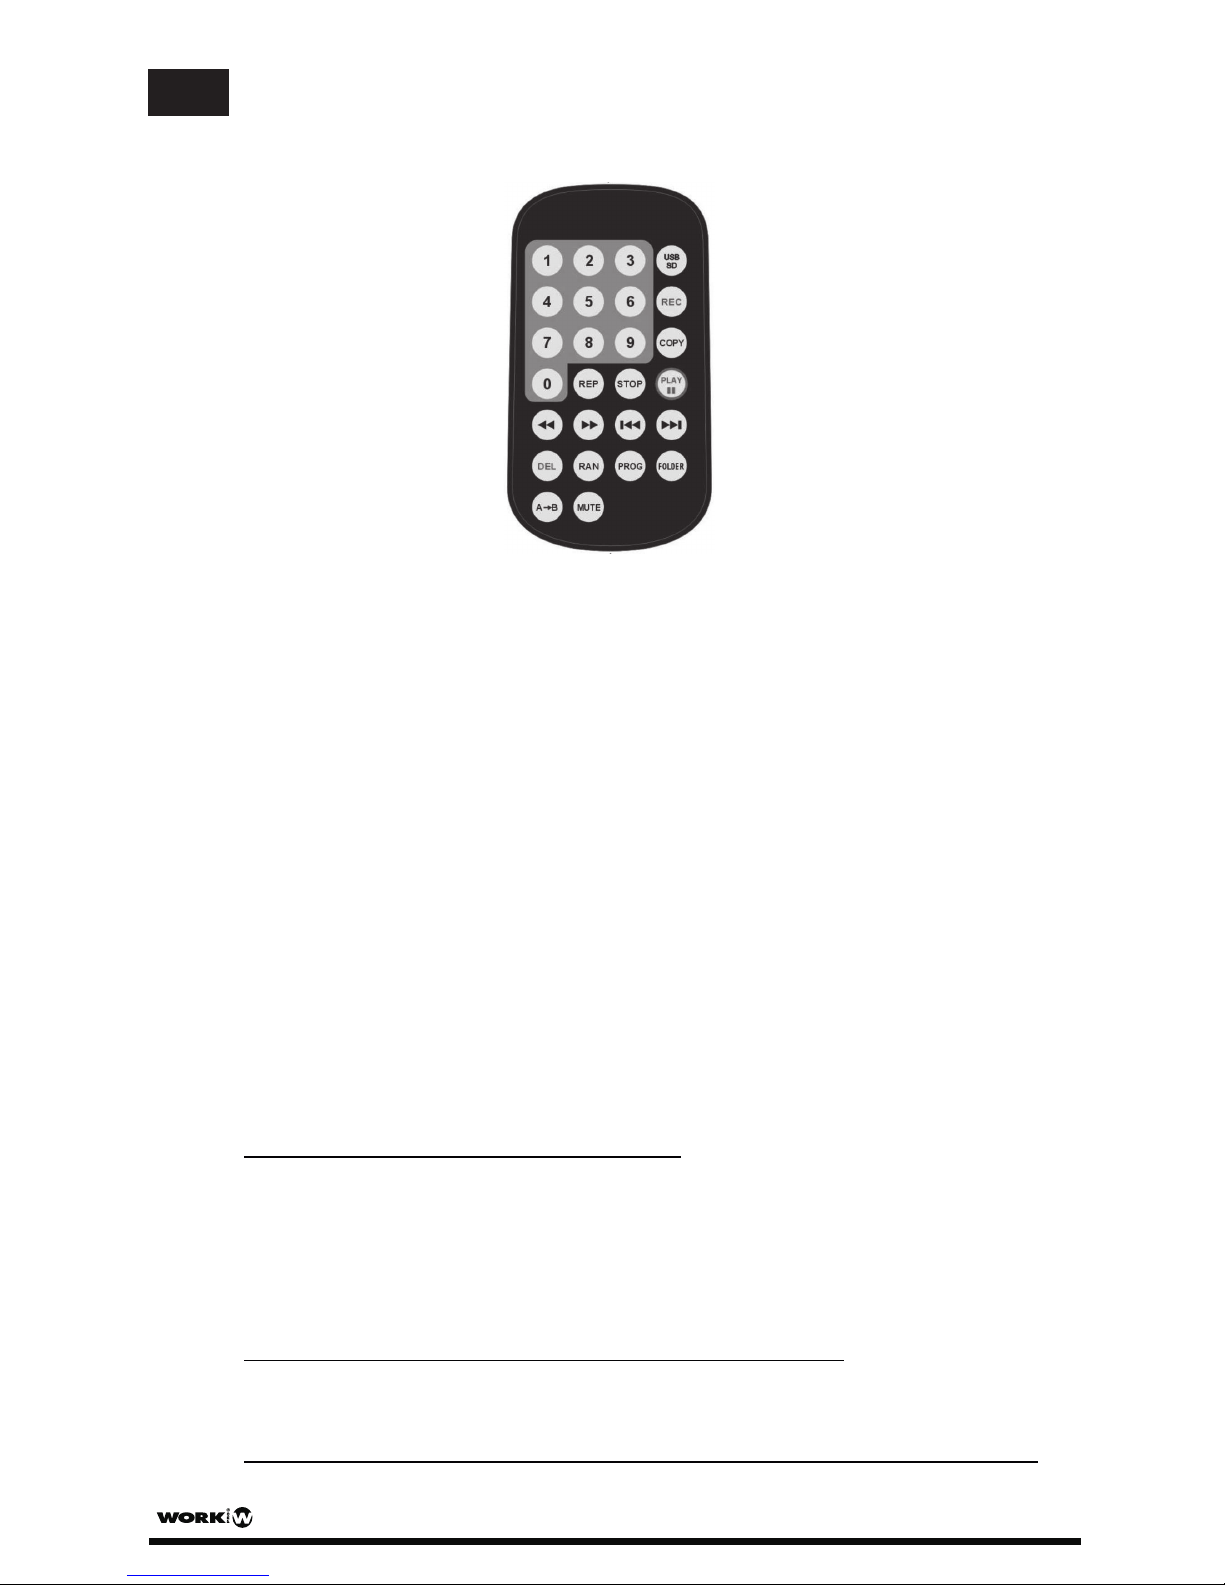
FUNCIONES DEL CONTROL REMOTO
FOLDER Selección de la carpeta y ajuste de la calidad de grabación:
Seleccionar carpeta
- Presione FOLDER, la pantalla muestra F, entonces con las teclas PREV, NEXT y los
números de 0 a 9 seleccione la carpeta. Doble click y la “F” desaparece y se
cancela la acción.
Ajuste de la calidad de grabación: Presione la tecla FOLDER más de 3 segundos
ahora puede seleccionar la calidad de grabación. Presionando PREV o NEXT para
seleccionar 128 Kbps o 192 Kbps.
Numerós 0 ~ 9 : Seleccione la pista con los números y presione PLAY/II para ejecutar
USB / SD Conmuta el modo USB o SD:
REC Función de grabación, grabación para LINE IN:
Cuando tanto USB y SD están coenectados :
- Presioen la tecla REC. La pantalla parpadea para indicar que se grabará en el USB o el SD.
- Use la tecla USB/SD para seleccionar la opción de grabación al USB o SD.
- Presione REC para comenzar a grabar, la pantalla comienza a parpadear indicando que
está grabando
- Presione STOP para detener la grabación
Cuando sólo está conectado uno de los dispositivos (USB o SD)
- Presione REC para comenzar a grabar, la pantalla parpadea indicando que está grabando
presione STOP para dejar de grabar.
El sonido grabado a través de la función REC se guarda en el directorio REC
- Para ejecutar las pistas de la carpeta REC: presione FOLDER, la pantalla muestra . UseF
El controlador remoto debe apuntarse sobre el sensor IR del panel frontal. La distancia óptima es de 3
metros. Las pilas (modelo Cr2025 3V) debe insertarse en el controlador.
PAG. 20
User Manual/Manual de Instrucciones MULTIPLAYER 3R
ES
Page 23
las teclas PREV o NEXT para seleccionar la carpeta REC, presione PLAY/II para ejecutar
- El número de pista en la carpeta REC comienza con “REC 001" y se incrementa
gradualmente. Así, si quiere comprobar los ficheros grabados, la última pista grabada
coincidirá con el número más alto en las pista de la carpeta REC..
REP
::
:Función Repeat: Necesita funcionar en modo reproducción
- Presione una vez, la pantalla muestra "
REP”, y ejecutará repetidamente la pista
actual.
- Presione 2 veces, la pantalla muestra "REP F” , y ejecutará repetidamente la carpeta
que se está ejecutando en ese momento.
- Presione 3 veces , la pantalla muestra
"
REP ALL”, y ejecutará todas las pistas.
- Presione 4 veces para cancelar la función de ejecución de repetición. Las palabras en
la pantalla se eliminarán.
Función memoria PROG: Necesita funcionar en modo stop y play, puede memorizar hasta
99 pistas.
COPY: Tecla de función copia. Funciona con la unidad en estado STOP y se usa para copiar desde
un USB a un SD y viceversa.
Presione la tecla STOP, la unidad para al modo de detención (stop)
Inserte un USB y una tarjeta SD, use la tecla USB/SD para seleccionar el dispositivo que quiere
copiar y siga estas instrucciones:
Copia single:
Presione PREV/NEXT o los números 0-9 para seleccionar la pista que desea
copiar, luego presione COPY para comenzar la copia.
Copia multipista o multi-carpetas:
- Dede antes seleccionar las pistas y almacenarlas en la memoria (para función PROG
diríjase a su apartado)
- Presione la tecla COPY para copiar las pistas guardadas en la memoria, si copia a un SD
en la pantalla parpadeará “SD” indicando donde se produce la grabación.
Copia del directorio completo:
- Presione la tecla FOLDER, la pantalla muestra “ ”, use las teclas PREV/NEXT paraF
seleccionar la carpeta que quiere copiar.
- Presione la tecla COPY para copiar la carpeta seleccionada. Si copia a un SD, en la
pantalla parpadea “SD” para indicar que está grabando en uan tarjeta SD..
- Las pistas grabadas a través de la función COPY se almacena en la carpeta “CPY”
- Para ejecutar la carpeta “CPY”, presione la tecla FOLDER, la pantalla muestra “F”
presione entonces las teclas PREV/NEXT para seleccionar el directorio CPY y presione
PLAY/II para comenzar la ejecución.
- La función Copy copia sin carpetas. Por ejemplo, si queremos copiar 5 pistas en 3
carpetas (total 15 pistas), se grabarán en CPY001 a CPY 015. Si copia una nueva pista
grabará como CPY016.
PAG. 21
User Manual/Manual de Instrucciones MULTIPLAYER 3R
ENES
Page 24
- Memoria single o Multi-tracks:
Presione STOP para detener la ejecución
Presione STOP para detener la ejecución
Presione PROG / REPEAT , la pantalla muestra . SeleccionePROG
Presione PROG / REPEAT , la pantalla muestra . Presione la tecla FOLDERPROG
la pista deseada usando las teclas 0 a 9, PREV o NEXT key.
Presione PROG / REPEAT para guardar la 1ª pista, la pantalla muestra “00 01"
para la 1ª pista. Presione >>PROG/REPEAT>> otra vez para guardar la 2ª pista;
La pantalla muestra “00 02".m Siga el mismo proceso para guardar más pistas.
Presione PLAY / II para ejecutar las pistas guardadas en Program
- Memoria de la carpeta completa:
y seleccione la carpeta con las teclas 0-9 o PREV y NEXT
Presione PROG para guardar la carpeta seleccionada. Para guardar más carpetas
Presione PLAY / II para comenzar a ejecutar la carpeta memorizada
repita los pasos anteriores.
Para memorizar varias carpetas o pistas repita los pasos anteriores
La pantalla muestra FULL cuando se almacenan 99 pistas.
STOP :Presione para detener la ejecución
:Presione para volver a la pista anterior
:Presione para ir a la pista siguiente
:Presione para retroceder rápido. Presione otra vez para cancelarlo
:Presione para avanzar rápido. Presione otra vez para cancelarlo
DEL: Borra la pista/carpeta o todos los ficheros
Borrar la pista actual funciona bajo modo “Stop” o durante el modo
“Playing”
Presione DEL, en la pantalla parpadea DEL FILE, recordando que va a borrar un fichero
entonces presione DEL para confirmar el borrado, la pantalla muestra DEL END.
Borrar una carpeta
: Para borrar una carpeta específica , presione FOLDER para
seleccionar la carpeta que desea borrar, la pantalla LCD muestra DEL FOLDER,
recordando que quiere borrar una carpeta, entonces presione DEL para confirmar
el borrado, la pantalla LCD muestra , la carpeta ha sido borrada.DEL END
Borrar todos los ficheros:
En modo Stop-play
- Pressione la tecla Stop
- presione DEL durante 5 segundos
- La pantalla muestra para confirmar que quiere borrar todos los ficheros" "
DEL ALL
- presione DEL de nuevo para borrar todos los ficheros
- Para cancelar la función de borrado, espere a que la pantalla deje de parpadear
PAG. 22
User Manual/Manual de Instrucciones MULTIPLAYER 3R
ES
Page 25
RAN :Presione para ejecutar las pista en modo aleatorio. Presione otra vez para cancelar
PLAY / II :Play y pause, presione para ejecutar una pista, presione otra vez para pausa
MUTE ::::Presione para “mutear” la salida, presione de nuevo para volver a la reproducción normal.
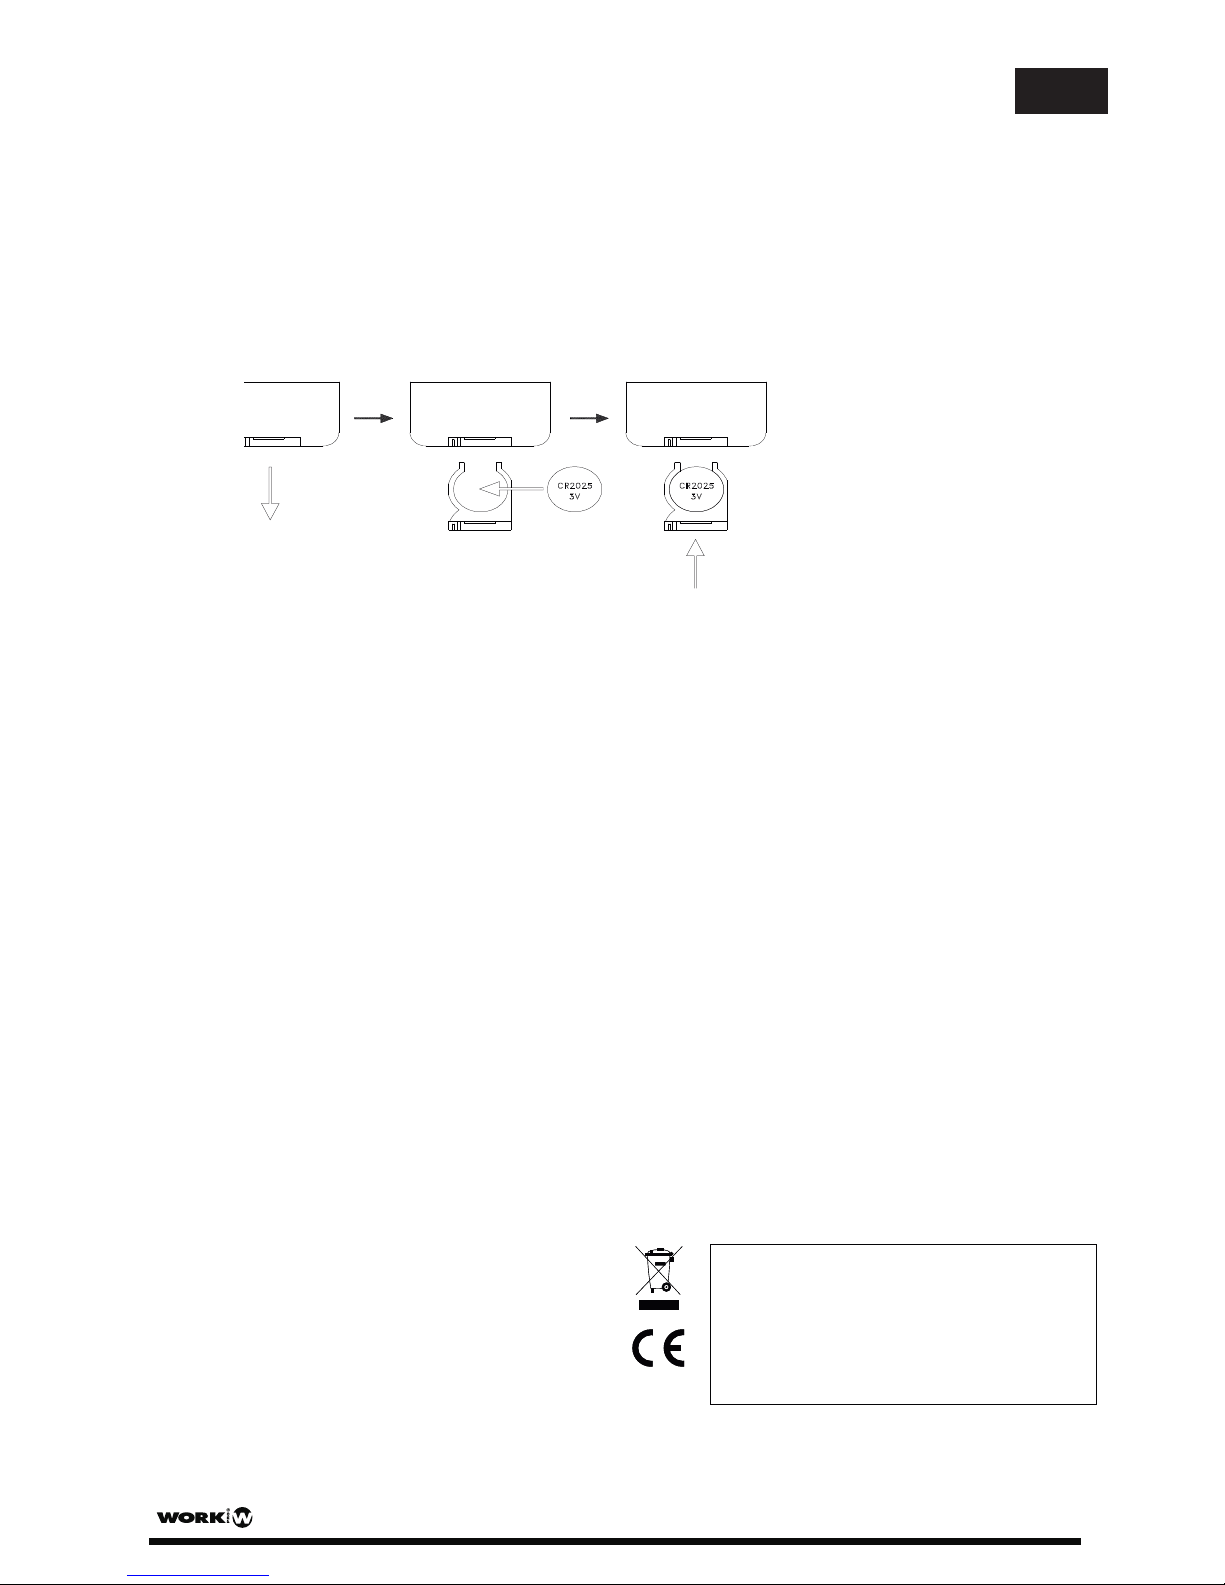
Instalación de la pila en el mando remoto
1. Abrir la cubierta de la pila (en la parte trasera del mando), presione hacia abajo y
deslícela de izquierda derecha, entonces extraigala.
2. Coloque una nueva pila (tipo CR2025 3V con el positivo hacia arriba)
3. Realice el punto 1 a la inversa.
PAG. 23
User Manual/Manual de Instrucciones MULTIPLAYER 3R
Este símbolo en su equipo o embalaje, indica que el presente producto
no puede ser tratado como residuos domésticos normales, sino que deben
entregarse en el correspondiente punto de recogida de equipos electrónicos
y eléctricos. Asegurándose de que este producto es desechado
correctamente, Ud. está ayudando a prevenir las consecuencias negativas
para el medio ambiente y la salud humana que podrían derivarse de la
incorrecta manipulación de este producto. EL reciclaje de materiales
ayuda a conservar las reservas naturales. Para recibir más información,
sobre el reciclaje de este producto, contacte con su ayuntamiento, su
punto de recogida más cercano o el distribuidor donde adquirió el producto.
ENES
Page 26
La comunicacón entre el ordenador y la unidad es UART Los parámetros son:
PAG. 24
User Manual/Manual de Instrucciones MULTIPLAYER 3R
ES
RS232 – REC Command Code
Bit inicio : 1 Bits : 8Data
bit Stop : 1 bit Paridad :ninguno
Baud : 19200 Formato de Comando : HEX
Botón de Función Código de Comando
0x06
0x07
KEY_PLAY 0x01
0x02
0x03
0x0A
KEY_STOP
KEY_NEXT
KEY_PREVIOUS
KEY_PROG
KEY_REPEAT
KEY_RANDOM
KEY_REC
0x04
0x05
KEY_DELETE
KEY_COPY
0x0B
0x0C
0x0E
0x0F
KEY_AB
KEY_MUTE
KEY_FUNCTION
KEY_FOLDER
KEY_9
KEY_8
0x15
0x16
0x17
0x18
0x19KEY_7
KEY_6
KEY_5
0x1A
0x1B
0x1C
0x1D
KEY_4
KEY_3
KEY_2
KEY_1
0x1E
0x1F
KEY_0
KEY_FB
KEY_FF
0x20
0x21
0x22
Page 27

Page 28

EQUIPSON, S.A.
Avda. El Saler, 14 - Pol. Ind. L´Alteró,
46460 - Silla (Valencia) Spain
Tel. +34 96 121 63 01 Fax + 34 96 120 02 42
www.work.es [email protected]
 Loading...