

Page 1

E
E
E
S
S
S
U
U
U
H
H
F
F
F
S
SH
S
U
U
P
PU
P
E
E
E
S
S
S
U
U
U
H
H
H
F
F
F
S
S
S
U
U
U
P
P
P
E
E
E
S
S
S
U
U
U
H
H
F
F
F
S
S
SH
U
U
U
P
P
P
E
E
E
S
S
S
U
U
U
H
H
H
F
F
F
S
S
S
U
U
U
P
P
P
Equipson, S.A.
www.equipson.es
support@equipson.es
1 2
OUTPUT: 5A/CH, TOTAL 16A Max.
3
FUSES: F6.3A 250V 5x20mm
4
WDP-4
Infra-link ChaserInfra-link ChaserInfra-link Chaser
Mic
Stand by
SPEED
MONITOR
1 2 3 4
PATTERN
Audio/Chase Full on
Infrared sensor
WDP4 ANALOG
User Manual / Instrucciones de Usuario
Page 2

Unpacking:
Thank you for your purchase of this product. Every unit has been thoroughly
tested and carefully packed before delivery. Unpack the shipping carton carefully,
check carefully for sure your new unit is not damaged and all accessories not
missing. In the event damage has been found or parts are missing, please do not
use it and contact your authorized dealer immediately.
Introduction:
This unit is a four channel remote chaser. This unit features 16 built-in chase
programs plus a sequence of 16 programs, each can be subject to the music
beat or the speed you set. Meanwhile, Full on and Stand by functions allow you
to highlight or kill overall output instantly. At your most convenience, this unit can
be entirely controlled by its infrared control. Additionally, this unit has built in
memory to save and retain your data in case the unit's power is accidently
disconnected.
To optimize the performance of this product, please read these operating
instructions carefully to familiarize yourself with the basic operations of this
unit.
Warning!
This product must be grounded. Do not spill water or other liquids into or on to
your unit. To prevent or reduce the risk of electrical shock or fire, do not expose
this unit to rain or moisture.
Caution!
There are no user serviceable parts inside this unit. Do not attempt any repairs
yourself. Should you experience any problem during use, please contact your
local dealer immediately.
Do not discard the shipping carton in the trash. Please recycle when ever
possible.
Especificaciones:
Alimentación:
Salida de canal:
Salidas Aliment.:
Fusibles de canal:
Accesorios:
Dimensiones:
Peso
Especificaciones y mejoras en el diseño de esta unidad y este
manual, están sujetas a modificación sin previo aviso.
AC 230V~50Hz, 16A
5A por canal, total 16A max.
Un schuko por canal,
total 8 conectores de salida
F6.3A 250V 5x20mm
Mando infrarrojol(1pc)
260 x 210 x 75mm
2.2 Kgs
Este símbolo en su equipo o embalaje, indica que el presente producto
no puede ser tratado como residuos domésticos normales, sino que deben
entregarse en el correspondiente punto de recogida de equipos electrónicos
y eléctricos. Asegurándose de que este producto es desechado
correctamente, Ud. está ayudando a prevenir las consecuencias negativas
para el medio ambiente y la salud humana que podrían derivarse de la
incorrecta manipulación de este producto. EL reciclaje de materiales
ayuda a conservar las reservas naturales. Para recibir más información,
sobre el reciclaje de este producto, contacte con su ayuntamiento, su
punto de recogida más cercano o el distribuidor donde adquirió el producto.
Fuse replacement:
Disconnect the unit's main power. Insert a standard flat screwdriver in to the
fuse holder housing. Turn the screwdriver in counterclockwise direction to
release the fuse holder. Remove the old fuse and replace it with the same
type. Insert the fuse holder back into its housing and turn in clockwise direction
to lock the holder in place.
User Manual / Manual WDP4 ANALOG Page/Página 1
User Manual / Manual WDP4 ANALOG Page/Página 12
Page 3

Full On & Stand By
Full on
Presione y mantenga pulsado este botón, le permitirá llevar la totalidad de las salidas
a intensidad máxima, a pesar del modo de función activo. Si libera el botón, regresará
al estado anterior.
Functions & Controls (Front):
1
Stand by
Presione el botón Stand para acceder a esta función. El LED parpadeará indicando
que la función está activa. En este modo, la totalidad de las salidas se interrumpirá
momentáneamente. Para salir de este estado, pulse el botón Stand otra vez, el LED
se apagará y la unidad regresará al estado anterior.
2
2
OUTPUT: 5A/CH, TOTAL 16A Max.
3
FUSES: F6.3A 250V 5x20mm
41
WDP-4
I nfr a-l i n k Chas erI nfr a-l i n k Chas erI nfr a-l i n k Chas er
MONITOR
SPEED
5
PATTERN
6
1 2 3 4
Audio/Chase Full on
Infrared sensor
7
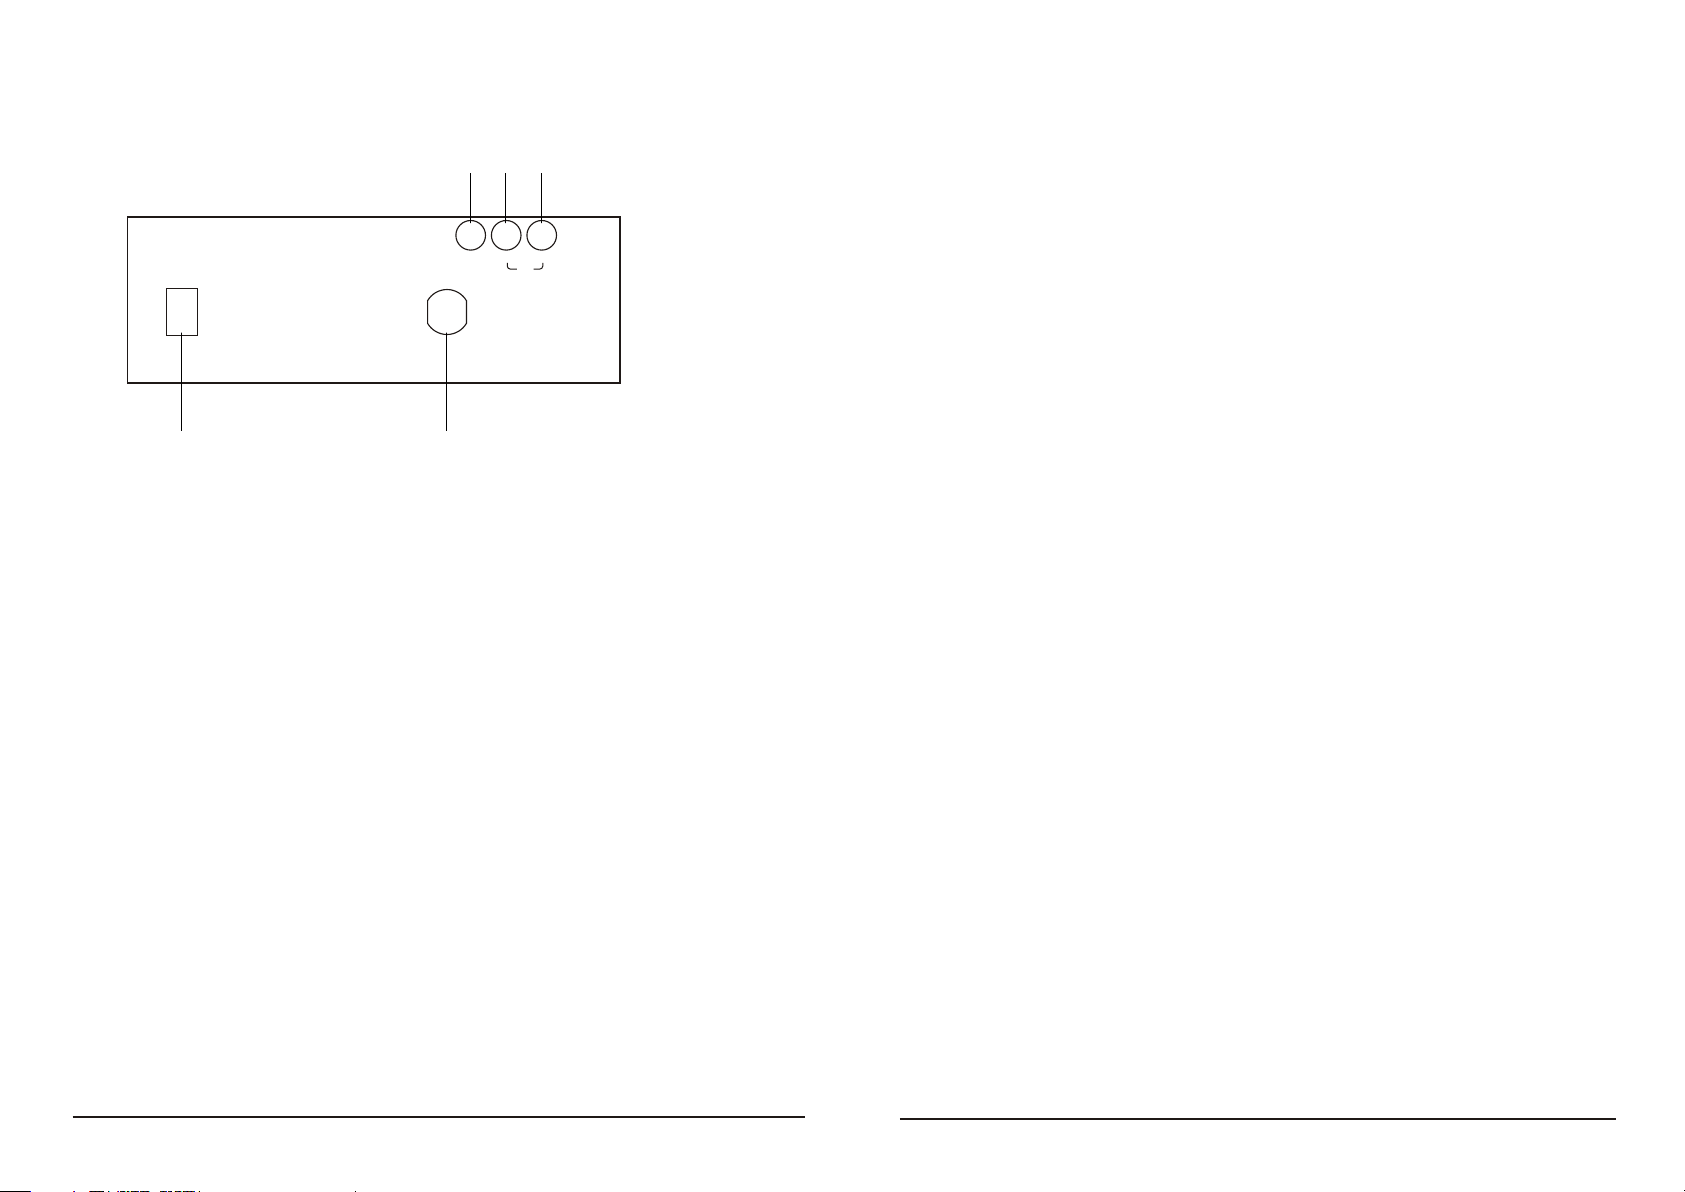
1. Channel Output - 5A per channel, total 16A max.
2. Channel Fuses - Each of the four channels is protected by a 6.3A fuse.
These fuses prevent you from overloading and damaging.
3. LED Indicators - These LEDs will indicate their relevant channel activity.
4. Mic. - This built-in microphone picks up audio signal for audio triggering.
5. Speed UP/DOWN Buttons - These two buttons can be used to increase
or decrease chase speed.
6. Pattern UP/DOWN Buttons - These two buttons allow you to select desired
chase program.
7. Audio/ Chase Button - Press this button to change between Audio and
Chase modes. The LED near this button is lit indicating Audio mode is active.
8. Full On Button - Pressing and holding down this button allows to bring
overall output to full intensity. Release of this button deactivates this function.
9. Stand By Button - This button is used to kill overall temporally, its LED flashes
indicating this operation.
10. Infrared Sensor - This sensor receives infrared signal from the remote control.
Mic
Stand by
810
3
4
9
User Manual / Manual WDP4 ANALOG Page/Página 11
User Manual / Manual WDP4 ANALOG Page/Página 2
Page 4
Functions & Controls (Rear):
3 4 5
Instrucciones de Funcionamiento:
Este producto tiene dos diferentes modos de funcionamiento. Modos Chase y
Audio. Presione el botón Audio/Chase para cambiar entre ambos modos. En
modo Audio, el programa seleccionado será ejecutado dependiendo del
ritmo de la música detectada por el micro incorporado. En modo Chase, el
programa funcionará a la velocidad configurada.
EXT.
IN
POWER
REMOTE
POWER INPUT
AC 230V~ 50Hz, 16A
OUT
LINK
1 2
1. Power Switch - This switch turns main power ON or OFF.
2. Power Input - AC 230V~50Hz, 16A
3. External Remote Detector Connector - Connect with an external infrared
detector for convenience of remote control.
4. Link In - This connector accepts the communication data from the preceding
unit. All the linked units will be controlled by the first unit.
5. Link Out - This connector sends the communication data to the next unit.
Por favor siga las instrucciones para hacer funcionar la unidad en un modo
u otro.
Modo Audio:
Presione el botón Audio/Chase para acceder al modo Audio. El LED junto al
botón se enciende indicando este estado. En este modo, el programa
seleccionado, se ejecutará de acuerdo con el ritmo de la música detectada
por el micro incorporado. Pulse los botones UP/DOWN pattern para seleccionar
el programa deseado de entre los 16 preconfigurados y una secuencia de
16 programas.
Modo Chase:
Seleccione su programa de chase deseado
Presione el botón Audio/Chase para acceder al modo Chase. Pulse los
botones UP/DOWN pattern para seleccionar el programa deseado de
entre los 16 preconfigurados y una secuencia de
16 programas.
Seleccione la velocidad deseada de chase
Esta función, le permite variar la velocidad de chase del programa. Mientras
está en modo Chase, presione los botones de Speed para seleccionar la
velocidad deseada. Una vez configurada la velocidad, el programa
seleccionado, se ejecutará a esa velocidad.
User Manual / Manual WDP4 ANALOG Page/Página 3
User Manual / Manual WDP4 ANALOG Page/Página 10
Page 5

Funciones y Controles (Panel Trasero):
Operating Instructions:
3 4 5
EXT.
IN
POWER
REMOTE
POWER INPUT
AC 230V~ 50Hz, 16A
OUT
LINK
1 2
1. Conmutador de red - Este interruptor, conmuta la alimentación entre ON
y OFF.
2. Entrada de alimentación - AC 230V - 50Hz 16A
3. Conector para detector remoto externo - Conecta con un detector infrarrojo
externo adecuado para su mando remoto.
4. Link In - Este conector, acepta datos de una unidad precedente. Todas las
unidades conectadas entre sí, serán controladas por la primera unidad.
5. Link Out - Este conector, envía datos a la siguiente unidad.
This product has two different operating modes: Chase and Audio modes.
Press Audio/ Chase button to change between Audio and Chase modes. In
Audio mode, the selected program will be executed depending on the music
beat detected by the built-in microphone. In Chase mode, the selected program
will chase at the speed you have set.
Furthermore, Full on and Stand by functions will allow you to turn overall output
ON or OFF at your convenience.
Please follow the instructions to operate the unit in your desired mode.
Audio Mode:
Press Audio/Chase button to access Audio mode, its LED near this button is
lit indicating Audio mode is active. While in Audio mode, the selected program
will be executed according to the music beat detected by the built-in microphone,
you can press Pattern UP/DOWN buttons to select any desired program from
16 preset programs and a sequence of 16 programs.
Chase Mode:
Select your desired chase program
Press Audio/Chase button to access Chase mode, its LED near this button will
be extinguished. You can use the Pattern UP/ DOWN buttons to select any of
the built-in 16 programs or a sequence of 16 programs.
User Manual / Manual WDP4 ANALOG Page/Página 9
Select your desired chase speed
This function allows you to change the program chase speed. While in Chase
mode, press Speed UP/DOWN buttons to select your desired chase speed.
Once you have set the speed, the program you have selected will be performed
by the speed.
User Manual / Manual WDP4 ANALOG Page/Página 4
Page 6

Full On & Stand By
Controles y Funciones (Frontal):
Full on
Pressing and holding down the Full on button allows you to bring overall output
to full intensity despite of any function mode. Release of this button will go back
to previous state.
Stand by
Press the Stand by button to activate Stand by function, its LED flashes
indicating Stand by is active. In Stand by mode, overall output will be interrupted
momentarily. To quit Stand by, just press the button once more, its LED will be
extinguished and this unit will return to its earlier state.
1
2
OUTPUT: 5A/CH, TOTAL 16A Max.
2
3
FUSES: F6.3A 250V 5x20mm
41
WDP-4
I nfr a-l i n k Chas erI nfr a-l i n k Chas erI nfr a-l i n k Chas er
MONITOR
SPEED
5
PATTERN
6
1 2 3 4
Audio/Chase Full on
Infrared sensor
7
1. Salida de Canal - 5 A por canal, Total 16A max.
2. Fusibles de canal - Cada canal está protegido por un fusible de 6.3A.
Estos fusibles previenen sobrecargas y daños.
3. Indicadores LED - Estos LED indican la actividad de los canales.
4. Mic - Este micro incorporado, capta señales de audio para el chaser.
5. Botones UP/DOWN (Velocidad) - Estos botones le permiten incrementar
o reducir la velocidad del programa.
6. Botones UP/DOWN (Patrón) - Estos botones le permiten seleccionar
el programa.
7. Botón Audio/Chase - Presione este botón para cambiar entre modos
Audio y Chase. El LED junto a este botón se iluminará en el modo Audio.
8. Botón Full on - Presione y mantenga pulsado este botón para conseguir
el encendido total de todas las salidas. Liberándolo, se desactiva la
función.
9. Botón Stand by - Este botón se usa para eliminar temporalmente la salida,
el LED parpadea , indicando esta función.
10. Sensor Infrarrojo - Este sensor recibe señal infrarroja procedente del control
remoto.
Mic
Stand by
810
3
4
9
User Manual / Manual WDP4 ANALOG Page/Página 5
User Manual / Manual WDP4 ANALOG Page/Página 8
Page 7

Desempaquetado:
Gracias por su compra. Cada unidad ha sido debidamente comprobada
y cuidadosamente empaquetada antes de su envío. Desembale la unidad
cuidadosamente y compruebe que no hay daños en la unidad y que todos
sus accesorios se encuentran presentes. En el caso de encontrar dañada la
unidad o falta de algún accesorio, por favor, no use la unidad y póngase
en contacto con su distribuidor.
Introducción:
Esta unidad es un chaser de 4 canales con posibilidad de control remoto.
La unidad dispone de 16 programas de chase incorporados mas una
secuencia de 16 programas, cada una pueden ser manejada mediante
la música o la velocidad configurada.
Además, Las funciones Full y Stand le permiten encender o apagar
totalmente las salidas. Para una mejor comodidad, esta unidad puede
ser controlada enteramente mediante un control de infrarrojos.
Adicionalmente, esta unidad ha sido fabricada con una memoria para
salvar y retener sus datos en caso de producirse una perdida de alimentación
Atención:
Este producto debe ser conectado a tierra. No vierta agua u otro líquidos
dentro de la unidad. Para prevenir y reducir el riesgo de descarga electrica
o fuego, no exponga la unidad a la lluvia o la humedad.
Precaución:
No hay ajustes para el usuario dentro de la unidad. No trate de repararlo por si
mismo. Para prevenir cualquier problema durante su uso, contacte contacte
inmediatamente con su distribuidor.
No tire el cartón a la basura. Recíclelo cuanto lo sea posible.
Specifications:
Power Input:
Channel Output:
Power Outlet:
Channel Fuses:
Accessory:
Size:
Weight
Specifications and improvements in the design of this unit and
this manual are subject to change without prior notice.
AC 230V~50Hz, 16A
5A per channel, total 16A max.
One schuko per channel,
total 8 output sockets
F6.3A 250V 5x20mm
Infrared remote control(1pc)
260 x 210 x 75mm
2.2 Kgs
This symbol on the product or on its packaging indicates that this product
shall not be trated as household waste. Instead it shall be handed over to
the applicable collection point for the recycling of electrical an electronic
equipment. By ensuring this product is disposed of correctly, you will help
prevent potential negative consequences for the environment and human
health, which could otherwise be caused by inappropriate waste handling
of this product. The recycling of amterials will help to conserve natural
resources. For more detailed information sabout recycling of this product,
please contact your local city office, your household waste disposal service
or the shop where you purchased the product.
Cambio de fusible:
Desconecte la alimentación. Inserte un destornillador plano en la ranura del
portafusible. Gire el destornillador en sentido antihorario para quitar la tapa.
Retire el fusible antiguo y sustitúyalo por uno del mismo tipo. Inserte la tapa y
giro el destornillador en sentido horario para fijar el portafusible en su sitio.
User Manual / Manual WDP4 ANALOG Page/Página 7
User Manual / Manual WDP4 ANALOG Page/Página 6
 Loading...