

Page 1
http://www.woosim.com
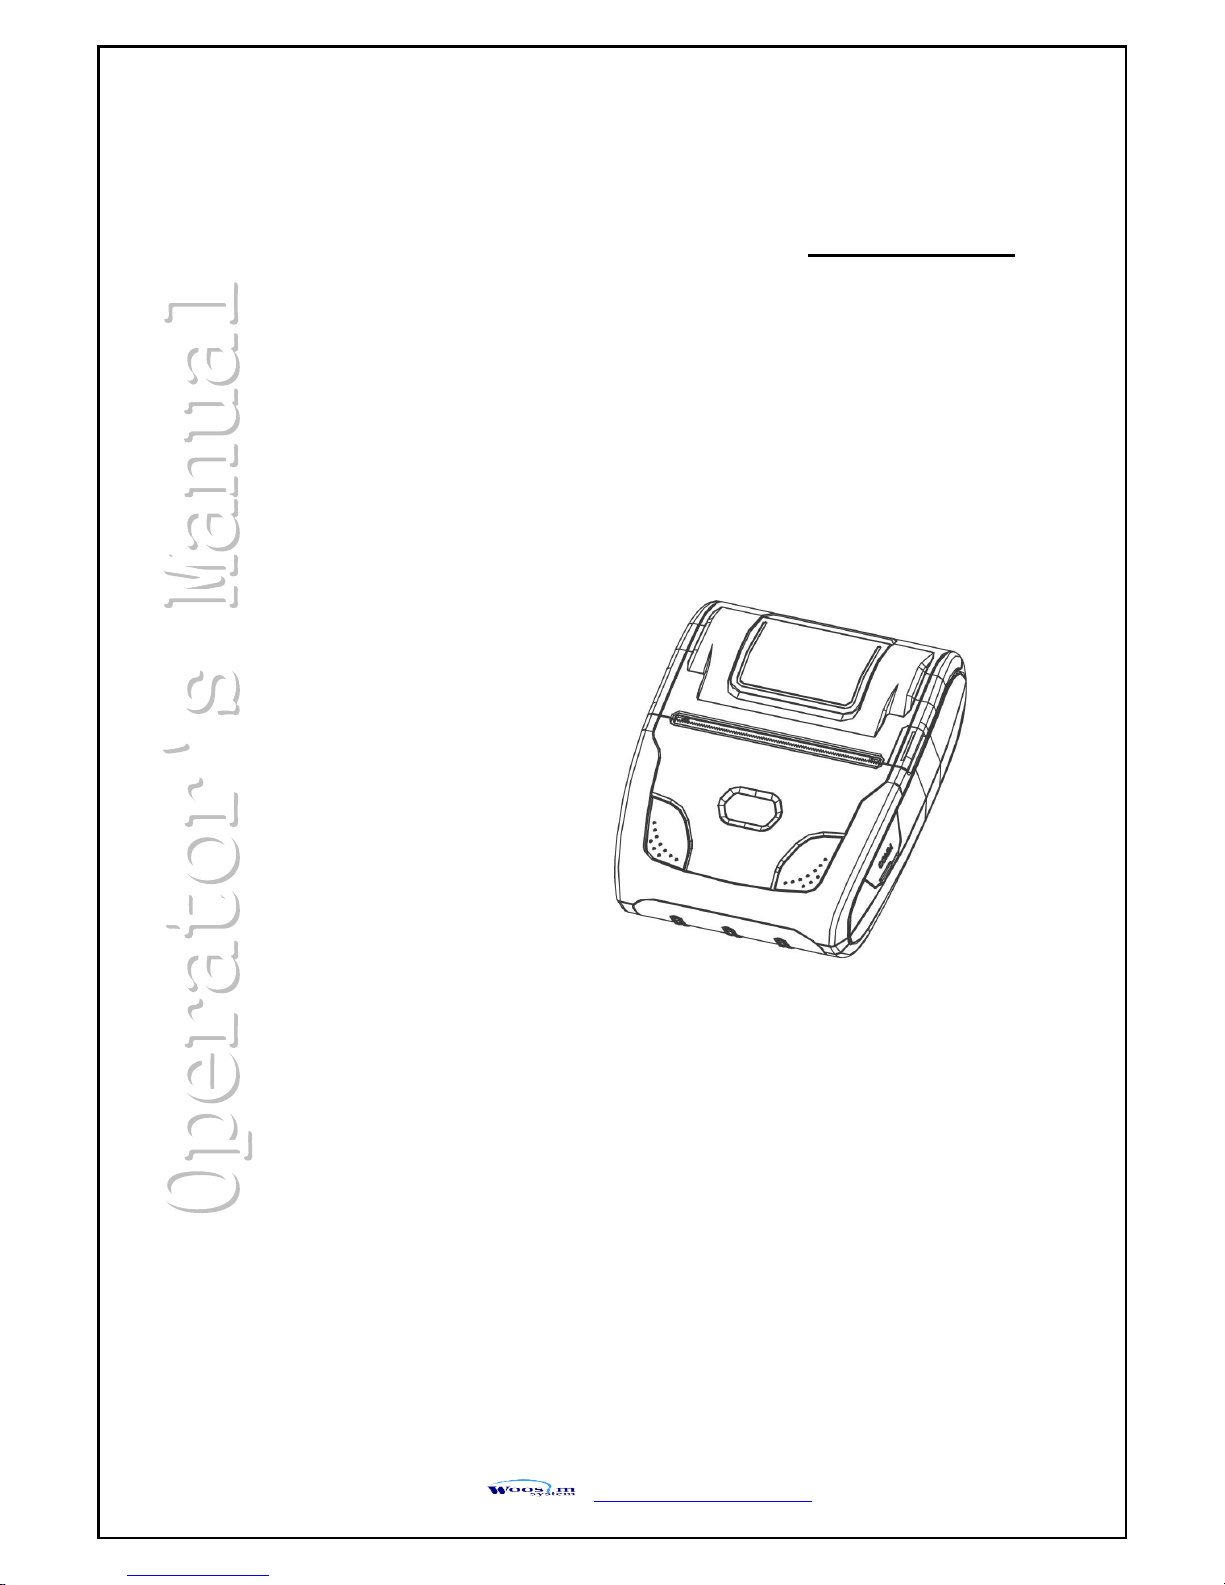
MODEL WSP-R350
(3inch Mobile Printer)
Rev. 1.5
All specifications are subjected to change without notice.
Page 2

WSP-R350 Rev. 1.5
http://www.woosim.com
2
Copyright
WSP-R350 3inch mobile printer operator’s manual.
Copyright ⓒ2017 by Woosim Systems Inc.
All rights reserved.
The information contained in this manual is the property of Woosim Systems Inc.
And may not be reproduced in whole or in part without the prior written permission of
Woosim Systems Inc.
Trademark
a registered trademark of Woosim Systems Inc.
All other trademark are the properties of their respective companies.
Caution
Some semiconductor devices are easily damaged by static electricity. You should turn the printer
“OFF”, before you connect or removed the cable on the rear side, in order to guard the printer
against the static electricity.
If the printer is damaged by the static electricity, you should turn the printer “OFF”.
Notice
The contents of this manual are subject to change without notice.
Page 3
WSP-R350 Rev. 1.5
http://www.woosim.com
3
Introduction
The WSP-R350 is the ideal solution for Mobile banking system , Retail,
point of sales, Credit card Transaction, other traveling and mobile computing etc.
The general features of WSP-R350 printer are as follows:
Pocket size (108.5 X 134.8 X 56.5mm)
Light weight (397.5g) for true mobility.
Very silent printing thru direct thermal printing method.
High speed(120mm/sec, MAX)
High resolution(203dpi : 8dots/mm)
UART(RS-232C or TTL), Bluetooth Ver3.0, USB [option] Interface
Intuitive LED’s indicate Power(on/off),Error, Bluetooth status, Battery status
Support Magnetic Stripe Reader [option].
Support text and graphic printing.
Easier paper loading by CLAMSHELL design.
One touch paper cover
Printer door open & Paper-out sensor
Easier maintenance with self-diagnostics.
In field programming – Update Firmware, Download Fonts and Logos
Microsoft Windows/Windows CE, Linux, Android, iOS compatible
Flow control : Software (XON/XOFF)
※ Hardware flow control not supported in printer.
Agency Approvals
Page 4

WSP-R350 Rev. 1.5
http://www.woosim.com
4
Operating Precautions
Please follow the precautions below to enjoy and maintain the full performance of the printer.
Using the Printer
● Be careful not to drop or bump the printer on a hard surface.
● Do not install the printer in direct sunlight or such areas.
Suitable environment for the use of the printer is as follows:
◆ Operating temperature :-10°C to 50°C
◆ Relative humidity : 30% to 80%
● Do not install the printer near devices that generate strong electromagnetic fields such as a
copy machine.
● Do not open the platen cover during printing .
● Do not remove or reinstall the communication cable during printing or transmission.
● Do not touch the connectors of the communication during printing.
● Switch the POWER OFF when not in use.
● Do not use other solvent.
● The AC adapter, the battery charger and the battery pack may
become warm when in use. This is normal and is not a malfunction.
● When the battery pack is used at low temperature, the length of time the printer can be used
may be shortened.
Thermal Paper Handling
● Store the thermal paper in a cool, dry and dark place.
● Do not rub the paper with hard object.
● Do not leave the paper with hard object.
● Do not allow plastic film, erasers, or adhesive tape to touch the paper for long periods.
● Do not stack the thermal paper with diazo copies immediately after copying or wet-type copies.
● Do not use chemical glue.
● Always use the clean thermal paper.
Page 5

WSP-R350 Rev. 1.5
http://www.woosim.com
5
Federal Communications Commission
Radio Frequency Interference Statement
FCC ID : QDDWSP-R350
This device complies with Part 15 of the FCC Rules. Operation is subject to the following two conditions:
(1) This device may not cause harmful interference, and (2) this device must accept any interference
received, including interference that may cause undesired operation.
CAUTION: Changes or modifications not expressly approved by the party responsible for compliance could
void the user’s authority to operate the equipment.
Note: This equipment has been tested and found to comply with the limits for a Class B digital device,
pursuant to part 15 of the FCC Rules. These limits are designed to provide reasonable protection against
harmful interference in a residential installation. This equipment generates, uses and can radiate radio
frequency energy and, if not installed and used in accordance with the instructions, may cause harmful
interference to radio communications. However, there is no guarantee that interference will not occur in a
particular installation. If this equipment does cause harmful interference to radio or television reception,
which can be determined by turning the equipment off and on, the user is encouraged to try to correct the
interference by one or more of the following measures:
ㆍReorient or relocate the receiving antenna.
ㆍIncrease the separation between the equipment and receiver.
ㆍConnect the equipment into an outlet on a circuit different from that to which the receiver is connected.
ㆍConsult the dealer or an experienced radio/TV technician for help.
Modifications not expressly approved by the manufacturer could void the user's authority to operated the
equipment under FCC rules.
This Device has been evaluated to comply with RF exposure requirement for general use
limit in portable condition. It is safe to be used in sold condition.
CE WARNING
ㆍChanges and modifications not expressly approved by the party responsible for compliance could
void the user’s authority to operate the equipment.
ㆍIt is desirable that it be installed and operated with at least 20cm or more between the radiator
and person’s body(excluding extremities hand, wrists, feet, and ankles)
Page 6

WSP-R350 Rev. 1.5
http://www.woosim.com
6
CONTENTS
1. Outline ................................................................................................................................................................. 7
1.1. Model classifications .................................................................................................................................. 7
1.2 Symbol .......................................................................................................................................................... 7
1.3. Product Part Number System .................................................................................................................... 8
1.4. Specifications. .............................................................................................................................................. 9
2. Setting up the printer ................................................................................................................................ ......11
2.1. Printer & Accessories ................................................................................................................................ 11
2.2. Printer Features ..........................................................................................................................................12
2.3. Dimensions .................................................................................................................................................13
2.4. Replacing the paper roll ...........................................................................................................................14
2.5. Power supply ..............................................................................................................................................15
2.5.1. Internal power supply ......................................................................................................................15
2.5.2. Installing the Battery ........................................................................................................................15
2.5.3. Recharging the battery ....................................................................................................................16
2.6. Set operation mode ..................................................................................................................................17
3. Interface ..............................................................................................................................................................21
3.1. UART(RS-232C or TTL) or USB .................................................................................................................21
3.2. Bluetooth ................................ .................................................................................................................... 22
3.3. Read a magnetic stripe card (option)......................................................................................................22
4. Using the printer ...............................................................................................................................................23
4.1. Control panel..............................................................................................................................................23
4.2. The self test ................................................................................................................................................ 24
4.3. Using the Belt clip .....................................................................................................................................24
5. Consumable Parts .............................................................................................................................................25
5.1. Recommended paper ................................ ................................................................................................ 25
5.2. Printing position ........................................................................................................................................25
6. Revision History ................................................................................................................................................26
Page 7
WSP-R350 Rev. 1.5
http://www.woosim.com
7
11.. OOuuttlliinnee
11..11.. MMooddeell ccllaassssiiffiiccaattiioonnss
11..22 SSyymmbbooll
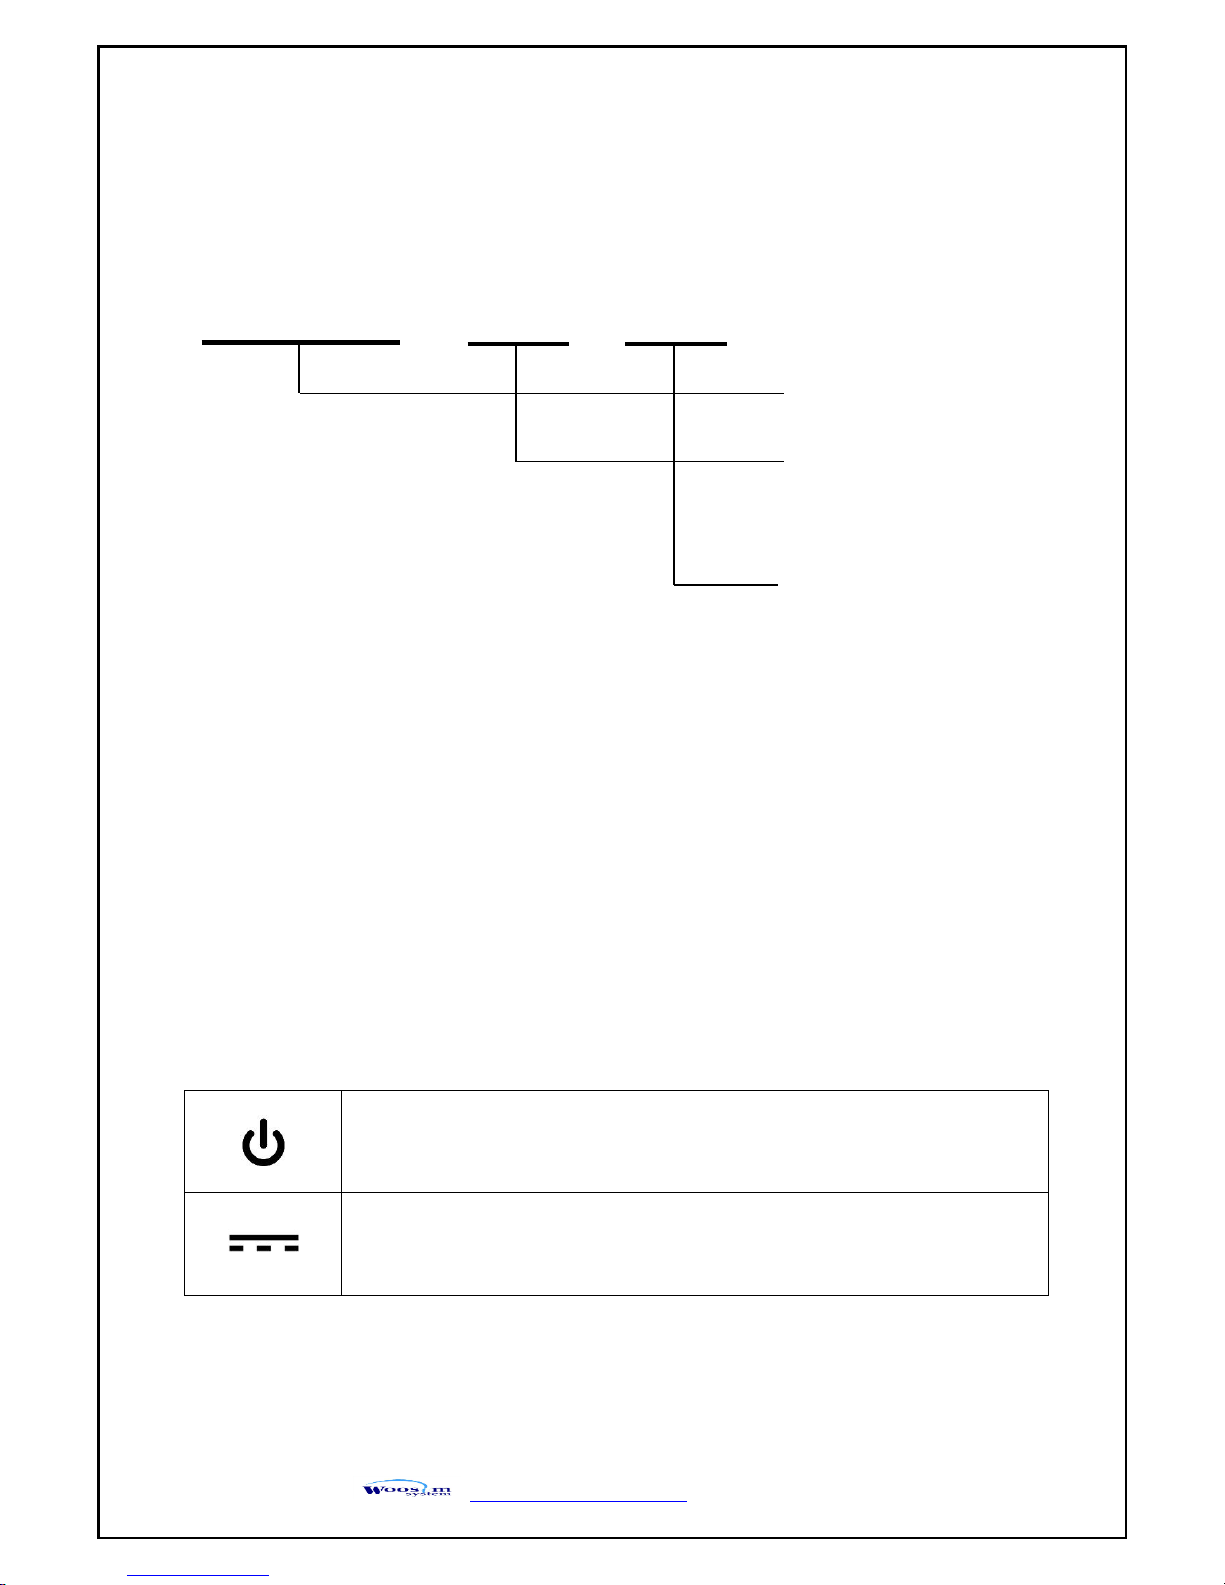
WSP-R350 ( ) ( )
Model
Interface
A1:UART/Bluetooth
C1:USB/Bluetooth
Power
None : DC 8.4V
Standby symbol
IEC 5009, the standby symbol(line partially within a broken circle),
Indicates a sleep mode or low power state.
Direct current symbol
This symbol is found on many electronic devices that either require or produce
direct current.
Page 8
WSP-R350 Rev. 1.5
http://www.woosim.com
8
11..33.. PPrroodduucctt PPaarrtt NNuummbbeerr SSyysstteemm
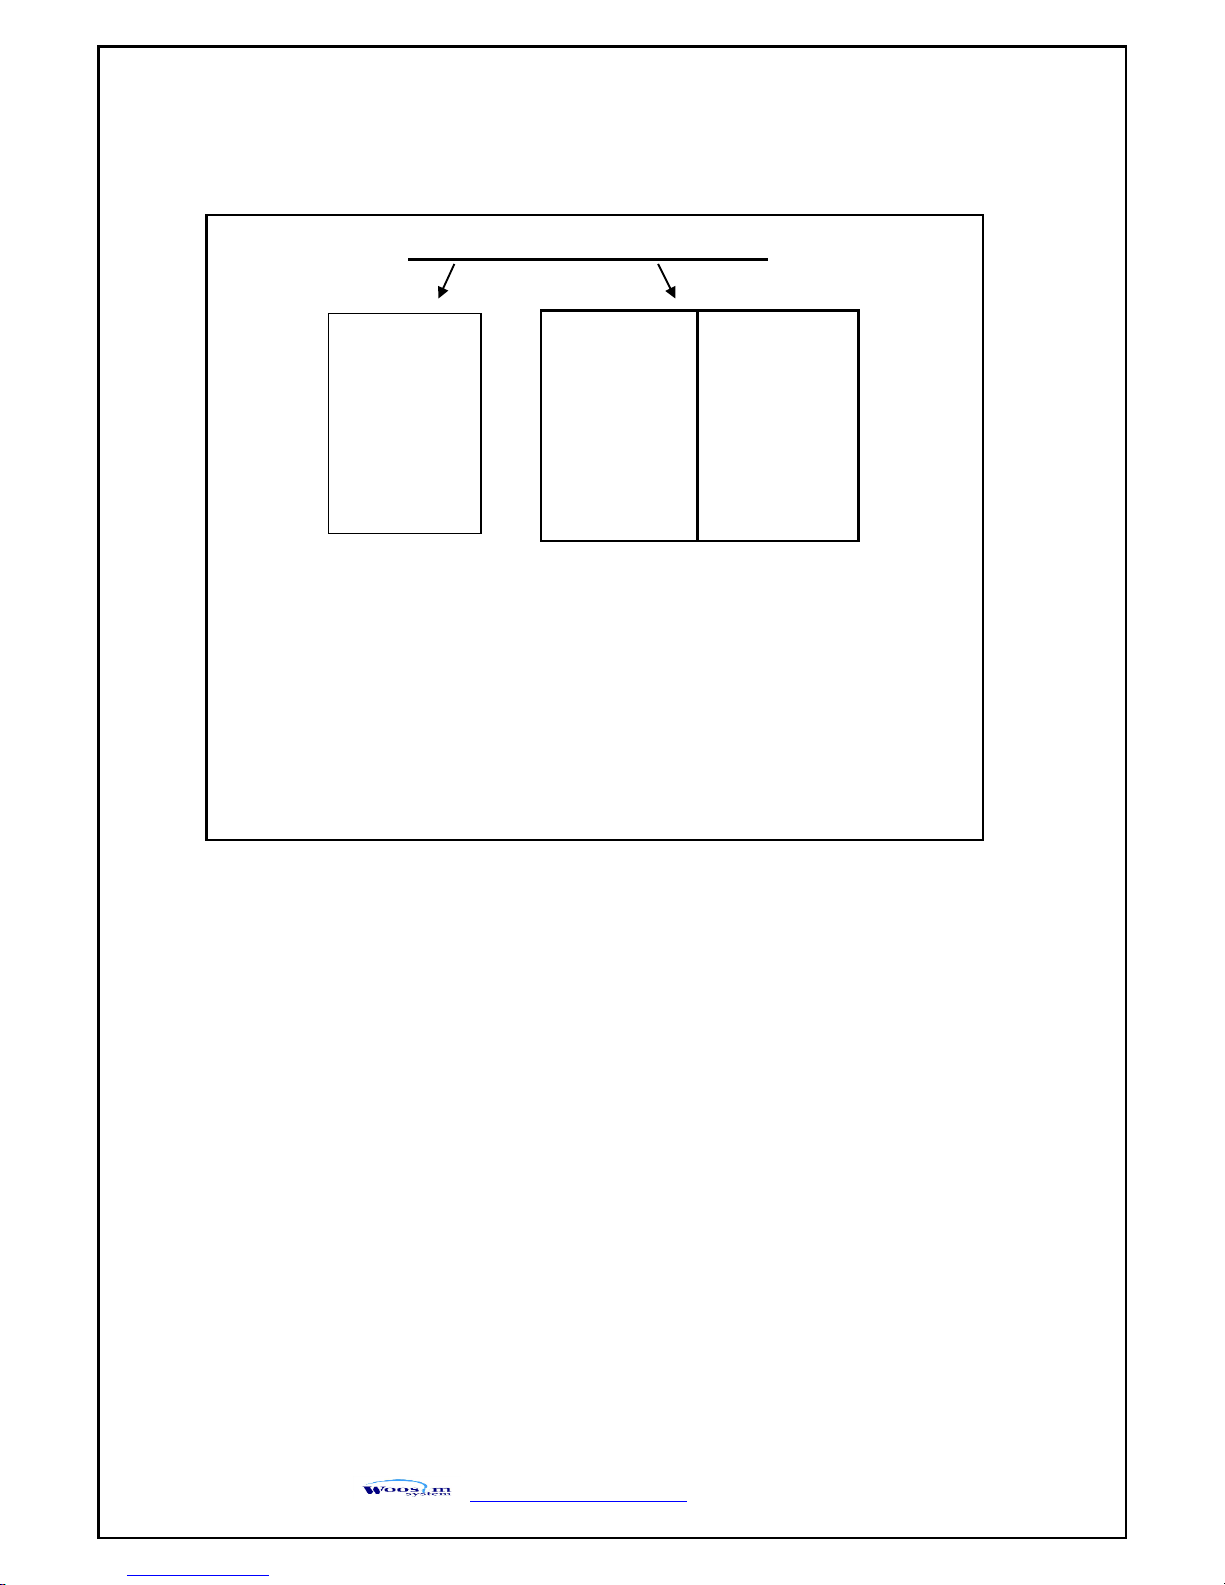
Model name / Interface Spec.
Example) 1. Porti-S40 UART/Bluetooth Part No. ⇒ S40/A1
2. Porti-SC30 Bluetooth Only Part No. ⇒ SC30/Z1
Note) The above table is the interface format which is supported.
But some of the interfaces are not supported according to the product
and please contact us, if you have any questions regarding the interface.
S40
SC30
W25
.
.
Wired
Wireless
A
RS-232C
1
Bluetooth
B
TTL 2 IrDA
C
USB
0
None
D
RS-485
E
Parallel
Z
None
Page 9
WSP-R350 Rev. 1.5
http://www.woosim.com
9
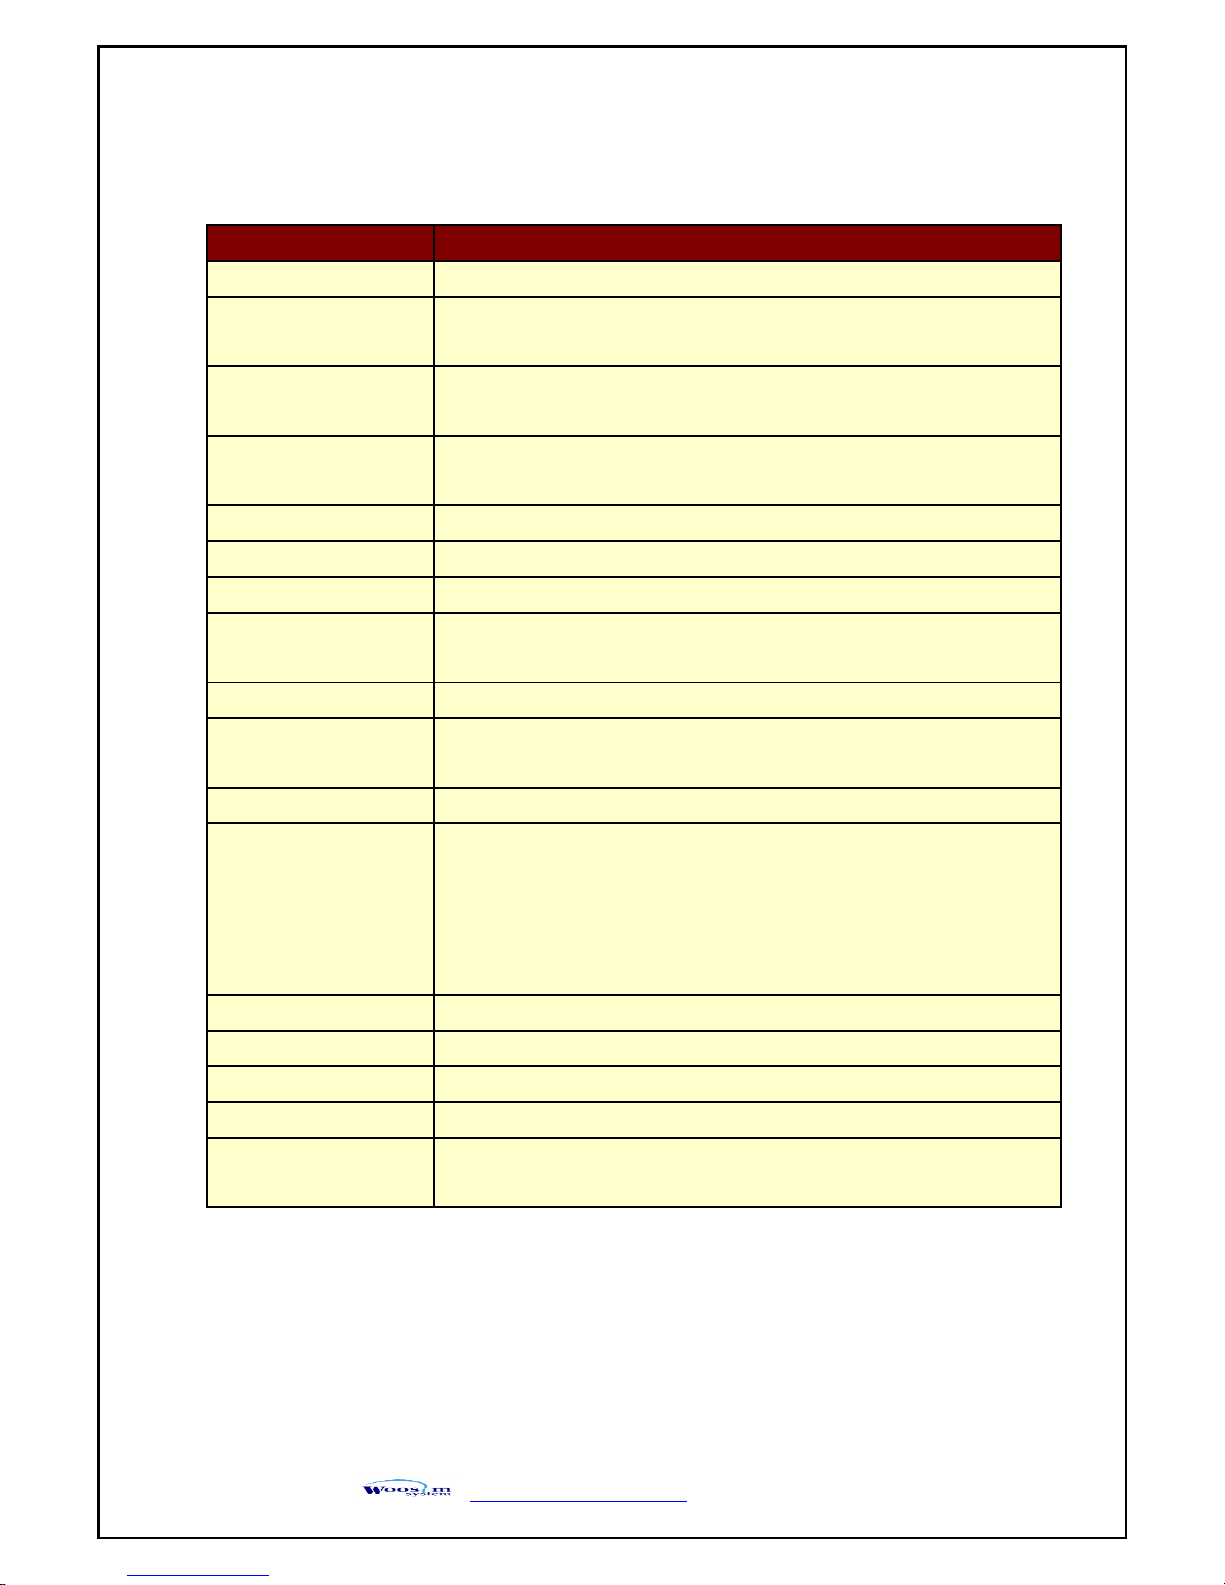
11..44.. SSppeecciiffiiccaattiioonnss..
Item
Specification
Printing method
Direct thermal line printing
Character size
- Font Size A: 12X24 / Font Size B : 9X24 / Font Size C : 8X16
- KOR : 24X24(16X24) / CHN, JPN : 24X24
Characters per line
- Font A : 48cpl / Font B : 64cpl / Font C : 72cpl
- KOR, CHN, JPN : 24cpl
Optional Characters
Alphanumeric:95, Extended Graphics:128X50 pages, International:10,
Simplified/Traditional Chinese, Japanese, Korean
Resolution
203dpi, 8dots/mm
Print width
3-inch (72mm, 576dots)
Printing speed
120mm / sec (MAX)
Dimensions
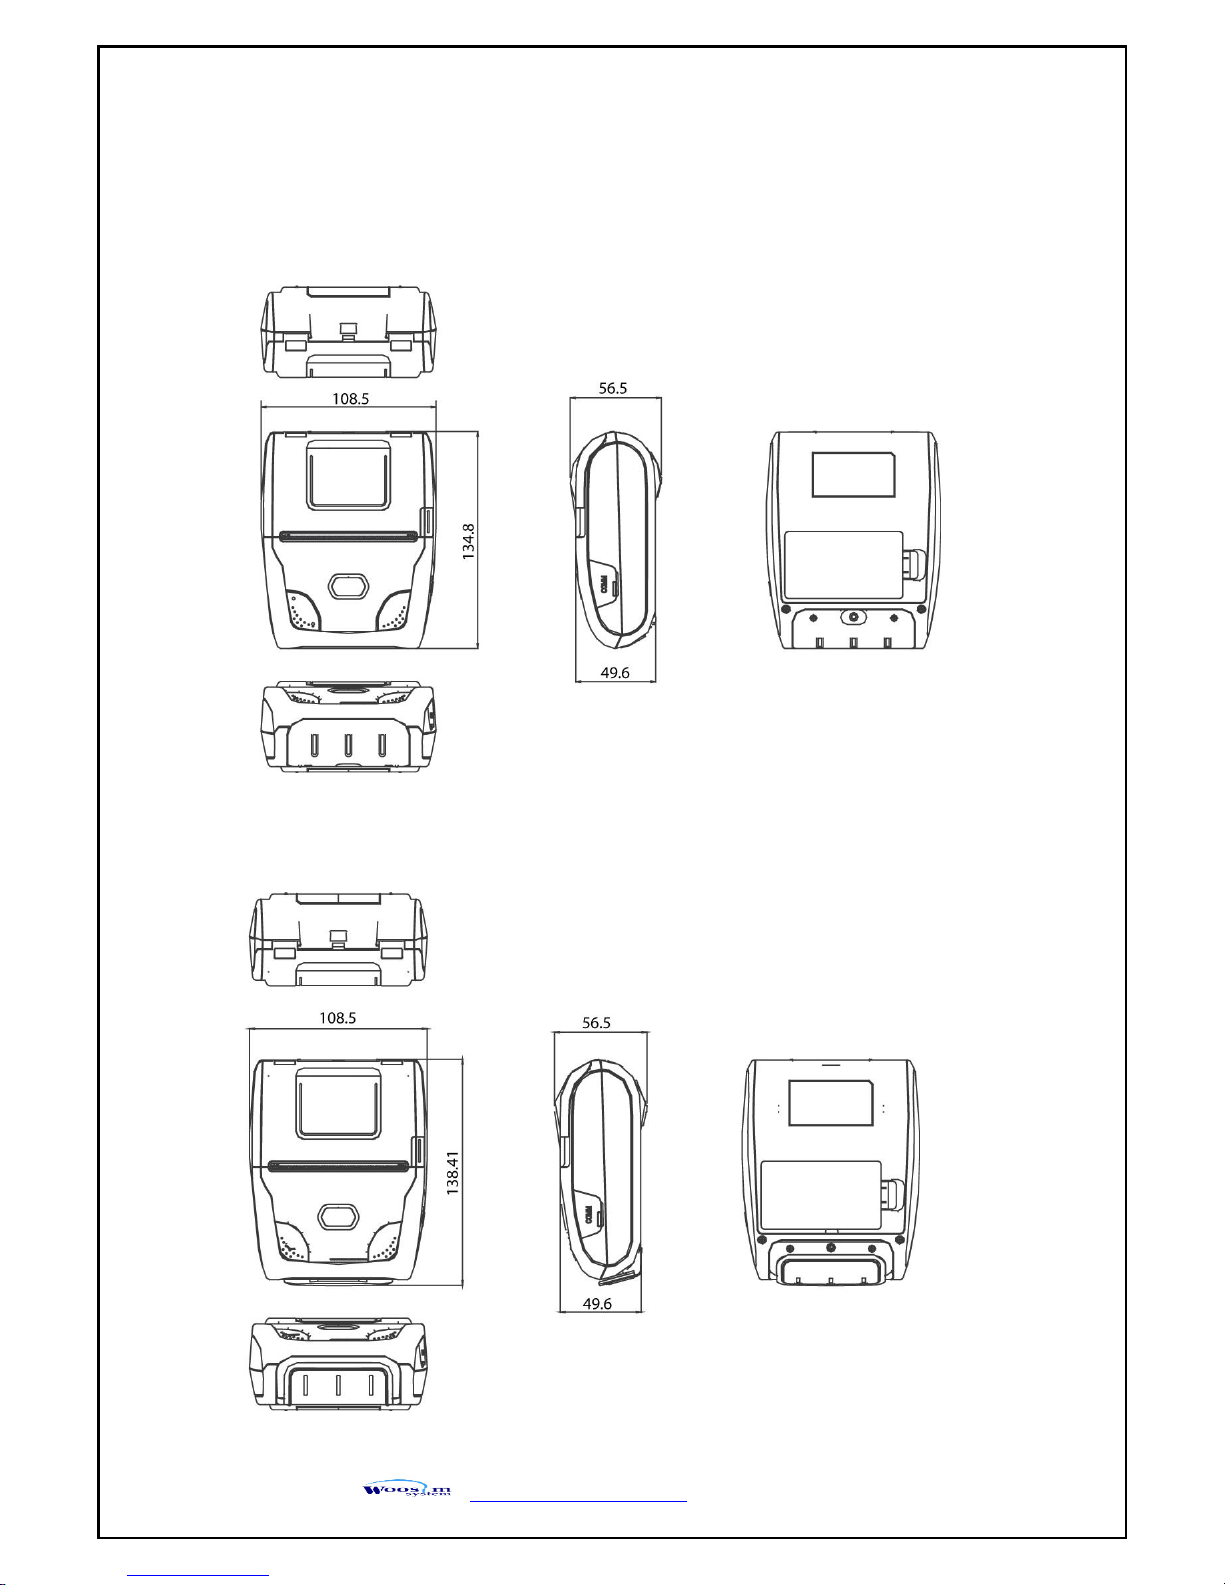
108.5 X 134.8 X 56.5mm
108.5 X 138.41 X 56.5mm (MSR Model)
Weight (w/o paper)
397.5g / 409.1g (MSR model)
Interface
UART(RS-232C or TTL) , Bluetooth Ver3.0
USB[option] interface
Paper supplied
Thermal roll paper, Label roll (80mm wide, 50ø)
Barcode supplied
1-dimension : UPC-A, UPC-E, EAN-8, EAN-13, CODE-39, CODE-93,
CODE-128, ITF, CODABAR
2-dimension : PDF417, Micro PDF417, Truncated PDF417, QR-CODE,
DATA Matrix, Maxicode
Etc :GS1 databar
Driver
Microsoft Windows, Linux
H/W spec.
MCU : RX-32bit, RAM : 128M bit, FLASH : 64M bit
Receive buffer size
1M bytes
Sensor
Support Cover open, Paper, Label
MSR (option)
Triple tracks (1&2&3 Tracks Reading)
*Supports 3DES & AES encryption
(Continue…)
Page 10
WSP-R350 Rev. 1.5
http://www.woosim.com
10
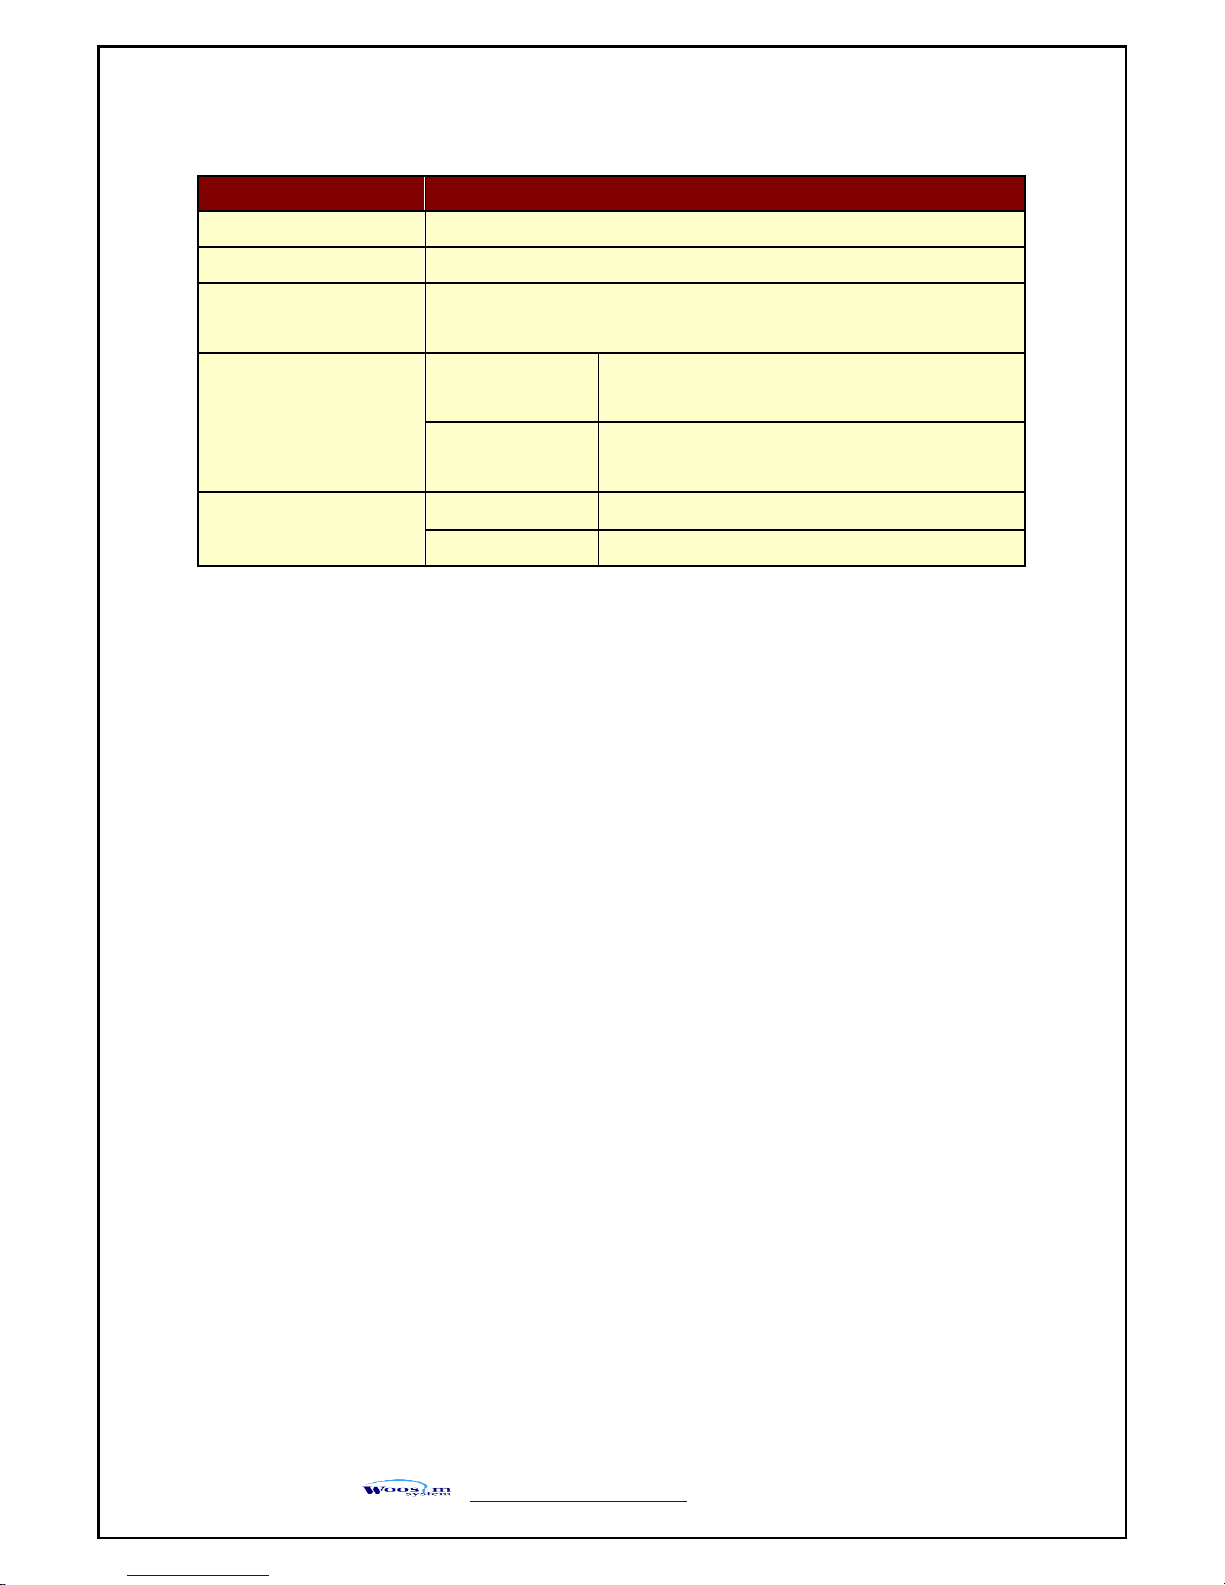
(Continue…)
Item
Specification
Battery
Rechargeable 7.4V DC, 2200mAh (Li-ion)
Battery duration
1 hour continuous printing
Battery Charger
Input (100~240V AC 50~60Hz)
Output(8.4VDC/0.8A), 4hours full charge time
Environment
Conditions
Temperature
-10°C ~ 50°C (operating)
-10°C ~ 70°C (storage)
Humidity
30% - 80% (operating)
10% - 90% (storage)
MCBF (Mean Cycle
Between failure)
Mechanical
37,000,000 lines
Head
Approximately 50 Km
< Table 1 >
Page 11
WSP-R350 Rev. 1.5
http://www.woosim.com
11
22.. SSeettttiinngg uupp tthhee pprriinntteerr
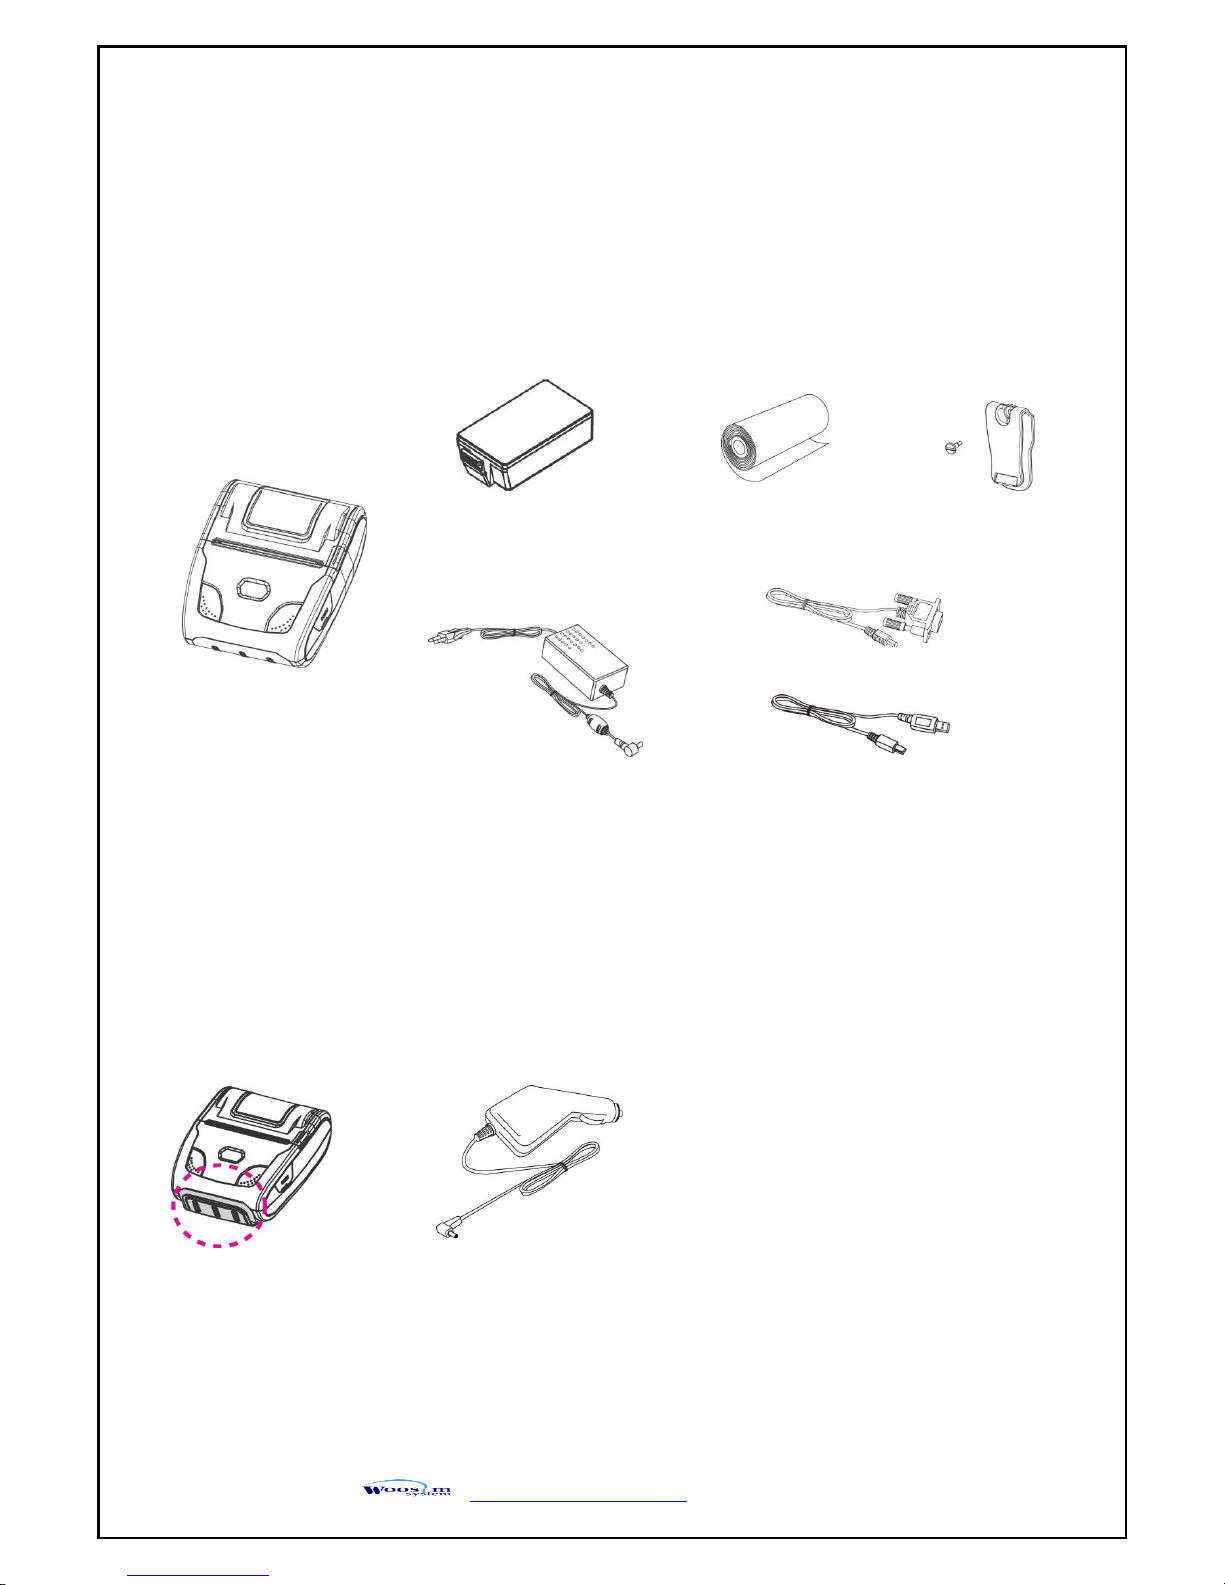
22..11.. PPrriinntteerr && AAcccceessssoorriieess
Your printer box should include these items. If any items are damaged or missing, please contact
your dealer for assistance.
Battery charger adaptor
▼ OPTIONAL
Car charger
Thermal roll paper
WSP-R350
Communication cable
Battery Pack
MSR
Belt Clip
or
Page 12
WSP-R350 Rev. 1.5
http://www.woosim.com
12
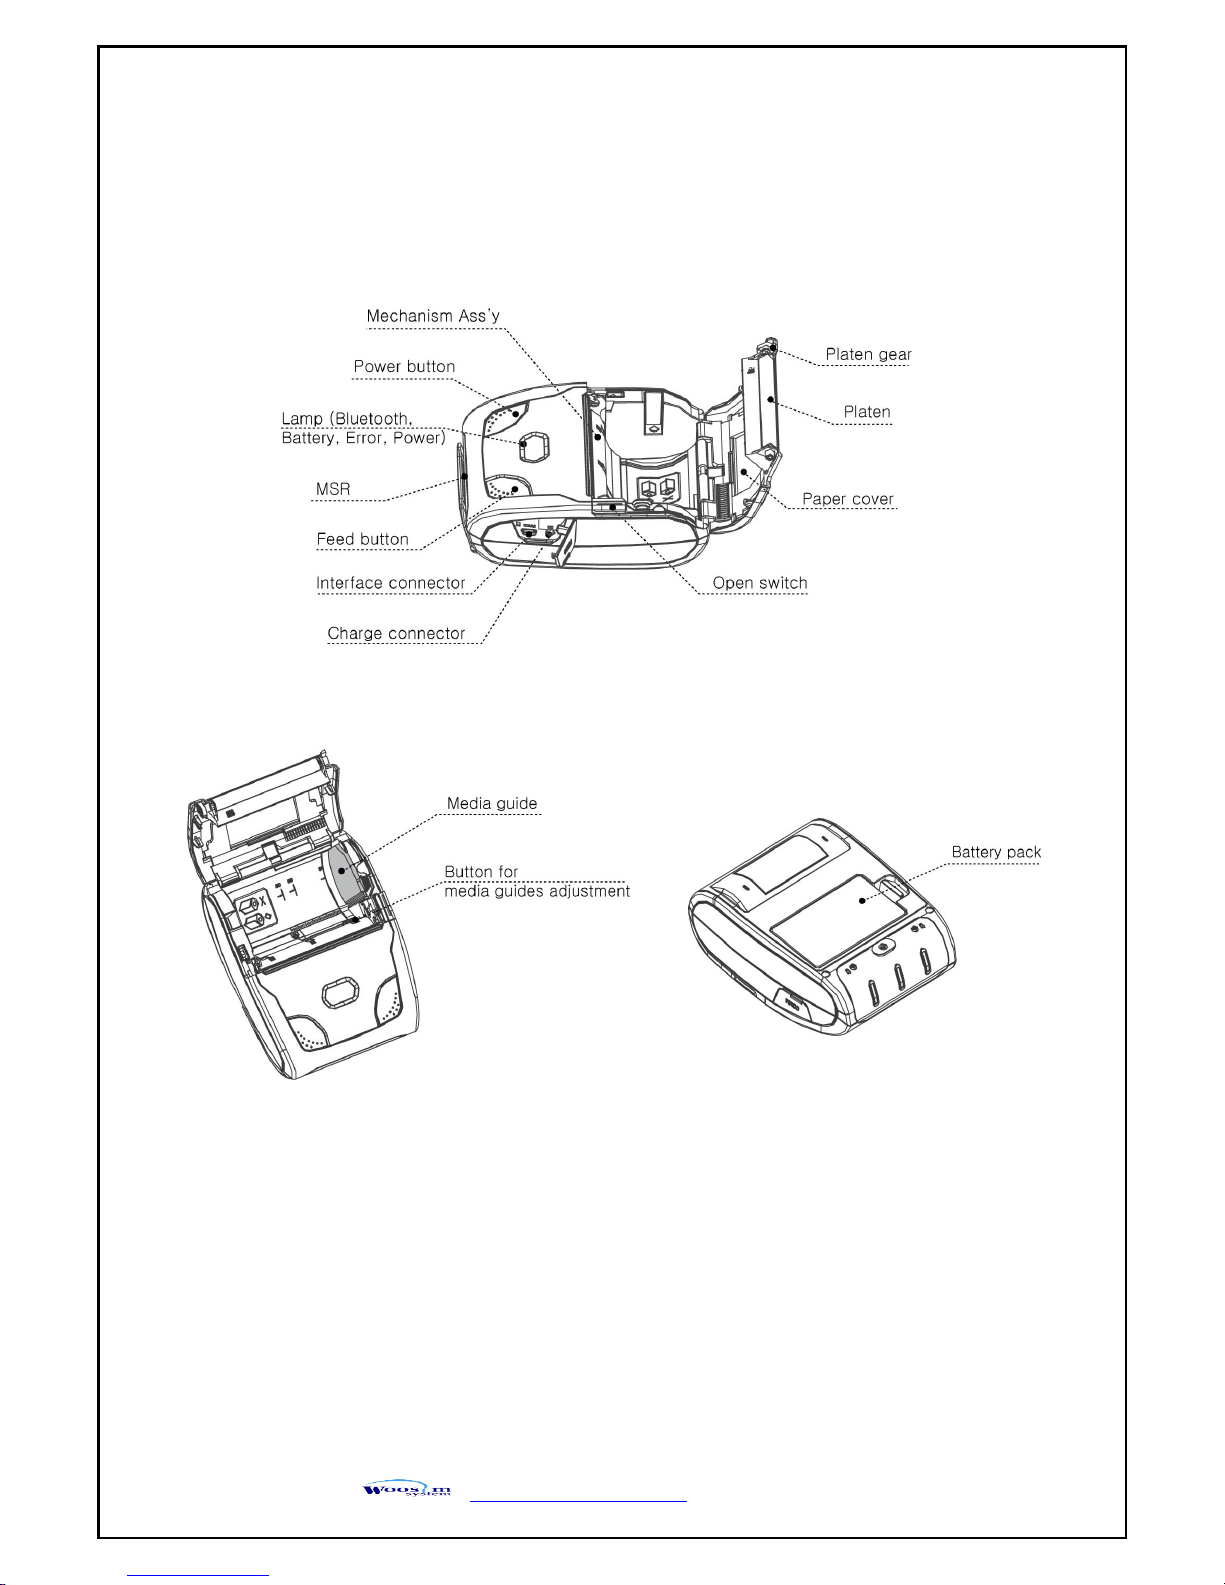
22..22.. PPrriinntteerr FFeeaattuurreess
▶ Part Name
[option]
Page 13
WSP-R350 Rev. 1.5
http://www.woosim.com
13
22..33.. DDiimmeennssiioonnss
▶ Standard Model
▶ MSR Model
Page 14
WSP-R350 Rev. 1.5
http://www.woosim.com
14
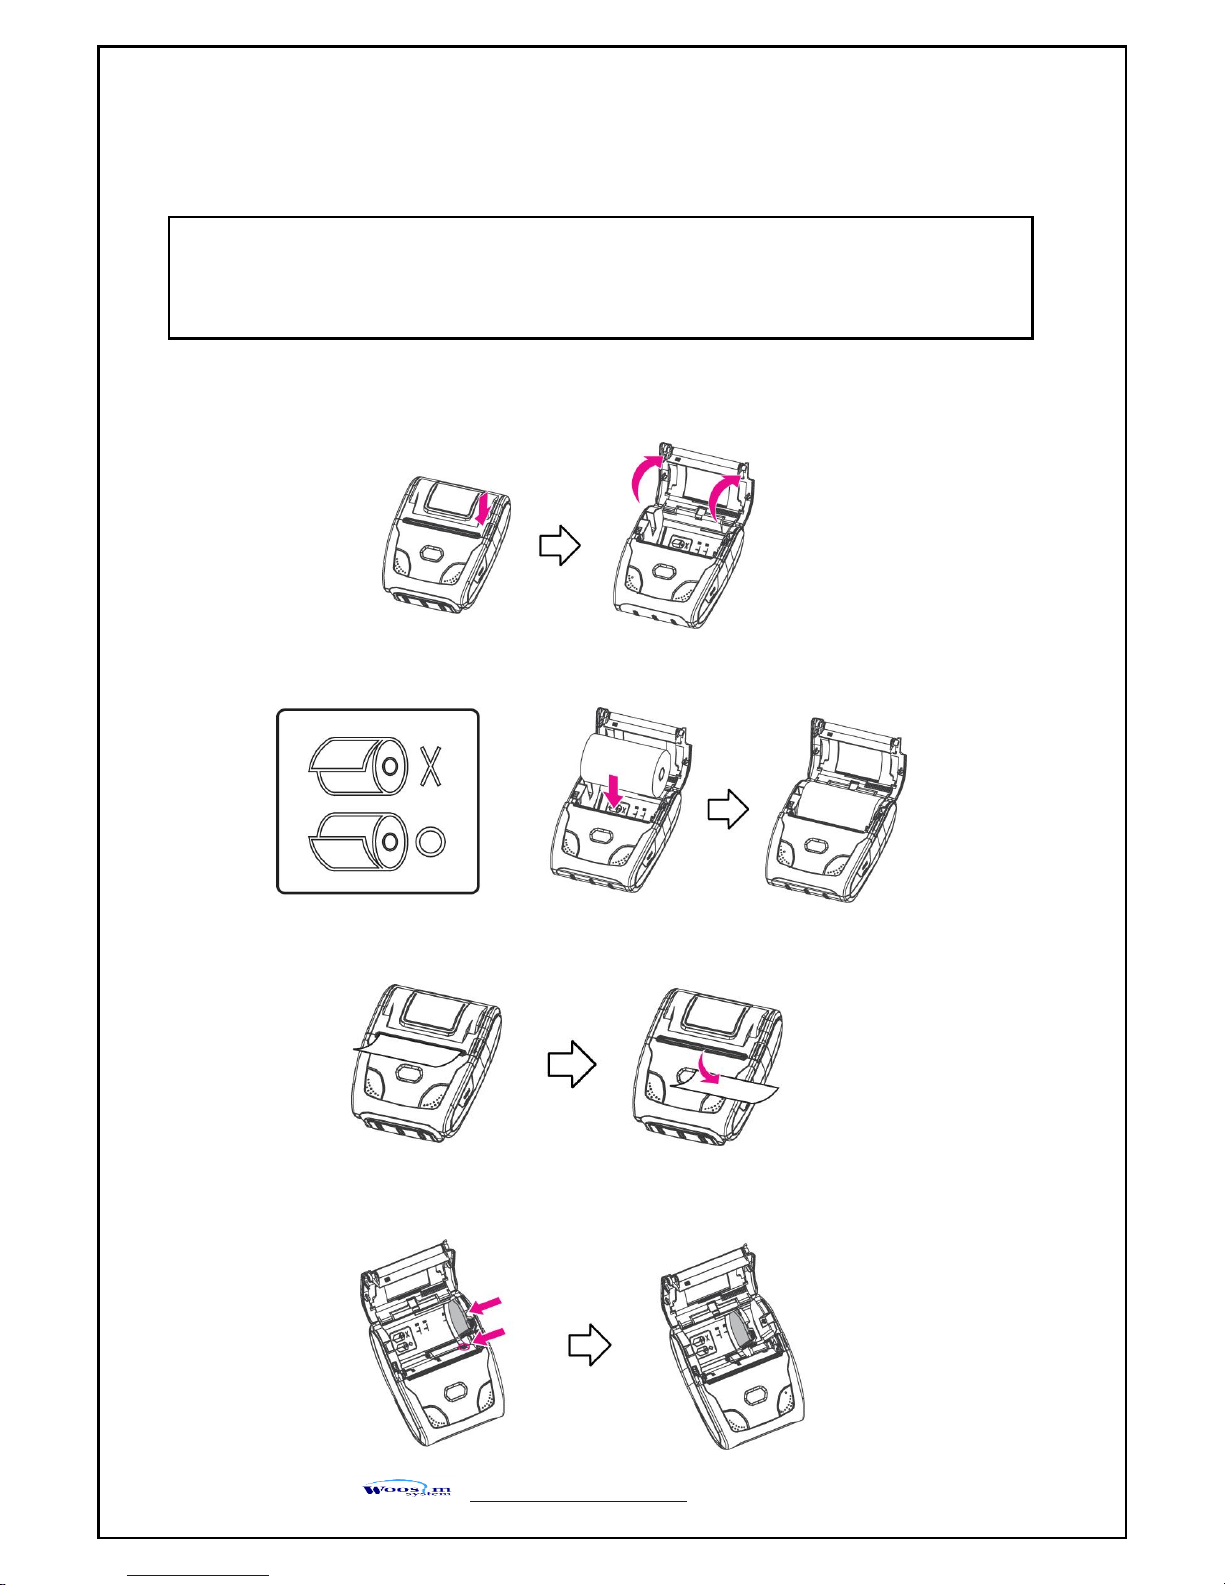
22..44.. RReeppllaacciinngg tthhee ppaappeerr rroollll
1. Make sure that the printer is not receiving data; otherwise, data may be lost.
2. Open the paper cover as the “One-Touch” way by pressing the button in the arrow direction like
the picture.
3. Insert the paper roll as shown.
4. Tear the excess paper off using the edge of paper door as a tear bar.
5. To change paper width, move paper guide while pressing paper width change button as shown in
the picture.
Note : Be sure to use paper rolls that meet the specifications.
Do not use paper rolls that have the paper glued to the core because the printer can not
detect the paper end correctly.
Page 15
WSP-R350 Rev. 1.5
http://www.woosim.com
15
22..55.. PPoowweerr ssuuppppllyy
22..55..11.. IInntteerrnnaall ppoowweerr ssuuppppllyy
The following specification is requested for Power supply.
Battery Charger : DC 8.4V/0.8A
Avoid using power supply which its power capacity of power current is extremely high.
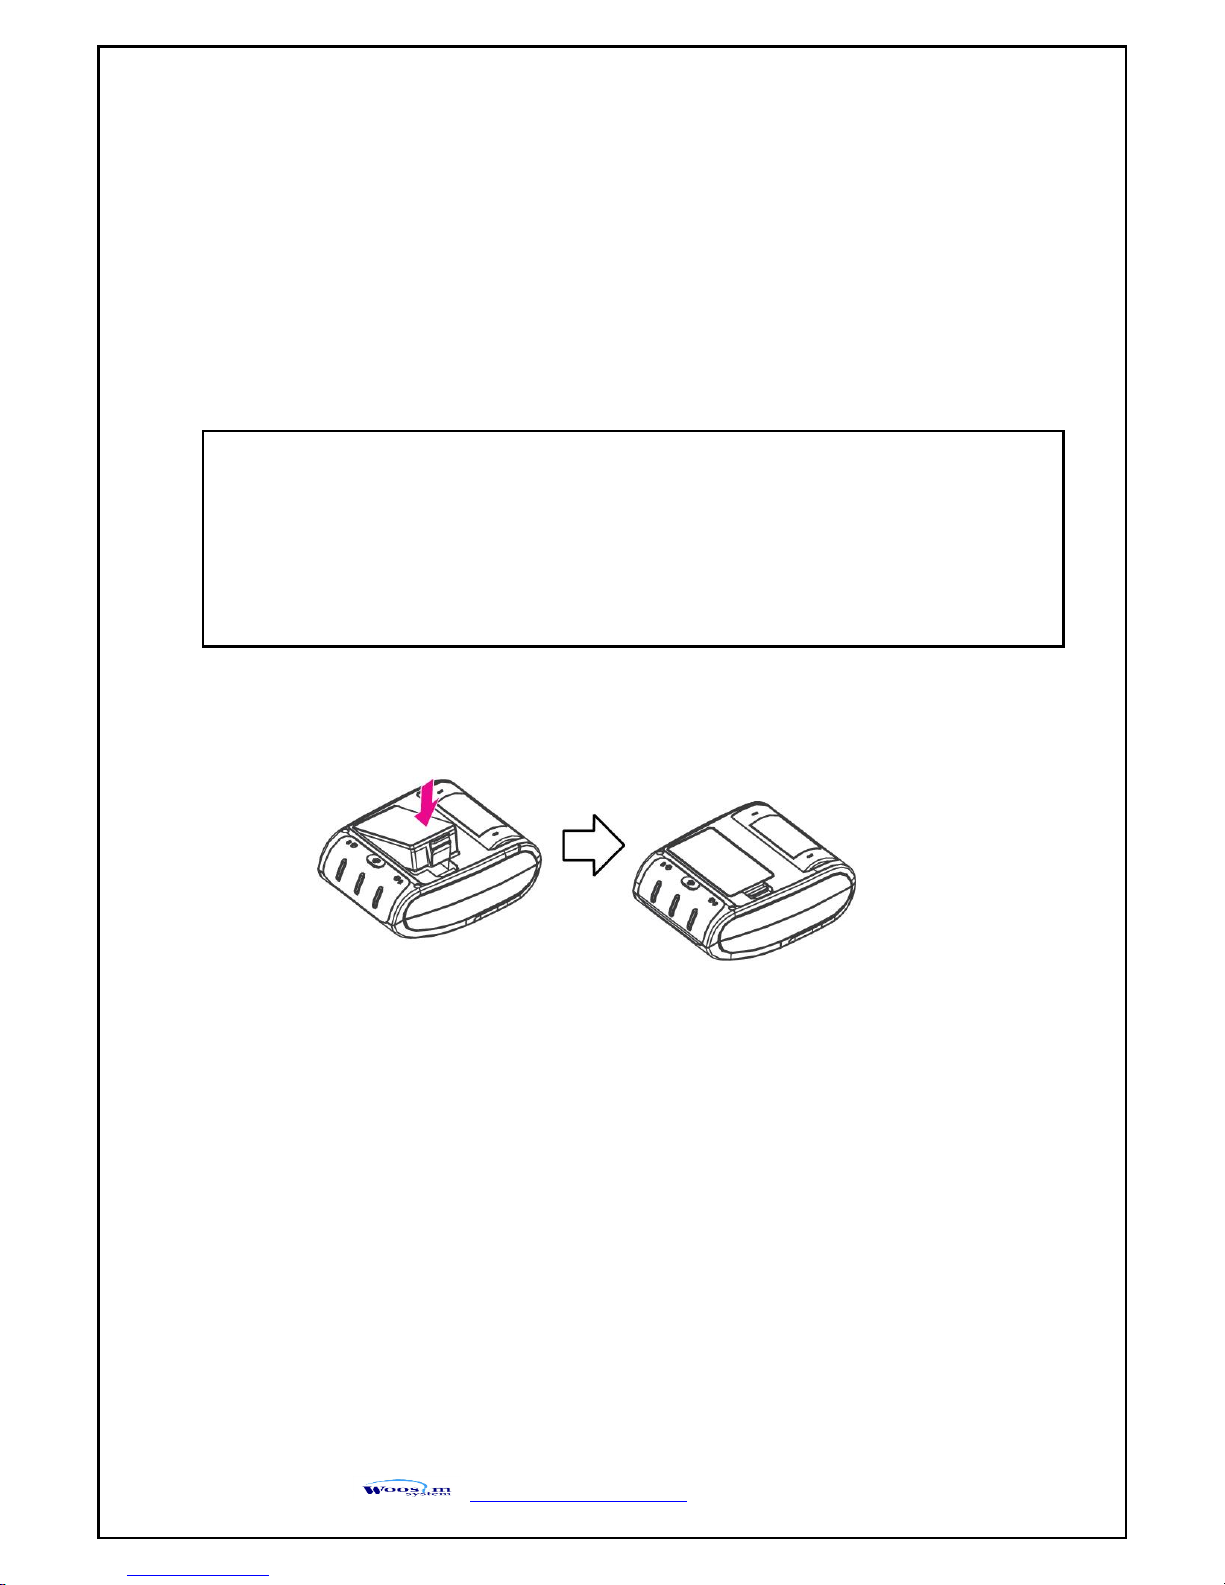
22..55..22.. IInnssttaalllliinngg tthhee BBaatttteerryy
① To install battery pack, proceed as follows:
-Insert the Battery Connector in the direction of the arrow.
② To remove battery pack, proceed the above order reverse.
Warning :
● Before installing or removing the battery pack, ensure the printer is OFF.
● If the printer is not used for long period of time, remove the battery pack from the printer.
● Risk of explosion if battery is replaced by an incorrect type.
Dispose of used batteries according to the instructions.
● Batteries are provided not being charged. Please charge the battery before use.
Page 16
WSP-R350 Rev. 1.5
http://www.woosim.com
16
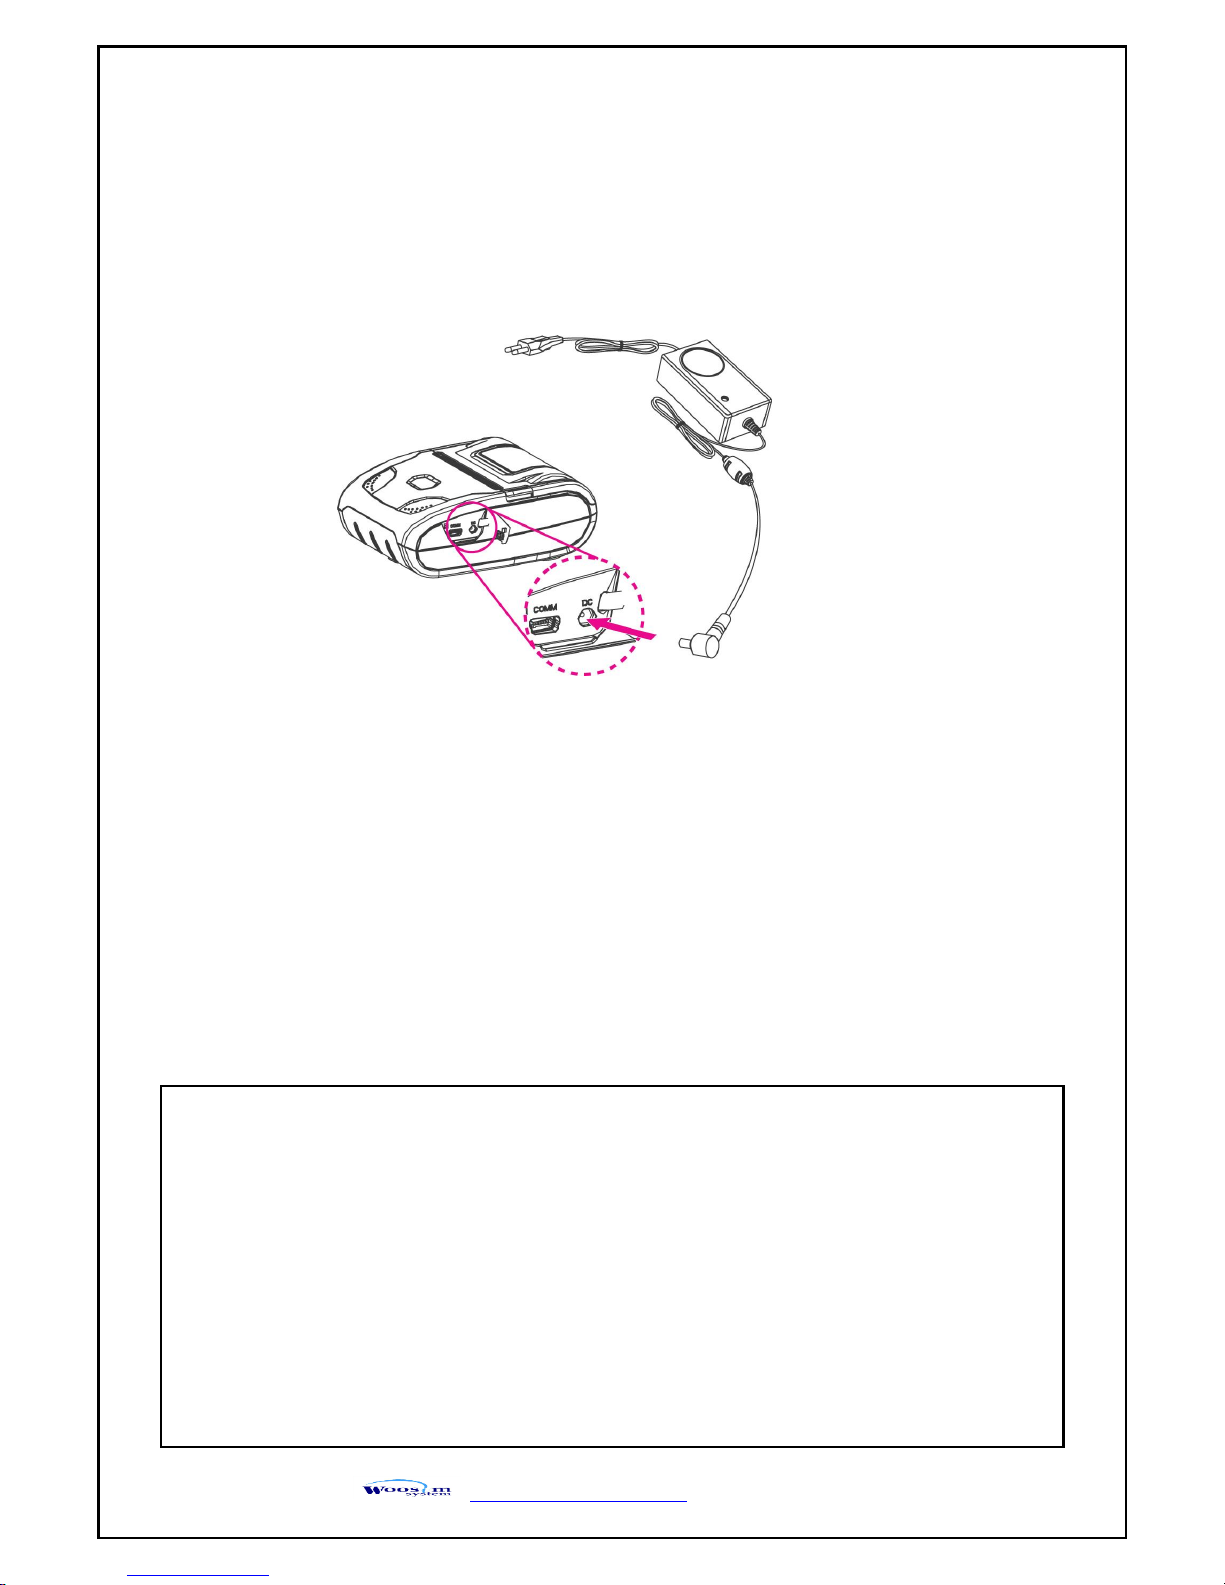
22..55..33.. RReecchhaarrggiinngg tthhee bbaatttteerryy
For recharging the battery pack, install the battery pack in the printer.
Insert the Battery Charger to the charge connector of the printer.
NOTE : ● While charging the printer, turn off the printer power.
● Do not remove the battery during charging.
● The battery is consumable parts and when purchasing, compared to the use hour is gradually
decreases. (Warranty 6 month)
● If the printer is not used for a long time, unplug the power cord from the printer and outlet.
● The recharging time depends on the voltage level and ambient temperature of the battery.
Normally, if takes about 4 hours to recharge a battery pack.
● You must use only the supplied adapter.
● Red Lamp : charging the battery.
Green Lamp : charging is finished.
Page 17
WSP-R350 Rev. 1.5
http://www.woosim.com
17
22..66.. SSeett ooppeerraattiioonn mmooddee
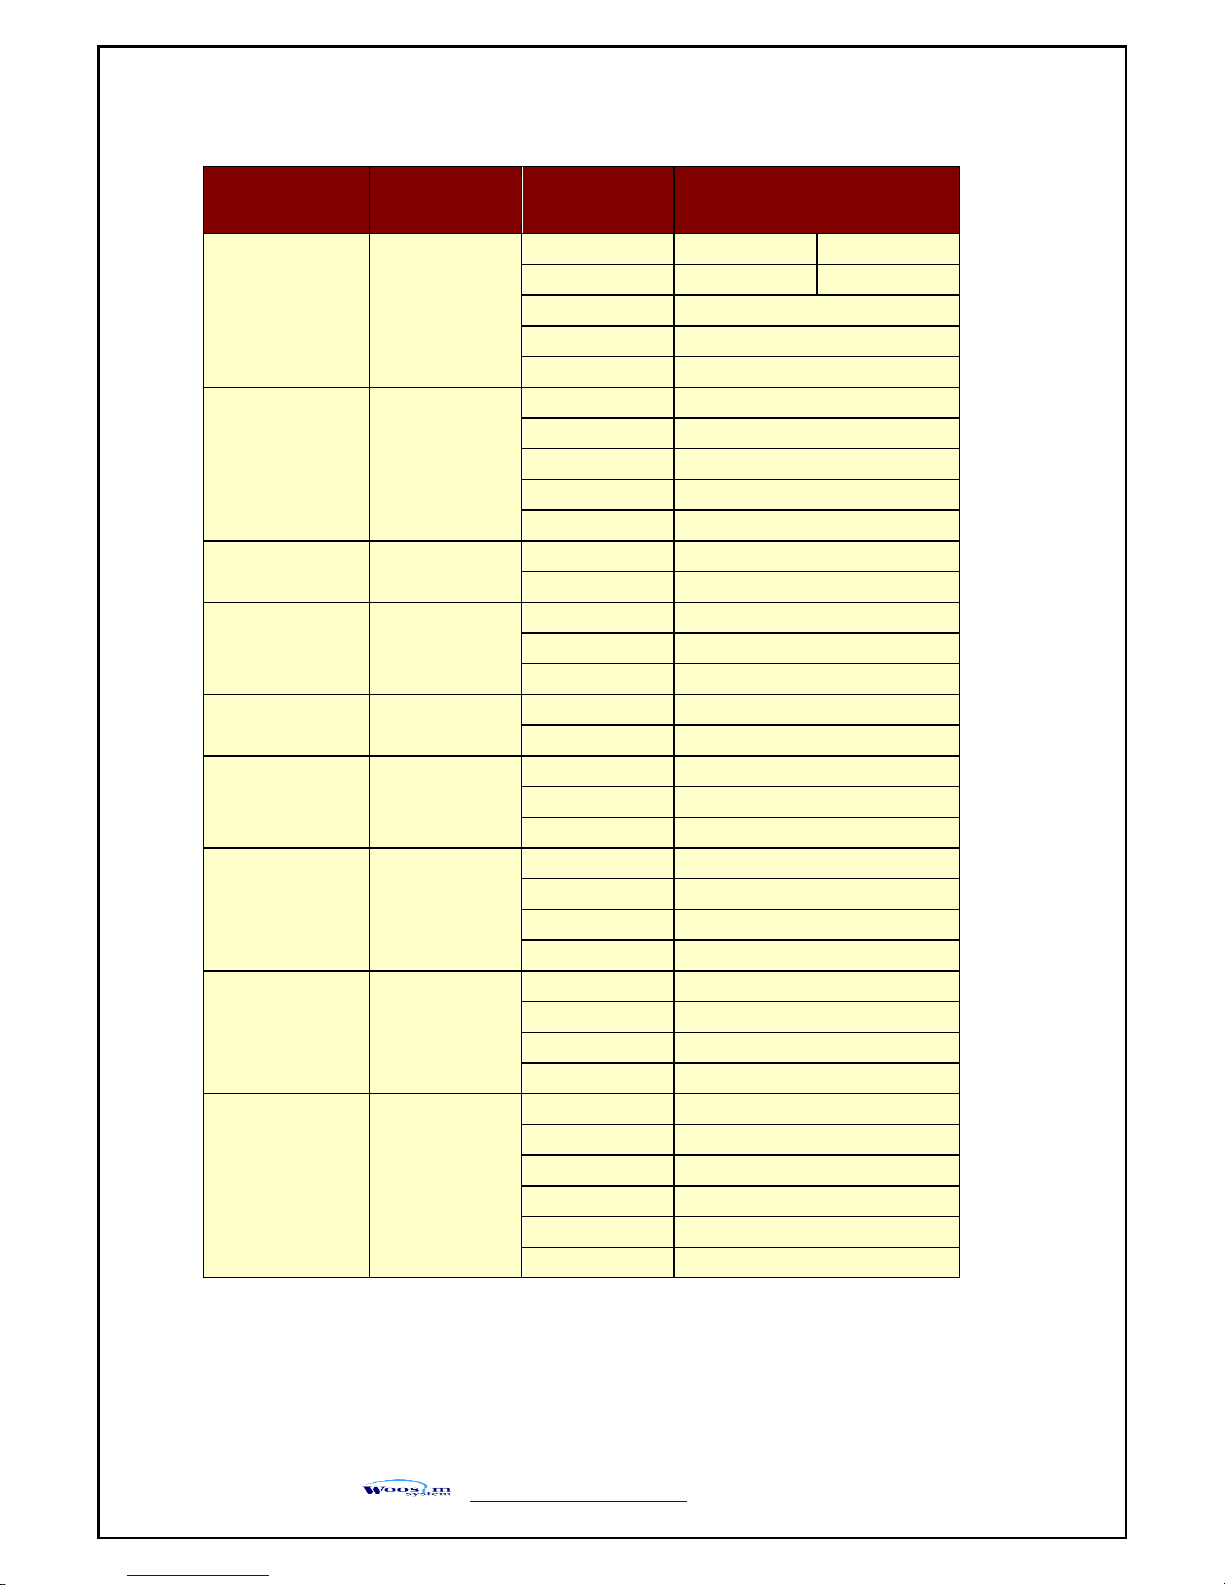
In keeping on pressing the Feed and Power button simultaneously until after the ERROR lamp
blinks 5 times, the printer comes out at the circumstance to change the printer mode.
(refer to Table 2)
POWER button : use for changing OPTION status. (Error Lamp)
FEED button : use for changing MODE status. (Power Lamp)
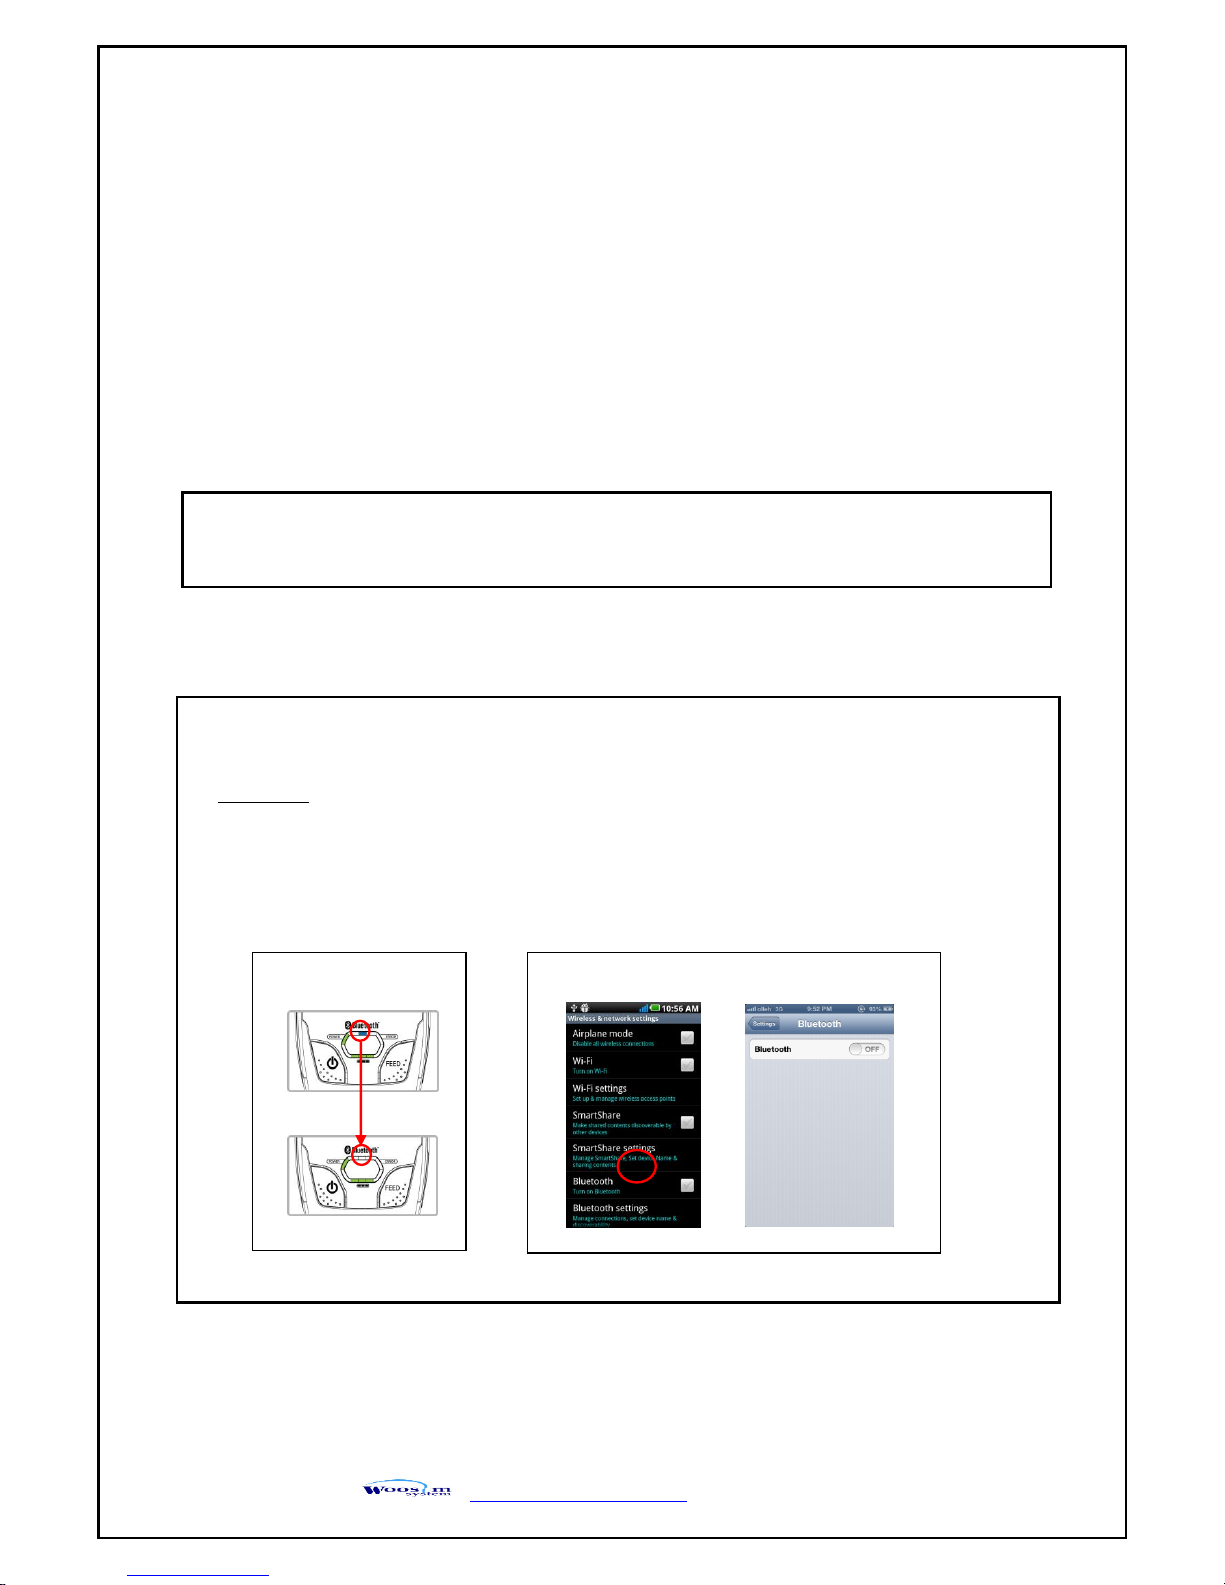
** If you want to change the Bluetooth Mode of printer, you need to disconnect the Bluetooth
function of the current paired Smartphone.
** Methods :
1. Turn off the Bluetooth function of the current paired Smartphone.
(Blue LED is off.)
2. Change the printer mode.
(Additionally, we want to recommend you to rest(OFF→ON) the printer and change mode.)
Printer LED status
Android status iOS status
*Note
No additional mode settings are required to connect Android or iOS devices.
Page 18

WSP-R350 Rev. 1.5
http://www.woosim.com
18
[Example] The defaults of the printer are :
USB / 9600 bps / 8 data bit / No parity / 1 stop bit / Density low
/ Mark no use / Sensor low / Power down 5 minute
If a user wants to modify the defaults with
Bluetooth / 57600 bps / 7 data bit / Odd parity / 2 stop bit / Density high
/ Mark use / Sensor medium1 / Power down no use
Press FEED & POWER Button during the Error Lamp flickers 5 times.
You will see the Power Lamp and the Error Lamp flickers once.
Press the POWER Button twice and the Error Lamp flickers 3 times.
And then, interface mode has set to Bluetooth mode.
When you press FEED button once again, Power Lamp flickers twice and
the Error Lamp flickers once.
Press POWER Button 3 times, Error Lamp flickers 4 times.
And then, baudrate has set to 57,600 bps.
When you press FEED button once again, Power Lamp flickers 3 times
and the Error Lamp flickers twice.
Press POWER Button once, Error Lamp flickers once.
And then Data Bit has set to 7 data bit.
When you press FEED Button once again, Power Lamp flickers 4 times
and the Error Lamp flickers once.
Press POWER Button once, Error Lamp flickers twice.
And then the Parity bit has set to Odd parity bit.
When you press FEED Button once again, Power Lamp flickers 5 times
and Error Lamp flickers once.
Press POWER Button once, Error Lamp flickers twice.
And then the density has set to 2 stop bit.
When you press FEED Button once again, Power Lamp flickers 6 times
and Error Lamp flickers once.
Press POWER Button twice, Error Lamp flickers 3 times.
And then the density has set to Density high.
Page 19

WSP-R350 Rev. 1.5
http://www.woosim.com
19
When you press FEED Button once again, Power Lamp flickers 7 times
and Error Lamp flickers twice.
Press POWER Button once, Error Lamp flickers once
And then the mark has set to Mark no use.
When you press FEED Button once again, Power Lamp flickers 8 times
and Error Lamp flickers once.
Press POWER Button once, Error Lamp flickers twice
And then the sensor has set to Sensor medium1.
When you press FEED Button once again, Power Lamp flickers 9 times
and Error Lamp flickers five times.
Press POWER Button once, Error Lamp flickers once
And then the power down has set to Power down use.
If all the mode have set, press the POWER Button and the FEED Button at the same time after
then release the buttons at the same time.
The printer will print out the mode status which has modified.
(Bluetooth / 57600 bps / 7 data bit / Odd parity / 2 stop bit / Density high /
Mark no use / Sensor medium1 / Power down use)
If the status is not correct, please try it again according to the procedure.
Page 20
WSP-R350 Rev. 1.5
http://www.woosim.com
20
MODE
POWER Lamp
(Green)
ERROR Lamp
(Red)
Option
Communication
Port
1
1
USB
RS-232C
2
USB(Pro)
RS-232C(Pro) 3 Bluetooth
4
Bluetooth(Pro)
5
Bluetooth(iAP)
Baud Rate
2
1
9600 bps
2
19200 bps
3
38400 bps
4
57600 bps
5
115200 bps
Data Bit
3
1
7 Data bit
2
8 Data bit
Parity
4
1
No Parity
2
Odd Parity
3
Even Parity
Stop bit
5
1
1 stop bit
2
2 stop bit
Density
6
1
Density Low
2
Density Medium
3
Density High
Mark
7
1
No use
2
Use
3
Gap/Hole
4
Back
Sensor
8
1
Low
2
Medium1
3
Medium2
4
High
Power Down
9
1
No use
2
1 minute
3
2 minute
4
3 minute
5
4 minute
6
5 minute
Notice : Bluetooth(iAP) is the mode which is used in iPod, iPhone and iPad Whole aspect.
< Table 2 >
Page 21
WSP-R350 Rev. 1.5
http://www.woosim.com
21
33.. IInntteerrffaaccee
33..11.. UUAARRTT((RRSS--223322CC oorr TTTTLL)) oorr UUSSBB
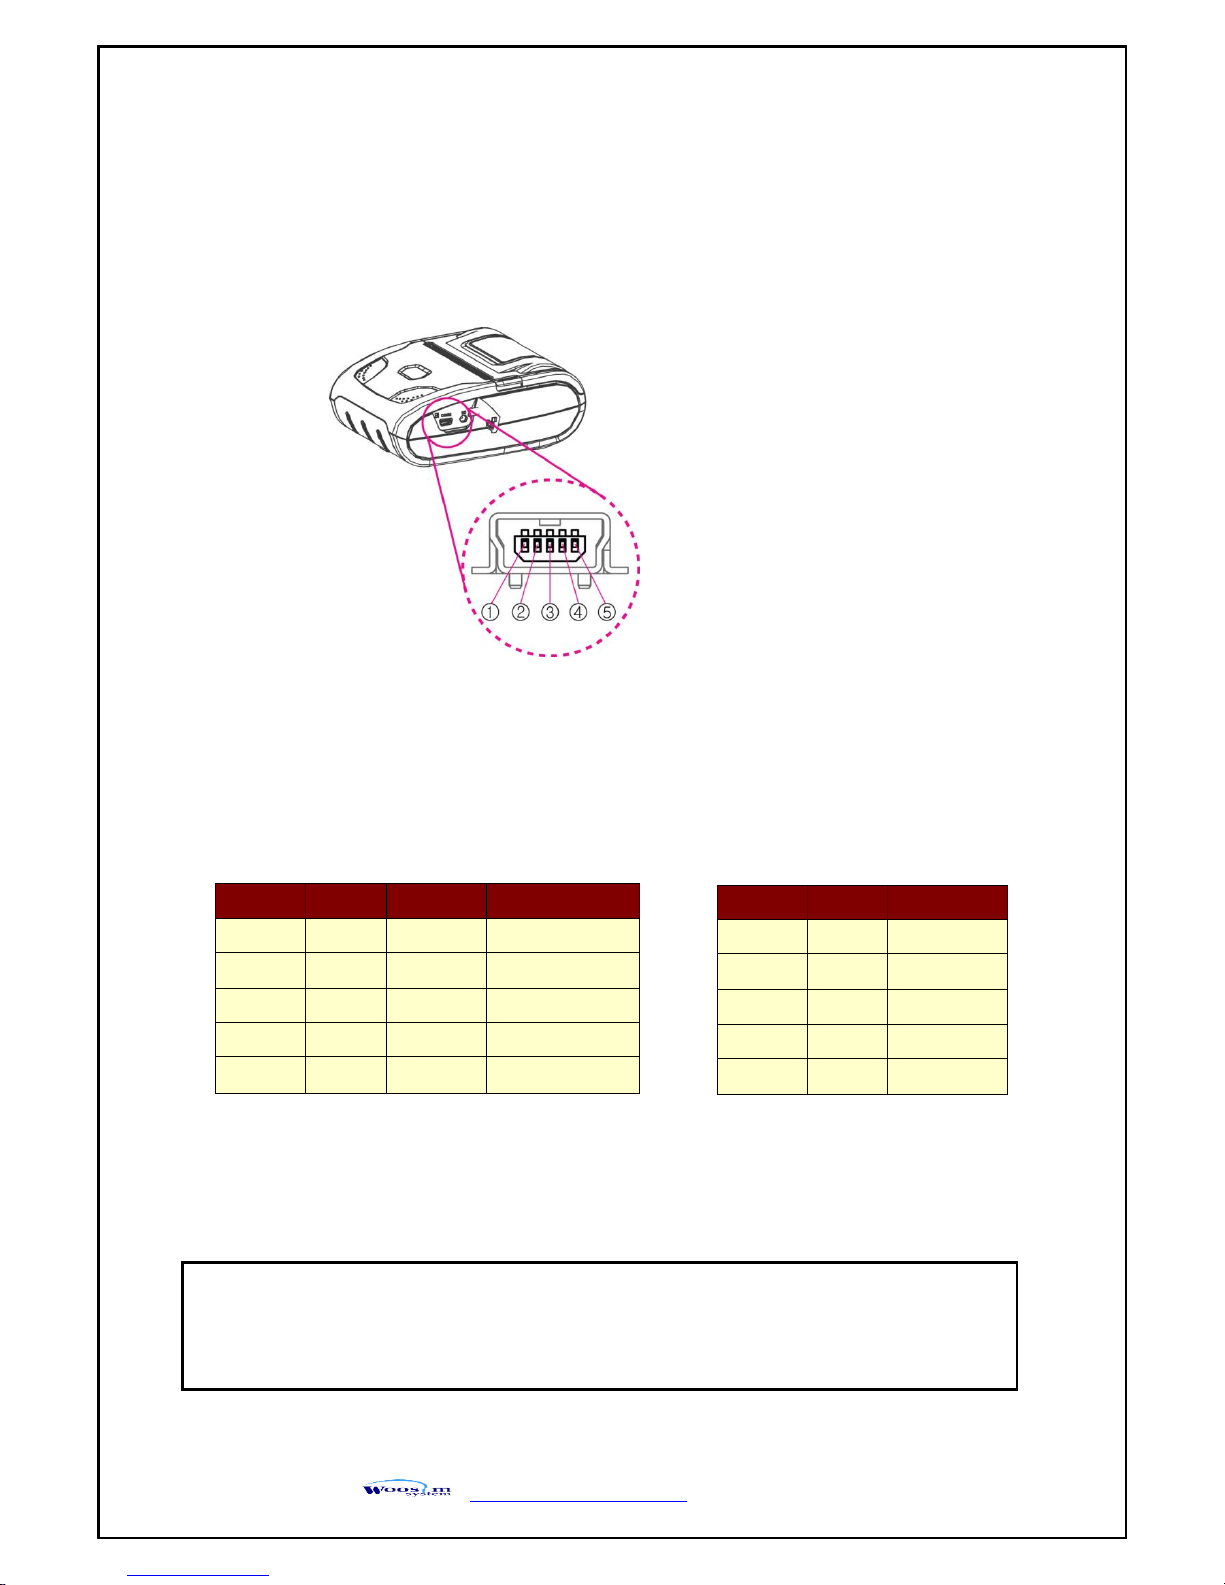
The WSP-R350 printer has a UART(RS-232C or TTL) or USB interface and is connected by means
of a 5 pin mini USB socket.
In the following table, the signals present on the Mini- USB socket are listed:
NOTE :
● If you connect the printer interface cable is converted to UART mode.
● When data receiving, when it removes the communication cable, it loses a data.
(Fig.3.1)
② USB
Pin No.
Name
Function
1
VCC
+5V
2
DM
DATA “-”
3
DP
DATA “+”
4
NC.
-
5
GND
Ground
① UART
Pin No.
Name
Direction
Function
1
TxD
Output
Transmit Data
2
RxD
Input
Receive Data
3
GND - Ground
4
NC. - -
5
GND - Ground
Page 22
WSP-R350 Rev. 1.5
http://www.woosim.com
22
33..22.. BBlluueettooootthh
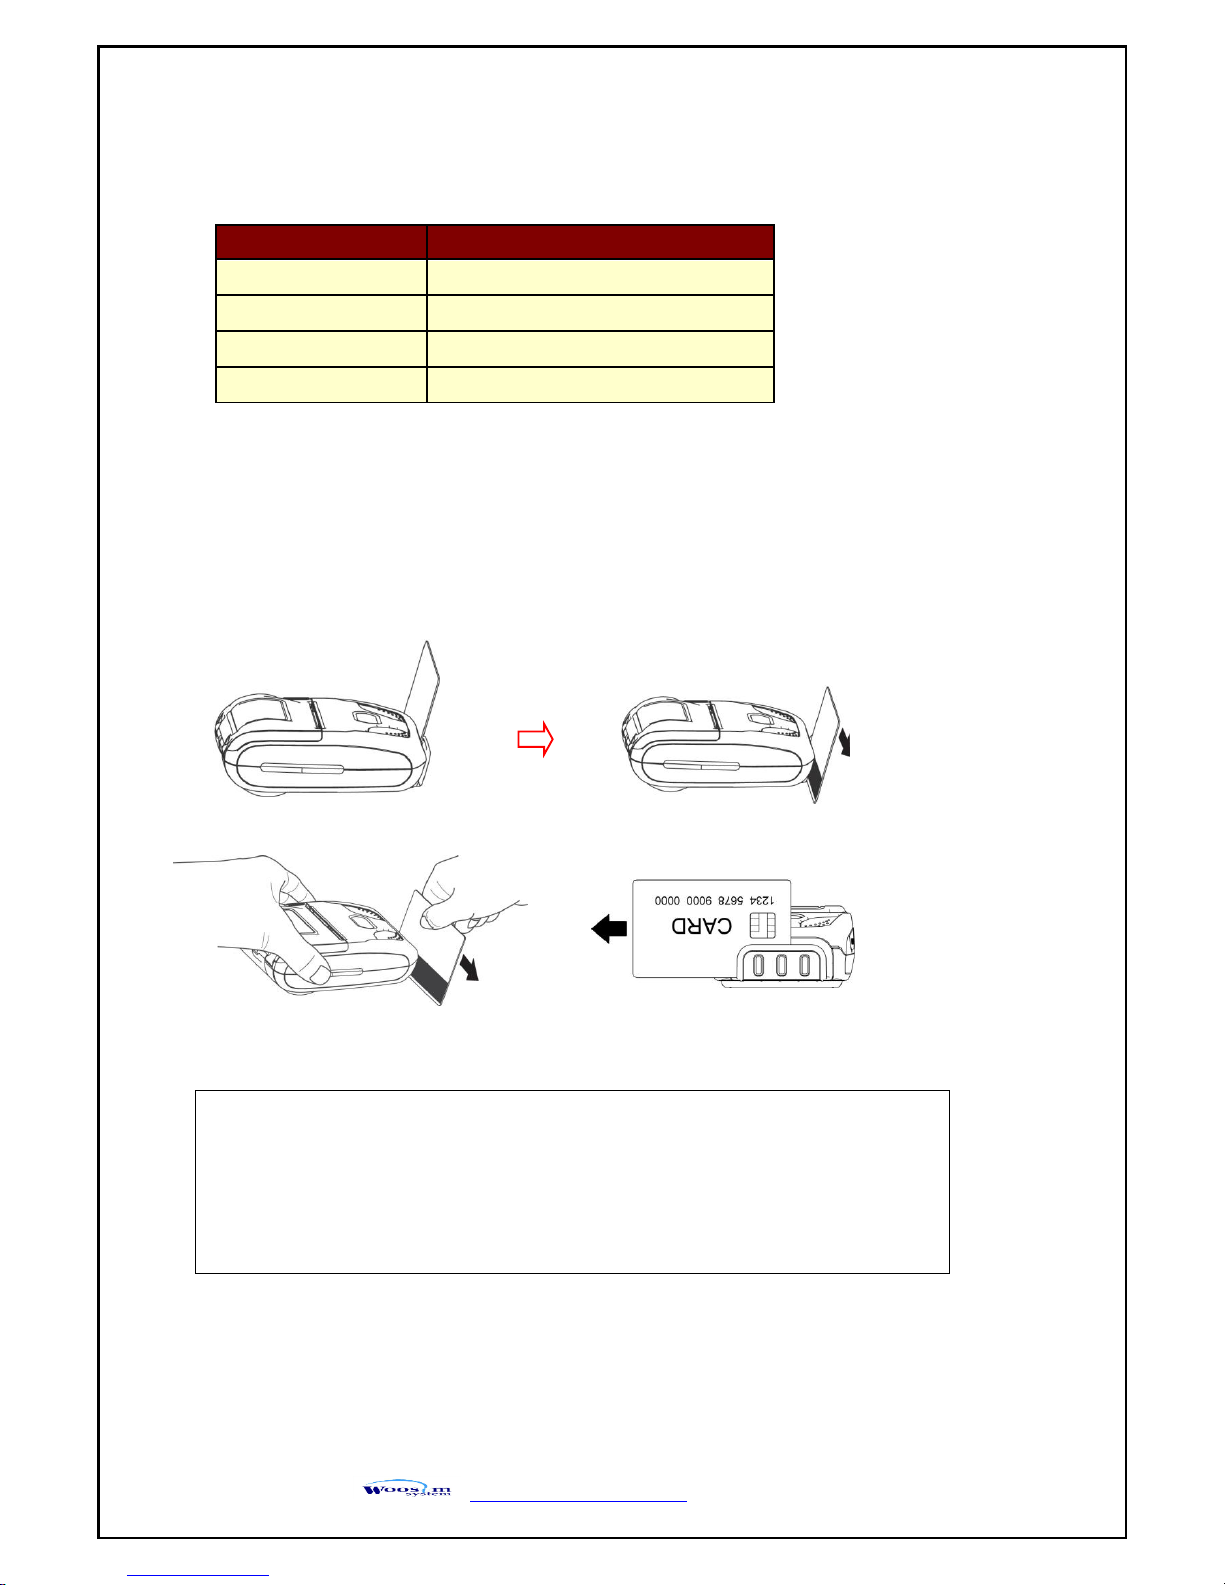
33..33.. RReeaadd aa mmaaggnneettiicc ssttrriippee ccaarrdd ((ooppttiioonn))
Category
Specification
Bluetooth Spec.
Bluetooth Ver3.0 / Class2 (10m)
Frequency band
2402~2480 MHz
Protocol
L2CAP, RFCOMM, SDP
Profile
GAP, SDAP, SPP
▶ Check the direction of the magnetic stripe and read the card.
▶ Holding the card as shown above,
please pass at a steady speed (check the direction of the arrow).
▶ When the card reading is successful, buzzer sound one time.
If it fails, buzzer sounds three times.
Page 23
WSP-R350 Rev. 1.5
http://www.woosim.com
23
44.. UUssiinngg tthhee pprriinntteerr
44..11.. CCoonnttrrooll ppaanneell
Button
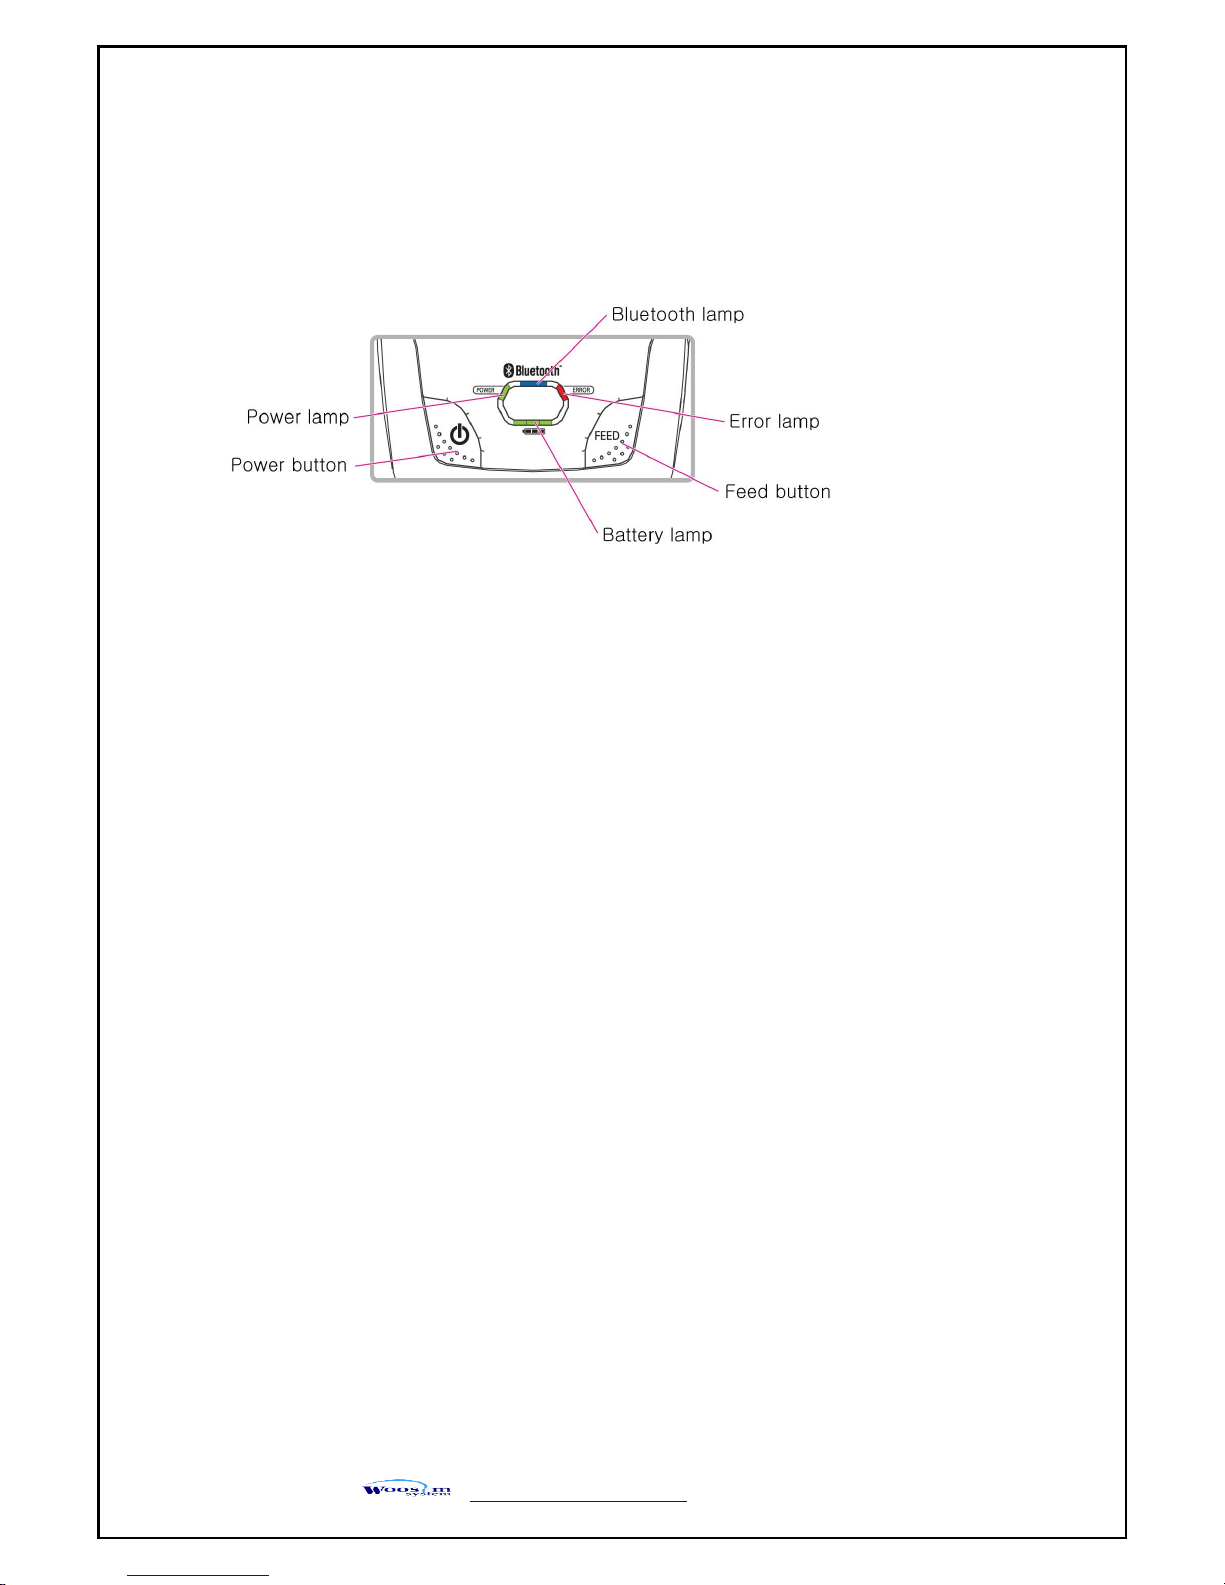
- FEED Button : Use feed button to feed the paper continuously.
- POWER Button : This button is used to power on/off.
When of 5 or more seconds presses and power comes to on or off.
: In keeping on pressing the Feed and Power button simultaneously until after the ERROR lamp
blinks 5 times, the printer comes out at the circumstance to change the printer mode.
(Refer to 2.6. Set operation mode for details about mode conversion)
LAMP
- Power : Printer is ON and ready to receive data.
(GREEN)
- Error : Indicates a fault condition or a printer error.
(RED) (details: no paper, paper cover opened. etc.)
- Bluetooth : Indicates a Bluetooth connection status.
(BLUE)
- Battery Power : These lamps(Green) indicated the battery power remaining.
(GREEN) The battery gain in quantity and these lamps are on the decrease.
If so, you must recharge the battery by using the battery charger.
(Fig.4.1)
Page 24
WSP-R350 Rev. 1.5
http://www.woosim.com
24
44..22.. TThhee sseellff tteesstt
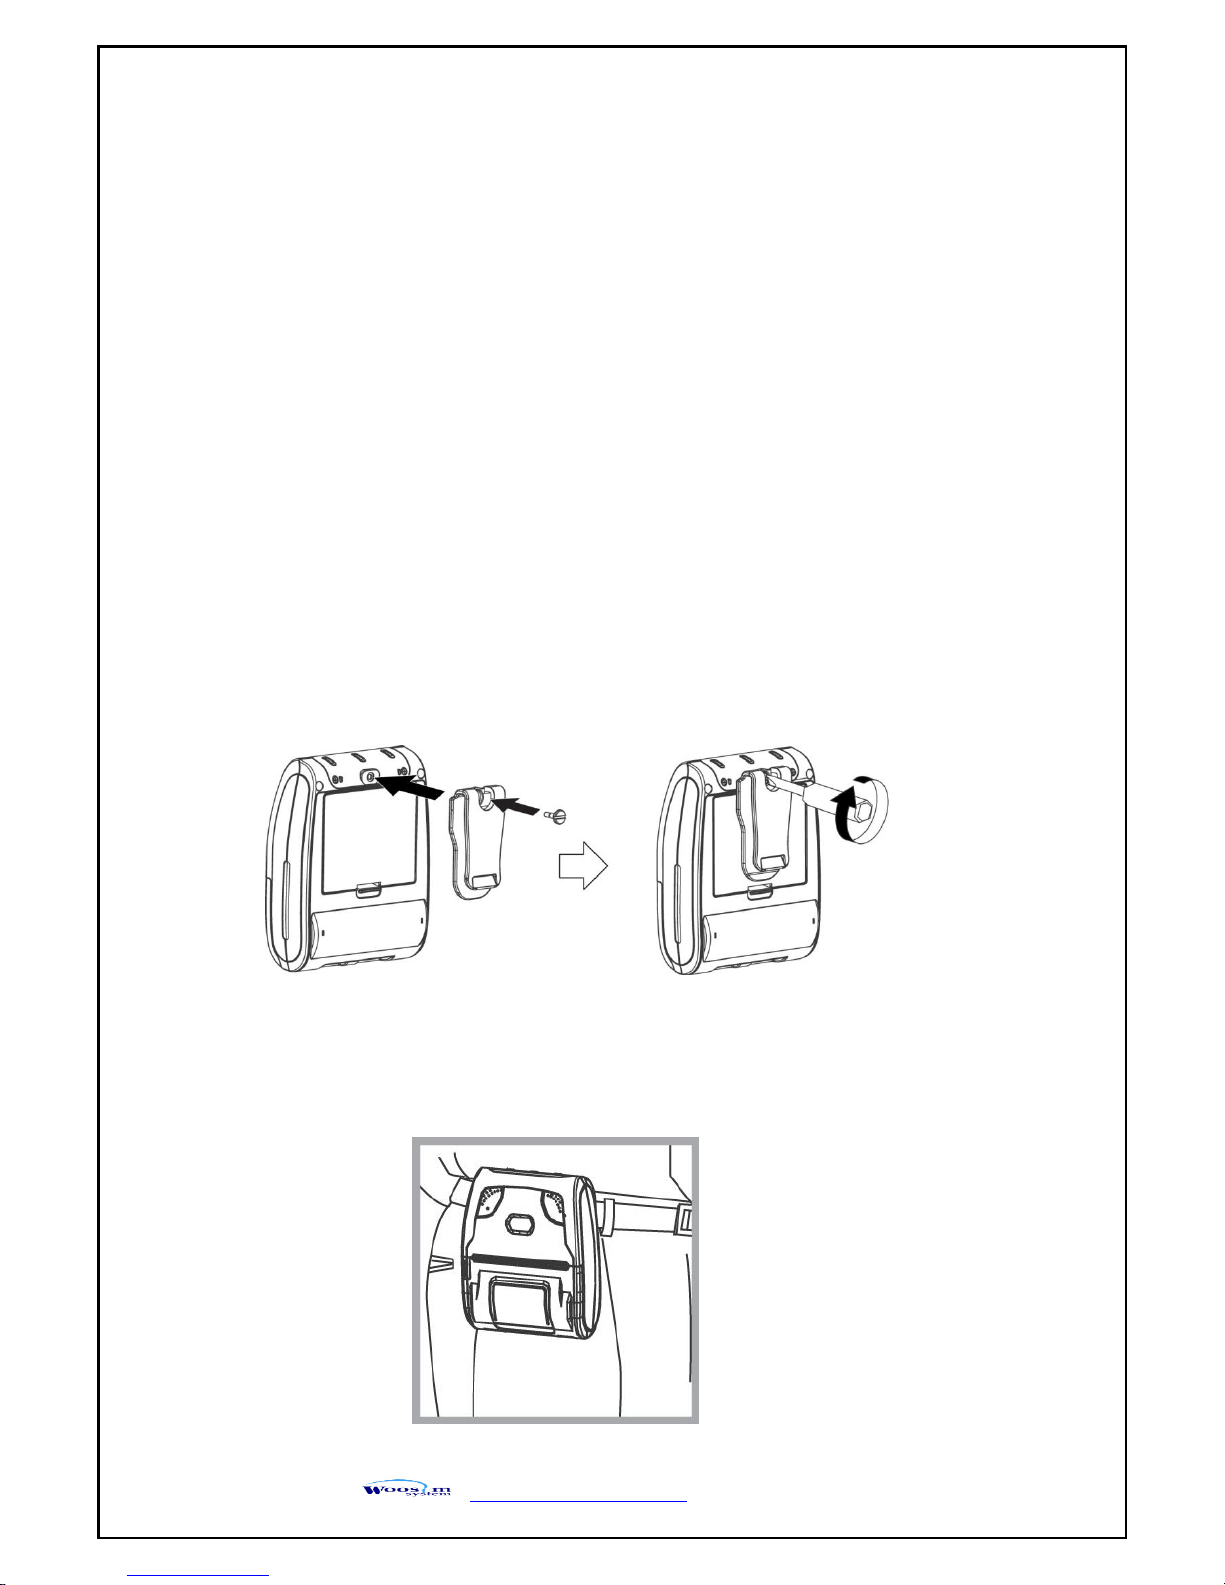
44..33.. UUssiinngg tthhee BBeelltt cclliipp
Self-Test prints out the current setting value of printer. The way of self-test is as follows.
1. Insert proper paper into the printer.
2. Power on while pressing feed button to start self-test.
3. Printer will print out the current status. (F/W version and set contents)
4. And then pattern of characters will be printed out.
5. Self-test will be finished automatically and turned to the standby status.
※ In case printer does not work properly, please contact Woosim customer service center.
Following the instruction of the arrow, please put the belt clip in the hole and turn and fix the screw
to the right by using a thing like a screwdriver.
Afterward, you can use it like the picture below
Page 25
WSP-R350 Rev. 1.5
http://www.woosim.com
25
55.. CCoonnssuummaabbllee PPaarrttss
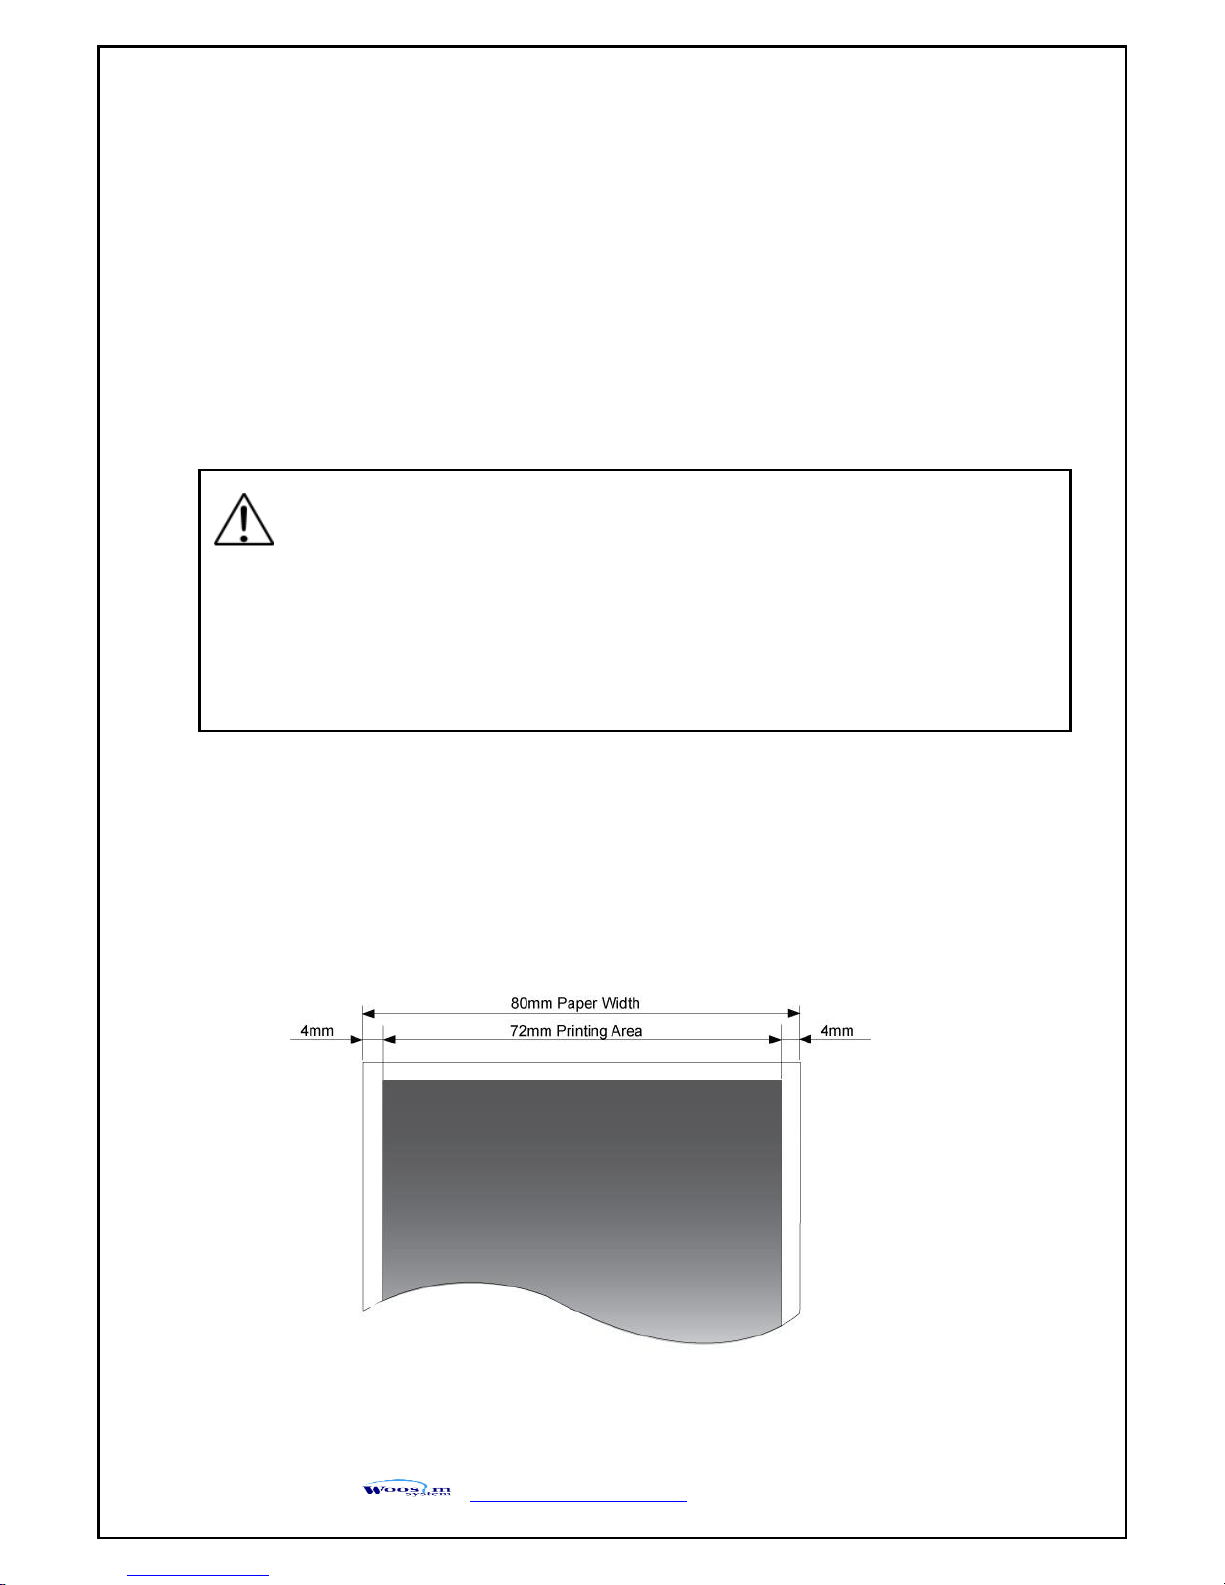
55..11.. RReeccoommmmeennddeedd ppaappeerr
55..22.. PPrriinnttiinngg ppoossiittiioonn
Type : Thermal Paper
Paper width : 80mm
Paper thickness : 60±5㎛
Outer diameter : Ø50mm or less
Recording side : Outside of roll
Cautions
1. Do not paste the paper to the core. And the roll paper which has
Near end mark printing on its near end is recommended.
2. Chemicals or oil may change the color of paper, or printed Characters may fade.
3. Change of paper color starts from approx 70 ℃.
Pay attention to heat, humidity and sun light.
4. Color of paper may be changed by being scratched by nail or hard metal, etc
Page 26
WSP-R350 Rev. 1.5
http://www.woosim.com
26
66.. RReevviissiioonn HHiissttoorryy
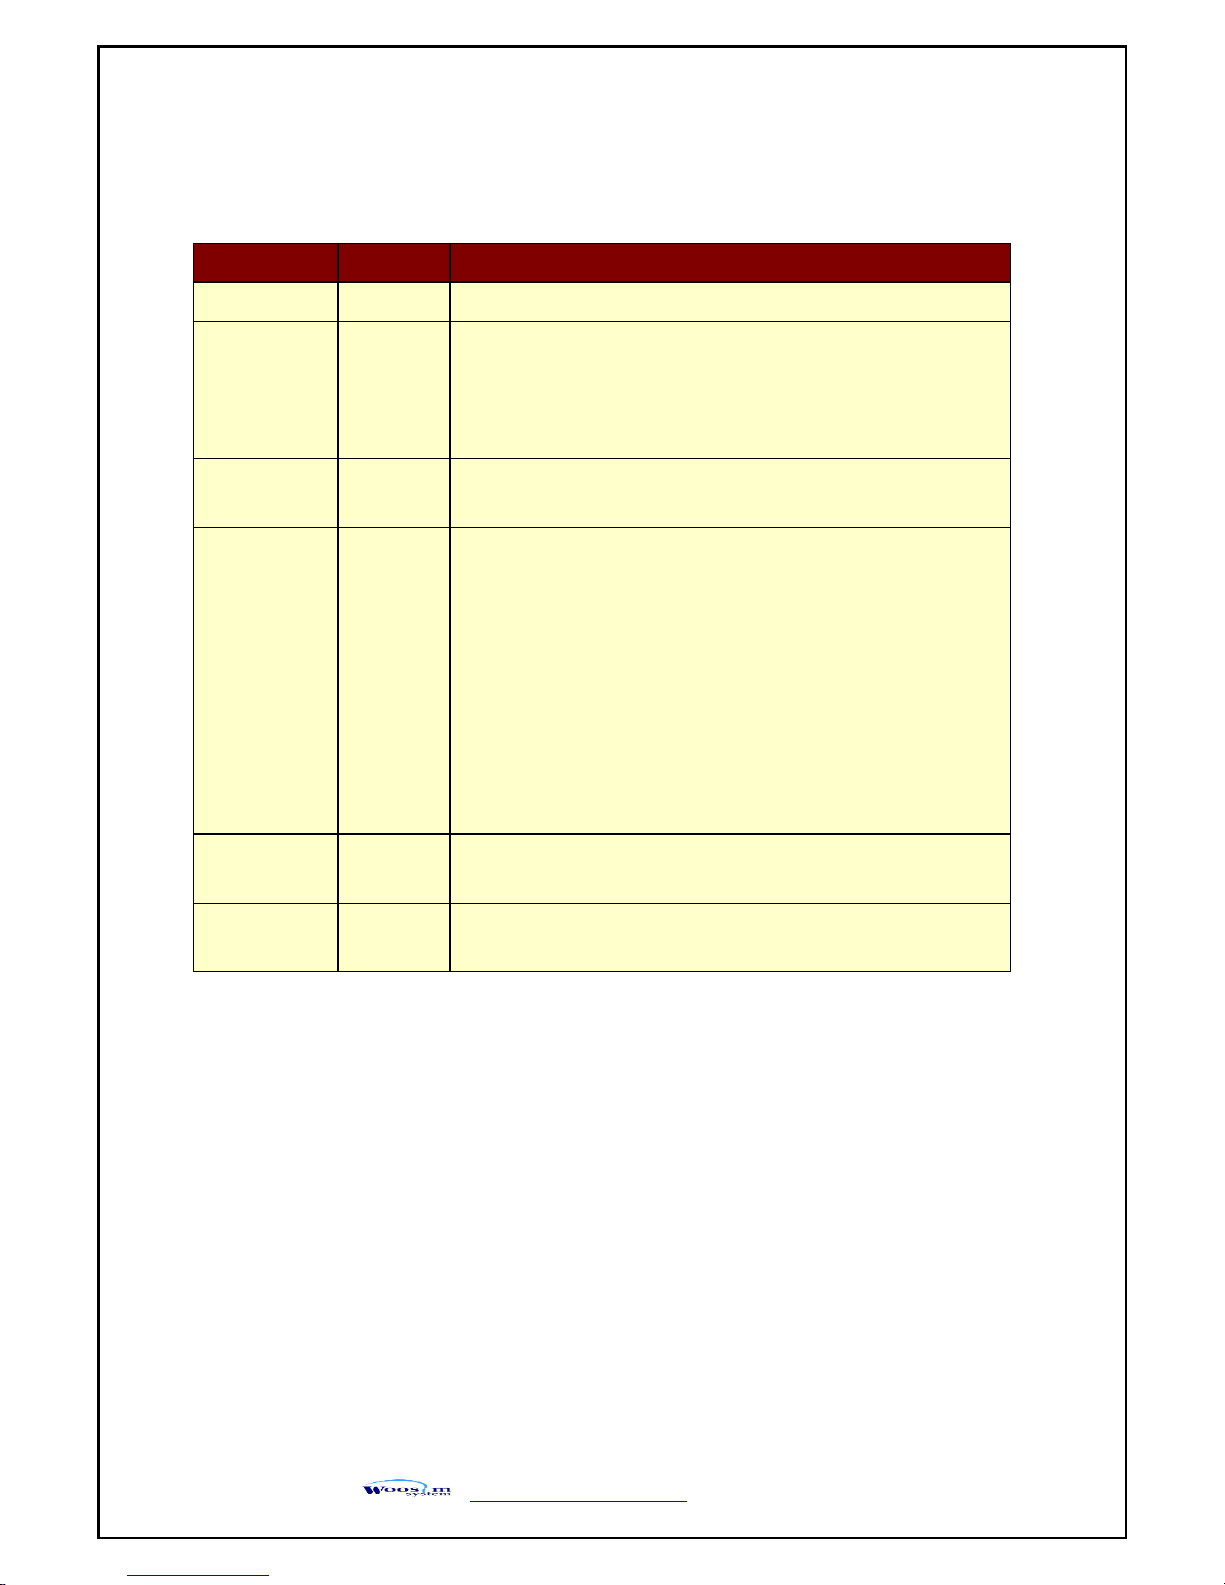
Date
Version
Comments
Oct. 20. 2014
1.0
Initialize
Jul. 15. 2015
1.1
p3,7,24 Bluetooth spec. update
: Ver2.1+ EDR → Ver3.0+ EDR
p8,14 Dimension(MSR) modify
p16 Mode setting modify(Android or iOS)
Sep. 21. 2015
1.2
p3,8 Print speed modify
: 80 → 120mm/sec
Nov. 03. 2015
1.3
p3
p5
p7
p10
p11
p17
p25
p28
Agency approvals update
Additional CE warning
Additional Symbol(standby, DC current)
Battery charger spec modify
Battery charge & interface cable image modify
Additional battery warnings
Bluetooth spec. modify
Card read image update
Using the belt clip image update
Jul. 01. 2016
1.4
p17
p25
Additional battery charging Notes
Read a magnetic card image update
May. 18. 2017
1.5
Change page layout (B5→A4)
* Delete address
 Loading...