

Page 1
Page 2
RU
UA
Общие рекомендации:
1. Карта клеится на гладкую поверхность
двусторонним скотчем.
2. Перед началом сборки удостоверьтесь в том,
что размер стены больше чем размер карты.
3. Для работы вам понадобится: канцелярский нож и линейка.
4. Очень аккуратно выдавливайте детали с внутренней
стороны доски, стараясь не сломать их.
5. Клейкая лента должна быть приклеена к задней части детали.
Клейкую ленту необходимо клеить по окружности детали. Для того
чтобы скотч не выступал за границы мелких деталей его необходимо
обрезать с помощью канцелярского ножа.
6. Места перемычек деталей рекомендуется подрезать канцелярским ножом, также рекомендуется
зачищать наждачной бумагой места перемычек двух соединяющихся между собой деталей.
EN
General recommendations:
1. The map is glued to even surface by bi-adhesive.
2. Until starting the assembly, make sure that the size of wall is larger
than the size of map.
3. You will need a stationery knife and a ruler for work.
4. Press very carefully the parts from inner side of board, trying not
to break them.
5. A sticky tape shall be glued to the rear side of part. A sticky tape
shall be put in a circumferential direction of part. A scotch shall be cut
using a stationery knife in order not to project beyond the limits
of small details.
6. It is recommended to cut the places of part connections using a stationery knife, as well as it is recommended
to trim off the connection places of two parts that connect between each other, using a sandpaper.
Загальні рекомендації:
1. Карта клеїться на гладку поверхню двостороннім скотчем.
2. Перед початком збирання упевніться в тому,
що розмір стіни більше ніж розмір карти.
3. Для роботи вам знадобиться: канцелярський ніж і лінійка.
4. Дуже акуратно видавлюйте деталі з внутрішньої сторони дошки,
намагаючись не зламати їх.
5. Клейка стрічка повинна бути приклеєна до задньої частини деталі.
Клейку стрічку необхідно клеїти по колу деталі. Для того щоб скотч
не виступав за межі дрібних деталей його необхідно обрізати за
допомогою канцелярського ножа.
6. Місця перемичок деталей рекомендується підрізати канцелярським ножем, також рекомендується
зачищати наждачним папером місця перемичок двох деталей що з'єднуються між собою.
DE
Allgemeine Anleitung:
1. Die Karte wird auf eine glatte Oberfläche mit einem doppelseitigen
Klebeband geklebt.
2. Vor dem Beginn der Montage stellen sie sicher, dass die Wandgröße
über die Größe der Karte hinausgeht.
3. Für die Arbeit brauchen Sie: Büromesser und Lineal.
4. Drücken Sie sehr sorgfältig die Details aus der inneren Seite des
Bretts aus, und versuchen Sie sie nicht zu brechen.
5. Das Klebeband muss auf die hintere Seite des Details geklebt werden.
Das Klebeband muss rundherum des Details geklebt werden.
Damit das Klebeband über die Ränder der Kleinteile nicht hinausgeht,
schneiden Sie es mit Hilfe des Büromessers ab.
6. Es wird empfohlen, die Überbrücker der Teile mit dem Büromesser zu beschneiden, sowie es ist empfohlen,
die Überbrückerstellen von zwei zwischen einander verbindenden Teilen mit dem Schleifpapier zu schmirgeln.
ITA
Istruzioni generali:
1. La carta va incollata su una superficie liscia con l’aiuto del nastro
adesivo a due lati.
2. Prima di iniziare l’incollatura Lei deve assicurarsi che le dimensioni
della parete siano superiori a quelle della carta.
3. Per effettuare l’incollatura Lei ha bisogno di: un temperino e un
righello.
4. I dettagli vanno sfondati con la massima cura dalla parte interna
dell’asse, senza che i dettagli sfondati siano rotti.
5. Il nasto adesivo va incollato sulla parte posteriore del dettaglio in
questione, seguendo la circonferenza del dettaglio. Affinché il nasto non
possa superare i limiti dei dettagli piccoli Lei deve tagliarlo col temperino.
6. I lavori con i punti di contatto dei dettagli vanno eseguiti con l’uso di un temperino, i punti di contatto di due
dettagli uniti vanno puliti con la carta smerigliata.
FR
Recommandations générales:
1. La carte est collée sur la surface lisse à l’aide d’une bande
adhésive double-face.
2. Avant d’assembler assurez-vous que les dimensions du mur
dépassent les dimensions de la carte.
3. Pour le faire vous aurez besoin: d’un couteau de bureau et d’une règle.
4. Poussez très soigneusement les détails du côté intérieur d’une
planche, essayez de ne pas les casser.
5. La bande adhésive doit être collée à l’arrière du détail. Il faut coller
la bande adhésive dans le sens circonférentiel du détail. Pour que
le scotch ne déborde les détails fins, il faut le couper à l’aide d’un couteau de bureau.
6. Il est conseillé de couper avec un couteau de bureau les lieux de jonction des détails, et de nettoyer les lieux de
jonction de deux détails voisins à l’aide du papier-émeri.
SP
Recomendaciones generales:
1. El mapa se pega sobre la superficie lisa con cinta adhesiva
de doble cara.
2. Antes de empezar a armar, convénzase de que la dimensión de la
pared es mayor que la dimensión del mapa.
3. Necesitará para el trabajo: un cuchillo de oficina y una regla.
4. Exprima las piezas desde la cara interior de la tabla con mucho
cuidado, tratando de no romperlas.
5. La cinta adhesiva deberá estar pegada a la parte trasera de la pieza.
Es necesario pegar la cinta adhesiva por la circunferencia de la pieza.
Para que la cinta adhesiva no salga del borde de las piezas pequeñas,
hay que cercenarla con ayuda de un cuchillo de oficina.
6. Se recomienda separar con un cuchillo de oficina los lugares de juntura de las piezas, así como recomendamos
alisar con papel de lija los lugares de juntura de dos piezas que se unen entre sí.
PL
Zalecenia ogólne:
1. Karta przykleja się do gładkiej powierzchni taśmą dwustronną.
2. Przed rozpoczęciem montażu należy upewnić się, że rozmiar
śсiany jest większy niż rozmiar karty.
3. Do pracy będą potrzebne: nóż papierniczy i linijka.
4. Należy bardzo ostrożnie wyciśkać części z wnętrza deski, starając
się ich nie złamać.
5. Taśma klejąca powinna być przyklejona z tyłu części. Taśma klejąca
powinna być przyklejona na obwodzie części. Aby taśma klejąca nie
wystawała poza granice małyсh części, należy ją przeciąć
nożem papierniсzym.
6. Zalecane jest przycinanie miejsc zworek części nożem papierniczym, zalecane jest również czyszczenie miejsc
zworek dwóch łączących się części papierem ściernym.
Page 3
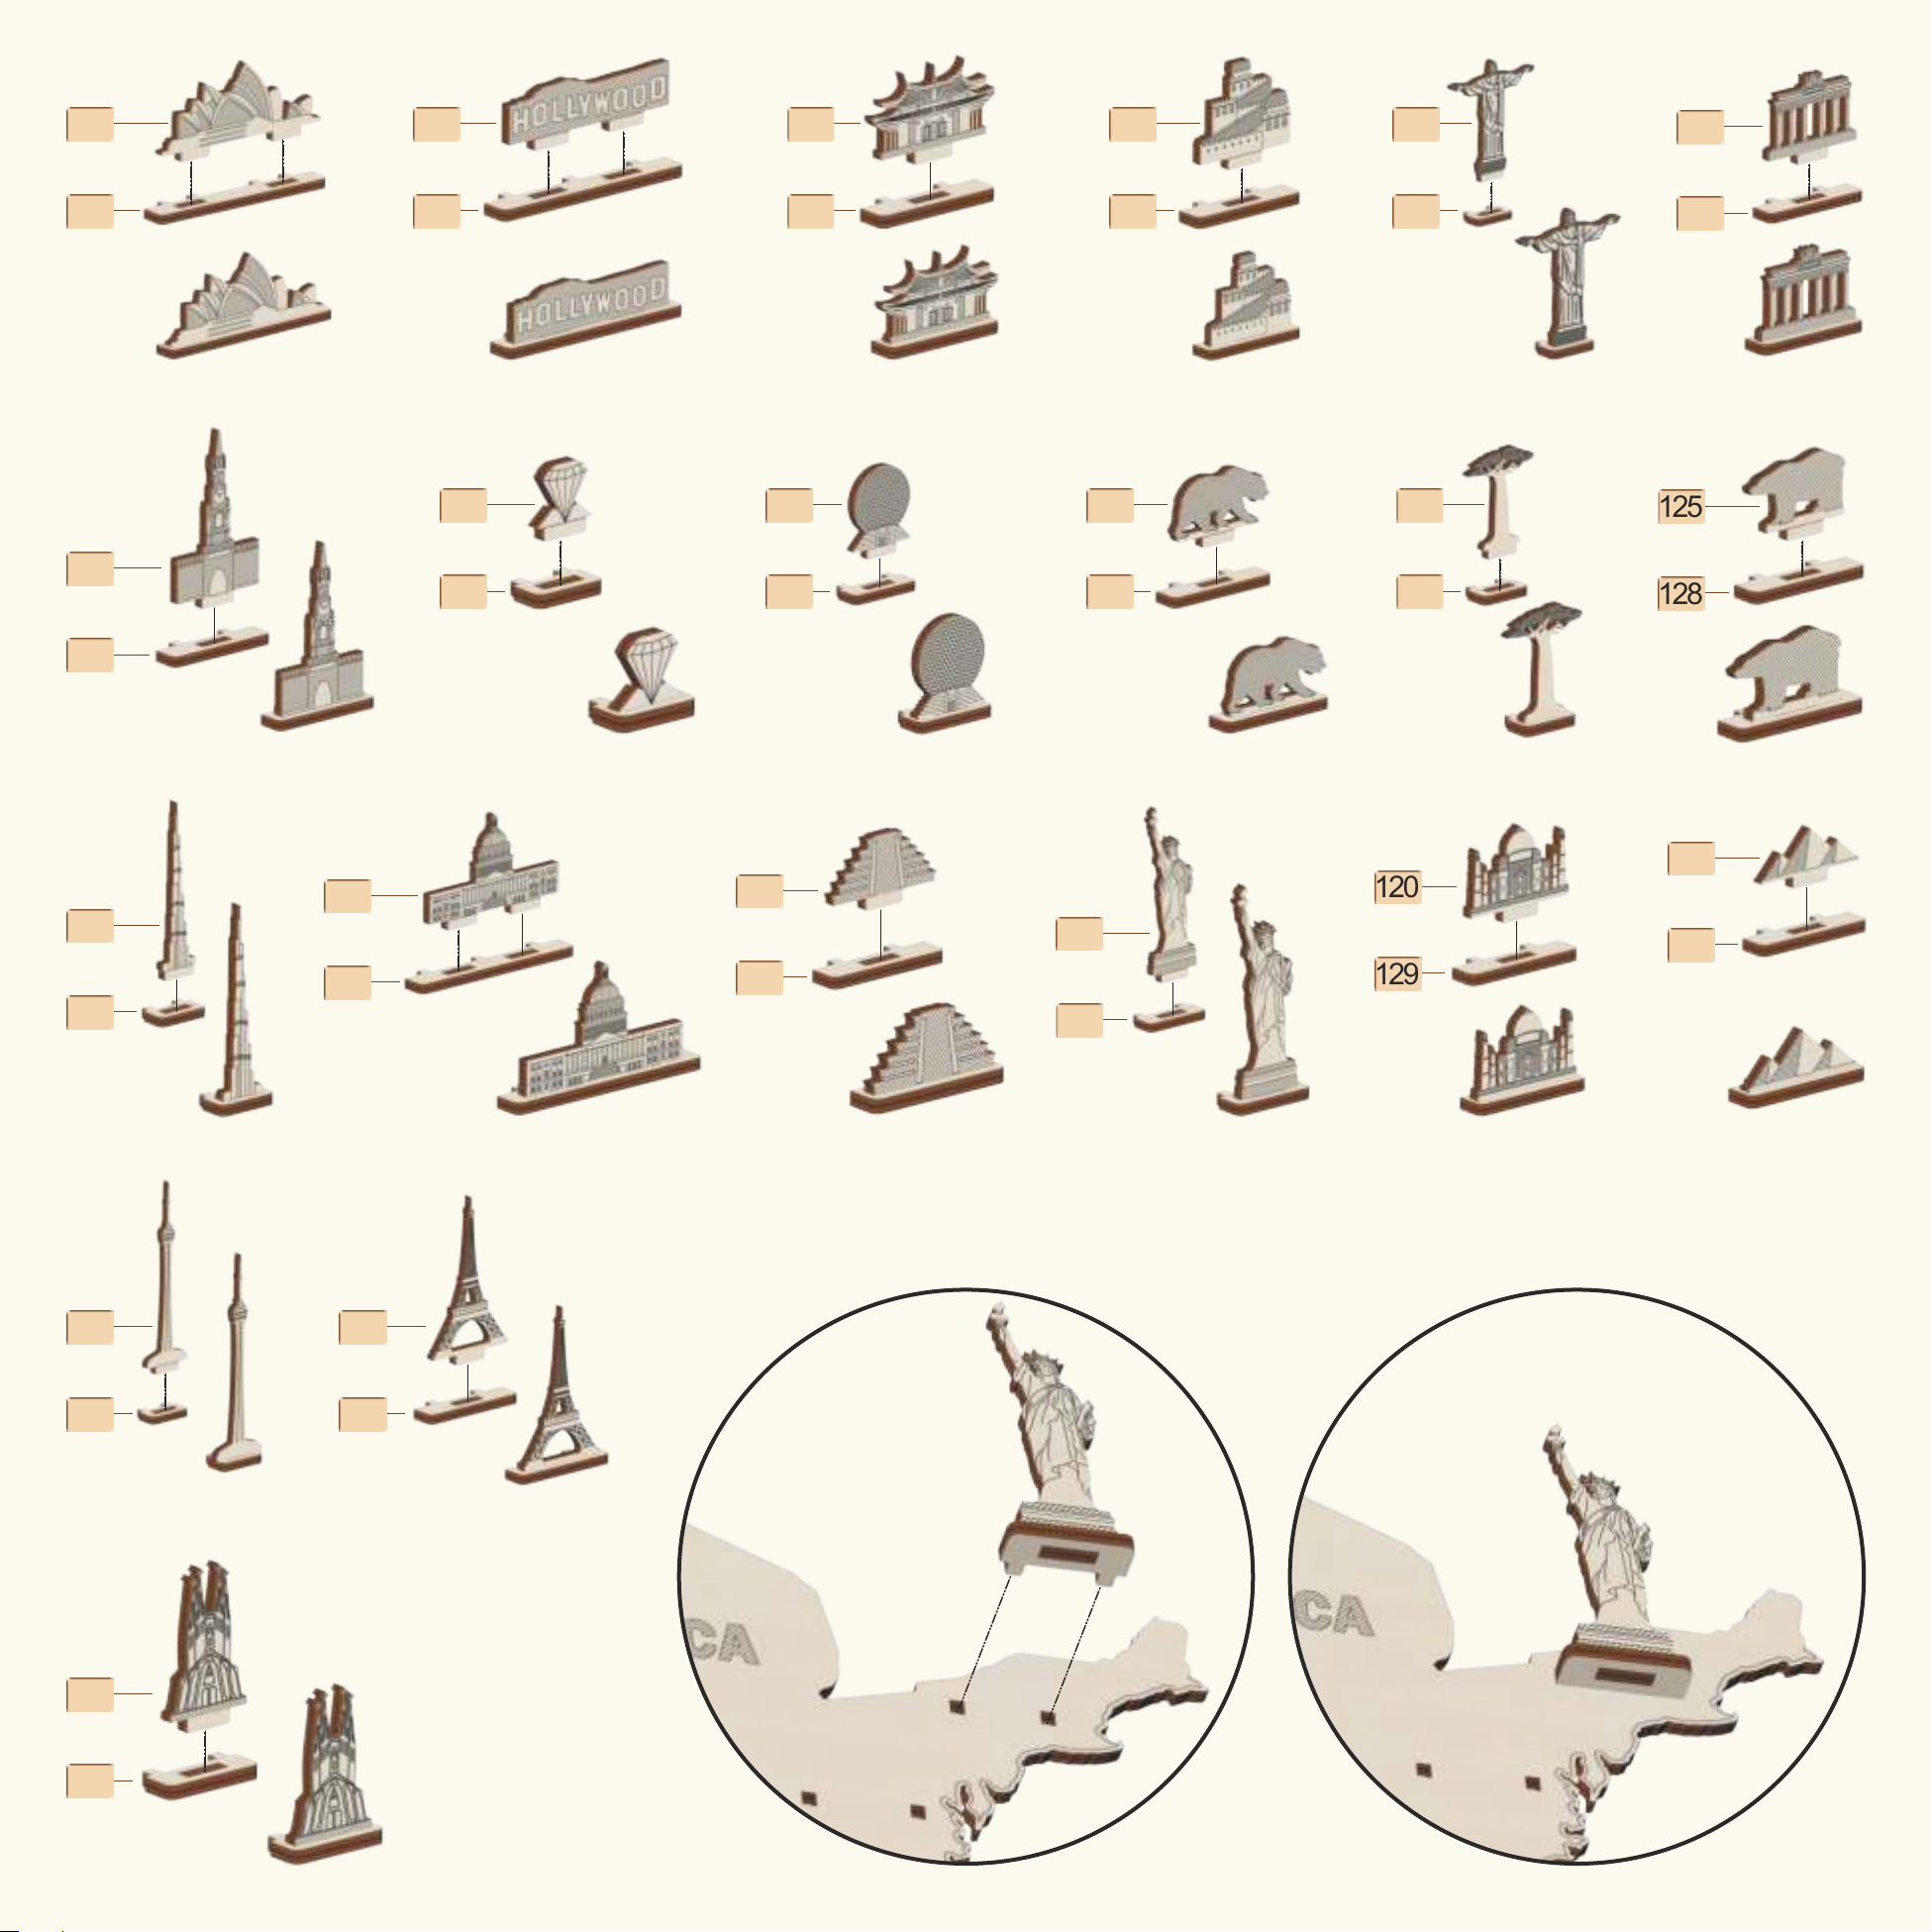
126 109 119 118
113
114
117
129
124
127
107
128
129
106
129
127129130131
123
127
129
125
128
121
127
108
128
110
130
115
129
112
129
111
128
122
120
129
129
116
128
!
Page 4
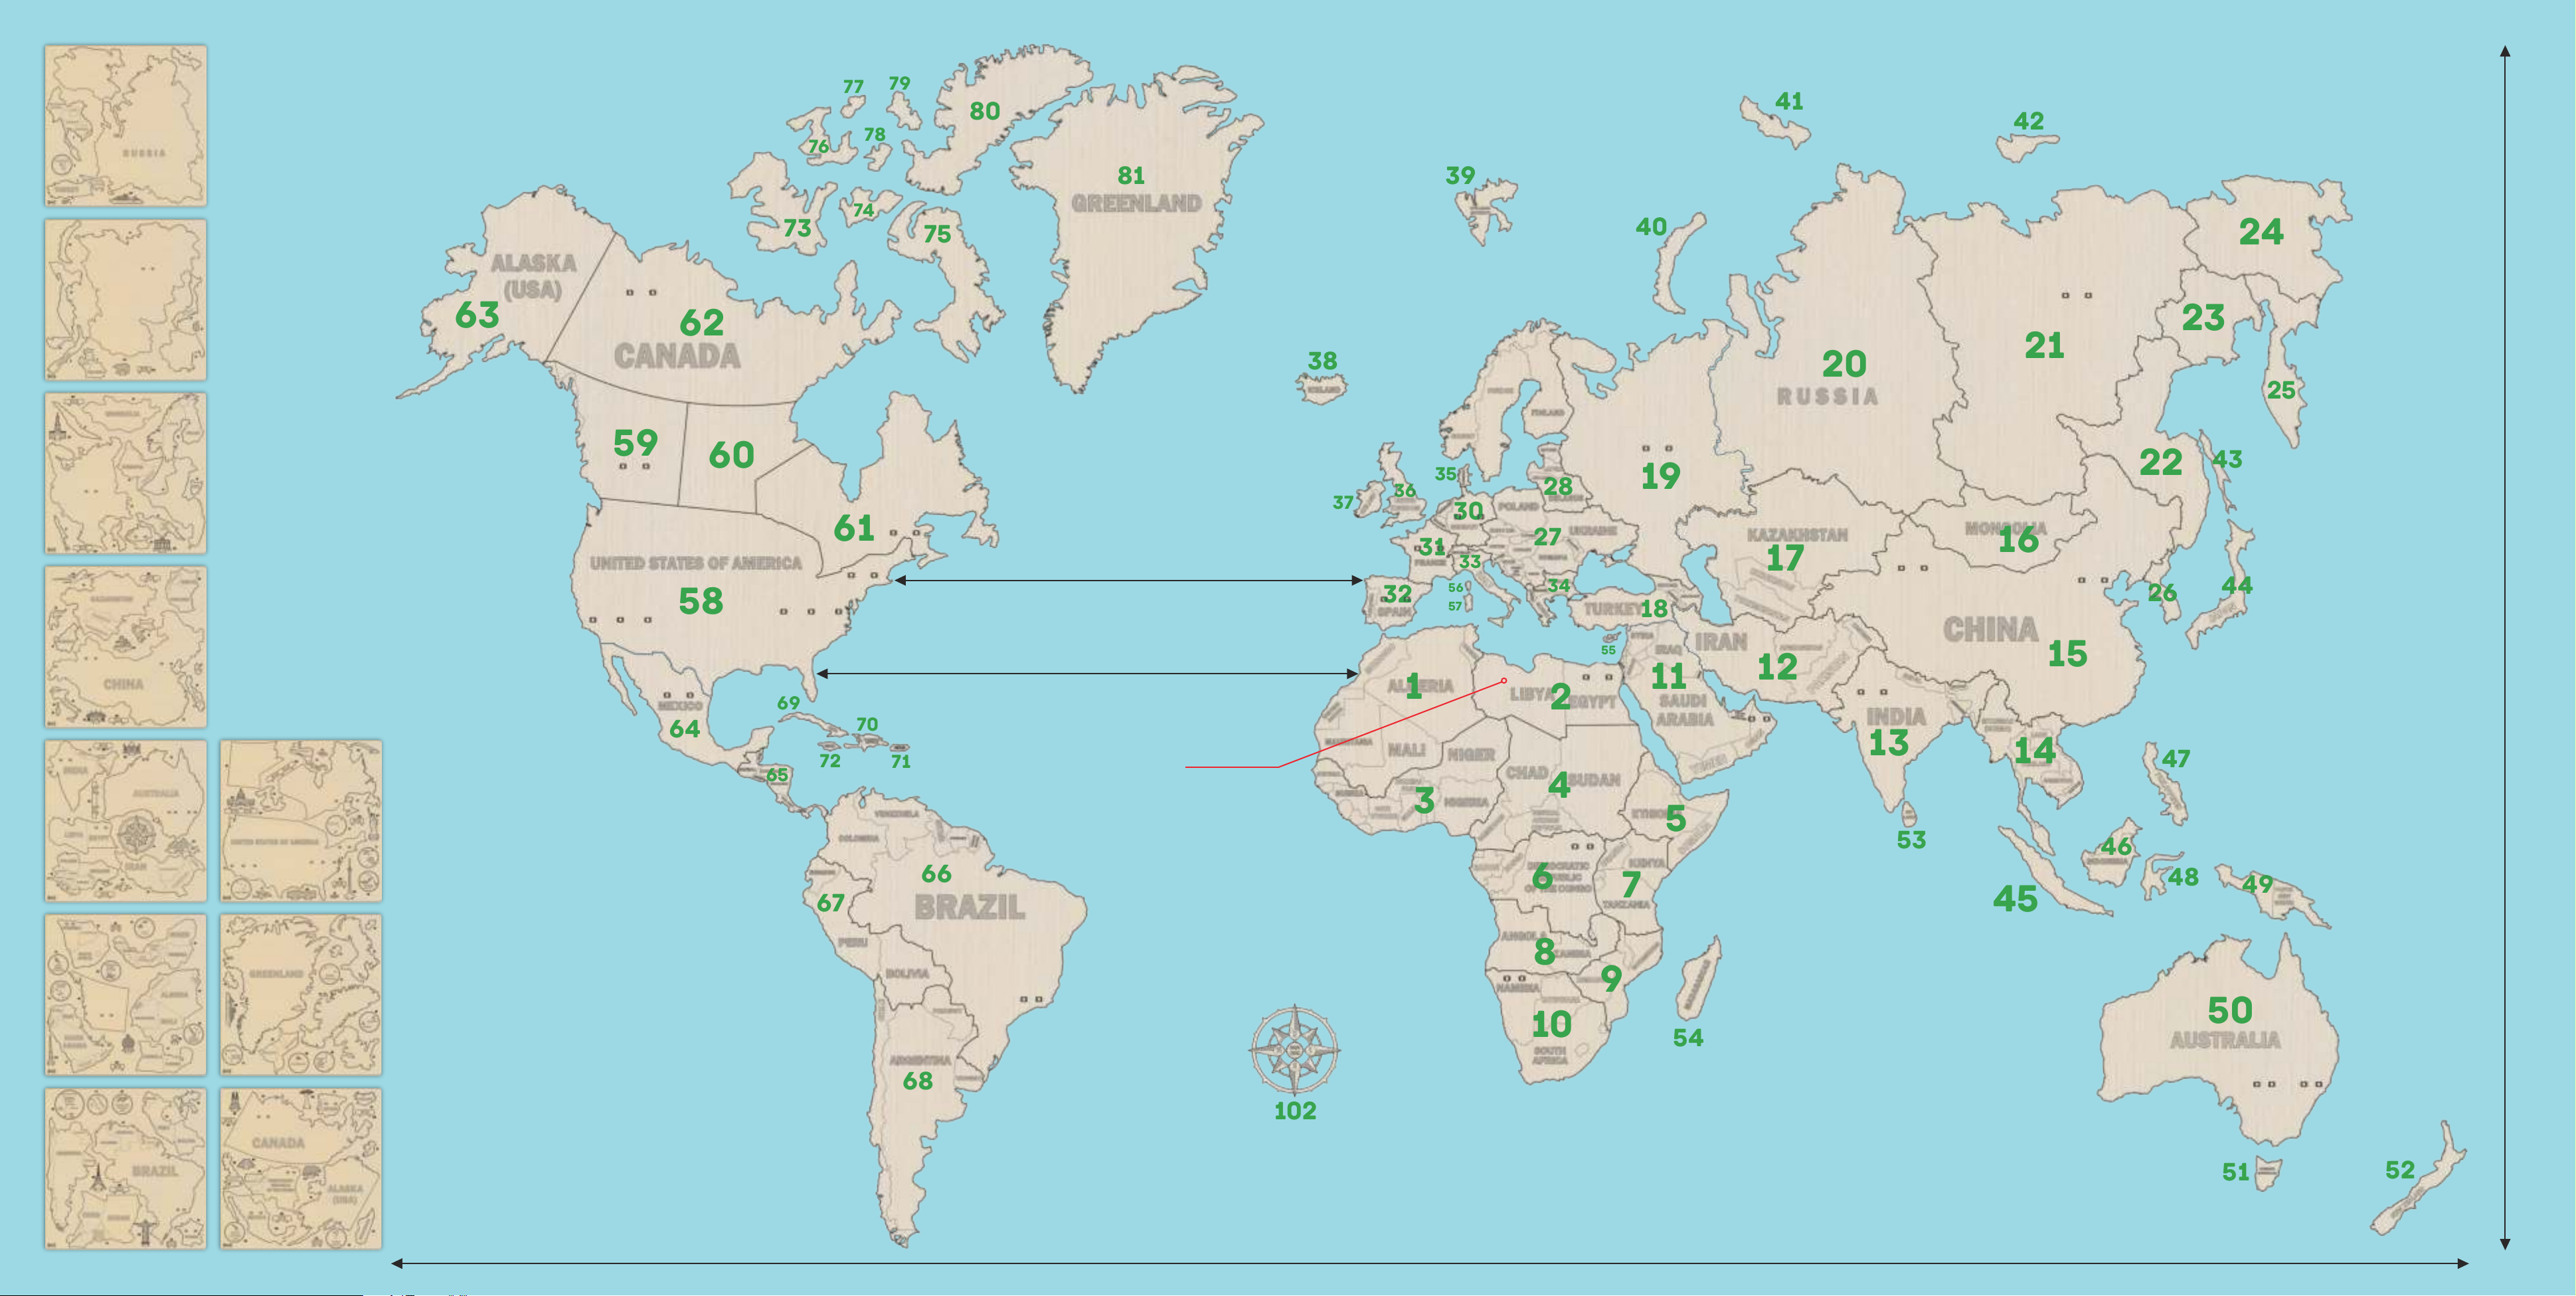
1
2
3
4
5
11
12
13
14
45
46
47
48
49
15
50
51
53
54
555657
52
16
17
19
58
64
66
67
68
65
697071
72
59
60
61
62
73
75
80
81
102
7476777879
63
20
21
22
23
24
25
26
27
30
38
39
31
32
3536373334
28
44
43
42
41
40
18
6
789
10
437,5мм
29
505мм
1200мм
map center
2000мм
Page 5
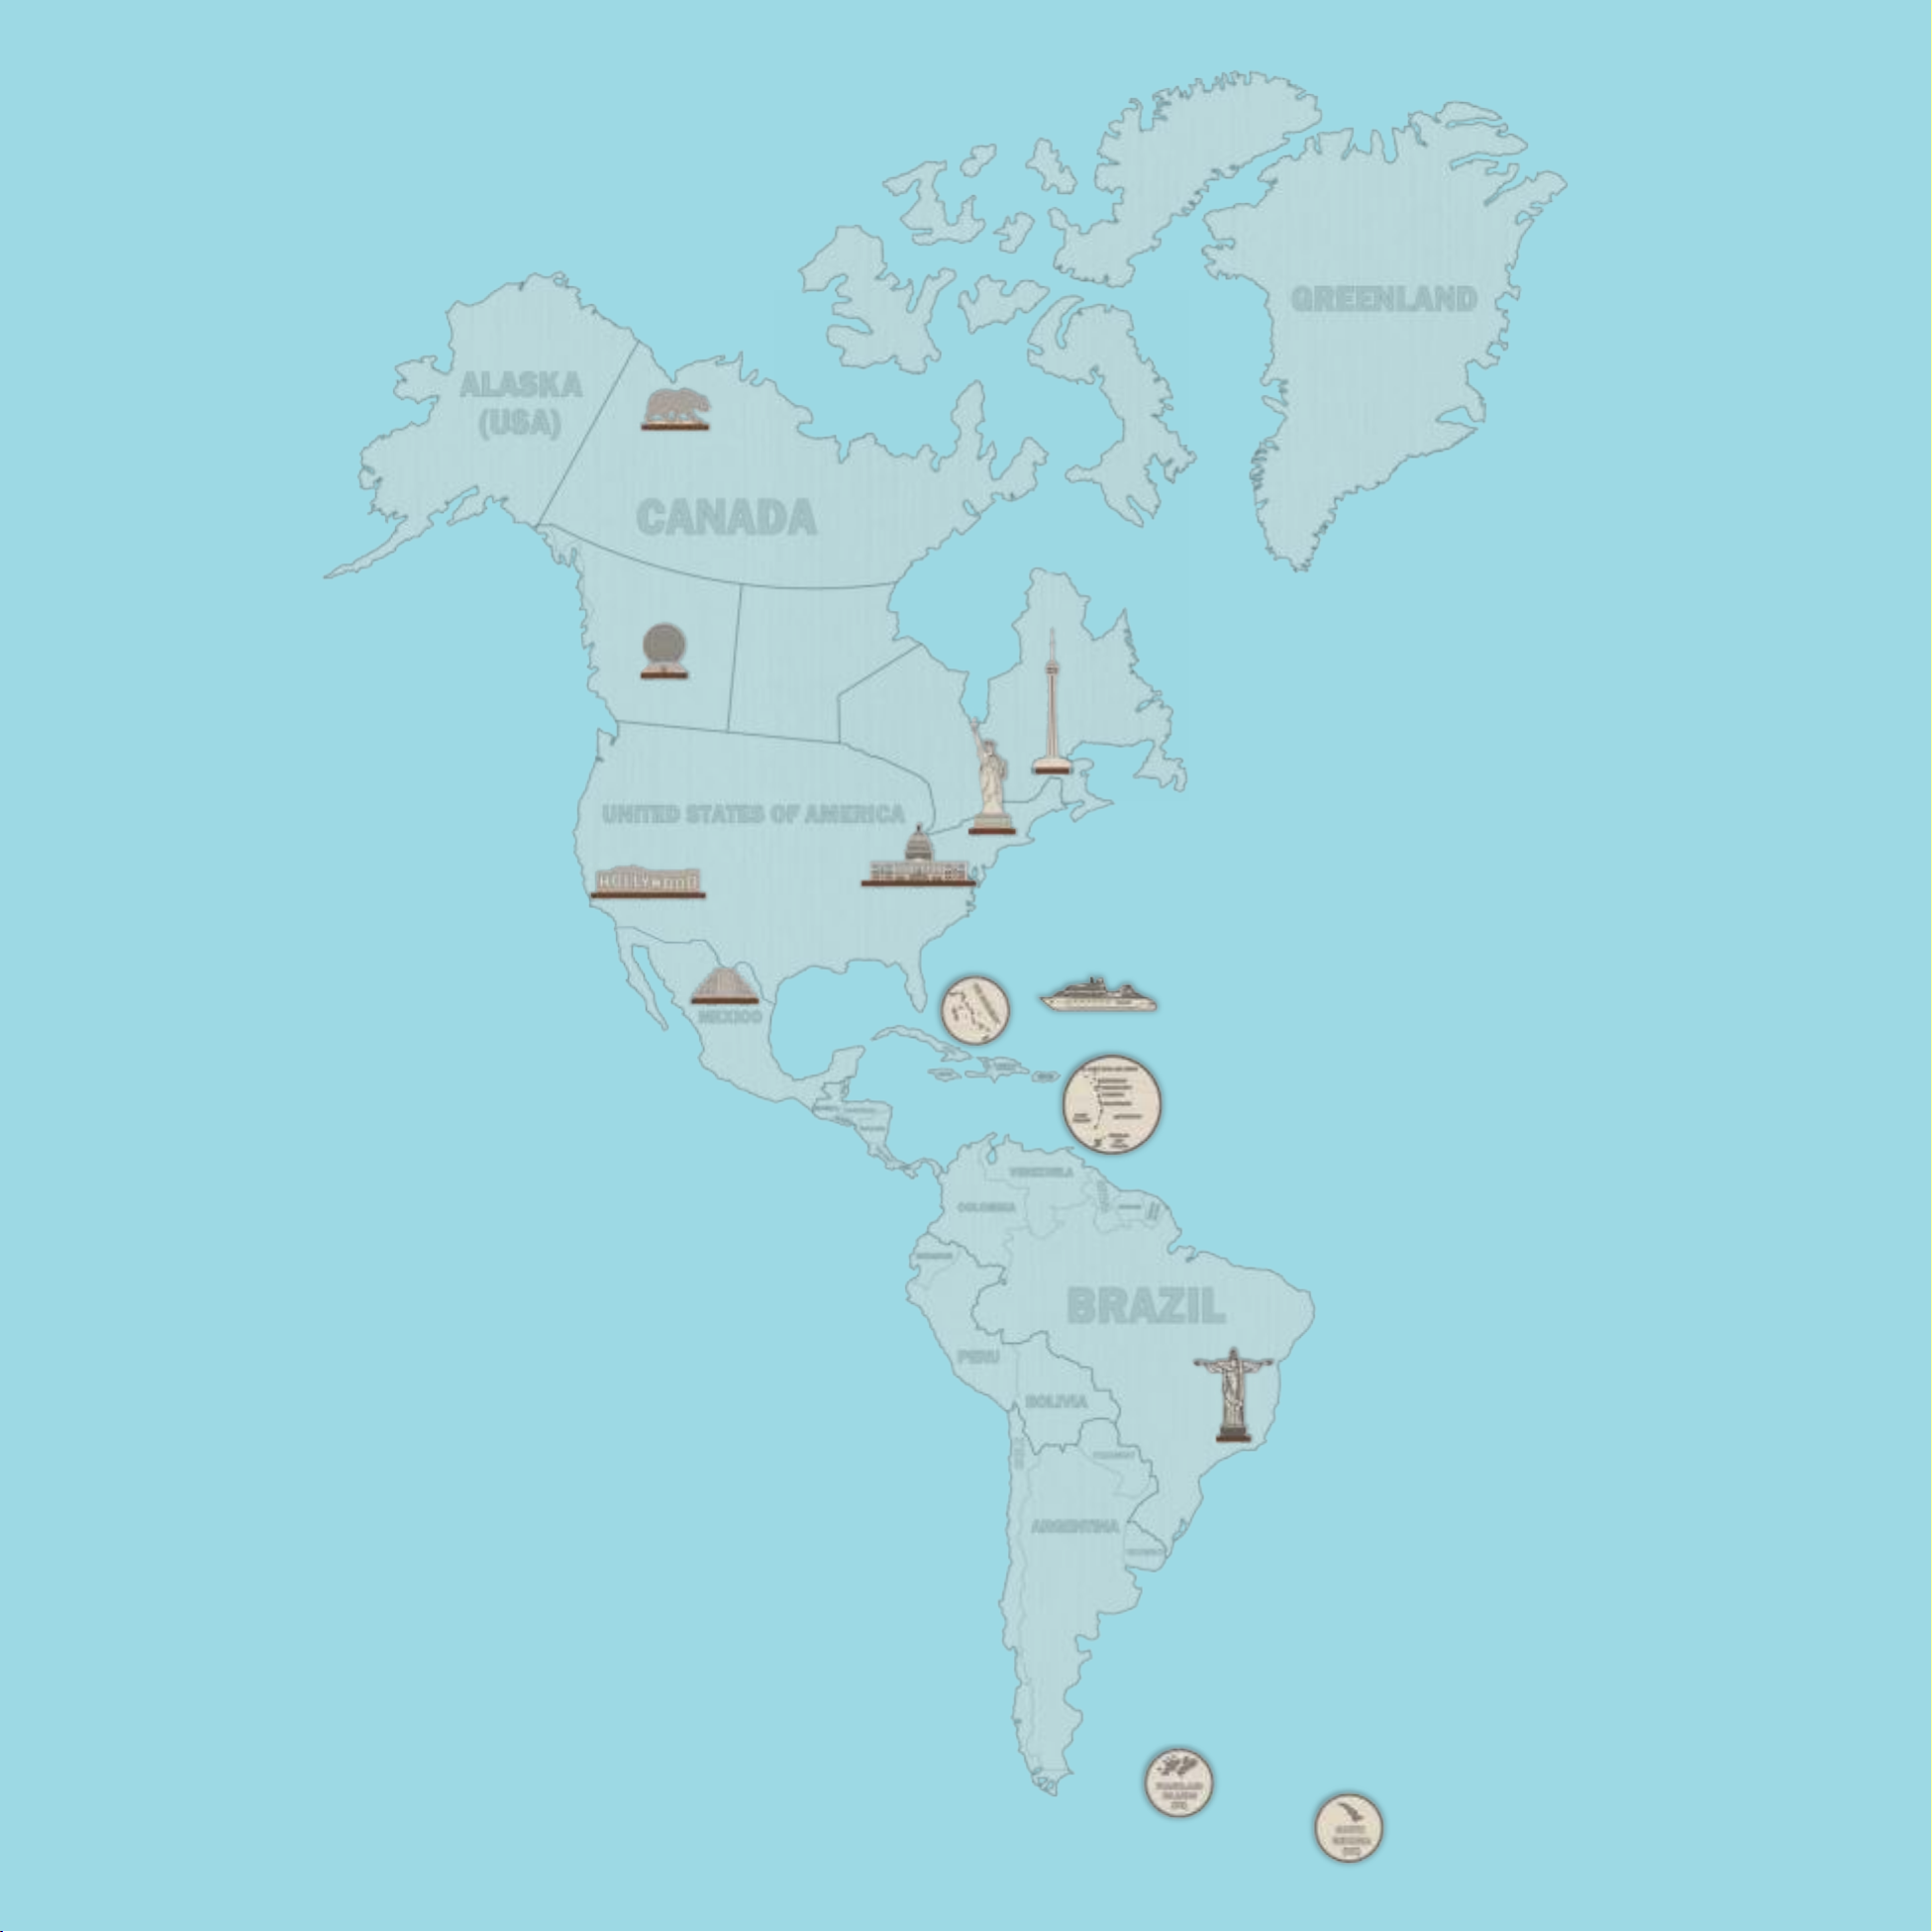
!
!
!
!
!
!
!
82
104
83
!
84
85
Page 6
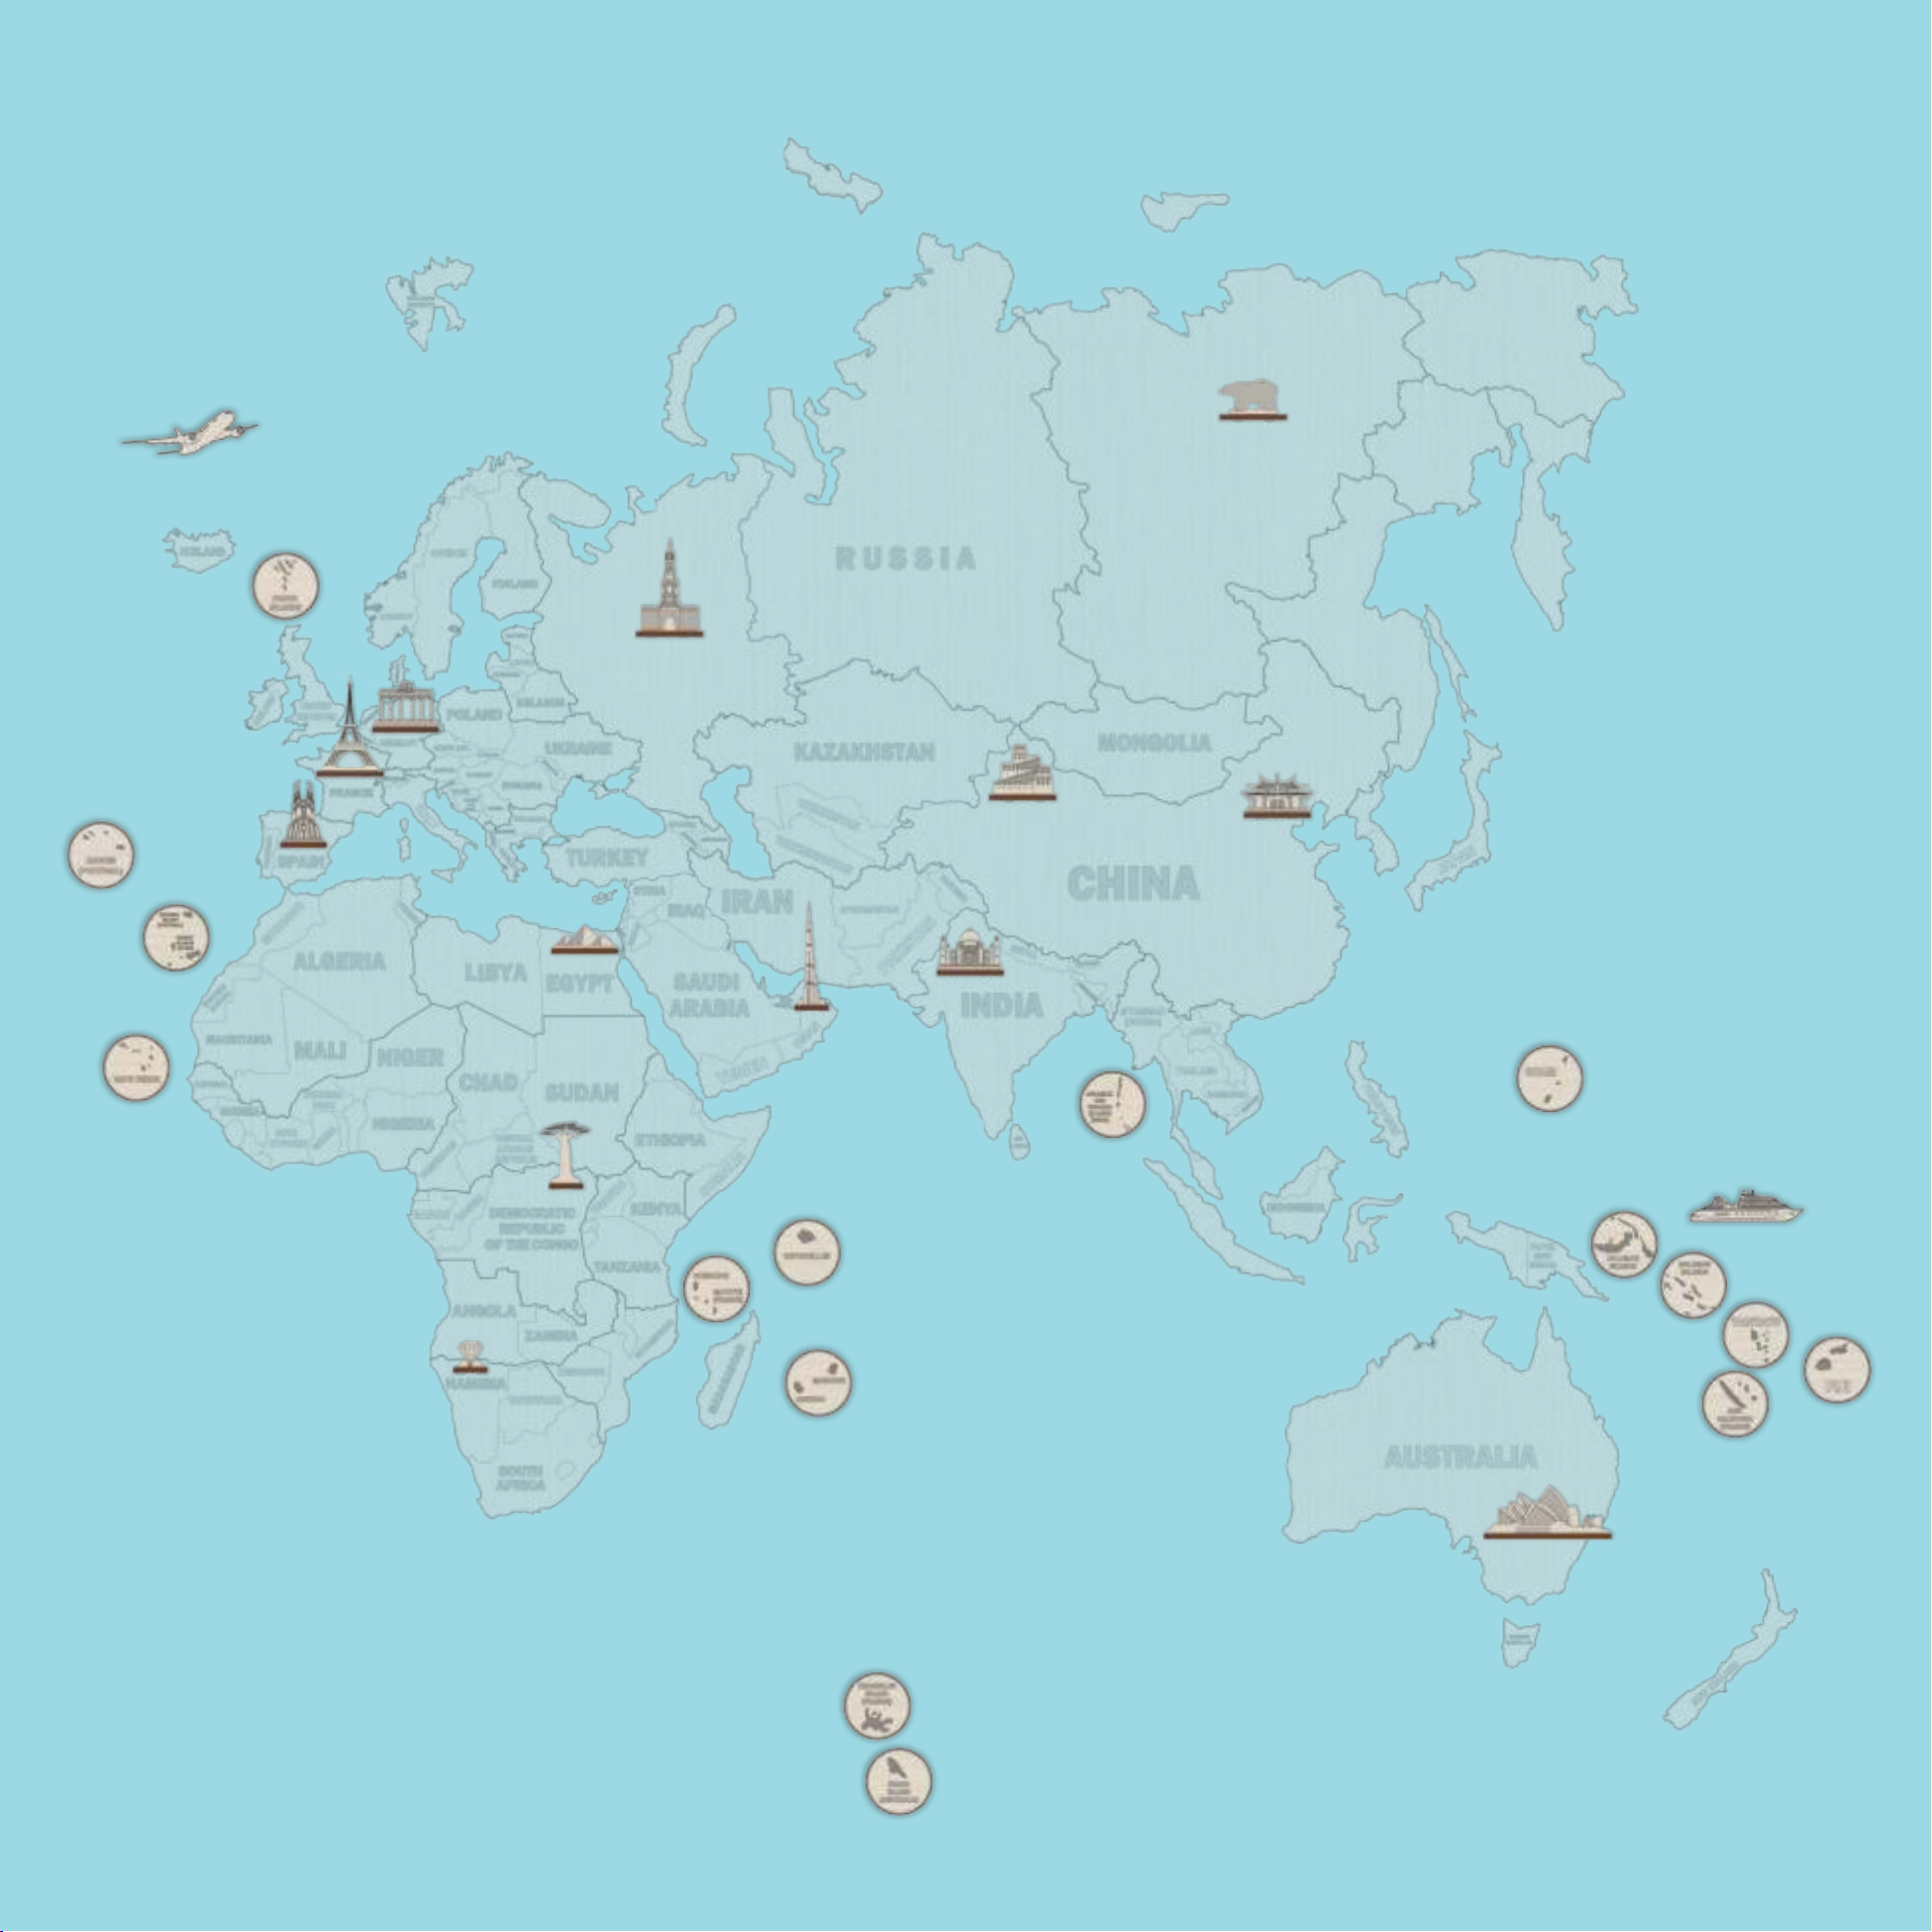
103
!
89
!
!
!
88
87
86
!
!
!
!
90
!
! !
93
91
92
!
96
105
97
99
98
100
94
95
101
!
Page 7
WOODTRICK.COM
 Loading...