

Woodstock W1106 Instruction Manual
Your BOARD BUDDIES®are engineered for
dependable service and ease of operation.
However with most shop tools, they may
need periodic inspection and cleaning.
• NEVER lubricate Board Buddy parts. Oil will
attract sawdust and foreign material which
could jam the mechanism or stain your
workpiece.
• ALWAYS make sure the jam nuts (5) and
the position locking thumbscrews (11) are
tight, and the BOARD BUDDIES® are correctly
adjusted.
INSTRUCTION MANUAL
ANTI-KICKBACK HOLD-DOWN DEVICES
(PART # W1106)
Figure 1. Typical Board Buddy application.
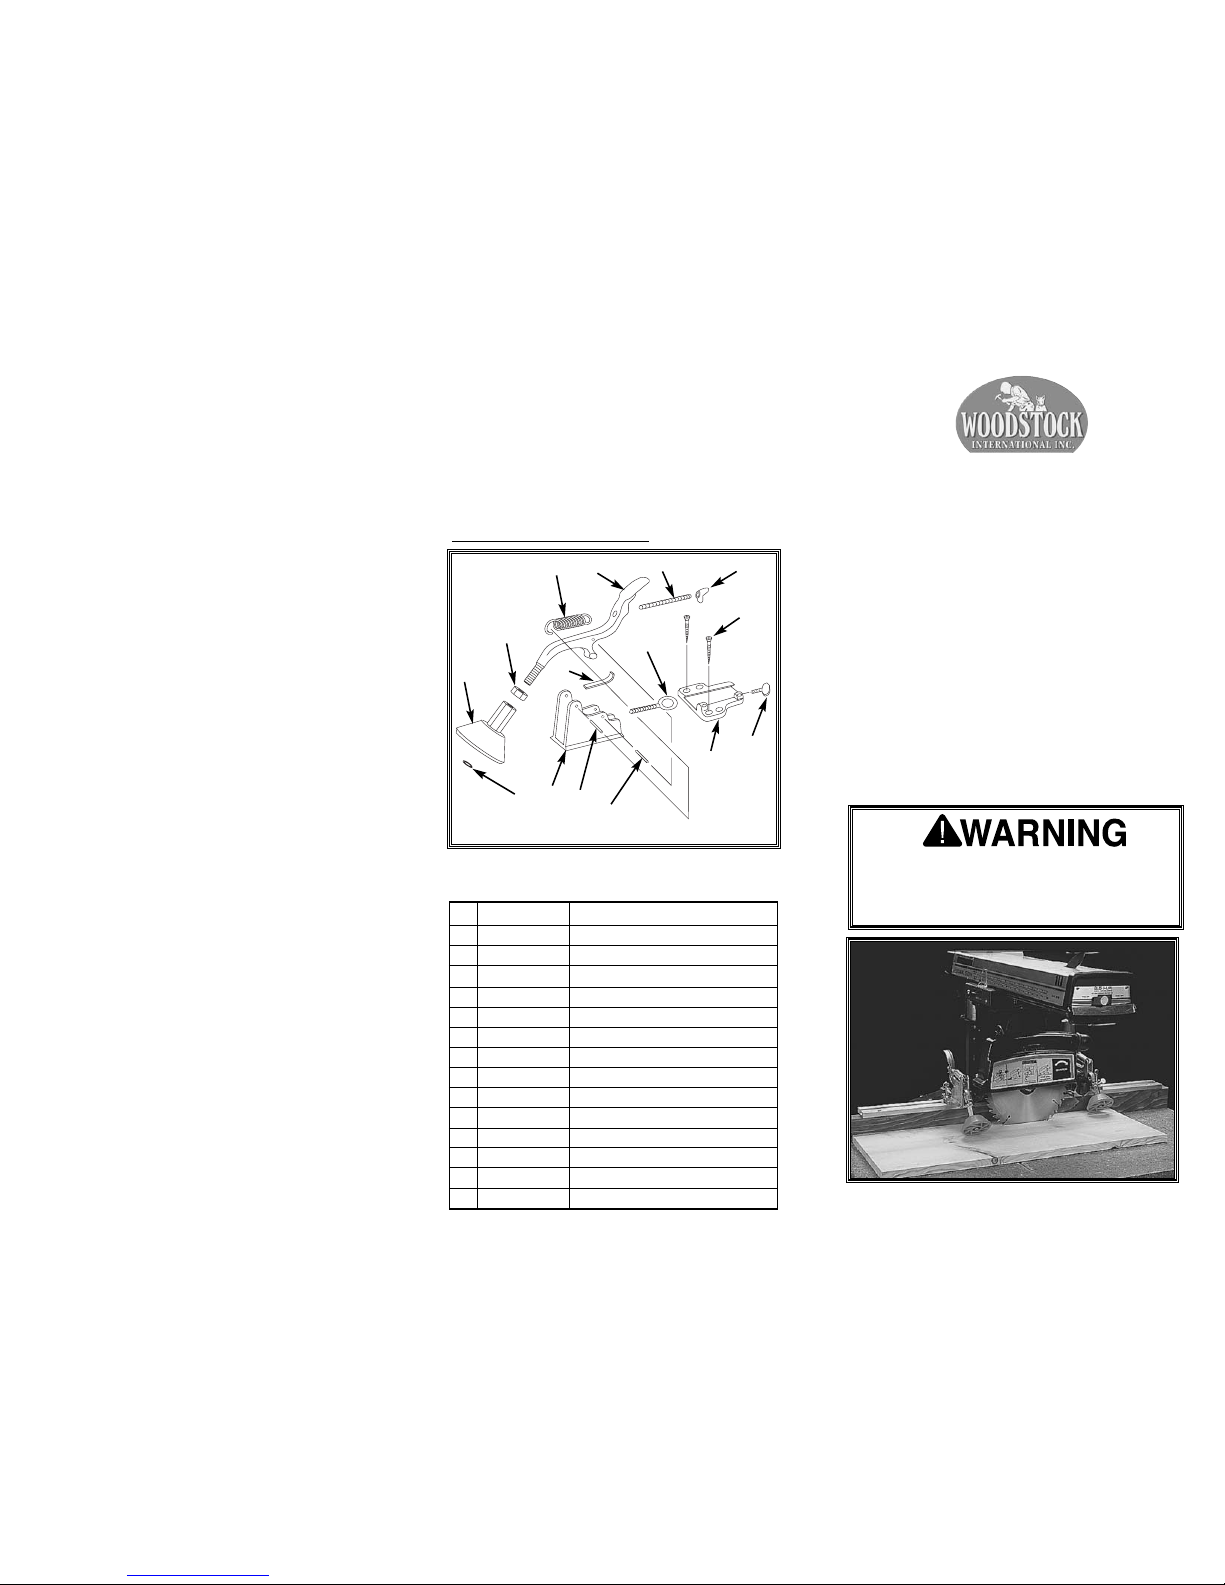
Use Figure 4 and the parts list to inventory
your package. Your new BOARD BUDDIES
®
are carefully packed. However, if any part is
damaged or missing, contact Woodstock
International Service and Support at
1-360-734-3482 or send e-mail to:
tech-support@shopfox.biz.
BOARD BUDDIES
®
1 X1104001 PIVOT ARM
2 X1104002 HOUSING
3 X1104003 MOUNTING BRACKET
4 X1106004 ROLLER (ORANGE)
5 X1104005 LOCK NUT
1
⁄2
"-20
6 X1104006 SPRING
7 X1104007 SHOE
8 X1104008 TIE ROD
5
⁄16"-18 x 2-1⁄2"
9 X1104009 WING NUT
5
⁄16"-18
10 X1104010 ADJUST ROD
5
⁄16"-18 x 2"
11 X1104011 THUMBSCREW
1
⁄4"-20 x 3⁄4"
12 XPRP25M ROLL PIN 5 X 20MM
13 XPRP07M PIVOT PIN 6 X 20MM
14 XPR02M EXT RETAINING RING 9 MM
15 XPHTEK13 WOOD SCREW
#10 X 1- 1⁄2"
ITEM PART # DESCRIPTION
Figure 4. Board Buddy Parts.
Introduction
BOARD BUDDIES
®
are made from die-cast aluminum
and feature non-marring orange neoprene rubber
wheels. Because the wheels turn counterclockwise
only, they function as anti-kickback and holddown devices. You can mount these to fences that
are 3" (76.2mm) to 11⁄2" (38.1mm) high x 1"
(25.4mm) or wider. Each Board Buddy uses a
mounting bracket, a main body, and a roller. The
main body has a pivot arm which accepts the roller,
a housing that contains the pivot point and a roller
pressure spring.
Parts List
Maintenance
Troubleshooting
Here are some common solutions for Board
Buddy problems:
The Board Buddy does not clamp down on the
stock as it should, the pivot arm binds, or the
roller tension does not adjust correctly.
1. Refer to the Safety and Operation section
and re-adjust the Board Buddy correctly.
2. Remove and clean the threads of the
adjusting screws and thumbscrews.
Replace any stripped adjustment
screws and re-adjust.
3. Depress the pivot arm (1) and remove the
shoe (7). Clean out any foreign material
that is preventing the shoe from sliding
inside the housing (2). See Figure 4.
4. Replace the shoe if it is broken or worn.
The Board Buddy roller does not lock rotation.
1. Incorrect roller, replace the roller with the
correct roller.
2. The roller is broken. Replace the roller with
a new one. DO NOT rebuild the rollers.
4
5
1
8
9
15
11
3
10
2
12
13
14
7
6
Read and understand your machine operators
manual, and know the machine limitations.
NO ANTI-KICKBACK DEVICE WILL MAKE
YOUR MACHINE COMPLETELY SAFE!

To assemble your BOARD BUDDIES®, see
Figure 4 for item numbers and do these steps:
1. Unplug your machine!
2. Thread the lock nut (5) onto each pivot
arm (1).
3. Thread the roller (4) onto each pivot arm
no less than
1
⁄2" (12.7mm), and tighten the
lock nut (5) against the roller nut (4).
4. Slide the housing (2) into the mounting
bracket (3) and tighten the thumbscrews (11).
To install your BOARD BUDDIES® see Figures 1
and 2, and do these steps:
1. Make an auxiliary wood fence that is
approximately 3" (76.2 mm) tall, 1" (25.4 mm)
thick, and is the length of the machine fence.
2. Mount the auxiliary wood fence to your
machine with countersunk fasteners.
3. Position the mounting bracket on the
auxiliary fence so it does not protrude into the
path of the stock. See Figures 1 and 2.
4. Position the rollers so they are not closer
than
1
/2" (12.7 mm) to the front and rear of the
saw blade. See Figure 1.
5. Make sure the rollers do not interfere
with guard operation and other saw
controls. Reposition the mounting
brackets if there is any interference.
6. Mark the FRONT screw hole locations
and drill the pilot holes into the wood fence
for the wood screws (REAR holes are for
the optional track). See Figure 2.
7. Install the mounting bracket with the
provided wood screws.
BOARD BUDDIES
®
help prevent kickback by
maintaining pressure against the stock with counter
clockwise rotating rollers. See Figures 1 and 2.
1. Turn the saw motor so the blade is parallel
to the fence and the blade rotates clockwise.
2. Position the infeed roller as far out as possible
in the mounting bracket, place the outfeed
roller between the line of cut and the saw fence,
and tighten the position locking thumbscrews.
3. Adjust the roller nut, the lock nut, and the
thumbscrew so the roller height is approximately
1
/8" (3 mm) less than the stock thickness.
4. Turn the roller pressure adjustment wing
nut so the roller applies a firm pressure on
the stock, but does not tilt the Board Buddy
off of the fence or sliding rack.
5. Make sure
BOARD BUDDIES
®
DO NOT touch
the saw blade during machine operation.
6. DO NOT adjust or reposition the BOARD
BUDDIES
®
while the machine is running. Wait
until the machine comes to a complete stop
before making any adjustments.
7. Keep your hands away from all cutting tools,
and feed stock evenly and smoothly.
Figure 3. Board Buddy Details.
Pivot Arm
Mounting
Bracket
Roller
Pressure
Spring
Roller
Pressure
Adjustment
Wing Nut
Roller
Height
Adjustment
Screw
Main Body
Roller
Roller
Nut
Lock
Nut
Figure 2. Auxiliary wood fence and an
optional sliding track.
Make sure your machine is
unplugged and the saw blade has
stopped before you assemble,
install, or adjust
BOARD BUDDIES®.
Otherwise serious personal injury
could result!
Assembly and Installation
Safety and Operation
A roller nut that is not threaded on the pivot
arm far enough or a loose lock nut could
render the hold-down feature useless and
could cause personal injury.
Optional
Sliding
Track
Use the Front
Mounting Holes
for Wood Screws
and Wood Fence
Use the Rear
Mounting Holes
for Machine
Screws and
Sliding Track
Auxiliary
Wood Fence
Mounting
Bracket
Your BOARD BUDDIES®are partially assembled
from the factory; however, some minor assembly
and adjustment is required using Figure 3 and
Figure 4 for reference.
The Board Buddy brackets (3) can be installed
directly on an auxiliary wood fence (not included)
or an optional sliding track (12" part # W1107 or
24" part # W1108 not included). The optional
sliding track also mounts to the auxiliary wood
fence. See Figure 2.
Position
Locking
Thumbscrews
 Loading...