

Page 1
Made in Sweden
OK
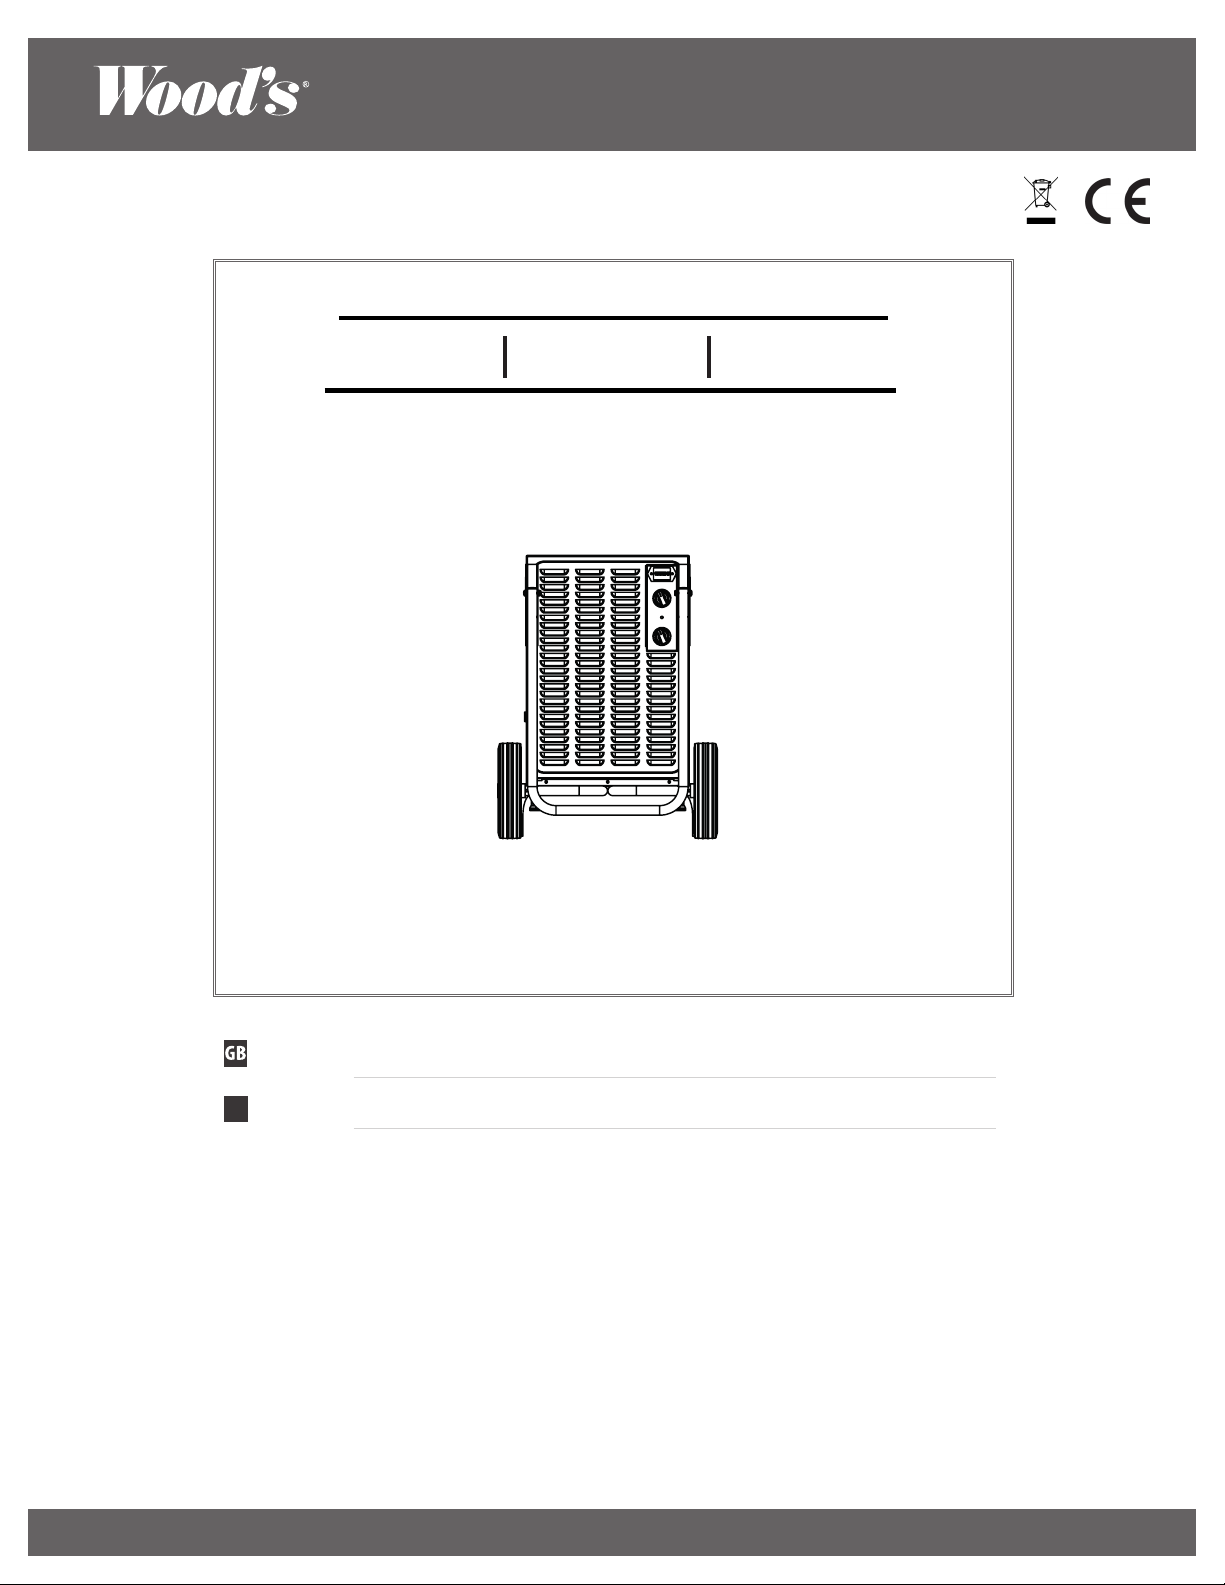
DEHUMIDIFIER
OPERATING INSTRUCTIONS FOR:
WCD2 WCD3 WCD4
Thank you very much for selecting this Pro model from Wood’s, please read
this Use and Care Manual carefully before installing and using this appliance.
Please keep this Use and Care Manual properly for future reference.
Visit warranty-woods.com for more information and updated user
guides, information about registering of your product and news.
Depending on the product line, we provide guarantees.
More to discover online woods.se
Operating Instructions
SE
Bruksanvisning
Revision date: 04-Jan, 2019# WCD2, WCD3, WCD4
Page 2

Page 3

Table of Contents
CONTENTS: PAGE NO.
TABLE OF CONTENTS
OPERATING INSTRUCTIONS
English
Swedish
0 4- 11
12-19
Page 4
Operating Instructions
GB
Flammable material. This
appliance contains R290/Propane a
flammable refrigerant.
Refer operators manual.
Read technical manual
Read operators manual.
SAFETY INFORMATION
Before the installation and use
of the appliance, carefully read
the supplied instructions. The
manufacturer is not responsible
if an incorrect installation and
use causes injuries and damages.
Always keep the instructions with
the appliance for future reference.
Children and vulnerable people
safety
WARNING
Risk of injury or permanent
disability.
This appliance can be used by
children aged 8 years and above
and persons with reduced physical,
sensory or mental capabilities or
lack of experience and knowledge
if they have been given supervision
or instruction concerning use of
the appliance in a safe way and
understand the hazards involved.
Do not let children play with the
appliance.
Children of less than 3 years should
be kept away unless continuously
supervised.
Keep all packaging away from
children.
Cleaning and user maintenance
shall not be made by children
without supervision.
General Safety
This appliance is intended for
use in large and open spaces. For
the building, and warehouses. in
shops, offices and other working
environments. The rating plate is
located behind the water tank of
the dehumidifier.
Keep ventilation openings clear of
obstruction.
Do not use mechanical devices
or other means to accelerate the
defrosting process, other than
those recommended by the
manufacturer.
The appliance shall not be stored
in a room where ignition sources
are operating continously (open
flames, working gas appliance or
an operation electric heater. Do
not pierce or burn.
Be aware that refrigerants may
not contain an odour. Do not use
water spray and steam to clean the
appliance. Clean the appliance with
a moist soft cloth. Only use neutral
detergents. Do not use abrasive
products, abrasive cleaning pads,
solvents or metal objects.
If the supply cord is damaged,
it must be replaced by the
manufacturer, its Authorised
Service Centre or similarly qualified
persons in order to avoid a hazard.
SAFETY INSTRUCTIONS
Installation
WARNING
Only a qualified person must install
this appliance.
Remove all the packaging.
Do not install or use a damaged
appliance. The appliance shall not
be stored, operated and stored
in a room with a floor area larger
than 4m². Obey the installation
instruction supplied with the
appliance. Always be careful when
you move the appliance because it
is heavy. Always wear safety gloves.
Make sure the air can circulate
around the appliance.
The dehumidifier should be
transported according to the
instructions, (see separate info).
If the dehumidifier has been
transported according to the
instructions, the dehumidifier
can be started immediately after
transport.
If the dehumidifier has not
been transported according to
instructions wait at least 4 hours
before connecting the appliance
to the power supply. This is to
allow the oil to flow back in the
compressor.
Do not install the appliance close
to radiators or other heat sources.
Do not install the appliance where
there is direct sunlight.
4
Page 5
Operating Instructions
GB
Electrical connection
WARNING
Risk of fire and electrical shock.
The appliance must be connected
to a grounded outlet.
Make sure that the electrical
information on the rating plate
agrees with the power supply. If
not, contact an electrician.
Always use a correctly installed
shockproof socket.
Do not use multi-plug adapters
and extension cables.
Make sure not to cause damage
to the electrical components (e.g.
mains plug, mains cable).
Contact the Authorised Service
Centre or an electrician to change
the electrical components.
The mains cable must stay below
the level of the mains plug.
Connect the mains plug to the
mains socket only at the end of the
installation.
Make sure that there is access
to the mains plug after the
installation.
Do not pull the mains cable to
disconnect the appliance. Always
pull at the mains plug.
Be careful not to cause damage to
the refrigerant circuit. It contains
propane (R290), a natural gas with
a high level of environmental
compatibility. This gas is
flammable.
If damage occurs to the refrigerant
circuit, make sure that there are no
flames and sources of ignition in
the room. Ventilate the room.
Do not put flammable products or
items that are wet with flammable
products near or on the appliance.
Disposal
WARNING
Risk of injury.
Disconnect the appliance from the
mains supply.
Cut off the mains cable and discard
it.
The refrigerant circuit of this
appliance is ozone-friendly.
Contact your municipal authority
for information on how to discard
the appliance correctly.
Do not cause damage to the part
of the cooling unit that is near the
heat exchanger.
Use
WARNING
Risk of injury, burns, electrical
shock or fire.
Do not change the specification of
this appliance.
03
5
Page 6
GB
Operating Instructions
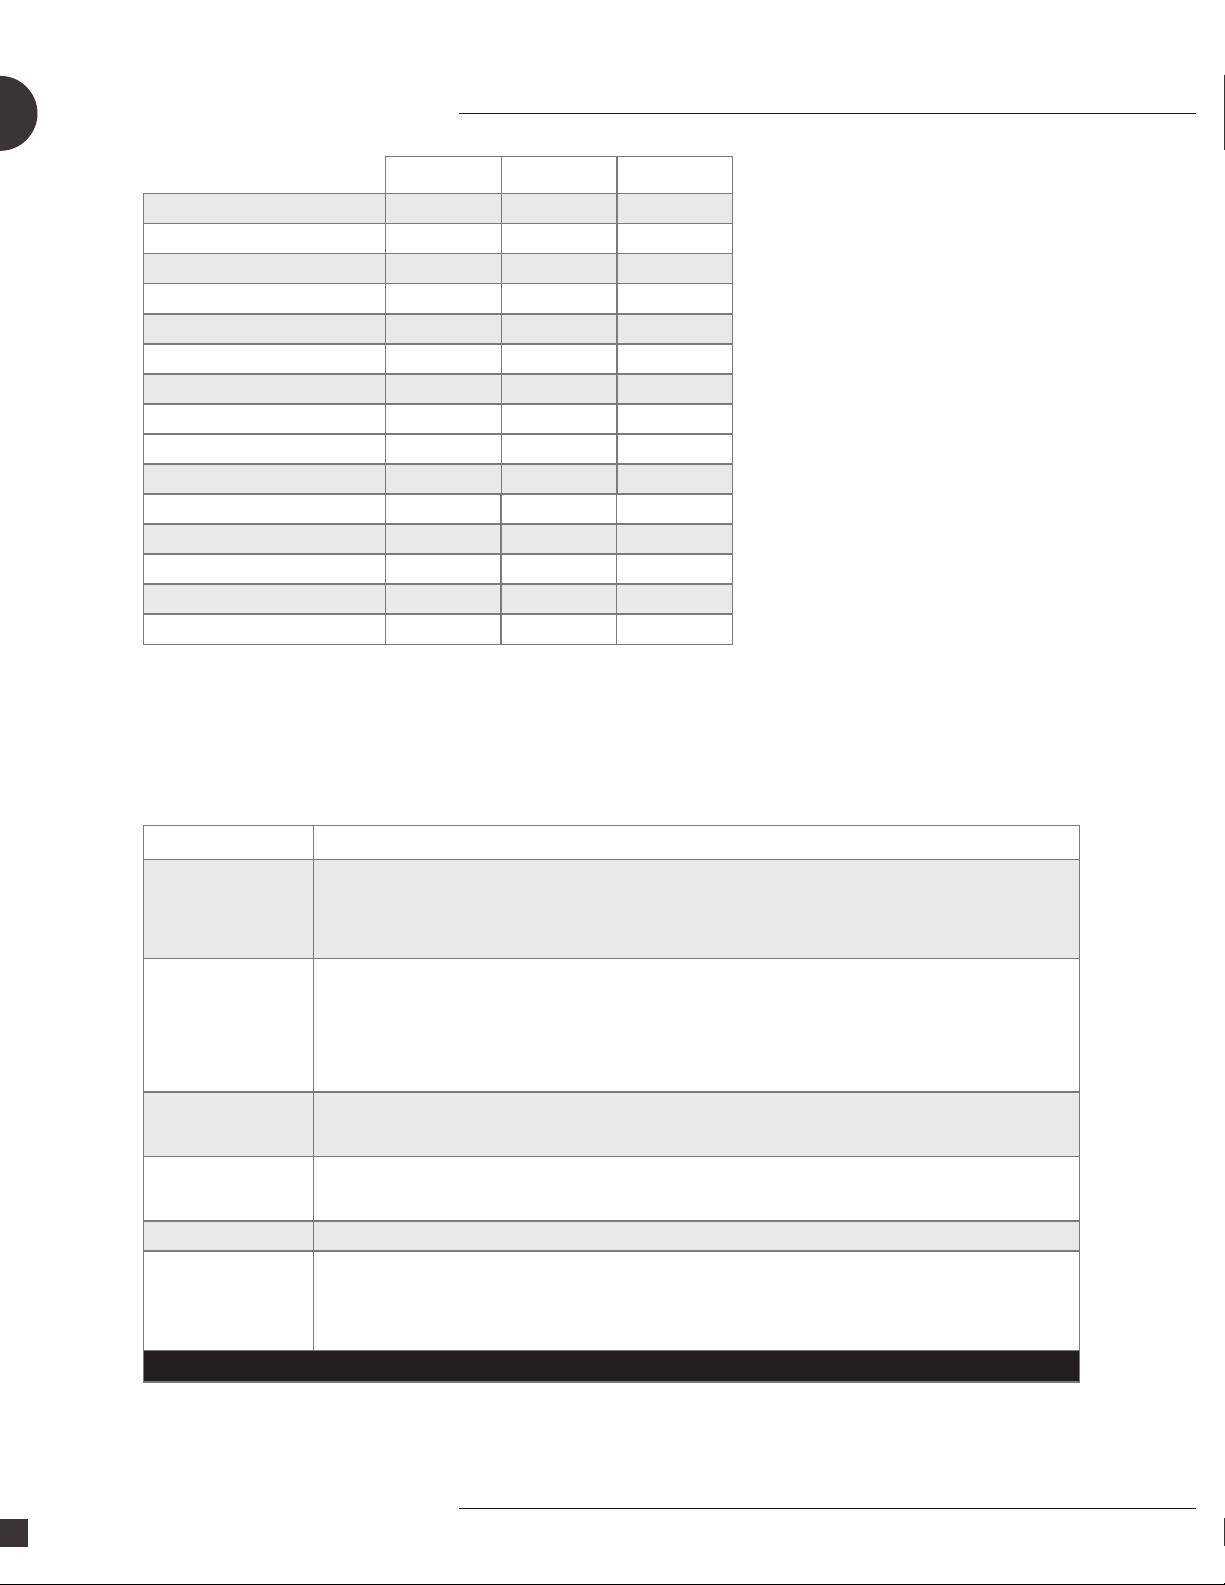
TECHNICAL DATA
WCD2 Pro WCD3 Pro WCD4 Pro
Max. wor king area 140m
Air flo w step 1 190m3/h 197m3/h 129m3/h
Air flo w step 2 336m3/hour 336m3/hour 296m3/hour
Dehumid ifying at 20˚C and 70% r.h. 11 l/ 24h 12l/24h 25l/24h
Dehumid ifying at 30˚C and 80% r.h. 19 l/ 24h 25,5l/24h 41l/24 h
Power at 20˚C and 70% r.h. 320 W 420 W 500 W
Power consu mption at 20˚C and 70% r.h. 7,3 kWh/24h 9,3kWh/24 12kWh/24
Tank volum e 11,4 litr es 11,4 l itr es 11,4 l itr es
Refrigerant R290 R290 R290
Charge 110 g 120 g 150 g
Volta ge 230V 230V 230V
Frequency 50Hz 50Hz 50Hz
Current 2,2 A 3 A 3,3 A
IP Code IP X1 IPX1 I PX1
Dimensions in mm, L x Bx H 508x464x595 508x464x595 508x464x595
2
*Technical changes and improvements may occur. All values are approximate and may vary due to external circumstances such as
temperature, ventilation and humidity.
190 m
2
230 m²
PROBLEM SOLUTION
Dehumidifier does not start - Check that dehumidifier is connected to electricity and that fuse has not gone
Does not dehumidify - Check that fan is spinning
High noise level - Increase distance between dehumidifier and surrounding surfaces
Ice formation on cooling coils - Remove air filter at rear of dehumidifier and check that no dust or fluff is obstructing passage of air through machine
No water enters reservoir - Check for obstruction to drip-tray above water reservoir
Does not turn off when water
reservoir is full
The Led is flashing in green
If none of the above works, you should contact your nearest retailer for checking and possible overhaul of dehumidifier
*Technical changes and improvements may occur. All values are approximate and may vary due to external circumstances such as
temperature, ventilation and humidity.
- If the warning light is on, check that the water reservoir is empty and correctly placed in the dehumidifier.
Check that float is free
- Check that hygrostat is working. Dehumidifier should start when hygrostat is in Maximum position
- Check that air can flow freely through the dehumidifier. Front grid and air filter should be clean and dehumidifier should stand
20-30cm from wall
- Listen for sound of compression, but bear in mind that the dehumidifier may be in a dehumidifying cycle, when the compression stops. Wait initially for about 35
minutes.
- Check that a thick coating of ice has not formed on the cooling coils.
- Cooling coils may be in contact with one another and cause vibration. Disconnect dehumidifier from electricity and separate coils
- It is important that the float moves freely in the water reservoir. If it does not, it will not respond to water levels and prevent dehumidifier from stopping
- To low temperature- increase room temperature.
6
Page 7
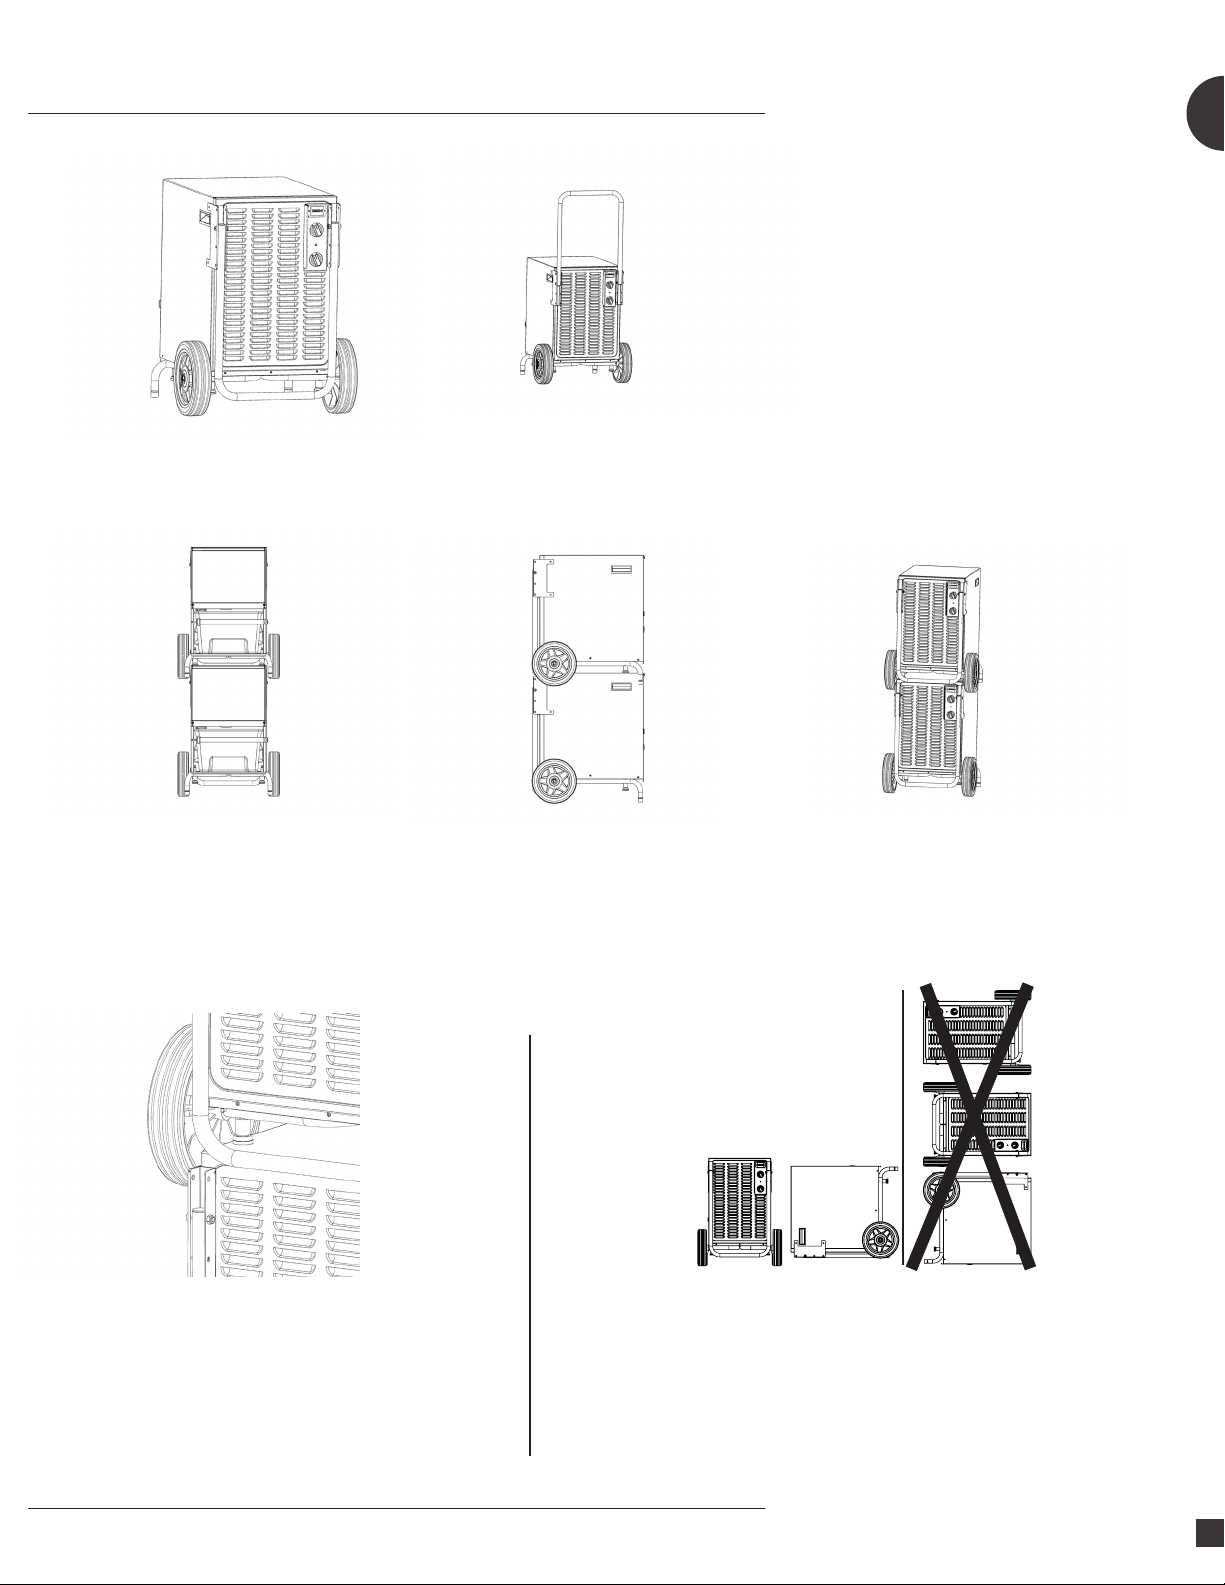
FOLDING HANDLE
Important! Make sure that the handle is
secured in its desired position with the
locking pins.
Operating Instructions
GB
• The locks for the handles are attached to the
housing to avoid being lost.
STACKING
• There are four feet under the machine to allow
stacking.
• The machines can be stacked up to save
storage space when not in use.
SECURE STACKING
•NOTE:
•Do not stack more than 2 machines high.
Secure the machines to ensure they do not fall or
move.
• Ensure that the feet under the machine are
clean before stacking to avoid scratches.
OK
TRANSPORT OF THE DEHUMIDIFIER
important
• The dehumidifier should be transported according to
the above instructions. In such case, the dehumidifier
can be started immediately after transport.
• If the dehumidifier has not been transported
according to the above instructions allow at least 4
hours before connecting the appliance to the power
supply. This is to allow the oil to flow back in the
compressor.
• The handle must be in a folded down position
when stacking.
7
Page 8
GB
Operating Instructions
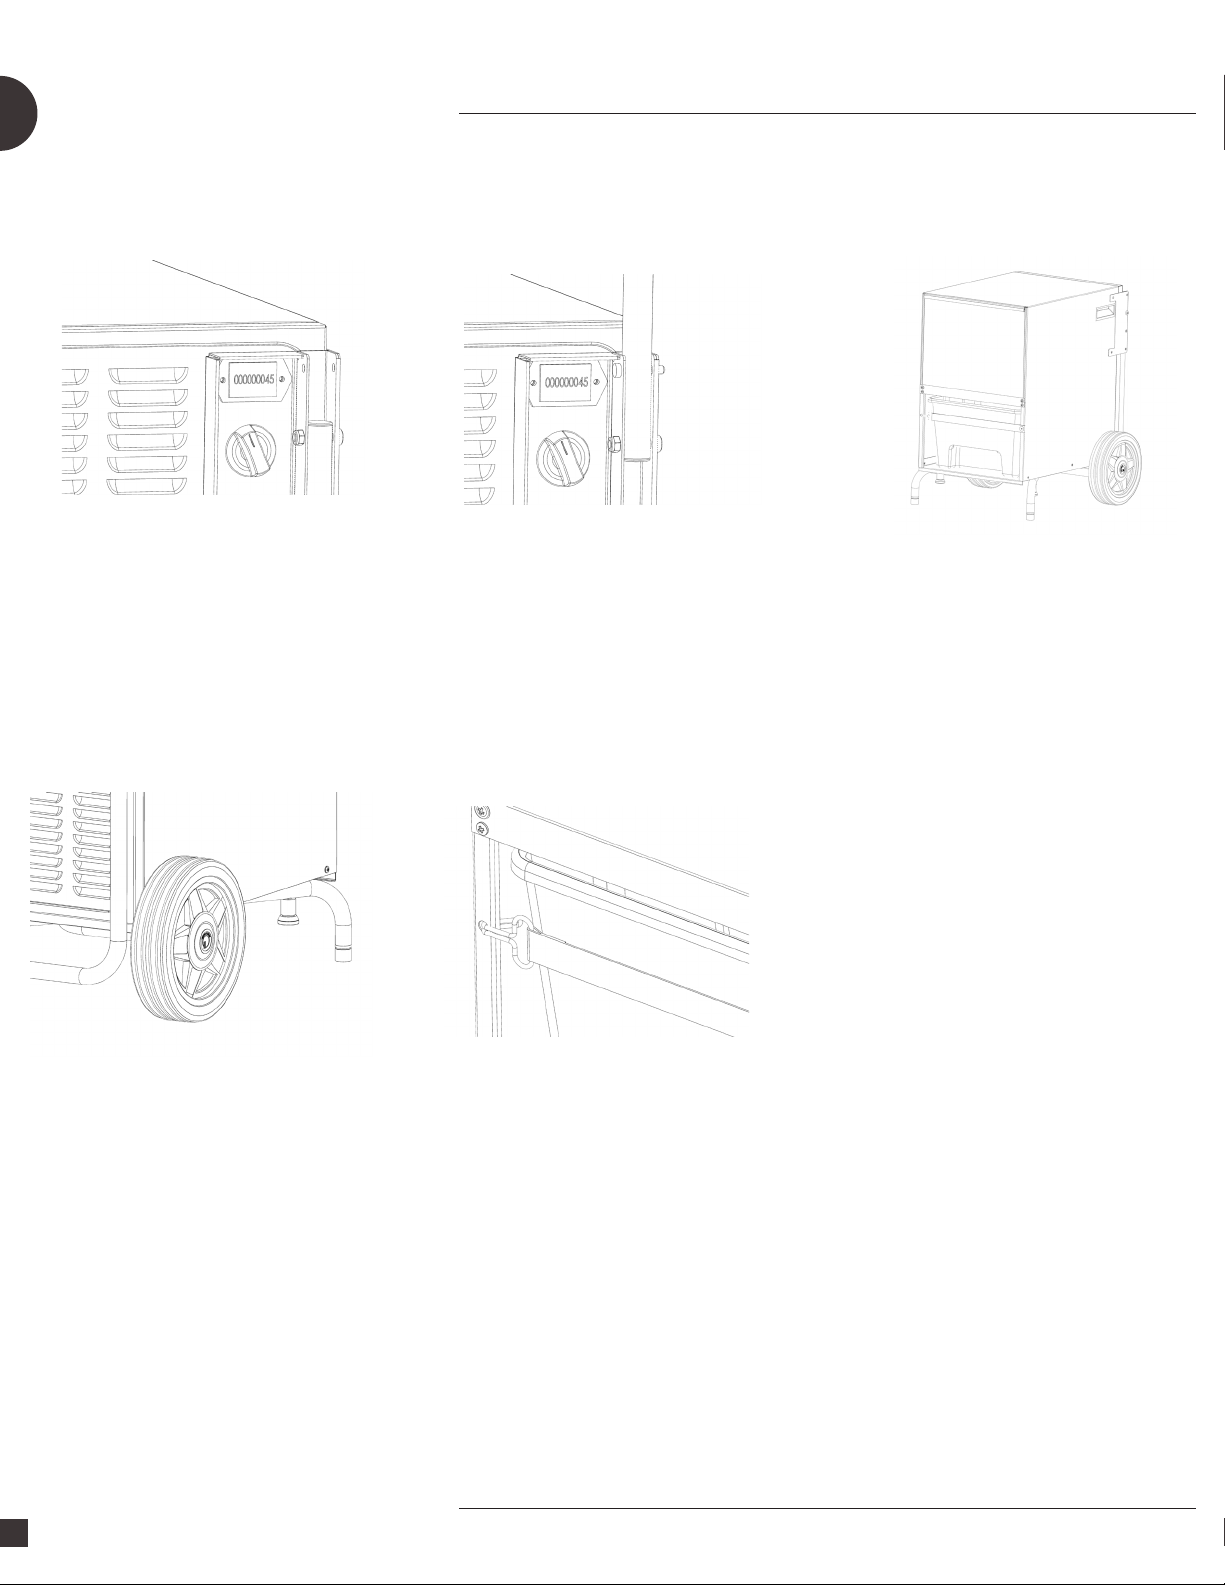
HOUR COUNTER
• The integrated hour counter measures how
many hours the dehumidifier has been used.
• The integrated hour counter measures how many
hours the dehumidifier has been used.
WHEELS SECURING THE WATER TANK
• Rubber wheels with polypropylene rim: 200mm
diameter 200, 50 mm width and 20 mm slide
bearing. Support up to 100kg.
• Make sure the wheels are clean before moving
the machine on sensitive floors.
• Ensure that the water tank is secured with the locking
strap before moving the machine.
WASHABLE FILTER
• Washable permanent filter
• Keep the filter Clean and always use a clean air filter.
Do not allow any material to clog the filter, as this may
cause the dehumidifier to overheat.
• Never use the dehumidifier without a filter. Always
check, and if necessary clean the filter before
switching the dehumidifier on.
• Do not allow oil, grease, or other external material to
be drawn into the dehumidifier.
• Do not clean the dehumidifier with abrasive solvents.
• Ensure that the filter sits in the frame fully when
installing it.
8
Page 9
Operating Instructions
GB
WOOD’S, THE WORLD’S LEADING
DEHUMIDIFIERS
Wood’s dehumidifier products have
been known as market leaders for many
years. Their dehumidifiers are suitable
for use in the most demanding climates,
where dehumidifying capacity is good
even at lower temperatures and humidity
levels. They are used with good results
in premises that become damp such as
large open spaces, storage rooms and
buildings.
The amount of humidity that the
dehumidifier removes depends on
temperature, humidity level and
placement. External weather conditions
may also affect the performance of
the dehumidifier. In cold weather the
absolute humidity decreases and thus
the extraction of humidity from the air by
the dehumidifier is reduced. (The relative
humidity might still be on a high level.)
The dehumidifier is suitable for use in the
temperature range +2˚C to +35˚C.
Wood’s dehumidifiers are safe in
operation and intended for continuous
use over many years.
EXCESSIVE AIR HUMIDITY – A DANGER
Condensation occurs when water vapour
in the air comes into contact with a cold
surface such as cold window or wall.
When water vapour is cooled down,
condensation occurs, and water-drops are
formed. In high air humidity, the air may
get musty and mould might get formed,
causing damage to a house and its
furnishings. This environment may even
cause illness for the residents. Mites and
spiders also thrive in a damp environment.
A dehumidifier with high performance
creates a good, healthy humidity level. For
greatest efficiency the doors and windows
of rooms that are being dehumidified
should be kept closed. Removes odours,
dries wood and removes moisture from
sportsware outdoors equipment.
A dehumidifier may be used for buildings
and in large and open spaces, If the
humidifier is kept in colder environments,
you should study the Hints at the end of
the manual.
PLACEMENT OF DEHUMIDIFIER
Wood’s dehumidifiers are easy to move
around, all you need to have is a power
source for 220/240V, but bear in mind the
following:
- The dehumidifier should not be placed
near radiators or other heat sources or
exposed to direct sunlight, as it will reduce
performance.
- It is beneficial to use a radiator or heating
fan to keep the temperature above +2˚C.
- The dehumidifier should stand at least
25cm from a wall or other obstruction, for
maximum air flow.
- Ideal is to put it in the center
of the room / area.
NOTE: When placed in a shower or
bathing area, the dehumidifier should
be fixed in place. It is compulsory to
check and respect your local bathroom
electrical regulations before use.
USING THE DEHUMIDIFIER
The dehumidifier should be transported
according to the instructions. In the event
of improper positioning during transport,
oil may flow out of the compressor and
into the closed pipe system. In such a
case, let the dehumidifier stand for a
4 hours before being used. It is very
important that the oil runs back into the
compressor, otherwise the dehumidifier
may be seriously damaged.
1. Check that the water reservoir is correctly
placed and the float moves freely in the
reservoir. See the section on the Float.
2. Connect the dehumidifier to an grounded
power source.
3. Select fan speed.
NOTE: When the dehumidifier
is turned off, it will take 5 minutes
before the dehumidifier is restarted,
the built-in automatic functions are
deactivated, during this period.
THE FLOAT
The float consists of a white plastic
cylinder which hangs on two arms.
The float rests on the surface, so it is
lifted when the water level rises. When
the float reaches a certain height, the
dehumidifier responds to this and shuts
down automatically to prevent flooding
of the tank.
When you have emptied the water
reservoir and are to replace it in the
dehumidifier follow these steps:
1. Push the water reservoir in until it
touches the float.
2. Raise the forward edge of the water
reservoir from below so that the whole
water reservoir is slightly slanted.
3. Push the water reservoir home. The
float should now be in the reservoir
instead of being stuck behind it.
NOTE: It is important that the float
moves freely, since its purpose is to
respond to the water level and ensure
that the dehumidifier is turned off when
it is high. A wrongly placed float may
allow the water reservoir to flood.
4. Set the desired humidity level by means of
the humidity control. See the section on the
humidity control.
9
Page 10
GB
Operating Instructions
DRAINAGE OF WATER
The dehumidifier is fitted with a hose
connection. By attaching a hose to the
dehumidifier the condensed water can be
drained directly away.
Using the hose:
1. Disconnect the dehumidifier from the
power source and remove the water
reservoir to give access to the drip tray.
2. Attach the hose coupling to the thread on
the dehumidifier and lead the hose to a
drainage outlet. Check that the hose is not
above the level of the drip tray.
3. Connect the dehumidifier to the power
source.
Without hose, direct to a drain outlet:
1. Disconnect the dehumidifier from the
power source and remove the water
reser voir.
2. Place the dehumidifier directly over the
drain so that the dehumidified water can
drip through the hole at the base of the
dehumidifier and into the drain.
NOTE: The ambient relative
humidity is most simply measured
with a Wood’s hygrometer, and the most
suitable range is between 50% and 60%.
SHUTTING OFF AUTOMATICALLY
When the water reservoir is full, the
dehumidifier is shut off automatically.
The indicator light at the front of the
dehumidifier will switch to red to show
that the water reservoir should be
emptied.
1. Disconnect the dehumidifier from the
power source.
2. Empty the water reservoir.
3. Put the empty water reservoir back and
check that the float moves freely. See the
section on the Float.
4. Connect the dehumidifier to the power
source.
THE AIR FILTER
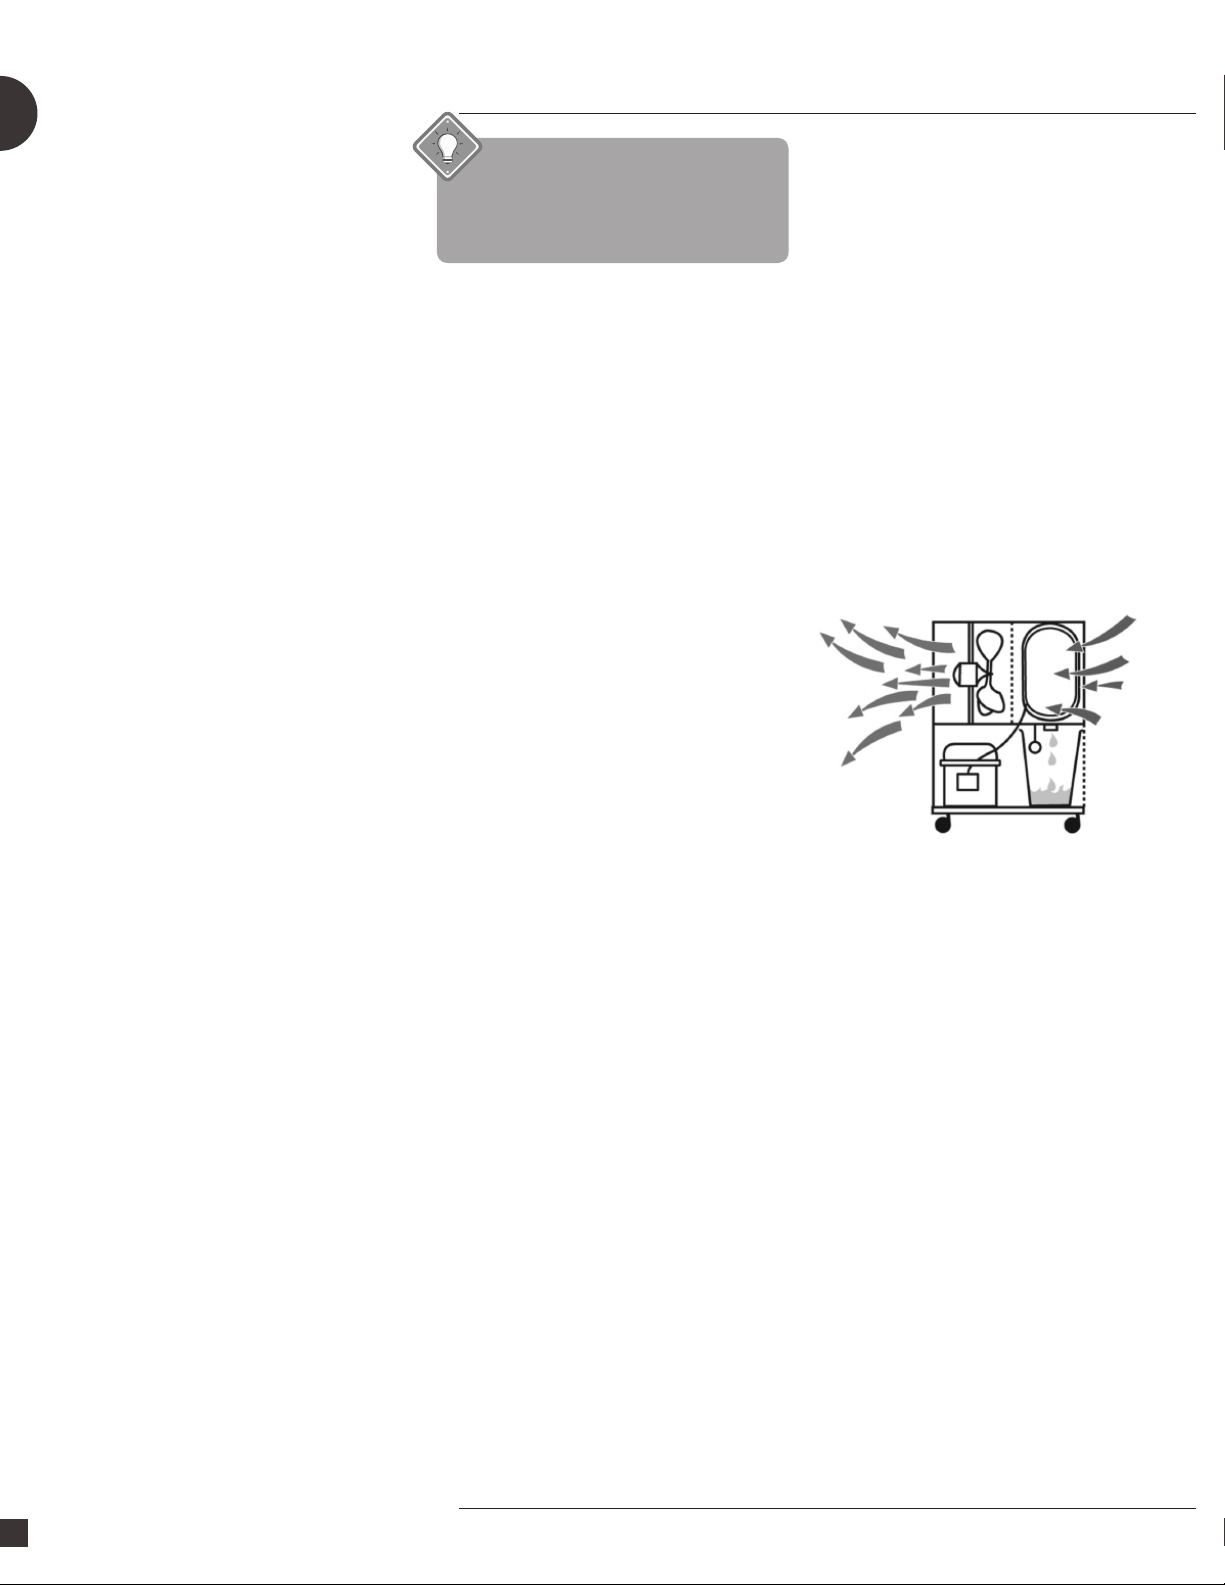
FAN
The fan ensures that air flows through the
dehumidifier. Moist air is sucked in from
the rear and goes via the cooling coil and
the vaporizer to come out dry and warm
at the front of the dehumidifier. Wood’s
dehumidifiers are fitted with two fan
speeds.
• Position II – gives a high air flow with
maximum dehumidifying of air.
• Position I – gives a lower air flow
which causes quieter operation and
somewhat lower dehumidifying
capacity.
3. Connect the dehumidifier to the power
source.
HUMIDITY CONTROL
Wood’s dehumidifier is fitted with a built
in humidity control, which is set to the
desired level of humidity. The control
registers the current level of humidity and
ensures that the dehumidifier is turned on
and off automatically.
How to set the humidity control:
1. Set the humidity control knob to the
maximum position.
2. Set the fan to position II .
3. When the desired level of humidity is
reached, the hygrostat knob is turned
counterclockwise until the dehumidifier is
turned off.
The air filter at the rear of the
dehumidifier ensures that the cooling
coils are kept free from dust. It is
important that the filter is kept clean
so that air can flow freely through the
dehumidifier.
Your dehumidifier is equipped with
a washable-filter that enhances the
capacity of the dehumidifier and cleanses
the air further. Please refer to the
separate filter leaflet for installation and
maintenance instructions.
AUTOMATIC DEFROSTING
Wood’s dehumidifiers are fitted with
a control unit which ensures that the
cooling coils are defrosted automatically
when needed. The control shuts down
the compressor, which causes the cooling
of the coils to stop. The fan continues
to draw the air at room temperature
through the dehumidifier and thus melts
the ice, and the water runs down into
the reservoir. This defrosting system
means that the dehumidifier works at
temperatures as low as +2˚C.
ACCESSORIES
The dehumidifiers in WCD-series (WCD2,
WCD3 and WCD4) can be equipped with
an external water pump to drain the
condensate water. This is an accessory
and it is sold separately.
The dehumidifiers in WCD-series (WCD2,
WCD3 and WCD4) can be equipped with
a F8 filter which is efficient to capture
silica dust. When using a F8 filter it
should be replaced regularly (when full)
and not cleaned. You can contact your
reseller for further usage instructions and
replacement cycles. This is an accessory
and it is sold separately.
10
Page 11
Operating Instructions
GB
CLEANING AND MAINTENANCE
Wood’s dehumidifiers require cleaning
of filter, to maintain their high
dehumidifying capacity.
- The front grid can be vacuum-cleaned or
cleaned with a brush.
- The cooling coils are best cleaned with a
rag and warm water-be careful
- The fan motor is permanently lubricated
and requires no maintenance.
NOTE: Always disconnect the cord
before cleaning.
HINTS:
- Sometimes it may be useful to use a frost
guard or heater fan to make sure that the
temperature does not fall below +2˚C.
- For maximum dehumidifying power in
a room, it is recommended that the air
supply from outside and from adjoining
rooms is minimized – close doors and
ventilators.
- Put in the center of the room
- Increase temp. for faster dehumidification
( warm air carries more water.)
- Use frost guard if temperature falls below
+2° C
- Higher dehumidification in autumn /
summer because outside air is warm and
humid. (Absolute humidity is normally
higher).
WHEN THE DEHUMIDIFIER REQUIRES
SERVICING
PRODUCT GUARANTEE
All professional machines are covered with
a 1-year manufacturer guarantee from the
date of purchase. The guarantee is limited
to the provision of repairs, free of charge,
within the specified period providing
the conditions are met. The warranty
is non-transferable. If your Professional
machine was purchased with a retailer or
supplier you must contact them to initiate
a guarantee claim.
The guarantee does not cover:
- Any repairs or replacement of
components during the warranty period
will not result in an extension of the
warranty period.
- The warranty will be voided if any
alterations have been made, if not
genuine components have been fitted or
if the dehumidifier has been repaired by a
third party.
- Components subject to normal wear and
tear, such as the air filter, are not covered
by the warranty.
- The warranty is only valid on
presentation of the original, unaltered,
and date-stamped purchase receipt.
- The warranty does not cover damage
caused by actions that deviate from those
as described in the user’s manual or by
neglect.
- The warranty does not covered faults
caused by dirt of third-party products.
- The warranty does not cover accidental
damage.
- All claims for compensation, including
consequential damage, will not be
entertained.
For product guarantee and extended
guarantee options, read more at
woods.se
Register your product at
warranty-woods.com
If the dehumidifier requires servicing,
you must first contact the retailer. Proof
of purchase is required for all guarantee
claims.
Recommended limits for use
Temp. WCD +2˚C to +35˚C
Relative humidity: 30% to 90%
Recommended
humidity level: appr. 50% RH
IMPORTANT! - Wood’s
dehumidifiers must be connected
to an grounded power source.
The power source sould be
220V-240V 50Hz
11
Page 12
Bruksanvisning
S
Brännbart ämne. Denna
maskin innehåller R290/Propan –
ett brännbart köldmedium.
Se bruksanvisning.
Läs serviceinstruktion
Läs bruksanvisning.
SÄKERHETSINFORMATION
Läs den medföljande
bruksanvisningen noggrant innan
installation och användning
av produkten. Tillverkaren är
ej ansvarig för person- och
egendomsskador som uppstår
på grund av felaktig installation
eller användning. Spara
bruksanvisningen för framtida
behov.
SÄKERHET FÖR BARN OCH
HANDIKAPPADE
VARNING!
Risk för skador och permanent
invaliditet.
Denna produkt kan användas
av barn från 8 års ålder och
uppåt och av personer med
nedsatt fysisk, sensorisk eller
mental förmåga samt personer
med bristande erfarenhet och
kunskap, om de övervakas
eller instrueras beträffande hur
produkten används på ett säkert
sätt och förstår de risker som är
förknippade med användningen.
Låt inte barn leka med produkten.
Barn under 3 år ska inte vistas
i närheten av produkten utan
ständig uppsikt.
Håll förpackningsmaterial utom
räckhåll för barn.
Rengöring och användarunderhåll
ska inte utföras av barn utan tillsyn.
ALLMÄN SÄKERHET.
Denna apparat är avsedd att
användas i stora och öppna
utrymmen. För byggen, och
lagerlokaler. Produktens
märkskylt är placerad bakom
kondensvattenbehållaren. Håll
produktens ventilationsöppningar
fria från hinder.
Använd ej andra metoder för
avfrostning eller rengöring än
de som rekommenderas av
tillverkaren. Produkten ska inte
förvaras i ett rum där kontinuerligt
använda tändkällor finns (till
exempel; öppen eld, gasvärmare
eller elektriska värmare). Kylkretsen
får ej punkteras eller utsättas för
öppen låga. Köldmediet kan vara
luktlöst. Spraya inte vatten eller
ånga på produkten för att rengöra
den. Använd en fuktad mjuk
trasa vid rengöring tillsammans
med rengöringsmedel. Undvik
att använda slipande medel eller
metallföremål. Om nätsladden
är skadad måste den bytas av
tillverkaren eller, en av tillverkaren
auktoriserad verkstad eller
liknande kvalificerad person för att
undvika framkallande av fara.
12
Page 13
Bruksanvisning
S
ELEKTRISK ANSLUTNING
VARNING!
Risk för brand och elektriska
stötar. Produkten måste anslutas
till ett jordat eluttag. Kontrollera
att märkskyltens elektriska
information överensstämmer
med nätspänningskällan. Om
så inte är fallet, kontakta en
elektriker. Använd alltid ett korrekt
installerat stötsäkert och jordat
eluttag. Använd inte grenuttag
eller förlängningssladdar. Vid
skadad anslutningssladd (t.ex.
stickpropp eller nätsladd) kontakta
en av tillverkaren auktoriserad
verkstad eller en elektriker om
en elektrisk komponent behöver
bytas. Nätsladden ska befinna
sig nedanför stickproppen efter
installation. Anslut nätsladden
sist i installationen. Tillse att
nätsladdens stickpropp är åtkomlig
efter installationen.
Dra inte i nätsladden för att koppla
loss produkten från eluttaget. Drag
alltid i stickproppen.
öppen låga eller andra tändkällor
inte finns i rummet. Vädra
utrymmet. Placera inte brännbara
ämnen eller föremål dränkta i
brännbara ämnen i närheten av,
eller på produkten.
AVYTTRING
VARNING!
Risk för skador.
Koppla loss produkten från
eluttaget. Klipp av nätsladden nära
produkten och kassera den.
Köldmediet i kylkretsen på denna
produkt är miljövänligt. Kontakta
de lokala myndigheterna för
information angående korrekt
avyttring av produkten. Skada inte
kylenheten närmast förångaren då
kylmedia kan läcka ut.
ANVÄNDNING
VARNING!
Risk för personskador, elektriska
stötar eller brand. Produktens
specifikation får inte ändras.
Iakttag försiktighet för att inte
skada produkten kylkrets.
Produkten innehåller propan
(R290), ett naturligt köldmedel
med låg miljöpåverkan.
Köldmediegasen är brandfarlig.
Om kylkretsen skadas tillse att
13
Page 14
Bruksanvisning
S
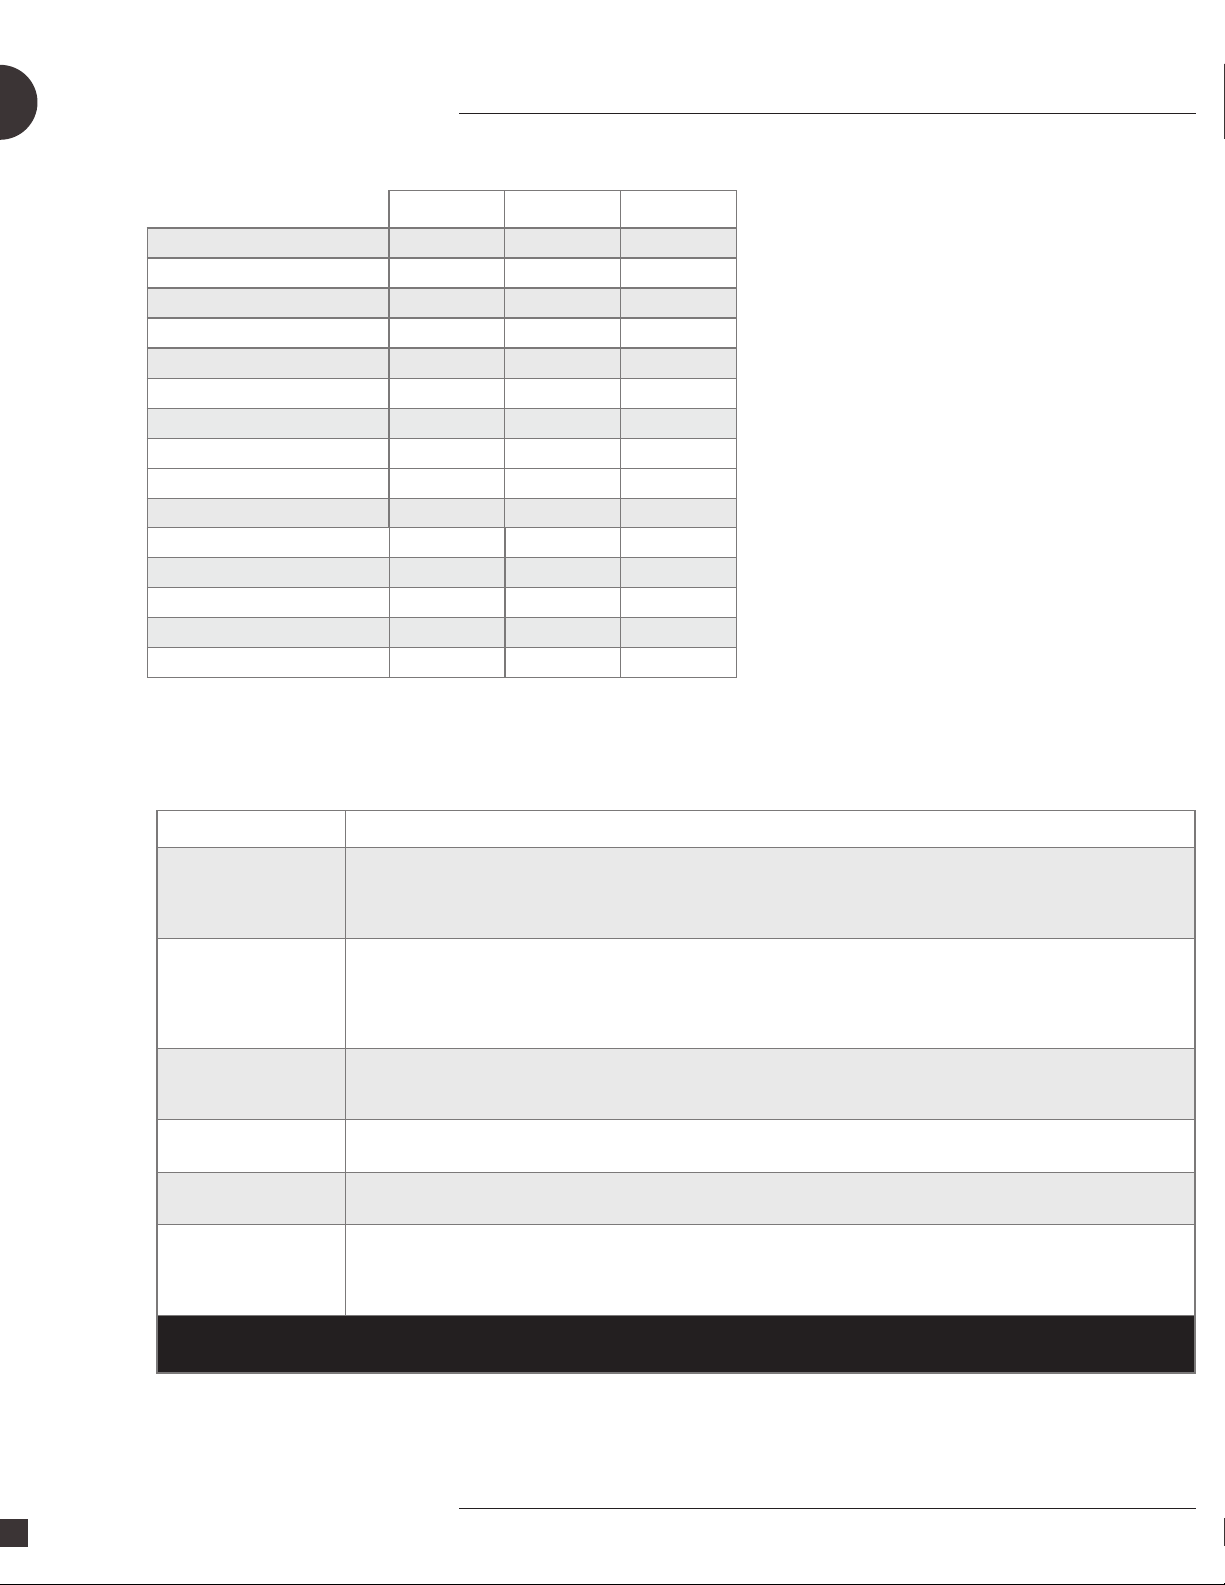
TEKNISKA DATA
WCD2 Pro WCD3 Pro WCD4 Pro
Max. arbetsområde 140m
Luftgenomströmning steg 1 190m3/h 197m3/h 129m3/h
Luftgenomströmning steg 2 336m3/hour 336m3/hour 296m3/hour
Avfuk tning vid 20˚C och 70% r.h. 11 L/ 24h 12 L/ 24h 25 L/24h
Avfuk tning vid 30˚C och 80% r.h. 19 L/24 h 25,5 L/24h 41 L/24h
Effek t vid 20˚C och 70% r.h. 320 W 420 W 50 0 W
Effek t vid 20˚C och 70% r.h. 7,3 kWh/24h 9,3kWh/24 12kWh/24
Tankvolym 11,4 L 11, 4 L 11,4 L
Kylmedia R290 R290 R290
Fyllnadsmängd 110 g 120 g 150 g
Spänning 230V 230V 230V
Frekvens 50Hz 50Hz 50Hz
Ampere 2,2 A 3 A 3,3 A
IP-klass IPX1 I PX1 IPX1
Mått i mm, L x B x H 508x465x595 508x465x595 508x465x595
2
190 m
2
230 m²
*Tekniska förändringar och förbättringar kan förekomma. Alla värden är ungefärliga och kan variera beroende på yttre omständigheter
såsom temperatur, ventiliation och luftfuktighet.
PROBLEM LÖSNING
Avfuktaren startar inte - Se till att avfuktaren är kopplad till eluttaget och att inte säkringen har gått.
Avfuktar ej - Se till att fläkten snurrar.
Hög ljudnivå - Öka avståndet mellan avfuktaren och omgivande ytor.
Isbildning på
kylslingorna
Inget vatten kommer i behallaren - Kontrollera att ingen smuts mm ligger på dropptråget som är under kylslingorna, rengör vid behov.
Stänger inte av vid
full vattenbehållare
Led lampan blinkar
- Om varningslampan lyser, kontrollera att vattenbehållaren är tom och sitter rätt placerad i avfuktaren. Se till att flottören hänger fritt.
- Kontrollera att hygrostaten fungerar. Avfuktaren bör starta när hygrostatvredet ställs i maxläget.
- Se till att luften kan flöda fritt genom avfuktaren. Frontgaller och luftfilter ska vara rena och avfuktaren ska stå minst 20-30 cm från väggen.
- Lyssna om kompressorn är igång, men tänk på att avfuktaren kan vara inne i en avfuktningscykel och då stannar kompressorn. Börja med att avvakta i ca 35 minuter.
- Kontrollera så att inte ett tjockt lager av is bildats på kylslingorna.
- Kylslingorna kan ligga intill varandra och orsaka vibrationer. Koppla bort avfuktaren från eluttaget och sära på slingorna.
- Avlagsna luftfiltret pa avfuktarens baksida och se till att inget damm el dyl hindrar luftflodet genom maskinen.
- Kontrollera att temperaturen är över 2°C
- Det är viktigt att flottören hänger fritt i vattenbehållaren. Gör den inte det känner den inte av hur hög vattennivån är och kan därför inte se till att avfuktaren stannar.
- För låg temperatur - öka rumstemperaturen
14
Om inget av ovanstående fungerar bör du kontakta närmaste återförsäljare för översyn och eventuell reparation av avfuktaren.
Eller kontakta [email protected] www.woods.se 031-7613616
*Tekniska förändringar och förbättringar kan förekomma. Alla värden är ungefärliga och kan variera beroende på yttre omständigheter
såsom temperatur, ventiliation och luftfuktighet.
08
Page 15
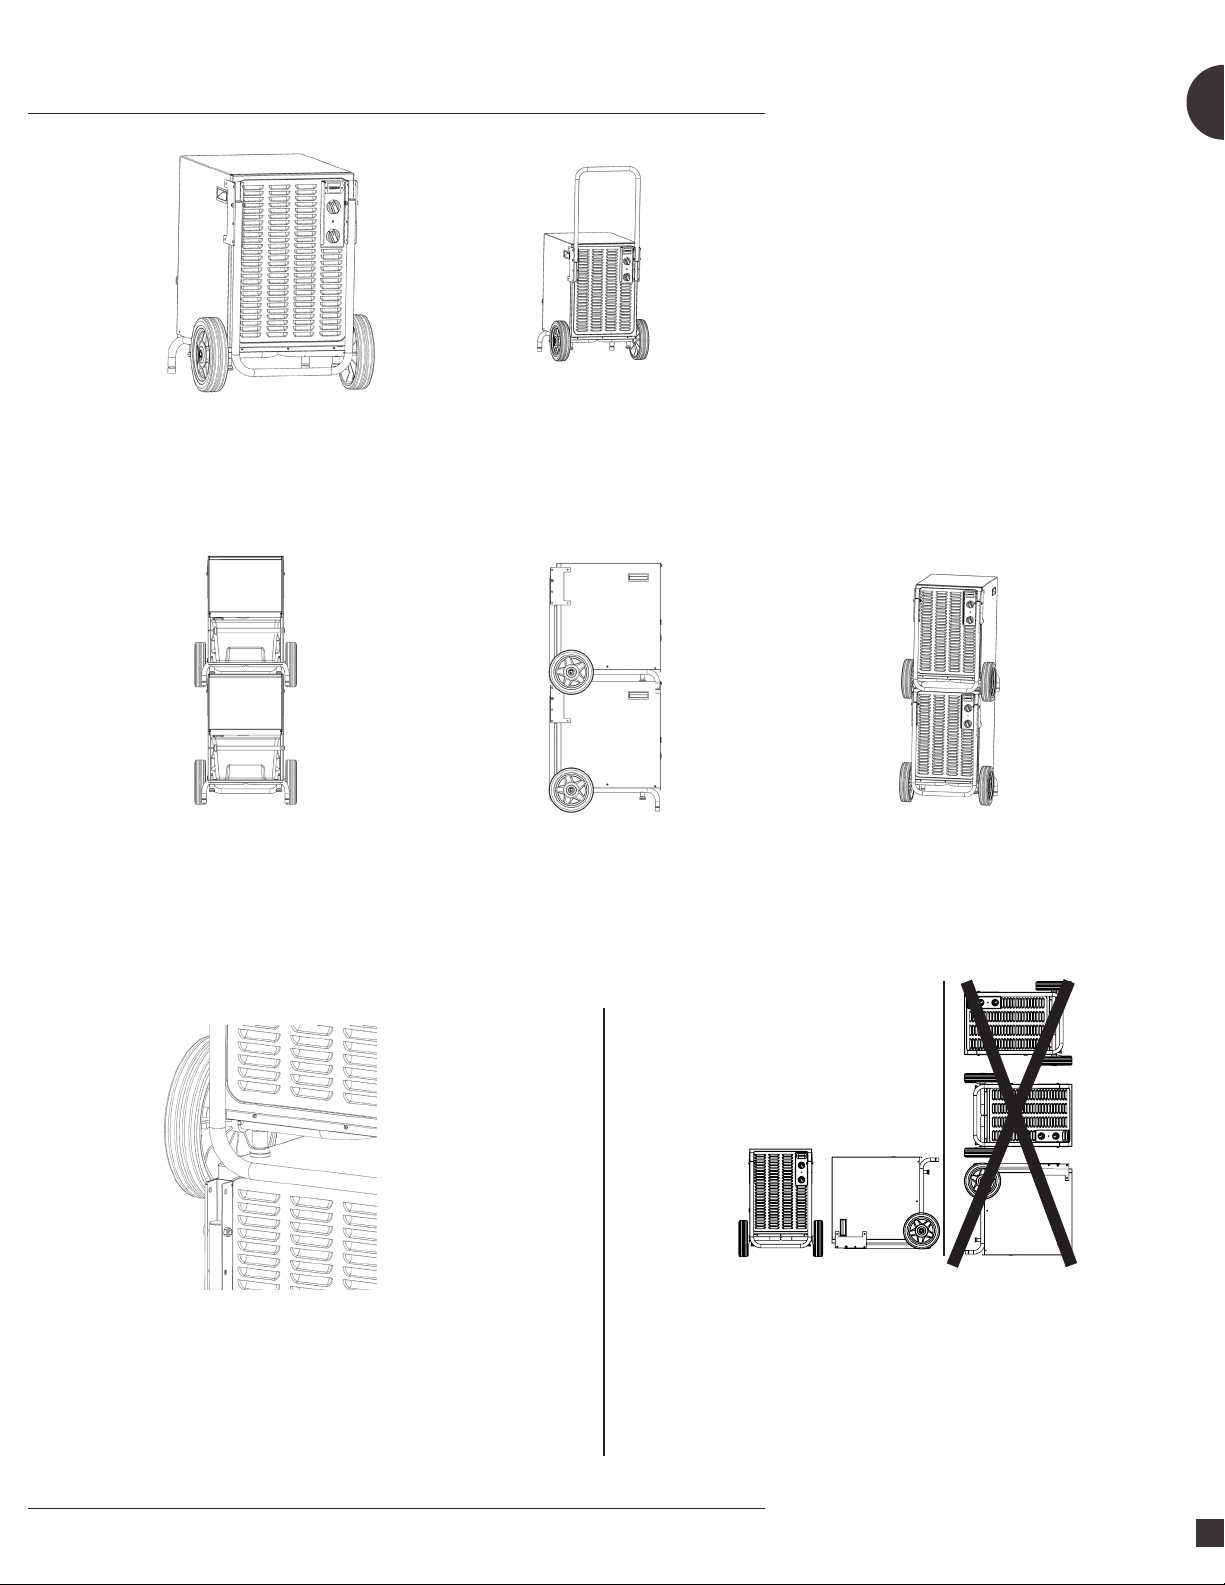
NEDFÄLLNINGSBART HANDTAG
• Säkra handtaget i önskat läge med
låssprintarna.
Bruksanvisning
S
•Låssprintar för handtag fastsatta i höljet för
att inte tappas bort.
STAPELBARA
•Avfuktaren är utrustad med fyra stycken
ställfötter under maskinen för att möjliggöra
stapling.
•Maskinen kan staplas på höjden för att spara
lagringsutrymme då den inte används.
Viktigt
• Stapla inte mer än 2 maskiner högt. Var noga med att
säkra maskinerna så att de inte faller eller flyttas.
•Säkerställ att ställfötterna under maskinen är
rena innan stapling för att undvika repor.
OK
TRANSPORT
Viktigt
Avfuktaren ska transporteras enligt anvisningen.
Om transporten av avfuktaren har skett enligt
anvisniningen kan avfuktaren startas direkt efter
transporten.
Om transporten inte har skett enligt anvisning låt
då avfuktaren stå i 4 timmar innan den tas i bruk.
Det är mycket viktigt att oljan hinner rinna tillbaka in
kompressorn, annars kan avfuktaren ta allvarlig skada.
•Handtaget ska vara i nedfällt läge vid stapling.
09
15
Page 16
Bruksanvisning
S
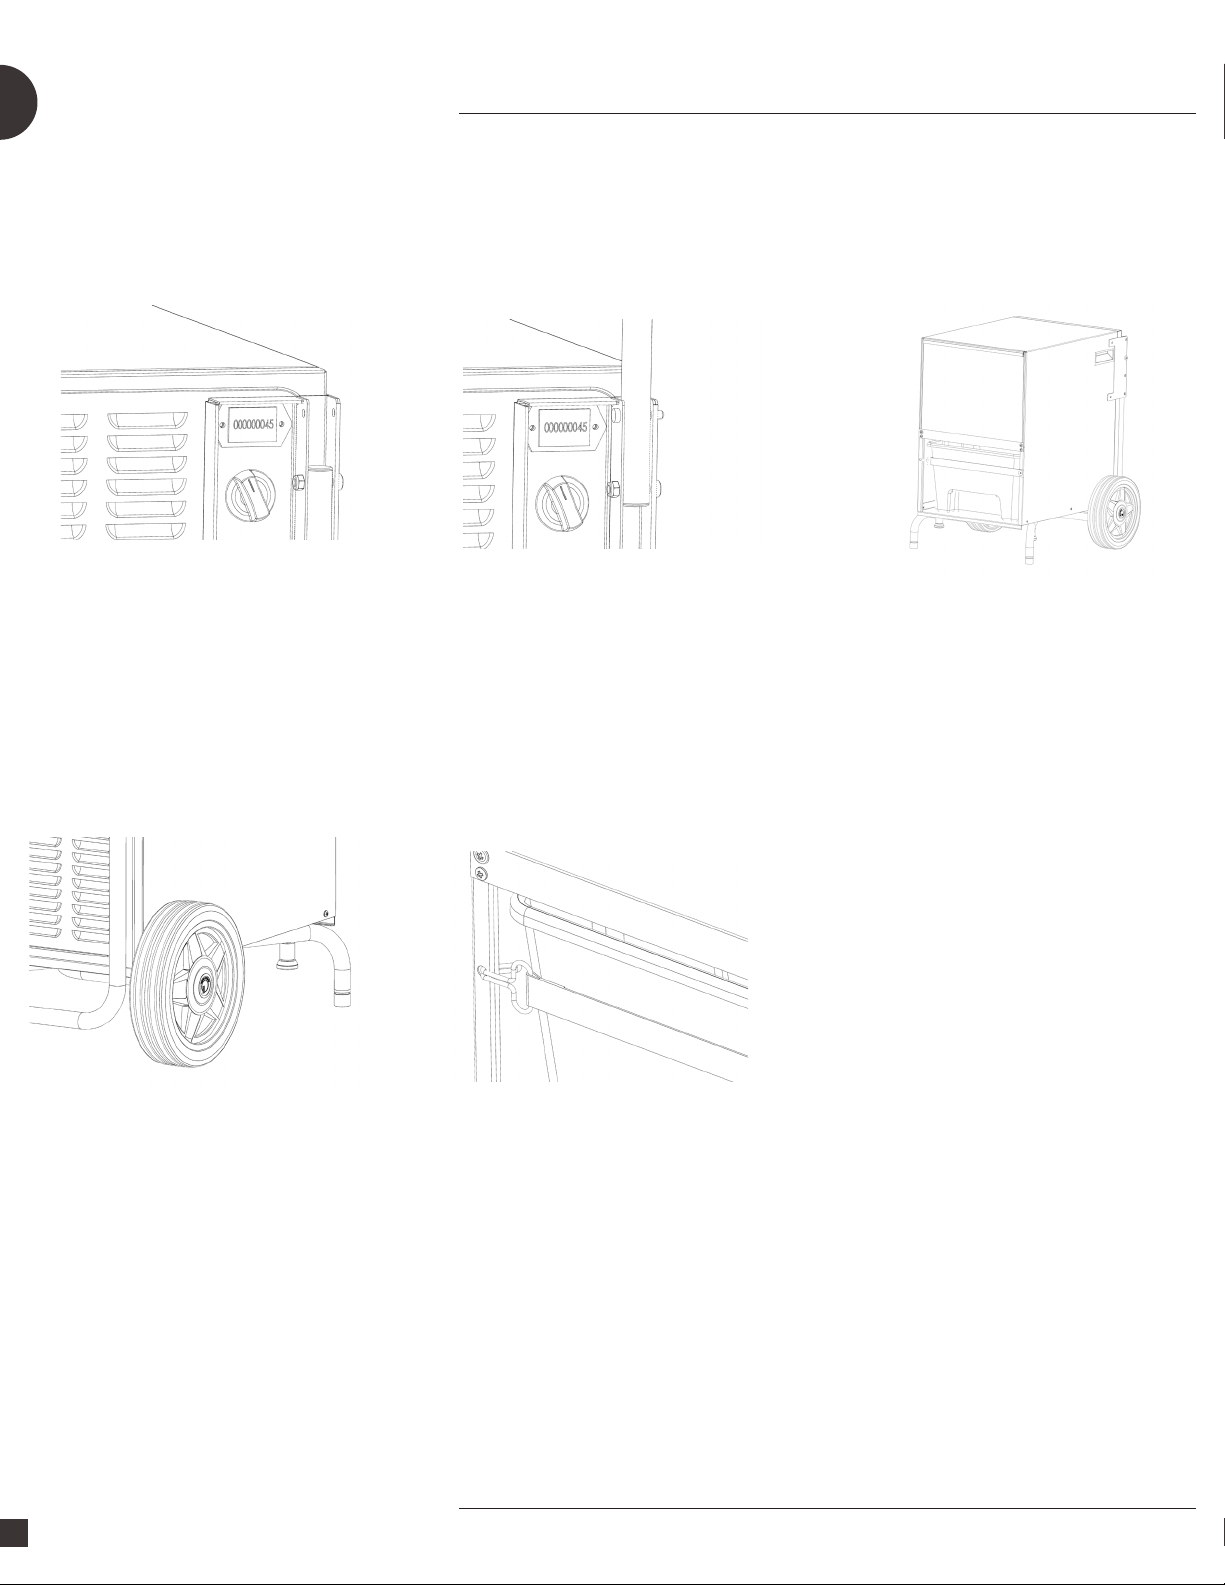
TIMRÄKNARE
•Drifttidsmätaren mäter kompressorns drifttid i
timmar.
• Den integrerade timräknaren mäter hur många
timmar avfuktaren har använts.
ROBUSTA HJUL VATTENTANK
•Gummihju l med polypropyl ennav, diameter 200,
bredd 50 mm, glidlager 20 mm (100kg/hjul).
•Säkerställ att hjulen är rena innan maskinen körs
på känsliga golv.
•Säkerställ att vattentanken är säkrad med låsremmen
under transport av maskinen.
TVÄTTBART PERMANENT FILTER
• Tvättbart filter
• Håll filtret rent: Använd alltid ett rent luftfilter
• Låt inte något material täppa till filtret, eftersom det
kan orsaka att avfuktaren överhettas.
• Använd aldrig avfuktaren utan filter.
Kontrollera alltid, och om nödvändigt, rengör filtret
innan du startar apparaten.
• Låt inte olja, fett eller andra föroreningar finnas i
avfuktaren.
• Rengör inte avfuktaren med organiska
lösningsmedel.
• Se till att filtret låses i spåret efter demontering.
16
Page 17
Bruksanvisning
S
VÄRLDSLEDANDE AVFUKTARE FRÅN
WOOD’S
Wood’s är en av de världsledande
tillverkarna av avfuktare. Våra avfuktare
är anpassade för att användas i nordiskt
klimat då avfuktningskapaciteten är
bra även vid lägre temperaturer och
fuktnivåer. De används med gott
resultat i utrymmen som lätt blir fuktiga,
såsom stora öppna utrymmen, byggen
och lagerlokaler. De är effektiva och har
låg energiförbrukning.
Den mängd fuktighet som avfuktaren
tar bort beror på temperatur,
fuktighetsnivå och placering. Även
vädret utomhus påverkar avfuktarens
prestanda. Vid kallt väder sjunker
den relativa fuktigheten och därmed
minskar avfuktarens fuktuttag ur luften.
Därför är avfuktaren anpassad att
användas i temperaturintervallet +2˚C
to +35˚C.
Wood´s avfuktare är säkra i drift och
avsedda att fungera kontinuerligt under
många år.
FÖR HÖG LUFTFUKTIGHET - EN FARA
Kondens uppstår när luftens vattenånga
kommer i kontakt med en kall yta såsom
tak, fönster eller vägg. När vattenångan
kyls ned sker en kondensering
varvid vattendroppar bildas. Vid hög
luftfuktighet kan unken luft uppstå och
mögel bildas vilket gör att huset och
dess inredning tar skada.
Denna miljö kan även leda till sjukdomar
hos de boende då bland annat kvalster
trivs i en fuktig miljö. En avfuktare
med hög prestanda skapar en bra och
hälsosam fuktnivå. För att nå bästa
effekt skall dörrar och fönster hållas
stängda till de utrymmen som ska
avfuktas.
Avfuktaren avlägsnar dålig lukt,
torkar trä och avlägsnar fukt från
idrottsredskap för utomhusbruk m.m.
WCD-seriens användningsområden
är stora och öppna utrymmen och för
byggen, industrier och lagerlokaler.
Kommer avfuktaren att stå i kallare
miljöer bör du titta närmare på tipsen i
slutet av manualen.
PLACERING AV AVFUKTAREN
Wood’s avfuktare är lätta att flytta runt
då de är utrustade med hjul. Allt som
krävs är närheten till ett eluttag för
220/ 240 V, men tänk på följande:
Avfuktaren bör inte ställas i närheten
av element eller andra värmekällor och
inte utsättas för direkt solljus då det
sänker prestandan.
- Man kan med fördel använda ett
värmeelement eller värmefläkt för att hålla
temperaturen ovan +2˚C.
- Avfuktaren ska stå minst 25 cm från
väggen och andra hinder för att
luftgenomströmningen ska vara maximal.
- Det är idealiskt att placera avfuktaren så
centralt i rummet som möjligt.
OBS: Placerad i ett duschutrymme
eller vid bassänger måste avfuktaren
fastmonteras. Avfuktaren bör även
säkras med jordfelsbrytare i dessa
utrymmen
ANVÄNDA WOOD’S AVFUKTARE
Avfuktaren ska transporterats enligt
anvisningen. Vid felaktig positionering
vid transport kan det hända att olja
runnit ut från kompressorn och in i det
slutna rörsystemet. Låt då avfuktaren
stå i minst 4 timmar innan den tas i
bruk. Det är mycket viktigt att oljan
hinner rinna tillbaka in i kompressorn,
annars kan avfuktaren ta allvarlig skada.
1. Se till att vattenbehållaren är riktigt
placerad och att flottören hänger fritt i
behållaren. Se avsnittet Flottör.
2. Koppla avfuktaren till ett jordat
eluttag.
3. Välj fläk thastighet.
4. Ställ in önskad fuktighetsnivå med
hjälp av fuktkontrollvredet. Se
avsnittet Fuktkontroll.
OBS: När avfuktaren stängs
av tar det 5 minuter innan den
återstartar. De inbyggda automatiska
funktionerna är avstängda under
denna tid.
FLOTTÖR
Flottören består av en vit plastcylinder
som hänger i två armar. Flottören
flyter och när vattennivån stiger lyfts
flottören upp. När flottören kommit upp
till en viss höjd, känner avfuktaren av
detta och stängs av automatiskt för att
förhindra översvämning.
När du tömt vattenbehållaren och den
ska sättas tillbaka i avfuktaren gör du
enklast så här:
1. Skjut in vattenbehållaren tills den
nuddar flottören.
2. Lyft undertill i vattenbehållarens
framkant så att hela vattenbehållaren
lutar något.
3. Skjut in vattenbehållaren den sista
biten. Flottören bör nu ha hamnat i
vattenbehållaren, istället för att bli
fastklämd bakom den.
OBS: Det är viktigt att flottören hänger
fritt, eftersom dess syfte är att känna
av vattennivån i tanken och försäkra
att avfuktaren stängs av när nivån
är hög. En felaktigt placerad flottör
kan medföra att vattenbehållaren
svämmar över.
17
Page 18
Bruksanvisning
S
AVLEDA VATTNET TILL AVLOPP
Avfuktaren är utrustad med en
slangkoppling. Genom att koppla en slang
till avfuktaren kan kondensatet ledas
direkt till ett avlopp eller golvbrunn.
MED HJÄLP AV SLANG:
1. Koppla bort avfuktaren från eluttaget och
ta bort vattenbehållaren för att komma åt
dropptrågets gänga.
2. Fäst slangens koppling till avfuktarens
gänga och led slangen till avloppet. Se till
att slangen inte kommer högre än själva
dropptråget.
3. Sätt avfuktarens kontakt i eluttaget.
Utan slang direkt över avlopp:
1. Koppla bort avfuktaren från eluttaget och
ta bort vattenbehållaren.
2. Ställ avfuktaren direkt över avloppet så
att det kondenserade vattnet kan droppa
genom hålet i avfuktarens botten och
vidare ner i avloppet.
3. Sätt avfuktarens kontakt i eluttaget.
FUKTKONTROLL
Wood´s avfuktare är utrustad med en
inbyggd fuktkontroll som ställs in på
önskad fuktnivå. Fuktkontrollen känner av
den aktuella fuktighetsnivån och ser till
att avfuktaren slås av och på automatiskt.
Så här ställer du in fuktkontrollen:
1. Ställ fuktkontrollvredet i maxläge.
2. Ställ fläktvredet i läge II.
3. När önskad fuktighetsnivå uppnåtts, vrids
fuktkontrollvredet motsols tills avfuktaren
stängs av.
OBS: Den relativa luftfuktigheten mäts
enklast med en Wood’s hygrometer och
lämplig nivå är mellan 50% och 60%.
AUTOMATISK AVSTÄNGNING
När vattenbehållaren är full stängs
avfuktaren av automatiskt. Ljusindikatorn
på avfuktarens framsida slår om från
grönt till rött för att signalera att
vattenbehållaren måste tömmas innan du
kan använda avfuktaren igen.
1. Koppla bort avfuktaren från eluttaget.
2. Töm vattenbehållaren.
3. Sätt tillbaka den tömda vattenbehållaren
och se till att flottören hänger fritt. Se
avsnittet Flottören.
4. Anslut avfuktaren till eluttaget.
LUFTFILTER
Luftfiltret ser till att kylslingorna hålls fria
från damm. Det är viktigt att filtret hålls
rent så att luften kan flöda fritt genom
avfuktaren. Filtret bör därför bytas vid
behov. Avfuktaren är utrustad med ett
tvättbart permanent filter som förbättrar
kapaciteten hos avfuktaren samtidigt som
det ytterligare renar luften. Se instruktion
för byte av luftfilter. Registrera din
avfuktare på warranty-woods.com
AUTOMATISK AVFROSTNING
Wood’s avfuktare är utrustade med
styrsystem som ser till att kylslingorna
avfrostas vid behov. Styrsystemet stänger
av kompressorn, vilket gör att kylningen
av slingorna upphör. Fläkten fortsätter att
dra den rumstempererade luften genom
avfuktaren och på så sätt smälter isen och
vattnet rinner ner i behållaren. Notera
att detta styrsystem gör att avfuktaren
fungerar vid så låg temperatur som +2˚C.
Vid lägre temperatur stänger avfuktaren
av automatiskt och går igång igen när
temperaturen varit över 2°C i mer än 5
minuter. Notera att mögelsvamp kräver
minst temperatur på 7°C och 72 % RF för
att växa.
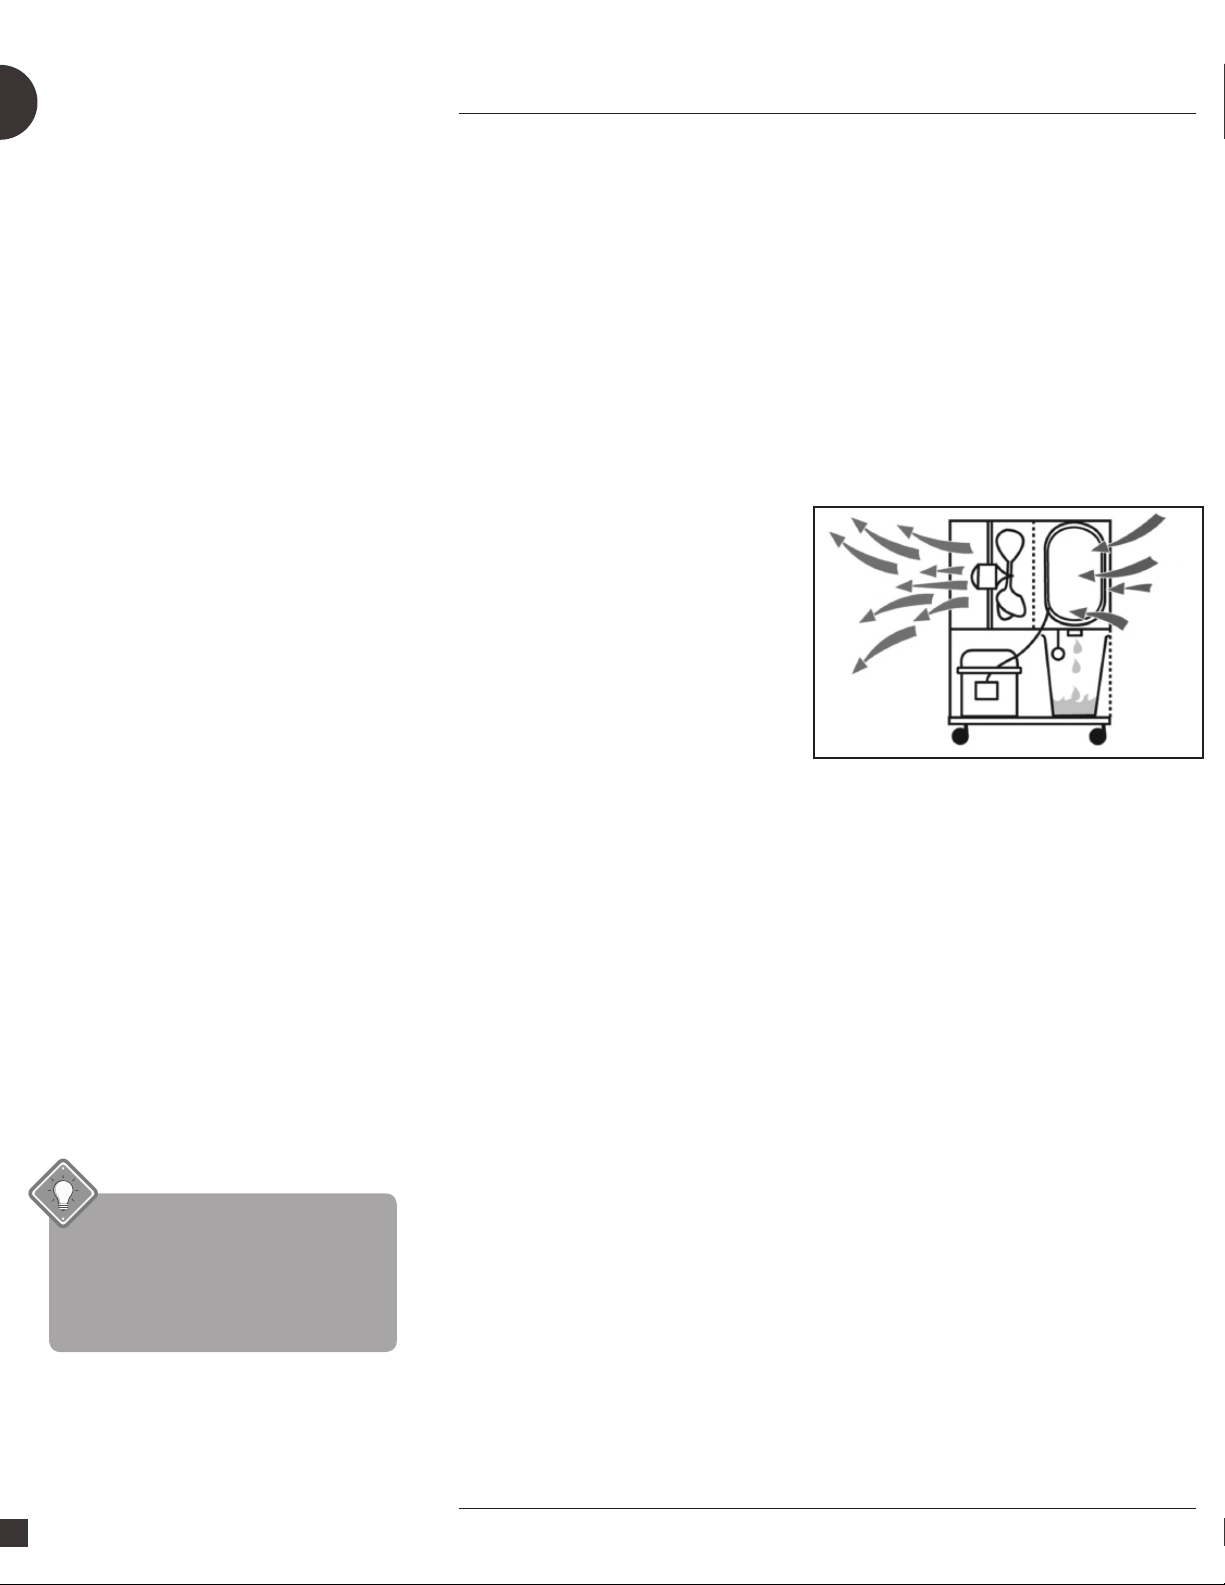
FLÄKT
Fläkten ser till att luft strömmar genom
avfuktaren. Fuktig luft sugs in från
baksidan och går via förångaren och
kondensorn för att sedan komma ut torr
på avfuktarens framsida. Wood’s avfuktare
är utrustade med två fläkthastigheter.
• Läge II – ger en hög luftgenomströmning
med en maximal avfuktning av luften
• Läge I – ger en lägre luftgenomströmning
vilket genererar i en tystare gång och en
något lägre avfuktningskapacitet.
TILLBEHÖR
WCD2, WCD3 och WCD4 kan utrustas
med en separat vattenpump för att
dränera kondensvattnet, detta är ett
tillbehör och säljs separat.
WCD2, WCD3 och WCD4 kan utrustas
med ett F8 filter för att ta bort kiseldamm.
Frekventa byten behövs när F8-filtret
är fullt. Detta är ett tillbehör och säljs
separat.
18
Page 19

Bruksanvisning
S
RENGÖRING OCH UNDERHÅLL
Wood’s avfuktare kräver rengöring och
rengöring av filter för att bibehålla sin höga
avfuktningskapacitet.
- Metallfronten kan dammsugas eller rengöras
med en borste.
- Kylslingorna rengörs bäst med en trasa och
varmt vatten. Iakttag försiktighet
- Fläktmotorn är permanent smord och
kräver inget underhåll.
OBS : Koppla bort nätsladden från
eluttaget innan rengörning.
TIPS:
- För maximal avfuktningskapacitet i ett rum
rekommenderas att tilluften från utsidan
och intilliggande rum minimeras – stäng
dörrar och ventiler.
- Placera avfuktaren om möjligt mitt i
rummet.
- Höj temperaturen i rummet för snabbare
avfuktning. (Varm luft kan bära mer vatten).
- Använd en frostvakt om temperaturen faller
under +2°C
- Avfuktaren ger mer vatten under sommaren
och hösten eftersom utomhusluften är varm
och fuktig. (Den absoluta luftfuktigheten är
normalt högre).
PRODUKTGARANTIER
Alla professionella maskiner omfattas av 1
års tillverkningsgaranti från inköpsdatumet.
Garantin är begränsad till reparation,
kostnadsfritt inom den angivna perioden
under förutsättning att villkoren är
uppfyllda. Alla garantiperioder börjar
vid inköpsdatum och kan inte överföras.
Om din professionella maskin köptes
hos en återförsäljare eller leverantör
måste du kontakta dem för att initiera ett
garantianspråk. Garantin täcker inte:
- Eventuella reparationer eller byte av
komponenter under garantiperioden leder
inte till förlängning av garantiperioden.
- Garantin upphör att gälla om eventuella
ändringar har gjorts, ej äkta komponenter
har monterats eller om avfuktaren har
reparerats av en tredje part.
- Komponenter som utsätts för normalt
slitage, som filter, omfattas inte av garantin.
- Garantin gäller endast vid uppvisande
av original, oförändrat och datumstämplat
köpkvitto.
- Garantin täcker inte skador som orsakas
av åtgärder som avviker från de som
beskrivs i användarmanualen eller genom
försummelse.
- Garantin täcker inte fel som orsakas av
smuts av produkter från tredje part.
- Garantin täcker inte oavsiktlig skada.
- Alla krav på ersättning, inklusive
följdskada, kommer inte att underhållas.
OM AVFUKTAREN BEHÖVER SERVICE
Om avfuktaren behöver service ska du i
första hand kontakta inköpsstället. För alla
garantikrav krävs ett inköpsbevis.
dagar från inköpsdatumet.
För mer information om produktgarantier
besök woods.se
Registrera din produkt på
warranty-woods.com för möjlighet till
förlängd garanti.
Rekommenderade gränser för användning:
Temp. WCD +2˚C to +35˚C
Relativ fuktighet: 30% to 90%
Rekommenderad luftfuktighetsnivå: c.a.
50% RH
avfuktare måste vara kopplad
OBS! - Wood’s
till ett jordat uttag
220V-240V 50Hz
19
Page 20
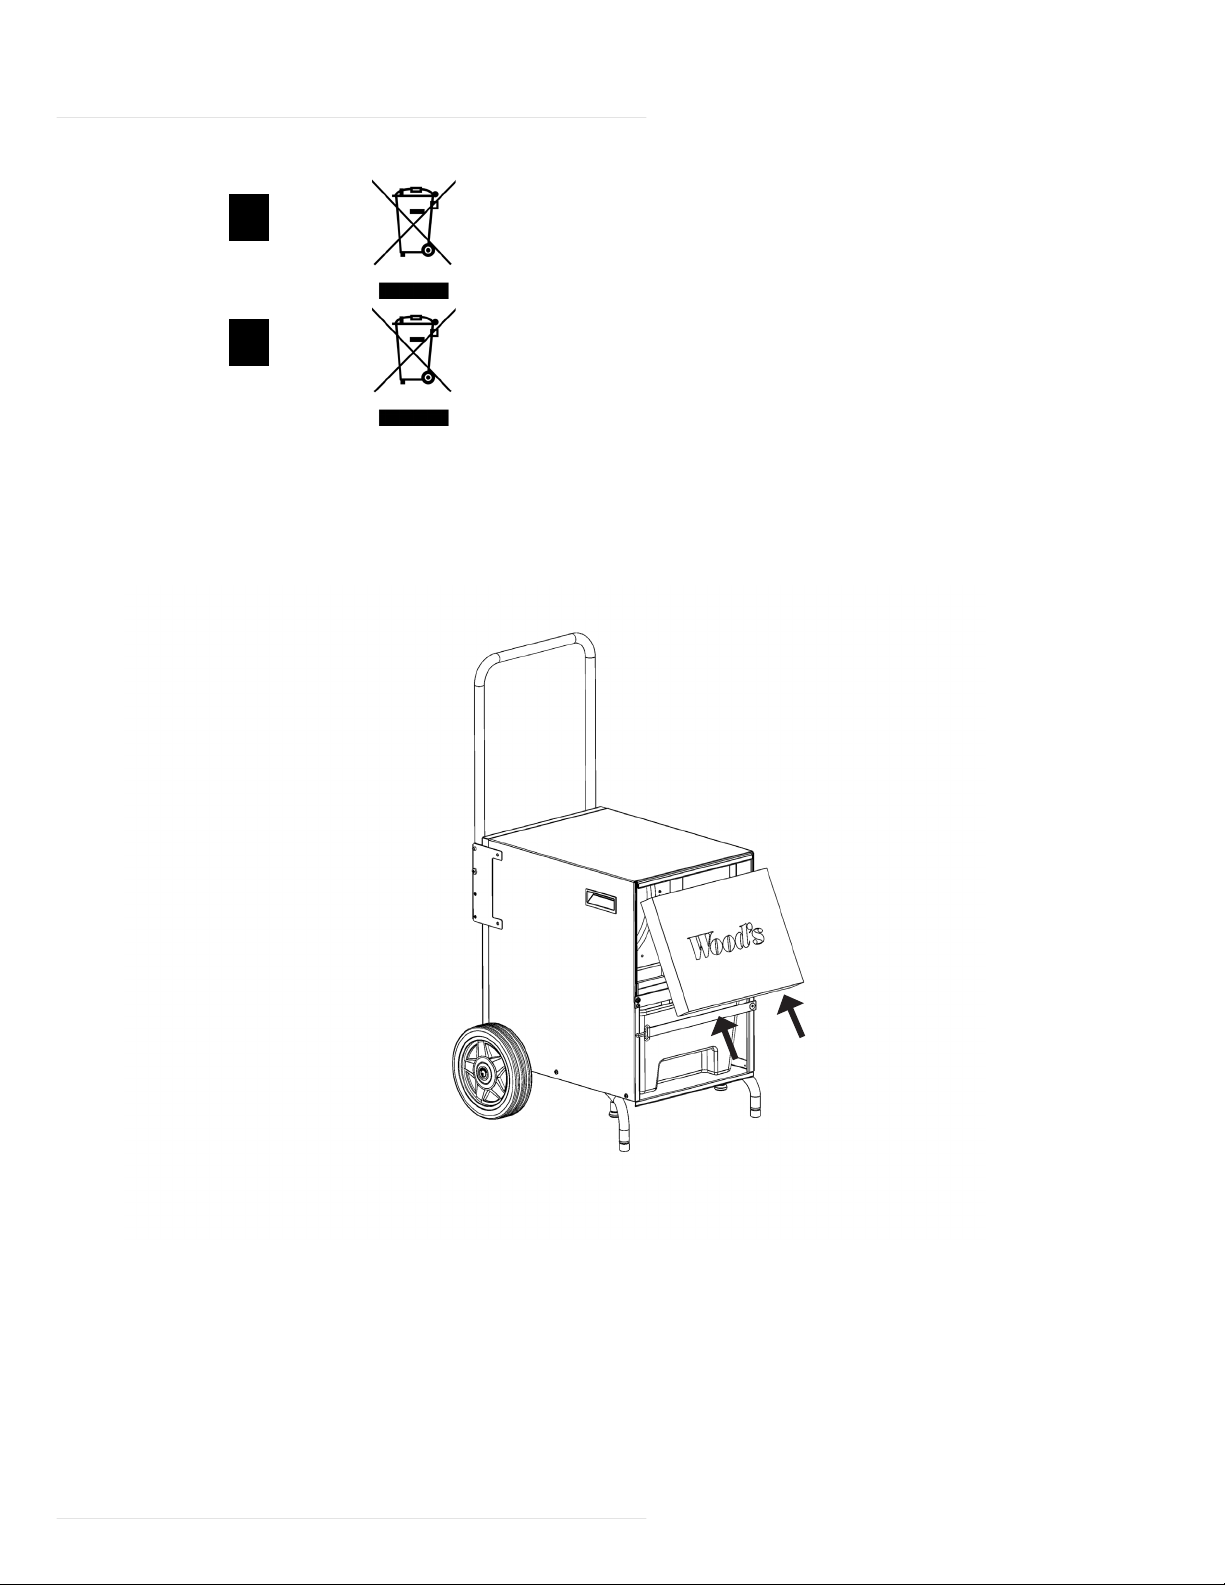
SE
GB
Filter replacement
Enligt livslängd för elektriska produkter (WEEE) gäller i EU med insamlingssystem på plats): Enligt Europaparlamentets och rådets direktiv 2002/96 / EG får denna produkt inte kasseras med vanligt avfall. När specialsymbolen soptunnan med överstrukna streck är placerad på produkten eller nämns i användarhandledningen är
det för att indikera att produkten ska återvinnas separat vid slutet av livslängden. Detta kommer att minska
miljöpåverkan av kemiska material. Det främjar också återvinning av alla delar som kan återvinnas. När produkten har förbrukats, bör du kontakta din återförsäljaren eller kommun, för att få information om hur du återvinner denna produkt.
This marking indicates that this product should not be disposed with other household wastes throughout the
EU. To prevent possible harm to the environment or human health from uncontrolled waste disposal, recycle
it responsibly to promote the sustainable reuse of material resources. To return your us device, please use
the return and collection systems or contact the retailer where the product was purchased. They can take this
product for environmental safe recycling.
Page 21

Wood’s is marketed and distributed by:
TES Scandinavia AB.
Maskingatan 2-4
441 27, Alingsås
Sweden.
woods.se
+46 317613610
 Loading...