

Page 1
1
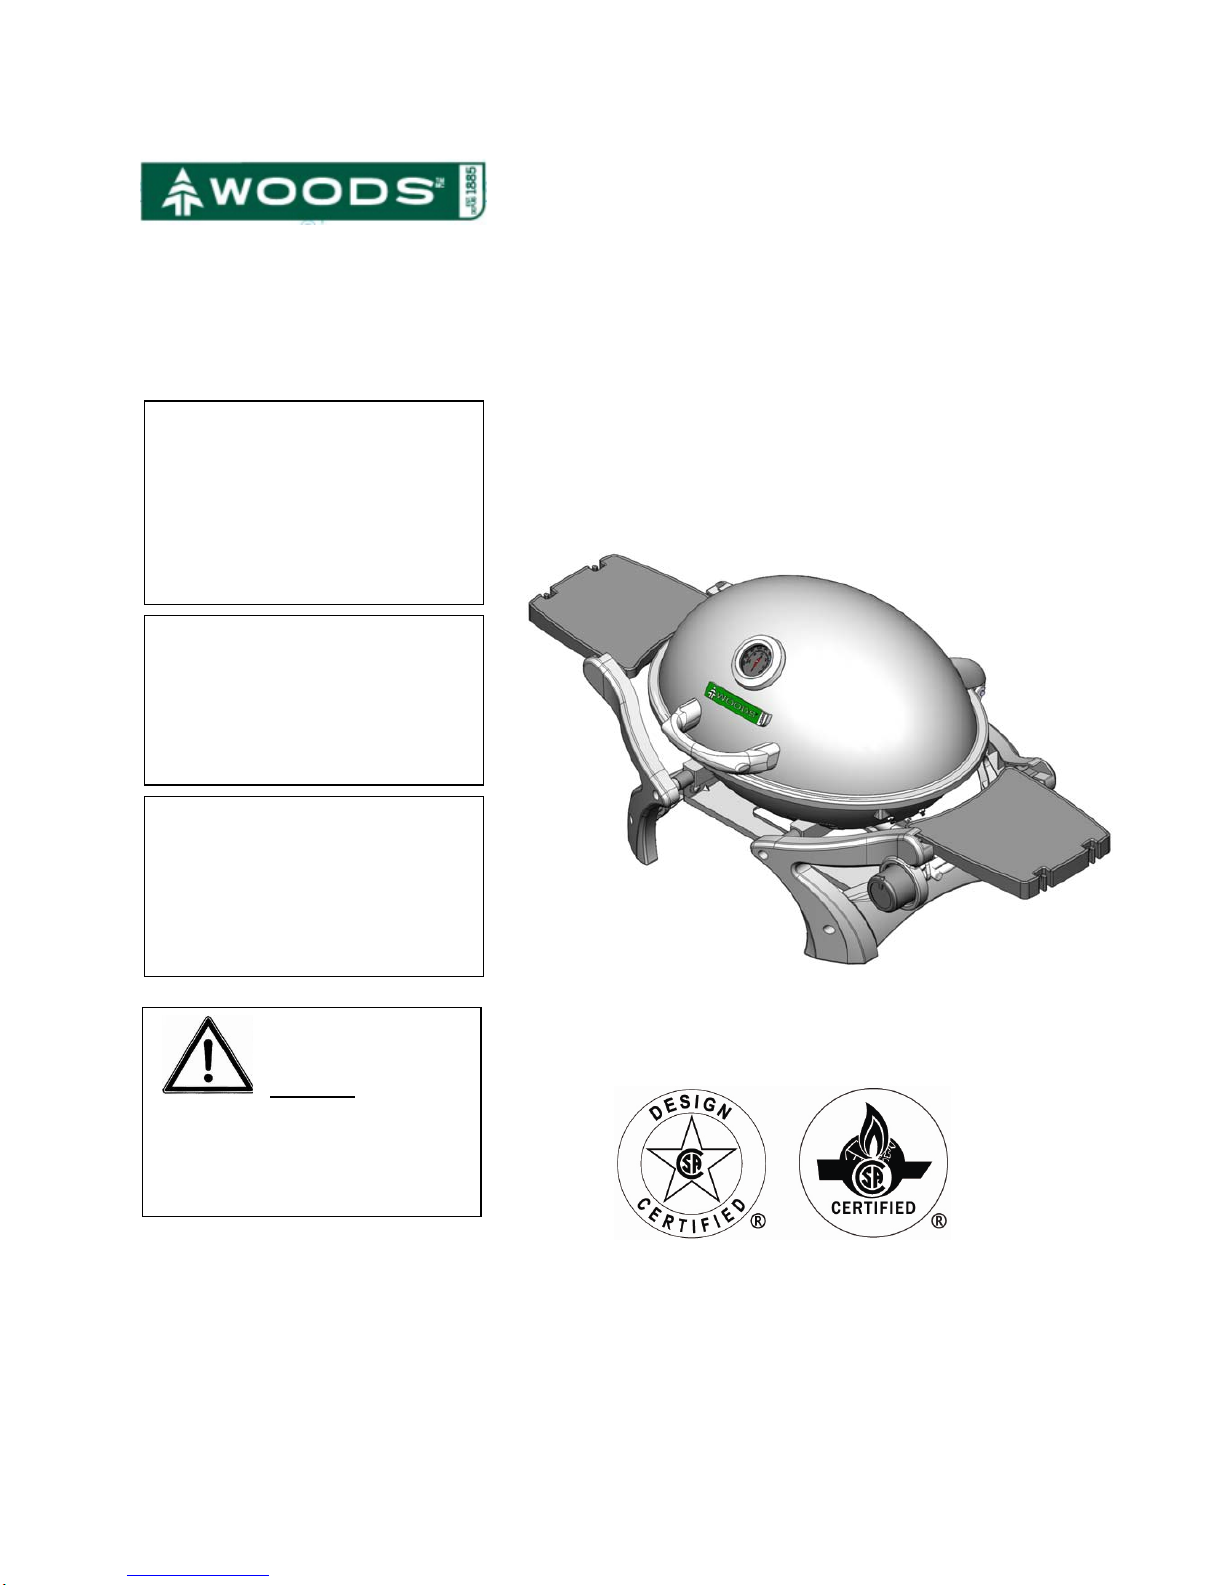
Gas BBQ for Outdoor Use
WARNING
Improper installation, adjustment,
alteration, service or maintenance can
cause in
j
ury or property damage.
Read the installation, operation and
maintenance instructions thoroughly
before installing or servicing this
equipment.
DANGER
Failure to follow these instructions
could result in fire or explosion that
could cause property damage,
personal injury or death.
DANGER
DO NOT use gas grill for indoor
cooking or heating. TOXIC fumes can
accumulate and cause asphyxiation.
DO NOT use in or on boats or
recreational vehicles.
WARNING
FOR YOUR SAFETY:
For Outdoor Use Only
(Outside any enclosure)
SAVE THESE INSTRUCTIONS FOR FUTURE REFERENCE. IF YOU ARE
ASSEMBLING THIS UNIT FOR SOMEONE ELSE, GIVE THIS MANUAL
TO HIM OR HER TO SAVE FOR FUTURE REFERENCE.
FOR CUSTOMER SERVICE
:
CALL
Woods™Toll‐free helpline: 1‐855‐966‐3785
MODEL# SQ200
SKU#085‐2203‐4
Page 2
2
Grill Operation 1‐2‐3
Before Grilling
Step 1 Keep your grill a safe distance away from your property.*
Step 2 Always perform a Leak Test on all connections *
Step 3 Keep children away from the grill.
During Grilling
(To avoid tripping safety valves, please follow these instructions carefully.)
Step 1 First open lid and connect gas cylinder slowly.
Step 2 Use protective gloves when grill gets hot.
Step 3 Never leave a lit grill unattended.
After Grilling
Step 1 Always burn grill for 10‐15 minutes to burn off food residues after use.
Step 2 Wait until the grill is completely cooled before closing lid.
Step 3 Clean up grease build‐up to avoid grease fire, and cover your grill to prevent rust.
* Please refer to the owner’s manual for details.
NOTE: Installer: Leave this manual with the consumer.
Consumer: Retain this manual for future reference.
WARNING
1. Do not store or use gasoline or
other flammable liquids or vapour
in the vicinity of this or any other
appliance.
2.
An LP cylinder not connected for use
shall not be stored in the vi
cinity of
this or any other appliance.
3. Never refill disposable cylinder.
4. Never allow oil or grease to get
hotter than 400
℉
or 200℃.Ifthe
temperature exceeds 400
℉
(200℃)
or if oil begins to smoke,
immediately turn the burner or gas
supply off.
DANGER
If you smell gas:
1. Turn off gas.
2. Extinguish any open flame.
3. Open lid.
4. If odor continues, keep away from
the appliance and immediately call
your gas supplier or your fire
department.
DANGER
1. Never operate this appliance unattended.
2. Never operate this appliance within 10 ft
(3 m) of any structure, combustible
material or other gas cylinder.
3. Never operate this appliance within 25 ft
(7.5 m) of any flammable liquid.
4. If a fire should occur, keep away from the
appliance an immediately call your fire
department. Do not attempt to extinguish
an oil or grease fire with water.
Always read and understand the WARNINGS and INSTRUCTIONS that are contained in this manual before attempting to use this
gas barbecue grill to prevent possible bodily injury or property damage.
Page 3

3
Table of Contents
For Your Safety ........................................................ ..................................................................4
Illustrated Part List.............................................................. .......................................................6
Assembly Instructions....................................................... .........................................................7
Operating Your Grill........................................................ ..........................................................11
Connecting & Disconnecting Gas Cylinder.................................................................................11
Checking
for
Leaks
................................................................ .....................................................11
Lighting Your Grill
....................................................................... ...............................................12
Care and Maintenance.............................................................. .................................................13
Troubleshooting........................................................................... ............................................14
Warranty Program............................................................................. ........................................15
Page 4

4
For Your Safety
Dear Valued Customer,
Congratulations on your new barbecue grill purchase! You’ve made the right choice. In this manual, you will find assembly
instructions, su ggestions for grilling and helpfu l hints, as well as guidelines for the safe operation, proper care and use of your
grill. Our expert staff strives to provide you with an easy‐to‐assemble product. Should you have any questions or problems with
this product, please call our customer service department at
1‐855‐966‐3785
(10:00 am – 7:00 pm (EST), Monday through
Friday.)
IMPORTANT NOTICE: READ ALL INSTRUCTIONS PRIOR TO ASSEMBLY AND USE.
Safety First!
Read and understand all warnings and precautions prior to operating your grill.
WARNING
1.
Cylinders must be stored outdoors out of the reach of children and must not be stored in a building, garage or any other
enclosed area.
2. The use of alcohol, prescription or non‐prescription drugs may impair an individual’s ability to properly
assemble or safely operate this appliance.
3. Always open the grill lid carefully and slowly as heat and steam trapped within the grill could cause severe burns.
4. Always place your grill on a hard and level surface far away from combustible materials and structures. An
asphalt or blacktop surface may not be acceptable for this purpose.
5. Do not leave a lit grill unattended.
6. Keep children and pets away from the grill at all times.
7. Do not use the grill in high winds.
8. Do not attempt to attach this grill to the self‐contained propane system of a camper
,
trailer, motor home or house.
9.
Do not use charcoal or lighter fluid.
10.
Liquid gas cylinder systems must only be installed in the commercial sector by trained personnel and checked by an appropriately
qualified person or, when dealing with certain cylinder systems, by a person assigned by the contractor (accident prevention
regulations (BGV D 34).
11. This outdoor gas appliance is not intended to be installed in or on recreation vehicles and/or boats.
12. Do not attempt to move the grill while it is lit.
13. Do not use the grill unless it is
COMPLETELY
assembled and all parts are securely fastened and tightened.
14. Keep combustible items and surfaces at least 6 feet away from the grill at all times. DO NOT use this gas grill or any gas product
under any overhead enclosure or near any unprotected combustible constructions.
15. Do not use in an explosive atmosphere. Keep grill area clear and free from combustible materials,
gasoline and other flammable vapours and liquids.
16. Do not attempt to use or assemble with missing or damaged parts. Contact customer service for replacement part.
CAUTION ‐ Prevention ofBurns
1. To avoid burns, do not touch metal parts of the grill until they have completely cooled for at least 45 minutes or unless you are
wearing protective gear such as pot holders, protective gloves or mittens.
2. Do not alter the grill in any manner.
3. Clean and inspect grill before each use. Never use a grill with damaged or missing parts.
4. Never keep a gas container in a hot car or car trunk. Heat will cause the gas pressure of a filled container to increase, which
could open the relief valve and allow gas to escape, and even an empty gas container is dangerous.
Safe Locations For Use Of This Outdoor Grill
DANGER
Never use this outdoor grill inside any building, garage, shed or breezeway, or inside any boat, trailer or recreational vehicle to
prevent a possible fire and to prevent the possibility of carbon monoxide poisoning or asphyxiation.
WARNINGS
Do not use this appliance under overhead combustible surface or covered area (e.g., awnings, umbrellas, porches or
gazebos).
Always confirm that this grill is not positioned under the overhang of a house, a garage or other structure before
Page 5
5
lighting it. An overhang will serve to deflect flare‐ups and radiated heat into the structure itself, which could
result in a fire.
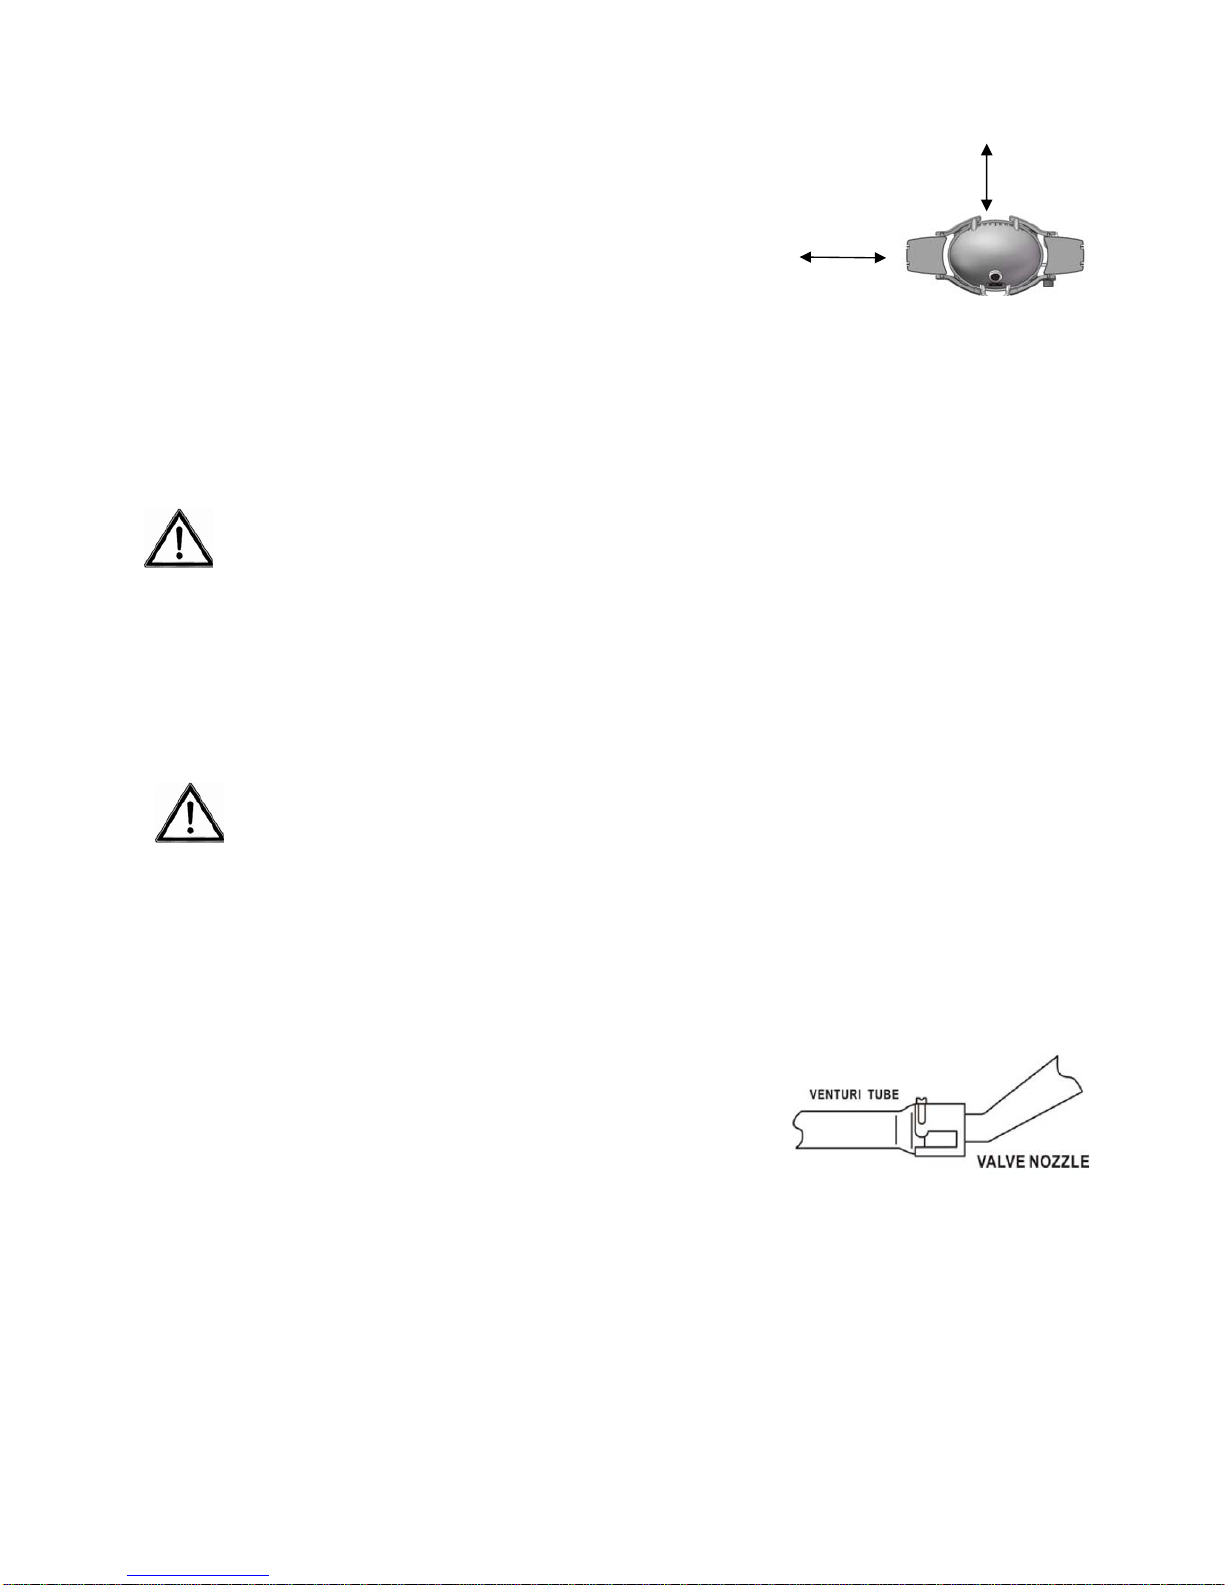
Always confirm that this grill is positioned more than 12 inches (30 cm) away
from any combustible materials or surface before lighting it, and that no gasoline
or other volatile substances are stored in the vicinity of this grill.
(see diagram to right). The temperature of a grease fire or of the radiated heat
might otherwise be sufficient to ignite nearby combustible or volatile substances.
Always locate this grill where there will be ample combustion and ventilation air. Do not obstruct the flow of combustion and
ventilation air, but never position it in the direct path of a strong wind.
Never allow the grill to operate while unattended to prevent uncontrolled grease fires from erupting.
Never attempt to move this grill while it is in operation or while it is still hot to prevent possible personal injury.
Never store or use gasoline or other flammable or volatile substances in the vicinity of this grill or in the vicinity of any other
heat‐generating appliance because of the danger of starting a fire.
DANGER–Gas Safety
Liquid propane (LP) gas is flammable and hazardous if handled improperly. Become aware of its characteristics before
using any LP gas product.
• LP gas Characteristics: Flammable, explosive under pressure, heavier than air and settles in pools in low areas.
• In its natural state,
LP
gas has no odor. For your safety, an odorant has been added.
• Contact with LP gas could cause freeze burns to the skin.
• This grill is shipped from the factory for LP
g
as use only.
• Never use an
LP gas
cylinder with a damaged body.
• Dented or rusted propane cylinders may be hazardous and must be checked by your propane gas supplier.
CAUTION
It is essential to keep the grill’s valve compartment, burners and circulating air passages clean.
Inspect the grill before each use
.
Step 1. Inspect all connections and make certain they are secure.
Step 2. Check and clean the burner venturi tubes for insects and insect nests by removing the burner and inserting a bottle brush
cleaner into each tube to make sure the passage is clear.
*** A clogged tube can lead to a fire beneath the grill. ***
Step 3. Ensure that the valve nozzle is pointing straight and completely inserted into the venturi tube.
GENERAL INFORMATION
1. A propane gas cylinderisrequired for operation.
2. This gas grill is NOT intended for commercial u
se.
3. Do not obstruct the ventilation opening of the cylinder enclosure.
IMPROPER USE
Any other application or applications extending beyond the stated purpose are not authorized. This applies to the following
types of misuse in particular:
• Do not operate the barbecue with coal or fuel other than liquid gas (propane).
• Do not operate the barbecue as a stove with pots and pans.
• Do not operate the barbecue as a heater.
Do not use the grill to heat materials and substances other than food that is suitable for barbecuing.
Do not modify the appliance.
12 inches
12 inches
Page 6
6
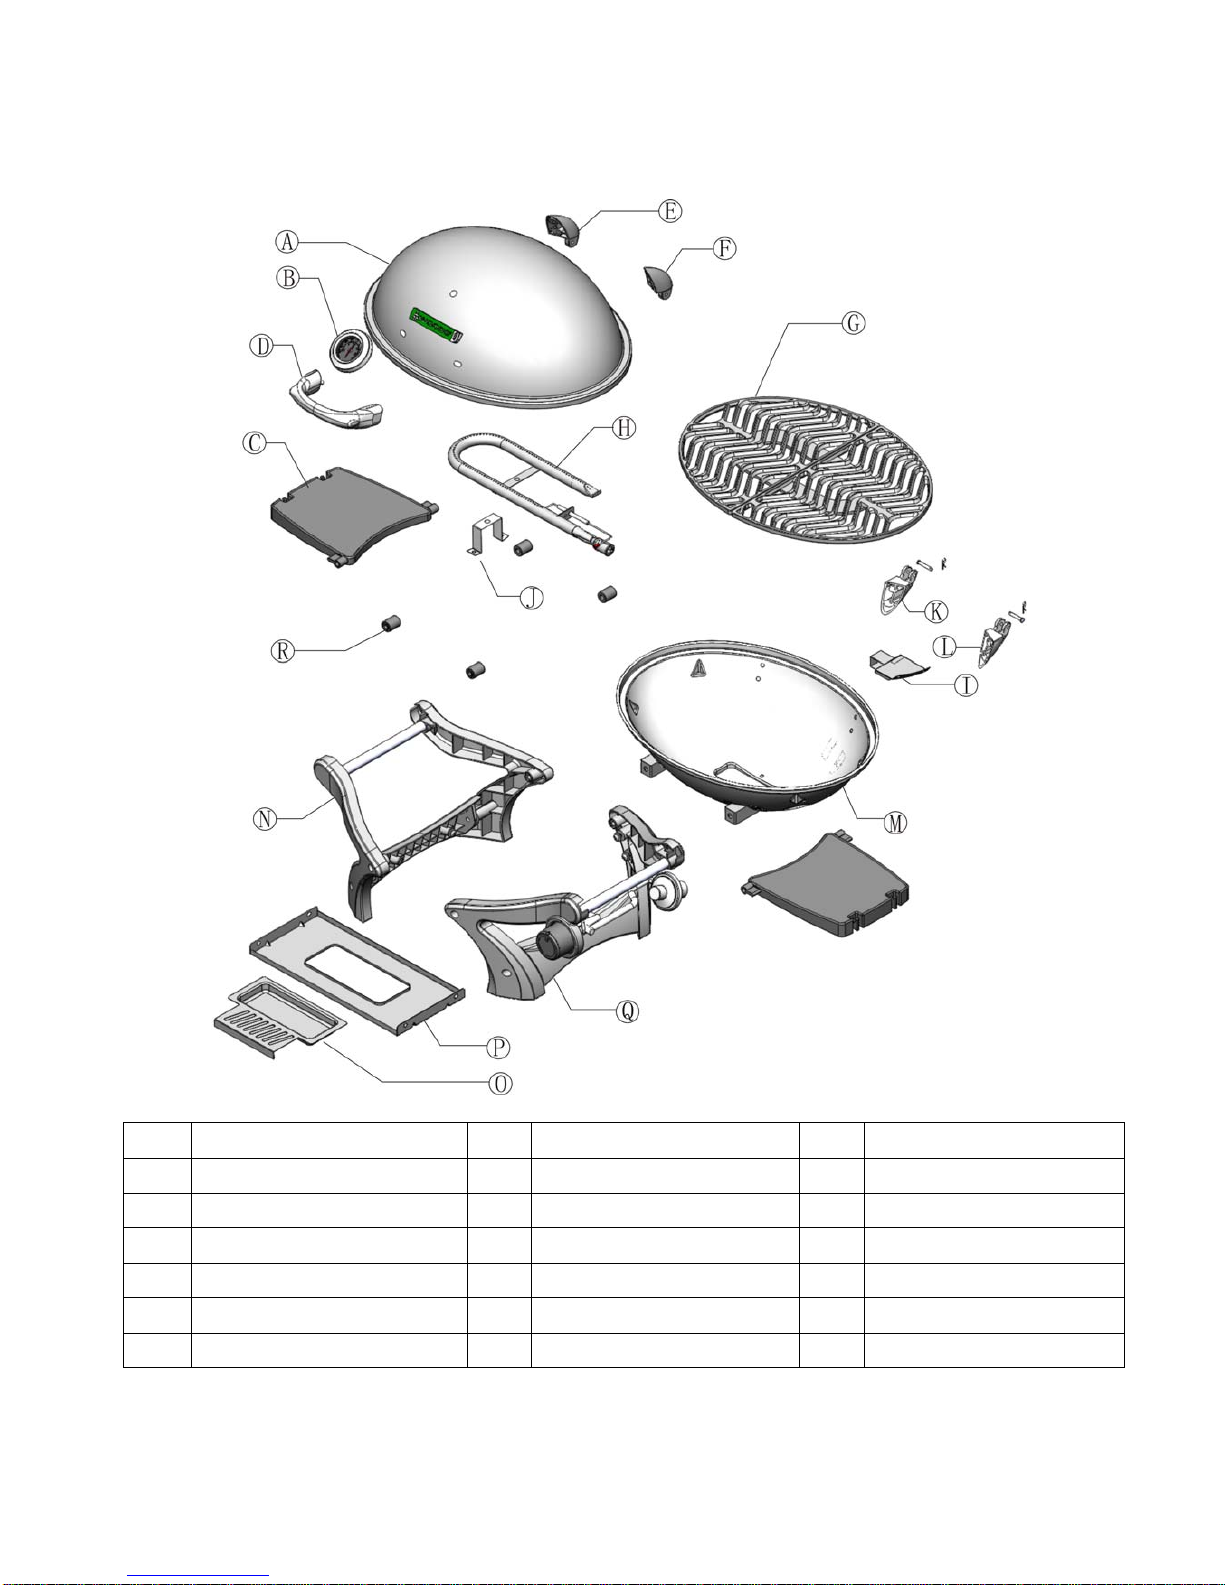
Illustrated Parts List
Part Description (QTY) Part Description (QTY) Part Description (QTY)
A Lid…………………….…1 pc G Cooking grid……….....2 pcs M Body………………............1 pc
B Thermometer…….…1 pc H Burner…………...............1 pc N Body support‐L………….1pc
C Side shelf….................2 pcs I Oil plate.........................1 pc O Grease cup………………1 pc
D Lid handle…………..…1 pc J Burner support……….…1 pc P Connecting plate…....…1 pc
ELidgemel‐L……………..1 pc K Body gemel‐L…………….1 pc Q Body support‐R…………1 pc
FLidgemel‐R………………1 pc L Body gemel‐R…………….1 pc R Insulation cushion ……..4 pcs
Page 7
7
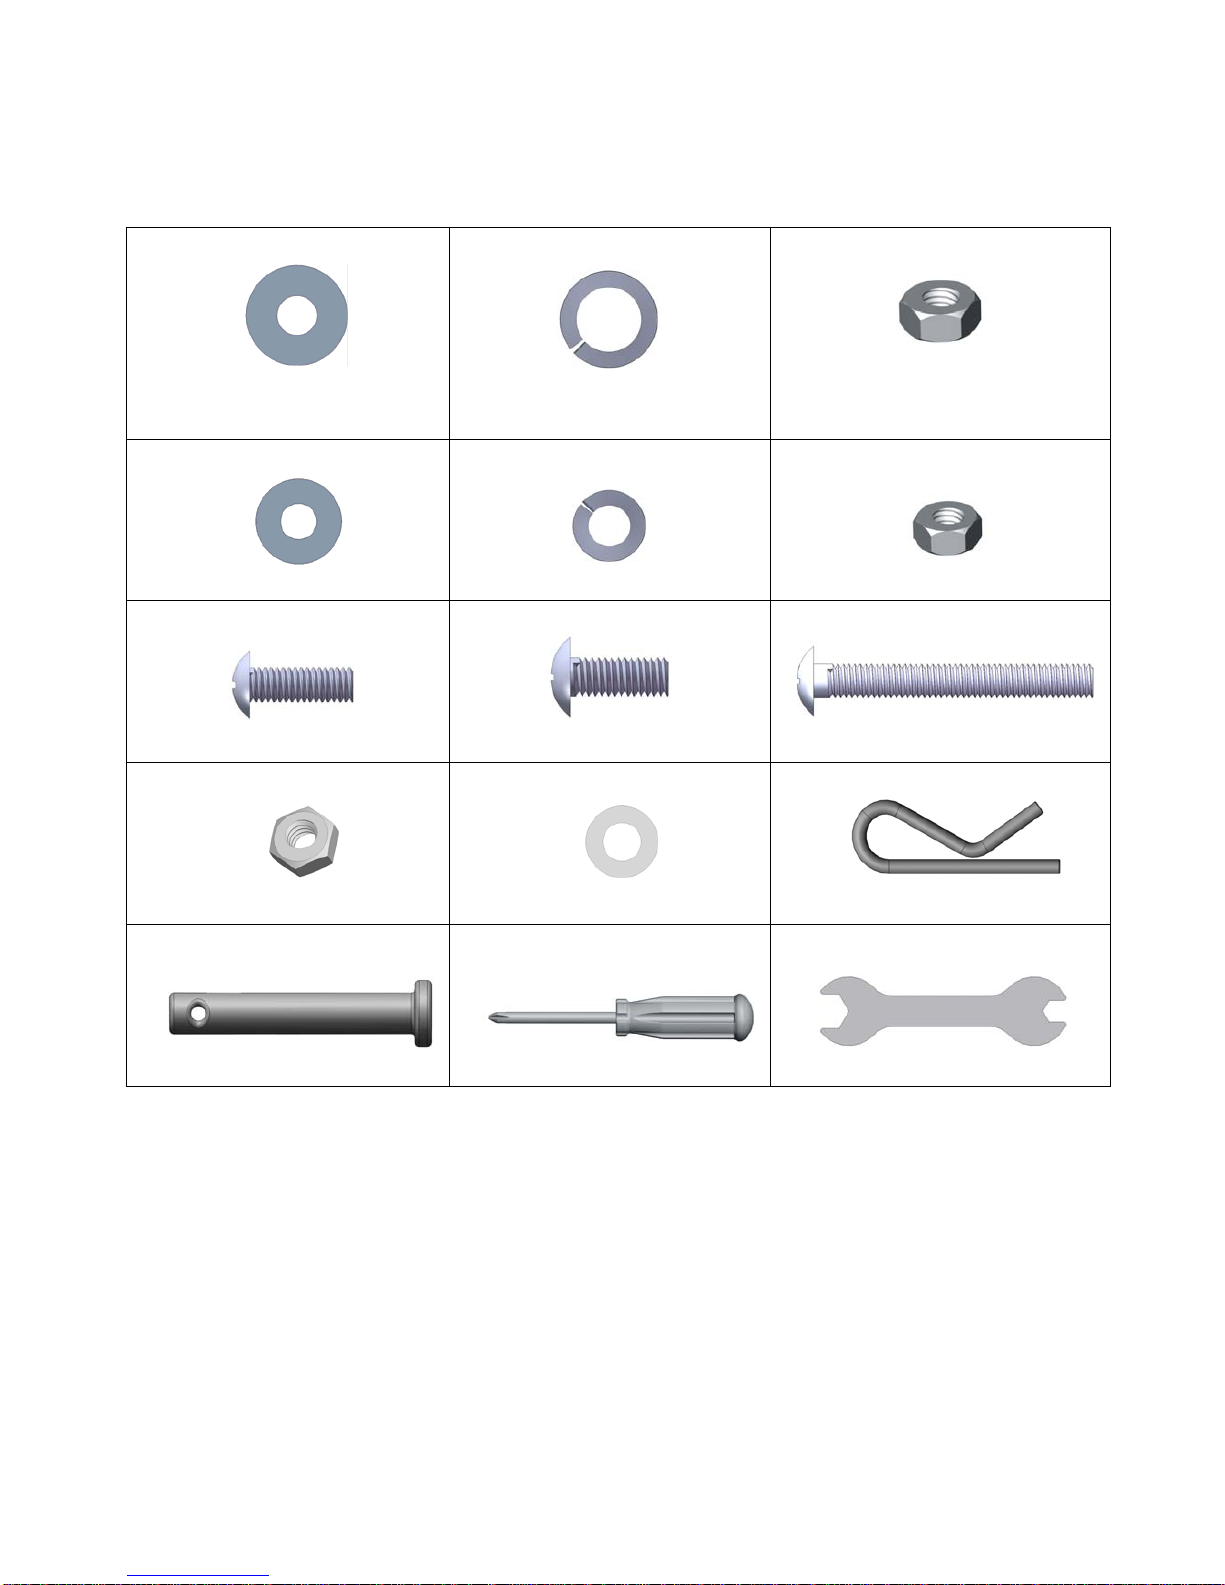
Parts List
AAA:7PCS
Flat washer
BBB:7PCS
Spring washer
CCC:2PCS
M6 nut
DDD:12PCS
Flat washer
EEE:12PCS
Spring washer
FFF:4PCS
M5 nut
GGG:12PCS
Bolt
HHH:5PCS
Bolt
III:4PCS
Bolt
JJJ:1PC
Thermometer nut
KKK:1PC
Thermometer flat washer
LLL:2PCS
Pin
MMM:2PCS
LID PIN
NNN:1PC
Screwdriver
OOO:1PCS
Wrench (M5/M6)
Assembly Instructions
Remove all contents from the carton packaging. Make sure all parts are present before attempting
assembly. Once the grill is fully assembled, go back and check to make certain all the bolts are secure.
Tighten again using the screwdriver provided if necessary.Estimated Assembly Time: 35 minutes
Page 8
8
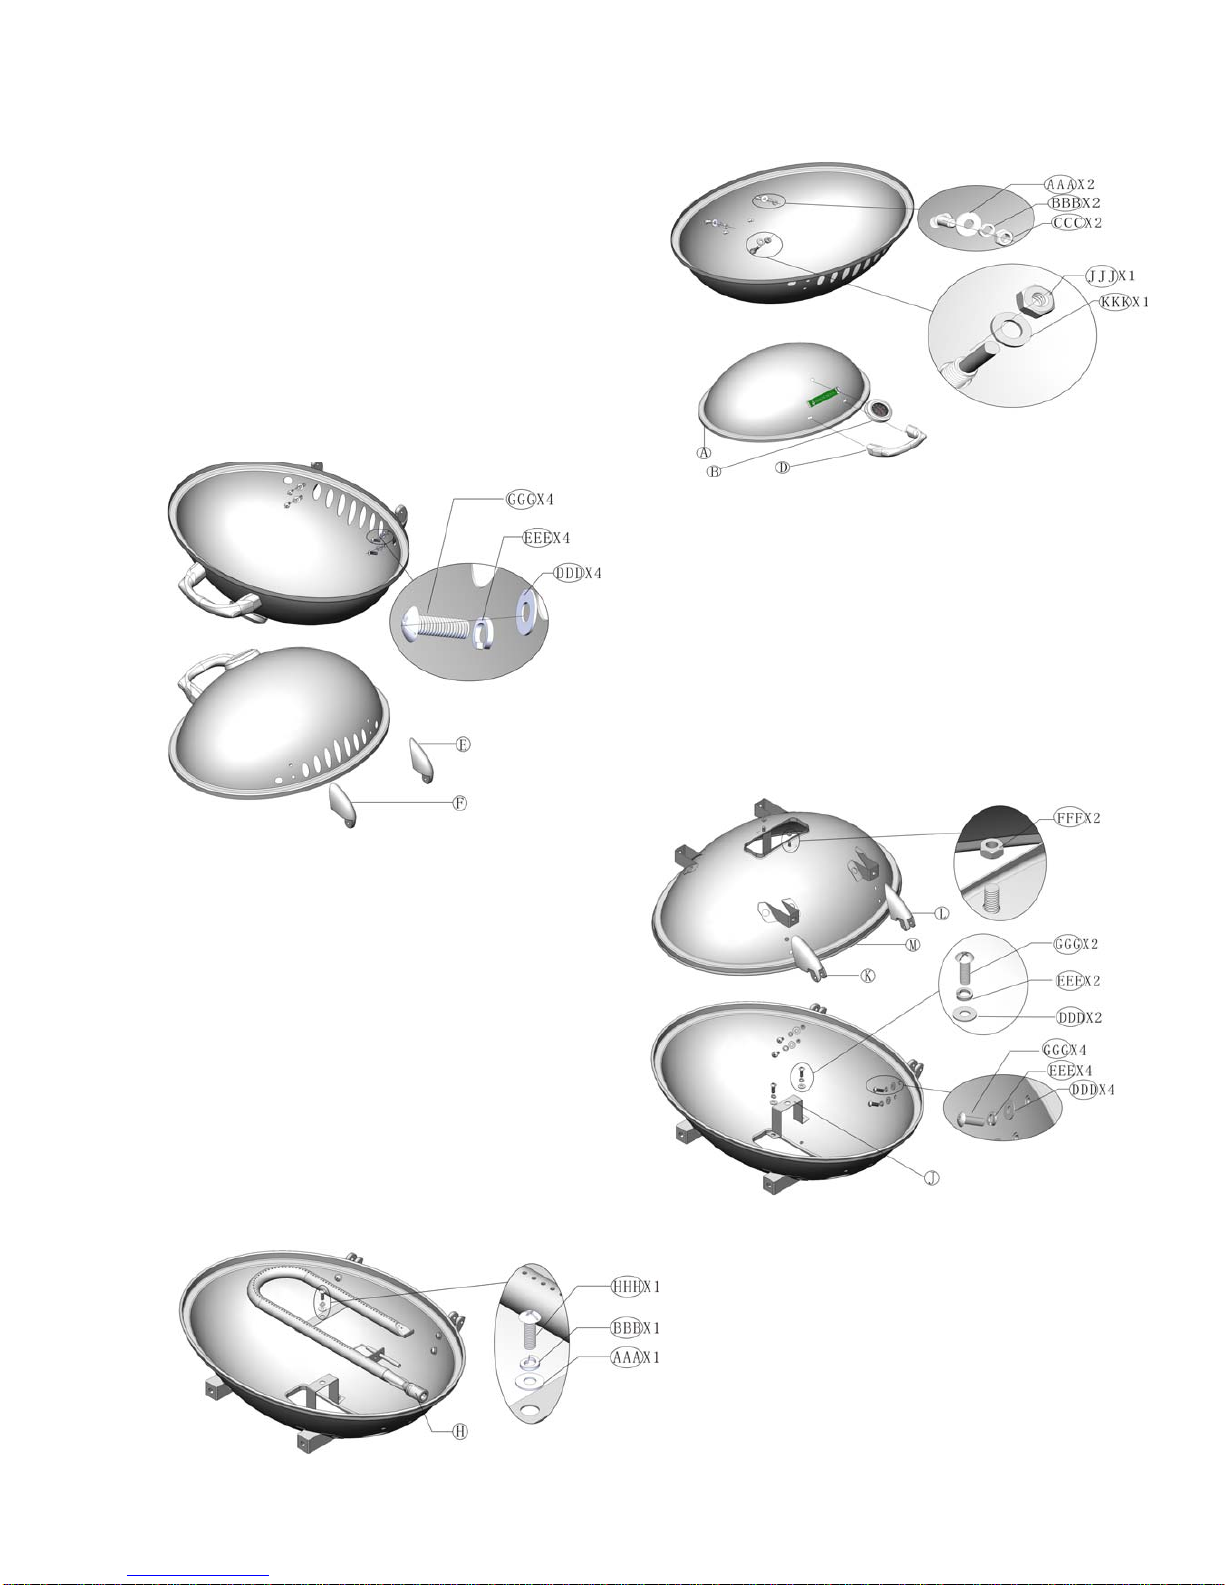
Step 1
a) Inset the thermometer (B) into the holes on
the front top of the lid (A) and seal with the
thermometer flat washer (KKK) and the
thermometer nut (JJJ).
b) Insert the pre‐attached bolts on the lid handle (D)
into the holes on the front bottom of the lid and seal
withoneflatwasher(AAA),onespringwasher
(BBB), and one nut (CCC).
c) Tighten the nuts by the wrench (OOO).
Step 2
a) Align the holes on the back side oflid with the
holes on the LID GEMEL‐L(E)andtheLID
GEMEL‐R(F).
b) Insert one bolt (GGG) into each pre‐drilled hole
and seal with one flat washer (DDD) and one
spring washer (EEE).
c) Tighten the bolts by the screwdriver (NNN).
Step 3
a) Align the holes on the back side of body (M) with
the holes on the BODY GEMEL‐L(K)andtheBODY
GEMEL‐R(L).
b) Insertonebolt(GGG)intoeachpre‐drilled hole
and seal with one flat washer (DDD) and one
spring washer (EEE).
c) Align the holes on the bottom o
f
body (M) with
the holes on the burner support (J).
d) Insertonebolt(GGG)intoeachpre‐drilled hole
and seal with one flat washer (DDD) and one
spring washer (EEE), and one nut (FFF).
e) Tighten the bolts by the screwdriver (NNN).
Step 4
b) Align the hole on the burner support (J) with
the hole on the burner (H). Through the
burner head out from the side hole of the
body.
c) Insert one bolt (HHH) into the pre‐drilled
holes and seal with one flat washer (AAA) and
one spring washer (BBB).
d)
Tighten the bolt by the screwdriver (NNN)
.
Page 9
9
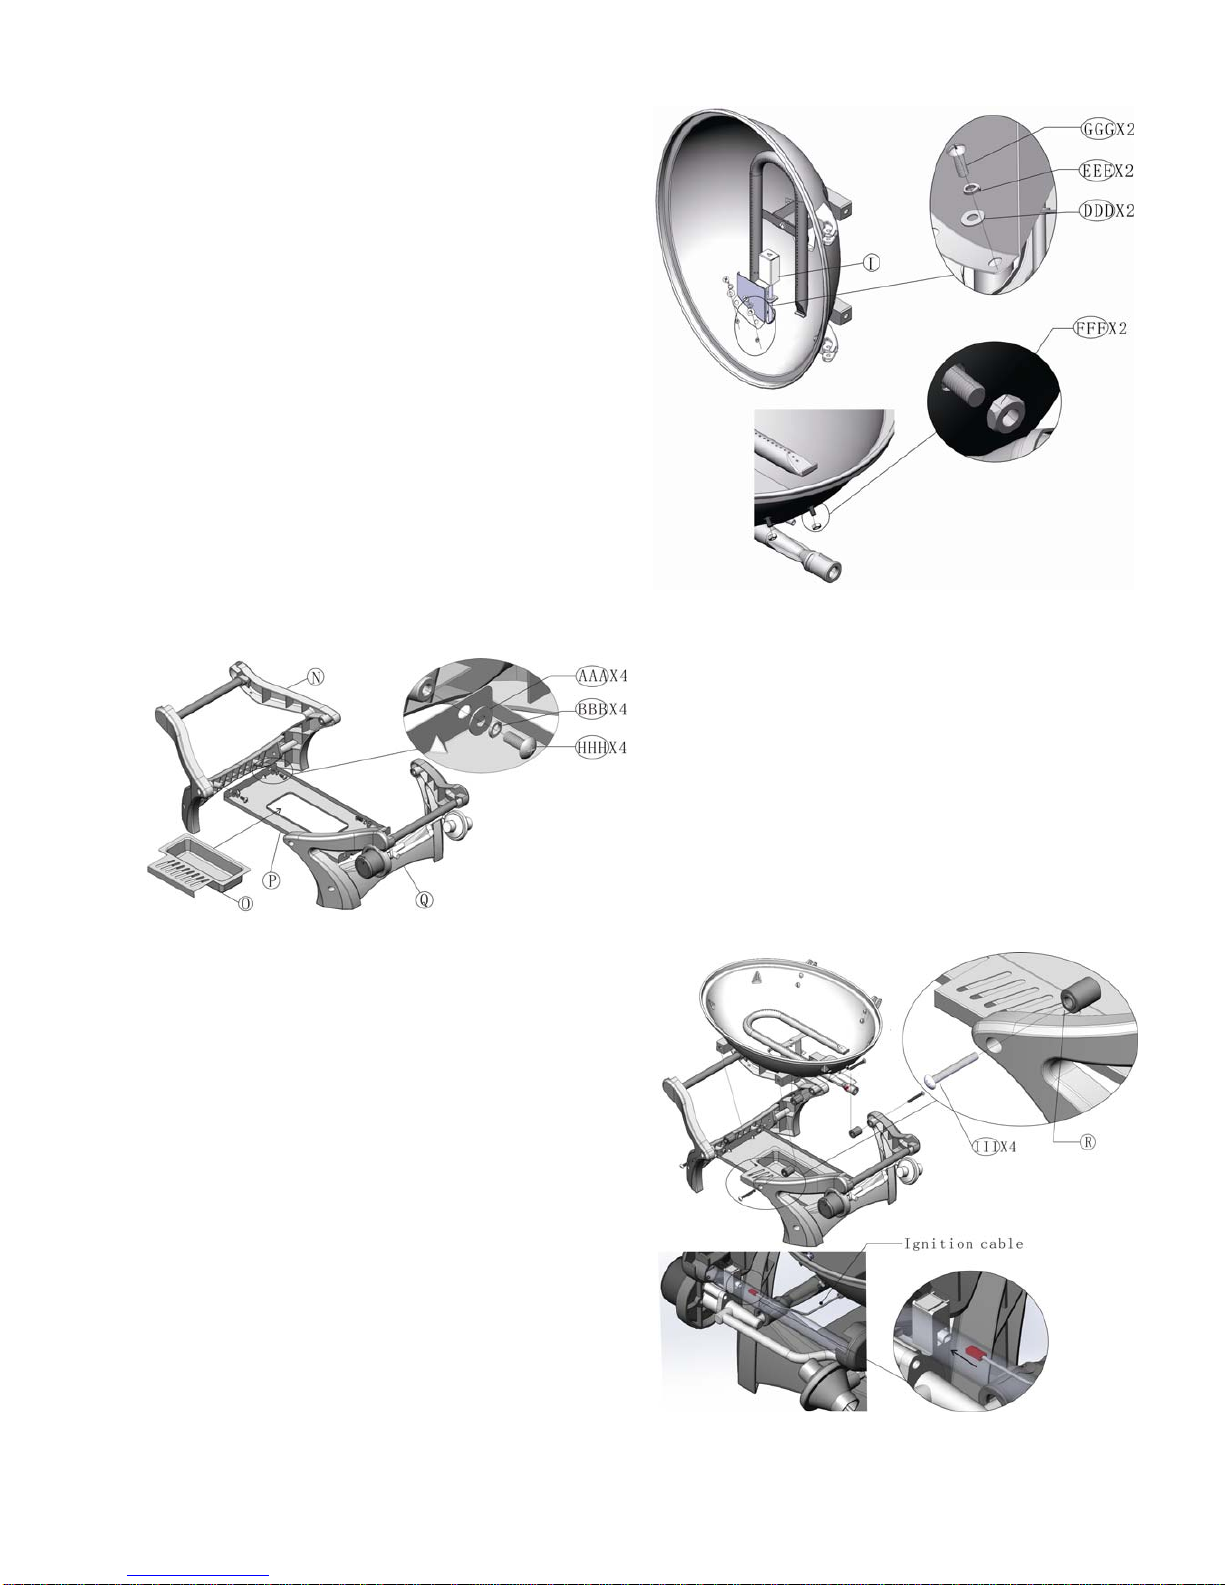
Step 5
a) Put the oil plate (I) above the burner and align
the holes with the holes on the side hole of the
body.
b) Insertonebolt(GGG)intoeachpre‐drilled hole
and seal with one flat washer (DDD) and one
spring washer (EEE), and one nut (FFF).
c) Tighten the bolts by the screwdriver (NNN).
Step 6
a) Align the holes on the body support‐L(N)and
the body support‐R (Q) with the holes on
connecting plate (P).
b) Insert one bolt (HHH) into each pre‐drilled
hole and seal with one flat washer (AAA) and
one spring washer (BBB).
c) Put the grease cup (O) onto the connecting
plate (P).
d) Tighten the bolts by the screwdriver (NNN).
Step 7
a) Align the holes on the bottom o
f
the body
with the holes on the body support‐L(N)and
the body support‐R(Q).
b) Insert one bolt (III) into each pre‐drilled hole
and seal with one body insulation cushion (R).
c) Tighten the bolts by the screwdriver (NNN).
d) Insert the Ignition cable to the valve.
Page 10
10
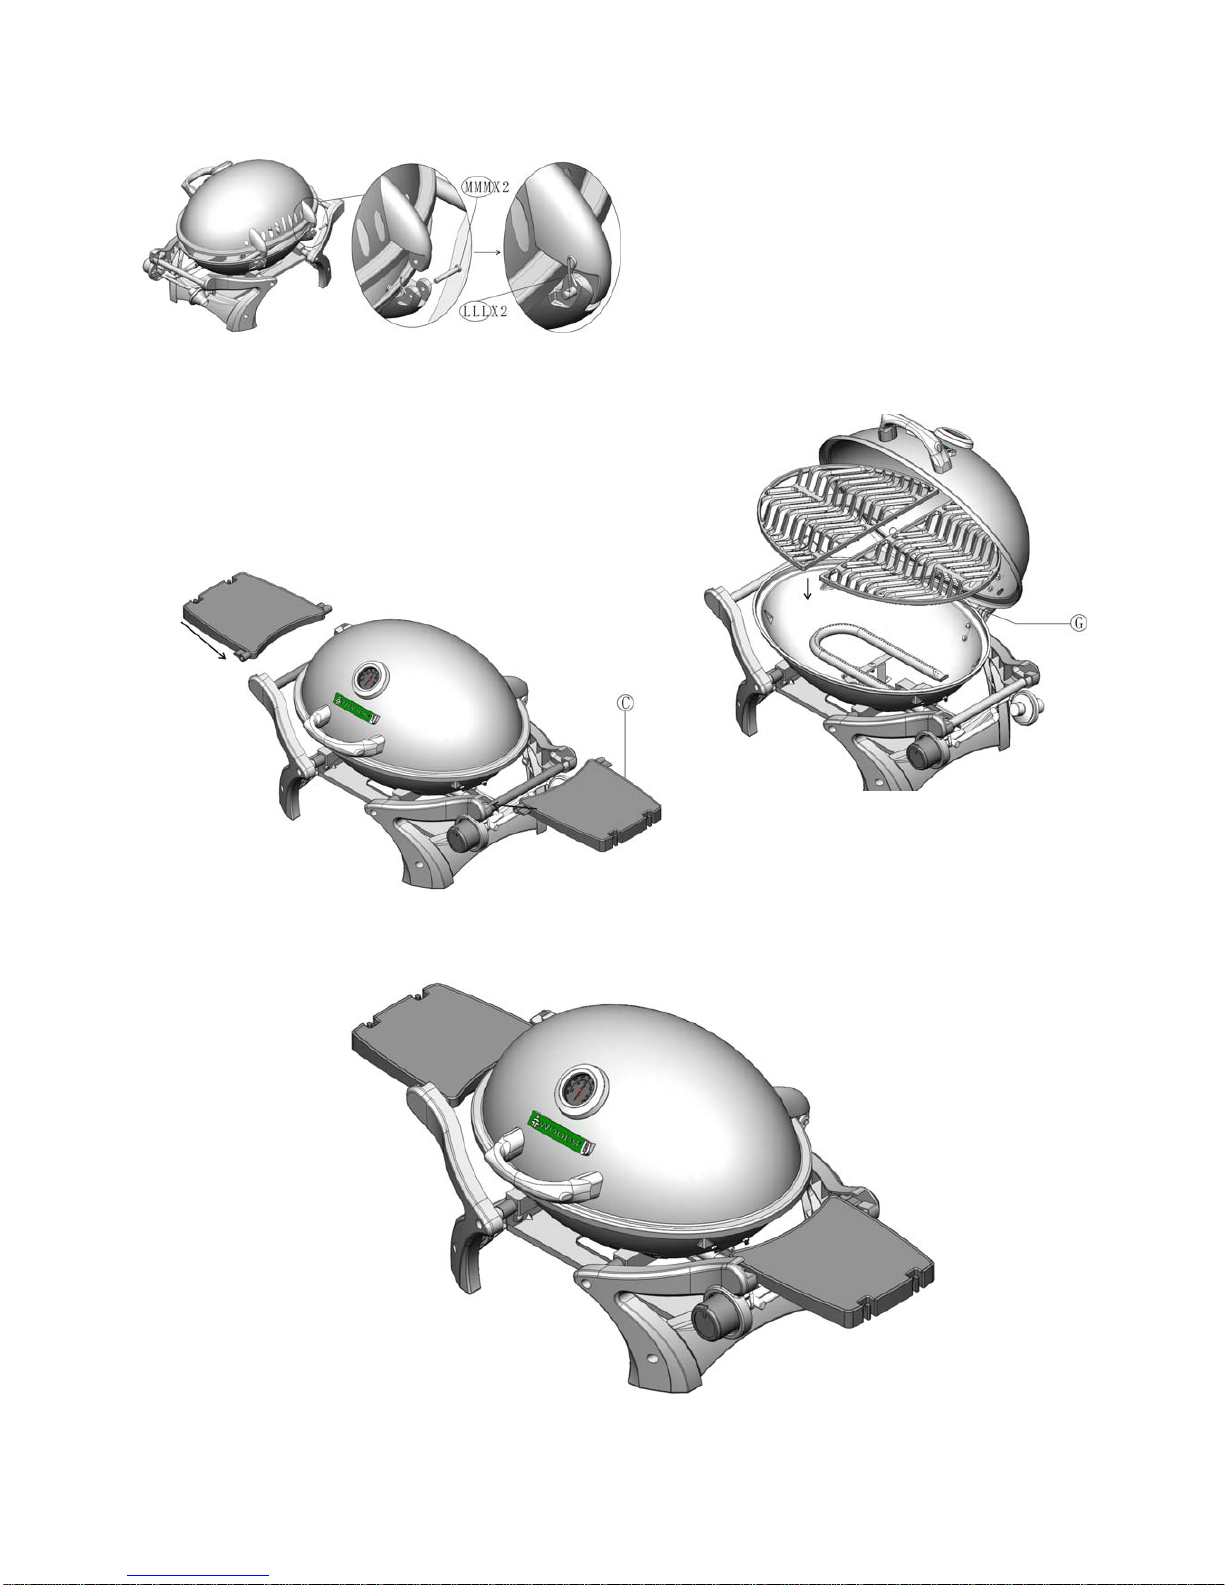
Fully Assembled View
Right Side
Left Side
Step 8
a) Align the holes on the lid gemel on the back
of the lid with the holes of the body gemel on
the back of the body.
b) Insert one lid pin (MMM) into each hole.
c) Insert one pin (LLL) into the hole on the front
of the lid pin (MMM).
Step 9
Put the cooking grids (G) on the support of
the body (M).
Step 10
Insert the side shelves (C) on the right and
left handle of the body.
Page 11
11
Operating Your Grill
CAUTION:
Use only th e regulator provided. If a replacement is necessary, call our customer service center. The use of unauthorizedparts
can create an unsafe condition and environment.
Connecting & Disconnecting the Gas Cylinder
1. Always confirm all burner control knobs are in the OFF position before activating the gas supply.
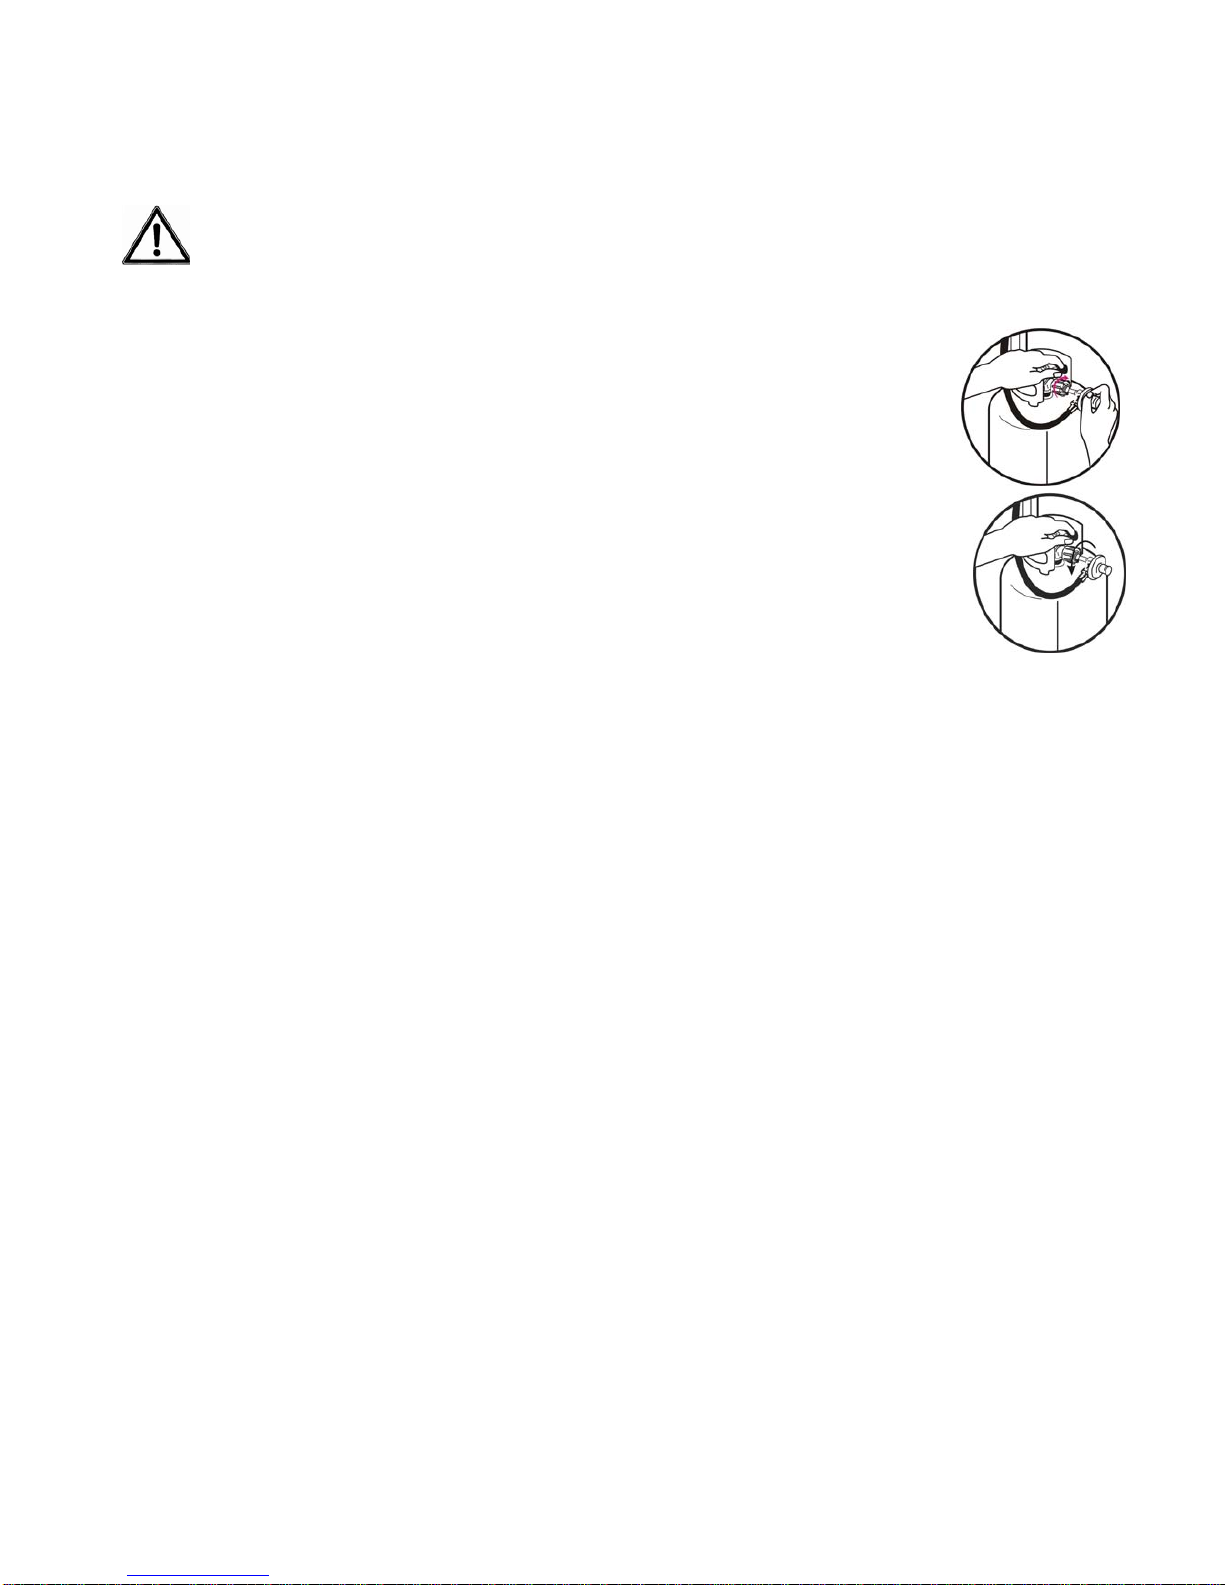
2. Before connection, be sure that there is no debris caught in the head of the gas cylinder, head of
the regulator valve, or in the head of the burner and burner ports.
3. Always connect the gas supply regulators as follows: Insert the nipple of the valve coupling into the
tank valve and tighten the connection collar by turning it clockwise with one hand while holding the
regulator with the other hand.
4. Disconnect the propane cylinder from the regulator valve when the grill is not in use.
5. Always confirm all burner control knobs are in the OFF position before disconnecting the gas supply.
6. Before disconnecting, be sure that the tank valve is in OFF position.
7. Always disconnect the gas supply regulators as follows: Loosen the connection collar by turning it
counter‐clockwise with one hand while holding the regulator with the other hand and take the nipple
of the valve out of the tank valve .Do not obstruct the flow of combustion air
and ventilation air to the grill. Keep ventilation openings of the cylinder enclosure free and clear from
debris.
8. Place dust cap on cylinder valve outlet whenever the cylinder is not in use. Install only the type of dust cap on cylinder
valve outlet that is provided with the cylinder valve. Other types of caps or plugs may result in leakage of propane.
9. Turn off the gas supply at the gas cylinder after use.
10. Gas cylinder: a common camping gas cylinder with a fill weight of 3,5 or 11 kg(e.g. grey camping gas cylinder). These are
available at DIY shops or liquid gas suppliers.
11. Pressure regulator: preset and properly approved pressure regulator,max.1.5kg/operating pressure suitable for the gas
cylinder used. This type of pressure reducer is also available from your local dealer.
DANGER
To prevent fire or explosion hazard when testing for a leak:
1. Perform the leak test described below before lighting the grill and each time the cylinder is connected for use.
2. Do not smoke or allow other sources of ignition in the area while conducting a leak test.
3. Conduct the leak test outdoors in a well‐ventilated area.
4. Do not use matches, lighters or a flame to check for leaks.
5. Do not use grill until all leaks have been stopped. If you are unable to stop a leak, disconnect the propane supply, call for gas
appliance service or your local propane gas supplier.
Checking
for
Leaks
1. Make two to three oz. of leak solution by mixing one part liquid dishwashing soap with three parts water.
2. Make sure control knob is in the “OFF” position.
3. Spray some solution on the reg ulator connection.
4. Inspect the solution at the connections for bubbles. If no bubbles appear, the connection is secure.
5. If bubbles appear, you have a leak. Go to step 6.
6. Disconnect the cylinder and reconnect. Make sure the connection is secured.
7. Retest with solution.
8. If you continue to see bubbles, replace the cylinder.
Page 12
12
Lighting Your Grill
DANGER:
Failure to open lid while igniting the grill’s burners or no t waiting five minutes to allow gas to clear if the grill
does not light, may result in an explosion, which could cause serious bodily injury or death.
WARNING
: To prevent possible bodily injury, never stand with your head directly over the grill when preparing to light
or when lighting the main burners.
WARNING
: Attempting to light t he burner with the lid closed may cause an explosion. Make sure there are no
obstructions o
f
airflow to the gas unit. Spiders and insects can nest and clog the
burner/venturi tube at the orifice. A clogged burner tube can lead to a fire beneath the
appliance.
Main Burner
1. Open lid
before
lighting burners.
2. All valves must be in the “OFF” position.
3.
Turn gas supply "ON" by connecting propane cylinder to regulator inlet fitting.
4.
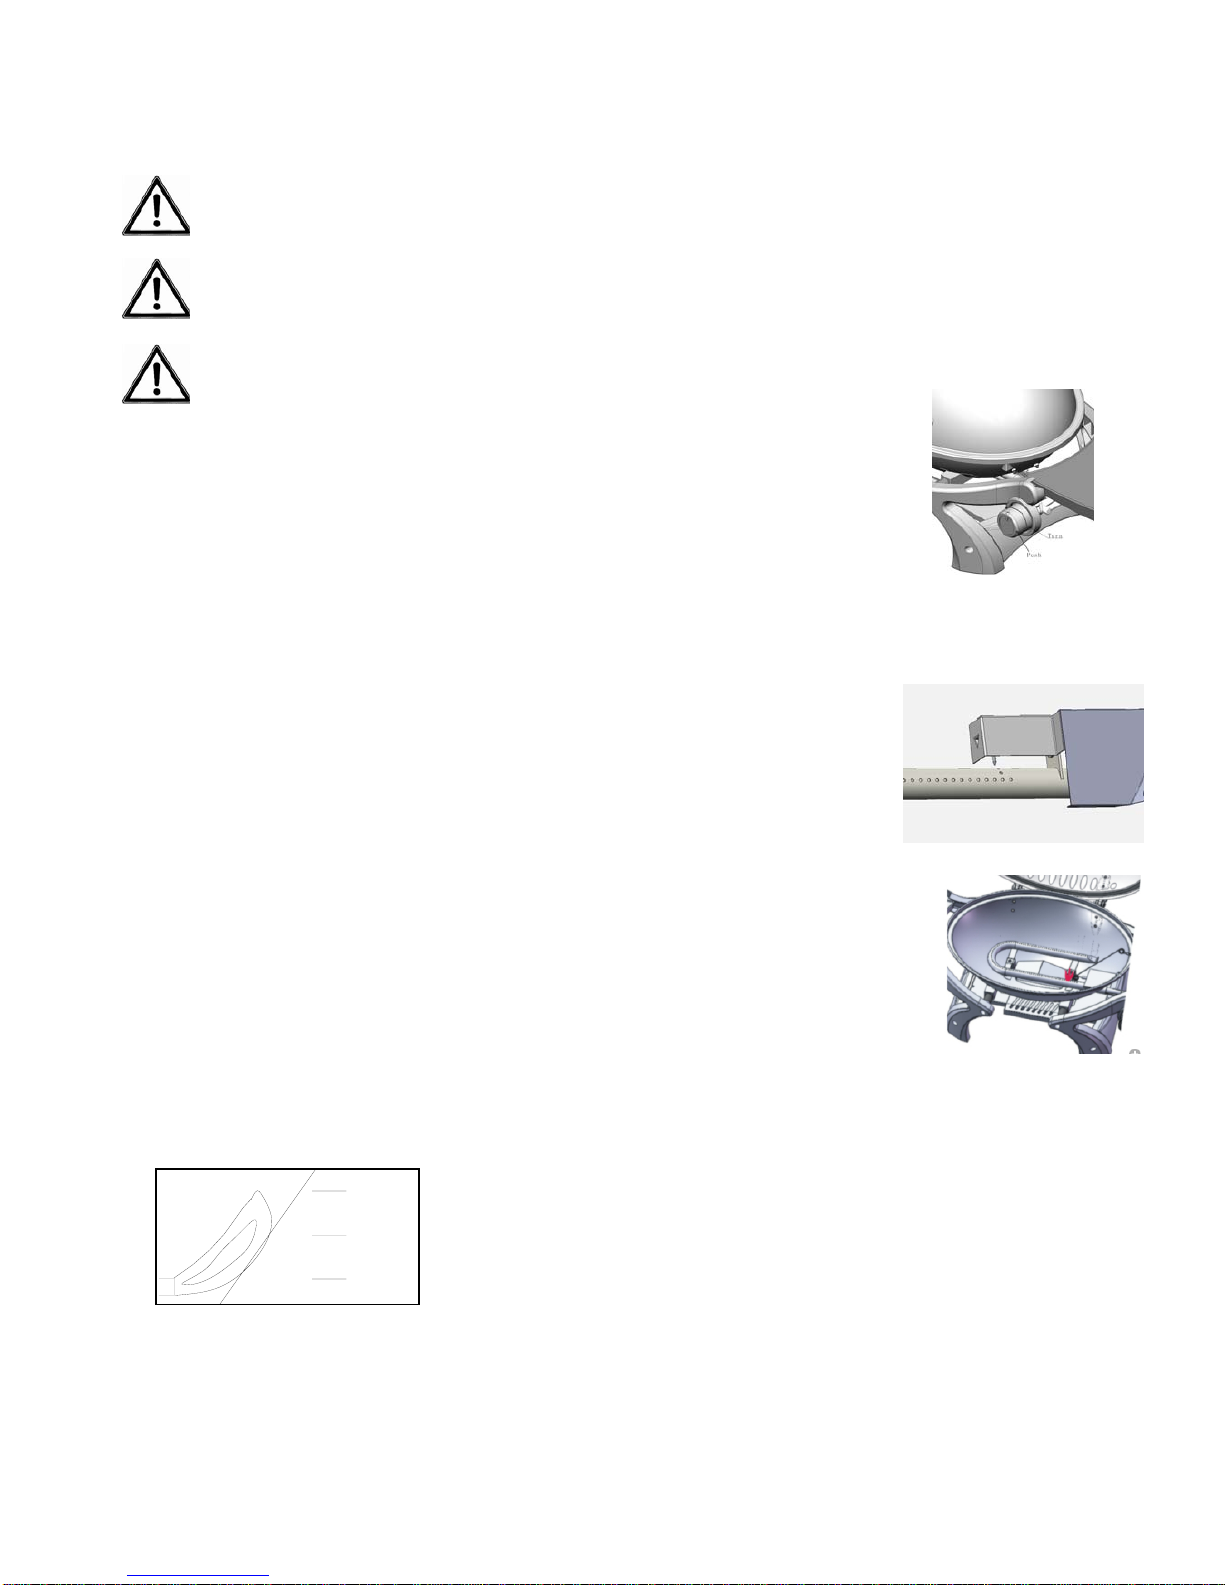
Push in control knob completely (3 to 4 seconds) and rotate slowly about 1/4 turn counter
clockwise until a click is heard. The burner should light. Observe the burner flame and make
sure all burner ports are lighted. A blue/yellow flame of 1‐2 inches should appear from the
burner.
5 If the burner does not light, turn the control knob to “OFF” position immediately. Wait 5 minutes
and repeat the lighting procedure.
6. Adjust control knob to desired cooking temperature.
If the burner does not light by the lighting instruction above, please adjust the ignition needle to
align with the burner port as the illustration.
Using the Lighting Stick to Light the Burners
1. Insert a match into the end of the lighting stick and light it.
2. Once lit, place the flame through the cooking grid slots to reach
the burner ports. (see diagram to right).
3. Push and turn control knob to “HIGH” setting. After lighting observe the burner flame, make
sure all burner ports are lighted‐‐a blue/yellow flame of one to two inches from the burner ports
should appear.
If ignition does not take place, turn the burner control knob to the “OFF” position.
Wait five minutes with lid open for the gas to clear and repeat the lighting procedure.
4. Adjust burners to the desired cooking temperature.
Confirm that the burner is properly lit by agreeing with description below. If the flame pattern appears abnormal, consult the
troubleshooting guide on page 14 for corrective action.
1) Push in for 3 to 4 seconds
2) Turn counterclockwise to “on”
3) Turn clockwise to ”off”
2in.
1in.
0in.
Observe flame height
and colour
when lit:
Flame should be a blue/yellow colour between 1–2” (25–50 mm)
high.
Page 13
13
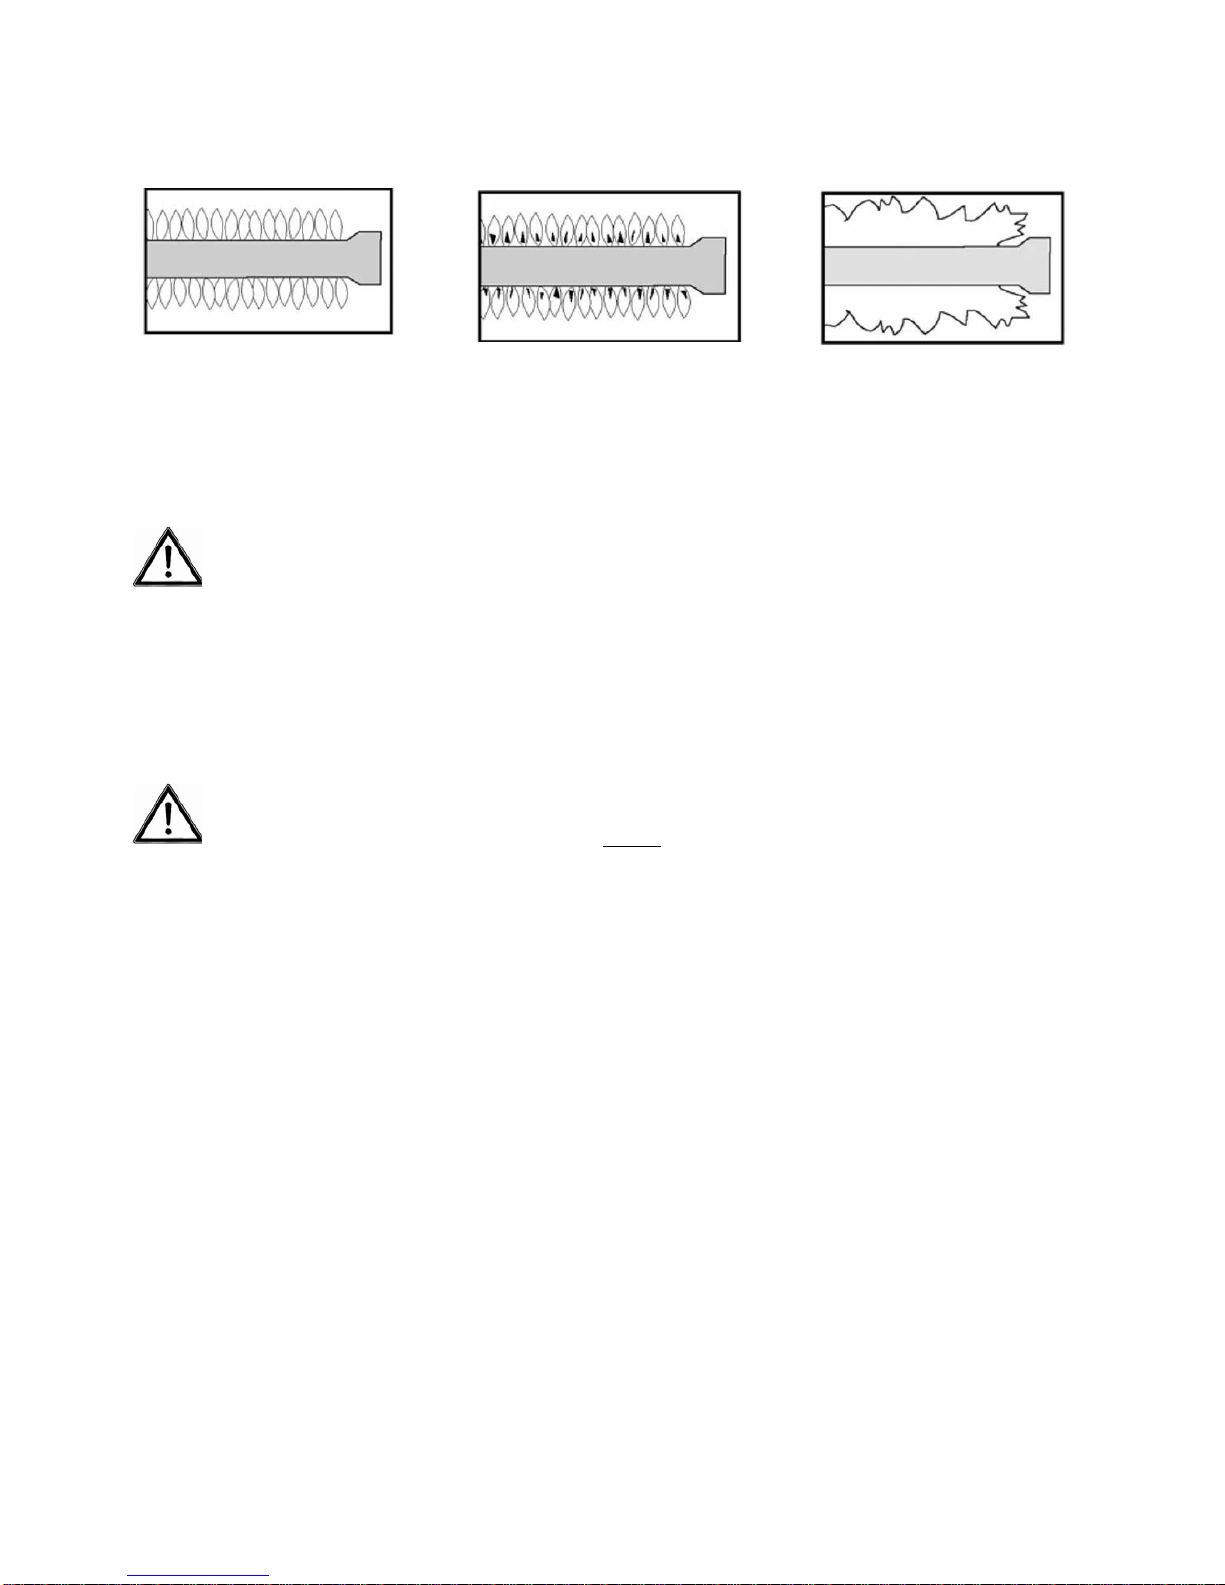
FIG. A FIG. B FIG. C
Flare‐ups:
“Flare‐ups” sometimes occur when food drippings fall onto the hot heat plate or burner and ignite. Some flaring is normal and
desirable as it helps impart the unique flavors associated with grilled foods. Controlling the intensity of the flare‐ups is necessary,
however, in order to avoid burned or unevenly cooked foods and to prevent the possibility of accidental fire.
WARNING: Always monitor the grill closelywhen cooking and turn the flame level down (LOW) or OFF if flare‐ ups
intensify.
Shutting off the burner:
Always turn the control knob clockwise all the way to the “LOCK OFF’’ pos i tion.
Promptly disconnect the propane cylinder.
Care and Maintenance
IMPORTANT
Always allow to completely cool off before covering your grill to prevent corrosion from condensation.
Caution:
All cleaning and maintenance should be done when the grill is cool, with the fuel supply turne d off at the
control dial and the propanecylinder disconnected. DO NOT
clean any grill part in a self‐cleaning oven. The extreme
heatwill damage the finish.
Cleaning the Burner Assembly
Burning off the grill after every use (approx. 15 minutes) will keep excessive food re sidue from building up.
Recommended cleaning materials
‐
Mild dishwashing liquid detergent Hot water
Nylon cleaning pad Heat Resistant Acrylic brush
Paper clip Putty knife/scraper
Compressed air
DO NOT use cleaners that contain acid, mineral spirits or xylene.
Outside surfaces
Use a mild dishwashing detergent and hot water solution to clean. Rinse th oroughl y with water.
Inside surfaces
If the inside surface of the grill lid has the appearance of peeling paint, baked‐on grease has turned t o carbon and is
flaking off. Clean thoroughly with a strong solution of detergent and hot water. Rinse with water and allow it to completely
dry.
Interior of grill bot to m – Remove r esidue using brush, scraper and/or cleaning pad. Wash with a dishwashing detergent and
hot water solution. Rinse with water and le t dry.
Cooking Grids – The stainless steel plate grates have a glass‐like composition that should be handled with care. Use a mild
dishwashing detergent or baking soda and hot water solution. Non‐abrasive scouring powder can be used on stubborn
stains. Rinse with water.
Heat Plates – Clean residue with wire brush and wash with soapy water. Rinse with water.
Normal: Soft blue flames with yellow tips
between I inch - 2 inches high.
Out of adjustment: Noisy hard blue
flames – too much air
Poor combustion: Wavy, yellow
flames- too little air.
Page 14
14
Troubleshooting
Problem Possible Cause Prevention/Cure
Burner will not light using a mat ch. No gas flow. Check if propane cylinder is e mpty. If empty,
replace.
.
Obstruction of gas flow. Clear burner tube.
Disengagement of burn er to valve. Reengage burner and valve.
Spider webs or insect nest in venturi. Clean venturi.
Burner ports clogged or blocked. Clean burner ports.
Irregular heat pattern. Burner ports are clogged or blocked. Clean burner ports.
New burner may have residual
manufacturing oils.
Burn grill
f
or 15 minutes with the lid closed.
Spider webs or insect nest in venturi Clean venturi.
Food residue, grease or seasoning
salt on burner.
Poor alignment of valve to burner
venturi.
Clean burner.
Ensure burner venturi is properly engaged
with valve.
Sudden drop in gas flow or heat. High or gusting winds. Turn front of grill to face wind
Low on propane gas. Replace propane cylinder.
Flare‐up. Grease buildup. Clean grill.
Excessive
f
at in meat. Trimfatfrom meat before grilling.
Grease trapped by
f
ood buildup
around burner system.
Flashback [fire in burner tubes]. Burner and /or burner tubes are
blocked.
Inside of lid is peeling – Carbon build up.
like paint peeling.
Turn k nob OFF. Disconnect propane
cylinder. Leave lid in closed position and let fire
burn out. After grill cools, remove and clean all
parts.
Clean burner and/or burner tube.
Baked on greasebuildup has turned to carbon
and is flaking off. Clean thoroughly.
Check to see if cylinder is empty. If empty, replace.
Clear burner tube.
Cylinder empty.
Obstruction of gas flow.
Burner accidentally extinguished.
Persistent grease fire.
Excessive cooking temperature. Adjust (lower) temperature accordingly.
Page 15

15
W
arrantyProgram
Proof ofpurchase
is required to access this warranty program, which is in effect from the date of purchase. If unable to provide
proof of purchase or after the warranty has expired, customers will be subject to parts, shipping and handling fees.
Full 30‐Day Warranty
Any missing parts can be replaced at no charge within 30 days from the date of purchase with a valid proof of purchase.
Limited Warranty
This grill cannot be returned or refunded after it is used.
1‐Year
Limited
Warranty
on all parts in regards to damage affecting the operation of the gas grill.
Warranty Provisions:
‐ This warranty is non‐transferable and does not cover failures due to misuse or improper installation or maintenance.
‐ This warranty is for replacement of defective parts only. We are not responsible for incidental or consequential damages or
labor costs.
‐ This warranty does not cover chips and scratches of porcelain or painted surfaces, nor does it cover corrosion or discoloration
due to misuse, lack of maintenance, hostile environment, accidents, alterations, abuse or neglect.
‐ This warranty does not cover damage caused by heat, abrasive and chemical cleaners, resulting in chipped porcelain enamel
parts or any damage to other components used in the installation or operation of the gas grill.
The original consumer purchaser will be charged for all shipping and handling fees of replacement under the terms of limited
warranty. If customer unable to provide proof of purchase or after t he warranty has expired, customers will be subject to
parts, shipping and handling fees.
Some states (provinces) do not allow the limitation or exclusion of incidental or consequential damages, so the above
limitations or exclusions may not apply to you. This warranty gives you specific legal rights, and you may also have other rights
that vary from state (province) to state (province).
If you have any questions related to the product or warranty, please call our customer service center at
1‐855‐966‐3785
1‐Year
Limited
Warranty
on all parts in regards to damage affecting the operation of the gas grill.
Manufactured by:
Lucas BBQ Co., Ltd.
Room 507, Eking Building, Shida Rd.,
Liaobu Town, Dong Guan City,
Guangdong, China.
Made in China
Imported by
Woods Canada Toronto,
Canada M4S 2B8
 Loading...