

Page 1
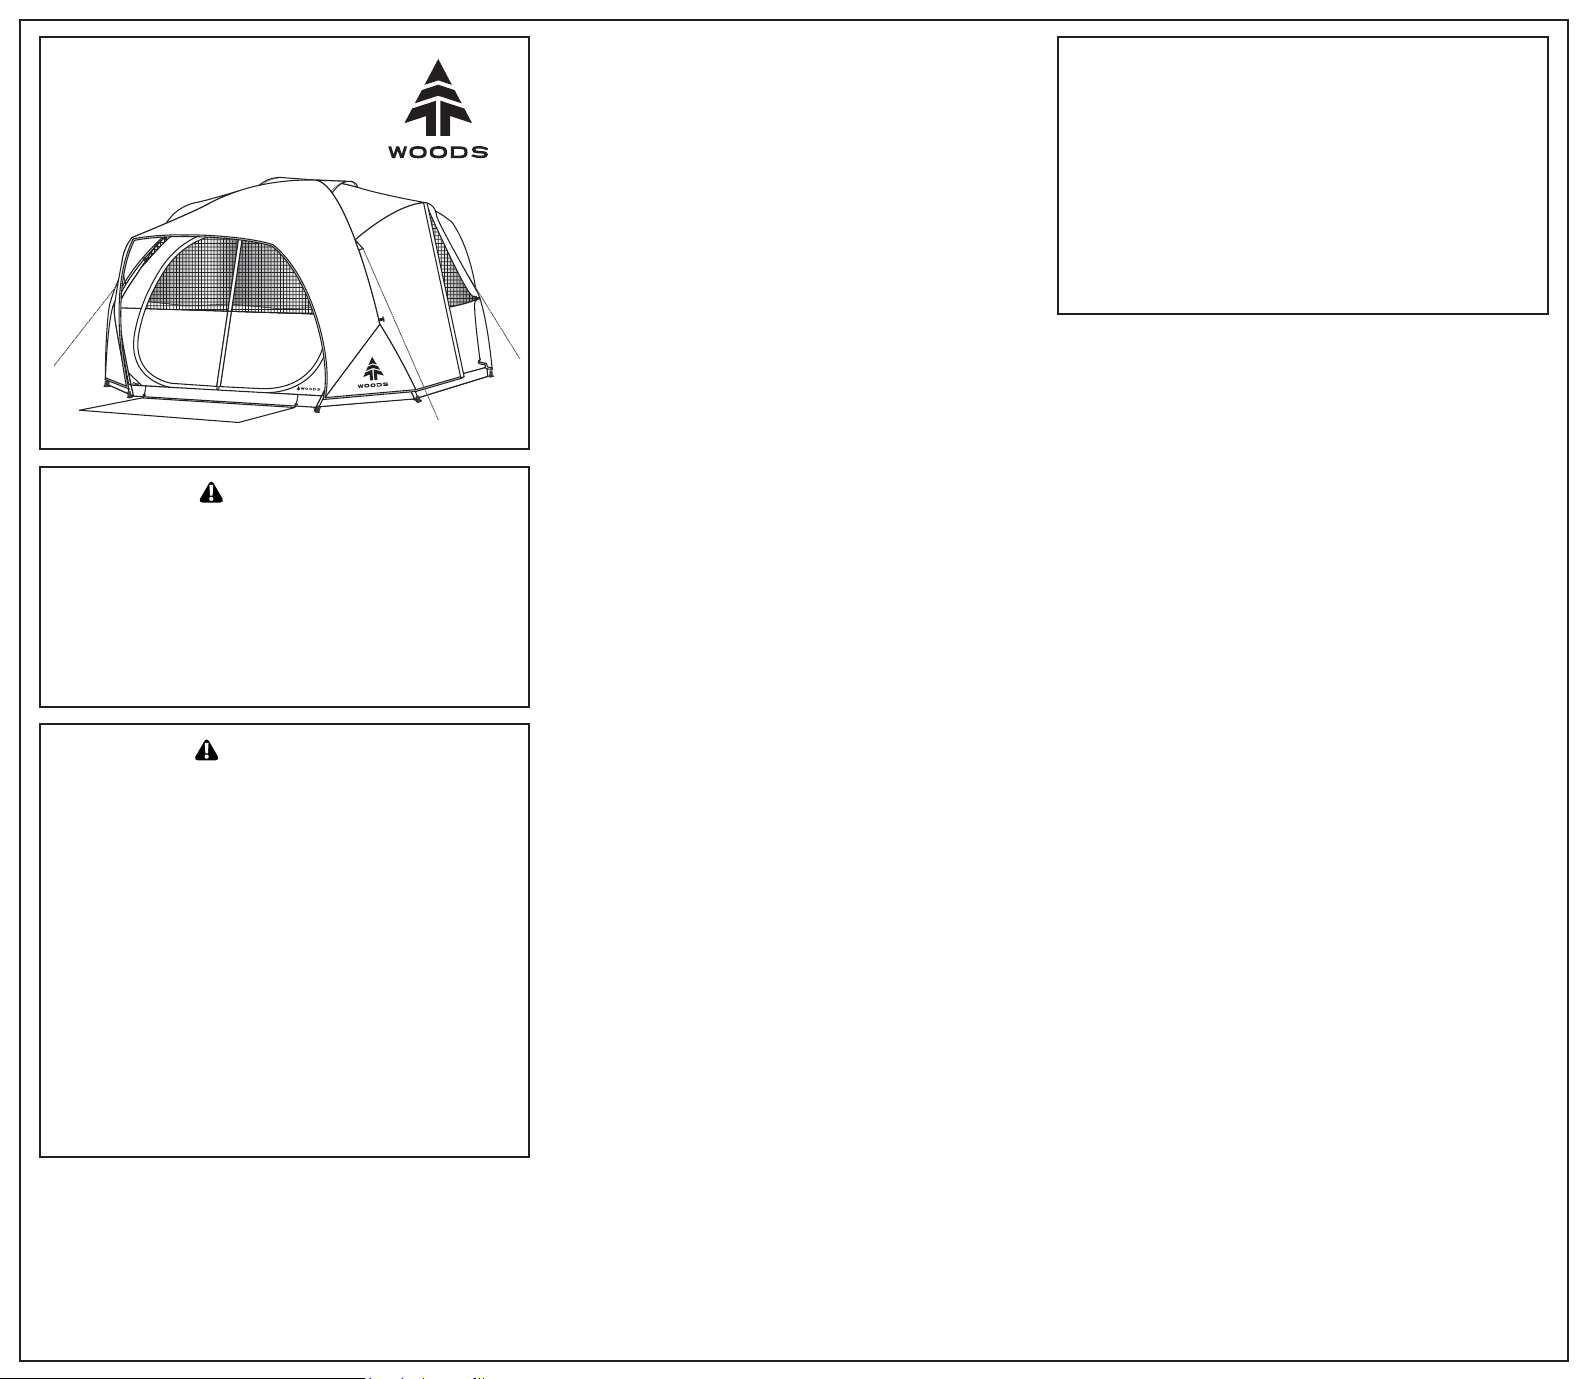
OWNER’S MANUAL
Huron 5
CTC Model: 076-6073
CTC161009-6
Huron 8
DANGER!
Stoves, lanterns, candles, grills, heaters and other fuel-burning
devices produce carbon monoxide and will consume the
available oxygen in a tent. Use of such devices in a tent may
cause asphyxiation, carbon monoxide poisoning, and death or
serious and permanent injuries. For this reason:
- DO NOT use fuel-burning devices inside or near this product.
- Your failure to follow this warning may cause death or serious
and permanent injury to you or others.
WARNING!
- KEEP ALL FLAME AND HEAT SOURCES AWAY FROM THIS
FABRIC. This product is made with flame-resistant fabric,
which meets CPAI-84 specifications. IT IS NOT FIREPROOF!
The fabric will burn if left in continuous contact with any
flame source. The application of any foreign substance to the
fabric may render the flame-resistant properties ineffective.
- Anchor properly at all times and carefully consider campsite
choice. Be aware of possible falling rocks or tree limbs,
lightning strikes, flash floods, strong winds and other hazards
which may cause harm to this product or its occupants.
- Have a minimum of two adults for assembly. During assembly
poles are under tension. If not held firmly in place during
assembly, poles could break or flip up, possibly causing
serious injury.
- Safety glasses may be worn throughout the assembly
process as an additional precaution.
- Exercise care when using electric devices in and near tents.
CLEANING:
Allow dirt to dry on the fabric after a rainfall before lightly
sweeping it off with a brush. For tougher stains, spray the area
with water and lightly wipe it off with a few strokes. Do not use
washer or dryer. DO NOT SCRUB THE FABRIC. ALWAYS MAKE
SURE IT IS COMPLETELY DRY BEFORE REPACKING.
CTC 7-DAY REPLACEMENT WARRANTY
Unpack and inspect all contents for defects in workmanship and
materials within 7 days of purchase. If any defects are found,
return the product to the place of purchase, along with the proof
of purchase, and it will be replaced free of charge.
2-YEAR REPLACEMENT PARTS LIMITED WARRANTY
This product carries a replacement parts warranty against defects
in materials and workmanship for a period of 24 months from
date of purchase. At its discretion, the manufacturer may provide
replacement parts. Original purchaser will be required to provide
proof of purchase. The consumer will be responsible for shipping
costs incurred outside of the U.S. or Canada.
Warranties DO NOT cover normal wear and tear, misuse, abuse,
inclement weather conditions (i.e. wind, rain, hail, lightning,
tornadoes or hurricanes) or other acts of God, mildew and
rotting, damage or fading caused by prolonged exposure to UV
rays. This warranty gives you specific legal rights. You may also
have other rights which vary depending on locale.
Under no circumstances shall the manufacturer be liable for
any incidental or consequential damages.
The tent is water-repellent. It is not waterproof. During heavy or
continuous rain, some leakage may occur. Avoid contact between
objects and the inside of the tent, as this may result in leakage at
points of contact. In the event of seam leakage, apply
a seam-sealer compound.
Although our products are manufactured according to rigorous
specifications, periods of wind or rain may loosen the stakes and
cause the frame to sink into the ground. This will weaken the
structure’s overall rigidity. Puddles may also form on the roof if
the unit has not been assembled tightly. If pooling should occur,
it is advisable to drain the fly to avoid possible damage to frame
and fabric. Adjustment of guy lines may be necessary. In case of
inclement weather, remove valuables and seek appropriate
shelter. Intended for recreational use only.
For your tent, screen house or canopy DO NOT...
- Pitch near an open fire.
- Use candles or open flames of any kind inside or near it.
- Leave children unattended inside.
- Use fuel-burning, oxygen-consuming devices (heaters, lanterns,
cooking stoves or other flame sources) inside.
- Refuel lamps, heaters or stoves inside.
- Smoke inside.
- Store flammable liquids inside.
- Use water-repellent compounds other than those recommended
for use on outdoor equipment.
- Spray with insecticide.
- Store on concrete floor.
For your tent, screen house or canopy DO...
- Always extinguish campfire before sleeping or leaving the area.
- Exercise care when using electricity and lighting.
- Make certain it is properly ventilated in all weather conditions.
In extreme weather conditions, snow could obstruct airflow and
cause asphyxiation. Clear frequently.
- Anchor securely to provide additional security in changing
climatic conditions. Snow pegs, skis and/or heavy rocks may be
necessary to supplement stakes and guy lines.
- Take down and store properly after camping.
For service call:
1-855-Woods 85
1-855-966-3785
CAMPERS’ TIPS
The key to an enjoyable camping experience is planning and
preparation.
Before you go …
Research the area where you intend to camp. Prepare for any
possible weather condition. Be aware of hazards and emergency
protocol. Know the rules and regulations.
Check out your equipment before your trip. Be sure your cook
stove, lanterns, flashlights, air mattress, etc., are in good working
order. Erect your tent to become familiar with setup. Once
you’ve assembled your tent in a dry, well-ventilated area, apply
seam-sealing compound to the stitching of the inside seams
following manufacturer’s directions. Allow to dry thoroughly
before storage. Reapply annually.
Checklists are great planning tools. Here are some areas to
consider.
Camp setup: Tent, chairs, table, ground cloth, entrance mat, tarp,
poles, rope, stakes, bungee cords, duct tape, zip ties,
hammer/tools, bedding.
Kitchen setup, food and beverages: Plan for transport,
preparation, storage and disposal. Remember to pack
fire-starting devices in waterproof containers, and bring pots,
dishes, utensils, can opener, heavy-duty garbage bags and
biodegradable soap. Store your food in lockers or out of sight in
vehicles.
Clothing: Be prepared for all your activities. Include a hat,
sunglasses and quality socks. Dress in layers.
Hygiene: Personal toiletries, rubber gloves, basic first aid items.
Don’t forget your medications.
Miscellaneous: Extra batteries, sewing kit, clothespins, dust
pan/brush and insect-repellant.
Be considerate of others, humans and wildlife.
Remember to clean up and dispose of waste properly.
“Leave no trace behind.”
CTC161009-6 10/15
Page 2
CTC161009-6(076-6073)
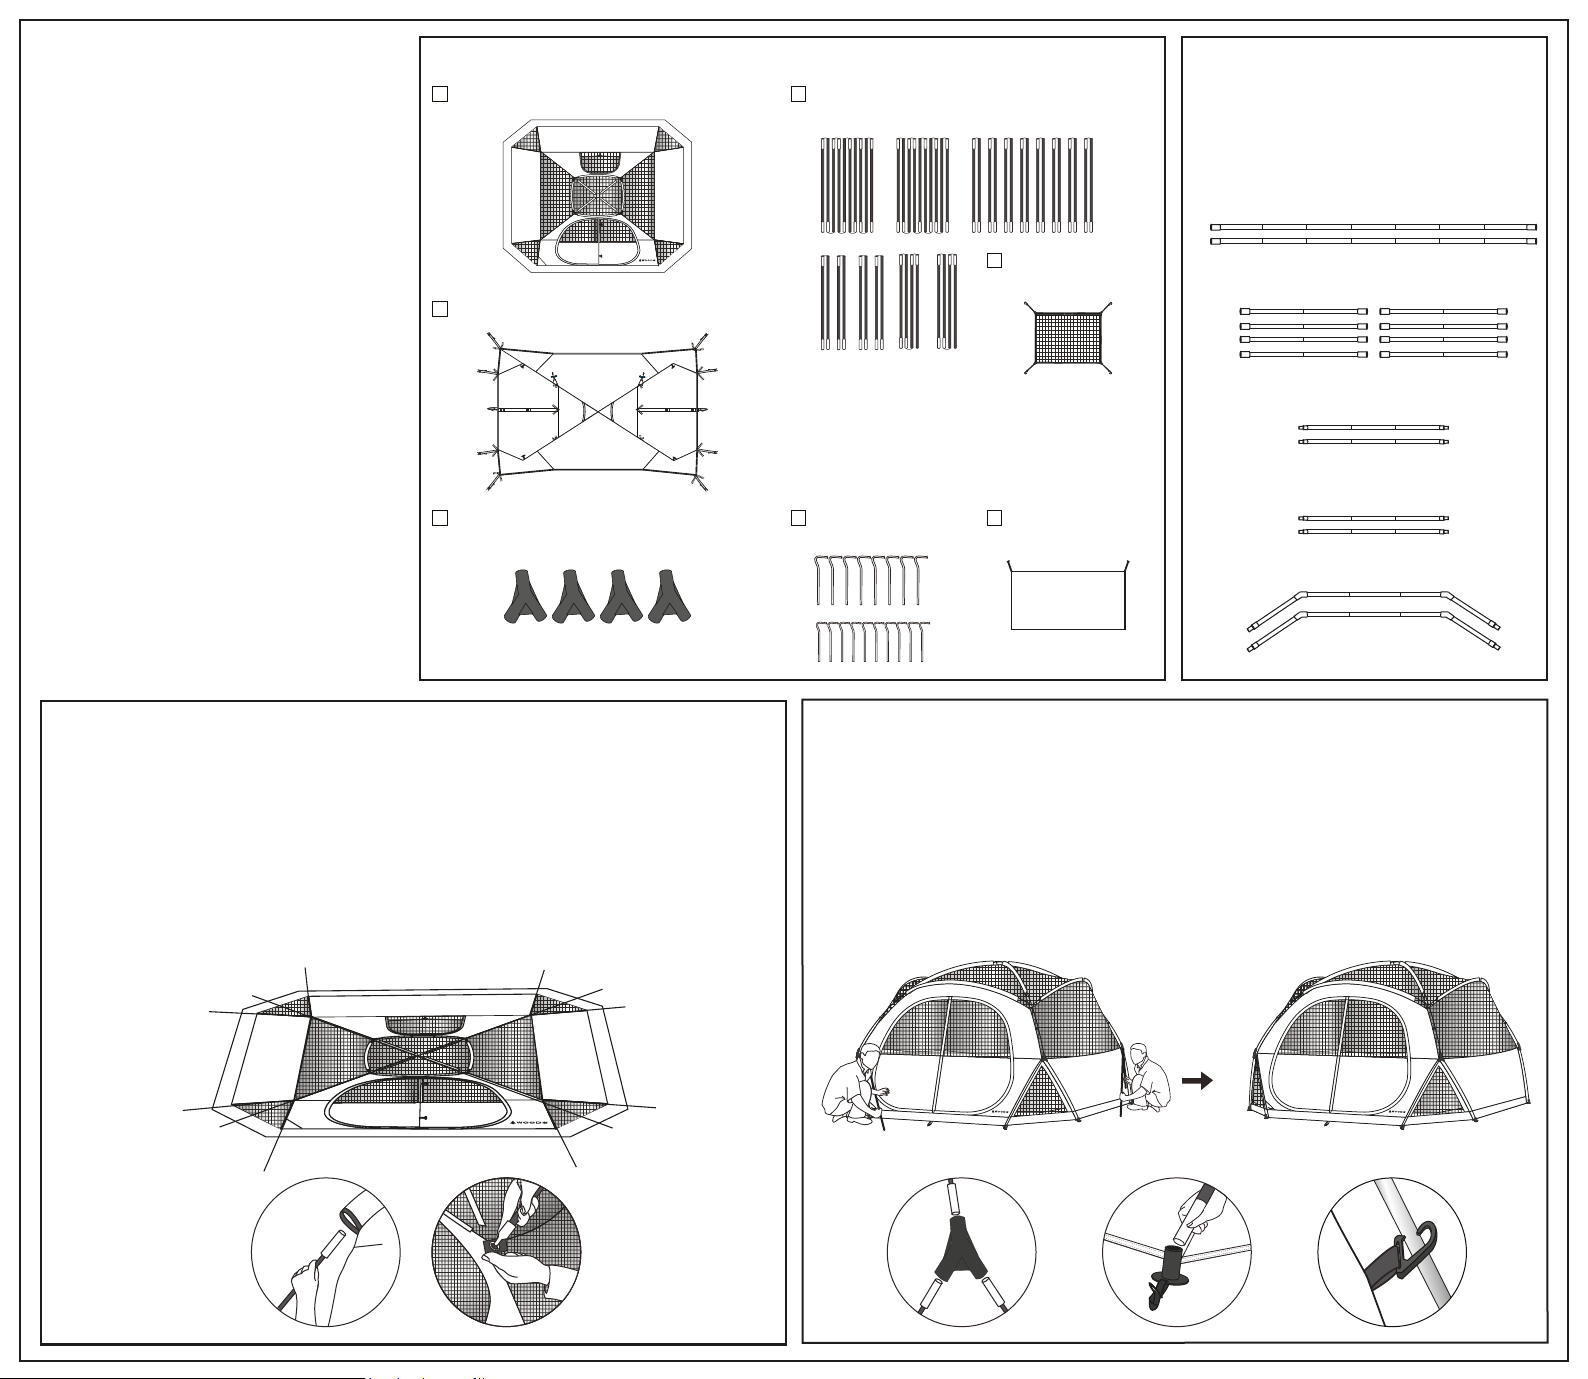
Step 1: Verify package contents
Tent : 1 each
ASSEMBLY INSTRUCTIONS
IMPORTANT NOTES:
* Assemble your tent before camping to become
familiar with the assembly.
* Two people are recommended for setup.
* Select a clean, level area for the campsites, free
of debris and sharp objects, away from any
natural watercourse.
* Use of a ground cloth is recommended to
prolong the life of the tent floor and provide
additional insulation and moisture protection.
* To prevent damage to the zippers, unzip the
doors and windows of the tent prior to
disassembly, allowing air to move freely.
* Seam-seal the inside stitched seams of the tent.
This will improve weather resistance. Available
in sporting goods departments. Discolouration
may occur if applied to outside seams.
Rainfly : 1 each
Plastic Hub 3-Way : 4 each
Step 2: Assemble poles
Fibreglass Poles : 16 each (total)
( ) denotes colour coding
1) Assemble the tent poles by placing
fibreglass sections into the metal ferrules.
Sixteen poles are provided:
2 each (A) Main poles (Gray)
Huron 5
(A) Main Pole(Gray) - 2 each
(B) Leg Pole(Gray) - 8 each
(C) Front and Rear Eave Pole
(Yellow) - 2 each
(D) Side Eave Pole(Orange) - 2 each
(E) Fly Pole(Black) - 2 each
Gear loft w/TP :
1 each
8 each (B) Leg poles (Gray)
2 each (C) Front and Rear Eave Poles (Yellow)
2 each (D) Side Eave Poles (Orange)
Mudmat : 1 eachTent Stakes : 18 each
2 each (E) Front and Rear Fly Poles (Black)
Step 3: Spread out tent and insert poles
1) Spread out the tent flat, floor side down.
2) Position poles (A, Gray) through pole sleeve. so they cross at the centre of the tent. Make
certain the centre of the poles meet at the centre of the tent and loosely fasten the fabric ties.
3) Insert front and rear eave poles (C, Yellow) through the corresponding color-coded sleeve.
Insert side eave poles (D, Orange) through sleeves at each side.
4) Insert eave pole ends into grommets in the sleeves.
B B
B
B
A A
Huron 5
B
B
B
B
Step 4: Raise the tent
1) With a person holding each end of pole (A), flex the pole into an arch. Carefully place the ends
into the pre-attached connectors.
2) Repeat this step for the other tent pole (A).
3) To raise the tent insert leg poles (B, Gray) into the bottom of the pre-attached connector and
into the fast feet along the perimeter of the tent.
4) Clip the plastic hooks on the tent to the fiberglass pole frame.
Huron 5
Huron 5
A
BB
CTC161009-6 10/15
Page 3
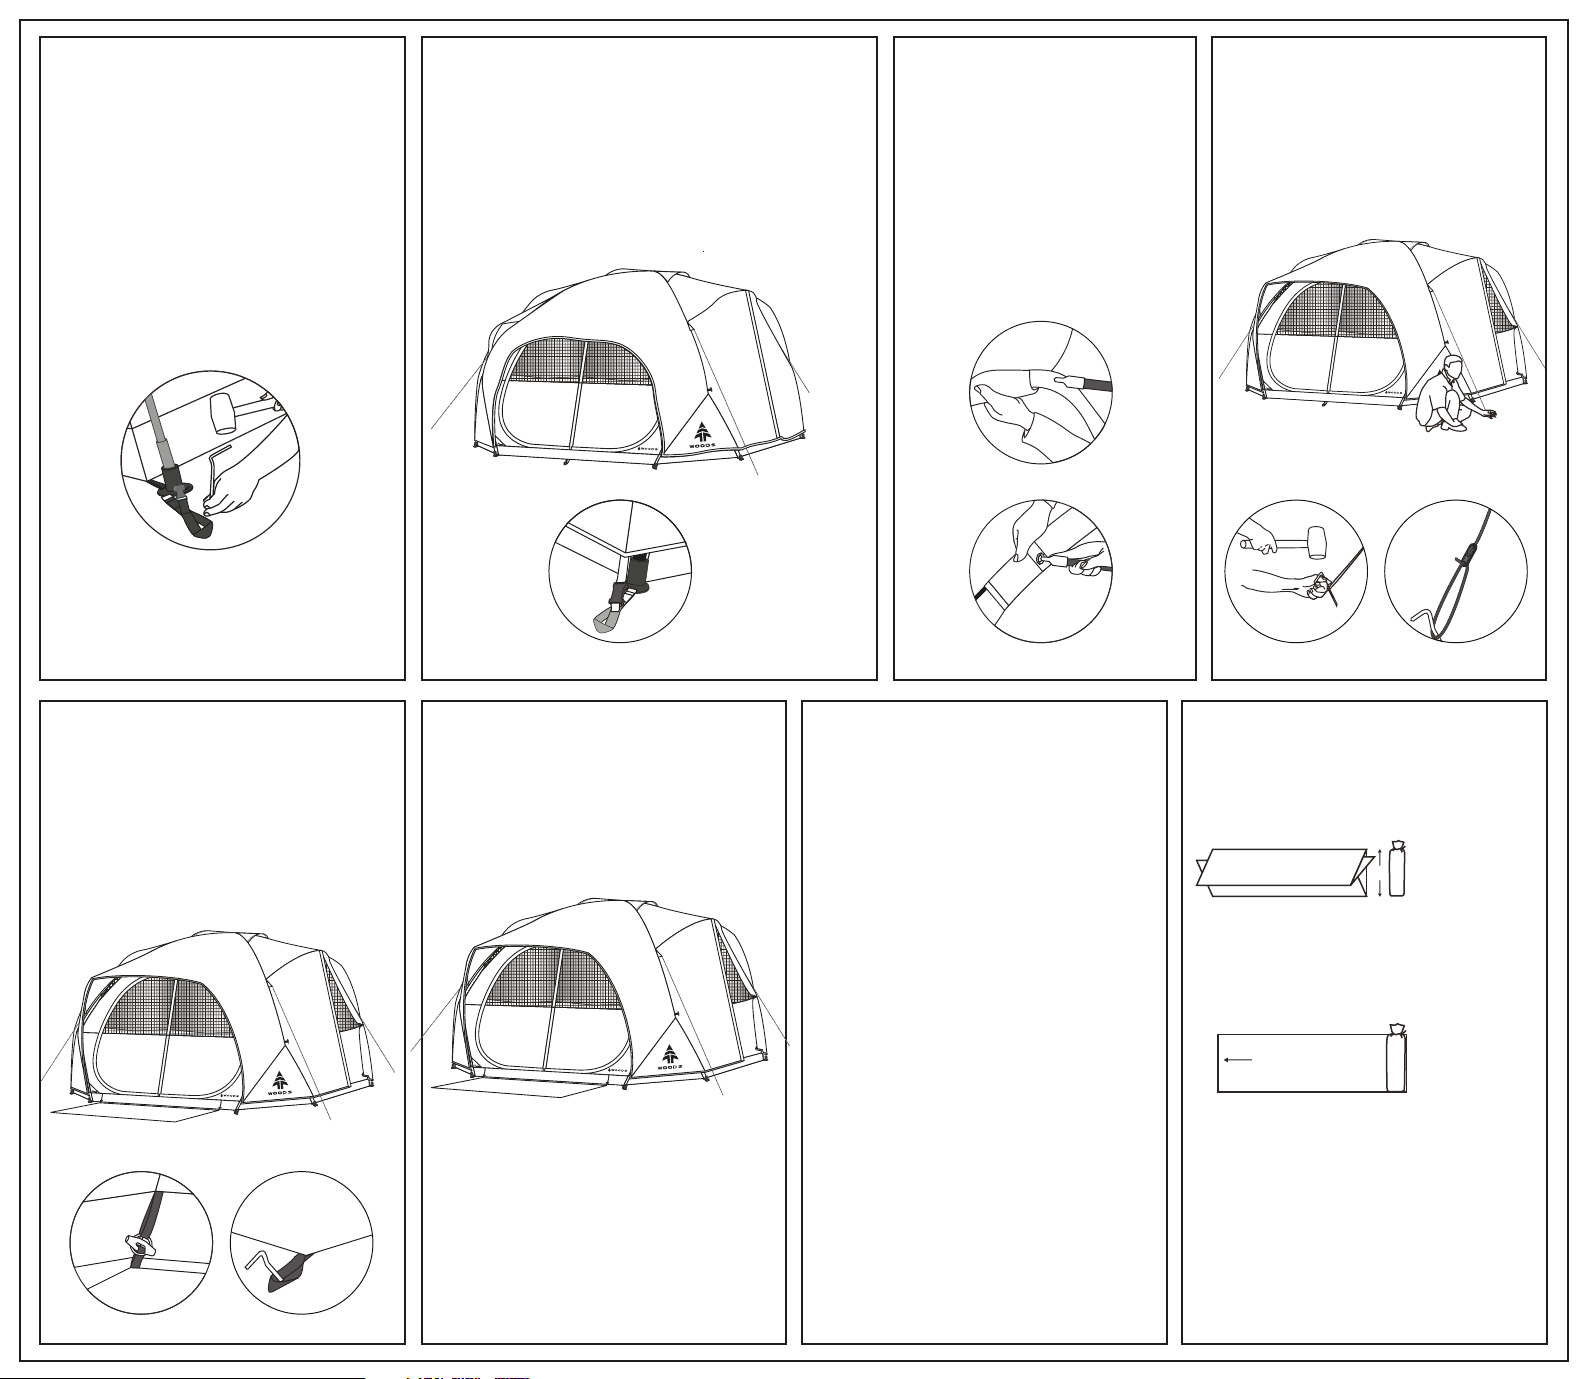
Step 5: Stake tent
Step 6: Attach fly
Step 7: Insert and secure fly pole
Step 8: Secure guy lines
1) Stake down the tent by inserting a stake
through the stake loops located along the
perimeter of the tent.
2) Make certain the tent floor is pulled out
evenly and tightly.
3) Hammer the stakes into the ground at a
45˚ angle using a hammer or mallet.
1) Unfold the fly and place over the tent. Position the fly
with the logo to the right of the door.
2) Attach the fly to the tent by attaching the plastic buckle
on fly ends to corresponding buckle located at the stake
loops. Buckles can be adjusted to make fly taut.
3) Fly can be toggled open at each side of the tent.
Huron 5
1) Insert the fly poles (E) through the
sleeves found at the edge of the
front and rear fly awning.
2) Flex the pole and insert each end
into the reinforced metal grommets
located in the adjacent pole sleeves.
1) Secure tent using all guy lines and stakes.
Tent must be secured for proper
function.
Huron 5
Step 9: Attach mud mat
1) Attach the rings on the mud mat to the
toggles near the bottom of the door.
2) Insert stakes in loops at outer corners
of the mud mat. Hammer the stakes
into the ground at a 45
0
angle using a
hammer or mallet.
Huron 5
Step 10: Fully assembled
1) Accessories may be attached.
Huron 5
Tent appears as shown.
Step 11: Disassembly Step 12: Packing the tent
1) To take down the tent, disassemble in
reverse order.
2) Remove accessories (if included).
1) Spread tent flat, distribute evenly.
2) Fold into quarters not to exceed the length
of pole bag.
3) Remove and fold fly.
4) Be sure to leave doors and windows
unzipped to avoid zipper damage.
5) Remove stakes with hammer or stake
Fold tent into a
rectangular shape.
A
puller. DO NOT pull on tent.
6) Carefully disengage poles from fast feet.
Carefully push pole away from you through
the hanger to minimize risk of damage to
tent or poles.
3) Lay pole bag at opposite end from door.
Tightly roll bag, skin and fly forcing air
through unzipped door.
7) Keep stakes in bags provided.
Front of tent
(door unzipped)
4) Secure with ties and place in carry bag with
stakes and accessories.
5) Tent must be clean and dry before storage.
Store off concrete floor.
Be certain campfires are extinguished.
Dispose of trash appropriately.
Dimension A should
be close to but not
exceed the length
of the pole bag.
CTC161009-6 10/15
Page 4
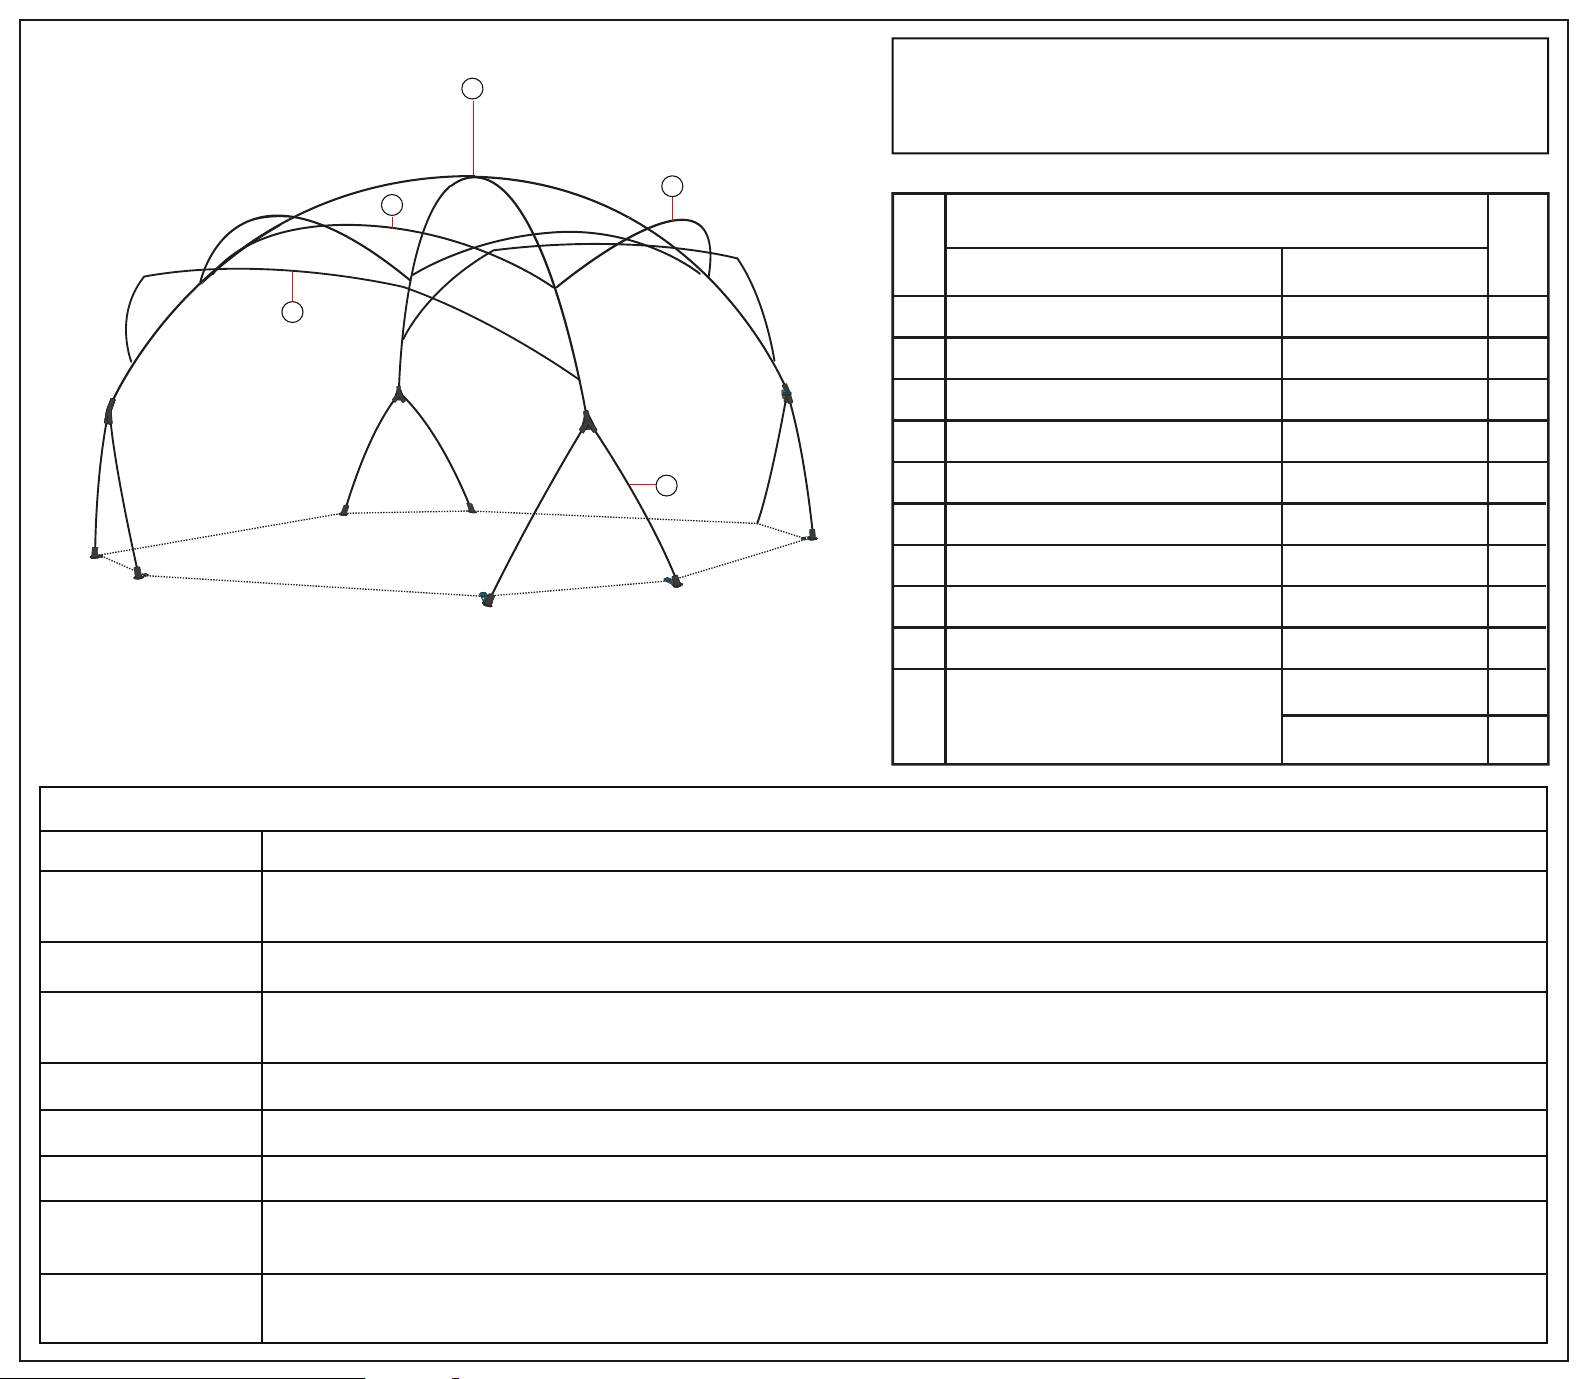
SPECIFICATIONS: 5 persons
A
Floor size: 10 x 9’ (3.0 x 2.7 m)
Centre height: 5’8” (1.7 m)
Weight: 21 lb 11 oz ( 9.8 kg)
C
D
KEY
NO.
E
B
A 2
Fibreglass pole - Main (Gray) HFP9.5-407f
B
Fibreglass pole - Leg (Gray)
Fibreglass pole - Front & Rear Eave (Yellow)
C
Fibreglass pole - Side Eave (Orange)
D
E
Fibreglass pole - Fly (Black)
Gear loft
Tent Stakes
DESCRIPTION
REPLACEMENT PARTS
MODEL NO. CTC161009-6(076-6073)
PART NO.
HFP11-85f
HFP6.3-162t
HFP6.3-138t
HFP7.9-54-149-54t
HTFCTC161009-6Replacement Fly
HMM5323Mud Mat
HHHKTCCT0804XPlastic Hub 3-Way
HGL1210
HMS6-12
HMS4-7
QTY.
REQ.
8
2
2
2
1
1
4
1
8
10
PROBLEM
CONDENSATION
SEAM LEAKAGE
MILDEW
REPAIRING A TEAR
FAULTY ZIPPER
FADING FABRIC
FLOOR CONDENSATION
USE OF STAKES
TROUBLESHOOTING GUIDE
SOLUTION
Condensation occurs when warm, moist air inside tent comes in contact with cooler outside air. Avoid touching walls to reduce contact leakage. Venting doors and
windows will reduce condensation. Store wet clothing outside of tent. A battery-powered fan may be helpful. Not applicable to screen houses.
Apply a generous amount of seam-sealer on inside seams. Seam-sealer may be purchased at any local sporting goods store.
To avoid mildew, store tent/screen house ONLY when thoroughly dry. However, if mildew occurs use a soft-bristle brush or sponge with mild dishwashing soap or Fels
Naptha soap to clean. Let dry thoroughly and a tent-approved water-repellent compound may be applied.
For small tears use a self-adhesive patch kit. We recommend a canvas or awning repair shop for larger tears.
Zippers are self-repairing. If the zipper separates, you can move the slider to the beginning of the zipper tape and rework the zipper.
Do not leave up in direct sunlight longer than necessary. If left in sunlight for prolonged periods of time, fabric will fade and weaken.
A ground cloth under the floor helps prolong its life, provides additional insulation and moisture protection. The cloth should be smaller than the floor to prevent rain
from running under the tent. Not applicable to screen houses.
Stakes should be installed at a 45 angle using a hammer or mallet. Stake loops should be kept taut without over-stretching fabric or webbing. This could cause tears or
leakage. To remove safely, use a hammer or stake puller. Do not remove by pulling on the fabric.
o
CTC161009-6 10/15
 Loading...