

Page 1

Users manual
Wood’s DS-series dehumidiers
Revision date: 12-April, 2016
#422757
Page 2

SVDA
DE
FR
ES
NL
RO
LT
LV
ET
CS
FI
PL
2
Page 3

Users manual Wood’s dehumidier
DS & ED series
2 ................................................................................ Technical drawings
4 ................................................................................ English
7 ................................................................................ Swedish
Please read this manual carefully before installing and using your dehumidier.
Store the manual in a safe place for future reference and product warranty.
www.woodseurope.com
IP21
3
Page 4
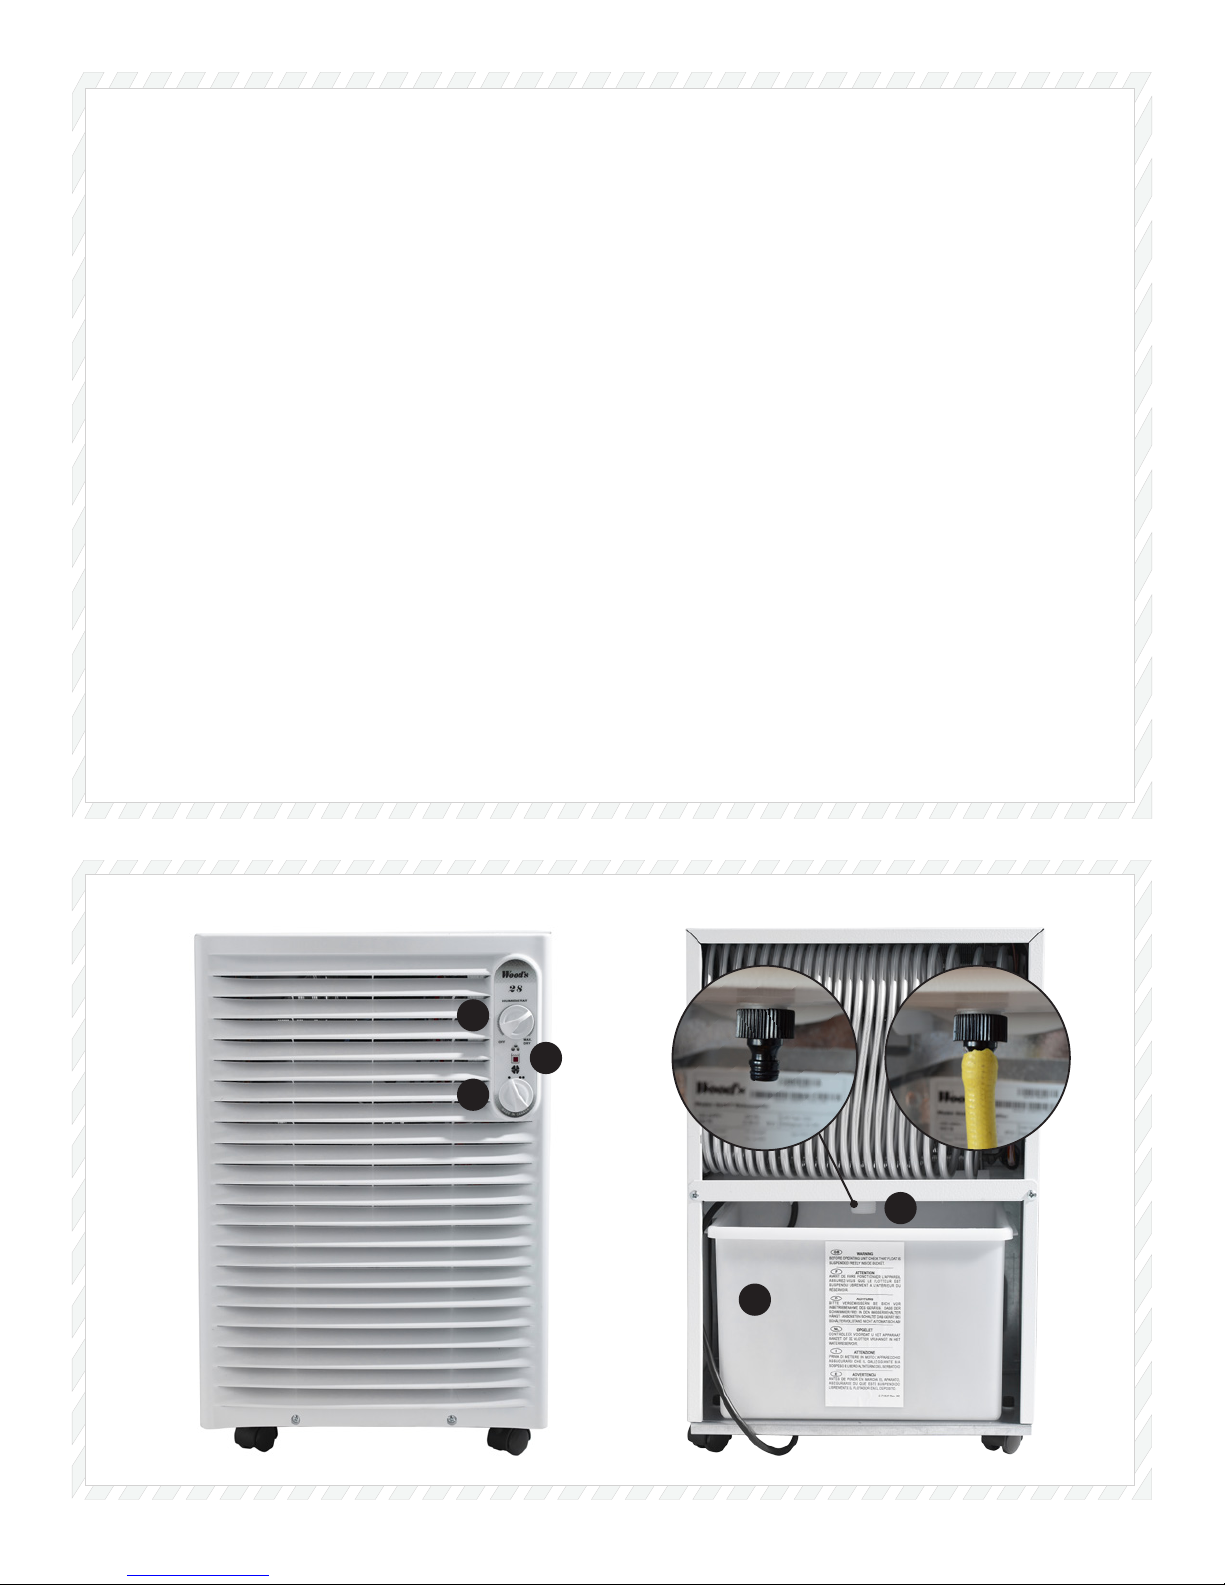
English
Svenska
1. The humidistat (ON/OFF)
2. Select fan speed (not DS12 & DS25)
3. Indicator for full water bucket
4. The water bucket
5. Hose connection (hose diameter 3/4”)
1. Hygrostaten (ON \OFF)
2. Välj äktläge (ej DS12 eller DS25)
3. Indikationslampa för full vattentank
4. Vattentanken
5. Slanganslutning (slangdiameter 3/4”).
1
3
2
5
4
4
Page 5
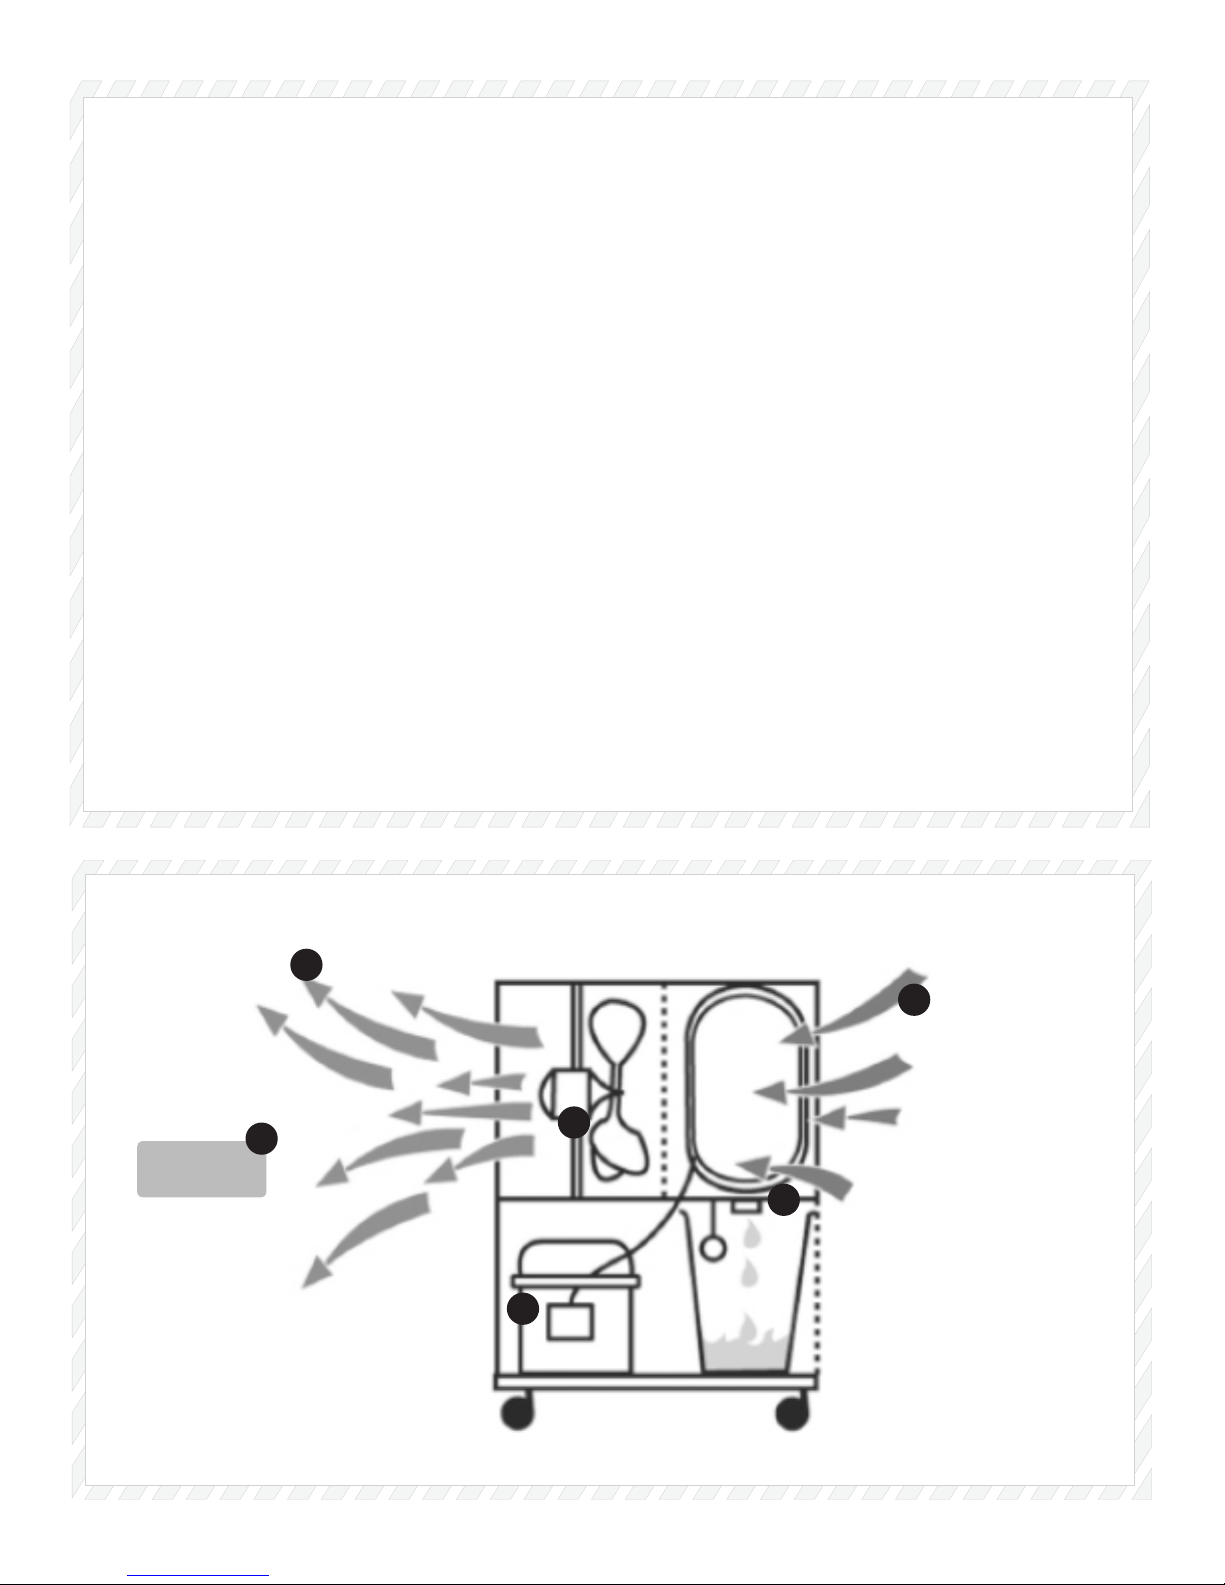
English
Svenska
1. Humid air
2. Water condensation
3. Compressor
4. Fan
5. Dry air
6. Recommended humidity level
1. Fuktig luft
2. Vattenkondensation
3. Kompressor
4. Fläkt
5. Torr luf t
6. Rekommenderad luftfuktighet
50-60%
5
1
4
6
2
3
5
Page 6

English
Thank you
Thank you for choosing a Wood’s
dehumidier. You are one of more than
300.000 people who have chosen
a Wood’s dehumidier to prevent
damages from excessive moisture
and mould. Originating in Canada in
1950, Wood’s has more than 60 years
experience of developing and manu-
facturing dehumidiers. When choosing a Wood’s dehumidier you’ll get
a unit with great quality, high capacity
and that will extract the most litres per
consumed kWh.
Workings of your dehumidier
As the air is drawn through the dehu-
midier by the fan, the air passes over
the compressor cooled copper coils.
The coils cool down the water vapour,
separating the water from the air.
The water drips down from the coils
and is drained away with the water
hose. Left is the dry air that is exhau-
sted in the room. As the dehumidier
condensates the water vapour, heat
energy is released. That is why a
compressor dehumidier will exhaust
warm, dry air that is extra benecial for
drying clothes, laundry, wood etc.
A compressor dehumidier is the most
energy efcient way to remove excess
moist and bad odour. Keep the relative
humidity level between 50% and 60%
to maintain a safe and healthy indoor
environment.
Security warnings
Please read the security warning
carefully before installing and using
the appliance. If the security regulations are not followed, it may void the
product warranty and even present a
re hazard:
• Unplug the unit from its power
supply before cleaning, storage or
maintenance of its lter.
• This appliance is not intended for
use by persons (including children)
with reduced physical, sensory
or mental capabilities, or lack of
experience and knowledge, unless
they have been given supervision
or instruction concerning use of the
appliance by a person responsible
for their safety.
• The appliance shall be installed
in accordance with national wiring
regulations.
• If the supply cord is damaged, it
must be replaced by the manufacturer, its service agent or similarly
qualied persons in order to avoid a
hazard.
• Always keep a safe distance from
water sources.
• The appliance is a heat source. It
is very important that the appliance
isn’t covered and that it is kept away
from inammable materials and
other heat sources.
• Do not put ngers or other objects
into air inlet or air outlet.
• Do not stand on the machine.
• Do not cover the appliance.
• Do not to alter or reconstruct the
appliance or its power cable in any
way.
• Always drain the water according to
the instructions.
• The compressor in the unit is lled
with a freon free refrigerant. If
there is a leakage on the refrigerant
system you should stop using the
appliance and contact your retailer.
• Do not use the appliance without its
air lter.
Installation and placement
Wood’s dehumidiers are easy to
move around, but bare in mind the
following.
• The dehumidier should not be
placed near radiators or other heat
sources or exposed to direct sunlight, as it will reduce its performance.
• Keep at least 25cm distance from
walls and other obstructions to maxi-
mize the air ow.
• For optimum performance, place
the dehumidier in the middle of the
room.
• Make sure that the air ow from the
inlet and outlet isn’t blocked
Installation:
1. Place the dehumidier on a at and
solid ground, preferably in the middle
of the room.
2. Close all windows and ventilators
in the room. Otherwise, moist air from
the outside will continue to ow into
the room.
3. Connect the dehumidier to a
grounded power outlet.
Using the dehumidier
Hygrostat controlled
The unit will run only when the ambient humidity exceeds your set value.
Automatic restart
In the event of a power failure, the unit
will continue to work according to your
latest settings once the power returns.
Automatic defrost
The unit will defrost automatically
when needed and resume to work
when the defrost is completed.
When defrosting, the compressor
shuts off.
Operating instructions
Starting the dehumidier & set
humidity
• Set the hygrostat knob to the Maximum position.
• When the desired level of humidity
is reached, the hygrostat knob is
turned counterclockwise until the
dehumidier is turned off.
• Select fan speed (not DS12 or
DS25).
6
Page 7

English
Water drainage
When the water reservoir is full, the
dehumidier is shut off automatically.
The warning light at the front of the
dehumidier comes on to show that
the water reservoir should be emptied.
1. Disconnect the dehumidier from the
power source.
2. Empty the water reservoir.
3. Put the empty water reservoir back
and check that the oat moves
freely.
4. Connect the dehumidier to the
power source.
Direct water drainage
Connect a water hose (3/4”) to the
pipe on the back of the dehumidier.
Lead the other end to a drain. Make
sure that the water can be drained
downwards.
The air lter
The air lter prevents dust and dirt
from entering the machine, prolonging
its life expectancy. Please refer to the
separate lter leaet for installation
and maintenance instructions.
It is very important that the lter
is cleaned or replaced regularly;
otherwise the dehumidier might
lose capacity and even be seriously
damaged.
Maintenance
- Clean the unit with a soft moist cloth.
Do not use solvents or strong cleaners
as this might damage the surface of
the unit.
- The front and side grids can be vacuum-cleaned or cleaned with a brush.
- The cooling coils are best cleaned
with a rag and warm water.
Service
If the dehumidier requires servicing,
you must rst contact your local retailer. Proof of purchase is required for all
warranty claims.
8. Warranties
2 years product warranty. Please note
that the warranty is only valid upon the
production of the receipt.
This machine complies with EEC
directives 76/889 + 82/499
Get a 6-years warranty! Register
at woodseurope.com and replace
the SMF-lter at least once a year.
Please visit www.woodseurope.com
for more information.
Hints
Sometimes it may be useful to use
a frost guard or heater fan to make
sure that the temperature does not fall
below +10˚C. Even if the dehumidier
works down to temperatures as low as
+5°C, its capacity will increase at higher temperatures as warm air carries
more water.
For maximum dehumidifying power in
a room, it is recommended that the air
supply from outside and from adjoining
rooms is minimized – close doors and
ventilators.
Expect higher dehumidication capacity during Autumn / Summer because
the outside air is warmer and more
humid.
To achieve a safe and reliable protection against mould and moisture
damage, keep the relative humidity
between 50% and 60%.
7
Page 8
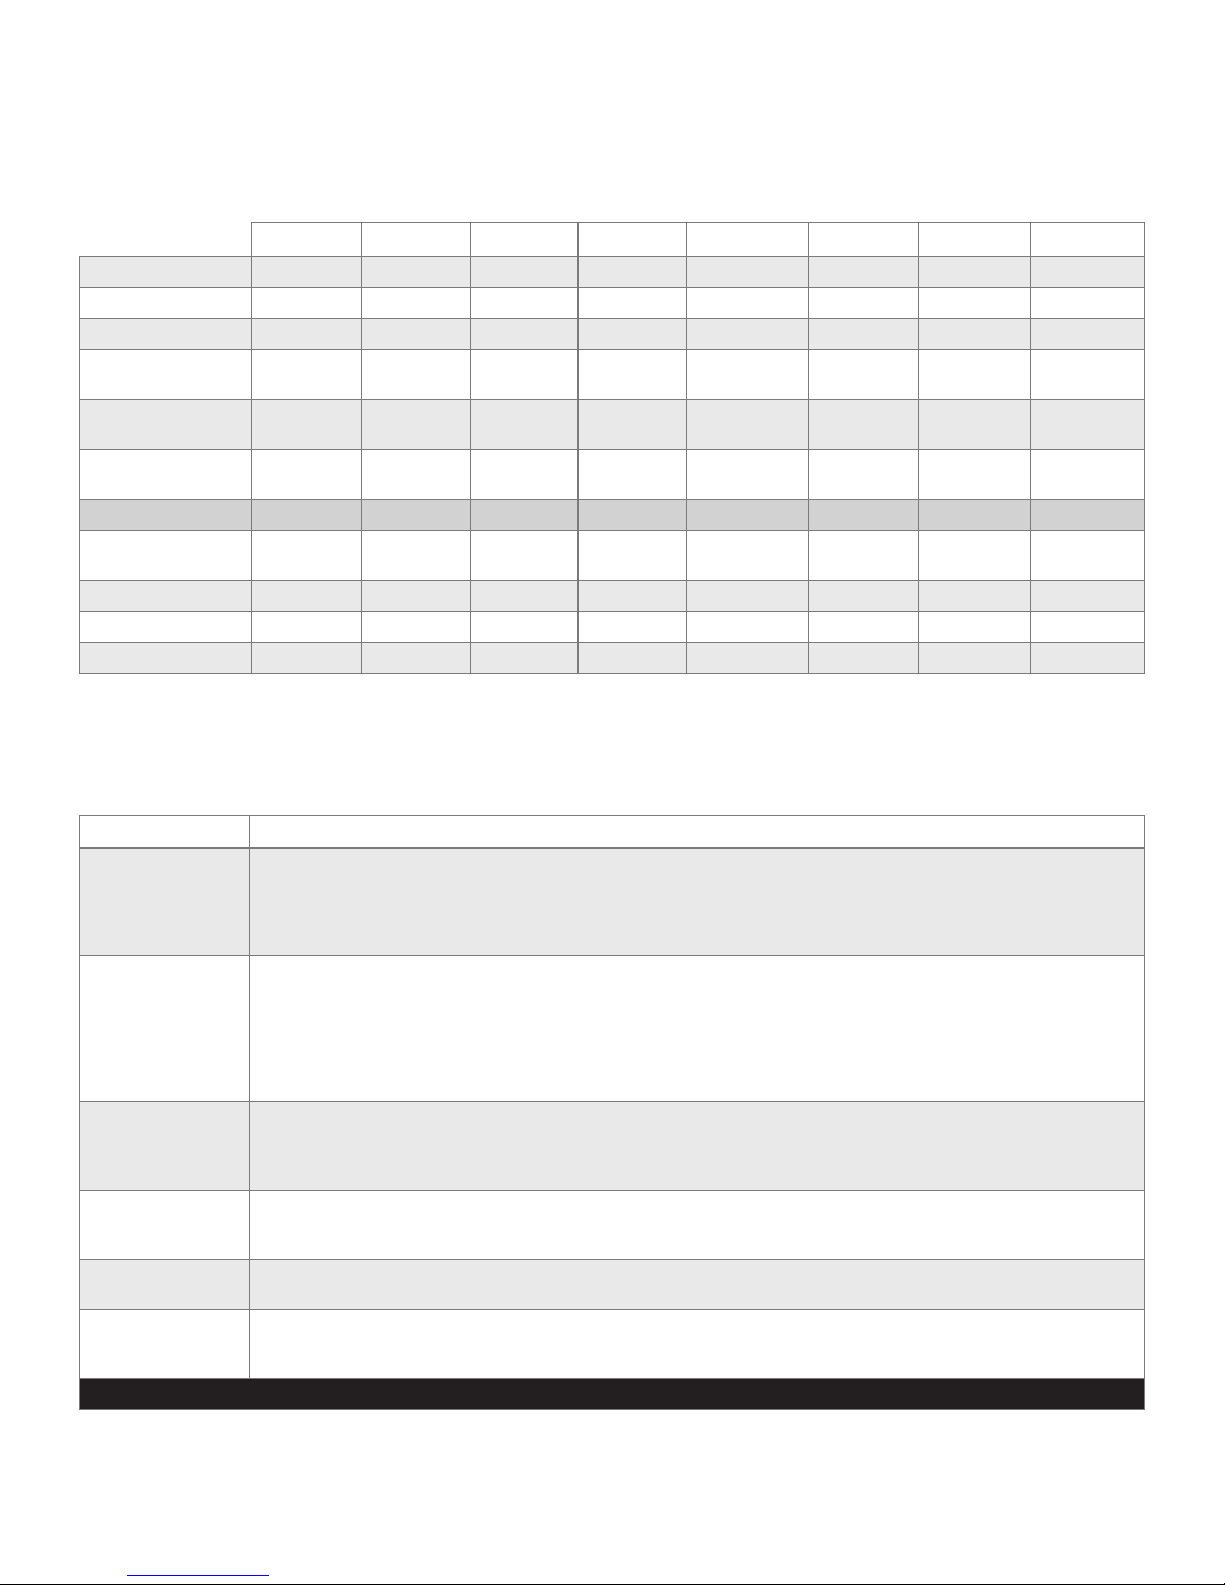
TECHNICAL DATA
DS12F DS15F DS25F DS28F DS28F plus DS36F ED50F ED50Feco
Max. working area 90 m
2
Air ow step 1 256 m3/h 256 m3/h 190 m3/h 190 m3/h 197 m3/h 197 m3/h 129 m³/h 172 m3/h
Air ow step 2 - 520 m3/h - 336 m3/h 336 m3/h 336 m3/h 296 m3/h 400 m3/h
Dehumidifying at
27˚C & 60% R.H.
Dehumidifying at
30˚C & 80% R.H.
Power at
27˚C & 60% R.H.
6.1 l/day 6.7 l/day 12,1 l/ da y 10.4 l/day 13.2 l/day 13.2 l/day 21,1 l/day 25,2 l/day
11.1 l/ da y 12.0 l/day 20,2 l/day 17.5 l/d ay 20.8 l/day 20.8 l/day 33,2 l/day 40 l/day
220W/h 240 W/h 400 W/h 460 W/h 510 W/h 510 W/h 850 W/h 790 W/h
Tank volume 10.4 litres 10.4 litres 10.4 litres 10.4 litres 10.4 litres 10.4 litres 10.4 litres 10.4 litres
Cooling medium,
freon-free
R134A R134A R134A R134A R134A R134A R410A R410A
Dims.LxWxH (cm) 3 4x41x53 3 4x41x53 34x41x 53 34x41x53 34x41x53 34x41x53 34x41x53 34x41x53
Weight 22 kg. 22 kg. 24 kg. 24 kg. 26 kg. 26 kg. 28 kg. 28 kg.
Noise levels 38 dB 38-58 dB 38 dB 38-58 dB 38-58 dB 38-58 dB 38-58 dB 38-58 dB
100 m
2
120 m 140 m
2
190 m
2
190 m
2
230 m
2
330 m
2
TROUBLE SHOOTING
PROBLEM SOLUTION
Dehumidier
does not start
Does not dehumidify - Check that fan is spinning
High noise level - Increase distance between dehumidier and surrounding surfaces
Ice formation on
cooling coils
No water enters
reservoir
Does not turn off
when water reservoir
is full
If none of the above works, you should contact your nearest retailer for checking and possible overhaul of dehumidier
- Check that dehumidier is connected to electricity and that fuse has not gone
- If the warning light is on, check that the water reservoir is empty and correctly placed in the dehumidier.
Check that oat is free
- Check that hygrostat is working. Dehumidier should start when hygrostat is in Maximum position
- Check that air can ow freely through the dehumidier. Front grid and air lter should be clean and dehumidier should
stand 20-30cm from wall
- Listen for sound of compression, but bear in mind that the dehumidier may be in a dehumidifying cycle, when the
compression stops. Wait initially for about 35 minutes.
- Check that a thick coating of ice has not formed on the cooling coils.
- Cooling coils may be in contact with one another and cause vibration. Disconnect dehumidier from electricity and separate coils
- Remove air lter at rear of dehumidier and check that no dust or uff is obstructing passage of air through machine
- Timer which controls defrosting may be broken, in which case compression will not stop regularly
- Check for obstruction to drip-tray above water reservoir
- It is important that the oat moves freely in the water reservoir. If it does not, it will not respond to water levels and prevent dehumidier from stopping
8
Page 9

Svenska
Tack
Tack för att du valt en Wood’s avfuktare. Du är en av mer än 300.000
människor som har valt Wood’s avfuktare för att förebygga skador orsakade
av fukt och mögel. Wood’s startade i
Kanada år 1950 och har mer än 60 års
erfarenhet av att utveckla och tillverka
avfuktare. När du väljer en Wood’s
avfuktare kan du vara säker på att du
får en avfuktare av bästa kvalitet, hög
kapacitet och som kommer att avfukta
est liter vatten per förbrukad kWh.
Wood’s avfuktare
Wood’s är väldigt kraftfulla och effektiva avfuktare. Wood’s avfuktare kan
användas i många olika utrymmen, till
exempel i källare, torkrum, garage och
andra stora utrymmen.
Så fungerar din avfuktare
Din Wood’s är en kompressoravfuktare. När luften dras genom av-
fuktaren med äkten, passerar den
fuktiga luften över de kompressorkylda
kopparslingorna. Slingorna kyler ner
vattenångan och separerar vattnet
från luften.
Vattnet rinner från slingorna och leds
bort till ett avlopp med vattenslangen.
Kvar är torr luft som blåses ut i rummet. När avfuktaren kondenserar vattenångan frigörs värmeenergi. Därför
blåser en kompressoravfuktare ut torr
varm luft som är perfekt för att torka
tvätt, kläder, ved m.m.
En kompressoravfuktare är det mest
energieffektiva sättet att ta bort
överödig fukt och dålig lukt. Håll den
relativa fuktigheten mellan 50% och
60% för att säkerställa ett tryggt och
hälsosamt inomhusklimat.
Säkerhetsföreskrifter
Läs dessa varningar noggrant innan
du använder avfuktaren. Om säkerhetsföreskrifterna inte följs kan det
leda till att garantin blir ogiltig och
även innebära en säkerhetsrisk.
• Dra alltid ut strömsladden innan un-
derhåll, förvaring och lterrengöring.
• Håll alltid ett behörigt avstånd från
vattenkällor.
• Denna apparat är inte avsedd att
användas av personer (inklusive
barn) med försämrad fysisk, mental,
eller psykisk förmåga eller brist på
erfarenhet eller kunskap, om de inte
övervakas eller getts instruktioner
om användning av apparaten av
en person som är ansvarig för dess
säkerhet.
• Apparaten måste installeras i enlighet med nationella kopplingsföreskrifter.
• Apparaten är en värmekälla. Den får
därför inte övertäckas eller komma i
kontakt med andra värmekällor eller
brandfarliga ämnen.
• Om strömsladden är skadad, måste
den bytas ut av tillverkaren, dess
serviceagent eller liknande kvalice-
rad personal för att undvika skador.
• Stick inte in ngrar eller andra objekt
i luftintaget eller luftutblåset.
• Ändra inte eller bygg om avfuktaren
eller dess strömsladd på något sätt.
• Det är mycket viktigt att ltret hålls
rent. Kontrollera ltret regelbundet
och byt ut eller rengör det vid behov.
• Dra in i strömsladden för att koppla
ur den från eluttaget.
• Kompressorn är fylld med ett freonfritt kylmedia. Om det blir ett läckage
på kylsystemet ska du sluta använda
avfuktaren och kontakta din återförsäljare.
• Använd inte maskinen utan dess
lter.
• Stå inte på avfuktaren.
• Dränera alltid vattnet enligt instruktionerna.
• Avfuktaren avger vatten. Håll alltid
avstånd från material som är känsliga för vattenskador, t.ex. trägolv.
Installation & placering
Wood’s avfuktare är enkla att ytta
runt, men tänk på följande.
• Avfuktaren ska inte placeras nära
element eller andra värmekällor då
det kan sänka avfuktaren kapacitet.
• Håll minst 25cm avstånd från väggar
och andra hinder för att maximera
luftödet.
• För bästa kapacitet, placera avfuktaren i mitten av rummet.
• Se till luftintaget och luftutblåset inte
blockeras.
Installation:
1. Placera avfuktaren på ett plant
och stabilt underlag, helst i mitten av
rummet.
2. Stäng alla fönster och ventiler i rum-
met. Annars fortsätter fuktig luft utifrån
att strömma in i rummet.
3. Anslut avfuktaren till ett jordat
eluttag.
Använd din avfuktare
Hygrostatstyrd
Avfuktaren arbetar bara när rummets
luftfuktighet överstiger ditt inställda
värde.
Automatisk omstart
Vid strömavbrott kommer avfuktaren
att fortsätta arbeta enligt dina inställda
värden när strömmen återvänder.
Automatisk avfrostning
Avfuktaren avfrostar automatiskt vid
behov och fortsätter att arbeta när
avfrostningen är slutförd.
Under avfrostning stannar kompres-
sorn och äkten.
Ställ in avfuktaren
1.Starta avfuktaren & ställ in
luftfuktighet
• Använd gärna en Wood’s hygrometer för att enkelt ställa in önskad
luftfuktighet.
• Koppla in avfuktaren och
vrid hygrostatvredet till max
(medurs).
• På hygrometern kan du se att fuktighetsnivån sakta faller.
• När du uppnått en relativ fuktighetsnivå på ca 50% så kan du
vrida hygrostatvredet sakta tillbaka (moturs) till dess att maskinen
stänger av - då kommer avfuktaren
att hålla den fuktighetsnivå som du
ställt in.
9
Page 10

Svenska
Fläkten
Fläkten ser till att luft strömmar genom
avfuktaren. Fuktig luft sugs in från
baksidan och går via kylslingan och
förångaren för att sedan komma ut
torr på avfuktarens framsida. Wood’s
avfuktare är utrustade med två
äkthastigheter med undantag av
modell DS12 & DS25 som bara har
en.
• Läge II – ger en hög luftgenomströmning med en maximal avfuktning av luften.
• Läge I – ger en lägre luftgenomströmning vilket genererar i en
tystare gång och en något lägre
avfuktningskapacitet.
Vattenavledning
När vattenbehållaren är full stängs
avfuktaren av automatiskt och kan
inte användas innan vattenbehållaren
töms.
1. Koppla bort avfuktaren från
eluttaget.
2. Töm vattenbehållaren.
3. Sätt tillbaka den tömda vattenbehållaren.
4. Sätt avfuktarens kontakt i eluttaget.
Direkt vattenavledning
Skruva fast slangkopplingen på gängorna ovanför vattentanken och anslut
en vattenslang (3/4”) till slangkopplingen. Led den andra änden av slangen
till ett avlopp. Se till att vattnet kan
ledas nedåt.
Luftltret
Din avfuktare levereras med ett
SMF-lter som skyddar avfuktaren och
renar luften. Registrera din avfuktare
på www.woods.se och byt ut ltret
1 gång per år för att ta del av den
förlängda garantin. Vill du inte delta i
garantiprogrammet kan du dammsuga
SMF-ltret vid behov.
1. Fäst lterramen på baksidan av
avfuktaren med hjälp av de svarta
plastpluggarna.
2. Använd tätningslisterna för att täta
runt om.
3. Sätt i ett SMF-lter och sätt på
locket.
4. När det är dags att byta lter lyfter
du bort locket och byter ut SMF-
ltret mot ett nytt.
Det är mycket viktigt att ltret
byts ut regelbundet, annars kan
avfuktaren tappa kapacitet och
till och med bli allvarligt skadad.
Underhåll
- Rengör avfuktaren med en fuktig tra-
sa. Undvik lösningsmedel och starka
rengöringsmedel då det kan skada
avfuktarens yta.
- Grillen på framsidan och sidorna kan
dammsugas eller rengöras med en
borste.
- Kylslingorna kan rengöras med en
trasa och varmt vatten.
Service
Om avfuktaren behöver service ska
du först kontakta din återförsäljare.
Inköpskvitto krävs vid alla garantianspråk.
Garantier
2 års produktgaranti. Notera att garantin bara är giltig mot uppvisande av
kvitto.
Denna maskin överensstämmer med
EEC direktiven 76/889 + 82/499
Få 6 års totalgaranti!
Registrera dig på woods.se och
byt ut SMF-ltret minst en gång
per år. Besök woods.se för mer
information.
Tips
Det kan ibland vara bra att använda
en värmeäkt för att hålla temperaturen över +10˚C. Även om avfuktaren
fungerar ner till +5°C kommer dess
kapacitet öka vid högre temperaturer
då varm luft kan bära mer vatten.
För bästa kapacitet, se till att minimera
luftinödet utifrån - stäng fönster och
ventiler.
Förvänta dig högre kapacitet under
sommaren och hösten då utomhusluften är varmare och fuktigare.
För att uppnå ett säkert och pålitligt
skydd mot fukt och mögel, håll den
relativa fuktigheten mellan 50% och
60%.
Luftltret på avfuktarens baksida ser
till att kylslingorna hålls fria från damm.
Det är viktigt att ltret hålls rent så att
luften kan öda fritt genom avfuktaren.
Filtret bör därför rengöras eller bytas
vid behov.
10
Page 11
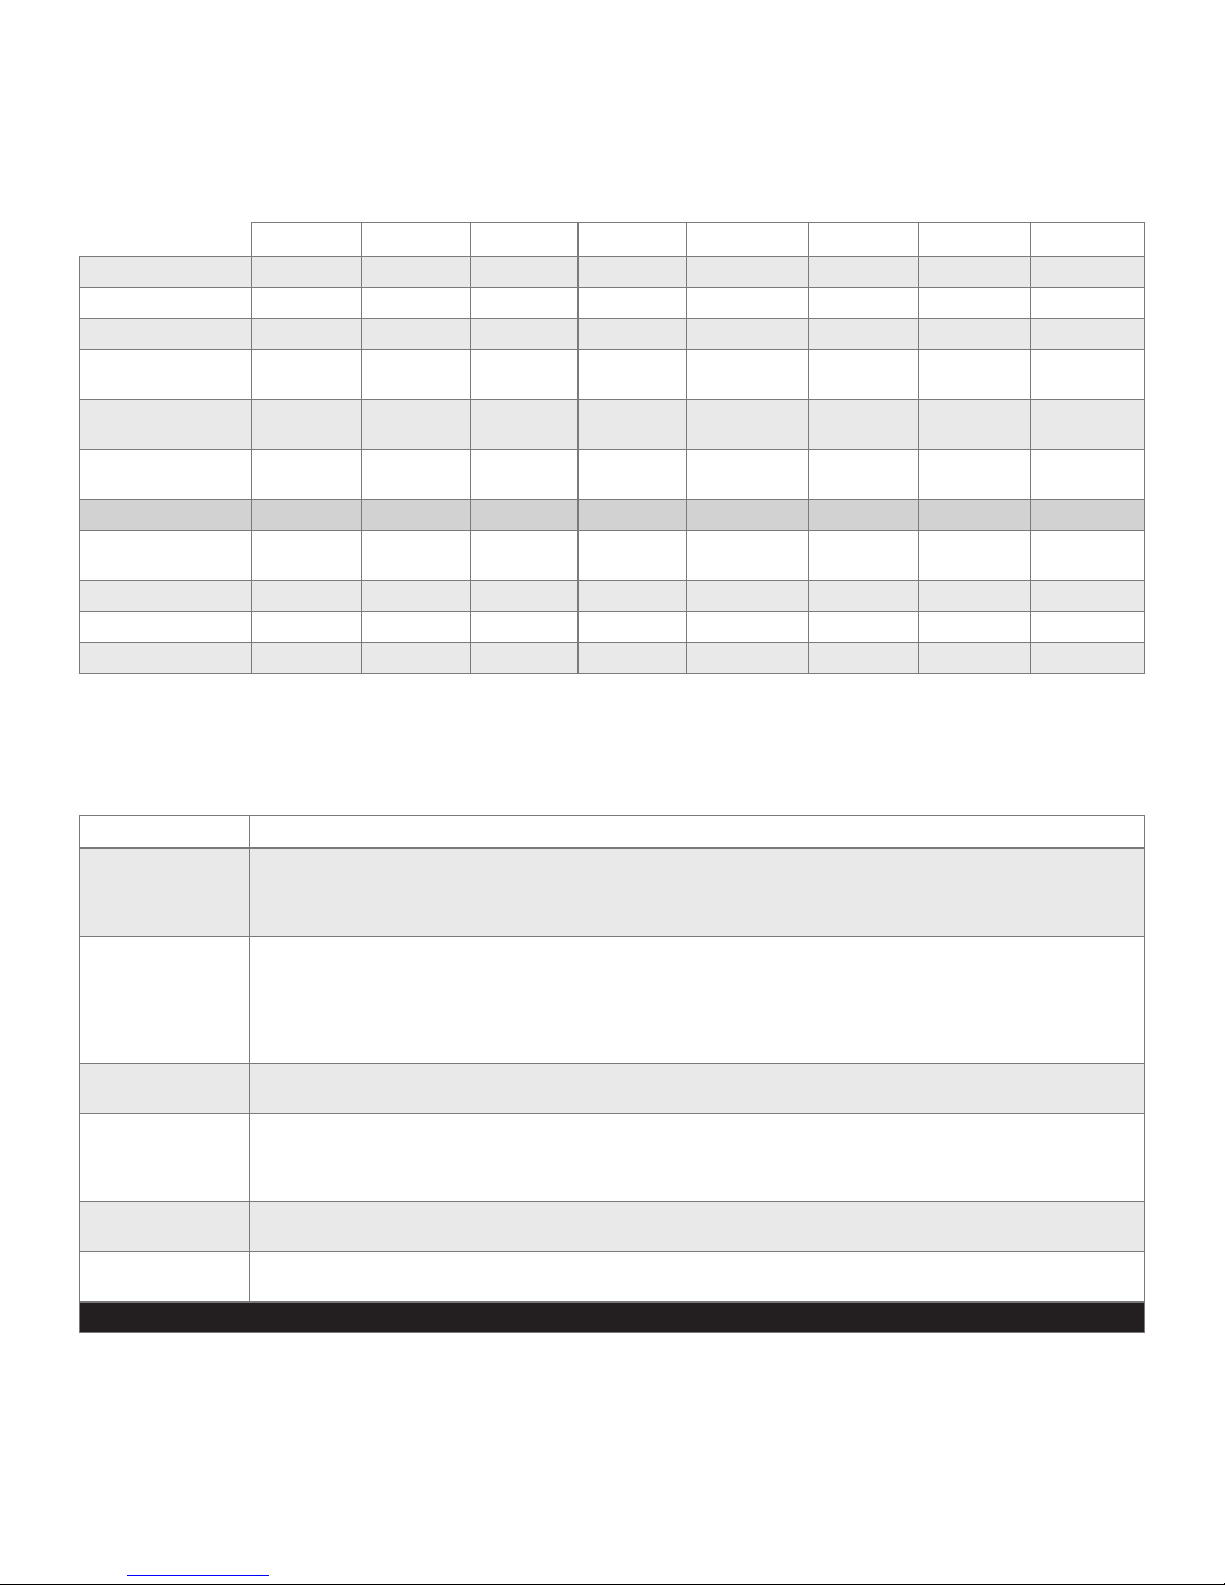
TEKNISKA DATA
DS12F DS15F DS25F DS28F DS28F plus DS36F ED50F ED50Feco
Max. arbetsområde 90 m
2
Luftöde steg 1 256 m3/h 256 m3/h 190 m3/h 190 m3/h 197 m3/h 197 m3/h 129 m³/h 172 m3/h
Luftöde steg 2 - 520 m3/h - 336 m3/h 336 m3/h 336 m3/h 296 m3/h 400 m3/h
Kapacitet vid
27˚C & 60% R.H.
Kapacitet vid
30˚C & 80% R.H.
Effekt vid
27˚C & 60% R.H.
6.1 l/dag 6.7 l/dag 12,1 l/dag 10.4 l/dag 13.2 l/dag 13.2 l/dag 21,1 l /dag 25,2 l/dag
11.1 l/ da g 12.0 l/dag 20,2 l/dag 17. 5 l/da g 20.8 l/dag 20.8 l/dag 33,2 l/dag 40 l/dag
220W/h 240 W/h 400 W/h 460 W/h 510 W/h 510 W/h 850 W/h 790 W/h
Tan kvolym 10.4 l 10.4 l 10,4 l 10.4 l 10.4 l 10.4 l 10.4 l 10.4 l
Köldmedia,
freonfritt
R134A R134A R134A R134A R134A R134A R410A R410A
Mått.LxBxH (cm) 34x41x5 3 34x41x 53 34x41x 53 34x41x53 34x41x53 34x41x53 34x41x53 34x41x53
Vikt 22 kg 22 kg 24 kg 24 kg 26 kg 26 kg 28 kg. 28 kg
Ljudnivå 38 dB 38-58 dB 38 dB 38-58 dB 38-58 dB 38-58 dB 38-58 dB 38-58 dB
100 m
2
100 m
2
140 m
2
190 m
2
190 m
2
230 m
2
330 m
2
FELSÖKNING
PROBLEM LÖSNING
Avfuktaren startar
inte
Avfuktar ej - Se till att äkten snurrar.
Hög ljudnivå - Öka avståndet mellan avfuktaren och omgivande ytor.
Isbildning på
kylslingorna
Inget vatten kommer
i behallaren
Stänger inte av vid
full vattenbehållare
Om inget av ovanstående fungerar bör du kontakta närmaste återförsäljare för översyn och eventuell reparation av avfuktaren.
- Se till att avfuktaren är kopplad till eluttaget och att inte säkringen har gått.
- Om varningslampan lyser, kontrollera att vattenbehållaren är tom och sitter rätt placerad i avfuktaren.
Se till att ottören hänger fritt.
- Kontrollera att hygrostaten fungerar. Avfuktaren bör starta när hygrostatvredet ställs i maxläget.
- Se till att luften kan öda fritt genom avfuktaren. Frontgaller och luftlter ska vara rena och avfuktaren ska
stå 20-30 cm från väggen.
- Hör om kompressorn är igång, men tänk på att avfuktaren kan vara inne i en avfuktningscykel och då stannar
kompressorn. Börja med att avvakta i ca 35 minuter.
- Kontrollera så att inte ett tjockt lager av is bildats på kylslingorna.
- Kylslingorna kan ligga intill varandra och orsaka vibrationer. Koppla bort avfuktaren från eluttaget och sära på slingorna.
- Avlägsna luftltret på avfuktarens baksida och se till att inget damm el dyl hindrar luftödet genom maskinen.
- Timern som sköter den automatiska avfrostningen kan vara trasig och då kommer inte kompressorn att stangas av med
jämna mellanrum.Kontakta din återförsäljare.
- Höj temperaturen i rummet.
- Kontrollera att ingen smuts mm ligger på dropptråget som är under kylslingorna, rengör vid behov.
- Det är viktigt att ottören hänger fritt i vattenbehållaren. Gör den inte det känner den inte av hur hög vattennivån är och
kan därför inte se till att avfuktaren stannar.
11
Page 12

Contact:
Wood’s is marketed and distributed by TES Scandinavia AB
Maskingatan 2-4
441 39 – Alingsås, Sweden
+46(0)31-761 36 10
www.woodseurope.com
 Loading...