

Page 1
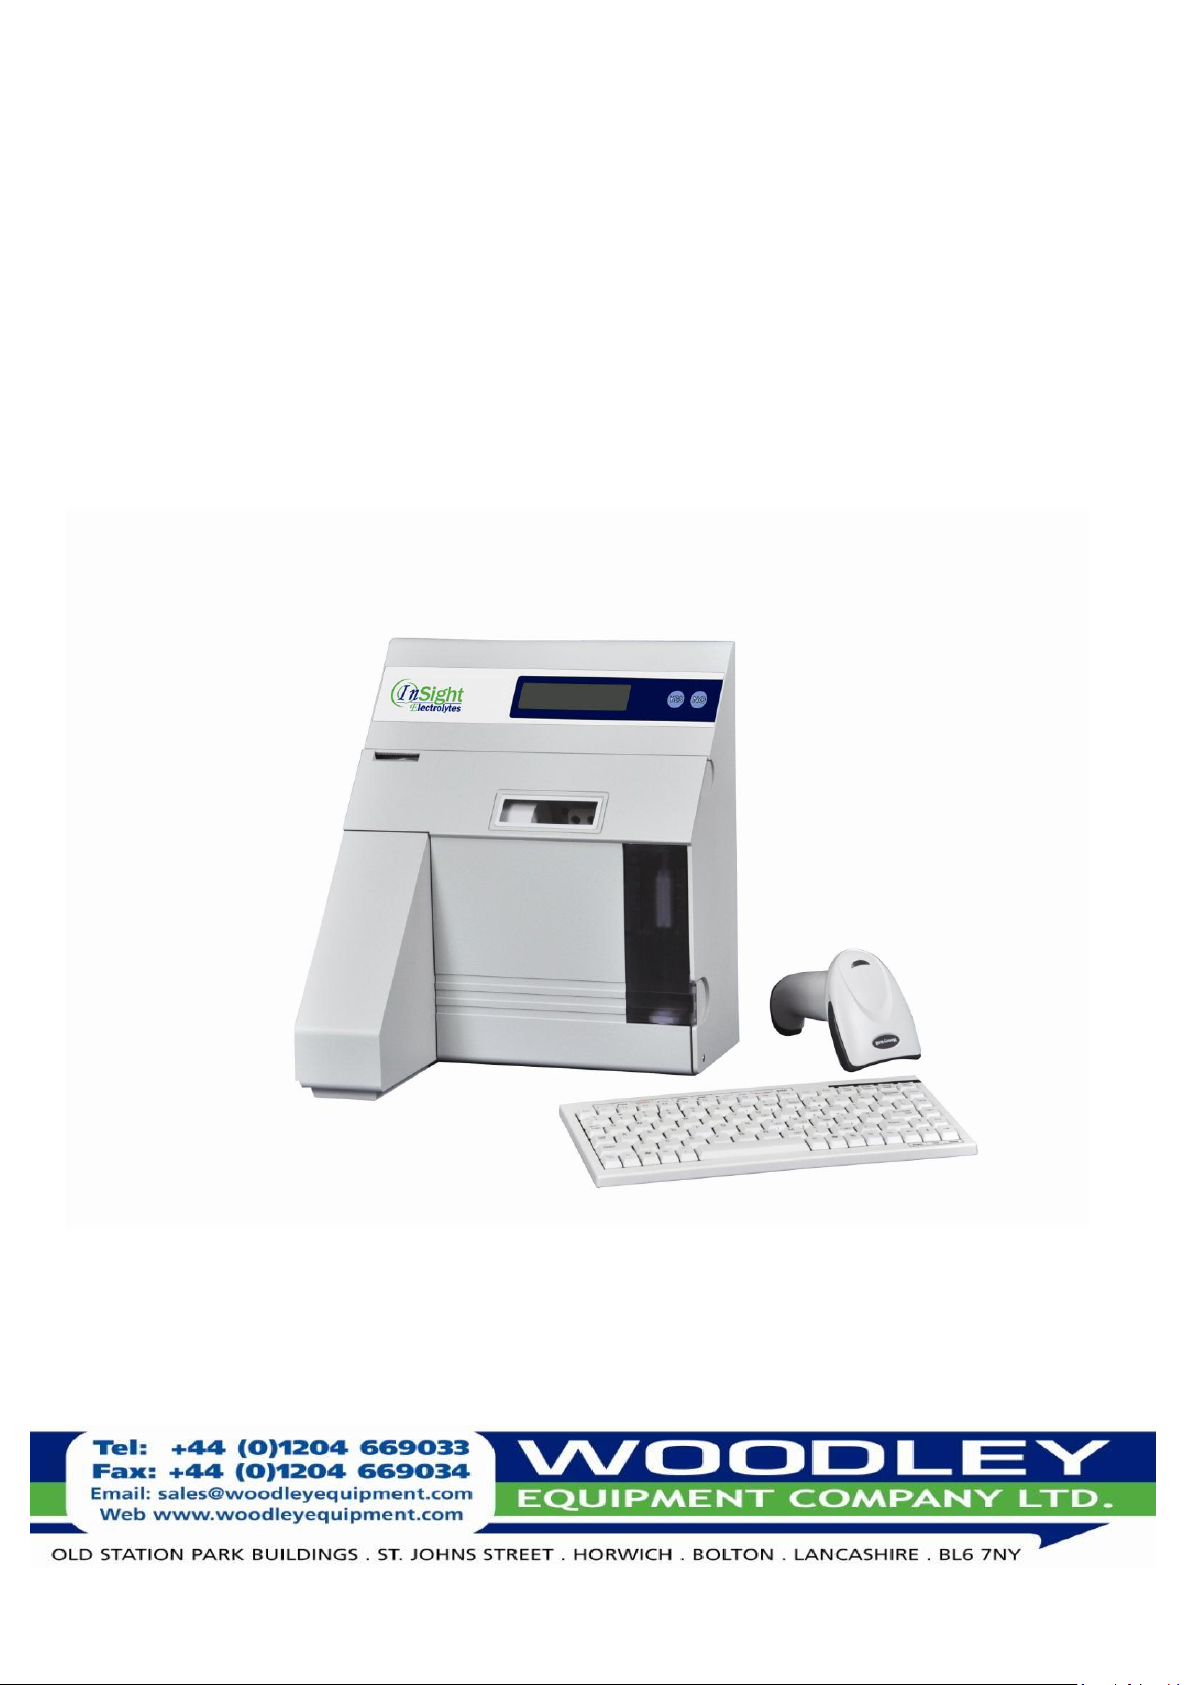
Insight Electrolyte Analyser
Quick Reference Guide
Page 2

3
Setup and Installing the Electrodes
5
Electrode Configurations
6
Start Up
7
Running a Sample
8
How to Run the Quality Control
9
Result Review
10-14
Maintenance
15
Shutdown
17
Reference Ranges
Quick Reference Guide Contents
This document is a Quick Reference Guide. For more comprehensive information please refer to the Insight
2
Electrolytes Operators Manual
Page 3
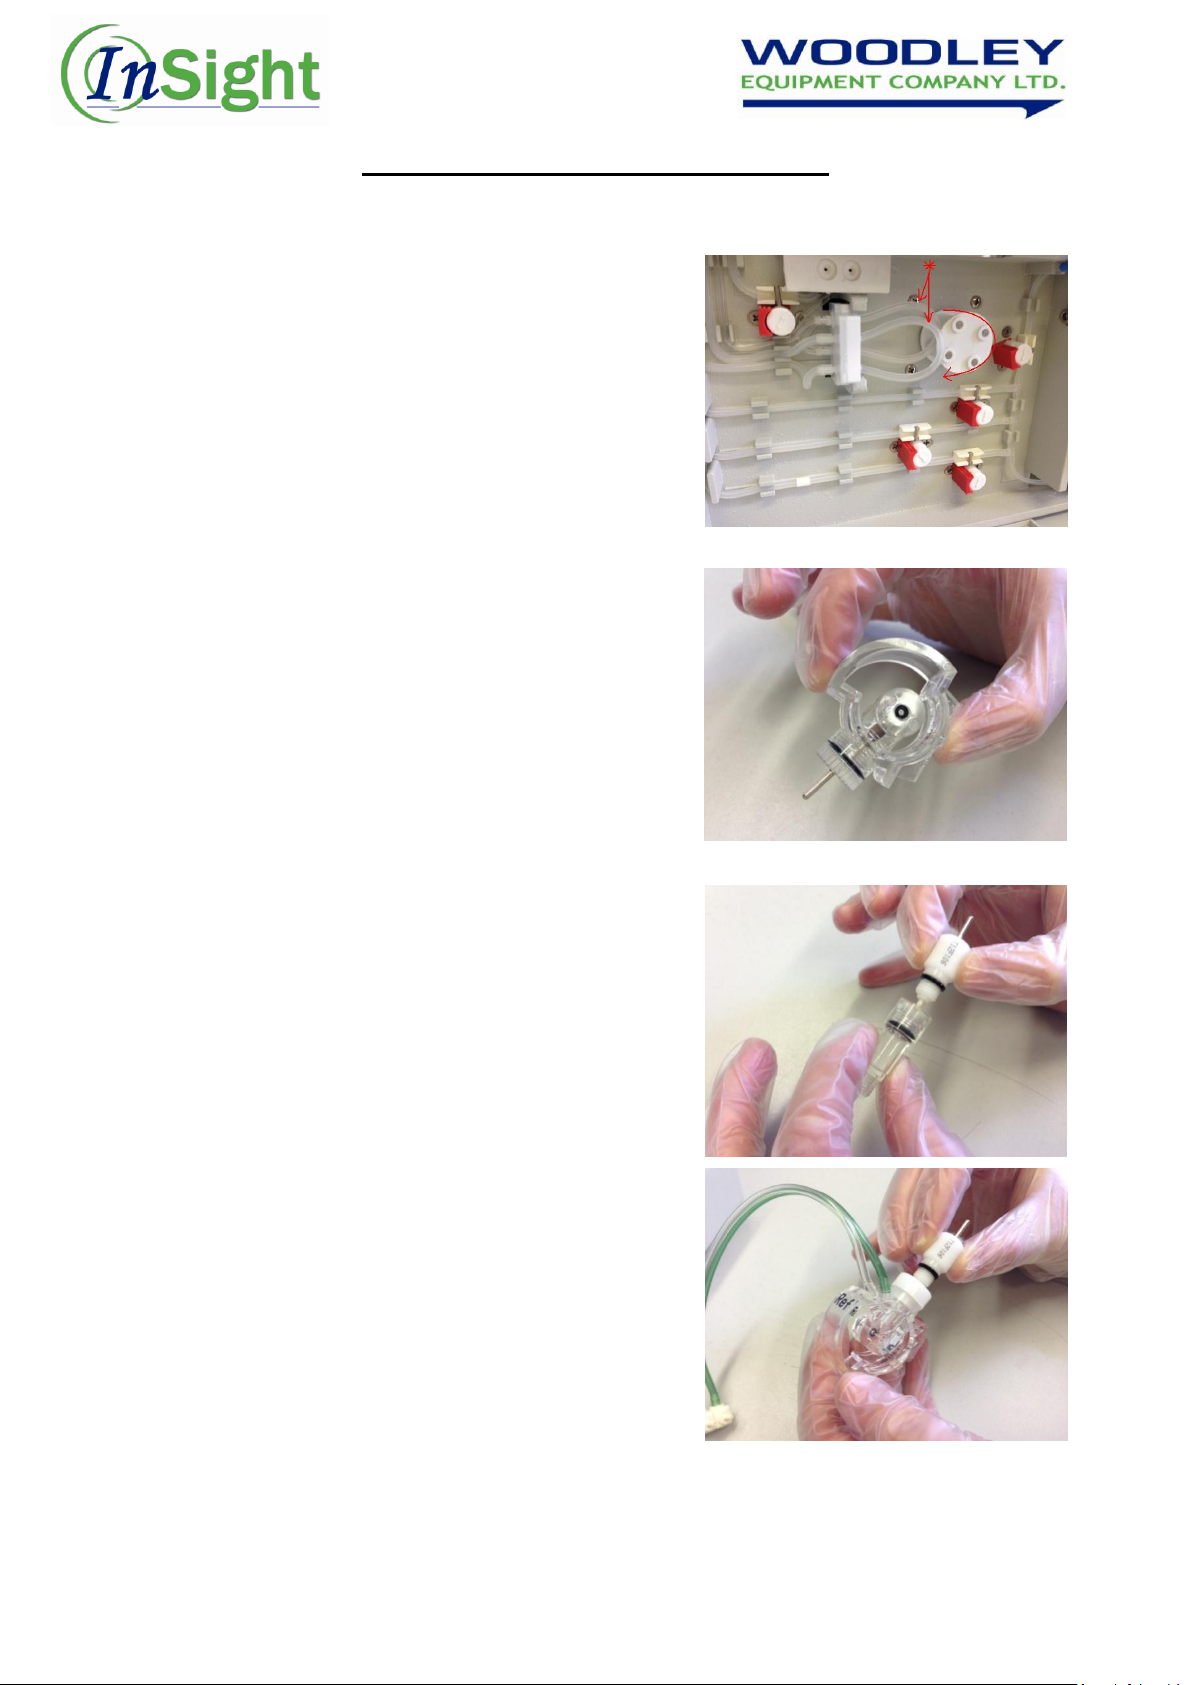
Setup and Installing the Electrodes
1. Remove the red transport clips and loop the tubing
around the white pump roller
2. Remove the reference housing and the electrodes from
their protective boxes and place on a clean surface. Make
sure each electrode has a black o-ring on the left side.
3. Unscrew the transport housing from the reference
electrode and check that the o-ring on the electrode is
properly seated. Rinse, dry and save the transport
housing.
4. Carefully screw the reference electrode into the
reference electrode housing and place it with the other
electrodes. Check for fill solution in the electrodes and top
up if required with the enclosed fill solution (see
unscheduled maintenance section, page 14).
This document is a Quick Reference Guide. For more comprehensive information please refer to the Insight
Electrolytes Operators Manual
3
Page 4
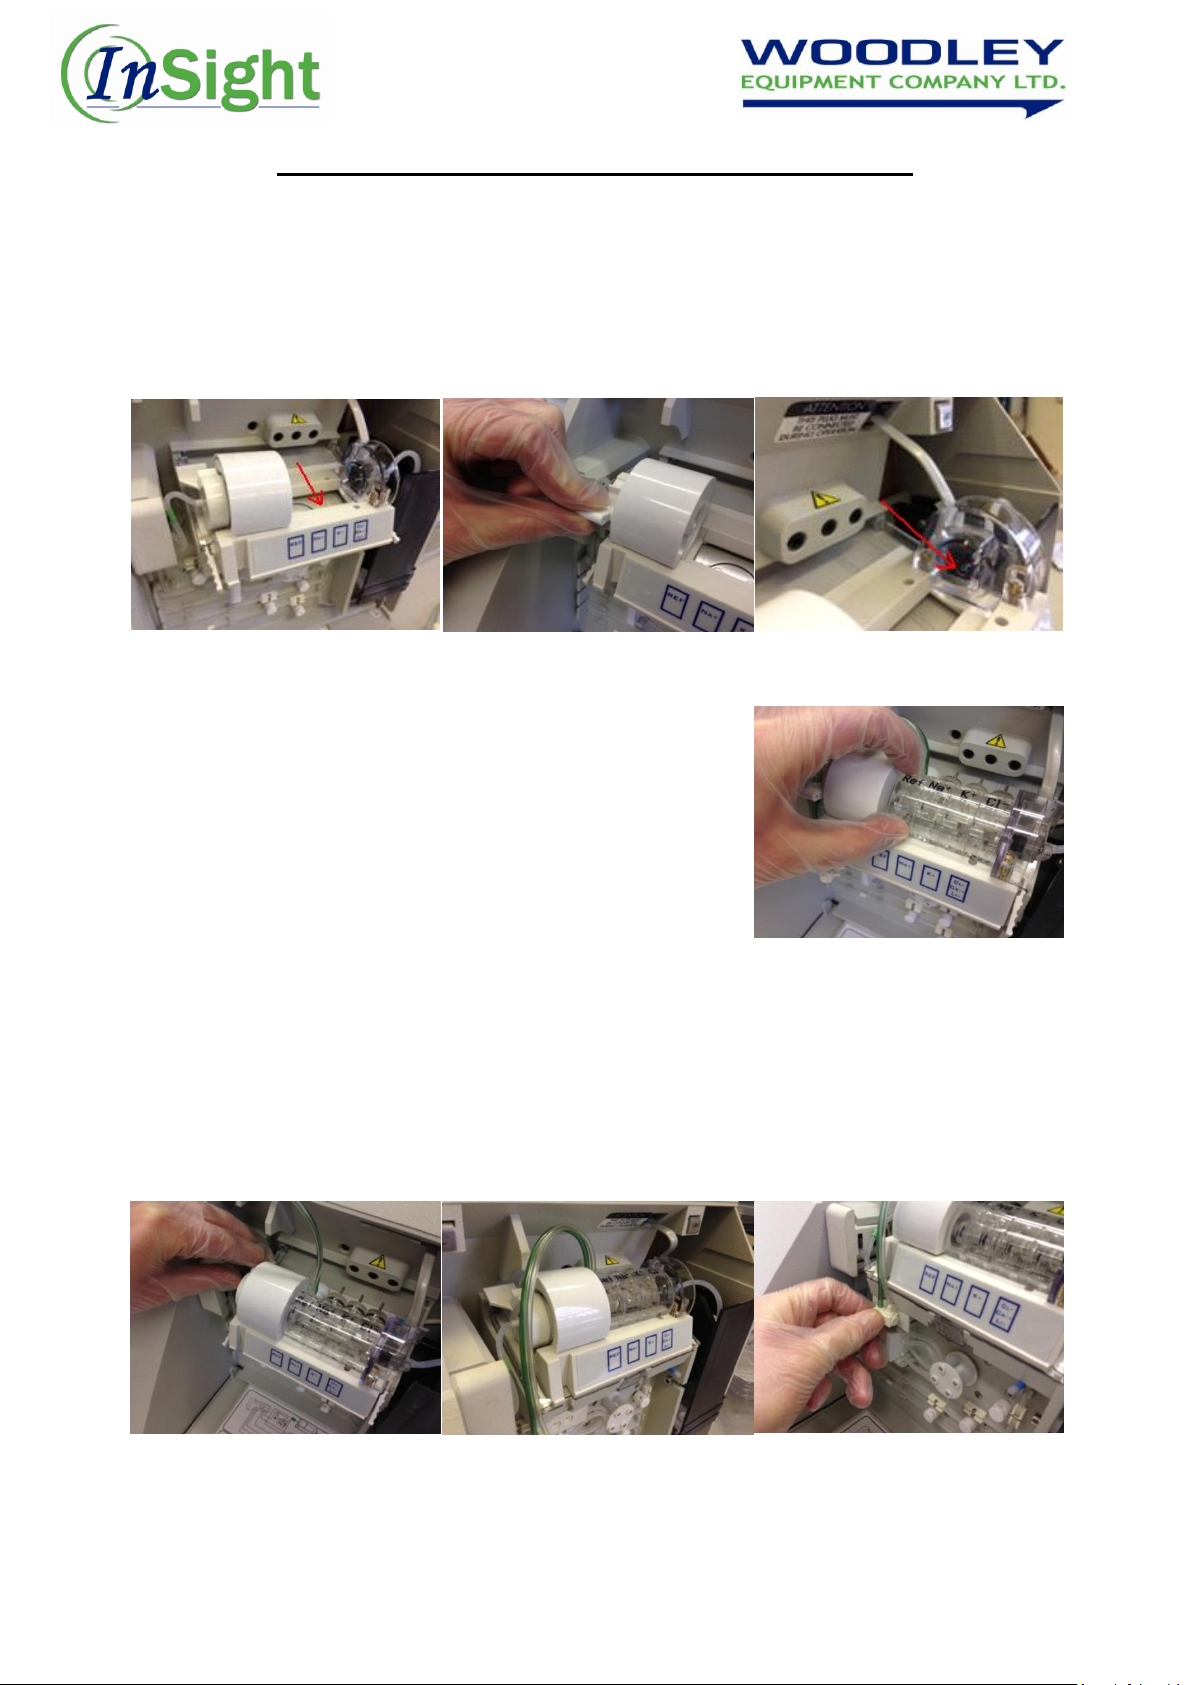
Setup and Installing the Electrodes Continued...
5. Slide the measurement chamber forward until it locks in the front position.
6. Unclamp the electrode holder on the left by moving the clamp forwards.
7. Check that an o-ring is present in the electrode holder on the right.
8. Install the electrodes into their corresponding positions
starting from the right hand side and working to the left (the
reference electrode will be installed last). The electrodes have
a lip on the bottom that rests on the flat edge of the
measurement chamber.
8. When all electrodes have been installed, close the clamp on the electrode holder on the left side
by lifting it upwards until it locks in the back position.
9. Slide the measurement chamber back until it snaps into position.
10. Plug the tubing connector of the reference housing assembly in the receptacle below the left
side of the measurement chamber.
4
This document is a Quick Reference Guide. For more comprehensive information please refer to the Insight
Electrolytes Operators Manual
Page 5
Electrode Position
Na K Ca/Cl/Li
1
Na K Dummy
2
Na K Cl
3
Na
Dummy
Cl
4
Na K Ca
5
Na
Dummy
Ca
6
Na K Li
7
Na
Dummy
Li
8
[Na]
Dummy
Li
9
Na
Ca
Li
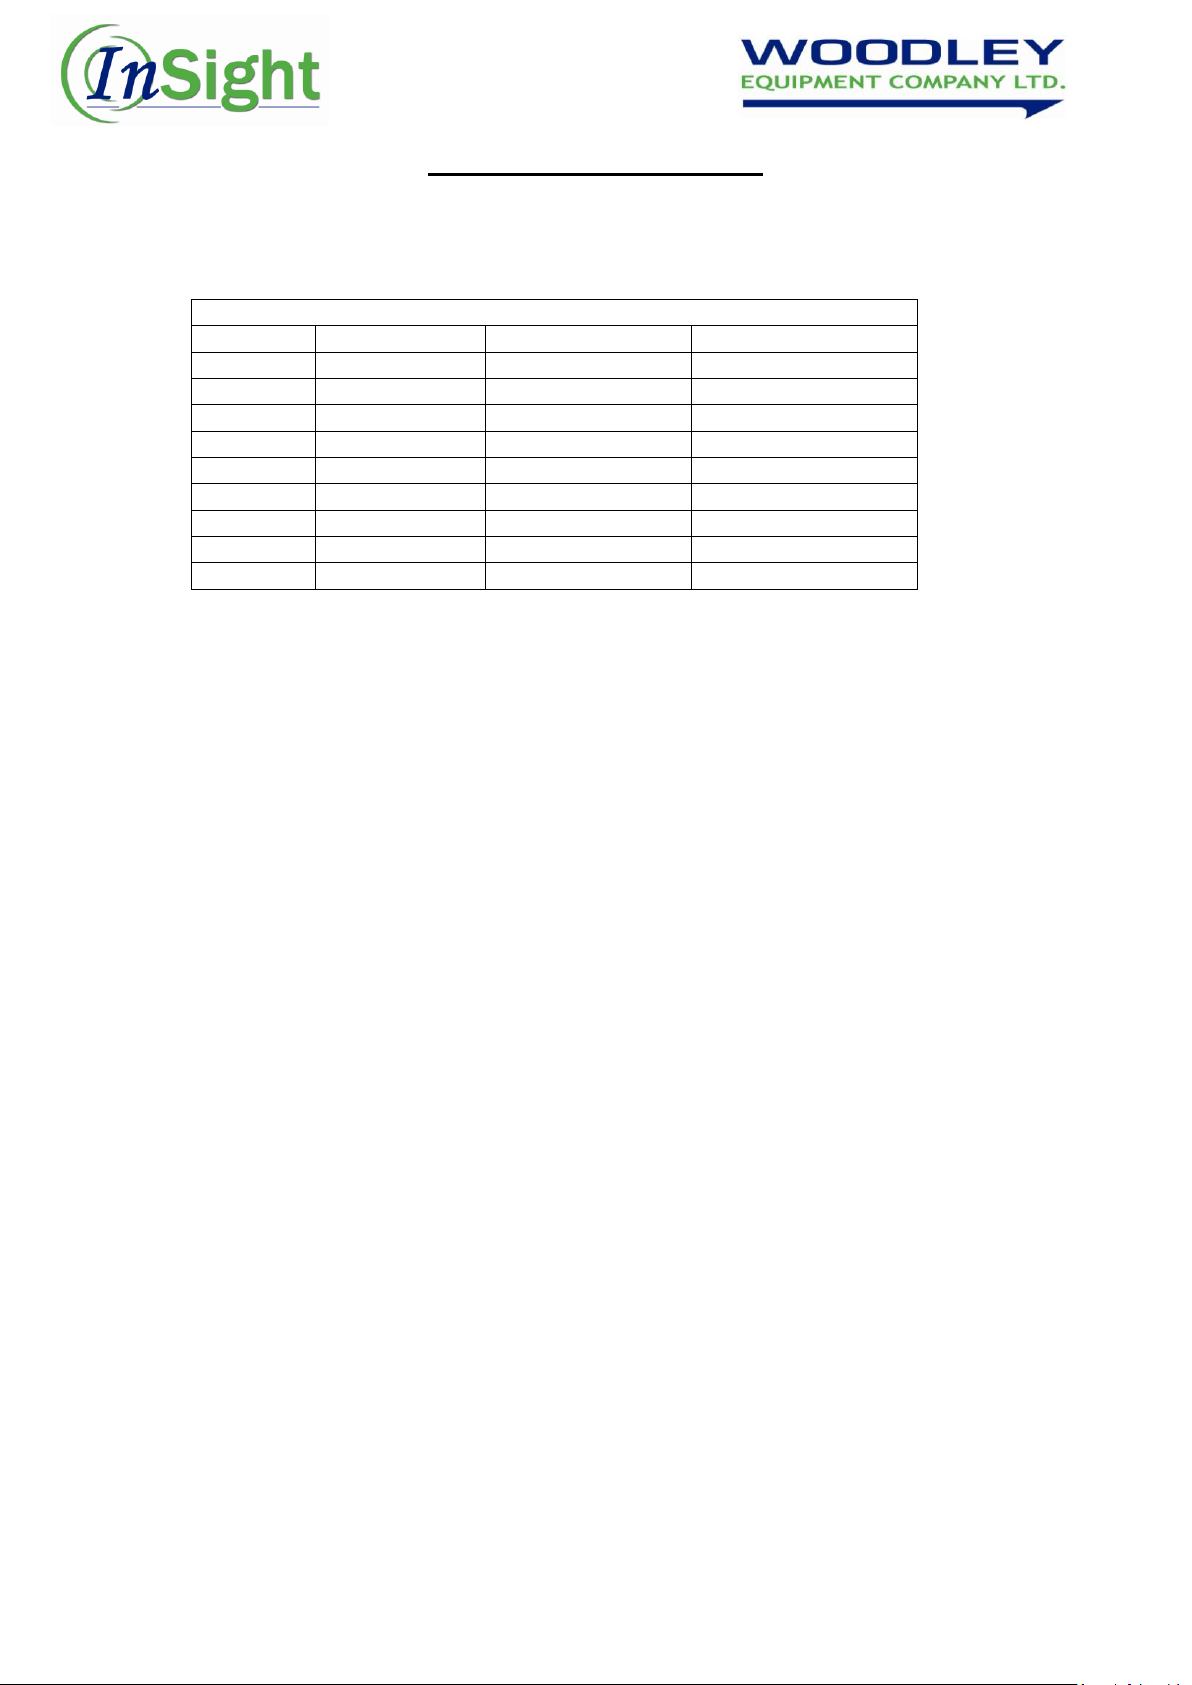
Electrode Configurations
Possible parameter configurations of the electrodes are:
5
This document is a Quick Reference Guide. For more comprehensive information please refer to the Insight
Electrolytes Operators Manual
Page 6

Start Up
1. Switch on the analyser. After 60 seconds the analyser will display “Standby on”. Press “Yes” and
the analyser will display “Deactivate standby?”. Press “Yes” to confirm.
2. When using the analyser for the first time every day, it is advised to perform a Daily Clean. The
analyser will display “Clean”.
Pour a small amount of the „ISE Cleaning Solution‟ into a clean tube. Press „Yes‟
“Lift door load sample” will be displayed. Open the sample door and introduce the
solution to the probe.
“Wipe probe_shut sample door” will be displayed. Wipe the probe with a lint-free tissue
and close the door.
3. The analyser will display “Condition”.
Pour a small amount of the „Electrode Conditioning Solution‟ into a clean tube. Press
„Yes‟
“Lift door load sample” will be displayed. Open the sample door and introduce the
solution to the probe.
“Wipe probe_shut sample door” will be displayed. Wipe the probe with a lint-free tissue
and close the door.
4. The analyser will display “Continue maintenance”. Press „No‟ and the analyser will begin an
automatic calibration cycle.
5. After finishing the calibration cycle, the analyser displays “H-Ready Na-K”. Other parameters will
be displayed if they are set up on the analyser. The analyser is now ready for sample analysis.
6
This document is a Quick Reference Guide. For more comprehensive information please refer to the Insight
Electrolytes Operators Manual
Page 7

Running a Sample
1. Sample types:
Whole blood - from a heparinised syringe or capillary tube.
Serum - by centrifuging either a plain tube or a gel tube.
Plasma - by centrifuging heparinised whole blood.
Urine - A dilution with “Urine diluent” must be performed before running urine samples.
2. To enter patient details press „No‟ until “QC/STD/Urine Sample?” is displayed.
3. Press „Yes‟ to confirm and then press „No‟ until “Standard sample” is displayed.
4. Press „Yes‟ and enter the patient details using the keyboard and press Enter. Press ‟Yes‟ to
confirm.
5. Open the sample door and “Load sample” will be displayed. Introduce the sample to the probe
until “Wipe probe_shut sample door” is displayed.
6. Wipe the probe with a lint-free tissue and close the door.
7. When analysis is complete, the results will be printed by the integrated printer.
7
This document is a Quick Reference Guide. For more comprehensive information please refer to the Insight
Electrolytes Operators Manual
Page 8

How to Run Quality Control
Reconstitution Procedure
1. Remove the control vial from the refrigerator and allow to warm at room temperature for 5
minutes.
2. Remove the stopper and add 5ml DIL SIM diluent to the control vial.
3. Replace stopper and swirl vial gently. DO NOT shake.
4. Let the vial stand on bench for 20 minutes then swirl again and gently invert 10 times.
5. The control is now reconstituted and ready to be analysed or frozen for prolonged storage.
QC Storage
Store at 2-8oC before and after reconstitution. Reconstituted control may be stored at -20oC. Thaw
frozen controls quickly using warm water (37oC), invert gently after thawing.
QC Stability
Open vial reconstituted stability is up to 10 days if stored at 2-8oC, or 2-3 weeks if stored at -20oC
once reconstituted. Frozen controls must be used within 8 hours of thawing.
Running the QC
1. Prepare QC and allow the QC to reach room temperature.
2. Gently swirl to mix the QC material.
3. Run the QC in the same way that you would a sample (refer to page 7).
4. Compare the results to reference sheet provided with the control.
5. Sign the QC log under the appropriate date.
In the event of a QC failure:
1. Reprocess the sample
2. If still out of limits, repeat with fresh QC
3. Contact your Woodley Account Manger or Technical support on 01204 669033
8
This document is a Quick Reference Guide. For more comprehensive information please refer to the Insight
Electrolytes Operators Manual
Page 9

Result Review
Results can be printed retrospectively if required from memory. The analyser can store up to 1000
tests. To print stored results follow these steps:
1. Press „No‟ and “Print reports?” will be displayed.
2. Press „Yes‟ and “Print last sample?” will be displayed.
If you want to print the last run then press „Yes‟. The results will be displayed and the report
will print.
If you want to print a different results press „No‟.
3. If „No‟ is selected “Print by sample ID” will be displayed.
Press „Yes‟ and the prompt “Enter ID” will be displayed.
Press „No‟ to scroll through the numbers or press „Yes‟ to enter the correct ID using the
keyboard.
Press „Yes‟ to confirm and the analyser will begin printing.
“Find more” is displayed. Press „Yes‟ to find more results for the same sample ID or press
„No‟ to move to the next menu option.
4. If „No‟ is selected “Print by name” is displayed.
Press „Yes‟ and then use the „No‟ button to scroll through letters or use the keyboard.
When the name is displayed press „Yes‟ to print.
“Find more” is displayed. Press „Yes‟ to print more results from the same patient name or
„No‟ to move to the next menu option.
5. If „No‟ is selected “Print by test” is displayed.
Press „Yes‟ and “Enter test #” is displayed
Press „No‟ to scroll through the numbers
When the correct number is displayed press „Yes‟ to print.
“Find more” is displayed. Press „Yes‟ to find more results for the same test number or press
„No‟ to move to the next menu option.
10. If „No‟ is selected “Print by date?” is displayed.
This will print results for a specific day.
11. “Daily summary” will print the last day‟s results.
12. “Weekly summary” will print the results from the previous 5 days.
13. “Print all” will print all data stored. This function can be interrupted by pressing „No‟.
9
This document is a Quick Reference Guide. For more comprehensive information please refer to the Insight
Electrolytes Operators Manual
Page 10
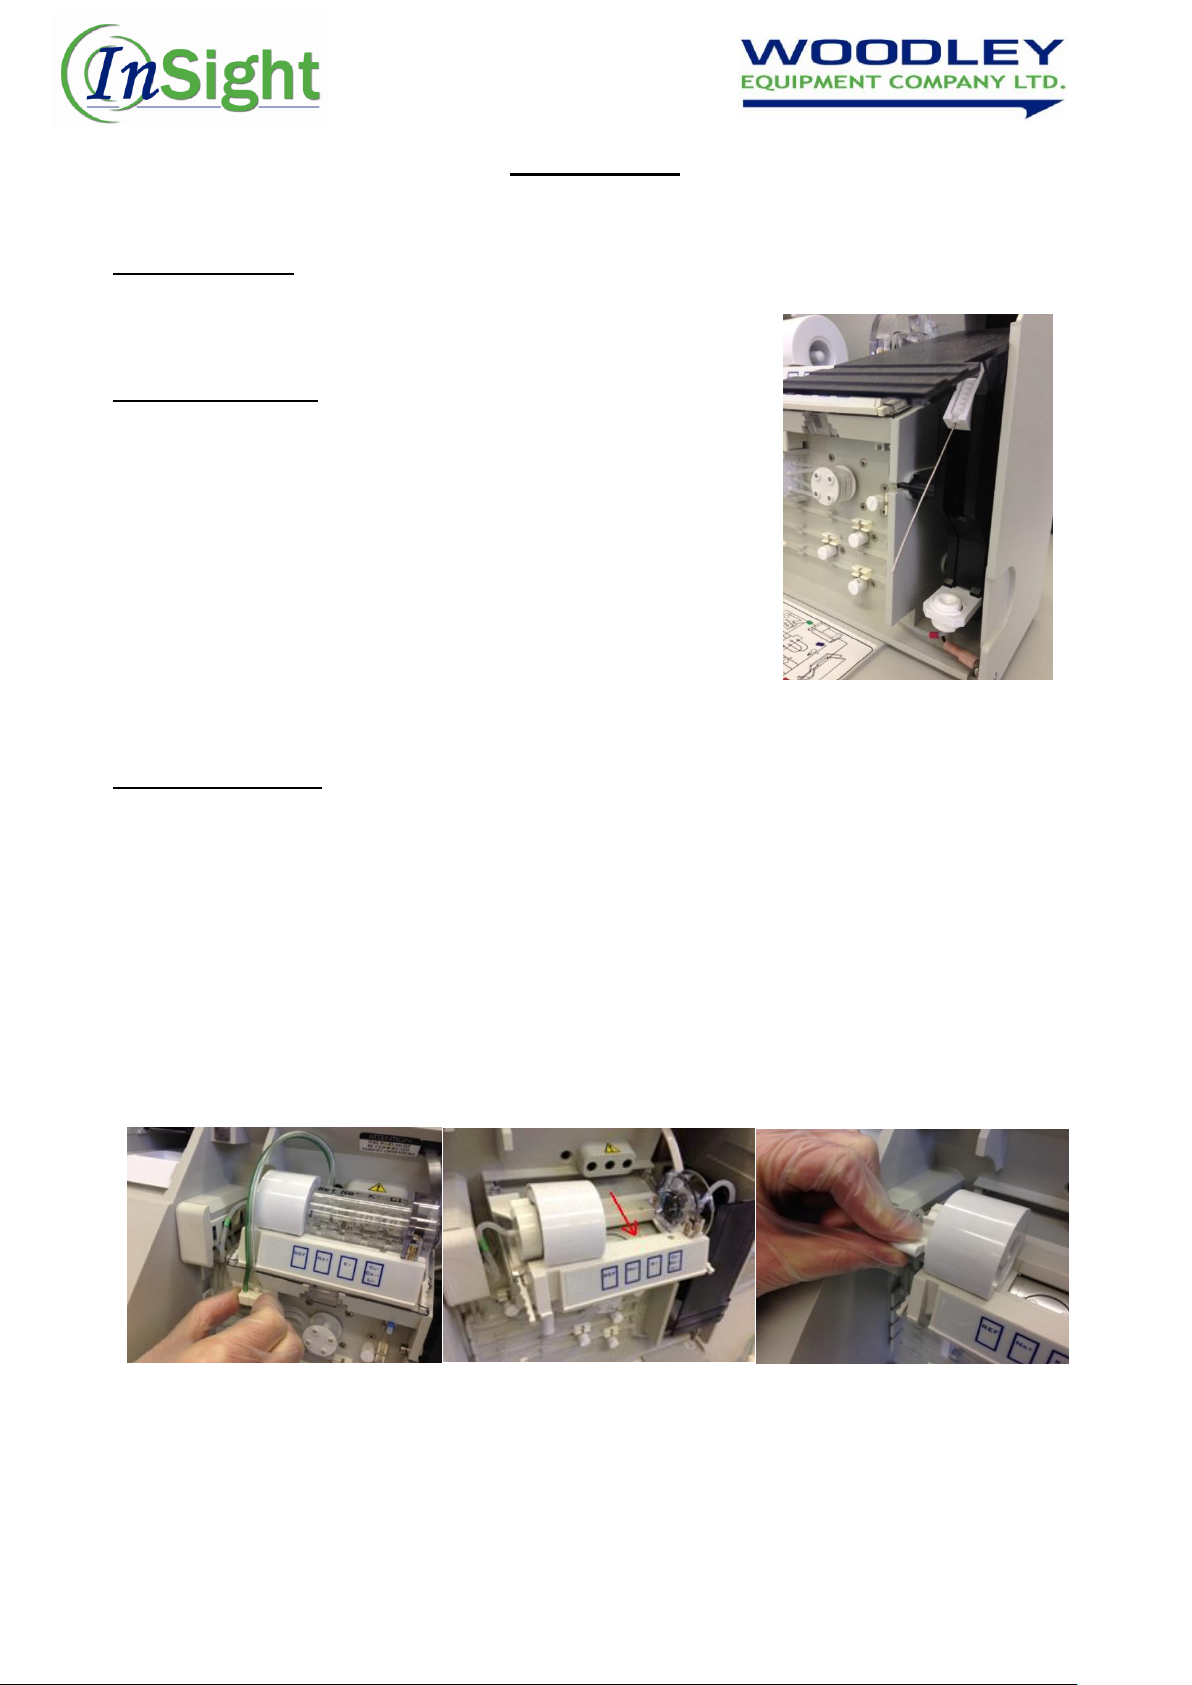
Maintenance
Daily Maintenance
Please refer to „Start Up‟ on page 6 for the daily clean instructions.
Weekly Maintenance
Clean sample probe and fill port:
From the “H-READY” screen open the sample door.
Clean the fill port, probe and surrounding area with a
damp cotton swab.
If the analyser attempts to perform sample analysis
“Sample not found” will briefly display but then return to
“H-READY”.
The exterior surfaces should be wiped with a soft, damp
cloth.
Monthly Maintenance
Clean the reference electrode housing:
From the “H-READY” screen, press „No‟ to access “Maintenance?”.
Press „Yes‟ and “Clean?” appears, DO NOT PRESS ANY KEYS.
Open the front cover of the analyser.
Unplug the tubing of the reference electrode from the receptacle below the left side of the
measuring chamber.
Slide the measuring chamber forward until it locks in the front position.
Unclamp the left electrode holder by moving the clamp forward.
10
This document is a Quick Reference Guide. For more comprehensive information please refer to the Insight
Electrolytes Operators Manual
Page 11
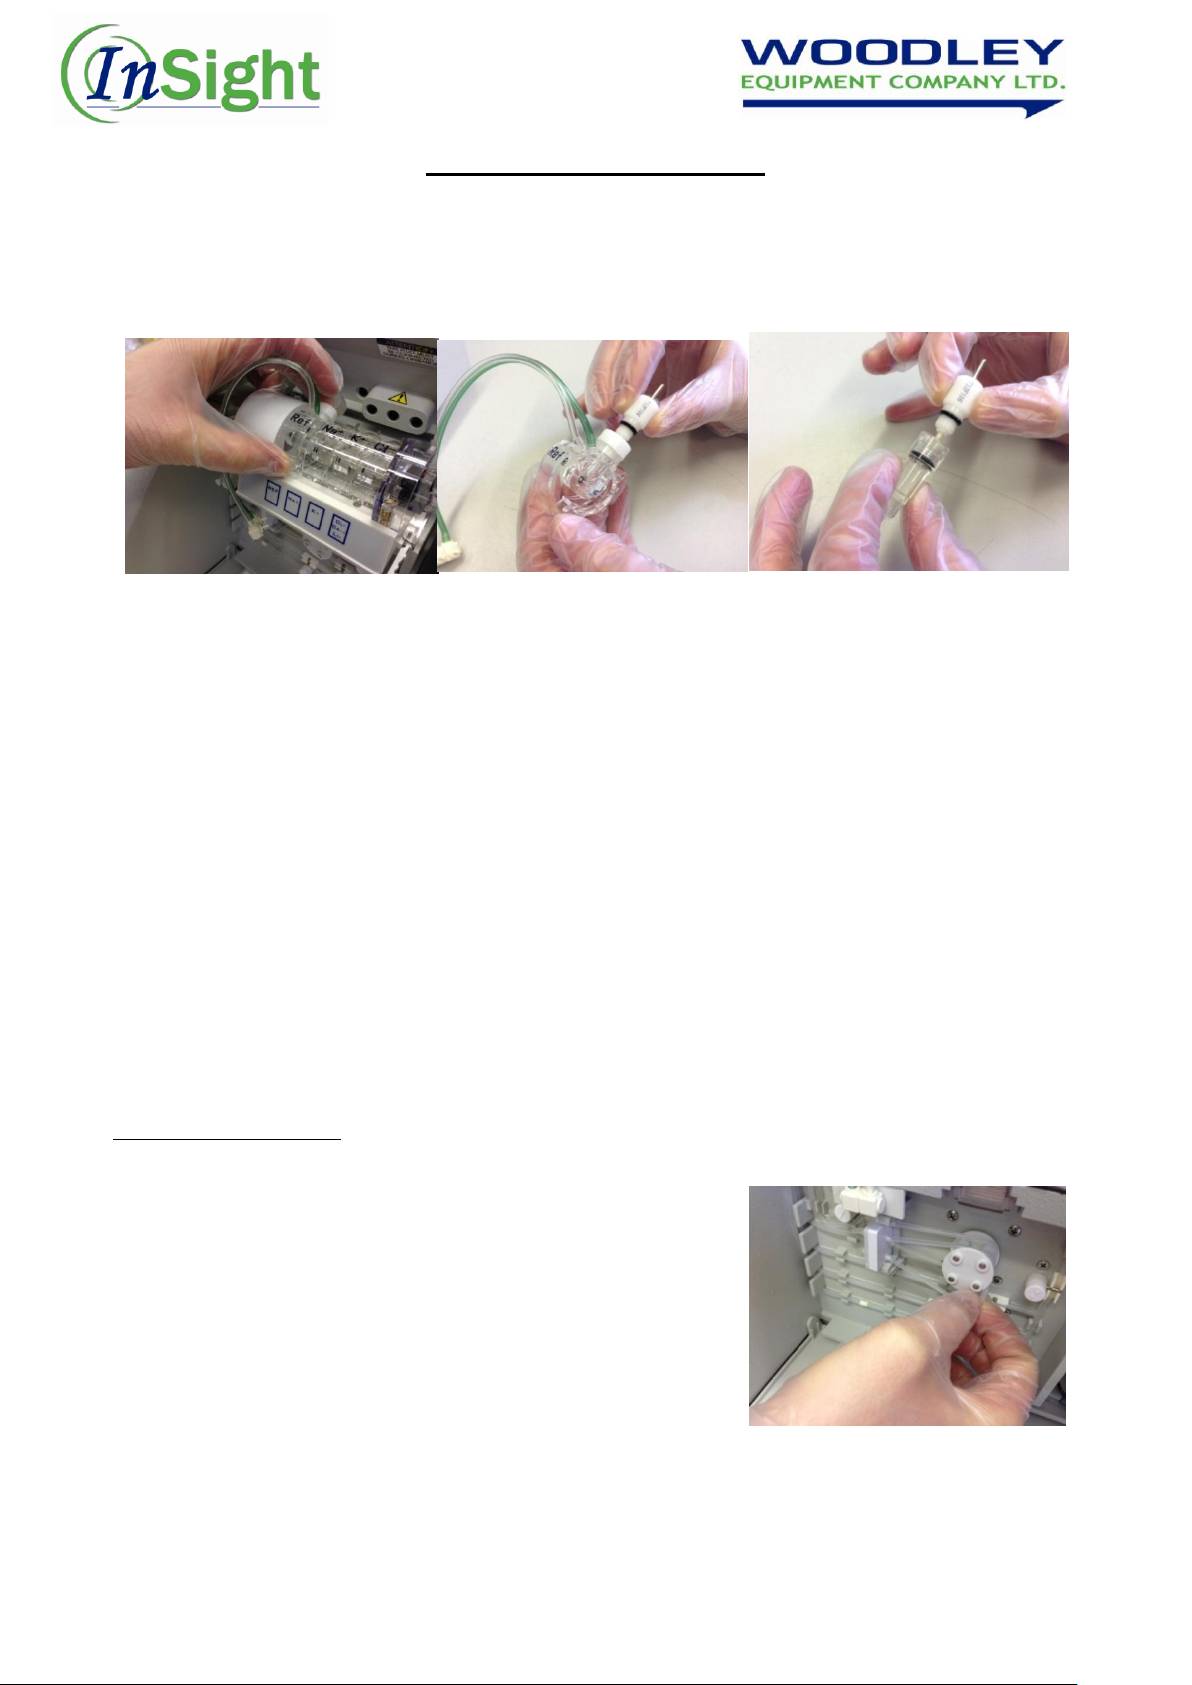
Maintenance Continued...
Remove the reference electrode assembly.
Unscrew the reference electrode from the housing and store in a transport housing filled
with reference solution.
Pour deproteiniser solution into a small container and submerge the reference housing into
it.
After 15 minutes remove the reference housing and thoroughly rinse with tap water.
Dry the housing and unscrew the transport housing from the reference electrode. Check
the O-ring is properly seated on the electrode. Rinse the transport housing and save for
later use.
Carefully screw the reference electrode into the housing and install the assembly into the
left side of the measuring chamber.
Close the clamp on the left electrode holder by lifting upward until it locks in the back
position.
Plug the tubing of the reference electrode back into the receptacle below the left side of the
measuring chamber
Slide the measuring chamber back until it snaps into position and close the front cover of
the analyser.
Perform the daily maintenance by pressing „Yes‟.
Bi-Annual Maintenance
Exchanging the pump tubing set:
Press „No‟ until “Maintenance” is displayed, then press
„Yes‟ and “Clean” will appear. Do not press any keys.
Remove the front cover and remove the two pump
windings from the pump rollers.
Disconnect one tube at a time from the old pump
winding plate and reconnect to the same place on the
new pump winding plate.
Install the new pump winding plate and slip the new
pump windings over the pump rollers. Do not cross the tubes.
Press „No‟ until “Perform calibration” is displayed and then press „Yes‟ to initiate a
calibration cycle.
11
This document is a Quick Reference Guide. For more comprehensive information please refer to the Insight
Electrolytes Operators Manual
Page 12
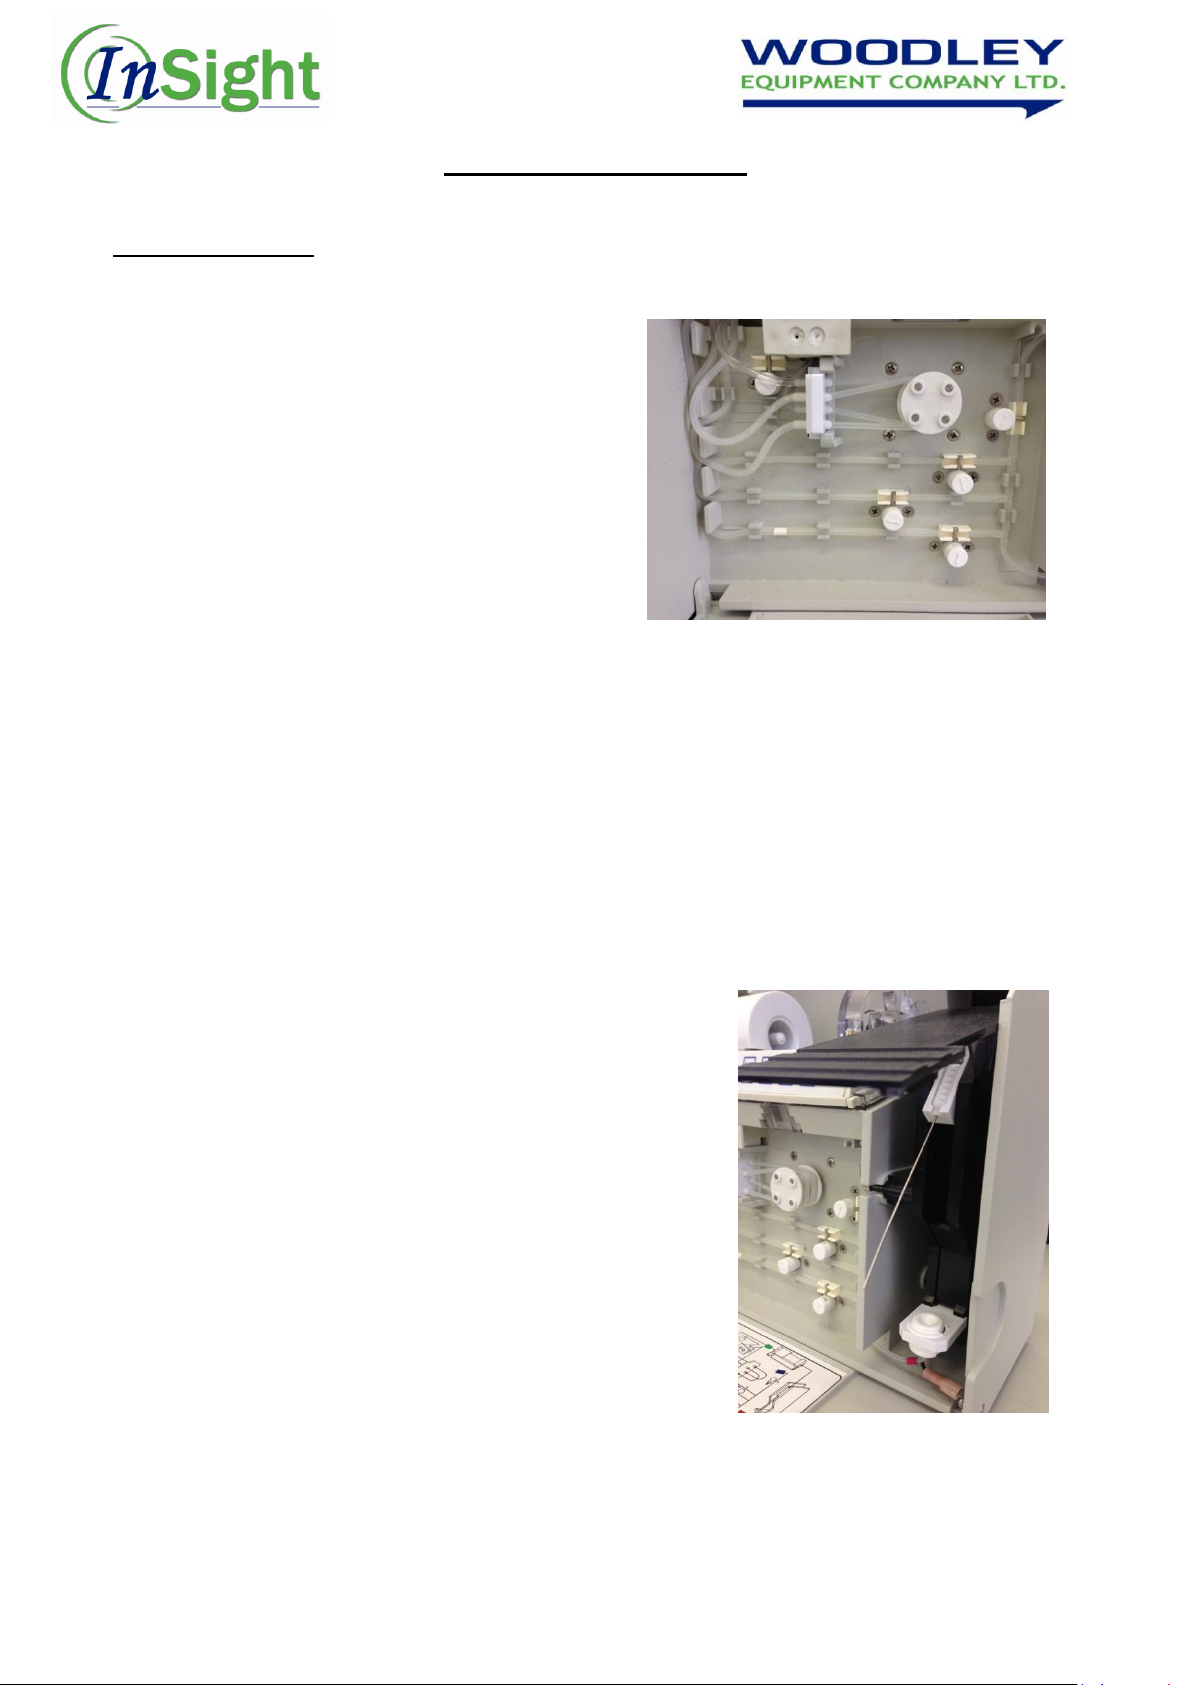
Maintenance Continued...
Annual Maintenance
Exchanging the main tubing harness (Wear gloves):
At the “H-READY” screen, press „No‟ until
“Service menu” appears and press „Yes‟.
Press „No‟ until “Check pinch valves”
appears and press „Yes‟.
Remove the valve caps, sliding them in the
direction of the arrow.
Remove the pinch bars.
Disconnect the reference electrode and pull
out the white reference electrode receptacle.
Disconnect the tubing with the green band
from the left side electrode holder.
Open the sample flap and pull out the fill port.
Remove the ISE pack and slide out. Disconnect the tubes from the pump winding plate and
pull out the tubing harness.
Install the new main harness in reverse order – use the tubing diagram in the front door as
a guide. Take special care to reconnect the tubes to the correct nipples of the pump
winding.
Activate each solenoid by pressing „Yes‟, then slide the pinch bar on and snap on the valve
cap in the direction of the arrow.
To activate the next solenoid, press „No‟ TWICE.
Press „No‟ until “Perform calibration” is displayed and press „Yes‟ to start.
Replacing the sample probe:
Disconnect the tubing of the sample probe from the
sample detector.
Open the sample door.
Lift and remove the sample probe from the holder.
Place and secure the new sample probe into the
holder.
Connect the tubing of the sample probe to the sample
detector.
12
This document is a Quick Reference Guide. For more comprehensive information please refer to the Insight
Electrolytes Operators Manual
Page 13
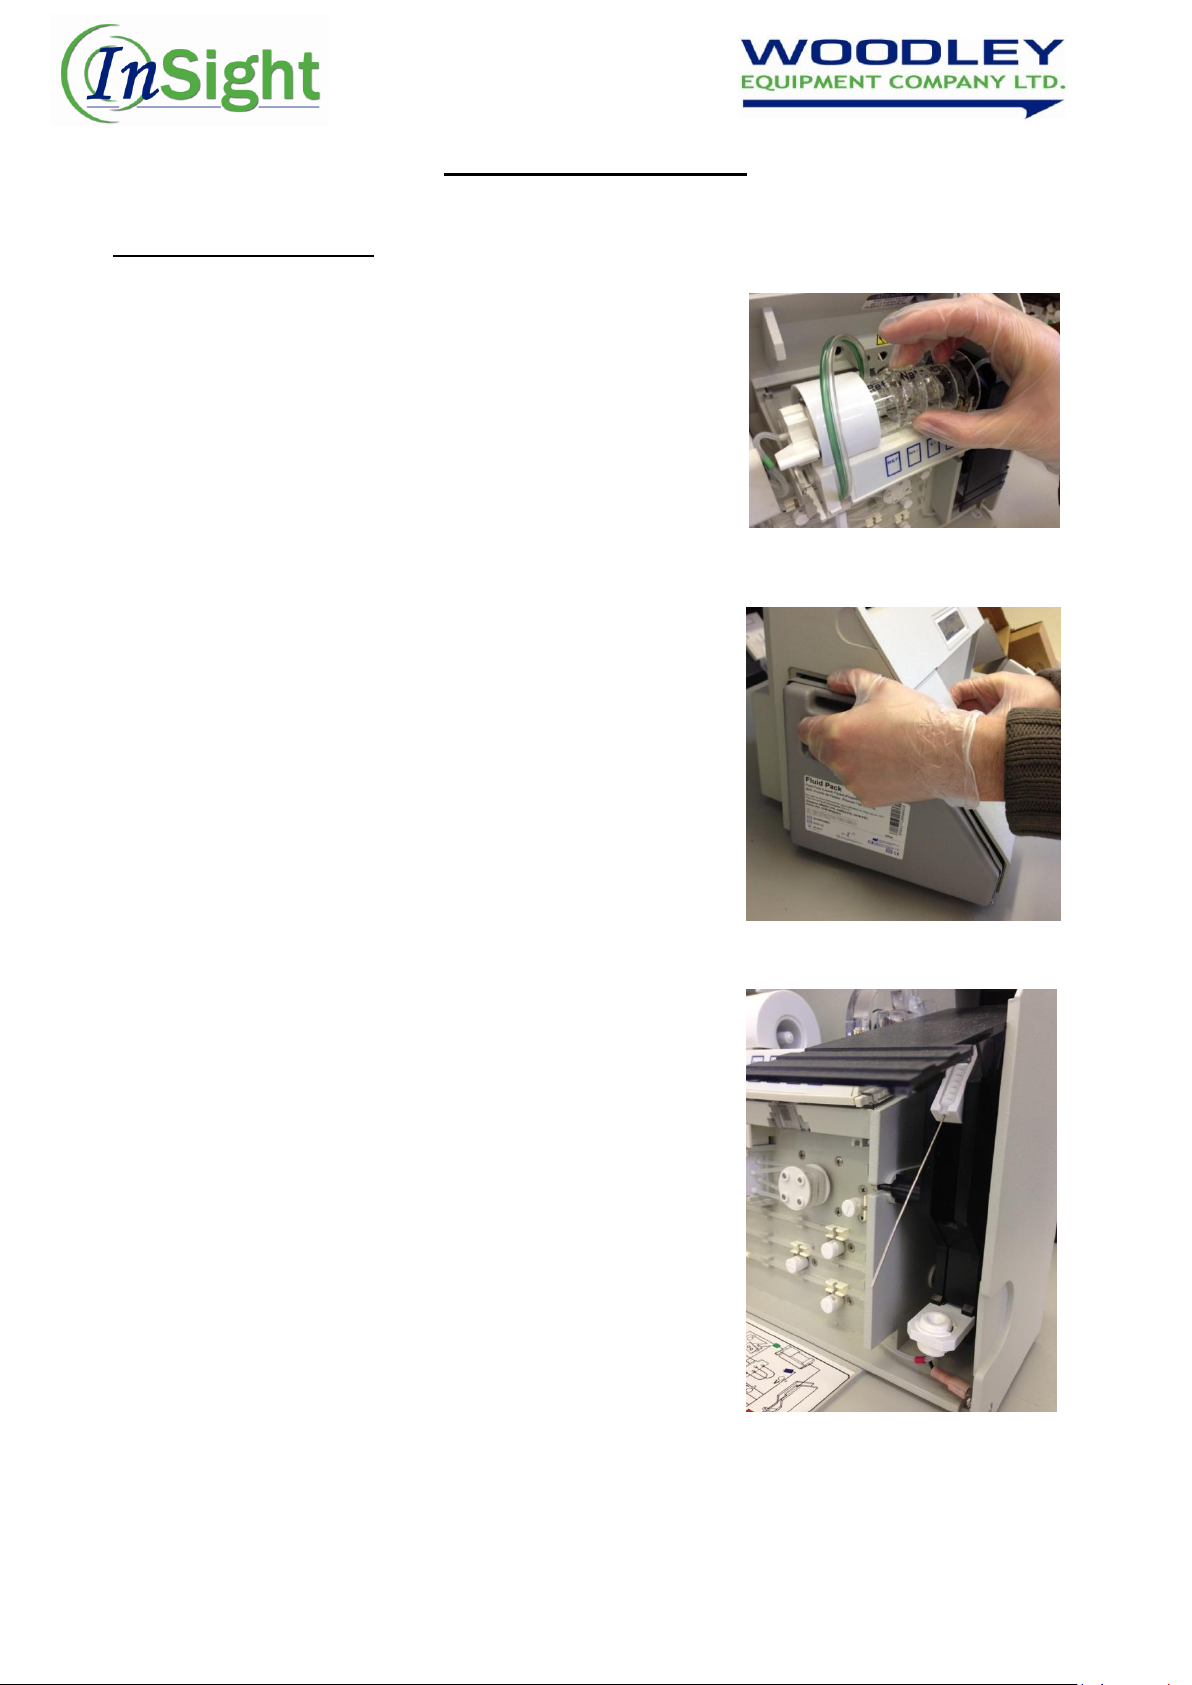
Maintenance Continued...
Unscheduled Maintenance
Replacing electrodes:
Remove old electrodes and see page 3 for installing
new electrodes.
Checking reagent fluid level:
From the “H-READY” screen, press „No‟ until
“Operator settings” is displayed and press „Yes‟.
The prompt “Verify ISE pack” will be displayed. Press
„Yes‟.
The analyser will display the amount of fluid remaining.
Change pack if required by removing the old one and
replacing with a new pack. Press „Yes‟ when “New
pack installed?” is displayed and „Yes‟ again when
“Are you sure?” is displayed.
Replacing the sample probe and fill port:
Open the front door and the sample door.
Remove the needle carefully from the holder and
unplug the tubing.
Reattach the new needle to the tubing and snap the
needle back into the holder.
Remove the fill port holder from the sample probe
mechanism.
Carefully remove the fill port from the holder and
unplug the tubing.
Mount the new fill port into the holder in the reverse
way and attach the tubing.
Mount the fill port holder into its default position.
Close the sample door and front cover.
Press „No‟ until “Perform calibration” is displayed and
press „Yes‟ to start.
13
This document is a Quick Reference Guide. For more comprehensive information please refer to the Insight
Electrolytes Operators Manual
Page 14
Maintenance Continued...
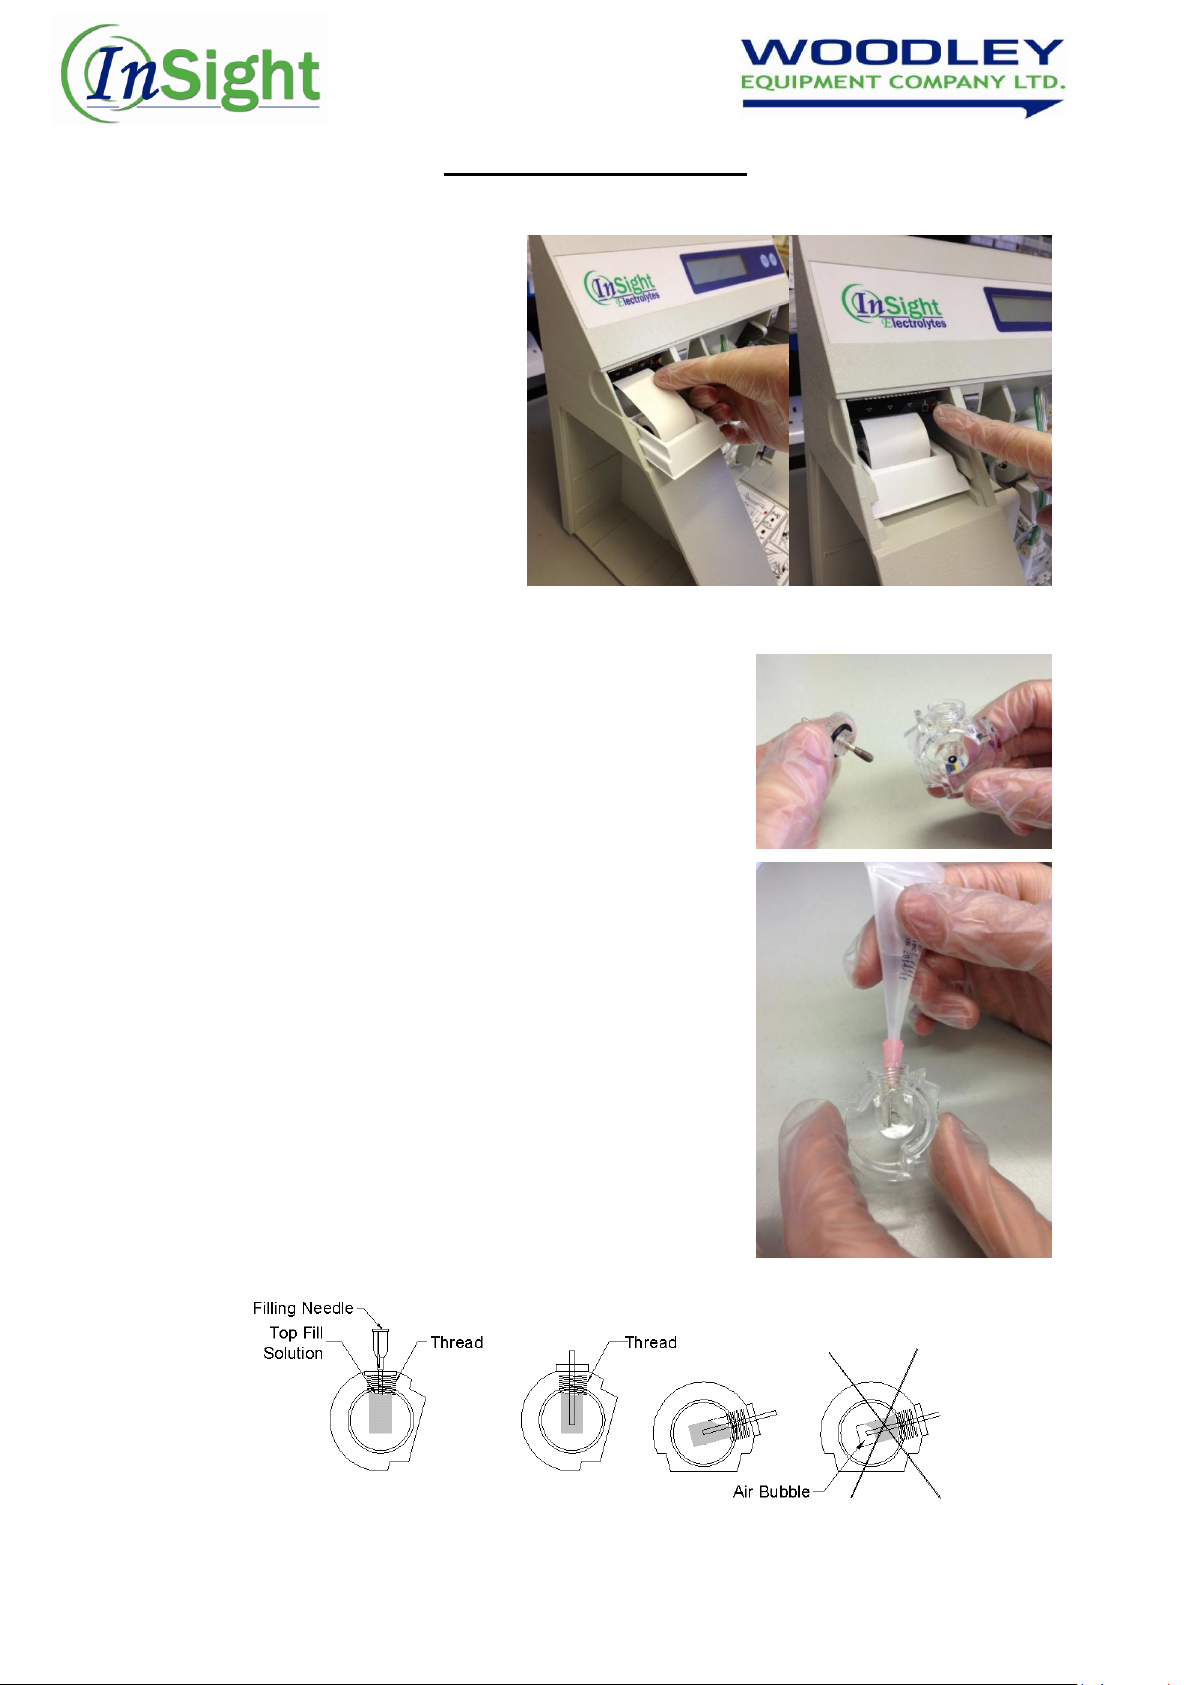
Replacing the printer paper:
Open the front cover and
remove the remaining paper by
pressing the paper feed button.
Place the new paper roll in the
paper tray and thread it through
the feeder slot.
Press the paper feed button to
completely feed the paper
through the analyser.
Close the front cover and tear
off any excess paper.
Re-filling electrodes:
Unscrew the inner electrode from the electrode body.
Do not touch the inner electrode wire. The wire is fragile
and is easily damaged.
Empty the fill solution remaining in the electrode body.
Taking extra caution not to touch the sample path area
– using the unidose fill solution with filling needle placed
on the end, slowly add fill solution into the electrode
body from the bottom up. Fill to just below the inside
threads.
Flush electrode by shaking fill solution out of the body,
and fill again as above.
Screw the inner electrode back into the electrode body
Tap the electrode body to dislodge any air bubbles from
the electrode.
Verify inner electrode is sufficiently submerged (~ ¾
submerged) in fill solution. If necessary add or remove
fill solution accordingly. See diagram below
Wipe any excess fill solution from the exterior of the
electrode body with a lint-free tissue.
14
This document is a Quick Reference Guide. For more comprehensive information please refer to the Insight
Electrolytes Operators Manual
Page 15
Shutdown
A complete shutdown of the analyser may be necessary to prepare the analyser for shipping or if
analyser is not being used for an extended period of time. A special „Shutdown kit‟ is required for
this procedure.
1. Starting at the “H-READY” display press „No‟ until “Operator functions” is displayed and press
„Yes‟. Use the „No‟ button to scroll to “Activate shutdown‟ and press „Yes‟. Press „Yes‟ again when
prompted “Are you sure?”.
2. The analyser will display “Water and plug installed?”.
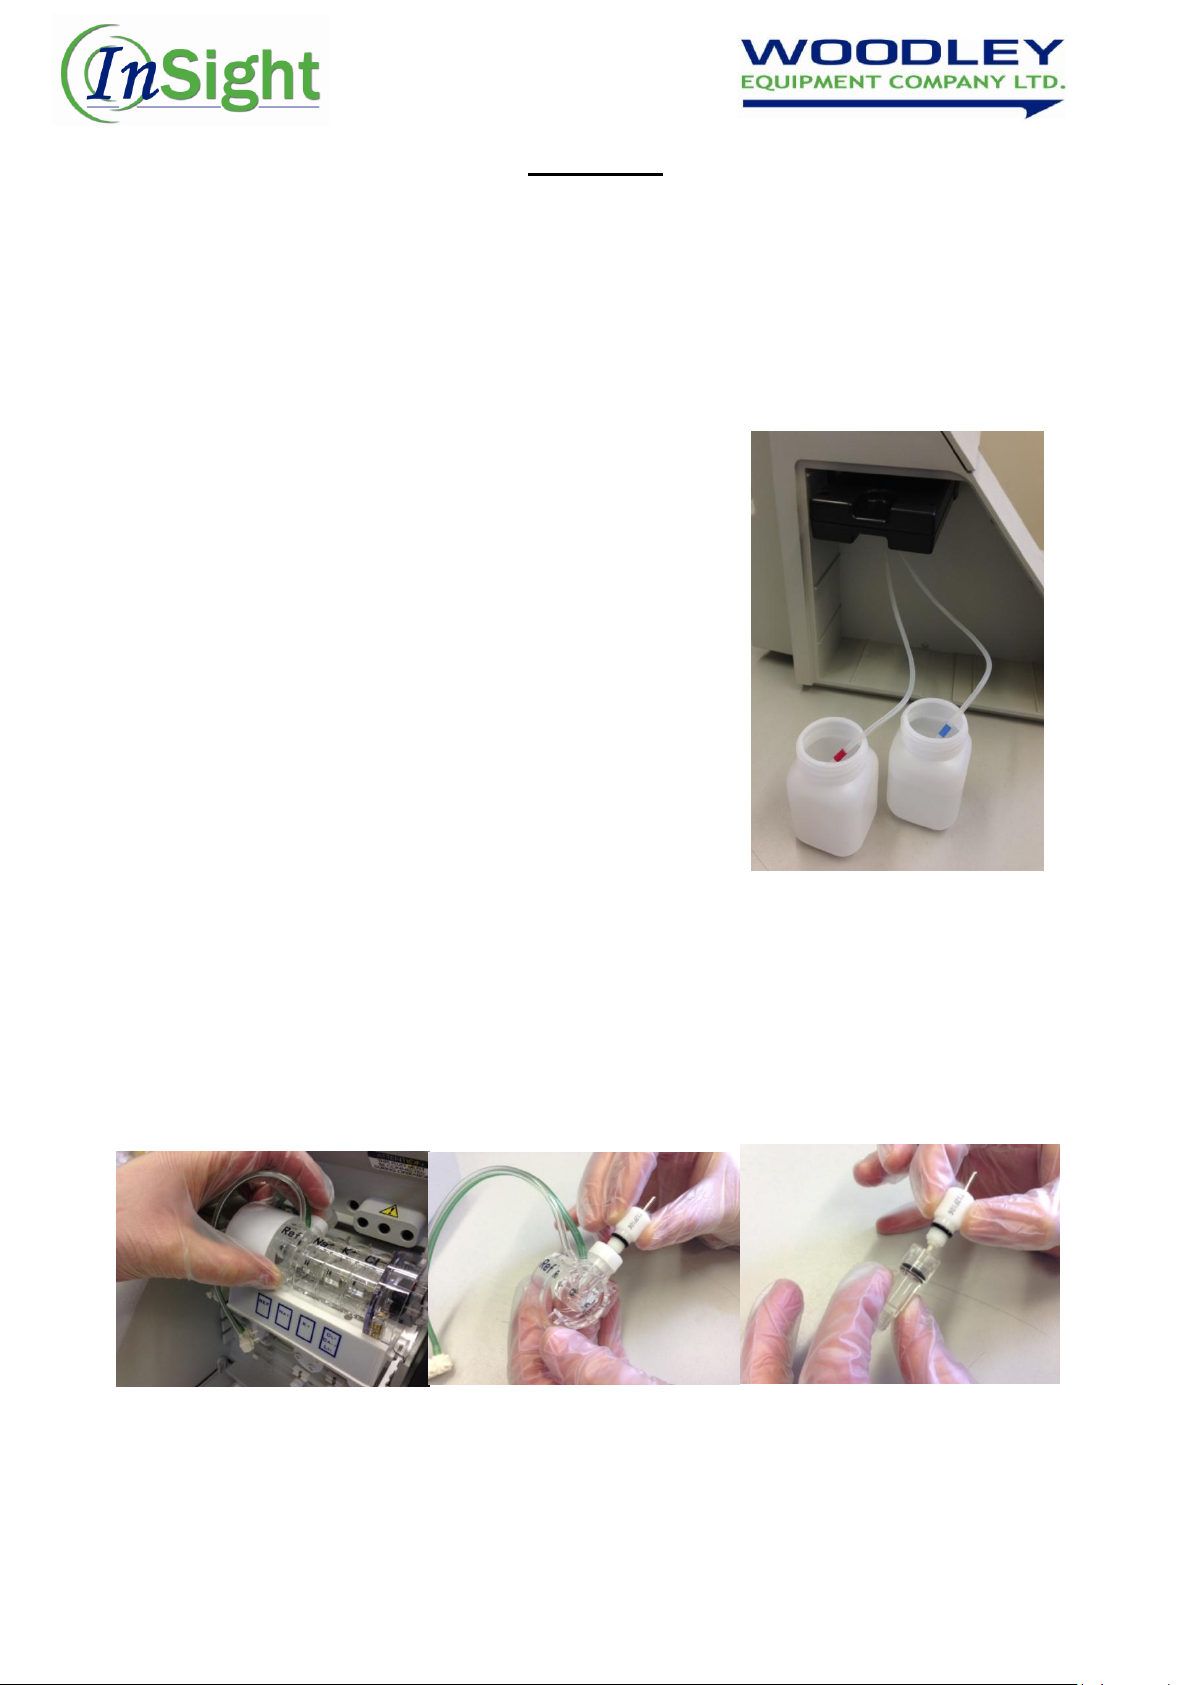
Remove the ISE pack and push the protective strip onto
the ISE pack connector.
Fill one of the containers from the shutdown kit about
halfway with distilled water.
Insert the shutdown plug carefully into the ISE pack
receptacle.
Place the blue marked line into the container filled with
water and the red marked line into the empty container.
Begin the tube wash procedure by pressing „Yes‟.
3. The analyser will display “Ref protective hsg installed?”
Pull the electrode holder forward and remove the
reference electrode assembly.
Carefully unscrew the reference electrode from the
housing and temporarily place the reference electrode
onto a clean cloth.
Pour the remaining reference solution from the reference housing into a transport housing.
Carefully screw the reference electrode into the filled transport housing.
The second transport housing is screwed into the reference housing.
Place the reference housing back into the electrode holder with the transport housing in
place, and move the lever backwards to seat the electrodes properly. The electrode holder
remains in the forward position.
Press „Yes‟.
15
This document is a Quick Reference Guide. For more comprehensive information please refer to the Insight
Electrolytes Operators Manual
Page 16
Shutdown Continued...
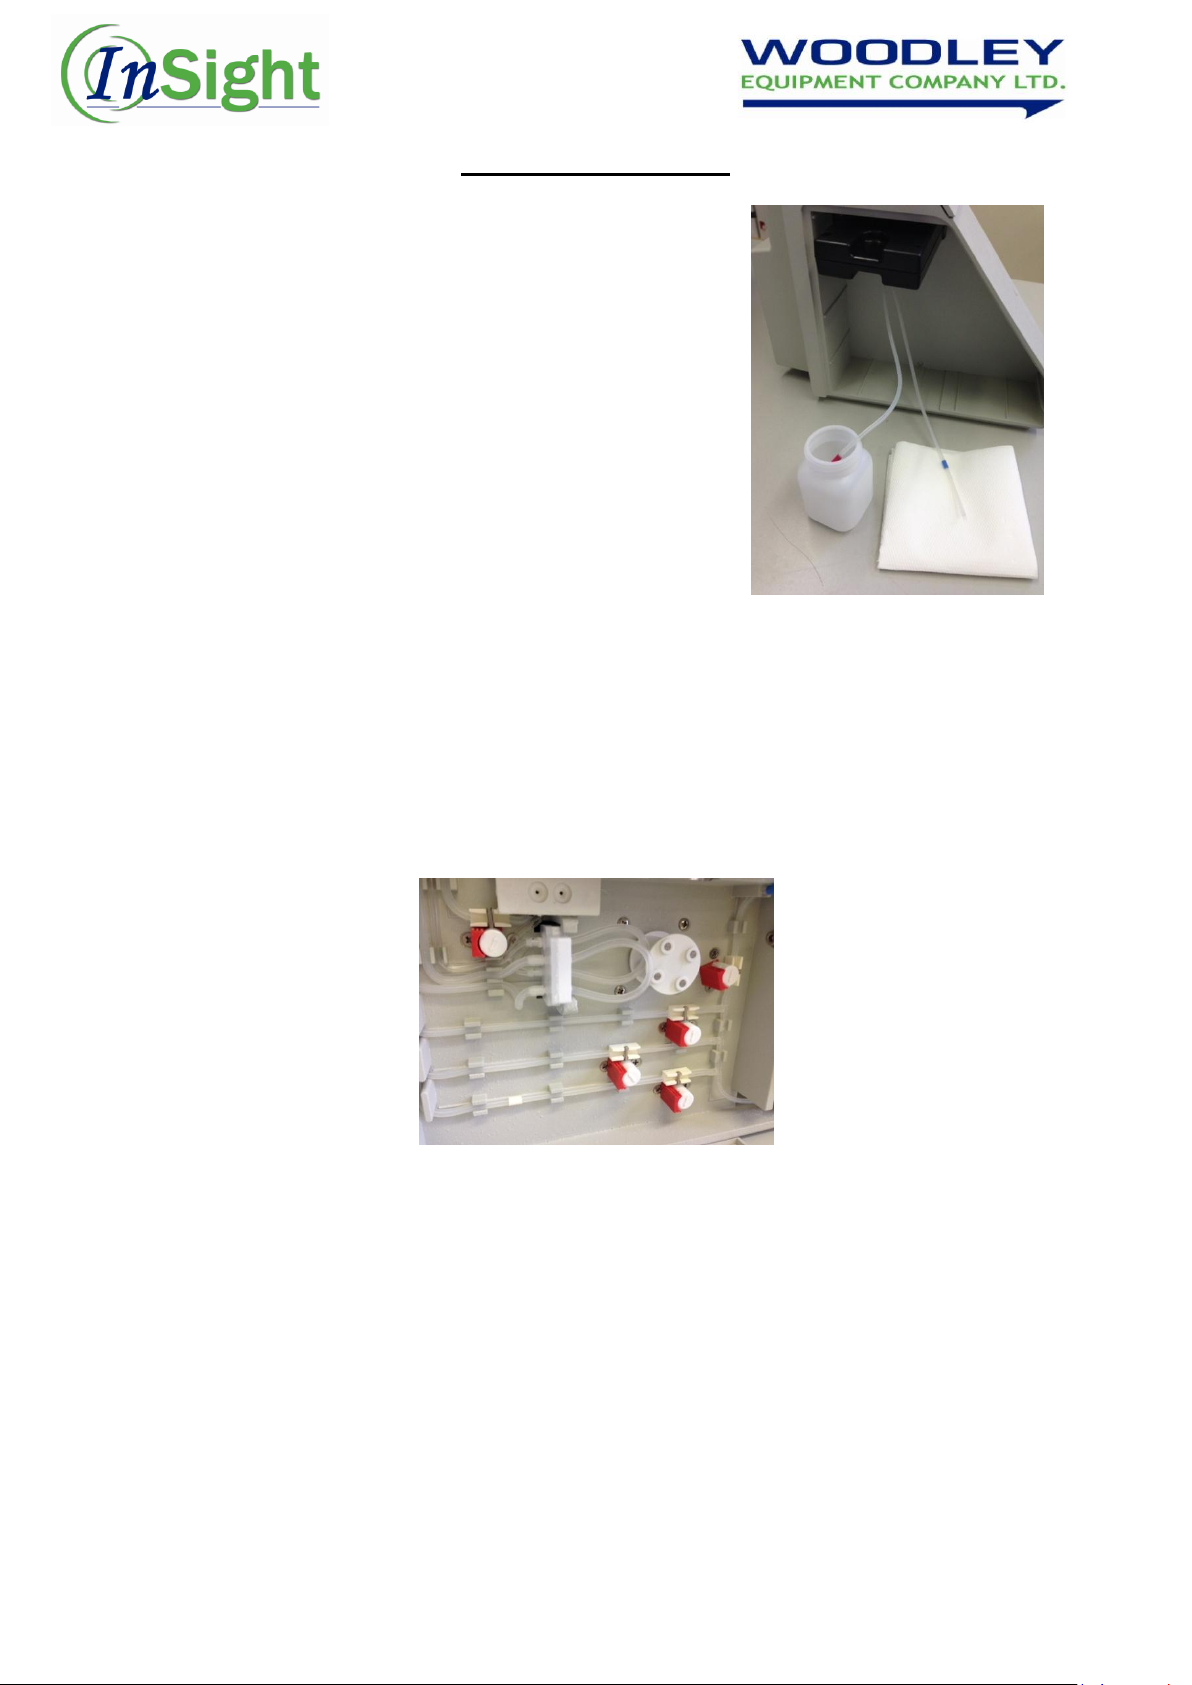
4. The analyser will flush all of the lines with water for one
minute and then display “Withdraw water.
Press “Yes” and remove the line with the blue mark
from the water and place it on a cloth.
Press „Yes‟ and the analyser will purge all of the lines of
water.
5. Upon completion “All electrodes removed?” is displayed.
Remove the shutdown plug from the fluid pack
receptacle.
Unplug the reference connector below the left side of
the electrode holder.
Move the lever on the left side forward and remove all
electrodes, placing them on a clean cloth.
Move the lever back and push the empty electrode holder into its back position.
Unscrew the transport housing from the reference housing.
Empty the reference housing and place all electrodes into their protective boxes.
Press „Yes‟.
6. “Valve clamps installed?” is displayed.
Install the 5 red relief clamps making sure that they are snapped securely into position.
7. “Plug tubing relieved?” is displayed.
Gently pull both pump windings from the pump roller and press „Yes‟.
8. “Reset all data” will be displayed.
Press „Yes to delete all data and reset the analyser settings to default.
Or press „No‟ to retain all data.
9. “Shutdown executed power off” is displayed.
Turn the analyser off, unplug the power cord and close the front door.
Clean all external surfaces as well as the areas accessible through the main door and
sample door.
16
This document is a Quick Reference Guide. For more comprehensive information please refer to the Insight
Electrolytes Operators Manual
Page 17
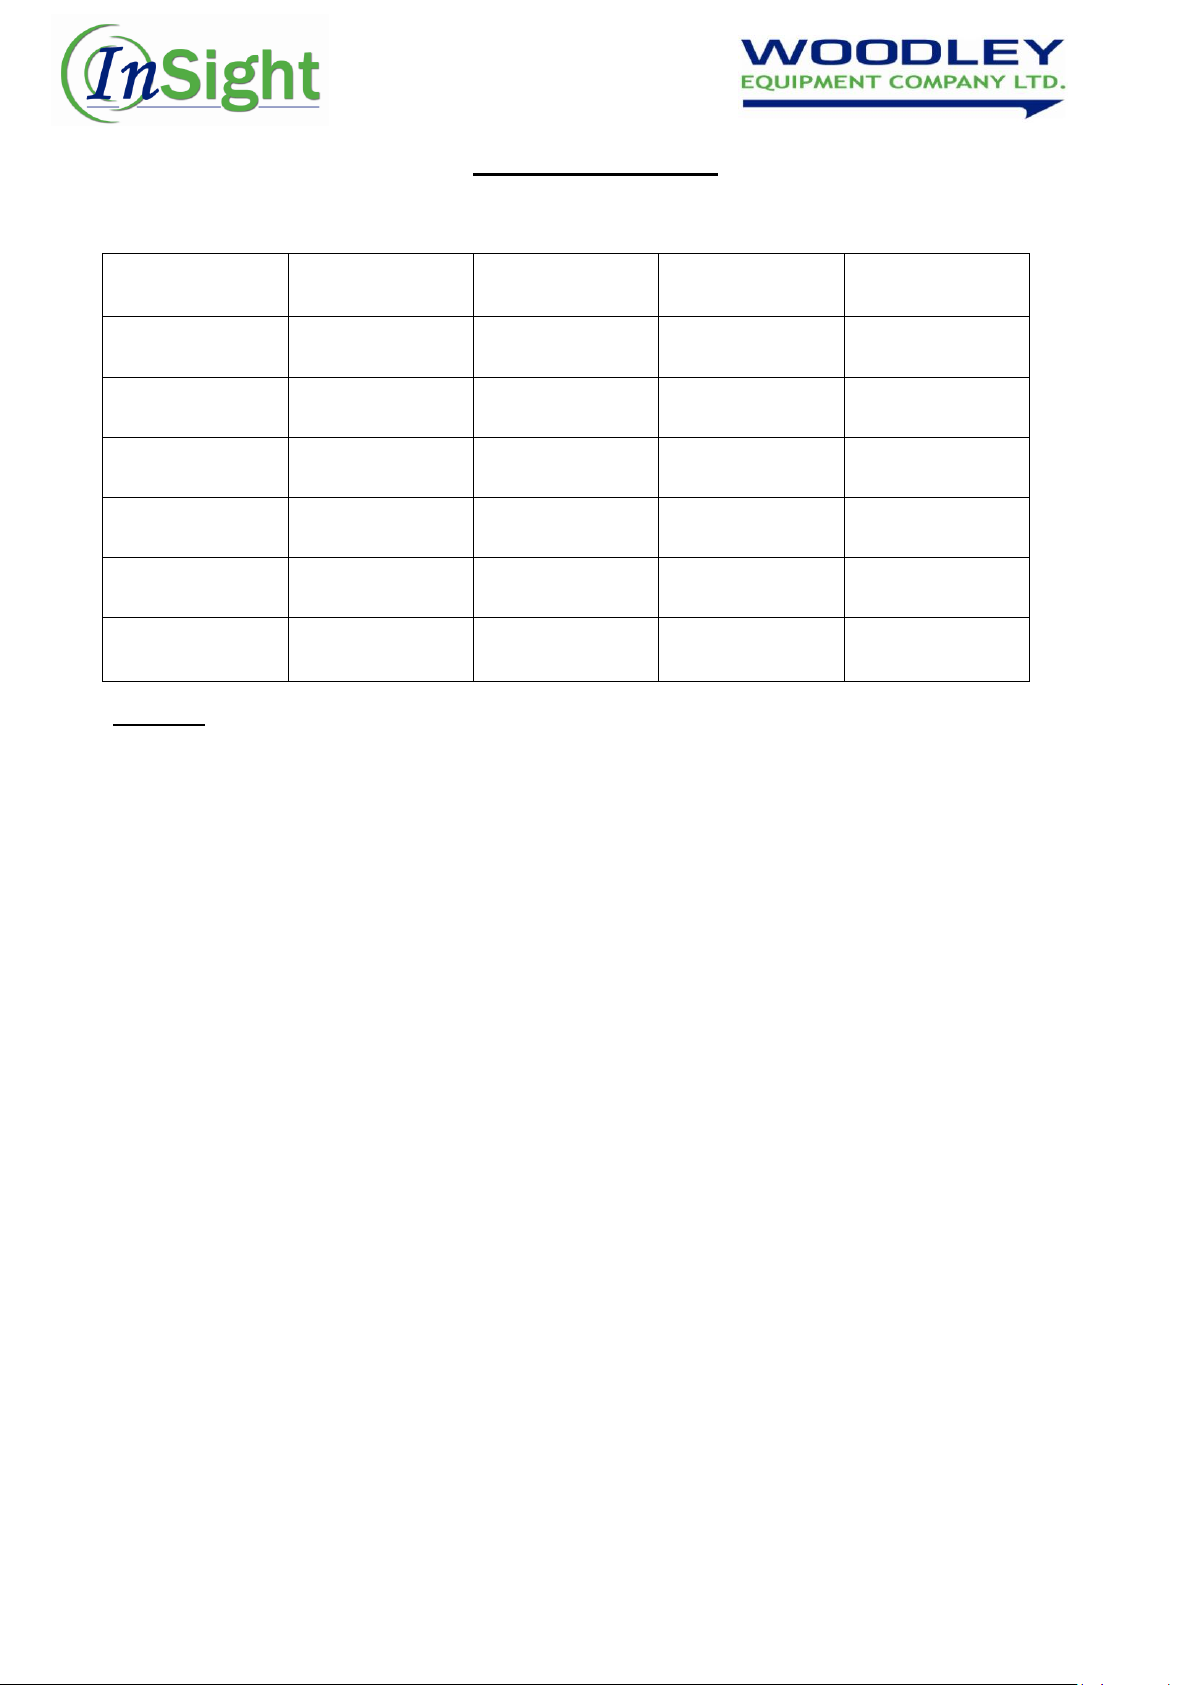
Na (mmol/L)
K (mmol/L)
Cl (mmol/L)
Ca (mmol/L)
Dog
140-154
3.8-5.6
102-117
1.25-1.45
Cat
146-159
3.8-5.3
108-130
1.15-1.35
Horse
133-147
2.8-4.7
97-110
***
Cow
135-148
4.0-5.8
96-109
***
Pig
139-153
4.4-6.5
97.106
***
Sheep
142-160
4.3-6.3
101-113
***
Reference Ranges
References
Kahn, C et al (Eds), Merck Veterinary Manual, 9th Ed, 2008, Merck and Co Inc.
DiBartola, S P, Fluid, Electrolyte and Acid-Base Disorders, 3rd Ed, 2005, Elsevier Saunders.
This document is a Quick Reference Guide. For more comprehensive information please refer to the Insight
17
Electrolytes Operators Manual
Page 18
Maintenance Schedule
Maintenance
Daily Maintenance
Run Start Up
Weekly Maintenance
Clean sample port
Monthly Maintenance
Clean reference electrode housing
Bi-Annual Maintenance
Exchange pump tubing set
Annual Maintenance
1. Exchange main tubing harness
2. Replace sample probe
InSight Electrolyte Analyser Maintenance Schedule
This document is a Quick Reference Guide. For more comprehensive information please refer to the Insight Electrolytes Operators Manual
18
Page 19
Weekly Procedures
WEEK 1
WEEK 2
WEEK 3
WEEK 4
WEEK 5
QC tested by:
Daily
procedures
1 2 3 4 5 6 7 8 9
10 11 12 13 14 15 16 17 18 19 20 21 22 23 24 25 26 27 28 29 30 31
Run ‘Start Up’
Weekly Procedures
WEEK 1
WEEK 2
WEEK 3
WEEK 4
WEEK 5
Clean sample port
Monthly
Date Performed & Initials
Clean reference electrode housing
Bi- Annual Procedures
Date Performed & Initials
Exchange pump tubing set
Annual Procedures
Date Performed& Initials
Exchange main tubing harness
Replace sample probe
Insight Electrolyte Analyser Quality Control & Maintenance Log
MONTH: ……………………………. REVIEWED BY: ……………………… DATE: ………………………
Quality Control
NOTE: Process a QC at least once a week, compare your results with results printed on the Insight Electrolyte control data sheet.
In the event of a QC failure 1. Reprocess the sample 2. If still out of limits, repeat with a fresh QC 3. Inform your Woodley Sales Representative or
Woodley Equipment Company Technical Support on 01204 669033 and press option 1.
Maintenance
This maintenance log is not intended to indicate when a procedure should be undertaken; it is a record of when it has been undertaken. To confirm that a
procedure has been completed please initial the appropriate box. If you require assistance with any of the above procedures please contact your Woodley
Equipment Company Sales Representative or Woodley Equipment Company Technical Support on 01204 669033 and press option 1.
19
This document is a Quick Reference Guide. For more comprehensive information please refer to the Insight Electrolytes Operators Manual
Page 20

WOODLEY EQUIPMENT COMPANY LTD
INSIGHT ELECTROLYTE ANALYSER INSTALLATION & TRAINING
DOCUMENTATION
Name of Practice:
Address:
Primary Contact: Phone:
InSight Electrolyte Analyser
Serial Number:
Installation and Training Topics
Name of Installer/Trainer:
Name of Trainee:
Date of Installation and Training:
The above mentioned trainee has undergone a period of formal training and has demonstrated
competence in the following areas:
YES
1. Instrument Overview
a. Power supply _____
b. Power switch _____
c. Display screen _____
d. Function buttons _____
e. Internal printer _____
f. External connection ports _____
g. Keyboard _____
h. Barcode reader _____
i. Electrodes _____
j. Reference electrode and housing _____
k. Electrode holder _____
l. Sample door/probe _____
m. Reagent pack _____
This document is a Quick Reference Guide. For more comprehensive information please refer to the Insight
Electrolytes Operators Manual
20
Page 21

2. Electrodes
a. Filling electrodes _____
b. Expiry dates _____
c. Storage temperature _____
d. Electrode handling _____
3. Reagent pack
a. Expiry dates _____
b. Storage temperature _____
c. Checking reagent fluid level _____
4. Set up and Electrode Installation (if applicable)
a. Transit clips _____
b. Reference housing and electrode _____
c. Electrode holder _____
d. Installing electrodes _____
e. Tubing connector _____
f. Electrode configurations _____
5. Start up
a. Deactivate standby _____
b. Daily clean _____
c. Electrode conditioning solution _____
d. Automatic calibration cycle _____
6. Sample processing
a. Sample handling _____
b. Correct sample material & sample volume _____
c. Selecting sample type _____
d. Entering patient details _____
e. Process a sample _____
f. Access, review and print results internally _____
g. Identify sampling errors & take appropriate action _____
h. Sample dilutions _____
7. Control processing
a. Correct control material and assay sheet _____
b. Correct control reconstitution _____
c. Correct control storage _____
d. If refrigerated, remove 20 minutes before processing _____
e. If frozen, thaw appropriately _____
f. Expiry date _____
g. Open-vial stability time _____
This document is a Quick Reference Guide. For more comprehensive information please refer to the Insight
Electrolytes Operators Manual
21
Page 22

h. QC recommendations _____
i. Correct procedure in the event of a control failure _____
j. Importance of keeping control records _____
8. System Maintenance
a. Daily clean _____
b. Clean/replacing sample probe and fill port _____
c. Clean reference electrode housing _____
d. Exchanging pump tubing set _____
e. Exchanging main tubing harness _____
f. Replacing sample probe _____
g. Replacing electrodes _____
h. Replacing printer paper _____
i. Shut down procedure _____
9. Troubleshooting
a. Demonstrate adequate knowledge of potential
sampling problems and system errors _____
b. Troubleshooting accordingly _____
The trainee named above is deemed to be fully competent in the procedures described and able
to complete InSight Electrolyte tests
Signed Trainer: Name in Full:
Signed Trainee: Name in Full: Date:
This completed and signed documentation serves as a certificate of
InSight Electrolyte installation and training
22
This document is a Quick Reference Guide. For more comprehensive information please refer to the Insight
Electrolytes Operators Manual
 Loading...