

Woodhaven 8531 User Manual

8531
Hinge Jig
Please Read Carefully!
Parts List:
Part listed below is not shown in the hardware
drawings. Refer to photos in the instructions:
Part Description Quantity
8531 3" Hinge Jig . . . . . . . . . . . . . . . . . . . . . . . . . . 1
In addition, please identify and verify that you have all of
the parts shown below prior to assembly.
Part# Description Qty.
STP001 3/4" Screw 2
Part# Description Qty.
BUSH002 1/4" Spacer 2
Part# Description Qty.
WS003 1” Washer 2
Part# Description Qty.
5503 Thumb Screw 2
1
2
Spacer
Thumb
Screw
8531 Hinge Jig
3-1/8" opening
Attach spacers here
Jig
Wood
Door
Fence
BEFORE BEGINNING
Identify and verify that you have all the parts listed.
Read the instructions at least once before beginning.
ASSEMBLY
Cut a wood fence approximately 3/4" thick, 1-1/4" wide
and 12" long to mount the Hinge Jig to. If you want, you can
make the wood fence longer to mount more then one Hinge Jig
to it so you can cut two or more hinge mortises at a time.
Drill two 1/8" pilot holes in the edge of the wood fence 6-3/8"
on center. Attach the wood fence to the underside of the jig using the
3/16" Washers (WS003) and 3/4" Screws (STP001). See fig. 1, 2 & 3.
Attach the 1/4" Spacers (BUSH002) to the underside
of the jig using the 1/2" Thumb Screws (5503). See fig.
1, 2 & 3. The other two holes in the jig are for storing
the thumb screws & spacers when not needed.
1
3
Picture may not be
of your Hinge Jig.
USING THE JIG ON A DOOR
Place the jig on the edge of the door so it's sandwiched
between the two spacers and the wood fence, snug the wood
fence against the door and tighten the screws. This positions the
hinge mortise 1/4" from the back of the door (the backset) and
insures that the jig is square and parallel to the door. See fig. 2.
A 1/4" backset is an industry standard, but you can change
to suit. If a smaller backset is needed, rip an 8" long spacer to
the thickness required (1/16" for example) and place it between
the spacers and the door. If a larger backset is needed, remove
the spacers and reposition the wood fence forward towards the
door, measuring off the edge of the jig to keep the fence parallel
and square. You can leave the spacers in place when routing door
mortises, but must remove the spacers for jamb mortises. Clamp the
jig to the door using the wood fence and two clamps. See fig. 3.
USING THE JIG ON A JAMB WITHOUT A STOP
The jig opening is 1/8" longer then the actual hinge length. Mark
the hinge location on the jamb, then mark 1/16" outside of the hinge
location marks to correspond to the actual opening in the jig. Clamp
the jig to the jamb using the wood fence and two clamps. See fig. 4.
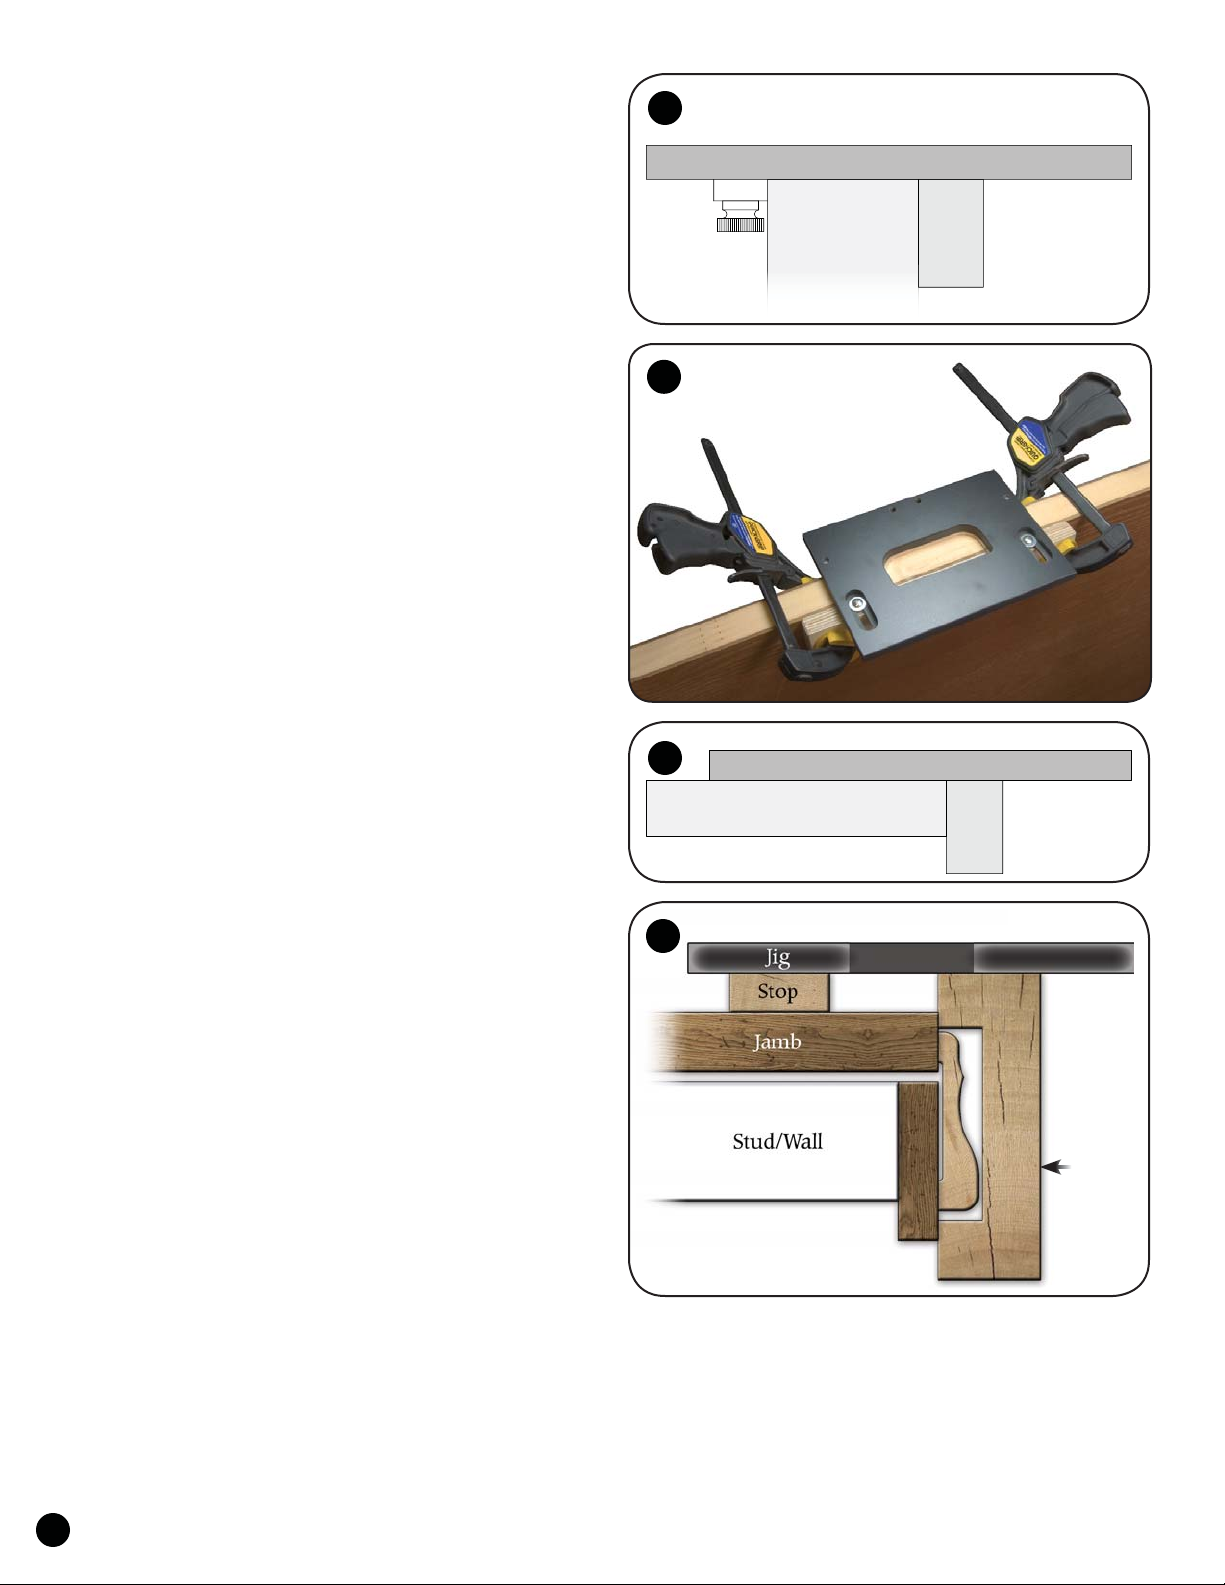
USING THE JIG ON A JAMB WITH A STOP
If you are cutting a hinge mortise in a jamb with a door stop
and casing in place, you'll need a longer bit (PN 8505 Hinge Bit, 3/4"
cut length). You'll also need to make a custom wood fence that will
position the jig at least 1/2" above the jamb and straddle the casing.
If your door stops are 1/2" thick, part of the jig will be supported on
top of the door stop. If the door stop is thinner than 1/2" you'll need
to shim between the underside of the jig and the jamb so it's at least
1/2" above the jamb. This can be accomplished by using double stick
tape to attach 1/2" thick shims to the underside of the jig. The 8505
Hinge Bit will work on doors with stops up to 3/4" thick. Clamp the
jig to the jamb using the wood fence and two clamps. See fig. 5.
CUTTING THE MORTISE
Install our 8500 Hinge Bit (1/2" diameter with a 5/8" bearing
and a 1/4" cut length), or a 1/2" bit (13416) and 5/8" bushing
(5030K), in your router. If using the 8500 Hinge Bit, make sure the
bearing rides firmly on the edge of the jig before attempting any
cuts. Since the cutting depth for locks is shallow (usually 1/8" or
less), either a standard or plunge router will work. Set the cutting
depth of the bit, taking into account the thickness of the jig.
Plunge or tilt the router bit into the approximate center
of the jig opening, moving in a small clockwise circle as
you do so to cut a relief opening. With the router base riding
firmly on the jig, move towards an edge of the jig opening.
Moving clockwise, follow the jig until the outline has been cut.
Make clean up passes to remove any remaining material.
After making the very first cut, the wood fence will have a cut
out area that corresponds to the hinge length. Now you can use the
cut area in the wood fence to position the jig for additional cuts.
2
Spacer
3
4
5
Thumb
Screw
Jig
Jig
Door
Picture may not be
of your Hinge Jig.
Jamb
Wood
Fence
Wood
Fence
Custom
wood fence
mounted to
underside of
jig.
OPTIONAL ACCESSORIES
Self-centering drill bits (6509 - 9/64", 6511 - 11/64" and 6513
- 13/64") are available to insure perfectly centered pilot holes.
A Corner Chisel (8508) is available to square
the radiused corners left by the 1/2" router bit.
The Hardware Kit (8510) and Double Track (72" - 4072
or 96" - 4096) allow you to attach up to three hinge jigs to an
aluminum extrusion for consistent and even hinge spacing.
©Copyright WOODHAVEN INC. 11/5/10
(800) 344-6657 or WWW.WOODHAVEN.COM
2
 Loading...