

Page 1
P/N : 388087406
PRINTED IN KOREA
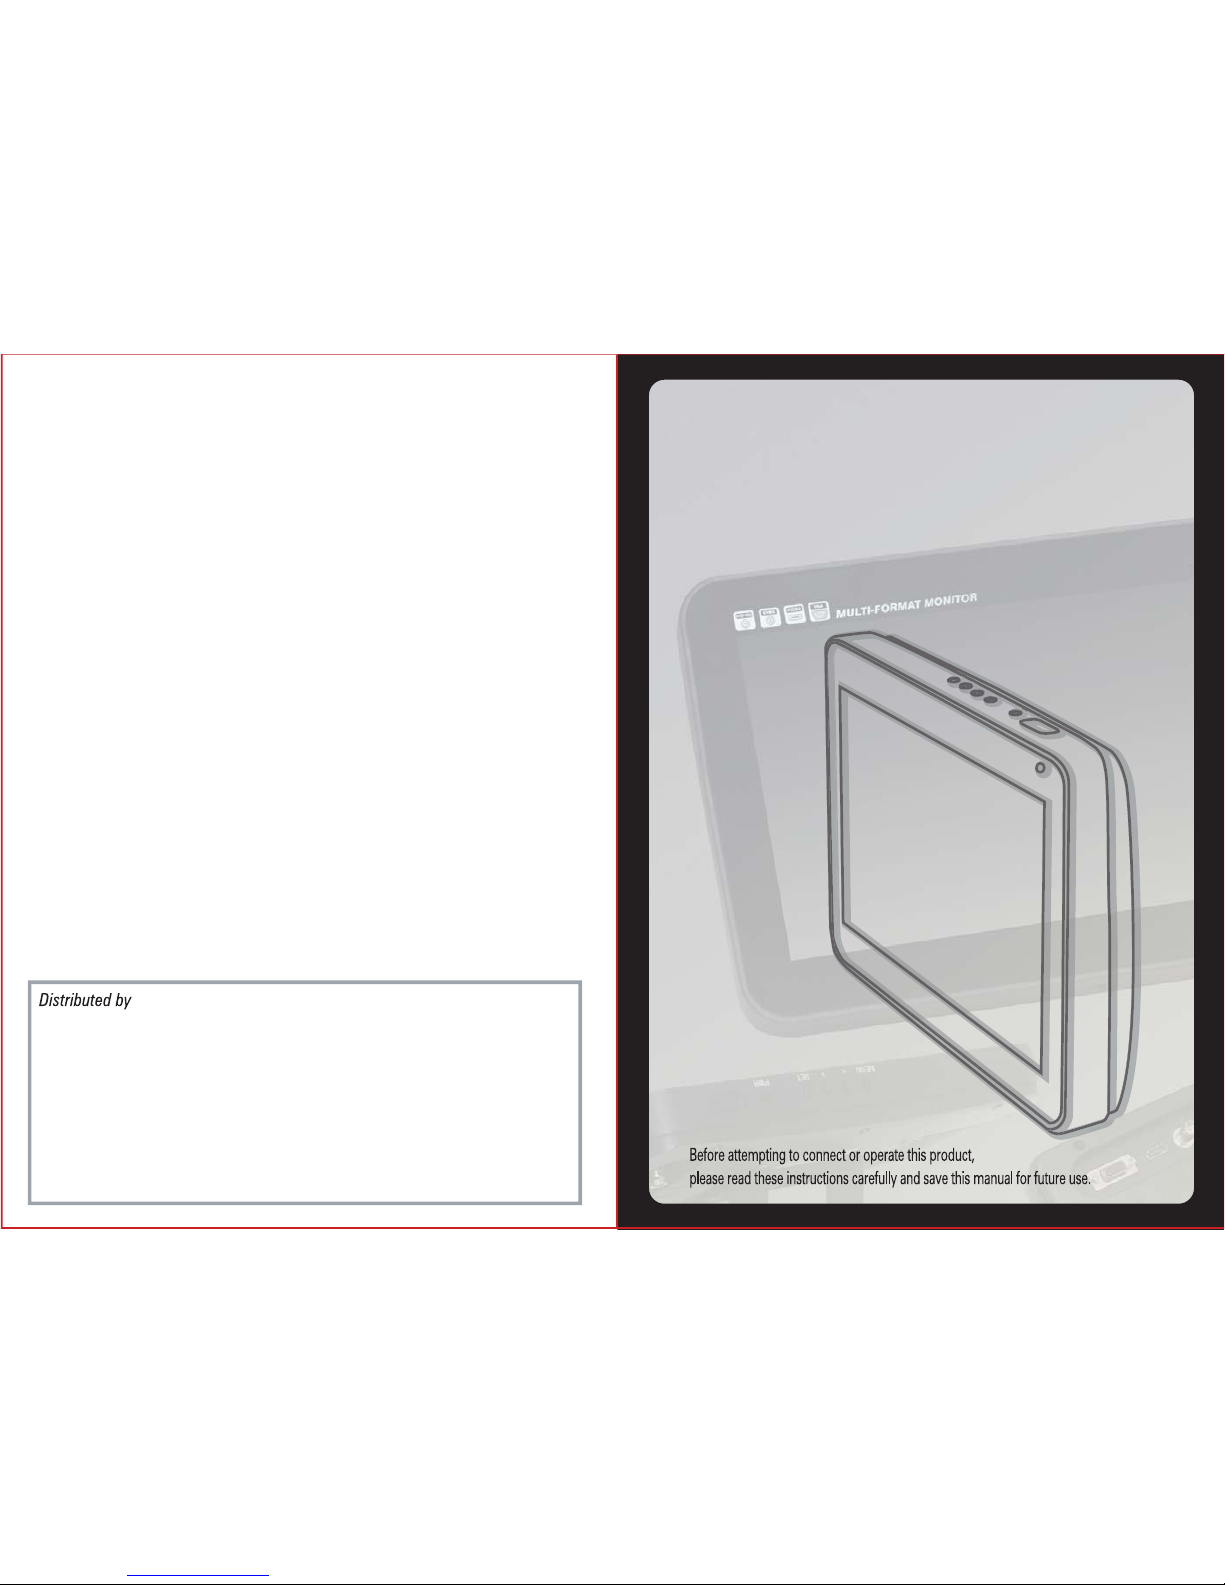
Rapport-10HD/PRO
Multi-Format Input Monitor
Page 2
Safety information
1 Preduct introduction
1.1 Standard items
1.2 Part name & Functions
1.2.1 Front
1.2.2 Top side
1.2.3 Back & side
1.3 Operation
1.3.1 Operating button
1.4 Product specifiations
1.4.1 Electrical Specifications
1.4.2 Dimension
1.5 Battery charging
1.5.1 Battery charging by DC power
1.5.2 LED Indicator
4p
6p
7p
8p
8p
8p
9p
10p
10p
11p
11p
12p
13p
13p
13p
2 Basic functions
2.1 Power On/Off
2.2 Starting and End
2.2.1 Starting
2.2.2 Finish the product
3 Rapport-10HD/PRO functions
3.1 Functions
3.2 Screen details
3.2.1 Monitoring mode
3.2.2 Screen
3.2.3 OSD MENU
3.2.4 Firmware update
3.2.5 Record / Playback function
3.2.6 TEST Mode & Battery low alarm
14p
14p
14p
14p
14p
15p
15p
16p
16p
17p
18p
23p
27p
32p
TABLE OF CONTENTS TABLE OF CONTENTS
02
Multi-Format Input Monitor
03
Multi-Format Input Monitor
Page 3
Temperature: : 0℃ ~ 50℃
Relative Humidity: : 30% ~ 90%
Power consumtion : 19.2W(DC12V ± 15%, 1.6A)
SAFETY INFORMATION SAFETY INFORMATION
Precautions
The following describes how to safely operate the
Rapport-10HD/PRO.
Please read carefully “the precautions for use of this product” prior to using
this device. Check the input and output ranges of any voltages being applied
to all inputs and outputs of the device, and ensure their connections have been
made properly so no abnormal load is placed on the operation of the device.
If the measurement value is unknown when measuring a resistance, set the
Rapport-10HD/PRO meter to its maximum value so that no abnormal load is placed
upon the device.
The Rapport-10HD/PRO should only be used under the environmental conditions shown
in the specification where temperature and humidity figures should be adhered to.
Battery Handling
Keep away from static electronic fields while using, charging or
when storing.
Stop charging immediately if the battery is overheating, emitting
a burning smell, changed in colour or distorted.
Only use the supplied battery charger or one with a safety guarantee.
Do not immerse the battery in water.
Avoid mechanical shocks to the battery.
Do not bend the tabs are these are breakable.
The soft packaging can easily be damaged by contact with sharp
surfaces or objects, take care when handling or storing.
Avoid short circuits, as this will cause internal damage to the battery.
Be sure to read through the "Safety Information" section
before using this Rapport-10HD/PRO
This basic instruction manual is for users of the Rapport-10HD/PRO. Star ting with an outline
of this Rapport-10HD/PRO, the manual explains its operation,how it connects to other
devices, how to use the menu buttons,and how it should be operated.
It is highly recommended, even for those who have handled similar devices, as well as for
those using it for the first time, to read all the instructions thoroughly, especially the
precautions, before using the Rapport-10HD/PRO.
If there are any questions which arise when using the Rapport-10HD/PRO or the unit is
damaged, please contact the supplier of your Rapport-10HD/PRO.
Safety Information highlights and explains the precautions which should be taken, for the
safety of users, when using the Rapport-10HD/PRO.
Pay attention to the following precautions when using
the Rapport-10HD/PRO
-Use only specified replacement fuses.
-Do not use the unit in damp, humid or gaseous environments.
-Be mindful not to shock or shake the unit while in use to avoid damage.
-Avoid areas with strong magnetic or electromotive fields, which can cause incorrect
measurements.
-Remove the power plug from the outlet when there is a lighting storm.
-Be sure to use only the standard adapter that is specified in the specification sheet.
-Using any other adapter could cause fire, electrical shock, or damage to the product.
-Securely plug the power cord into the power receptacle. Insecure connection may cause
fire.
-If any unusual smells or smoke come from the unit, stop using the product. In such
case, immediately disconnect the power source and contact the service center.
Continued use in such a condition may cause fire or electric shock.
04
Multi-Format Input Monitor
05
Multi-Format Input Monitor
04
Multi-Format Input Monitor
05
Multi-Format Input Monitor
04
Multi-Format Input Monitor
05
Multi-Format Input Monitor
Page 4
PRODUCT INTRODUCTION
1. Summary
Suitable for HD CCTV monitor in limited space and field monitor as well.
10.05", 16:9 widescreen aspect ratio without the quality loss than comes from
scaling, altering an image to fit on a different screen size
Superb connectivity with various surveillance equipments and peripherals with the
HD-SDI, CVBS, VGA ports. And the HDMI port also gives uncompressed high
quality video.
White LED backlight ensures natural colors from camera, DVR or others.
VESA standard 4 holes on the back allows placing in car window or mounting to a
wall.
Dust protection optical bonding glass with AR/AG coating.
Li-ion Polymer battery with 5000mA capacity runs 4 to 6 hours with battery.
User-friendly GUI and intuitive and stylishly designed touch controls on the top of
the sturdy aluminum case.
USB port prepared for firmware update in case debugging or performance
enhancement.
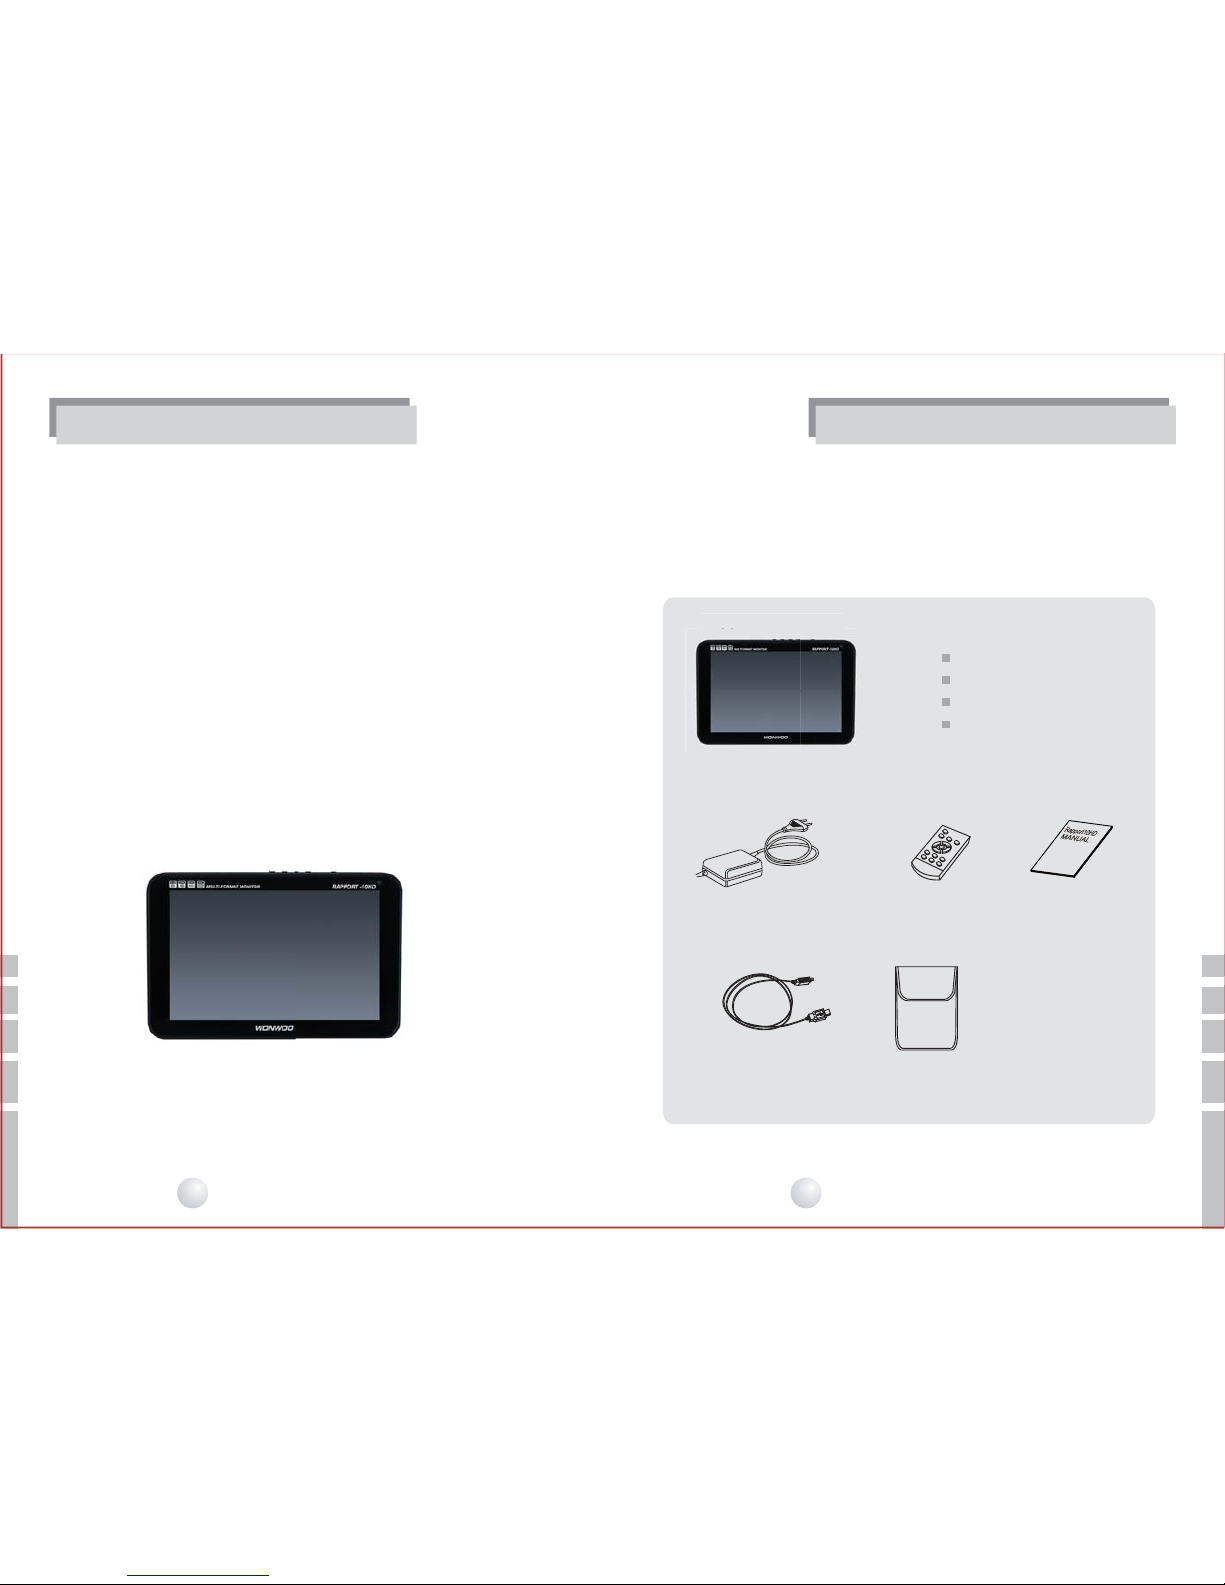
1.1 Standard Items
Check the contents of your Rapport-10HD/PRO package against the standard checklist
below :
PRODUCT INTRODUCTION
• Accessories
Manual
Power adaptor
Rapport-10HD/PRO Main Test Unit
Rapport-10HD/PRO
User Manual
Power Adapter (DC12V)
IR Remote Controller
IR Remote Controller
USB cable Pouch
Rapport-10HD/PRO
• Rapport-10HD/PRO
pp
06
Multi-Format Input Monitor
07
Multi-Format Input Monitor
Page 5
PRODUCT INTRODUCTION PRODUCT INTRODUCTION
1.2 Part name & Functions
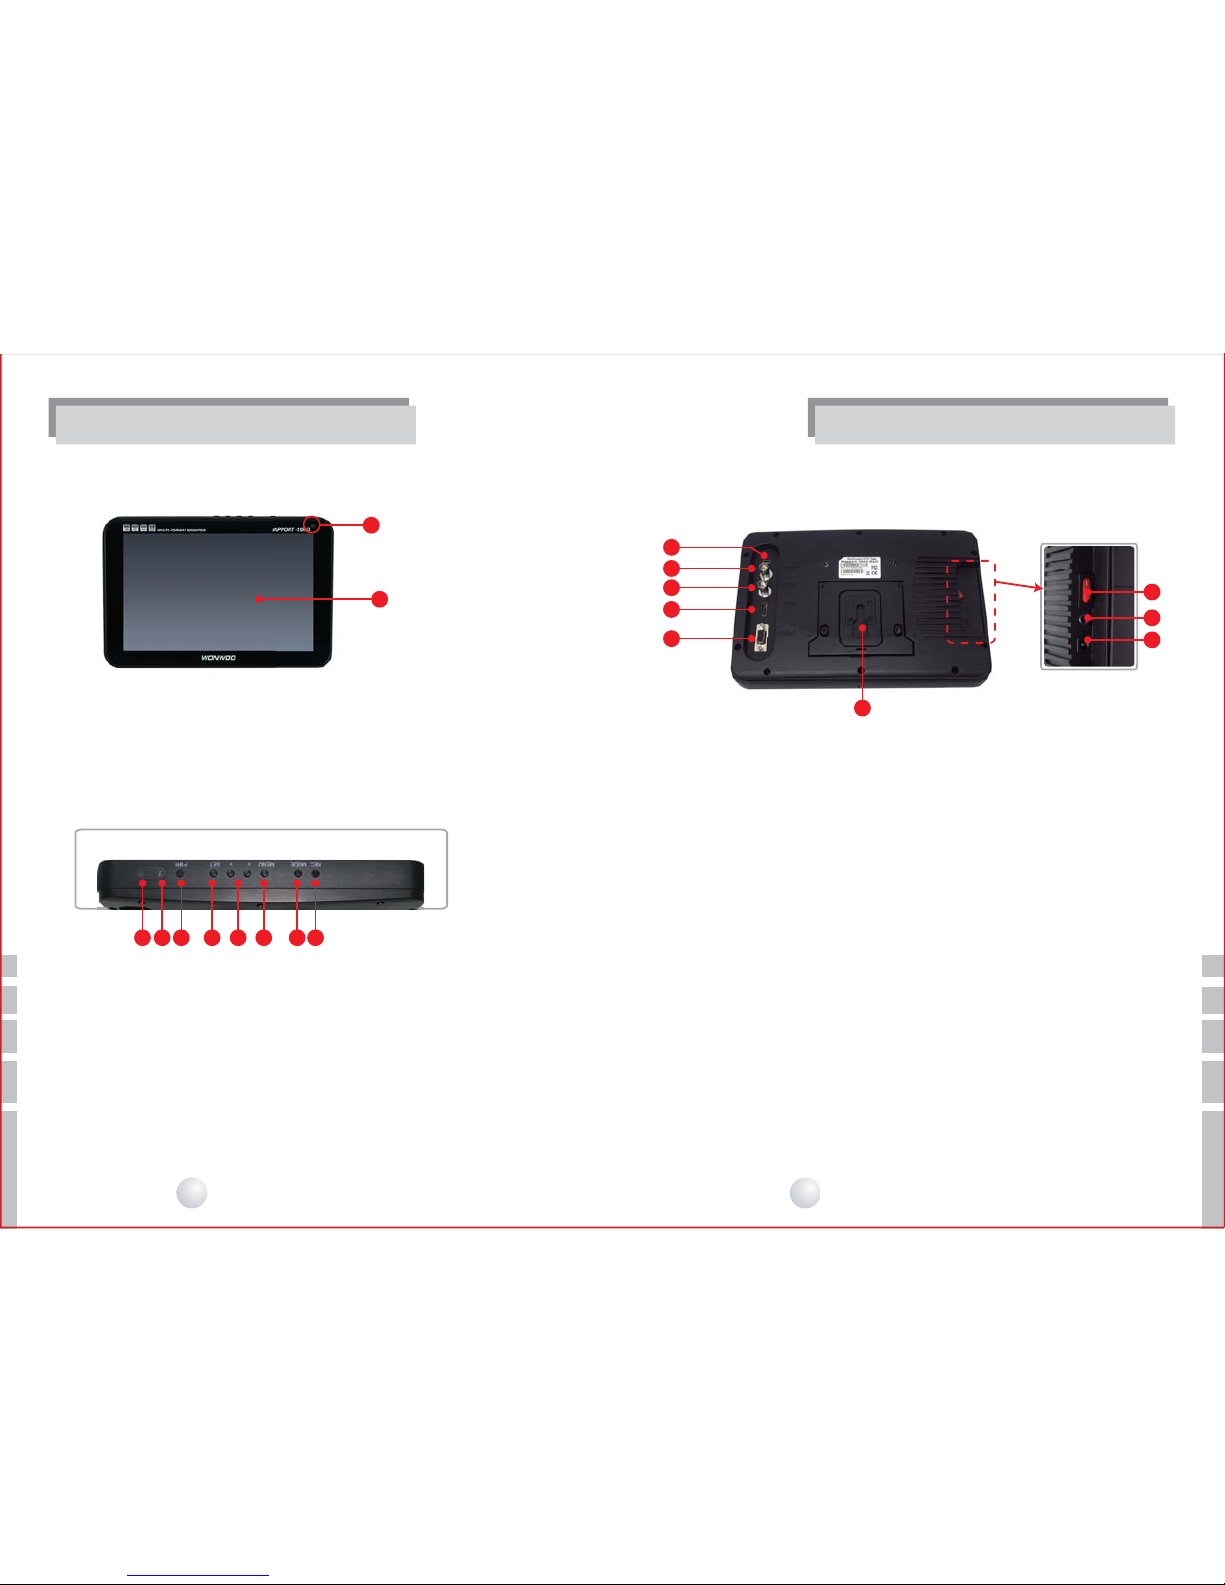
1.2.2 Top side
① Power LED : It shown the power is on.
② Red LED : Red light is turned on when charging it.
Green LED : Green LED is on when the battery is fully charghed.
③ PWR button : Power ON/OFF button.
④ SET button : Used to confirm selection in menu screens and set the picture ratio.
⑤ <, > button : Move and select menu.
⑥ MENU button : OSD menu ON/ OFF to set monitor setting.
⑦ MODE button : To change monitor mode and recording mode.(Rapport-10HD PRO)
⑧ REC button : Recording, stop, replay button in the monitor mode.(Rapport-10HD PRO)
1.2.3 Back & side
①
⑥
⑦
⑧
⑨
⑤
②
④
③
① Brace : It braces the product.
② Power switch : ON/OFF the main power supply.
③ Phone jack : Receive Audio by earphones.
④ DC Power Jack : DC power input jack
⑤ USB : Connect USB with PC for update firmware.
(Send the recorded video file of Rapport-10HD PRO to the PC)
⑥ HD-SDI : Input HD-SDI.
⑦ CVBS : Input CVBS .
⑧ HDMI : Input HDMI.
⑨ VGA : Input VGA .
① LCD : Display the video on the screen.
② Infrared singal receiver : Receive infrared signal.
**Be careful not to be covered when use it.
1.2.1 Front
① ② ③ ④ ⑤ ⑥ ⑦ ⑧
①
②
08
Multi-Format Input Monitor
09
Multi-Format Input Monitor
Page 6
1.4 Product specifications
1.4.1 Electrical Specifications
PRODUCT INTRODUCTION
PRODUCT INTRODUCTIO
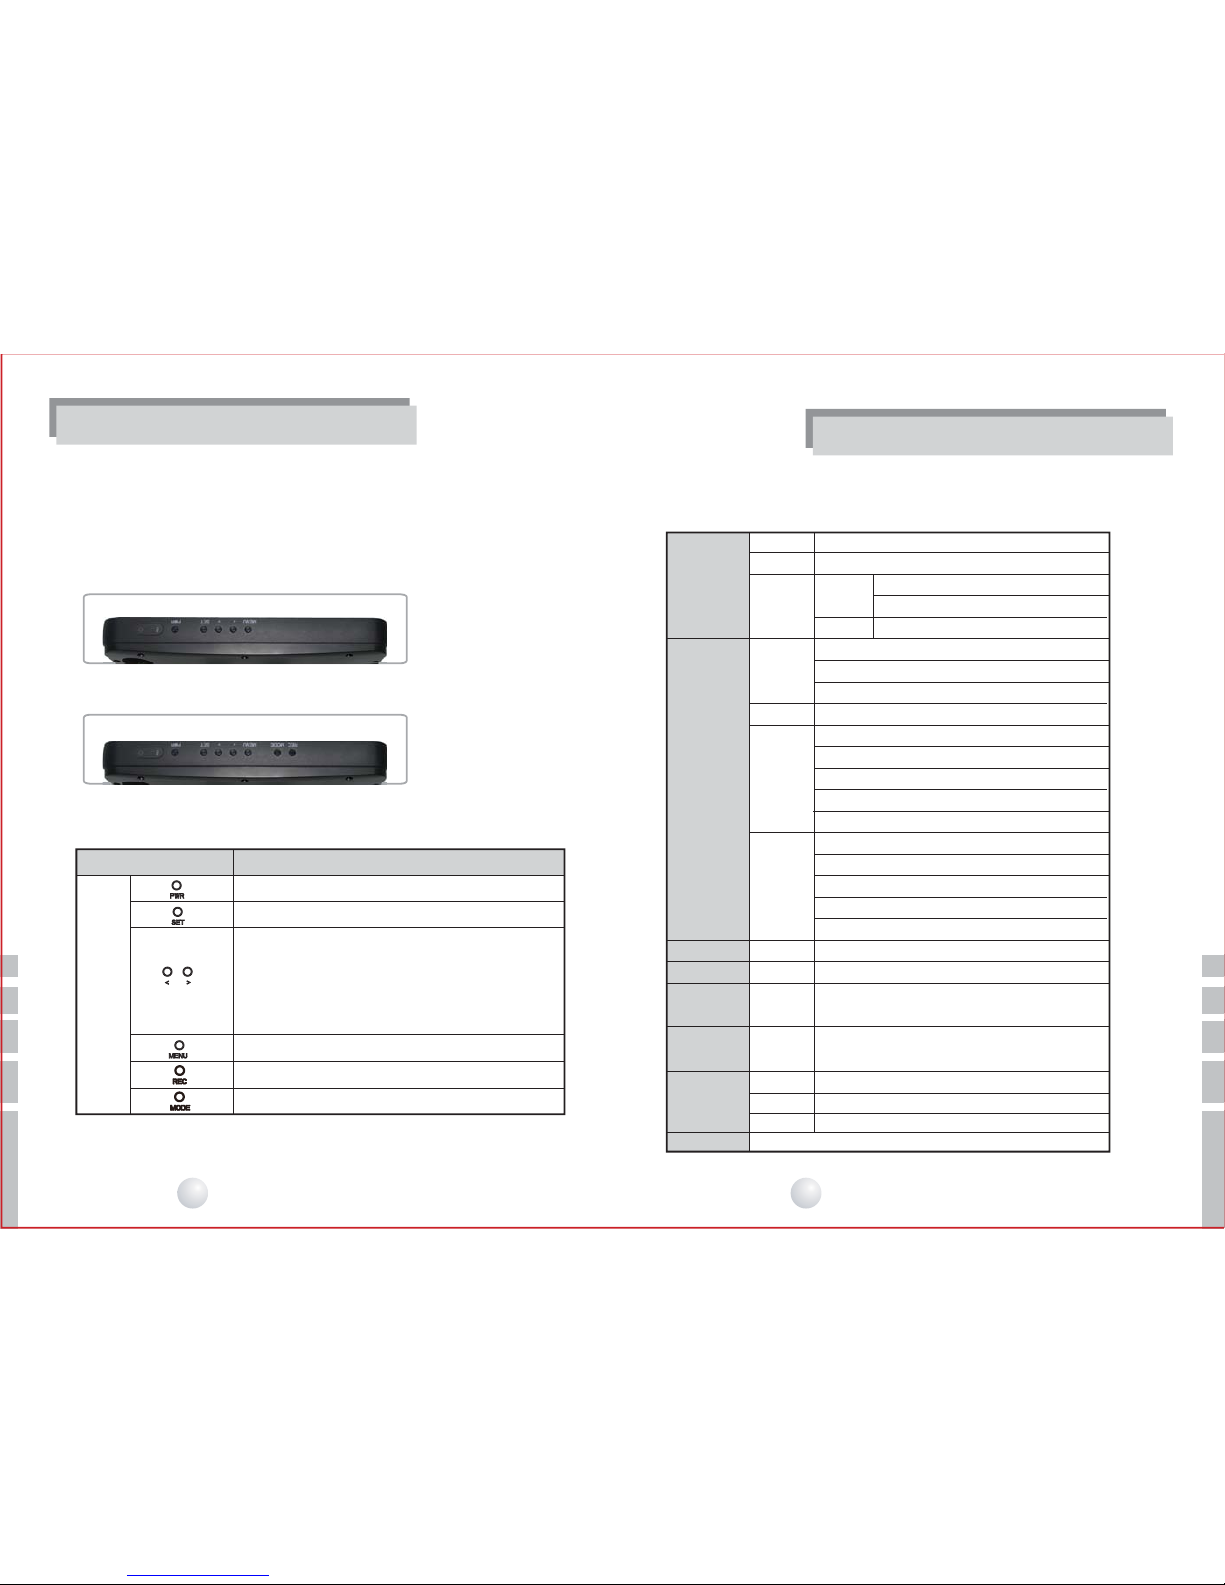
1.3 Operation
1.3.1 Operating button
Each function of buttons are as below.
< Rapport-10HD >
< Rapport-10HD PRO>
Power ON/OFF
Select OSD MENU and change the screen size
Display OSD menu시
Start recording / Pause recording
Monitor mode / change to playback or recording mode
Move OSD MENU
Select video type
- HD-SDI
- CVBS
- HDMI
- VGA
SECTION
버
튼
DESCRIPTION
Built-in
battery
Charging
time
Operating
8hours (charge only)
10hours (Working)
4~5 hours
Battery
1600mA (DC 12V ± 15% )
Li-ion Polymer Battery, 5000mAh/7.4V (Built-in)
HD-SDI
CVBS
HDMI
VGA
LCD
SD/SDHC
1080p 24,25,30
1080i 50, 60
720p 50,60
NTSC / PAL
1080p 24,25,30
1080i 50, 60
720p 50,60
480i, 576p
576i, 576p
1280x1024 60,75
1280x960 60,85
1152x864 75
1024x768 60,70,75,85
800x600 60,72,75,85
10.05”, 1280x800 RGB.
Default. SANDISK 32GB (Class 10)
FAT
VIDEO
FAT16, FAT32 (Recommended)
AVI (H.264)
AUDIO
Speaker
Phone jack
Only HD-SDI & HDMI ( Support 48KHz,16bit audio bandwidth)
8 ohms 0.5W (Audio OUT)
3.5inch Stereo (Audio OUT)
266(W) x 176(H) x 38(D)
Size
Electronic
characteristics
VIDEO
LCD
Storage
Storage
File System
Recording
File Format
AUDIO
Current
consumption
10
Multi-Format Input Monitor
11
Multi-Format Input Monitor
Page 7
FUNCTIONS
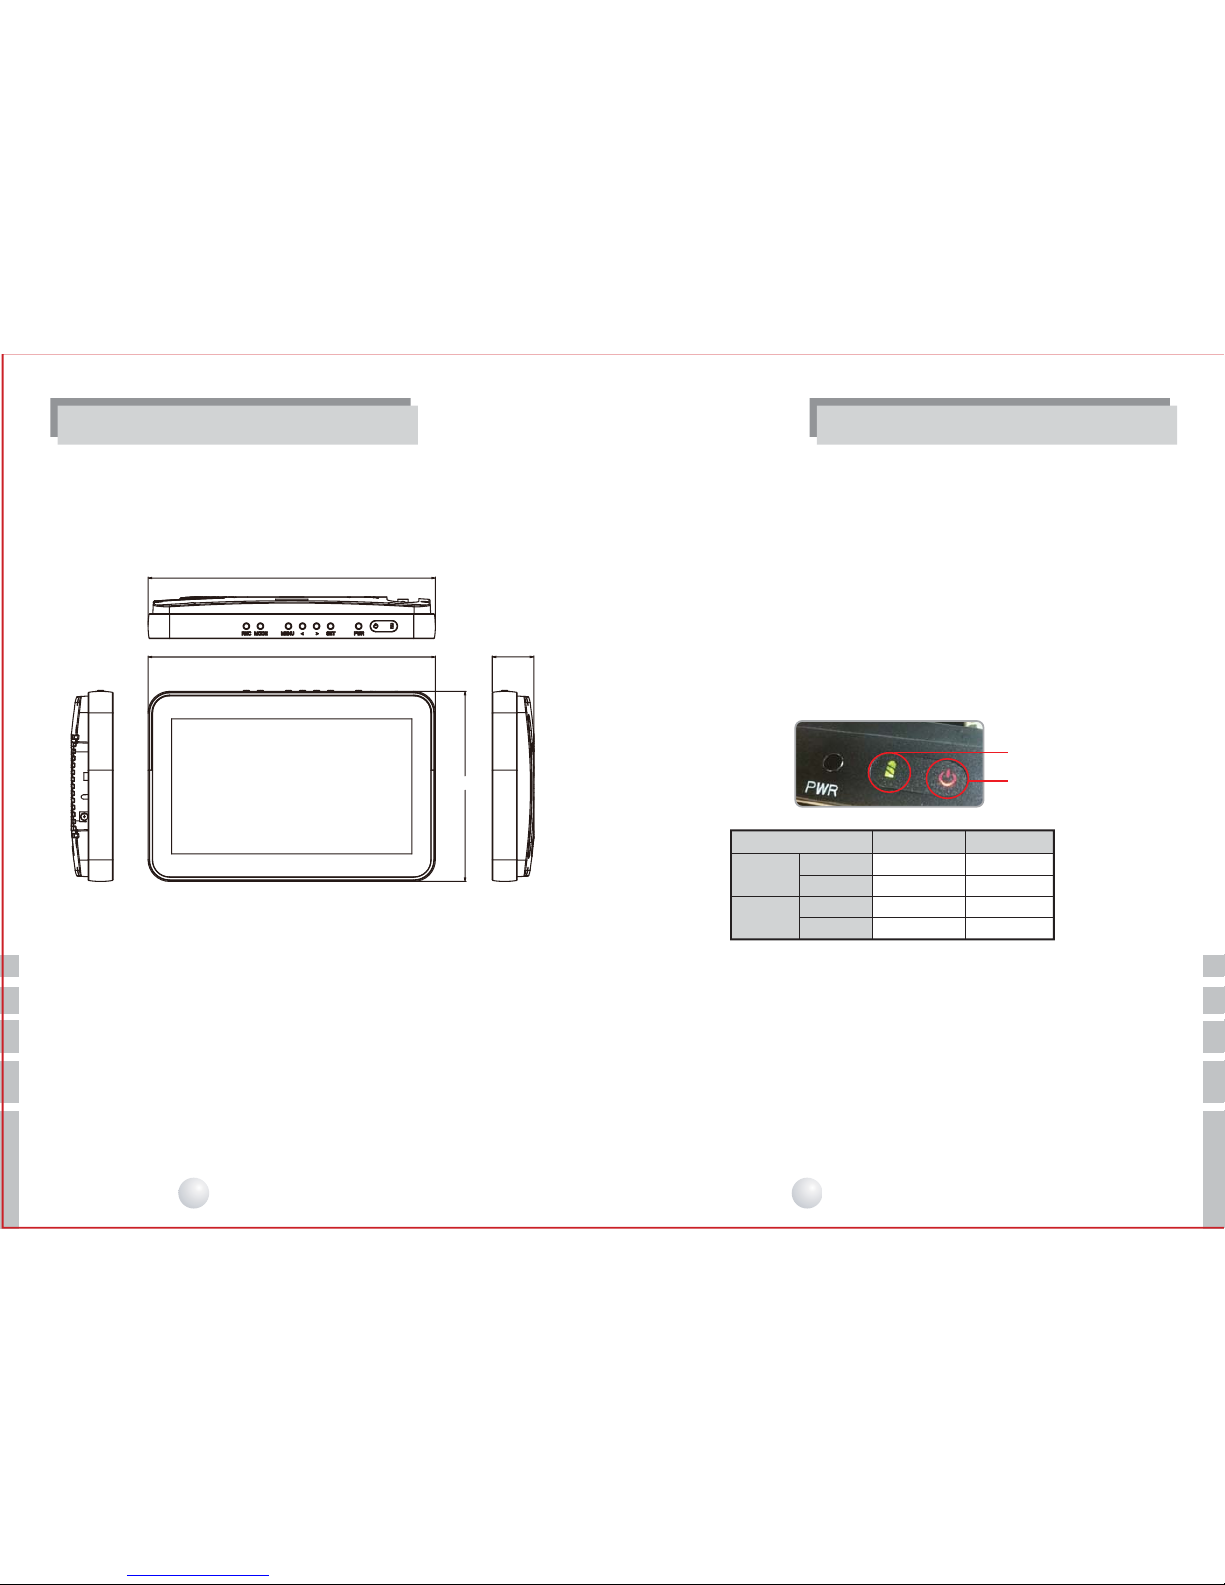
1.4.2 Dimension
* 266(W) x 176(H) x 38(D)
Unit : mm
266
176
38
266
1.5 Battery charging
1.5.1 Battery charging by DC power
This product can be charged by using DC adaptor which is provided in the box
and connect it to the DC jack of the product. If the product fully charged, the LED
is changed to green color. After fully charged it, disconnect the DC jack from the
adaptor.
1.5.2 LED Indicatior
Check the battery color as below picture.
- Use the manufacture provided adaptor only (12V/2.5A).
If you use low voltage termial, it may cause malfunction and explosion or
shorten the product’s life
- Battery is consumable item with 6 months warranty after purchase.
FUNCTIONS
Power OFF
Power ON
Charging
Fully charged
Charging
Fully charged
RED
GREEN
RED
GREEN
OFF
OFF
RED
RED
Charge LED
Charge LED
Power LED
Power LED
Item
13
Multi-Format Input Monitor
12
Multi-Format Input Monitor
Page 8
2 Basic functions
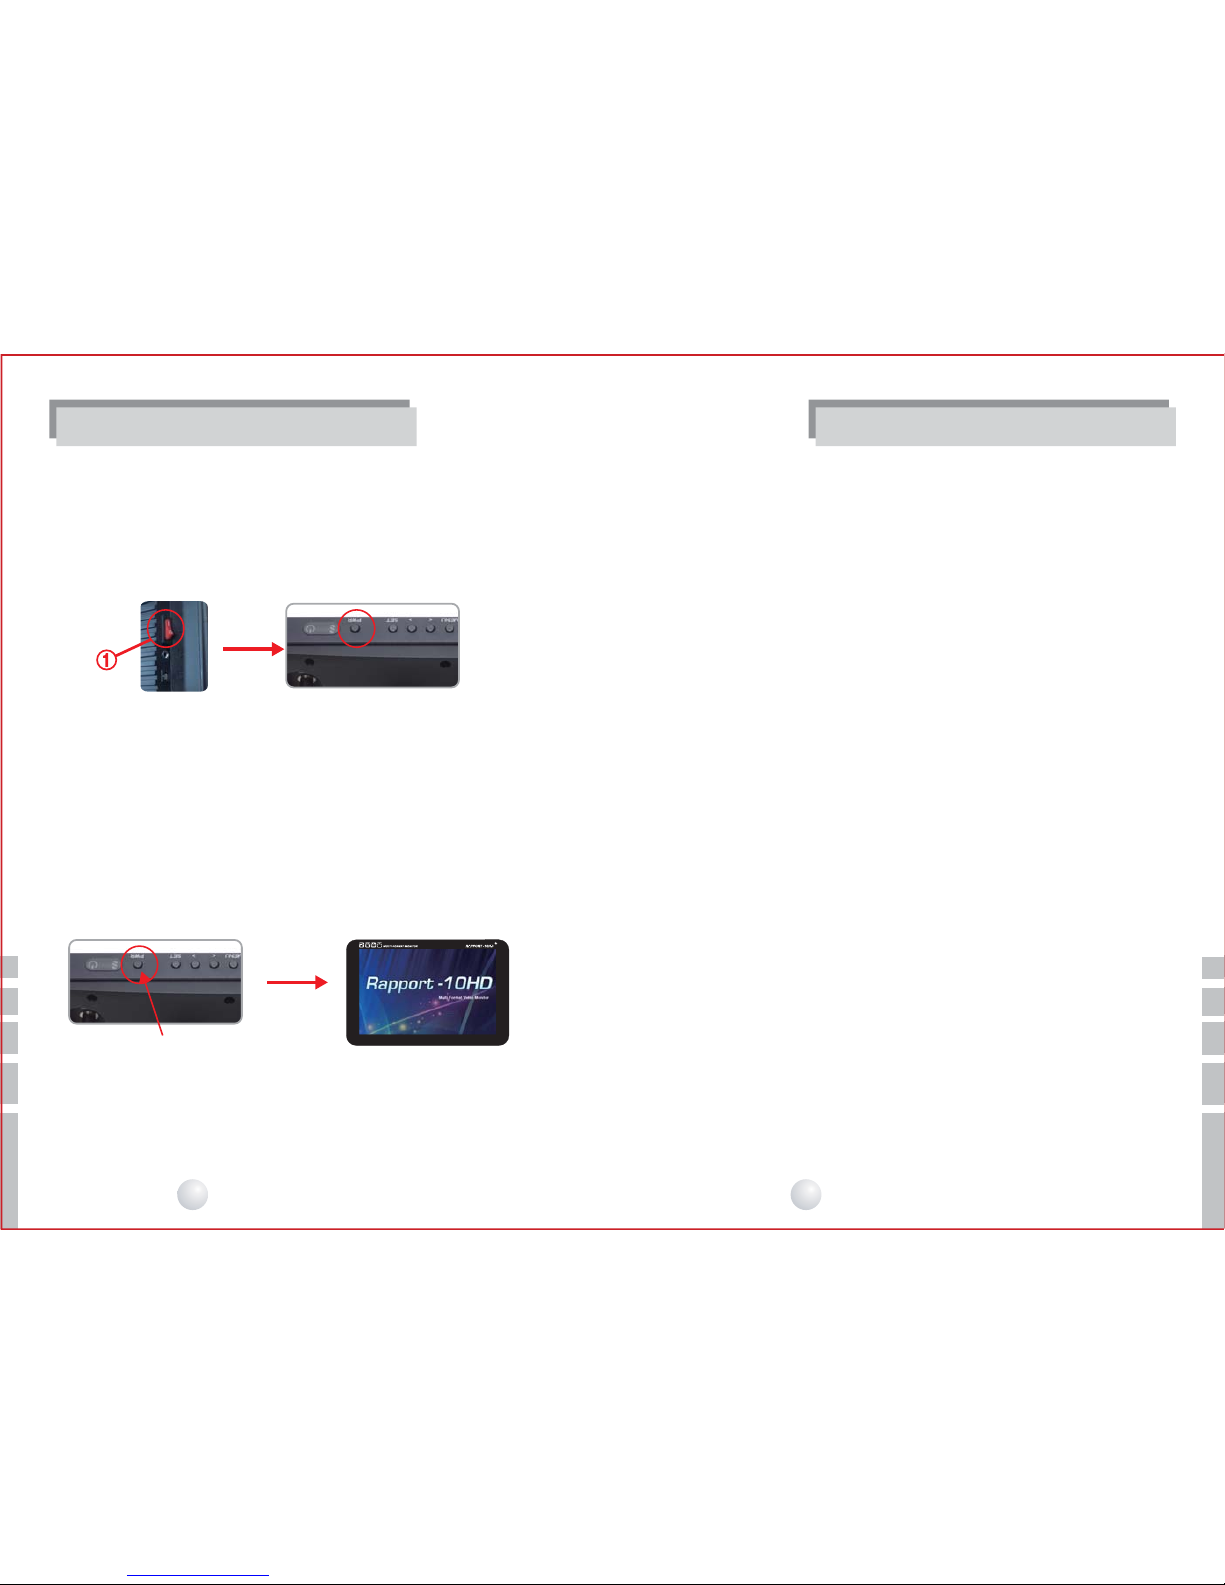
2.1 Power On / Off
Switch on the power button in the side of product and press “PWR” button for 3
seconds to turn on the power.
※ The discharge starts when the main switch is turned on and it star t to consume power from
the battery. Therefore, when the product is not being used for a period of time, make sure the
main switch is turned off.
2.2 Starting and Finish the product
2.2.1 Starting
2.2.2 Finish the product
To finish the proudct, press power button for 3 seconds.
press 3 seconds.
3 Rapport-10HD/PRO functions
3.1 Functions
This product have below functions
Multi Format Video TEST (input only)
- HD-SDI
- CVBS
- HDMI
- VGA
With this product, you can check above video types of video image
problem and control brightness, color and focus.
- OSD MENU system setup
- Firmware Update by USB
- Stereo Audio output (only HD-SDI/ HDMI input Audio signal)
- Input Image Recording / Replay (Storage SDHC 32GB Class 10)
FUNCTIONSFUNCTIONS
When turn on the product, below logo is shown on the screen during the booting time and
it will takes around 15 seconds.
14
Multi-Format Input Monitor
15
Multi-Format Input Monitor
Page 9
3.2 Screen details
3.2.1 Monitoring mode
Select HD-SDI, HDMI, CVBS and VGA by using “<”, “>” buttons.
The bottom left side is shown the current video mode.
- Default : HD-SDI
- video mode change : HD-SDI -> CVBS-> HDMI -> VGA -> HD-SDI
The video mode change
- Select picture ratio Full Screen, Aspect Ratio and 1:1 by using “SET”
button.
- The top right side is shown the current picture ratio with icon.
Select picture ratio
3.2.2 Screen
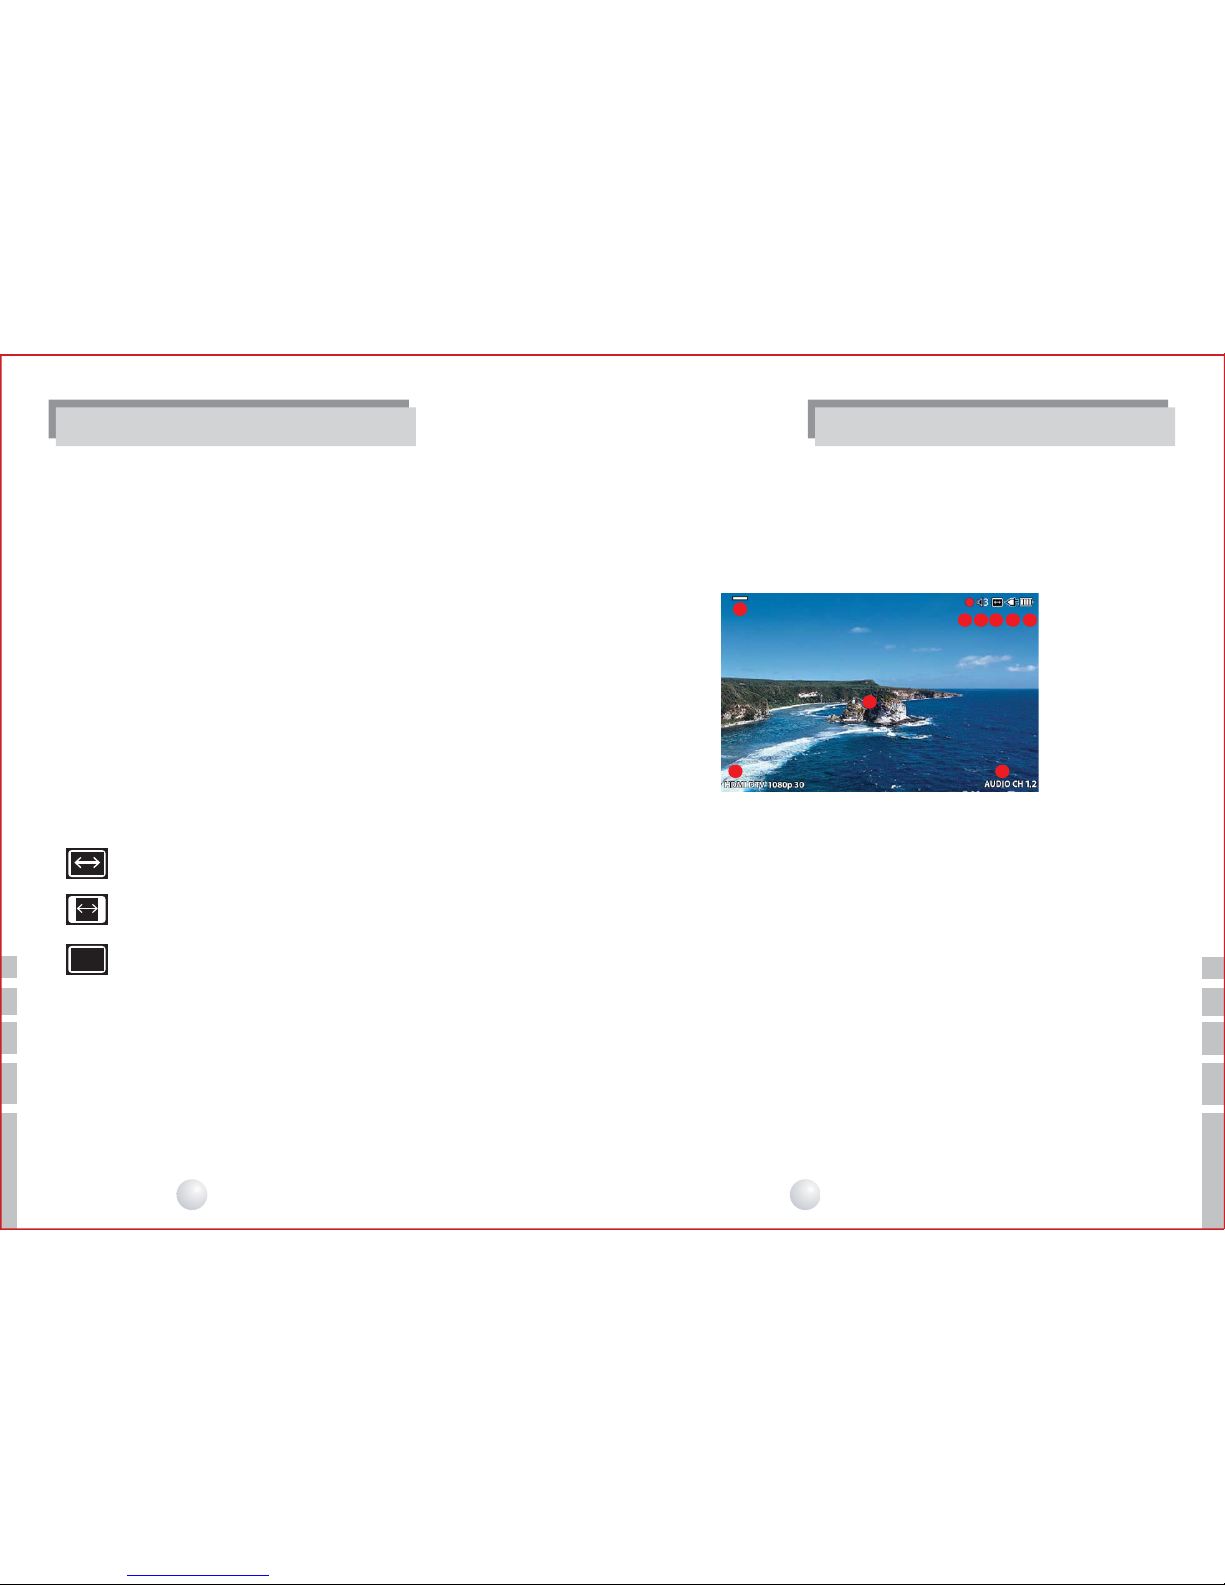
The video input, power connection and audio input etc, kinds of video connected
informations are shown by the OSD (On Screen Display).
① Picture : Shown the input video.
② Video mode : Shown the input video mode.
(Video mode, resolution, frame is shown by turns.)
③ Audio : Shown the selected Audio Pair Channel.
④ Picture ratio : Shown the picture ratio by icon.
⑤ DC power : Shown the DC power connected/ disconnected.
⑥ Battery: Indicates remained battery ( 5 steps.)
⑦ Input video : Select input video icon.
⑧ Shown the recording status.
⑨ Shown the volume level.
[ Example: HDMI video]
FUNCTIONSFUNCTIONS
Full Screen : Picture size is to fit on the Screen.
Aspect Ratio : The picture is expended with the origial picture ratio
proportionally.
1:1 : Show the picture as the origial picture size.
(The lager size than LCD size is shown with miniature size of LCD
screen.)
1:1
①
② ③
④ ⑤ ⑥⑨⑧
⑦
16
Multi-Format Input Monitor
17
Multi-Format Input Monitor
Page 10
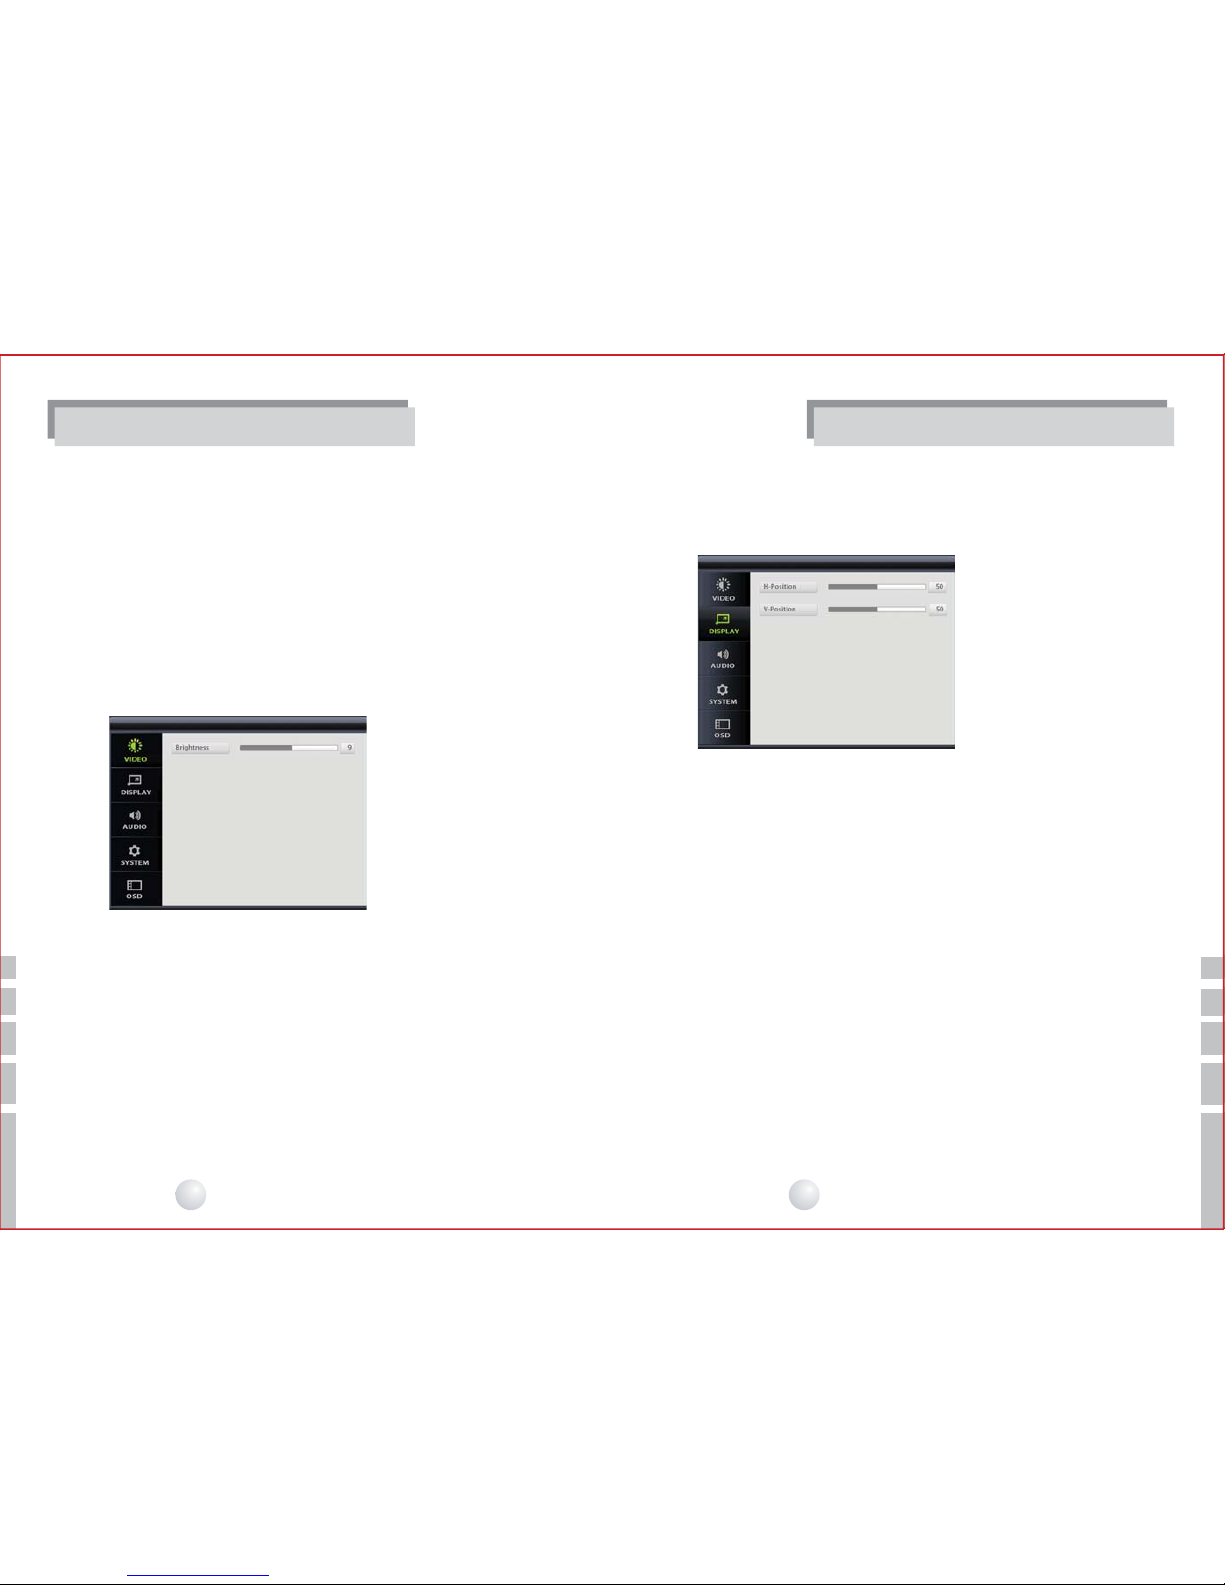
3.2.3.2 Display setting
Adjust video display position in this menu.
- H-Position : Adjust picture postion horizontally on the screen.
(Adjustable from 45~55 )
- V-Position : Adjust picture postion vertically on the screen.
(Adjustable from 47~53)
3.2.3 OSD MENU
3.2.3.1 Video setting
Adjust brightness of the Video.
Brightness : Adjust brightness of LCD screen.
0(Darkness)~15(Brightness)
Menu
- Menu : Press “MENU” button to go into the OSD menu in the monitering mode.
- Move item : Press “<”, “>” buttons to move and select OSD menu.
- Select item : Press “SET” button to select OSD menu.
[ Video setting ]
[ Display menu ]
FUNCTIONSFUNCTIONS
18
Multi-Format Input Monitor
19
Multi-Format Input Monitor
Page 11
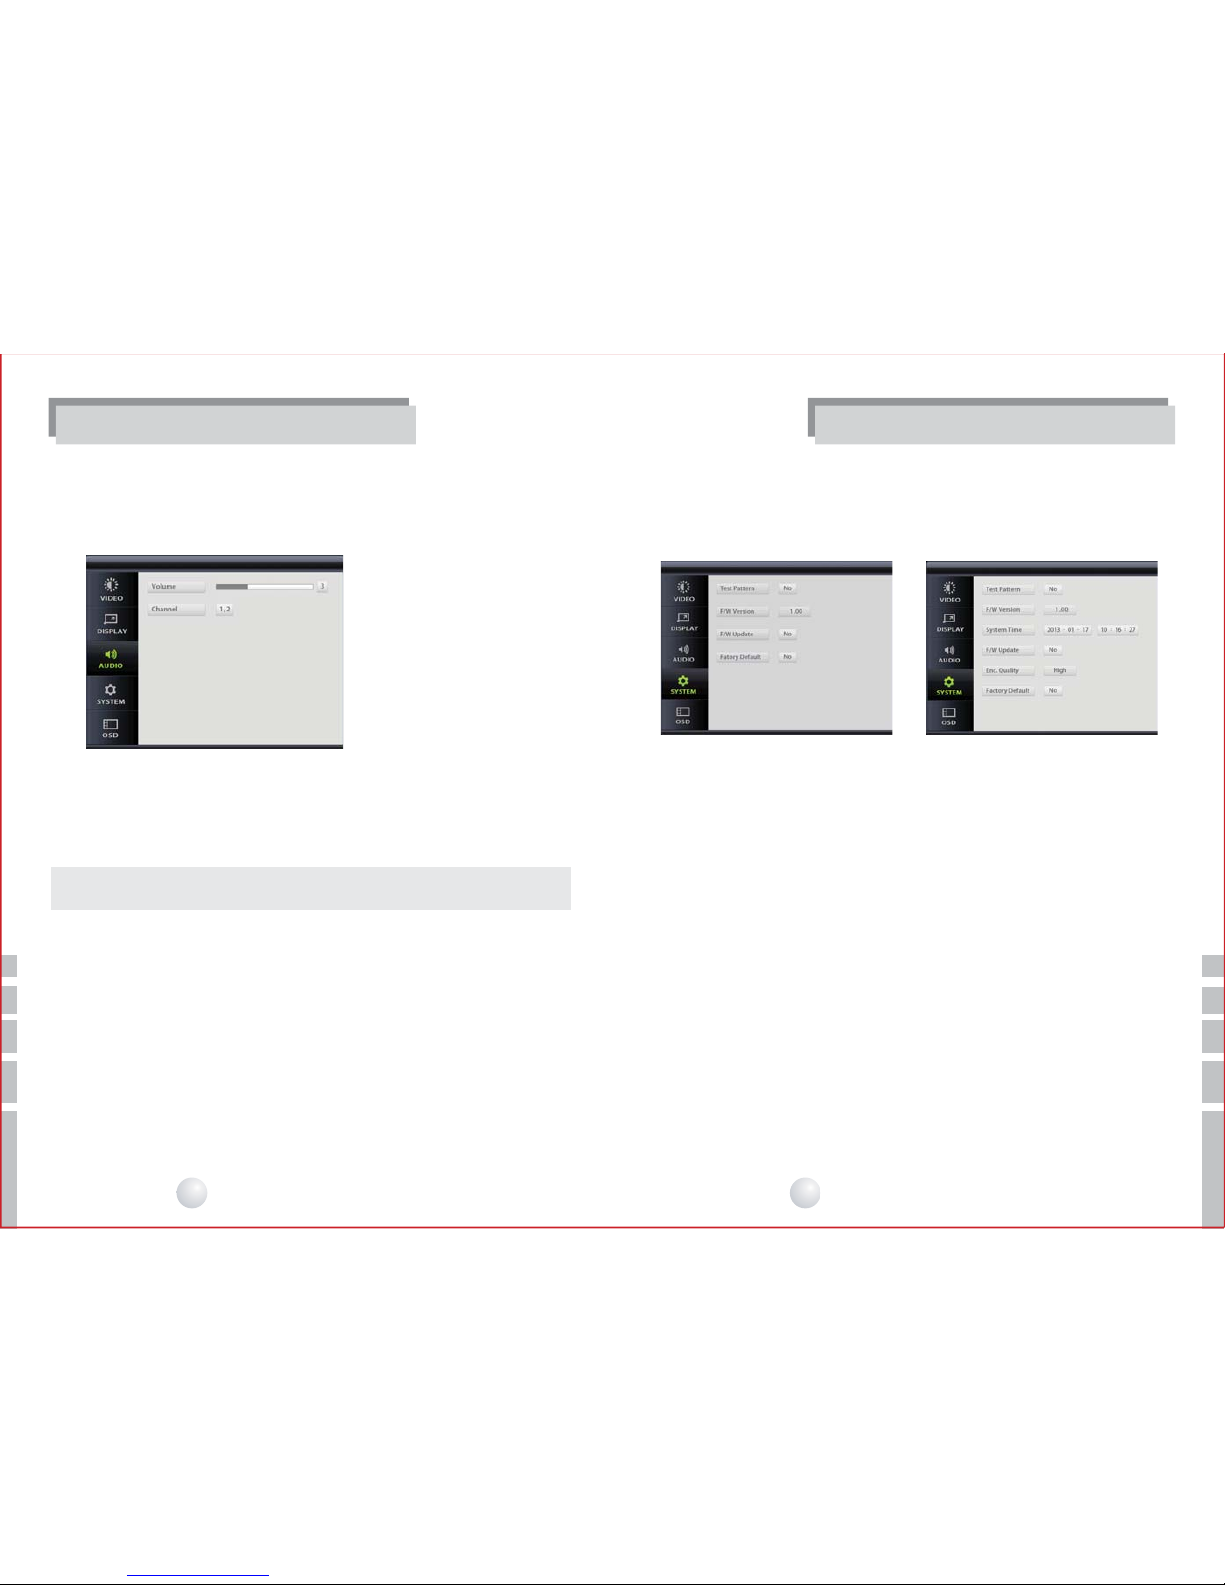
3.2.3.3 Audio setting
Set the Audio singal (only HD-SDI, HDMI) in this menu.
- Volume : Adjust volume.
0(Mute) ~ 9(MAX) steps selectable.
- Channel : Select Audio channel.
3.2.3.4 System setting
- Test Pattern : Display test pattern image on the LCD.
Press “SET” button to go back to the menu.
- FirmWare(F/W) Version : Check the firmware of the product.
- System Time : Set and display current time.
- F/W Update : Upgrade the product firmware.
(See the 22page for detail of Firmware upgrade)
- Enc. Quality : Select recordeing image qaulity. (HIGH/Normal/LOW )
- Factory Default : Set the data to the factory default.
[ Audio setting menu ]
[ Rapport-10HD PRO System setting ]
Set the product system in this menu.
FUNCTIONS
FUNCTIONS
* Coution : Audio signal of HDMI is supported from 48KHz, 16bit bandwidth.
20
Multi-Format Input Monitor
21
Multi-Format Input Monitor
[ Rapport-10HD System setting ]
Page 12
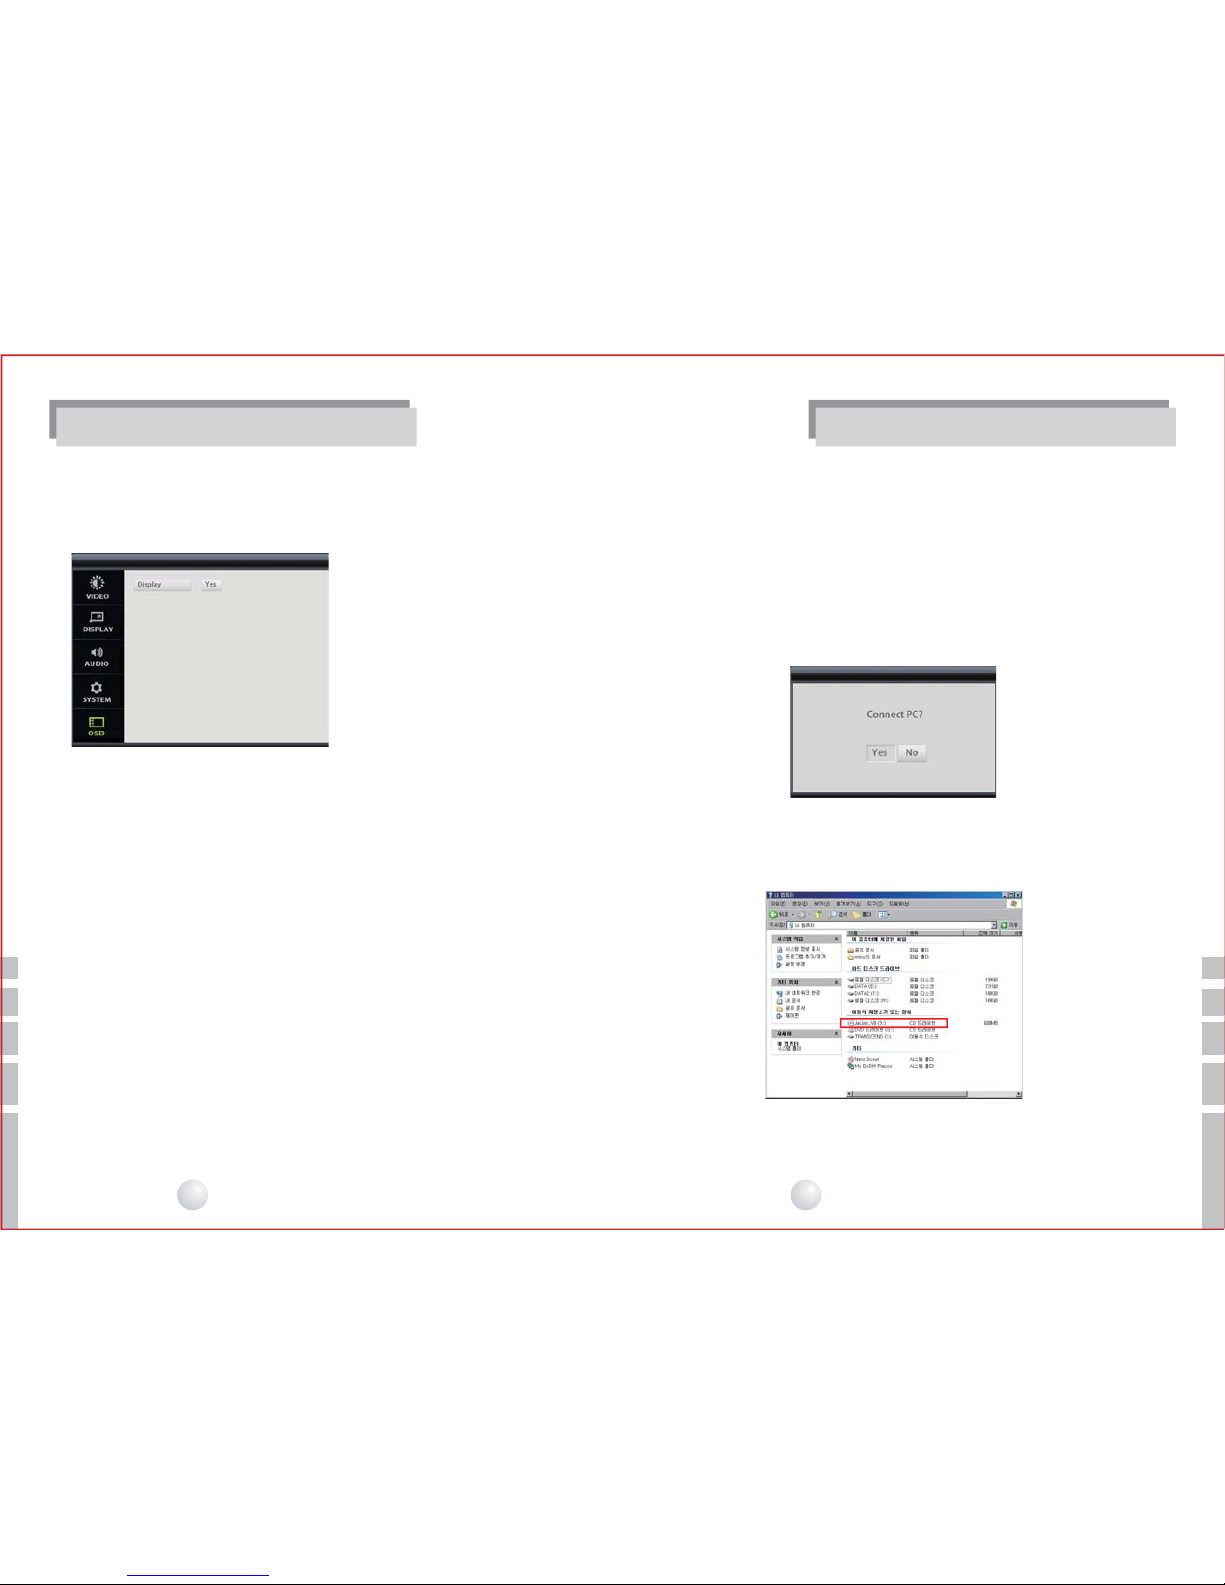
3.2.4 Firmware update
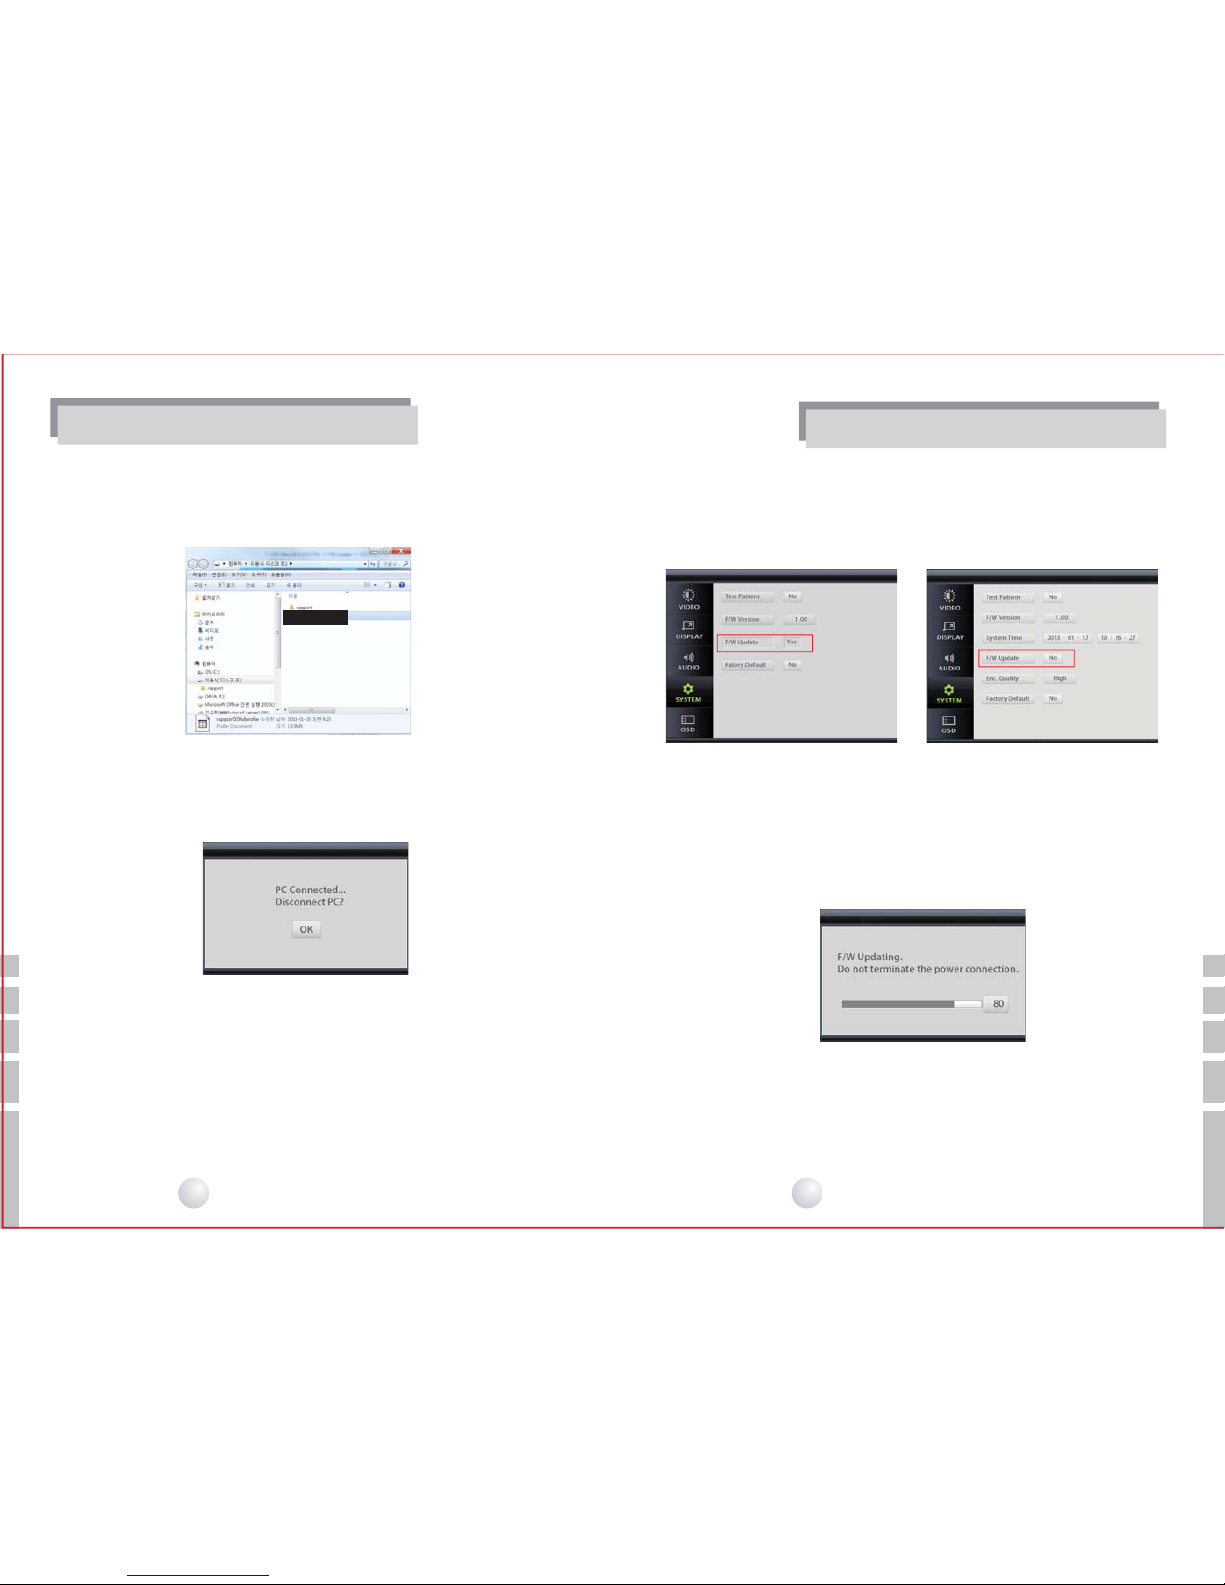
Using USB cable, update the proudcts’ firmware.
3. Find the removable disk in the “My computer” of the PC.
1. Connect USB cable :
Connect the USB cable in the back side of USB terminal and PC.
2. Select “Yes” on the screen.
- Copy Firmware ( PC-> USB connect -> SD Card of the product )
[ Select “Yes” to connect USB ]
[ Find “my computer”]
3.2.3.5 OSD setting
Set the product system in this menu.
Select OSD display in the monitoring mode.
[ OSD menu setting ]
FUNCTIONSFUNCTIONS
22
Multi-Format Input Monitor
23
Multi-Format Input Monitor
Page 13
1. Select as below.
OSD Menu SYSTEM → F/W Update -> YES
2.The firmware is automatically upgraded.
It will takes 1 minute.
Even the progress looks stop for dozens of seconds, it still working order.
(Do not discounnect power until the upgrade is finished.)
5. Select the “SET” button to disconnect PC.
[ Disconnect the USB ]
- Firmware update
[ Rapport-10HD PRO Select F/W update ]
[ F/W updating ]
FUNCTIONS
FUNCTIONS
[ Rapport-10HD Select F/W update ]
4. Copy the supplied firmware to the removable disk of PC.
File name for Rapport-10HD :rappor t10hdfw
File name for Rapport-10HD pro :rappor t10hdfw
[ Copy the upgrade file to to the removable disk of PC ]
24
Multi-Format Input Monitor
25
Multi-Format Input Monitor
Page 14

3. When update is completed, below window is shown and the power will be off
when press “OK” button. Turn on the power by pressing “POWER” button to
restart.
[ F/W update completed ]
4. Below screen is shown when there is no firmware files.
- Check the SD card and USB connecting.
- After checking it, restart the update.
If the update is keep filed, please contact where you originally purchased the
product.
[ F/W failed ]
FUNCTIONSFUNCTIONS
3.2.5 Record / Playback function (Support Rapport-10HD PRO only)
3.2.5.1 Recording
[ Start button to recording ]
[ Shown the recording stauts]
On recording
Record and playback functions are supported to Rapport-10HD PRO model only.
2,000 files can be made by recording function and each file have 10 minutes with AVI file.
* Caution : Do not power off while recording.
You will lose the recording file just before the power off.
Press REC button to start recording on the top of product, or press RECORD
button in the remote controller as below. If you press the button again, the recording
will be stopped.
26
Multi-Format Input Monitor
27
Multi-Format Input Monitor
Page 15
FUNCTIONS
FUNCTIONS
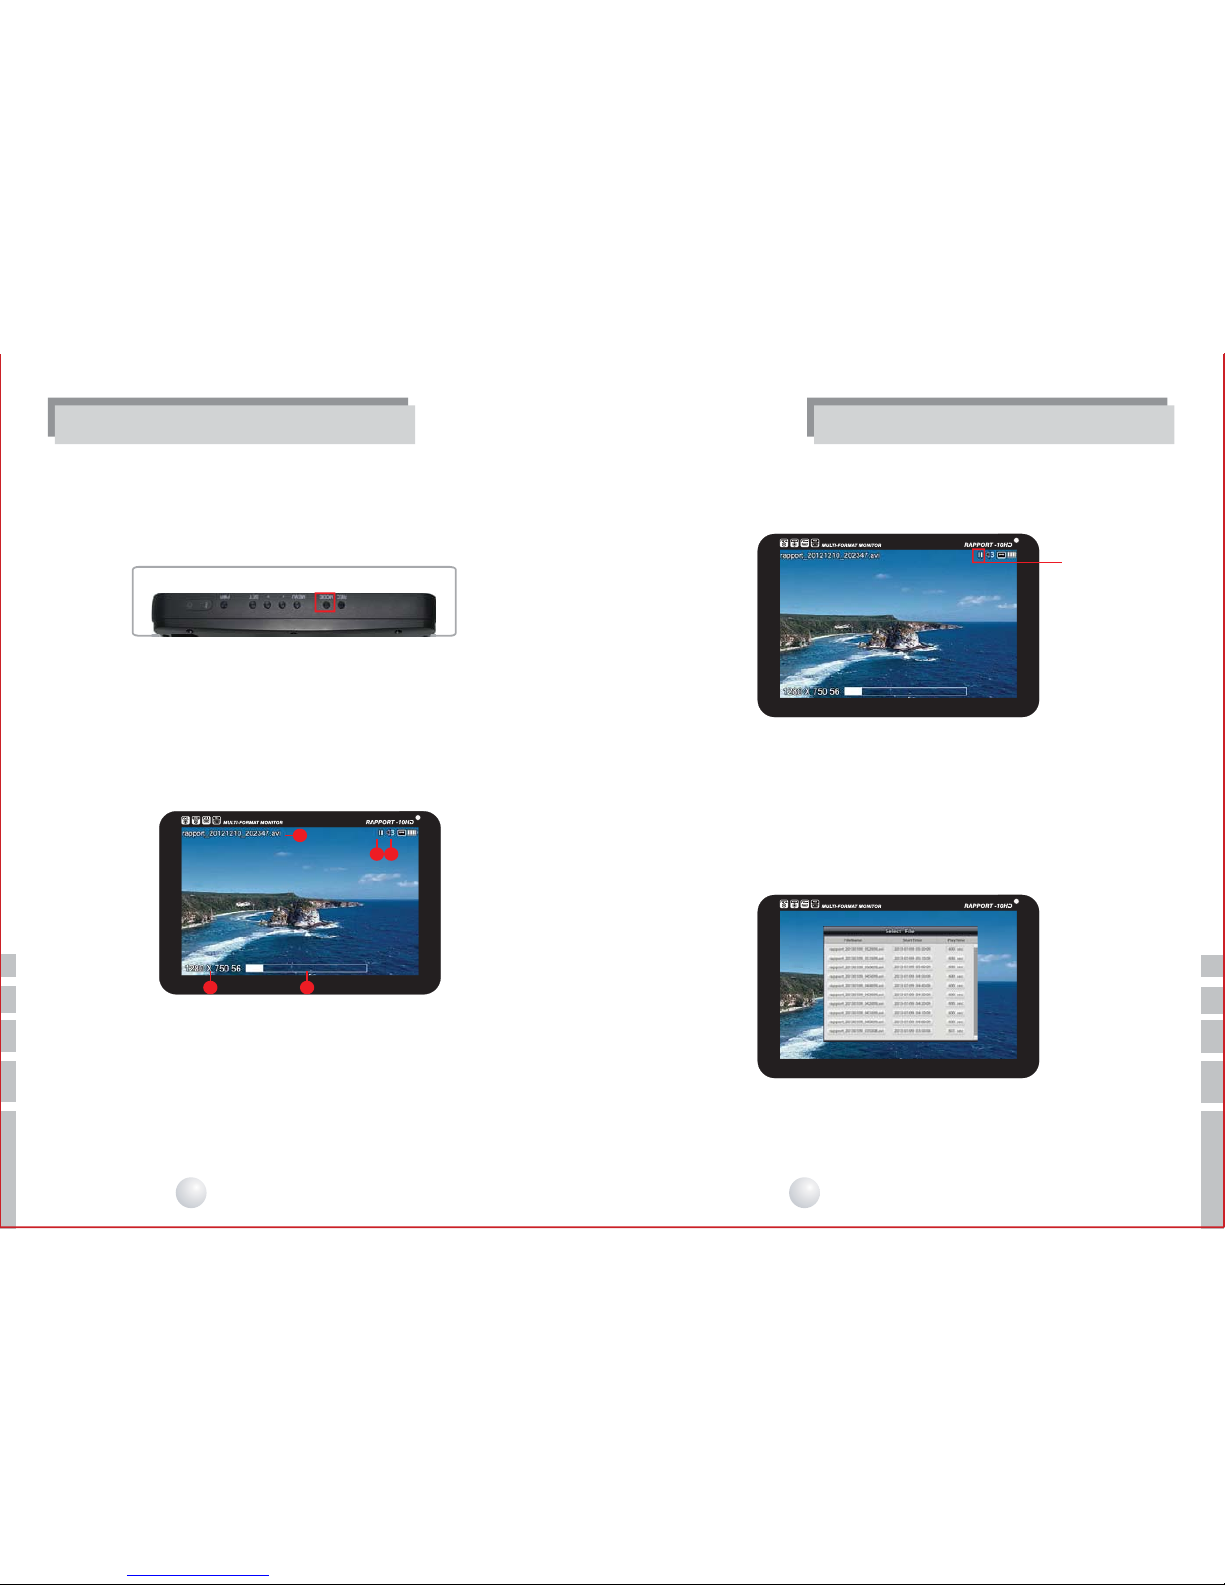
Pause icon
[ Paused screen ]
[ Recorded file list ]
3.2.5.2 Replay
① File name : Shown the file currently playing.
② Resolution / Frame rate : Shown the resolution and frame rate of currently playing.
③ Progress bar : Shown the playing progress bar
④ Playback icon : Shown the playing status by icon
( ▶:Playback , || : Pause )
⑤ Volume : Shown the volume level.
[ Play the recorded file ]
①
②
③
④ ⑤
Press REC button to pause replay.
Below is shown the paused screen.
To check the recorded file list, change the screen to the replay mode and press
the menu button on the body or remote controller.
Using the direction buttons, you can select the file and press SET button
(or press ENT button on the remote controller) to start play the file.
28
Multi-Format Input Monitor
29
Multi-Format Input Monitor
Replay the recorded file by using MODE button as below.
If the mode is changed to replay mode, the lastest file is shown automaticaly.
The file name : rapport_yyyMMdd_hhmmss.avi
(yyyy : year, MM : month, dd : date, hh : hour, mm : minute, ss: second)
Page 16
FUNCTIONSFUNCTIONS
You can select and change the recorded file by using the direction button as below.
- Press short time ‘>’ button of the product body : Fast forward to 20 sec.
- Press short time ‘<’ button of the product body : Fast rewind to 20 sec
- Press long time ‘>’ button of the product body : Play next file
- Press short time ‘<’ button of the product body : Play previous file
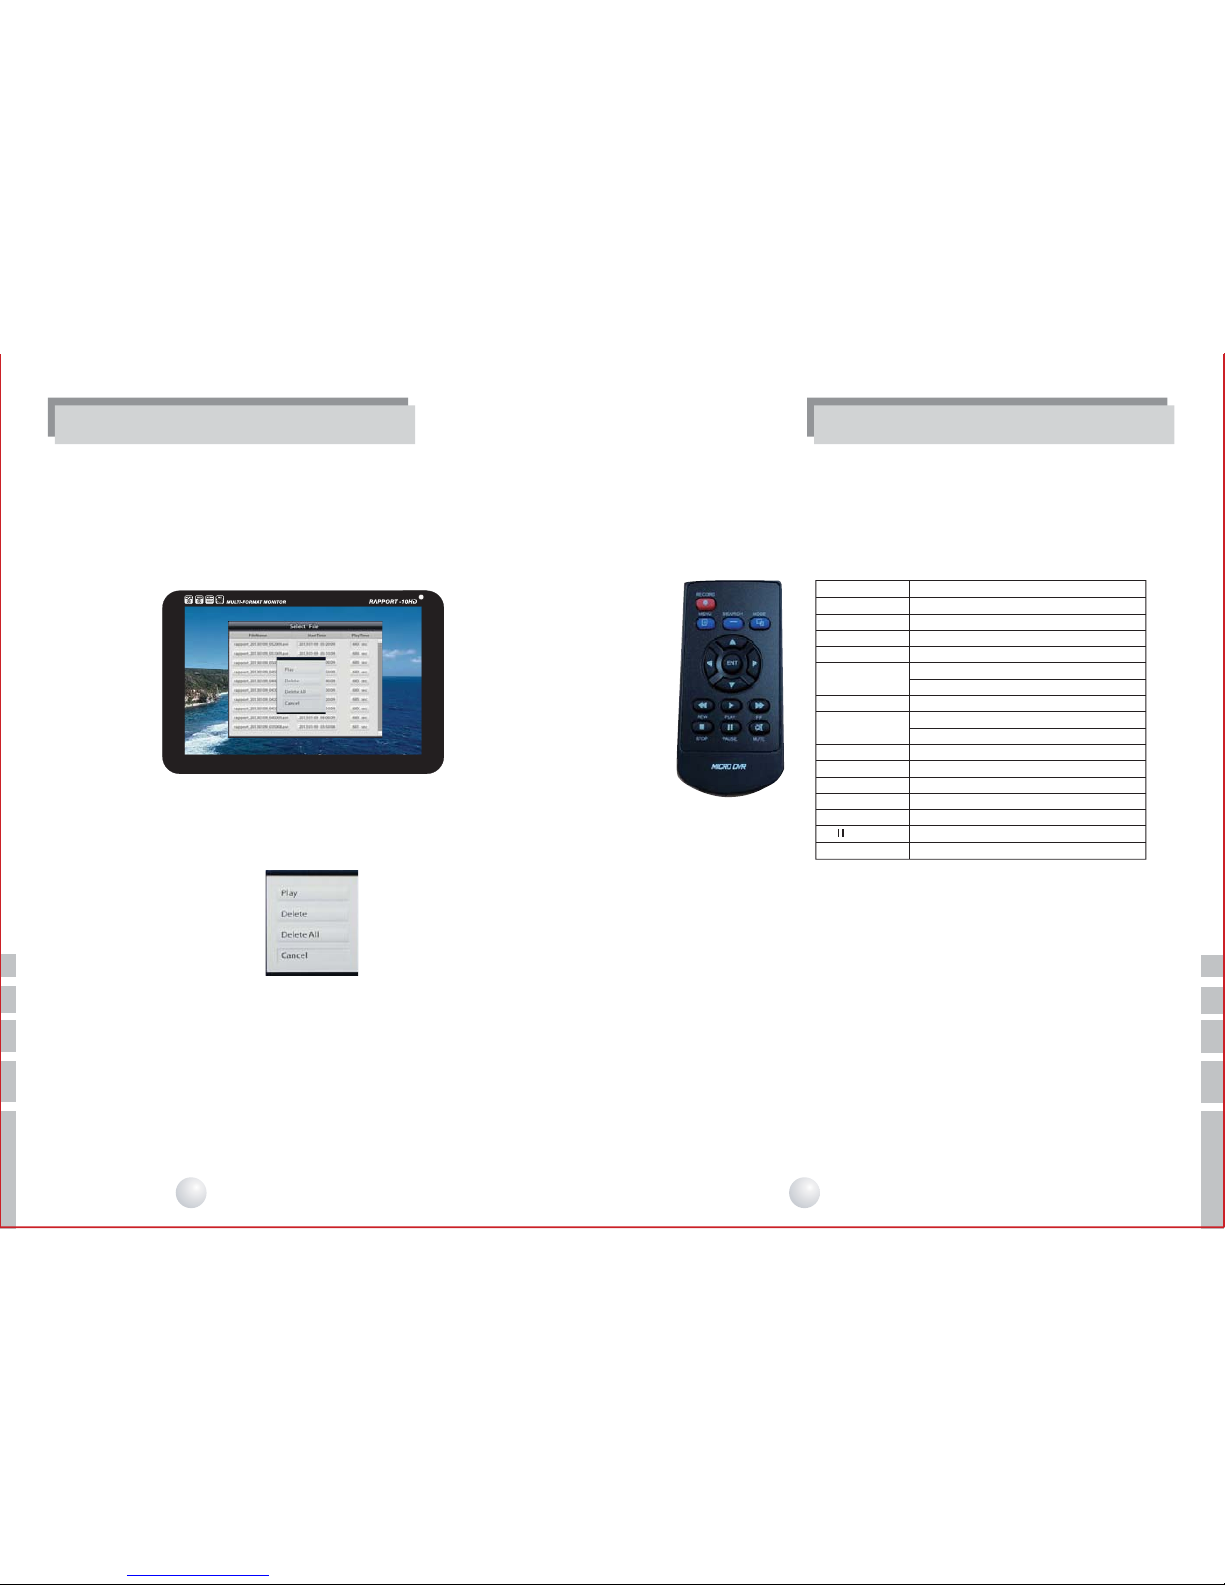
[ Remote controller ]
Start or stop to record
Display OSD menu
No Function
Change monitor mode / replay mode
Volume Up
Move to previous file/play
(Move to page of file list: Previous page)
Select / Enter
Move to next file / play
(Move to page of file list: Next page)
Voume down
Fast rewind to 20 sec.
Play the video
Fast forward to 20 sec.
Stop to reply video file
Pause to reply video file
Mute
RECORD
MENU
SEARCH
MODE
▲
◀
ENT
▶
▼
◀◀(REW)
▶(PLAY)
▶▶(FF)
■(STOP)
(PAUSE)
MUTE
3.2.5.3 Replay or delect the recorded file 3.2.5.4 Remote controller
If you press SET button in the file list menu, the select list is shown
automatically as below.
- Play : Play the selected file.
- Delete : Delete the selected file.
- Delete All : Delete all the recorded files.
- Cancel : Go back to the file list.
[ Play / delete menu ]
If you want to mute the audio signal in the recored video file, press the MUTE button
on the remote controller.
You can replay or delect the recored file in the recorded file list.
30
Multi-Format Input Monitor
31
Multi-Format Input Monitor
Page 17
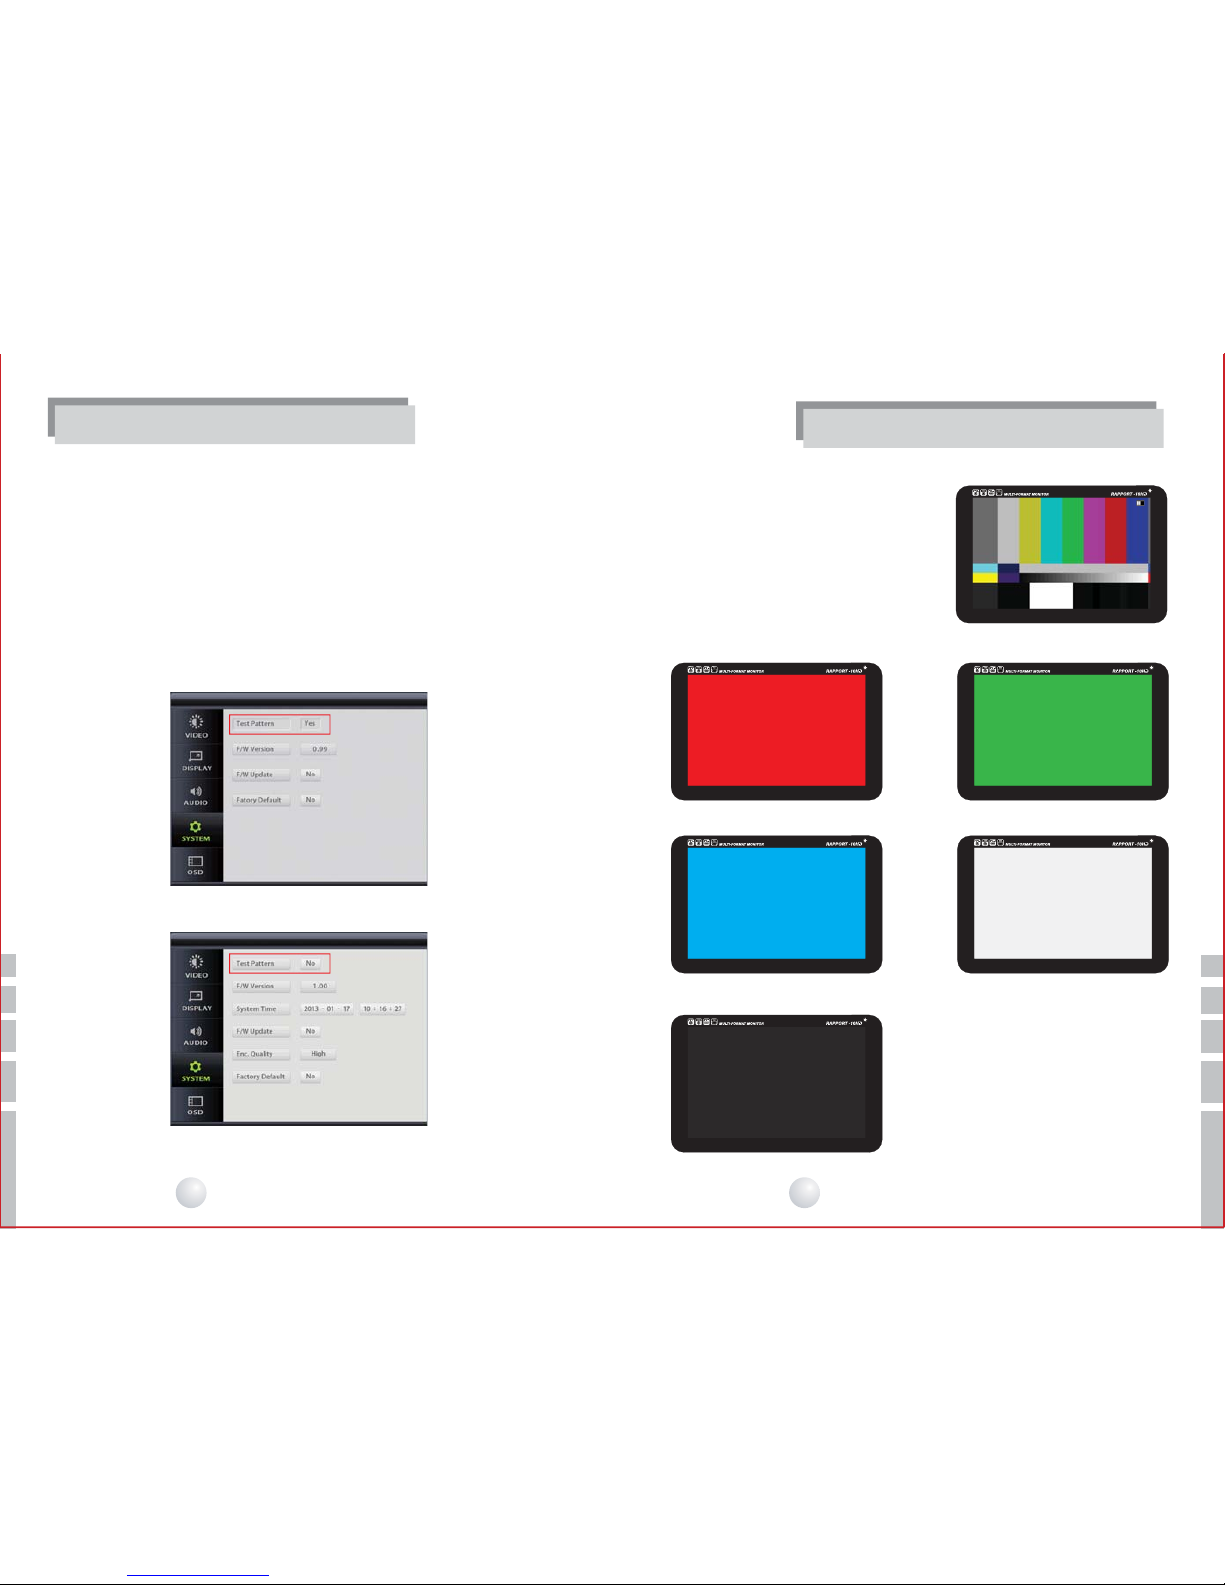
3.2.6.1 TEST Pattern
3.2.6 TEST Mode & Battery low alarm.
The test pattern function allow technicians to configure monitors and cameras video
siganl in/out problems. And the battery low alarm makes user know when the product
need to be charged.
1. Select as below to test pattern.
OSD Menu SYSTEM → Test Pattern -> YES -> press SET
FUNCTIONS
FUNCTIONS
[ Select Rapport10HD Test Pattern ]
[ Select Rapport10HD PRO Test Pattern ]
[ Test Pattern ]
[RED TEST Pattern] [GREEN TEST Pattern]
[BLUE TEST Pattern] [WHITE TEST Pattern]
[BLACK TEST Pattern]
2. You can change the pattern screen by
using the direction buttons (right, left)
on the remote controller.
32
Multi-Format Input Monitor
33
Multi-Format Input Monitor
Page 18
3.2.5.2 Low Battery
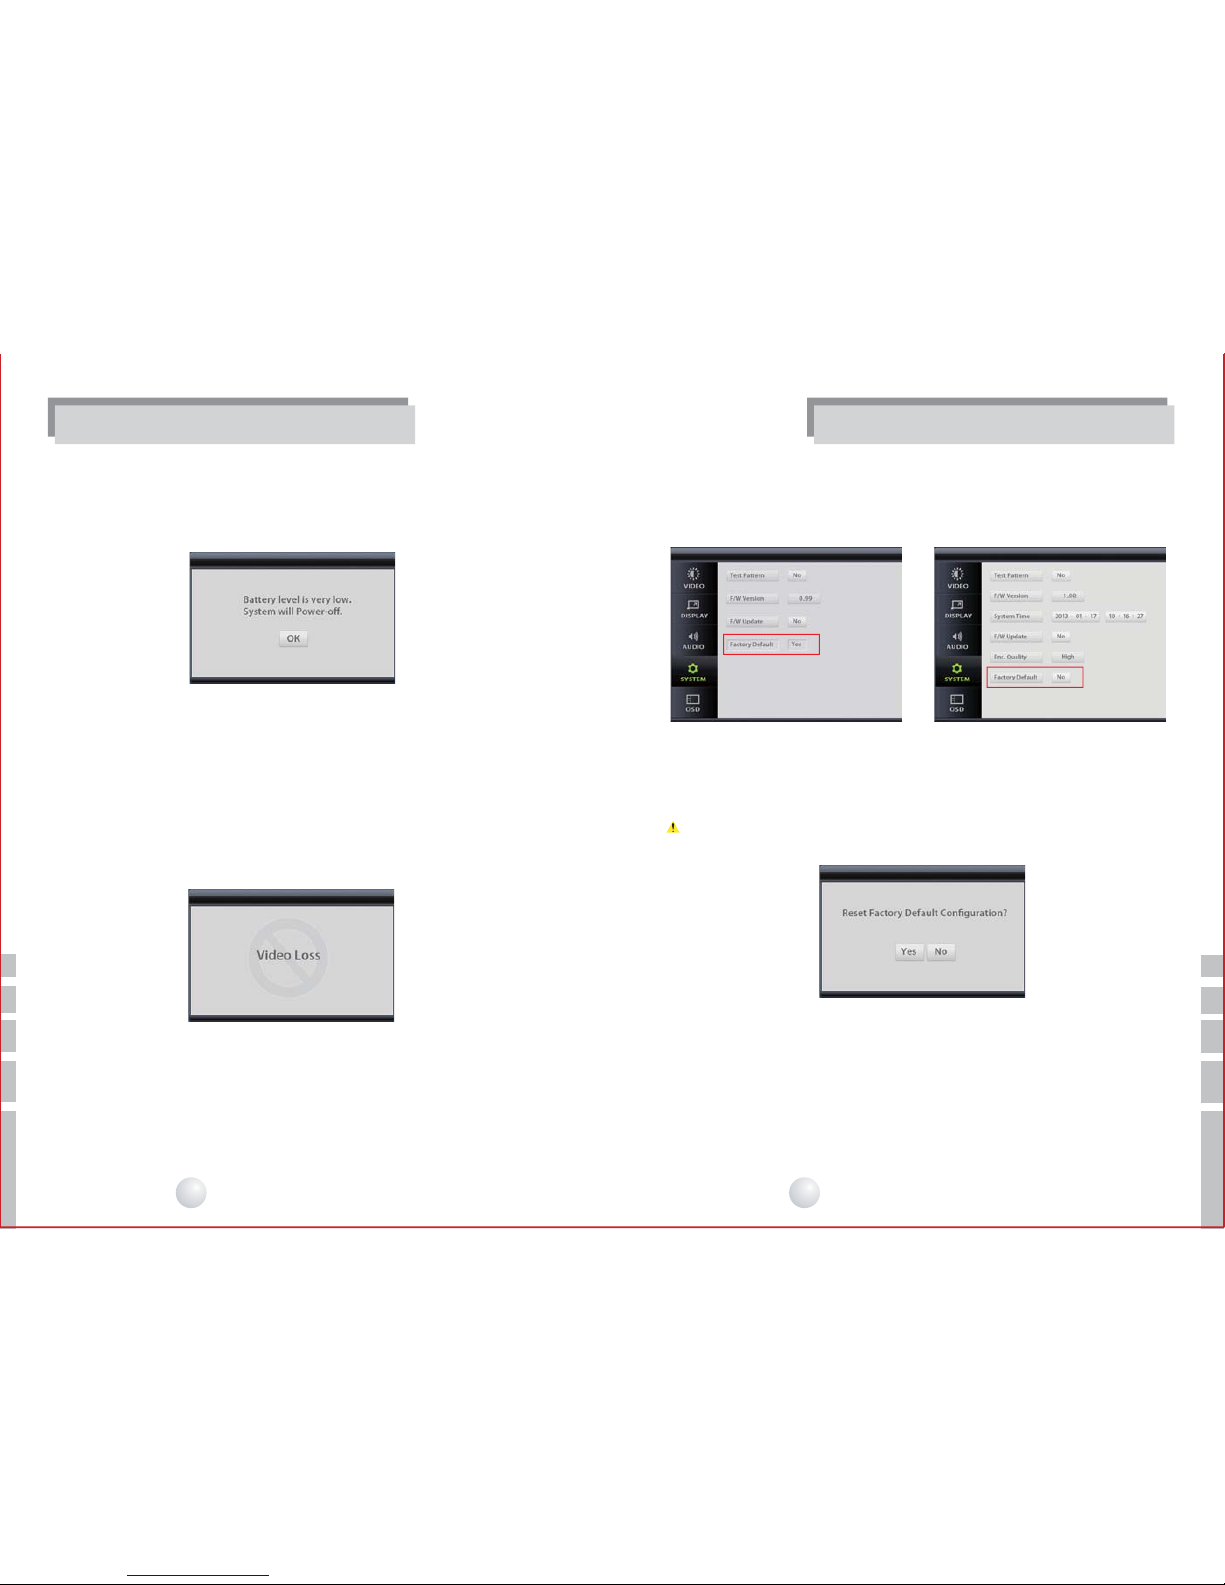
If below message is shown, please charging the battery.
1. Select as below to set factory reset.
OSD Menu SYSTEM → Factory -> YES
[ Low Battery warnning ]
Restore setting values to the factory default.
All existing setting value will be erased.
3.2.5.3 Video Loss & no video message.
If there is no video input or video loss, below message is shown up
[ Video Loss message]
[ Check Factory reset ]
FUNCTIONSFUNCTIONS
[ Rapport-10HD PRO Select Factory Default ][ Rapport-10HD Select Factory Default ]
34
Multi-Format Input Monitor
35
Multi-Format Input Monitor
Page 19
MEMO
MEMO
36
Multi-Format Input Monitor
37
Multi-Format Input Monitor
 Loading...