

Page 1

W3
WI-FI SPEAKER
INSTRUCTION MANUAL
Page 2

TABLE OF CONTENTS
TABLE OF CONTENTS
Introduction 2
Features
Inside the box
Product overview 4
Functions
Powering on
Villo App 5
App download
Setup your speaker
Dashboard 6
Add speakers
Group speakers (Multi-room music)
Speaker settings
More App Controls 8
Bluetooth/Wi-Fi Connection 9
Troubleshooting 10
Warranty 12
2
3
Page 3
INTRODUCTION
Thank you for purchasing the Villo W3. This speaker is designed
to fill your space with hi-fidelity music over your Wi-Fi network.
Please read this instruction manual and your Quick Start Guide
carefully and keep for future reference.
Features
• Built in Wi-Fi and Bluetooth connectivity for multi-room
streaming
• Wireless setup using smartphone or tablet
• Control speaker(s) using the Villo app
• Incredible sound, multi-speaker connectivity
• Compatible with internet music streaming services
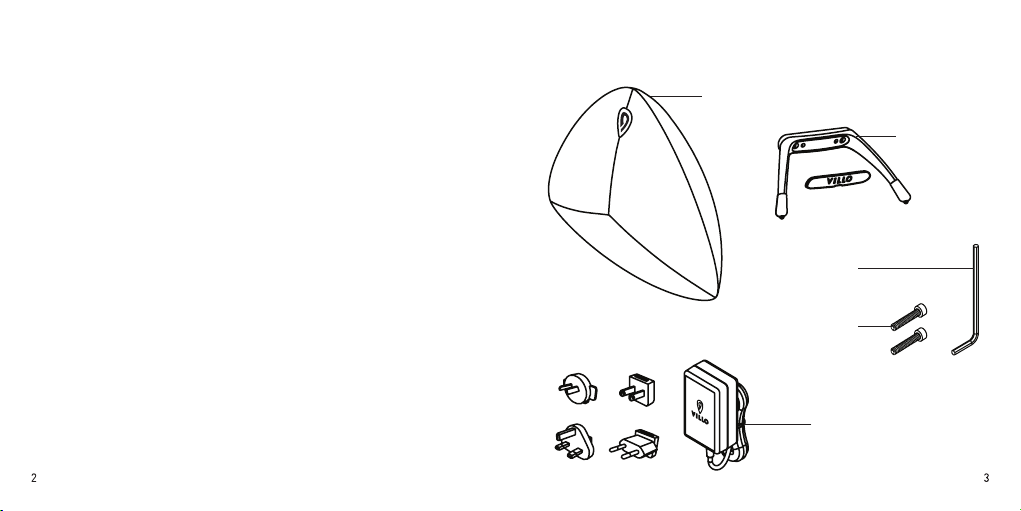
Inside the Box
Speaker
Metal Stand
Allen key
Hex screws x2
Universal Power Adapter
and Adapter Plugs
for different countries
Page 4

PRODUCT OVERVIEW
Power Button
(Logo LED
White: Wi-Fi
Blue: Bluetooth)
Play/Pause
Hold 3 sec: Bluetooth
/Wi-Fi toggle
Powering On
Your speaker is supplied with a universal AC adapter kit, select
the suitable plug for your region and snap it onto the AC adapter.
Insert the round plug from the AC adapter into the round jack
on the back of the speaker (below the metal stand), and plug the
adapter into any standard (100v-240v AC) wall outlet.
Metal Stand
Wi-Fi Pairing
Hold 6 sec: factory reset
Controls
Volume Up
Hold: next track
Volume Down
Hold: previous track
To turn the speaker on (or off), press and hold the on the
front for 3 seconds. The Logo LED will turn white when the
device is on.
VILLO APP
App Download
Download the Villo app for your device by searching for the Villo
App through the Apple App Store™ or Google Play Store™. The
Villo App is designed for iOS and Android devices only such as
smartphones or Wi-Fi enabled tablets, it is not available for
use on regular desktop or laptop computers.
Setup Your Speaker
Make sure your device is connected to a Wi-Fi network via a
2.4Ghz wireless router. Power-on your speaker and launch
Page 5

g
the Villo app on your device. The App will take you through
step-by-step to setup your Villo speaker in minutes. If you are
unable to setup your speaker, refer to the trouble-shooting
section of this manual.
DASHBOARD
After setting up your speaker you will be taken to the
dashboard. The dashboard lets you control all Villo speakers
that are connected to your Wi-Fi network. Here you can:
1. Setup new speakers
· Tap the button on the top right and follow the on
screen prompts to connect a new Villo speaker to your
Wi-Fi network.
2. Multi-room Music
If you have multiple Villo speakers on your network,
you can group them together for a rich, synchronized
playback experience.
· Grouping Speakers
After connecting 2 or more Villo speakers to your
network, tap the Group button on the top right corner
of any speaker and select speakers to add/remove
from the group. Speakers in the same group will play
synchronously until you remove them from the group.
· Left/Right/Stereo Channel
Speakers are set to stereo mode by default (left + right
channel). When speakers are grouped, you can assign
left or right channel for each speaker within the group
to simulate surround sound. Tap the button to the right
of the volume slider under the speaker name to change
between L (left), R (right), or LR (stereo).
3. Speaker Settings
· Tap the button next to the volume adjuster. You can
rename your speaker or restore it to factory settings.
Setup new speakers
L
R
L/R Stereo Channel
Speaker Settings
Speakers
Groupin
Page 6

MORE APP CONTROLS
From the dashboard, swipe left to navigate to additional screens
to see what’s playing, edit your favorites, and access streaming
services and or music stored on your device.
Streaming Music Services
Your Villo speaker supports TuneIn, iHeartRadio, Spotify, Tidal
and other third party streaming platforms. If you already have
accounts with any of these services, you can sign in through the
Villo app to access any songs or stations you may already have
saved with that service.
BLUETOOTH CONNECTION
1. Hold the button for 3 seconds to enable Bluetooth,
the logo LED will blink blue.
2. Enable Bluetooth on your device and search for your
Villo speaker.
3. Find and select the Villo speaker in your device list.
When connected, the logo LED will turn solid blue.
• To reset the Bluetooth connection, hold the button
for 3 seconds while in Bluetooth mode.
If you do not have an account with one of these services, the app
will guide you through the setup process, however, you may need
to download and install the internet music services first before it
can be played. Follow the on screen prompts to add services and
setup an account. Follow the on screen prompts to add services
and setup an account.
WI-FI CONNECTION
• To toggle between Bluetooth and Wi-Fi, hold the
button for 3 seconds.
• The Logo LED will turn white to indicate that Wi-Fi
mode is on.
Page 7

TROUBLESHOOTING
Cannot connect to
Wi-Fi Network
Cannot connect to
Bluetooth
Make sure speaker is powered on.
Make sure your device is connected to a Wi-Fi
network via a 2.4Ghz router.
Make sure your Wi-Fi password is correct.
Test internet connection.
Power speaker off and on, restart setup.
Uninstall and reinstall app.
Restore speaker to factory settings.
Make sure speaker is powered on.
Make sure Bluetooth is enabled.
Make sure device’s Bluetooth is enabled.
Power speaker off and on, restart setup.
Uninstall and reinstall app.
Restore speaker to factory settings.
Audio doesn’t play
Make sure volume isn’t too low on speaker.
Other electronic household items can
interfere with signal, move speaker to
another location.
Restore speaker to factory settings.
Restore Speaker to Factory Settings
• Press and hold the button for 6 seconds.
• The speaker will acknowledge the reset and the logo LED
will slow blink white.
You can also factory reset your speaker through the Villo app
by tapping speaker settings in the app dashboard and selecting
factory reset.
Page 8

FCC Statement:
This device complies with part 15 of the FCC Rules. Operation is subject to the
following
two conditions: (1) This device may not cause harmful interference, and (2) this
device
must accept any interference received, including interference that may cause
undesired
operation.
This equipment has been tested and found to comply with the limits for a Class B
digital
device, pursuant to part 15 of the FCC Rules. These limits are designed to provide
reasonable protection against harmful interference in a residential installation. This
equipment generates, uses and can radiate radio frequency energy and, if not installed
and used in accordance with the instructions, may cause harmful interference to radio
communications. However, there is no guarantee that interference will not occur in a
particular installation. If this equipment does cause harmful interference to radio or
television reception, which can be determined by turning the equipment off and on,
the
user is encouraged to try to correct the interference by one or more of the following
measures:
—Reorient or relocate the receiving antenna.
—Increase the separation between the equipment and receiver.
—Connect the equipment into an outlet on a circuit different from that to which the
receiver is connected.
—Consult the dealer or an experienced radio/TV technician for help.
Caution: Any changes or modifications not expressly approved by the party
responsible
for compliance could void the user's authority to operate the equipment.
This equipment complies with FCC radiation exposure limits set forth for an
uncontrolled environment. This transmitter must not be co-located or operating in
conjunction with any other antenna or transmitter.
This equipment complies with FCC radiation exposure limits set forth for an
uncontrolled environment.This equipment should be installed and operated with
minimum distance 20cm between the radiator&your body.
Page 9

© 2018 Villo-audio. Any unauthorized copying, duplicating, or other
reproduction of the contents hereof is prohibited without written
consent from Villo-audio. All rights reserved.
16
 Loading...