

Wolverine WorldRadio User Manual
1
Make sure that the voltage in your area meets the voltage
requirements printed on the WorldRadio’s rear panel (AC
230-240 V, 50 Hz). If you do not intend to use the
WorldRadio for an extended period, remove the power cord
from the AC outlet.
3. Never Touch This Unit with Wet Hands
Never handle this unit or its power cord while your hands
are wet or damp. If water or any other liquid gets inside this
unit, have it checked by your local dealer.
4. Installing This Unit
Install this unit in a well-ventilated location.
Do not expose this unit to direct sunlight or heat
sources.
Install this unit horizontally. Never use it on its side or on
a sloping surface, because it may cause a malfunction.
1. Read these instructions.
2. Keep these instructions.
3. Heed all warnings
4. Follow all instructions.
5. Do not use this apparatus near water.
6. Clean only with dry cloth.
7. Do not install near any heat sources such as radiators,
heat registers, stoves, or other apparatus (including
amplifiers) that produce heat.
8. Protect the power cord from being walked on.
9. Only use attachments specified by the manufacturer.
10. Unplug this apparatus during lightning storms or when
unused for long periods of time.
11. Refer all servicing to qualified service personnel.
Servicing is required when the apparatus has been
damaged in any way, such as power-supply cord or
plug is damaged, liquid has been spilled or objects have
fallen into the apparatus, the apparatus has been
exposed to rain or moisture, does not operate normally,
or has been dropped.
12. Damage Requiring Service
Unplug the apparatus from the wall outlet and refer
1. Care
Occasionally you should dust the WorldRadio all over
with a soft cloth. For stubborn stains, use a soft cloth
dampened with a weak solution of mild detergent and
water. Dry the WorldRadio immediately afterwards with
a clean cloth. Don’t use abrasive cloths, thinners,
alcohol, or other chemical solvents, because they may
damage the finish or remove the panel lettering.
2. Power
WARNING
BEFORE PLUGGING IN THE UNIT FOR THE FIRST
TIME, READ THE FOLLOWING SECTION
CAREFULLY.
AC outlet voltages vary from country to country.
Safety Instructions
Precautions
The exclamation point within an
equilateral triangle is intended to
alert the user to the presence of
important operating and
maintenance (servicing) instructions
in the literature accompanying the
appliance.
Caution: To prevent the risk of electric
shock, do not remove cover (or back).
No user-serviceable parts inside.
Refer servicing to qualified service
personnel.
The lightning flash with arrowhead
symbol, within an equilateral
triangle, is intended to alert the
user to the presence of uninsulated
“dangerous voltage” within the
product’s enclosure that may be of
sufficient magnitude to constitute a
WARNING:
TO REDUCE THE RISK OF FIRE OR ELECTRIC SHOCK, DO NOT EXPOSE THIS APPARATUS TO RAIN OR
MOISTURE.
CAUTION:
TO REDUCE THE RISK OF ELECTRIC SHOCK, DO NOT REMOVE COVER (OR BACK). NO
USER-SERVICEABLE PARTS INSIDE. REFER SERVICING TO QUALIFIED SERVICE PERSONNEL.
servicing to qualified service personnel under the following
conditions:
A. When the power-supply cord or plug is
damaged.
B. If liquid has been spilled, or objects have fallen
into the apparatus.
C. If the apparatus has been exposed to rain or
water.
D. If the apparatus has been dropped or damaged
in any way.
E. When the apparatus exhibits a distinct change
in performance this indicates a need for service.
13. Object and Liquid Entry
Never push objects of any kind into the apparatus through
openings as they may touch dangerous voltage points or
short-out parts that could result in a fire or electric shock. The
apparatus shall not be exposed to dripping or splashing and
no objects filled with liquids, such as vases shall be placed
on the apparatus.
14. Batteries
Always consider the environmental issues and follow local
regulations when disposing of batteries.
PDF Created with deskPDF PDF Writer - Trial :: http://www.docudesk.com

2
Dispose of the packaging and this product in accordance with the latest provisions.
Notes on Environmental Protection
After the implementation of the European Directive 2002/96/EU in the national legal system, the following applies:
Electrical and electronic devices must not be disposed of with domestic waste. Consumers are obliged by law to return
electrical and electronic devices at the end of their service lives to the public collection points that are set up for this
purpose or designated points of sale. However, such details are defined by the national law of the respective country.
This symbol on the product, the instruction manual or the packaging indicates that the product is subject to these
regulations. By recycling, reusing the materials, or other forms of utilizing old devices, you are making an important
contribution in protecting our environment.
Trademarks
The names of products or other vendors and suppliers appearing in this document may be trademarks or service
marks of their respective owners, which may be registered in some jurisdictions.
Microsoft, Windows, and Windows Media are trademarks or registered trademark of Microsoft Corp. in the United
States and/or other countries.
vTuner is a trade mark of vTuner.com.
All other trademarks used in this document are trademarks or registered trademarks of their respective owners.
Copyright Notice
MPEG Layer-3 audio decoding technology licensed from Fraunhofer IIS and Thomson multimedia.
This product is protected by certain intellectual property rights of NEMS and BridgeCo. Use or distribution of such
technology outside of this product is prohibited without a license from NEMS and BridgeCo or an authorized subsidiary.
This product is protected by certain intellectual property rights of Microsoft Corporation. Use or distribution of such
technology outside of this product is prohibited without a license from Microsoft or an authorized subsidiary.
Content providers are using the digital rights management technology for Windows Media contained in this device
(“WM-DRM”) to protect the integrity of their content ("Secure Content") so that their intellectual property, including
copyright, in such content is not misappropriated. This device uses WM-DRM software to play Secure Content
(“WM-DRM Software”). If the security of the WM-DRM Software in this device has been compromised, owners of
Secure Content ("Secure Content Owners") may request that Microsoft revoke the WM-DRM Software’s right to
acquire new licenses to copy, display and/or play Secure Content. Revocation does not alter the WM-DRM Software’s
ability to play unprotected content. A list of revoked WM-DRM Software is sent to your device whenever you download
a license for Secure Content from the Internet or from a PC.
Microsoft may, in conjunction with such license, also download revocation lists onto your device on behalf of Secure
Content Owners.
The information provided herein is believed to be accurate; nonetheless, the content may change without prior notice.
We assume no responsibility for inaccuracies, errors, or omissions. And we assume no responsibility for the use of this
PDF Created with deskPDF PDF Writer - Trial :: http://www.docudesk.com

3
information, and all use of such information shall be entirely at the user’s own risk. Specifications are subject to change
without notice.
PDF Created with deskPDF PDF Writer - Trial :: http://www.docudesk.com

4
Welcome
Thank you for purchasing WorldRadio product. Your WorldRadio is designed to provide you hours of music enjoyment
as much as we enjoy creating it with simple, convenient access to thousands of Internet radio stations worldwide. No
matter whether you are in Alaska and would like to listen to the Hawaiian music, or whether you want to listen to the
classical music, hard rock, or smooth jazz; the WorldRadio brings you home the radio station of your choice.
Your enjoyment is our pleasure. Thank you very much. ….
PDF Created with deskPDF PDF Writer - Trial :: http://www.docudesk.com

5
Table of Contents
1 – WorldRadio at Your Fingertips...................................................................................................6
2 – WorldRadio Installation Step by Step........................................................................................7
2.1 Overview of Your WorldRadio ............................................................................................7
2.1.1 WorldRadio Front Panel..................................................................................................7
2.1.2 WorldRadio Rear Panel...................................................................................................7
2.1.3 The Remote Control........................................................................................................8
2.2 Turning on Your WorldRadio for the First Time................................................................... 9
2.2.1 Connection via Wired Configuration (LAN)......................................................................9
2.2.2 Connection via Wireless Configuration (WLAN)............................................................10
3 – Using Your WorldRadio ........................................................................................................... 12
3.1 Listen to the World Radio Program by Using the Front Panel Control..............................12
3.2 Using Remote Control to Access More Features.............................................................15
3.2.1 Listen to the WorldRadio by Using the Remote Control................................................15
3.2.2 Advanced Configuration................................................................................................20
4 – For Network Expert User Only.................................................................................................25
4.1 The vTuner Premium Service...........................................................................................25
4.2 Playing Music Stored in Your Computer...........................................................................28
Appendices ...................................................................................................................................30
Appendix A: Specification.......................................................................................................30
Appendix B: Troubleshooting .................................................................................................31
Appendix C: Regulations & Safety......................................................................................... 34
PDF Created with deskPDF PDF Writer - Trial :: http://www.docudesk.com
6
1 – WorldRadio at Your Fingertips
From Opening the Package to Installation
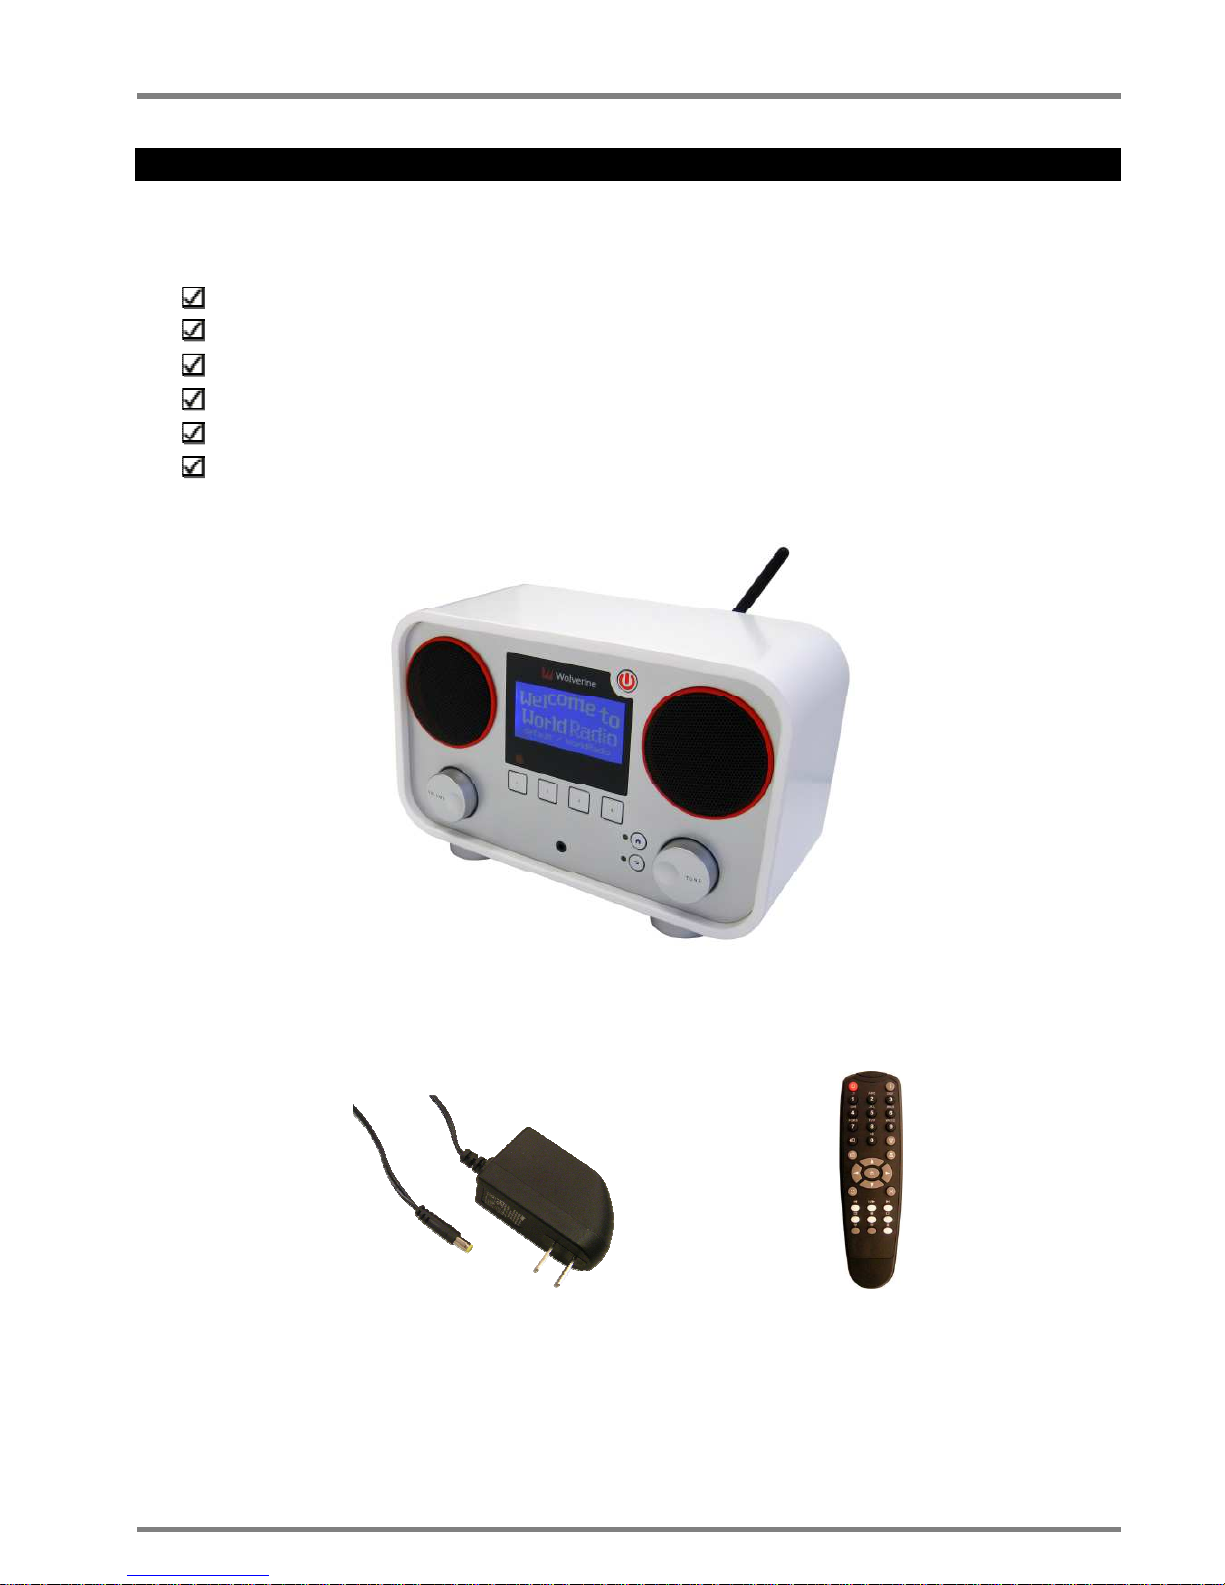
Now please make sure that the content of the package is complete. Your WorldRadio comes with the following:
WorldRadio main unit
Power supply with cable adapter (9VDC,2A)
Ethernet Network cable (2 m)
Remote control (requires two AAA batteries)
WorldRadio User Manual
WorldRadio Quick Installation Guide
Your WorldRadio
Power supply with cable adapter Remote Control
Before You Start
Please ensure that the Internet Broadband Network access is available before using the WorldRadio.
PDF Created with deskPDF PDF Writer - Trial :: http://www.docudesk.com
7
2 – WorldRadio Installation Step by Step
2.1 Overview of Your WorldRadio
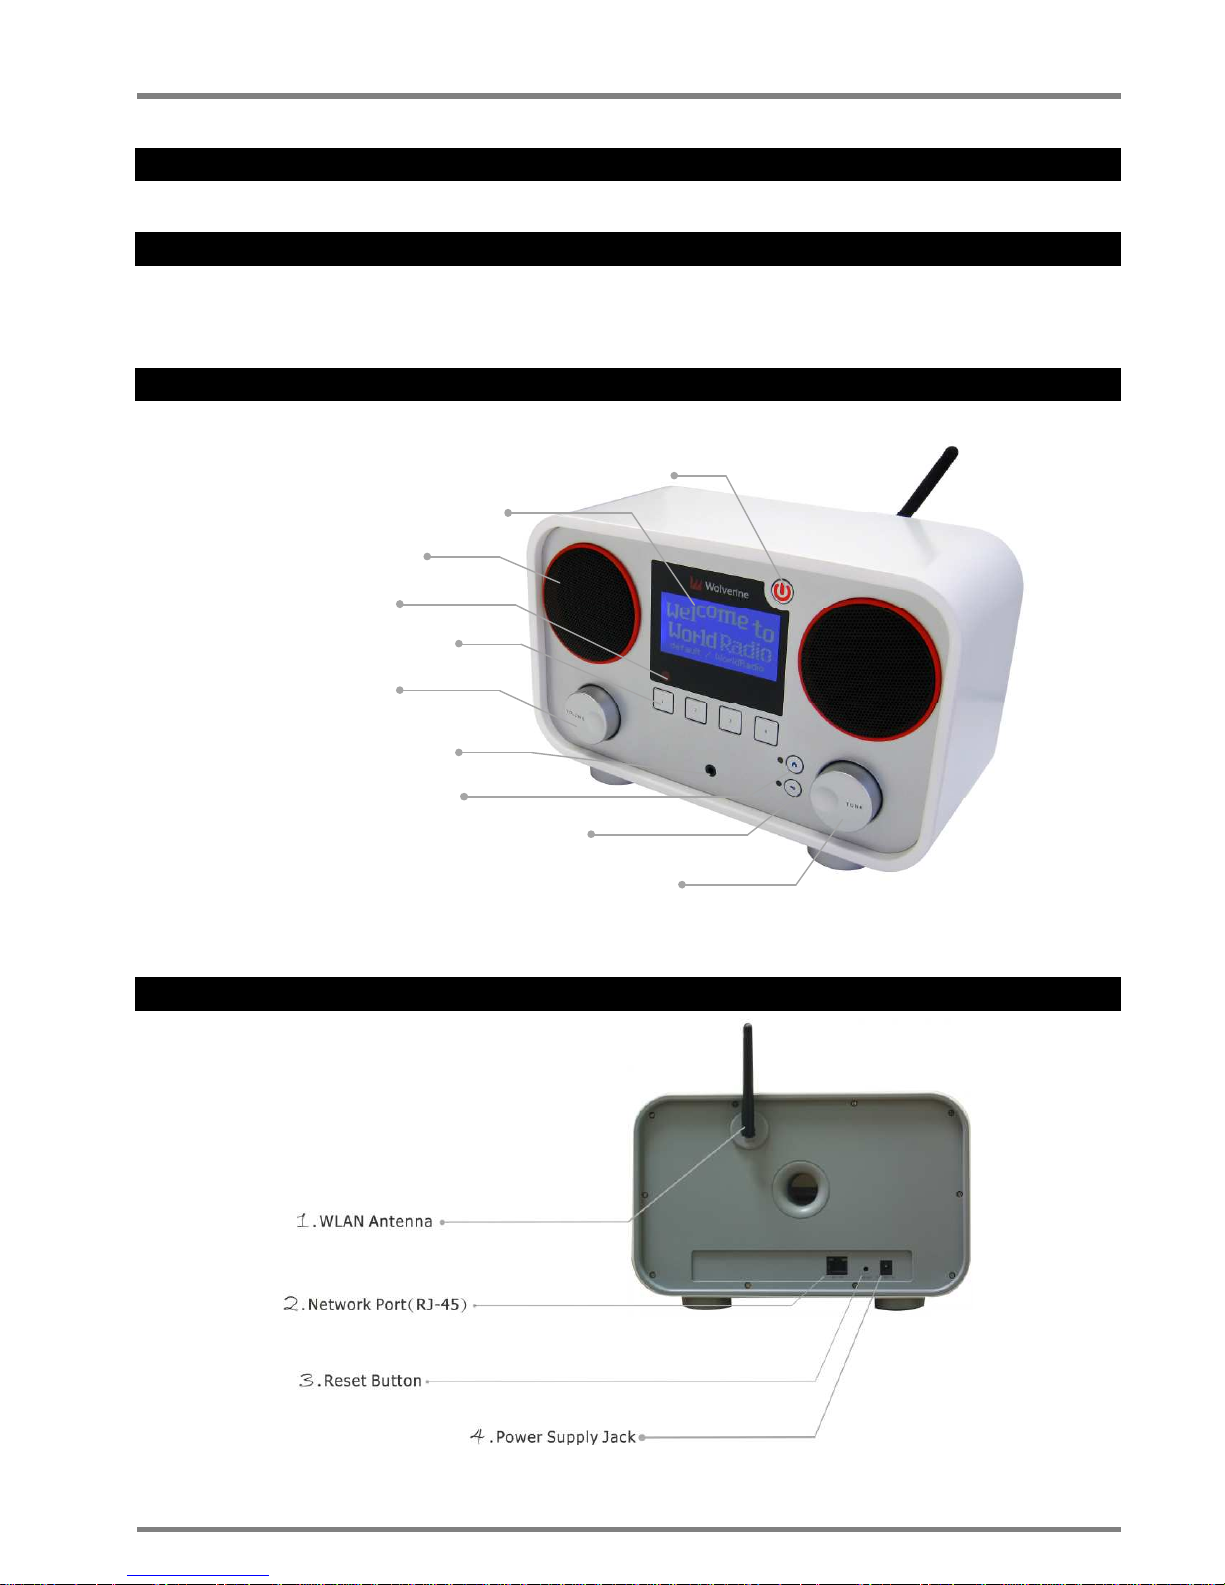
After taking your WorldRadio out of the box, please spend some time to familiarise yourself with its features.
2.1.1 WorldRadio Front Panel
2.1.2 WorldRadio Rear Panel
8. Home Button
1. Power Standby
2. LCD Display
3. Speaker
4. IR Receiver
5. Four Preset Buttons
6. Volume
7. Headphone
9. Return to Previous
10. Tune Knob
Push:Enter
PDF Created with deskPDF PDF Writer - Trial :: http://www.docudesk.com
8
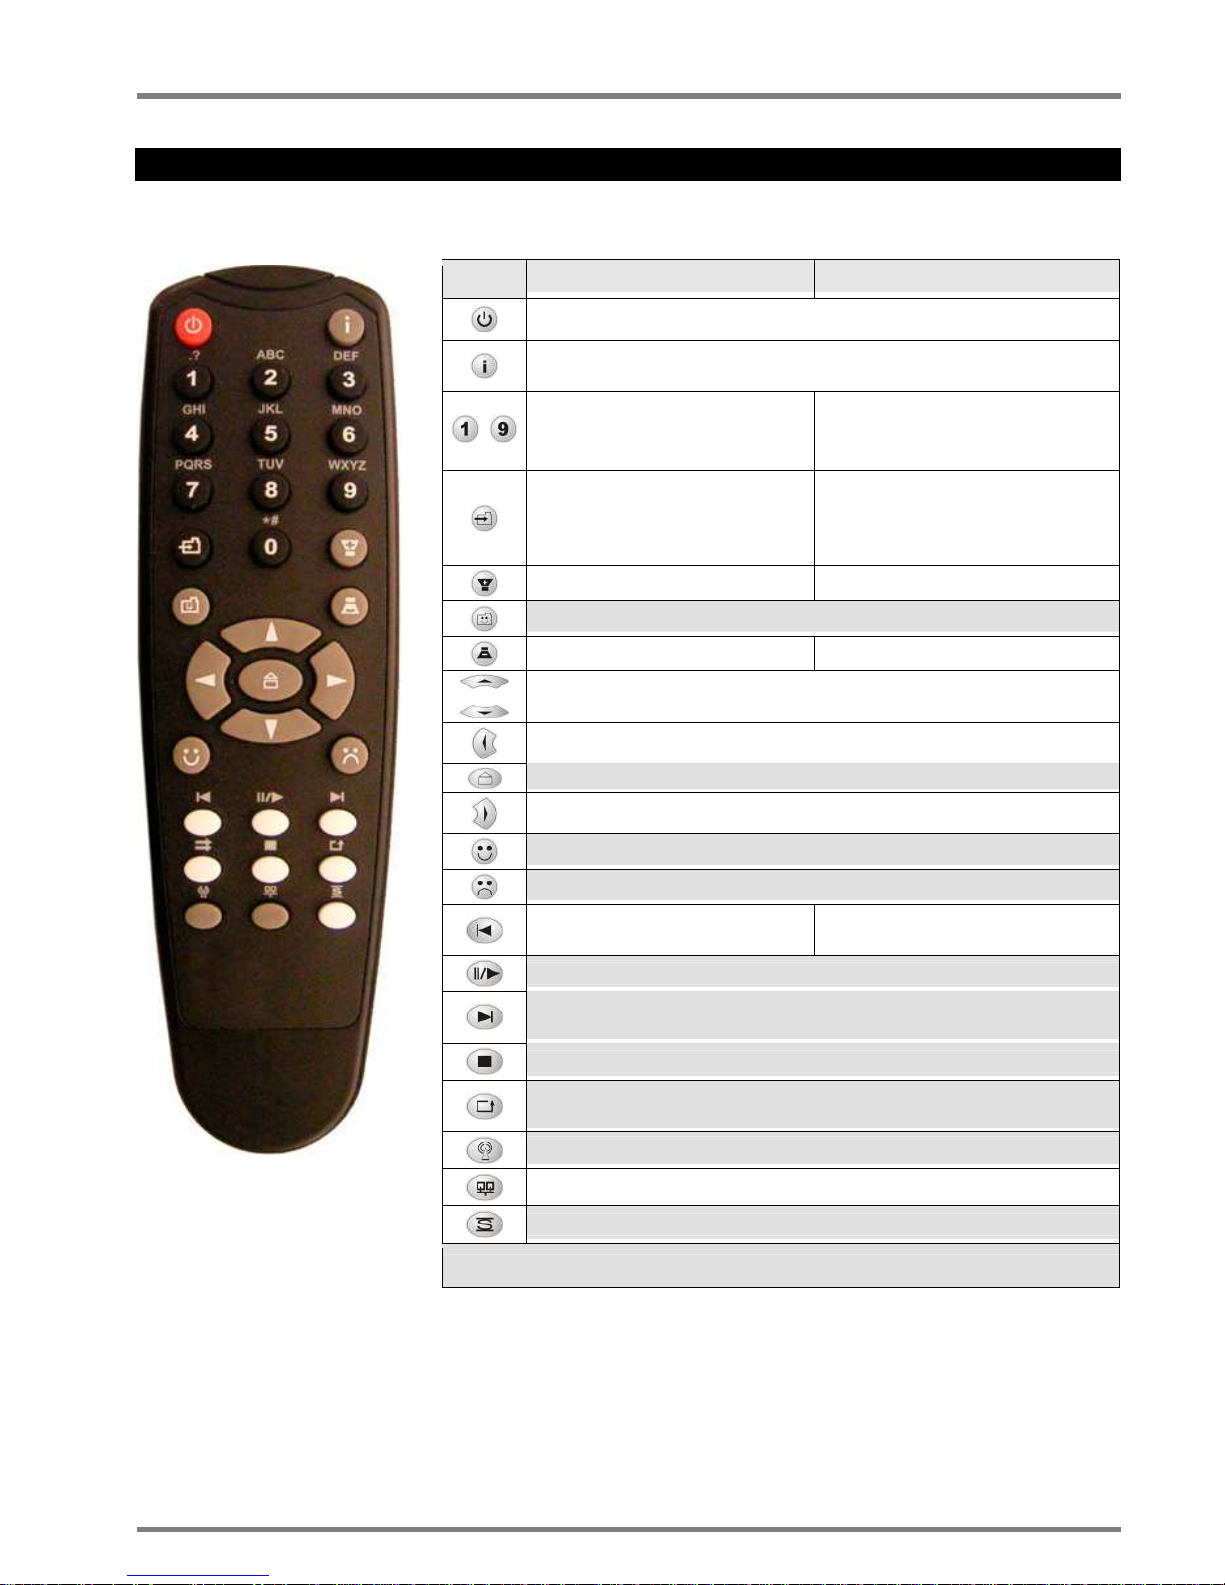
2.1.3 The Remote Control
The table below describes the functions of all the keys on the remote control in all three operating modes:
Key Select and Play Modes Configuration & Edit Modes
Standby on/off (press)
Information button to switch between Play and Select screens
~
Hotkeys for selecting stored
favorites 1 - 9
Enter numbers and text:
e.g.: Repeat
ed presses of the ‘2’ key
will scroll through ‘2’,’a’, ‘b’, ‘c’
Store current station/track as a
PRESET.
Press, then press required
number key
Inactive
Increase Volume Toggle upper/lower case
PLAYLIST: Open Select Menu for Dynamic Favorites list
Decrease Volume Toggle Insert/Replace modes
Scroll Up / Down (see Note 1) to highlight previous/next menu item.
Press and hold for fast scroll
Return to previous, higher level menu
Go to Home Menu
Select highlighted menu item
Like current station/track (add to Dynamic Favorites list)
Dislike current station/track (remove from Dynamic Favorites list)
Skip back through track, album or
playlist
Backspace (delete last character)
Play selected station/track, or Pause currently playing station/track
Skip forward through track (press and hold), or skip tracks in album or
playlist (press)
Stop Play
Repeat track (press once)
Repeat all tracks in album or playlist (press twice)
Open Internet Radio menu
Open Configuration Menu (see Note 2)
Shuffle-play current album/playlist
WorldRadio Remote Control
Note: Gray shading denotes key is inactive in Configuration Mode
Note 1) These keys can be used to scroll through all characters in Edit mode, but the keypad is usually a quicker
method.
Note 2) If pressed while editing, a screen appears asking if you want to Discard Changes. ‘No’ returns to Edit mode,
‘Yes’ performs the normal function of the button.
PDF Created with deskPDF PDF Writer - Trial :: http://www.docudesk.com
9
2.2 Turning on Your WorldRadio for the First Time
Preparing the WorldRadio for operation:
1. Place the WorldRadio at a flat surface.
2. Remove the packaging materials.
3. Place the WorldRadio at a location close to Ethernet LAN access.
4. Insert the batteries provided into the Remote Control device.
5. If you are accessing the Internet via wired Ethernet LAN, please proceed to 2.2.1 Connection via Wired
Configuration (LAN).
6. If you are accessing the Internet via wireless LAN, please proceed to 2.2.2 Connection via Wireless
Configuration (WLAN).
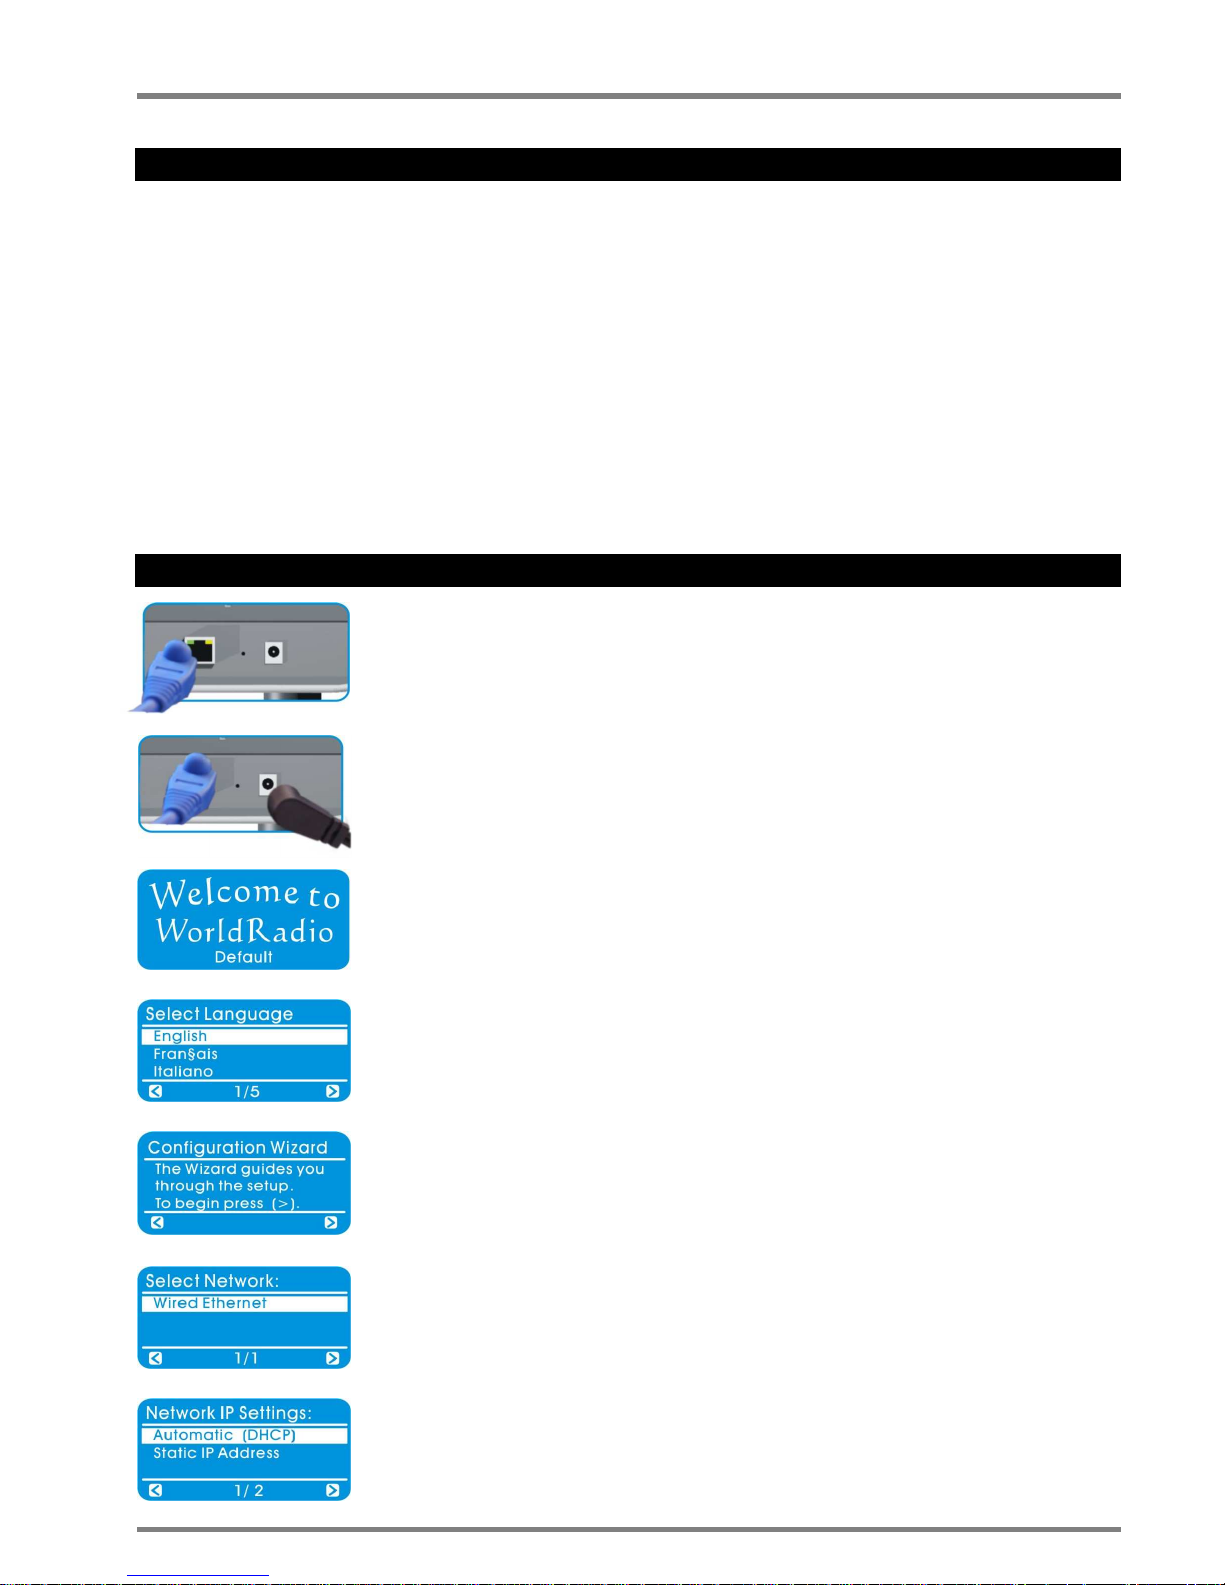
2.2.1 Connection via Wired Configuration (LAN)
1. You may access the Internet Broadband Network by plugging Ethernet Cable to the
back of the WorldRadio.
2. Connect the power cable to the WorldRadio and connect it to the power supply.
3. Wait for the WorldRadio to power up (it will take about 20 sec. to turn on for the first
time); and then the welcome message will be displayed.
4. When the WorldRadio is turned on for the first time, the Language menu will be
displayed. You may select the Language by rotating the TUNE knob clockwise or
counterclockwise; and then press the TUNE knob to select your language preference.
5. The WorldRadio will now start the Configuration Wizard. Press the TUNE knob to
proceed.
6. Press the TUNE knob again to enter the Wired Ethernet LAN setting.
7. Press the TUNE knob to select the Automatic (DHCP) for Network IP address setting.
PDF Created with deskPDF PDF Writer - Trial :: http://www.docudesk.com
10
8. Select NO option for proxy server and then press the TUNE knob.
9. Press the TUNE knob again to apply the Settings.
10. Your WorldRadio is now configuring.
11. The network setting is completed and ready to play music!
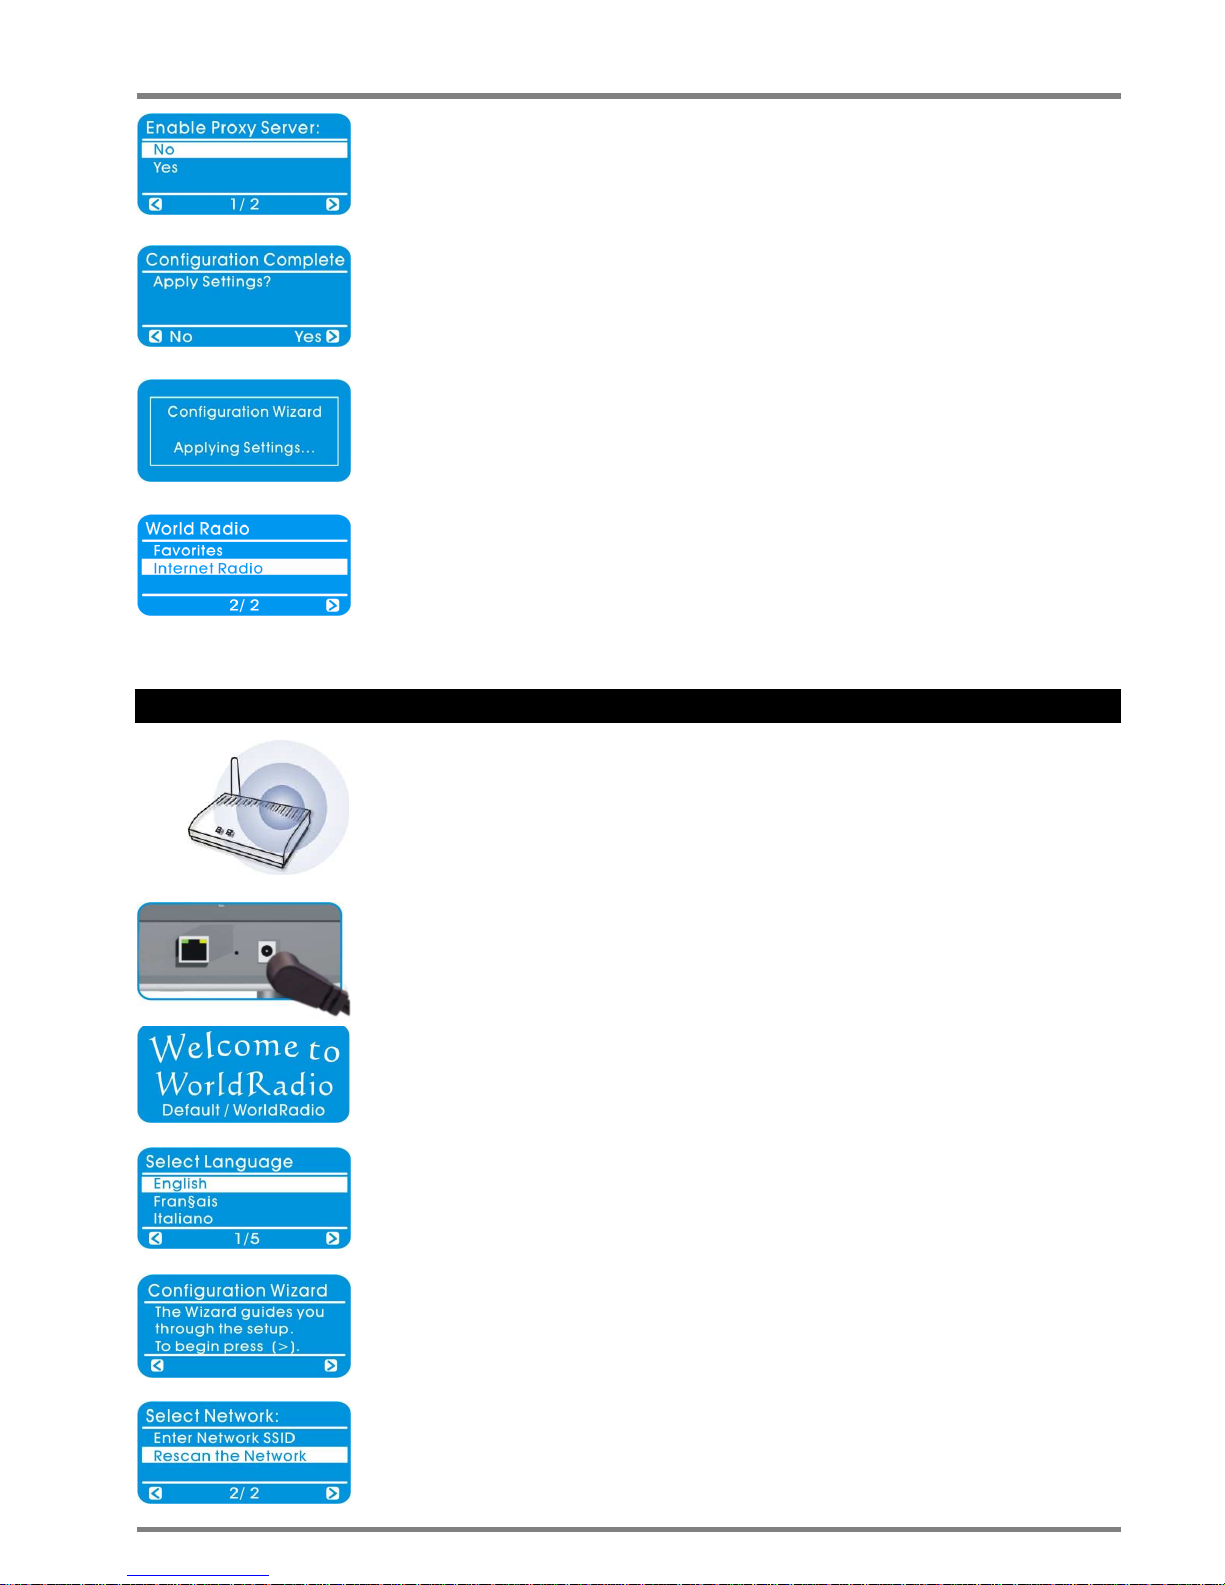
2.2.2 Connection via Wireless Configuration (WLAN)
1. You may access the Internet Broadband Network wirelessly if you have a wireless
Access Point in your location and you are authorised to use it.
2. Connect the power cable to the WorldRadio and connect it to the power supply.
3. Wait for the WorldRadio to power up (it will take about 20 sec. to turn on for the first
time); and then the welcome message will be displayed.
4. When the WorldRadio is turned on for the first time, the Language menu will be
displayed. You may select the Language by rotating the TUNE knob clockwise or
counterclockwise; and then press the TUNE knob to select your language preference.
5. The WorldRadio will now start the Configuration Wizard. Press the TUNE knob to
proceed.
6. Press the TUNE knob again to enter the Wireless Ethernet LAN setting.
PDF Created with deskPDF PDF Writer - Trial :: http://www.docudesk.com
11
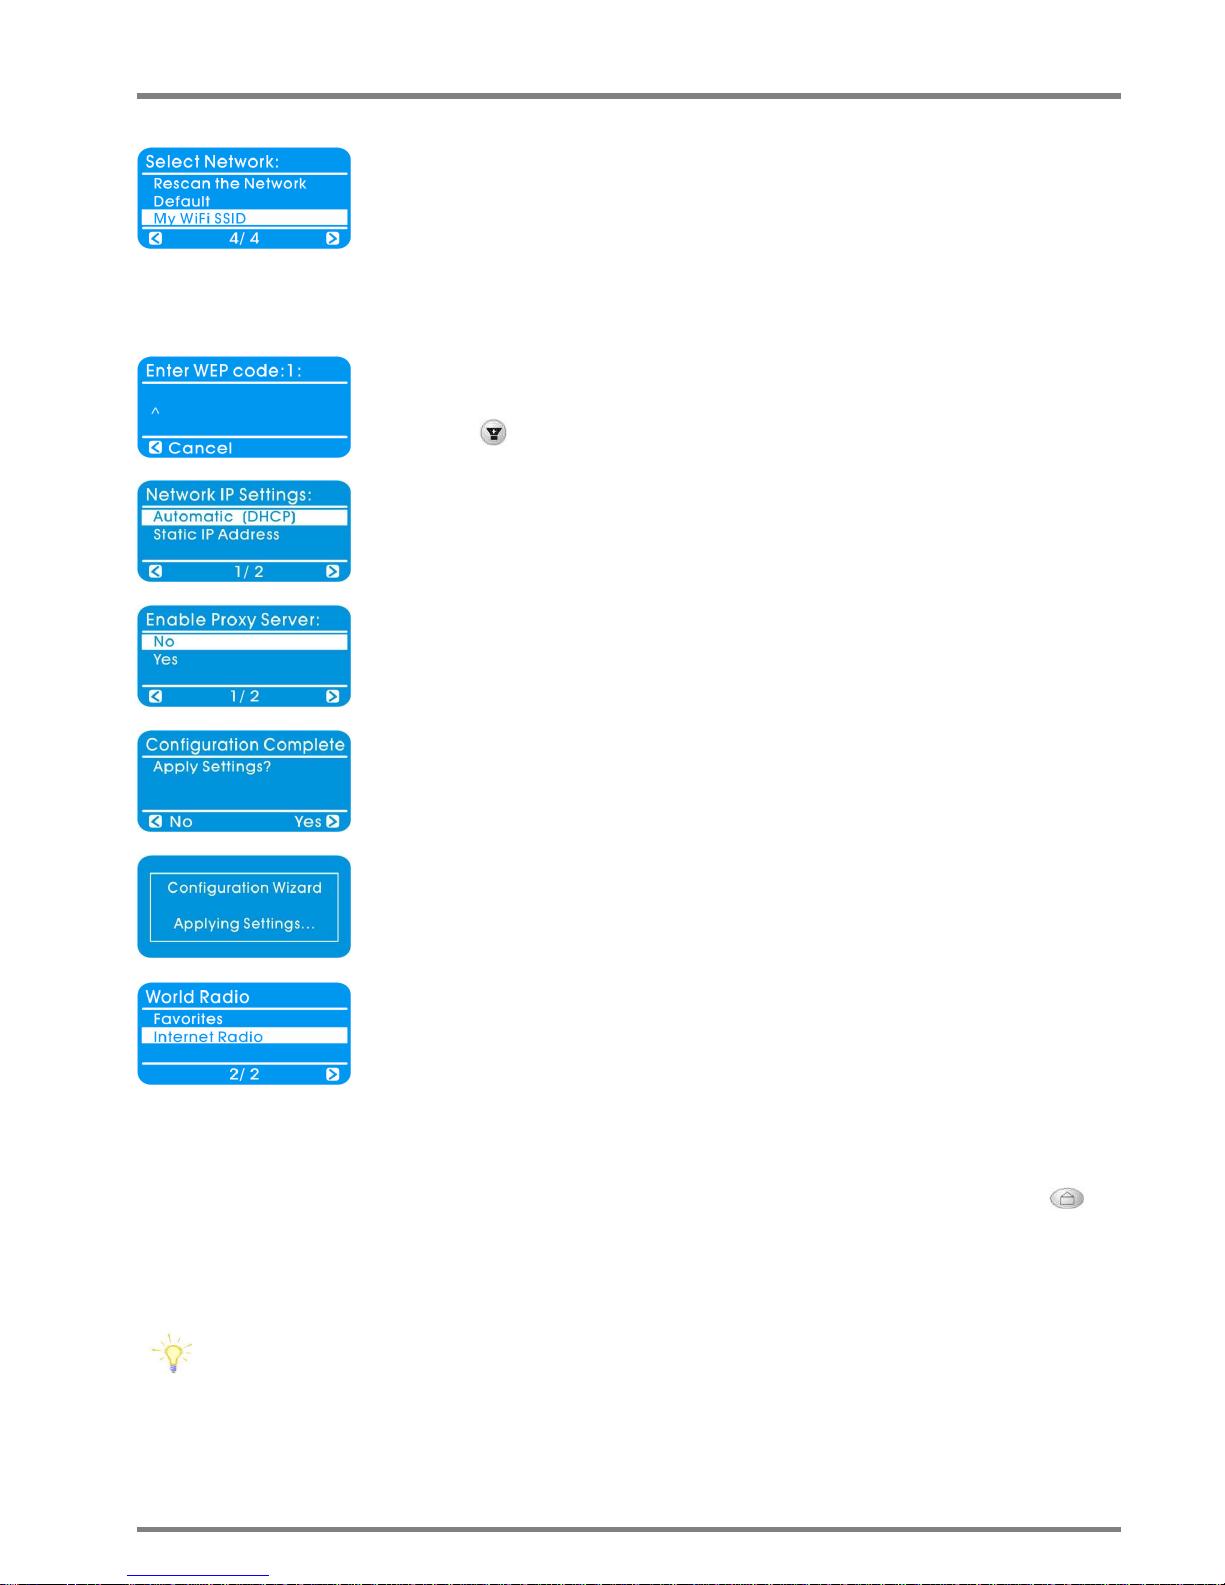
7. Please select your Access Point name then press the TUNE knob to enable your
selection. Note: If you cannot see your Access Point's name on the list, please select
"Rescan the Network" to search for your authorised Access Point.
(In this example, “My WiFi SSID” is your Access Point of choice)
Hint: If your wireless LAN is encrypted, then proceed with step #8; otherwise, proceed
to step #9.
8. Password setting. You will be prompted to enter a valid WEP code (with the Remote
Control for the entry).
Tip: use to switch upper/lower-case letters (with the Remote Control).
9. Press the TUNE knob to select the Automatic (DHCP) for Network IP address setting.
10. Select NO option for proxy server and then press the TUNE knob.
11. Press the TUNE knob again to apply the Settings.
12. Your WorldRadio is now configuring.
13. The network setting is completed and ready to play music!
Congratulations! Your WorldRadio is now set properly.
The welcome message will be displayed; you may select radio stations from the Home Menu by pressing the
button on the front panel of the WorldRadio. Then select “Internet Radio” by pressing the TUNE knob to choose your
desired station through different modes of Genres or Countries. (Note: rotate the TUNE knob clockwise or
counterclockwise to select your preferred station in different Countries or Genres, and then press the TUNE knob to
select and listen to the station of your choice.)
You may store your preferred station by pressing and holding any of the “1”, “2”, “3”, or “4” PRESET key on the
WorldRadio’s front panel for 2 sec. You may then recall the stored station by pressing the corresponding
PRESET key. You may press the Standby button to enter the WorldRadio into the Standby mode before next
activation time.
PDF Created with deskPDF PDF Writer - Trial :: http://www.docudesk.com
 Loading...