

Page 1
1
Using Wolverine MovieMaker Pro
The Wolverine Movie Maker Pro will help you convert your old 8mm and Super 8 film into a
digital MPEG-4 movie file at 1080P/20 FPS.
NOTE : A USB Flash Drive is required to save your movie files.
The following is a step-by-step guide that will walk you through how to use the Movie Maker
Pro to convert your 8mm and Super 8 films.
Step –by –Step Guide
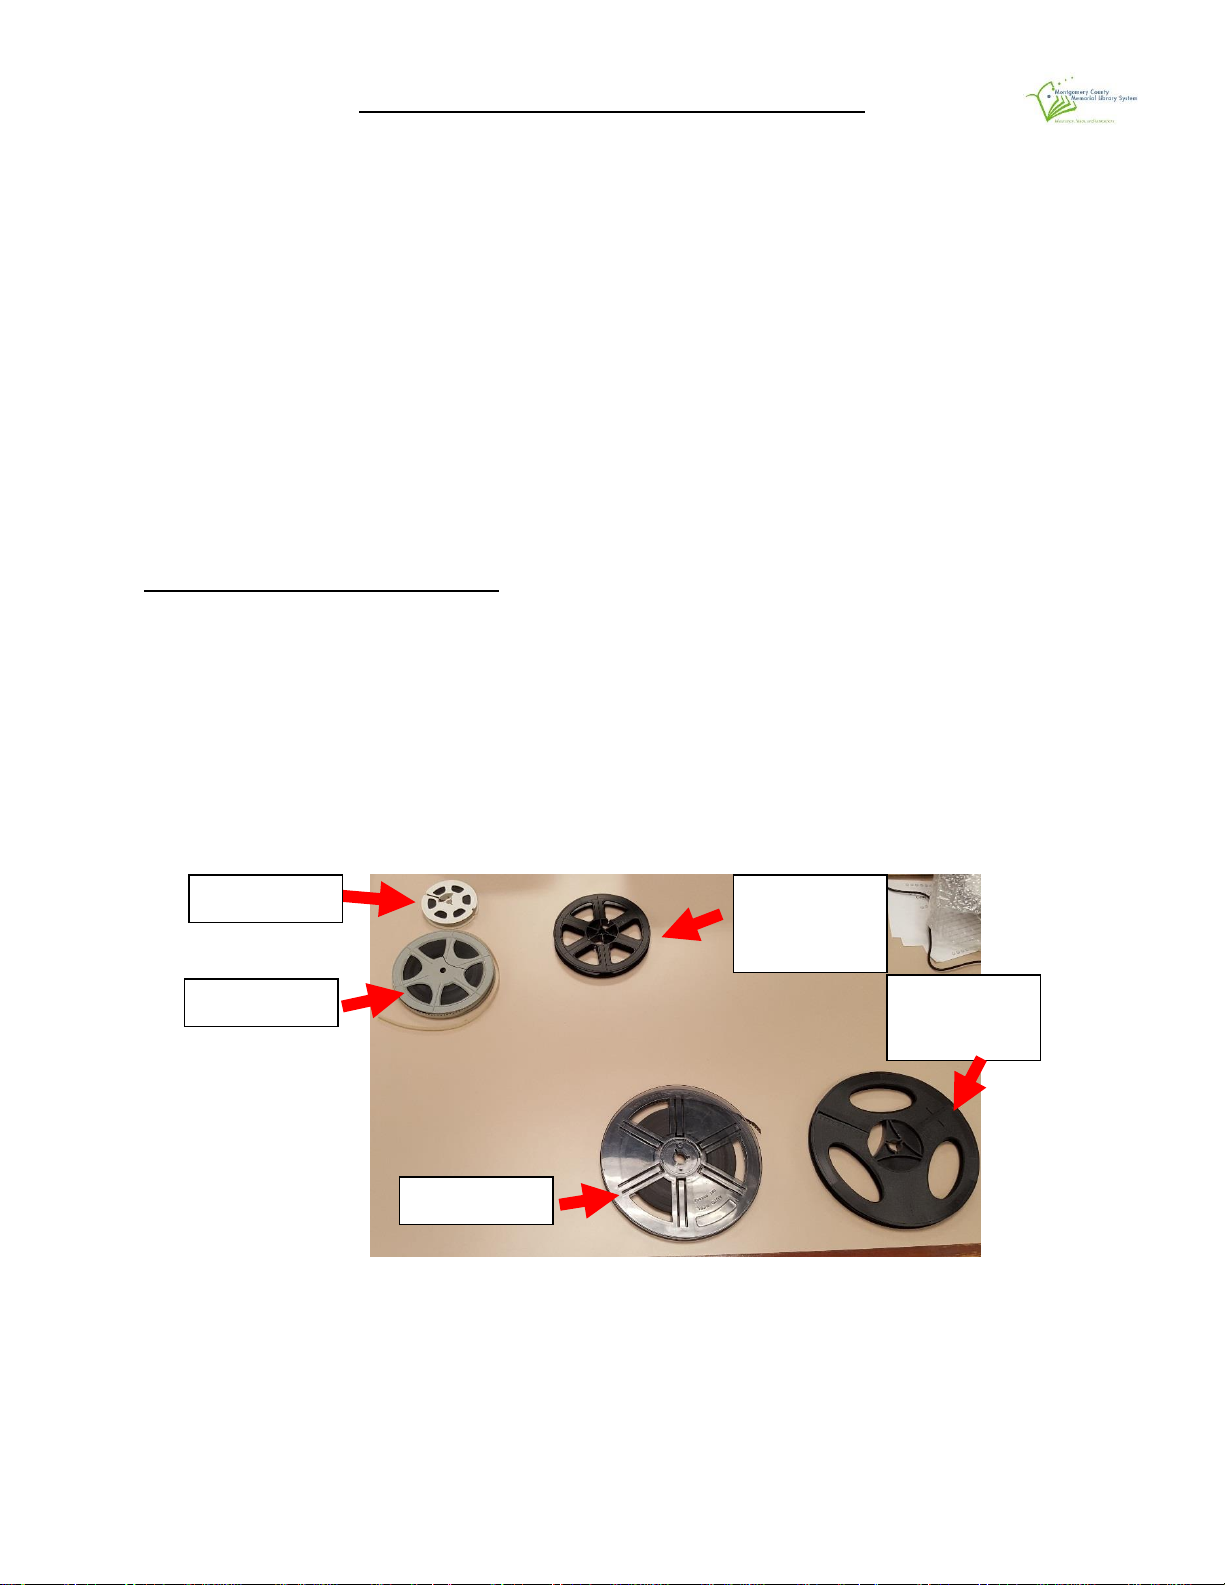
1. Determine which size take-up reel to use. Film reels come in three main sizes: 3 in, 5 in,
and 7 inch. If your film is 3 inches or 5 inches, use the 5 inch take up reel (smaller one). If
your film is on a 7 inch reel, use the 7 inch take up reel (larger one).
3 inch reel
5 inch reel
5 inch take
up reel
7 inch reel
7 inch take
up reel
Page 2
2
Note: The following table provides some approximate recording details for the three
film reel sizes:
Reel Size
Film length
How long to record
Run-time of Completed video
3 inch
50 ft
25-35 mins
2-3 mins
5 inch
200 ft
1hr 40 mins – 2.5 hours
12-15 mins
7 inch
400 ft
3.5 hours – 4 hours 40 mins
24-30 mins
Please use the above table when determining how long to make your
reservation. Daily reservations are limited to 5 hours per person, with
weekly reservations limited to 2 sessions per person.
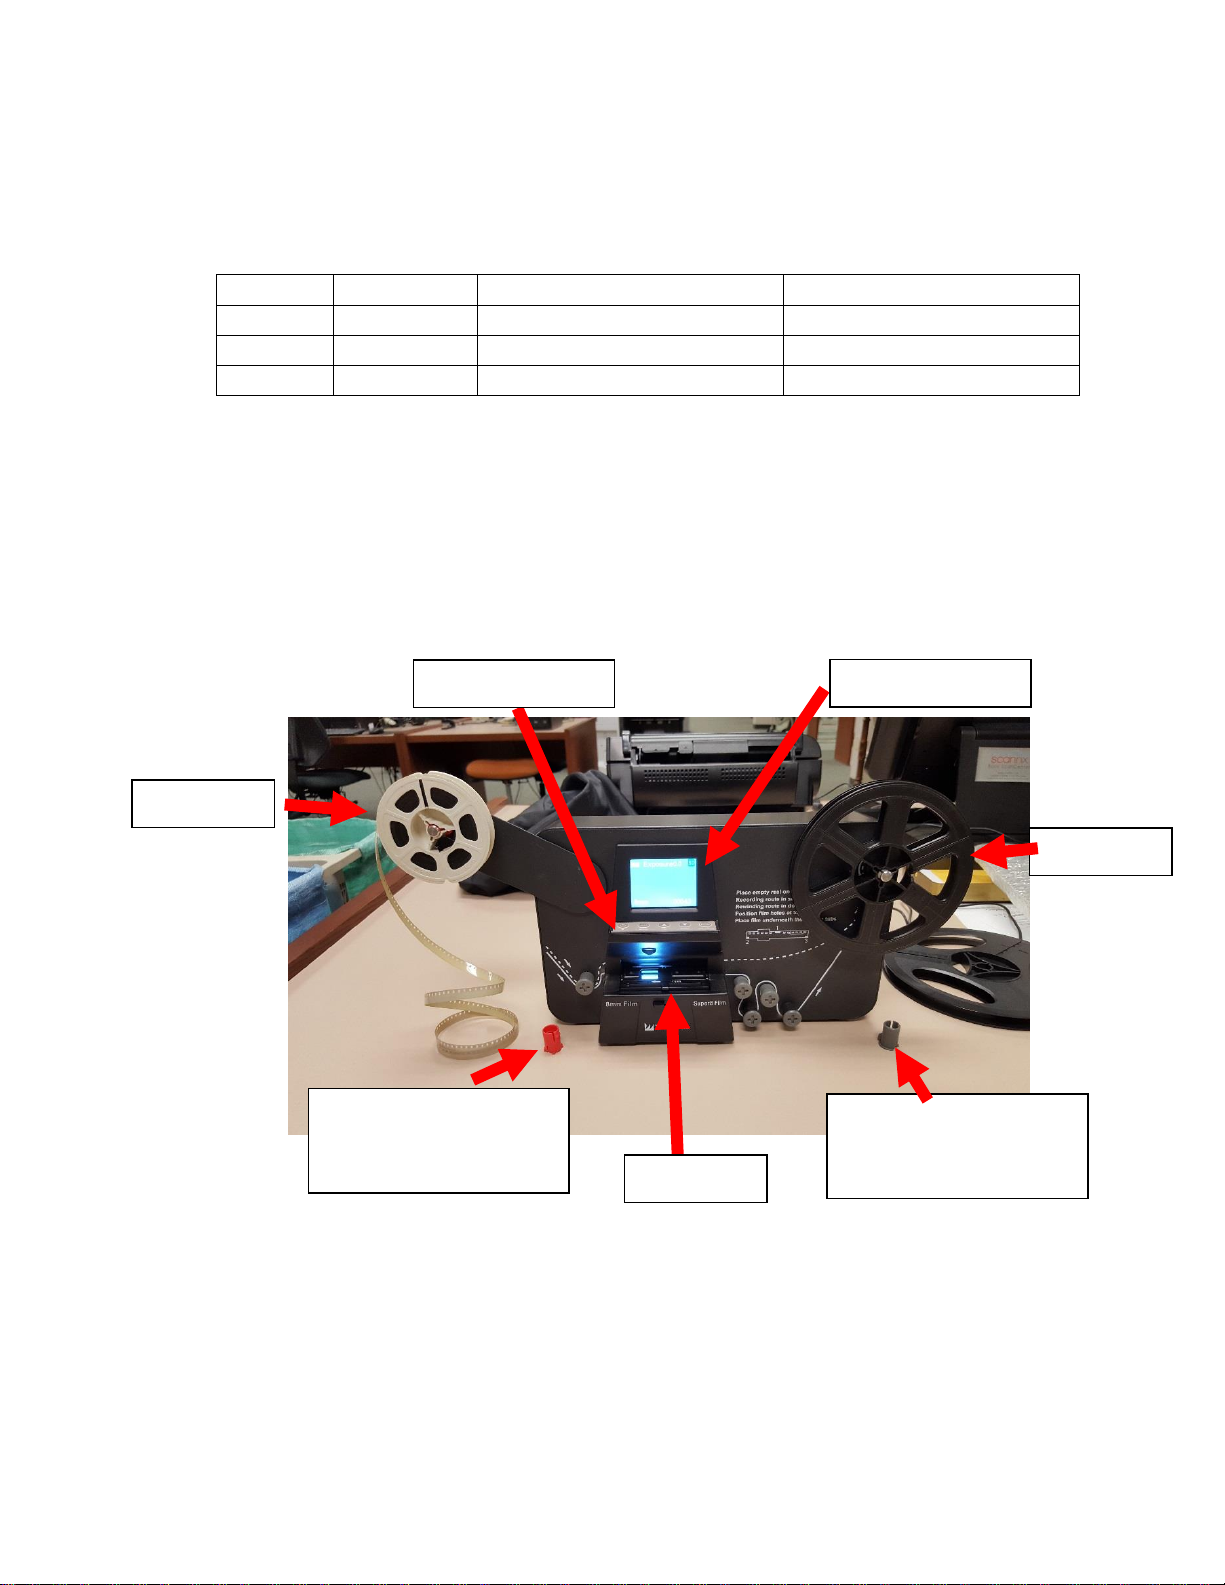
2. Familiarize yourself with the Movie Maker Pro machine
Source reel
Source side adapter
(needed for most Super 8
film reels)
Take up side adapter
(needed for rewinding
most Super 8 film reels)
Take up reel
Film bed
Display screen
Control Buttons
Page 3
3
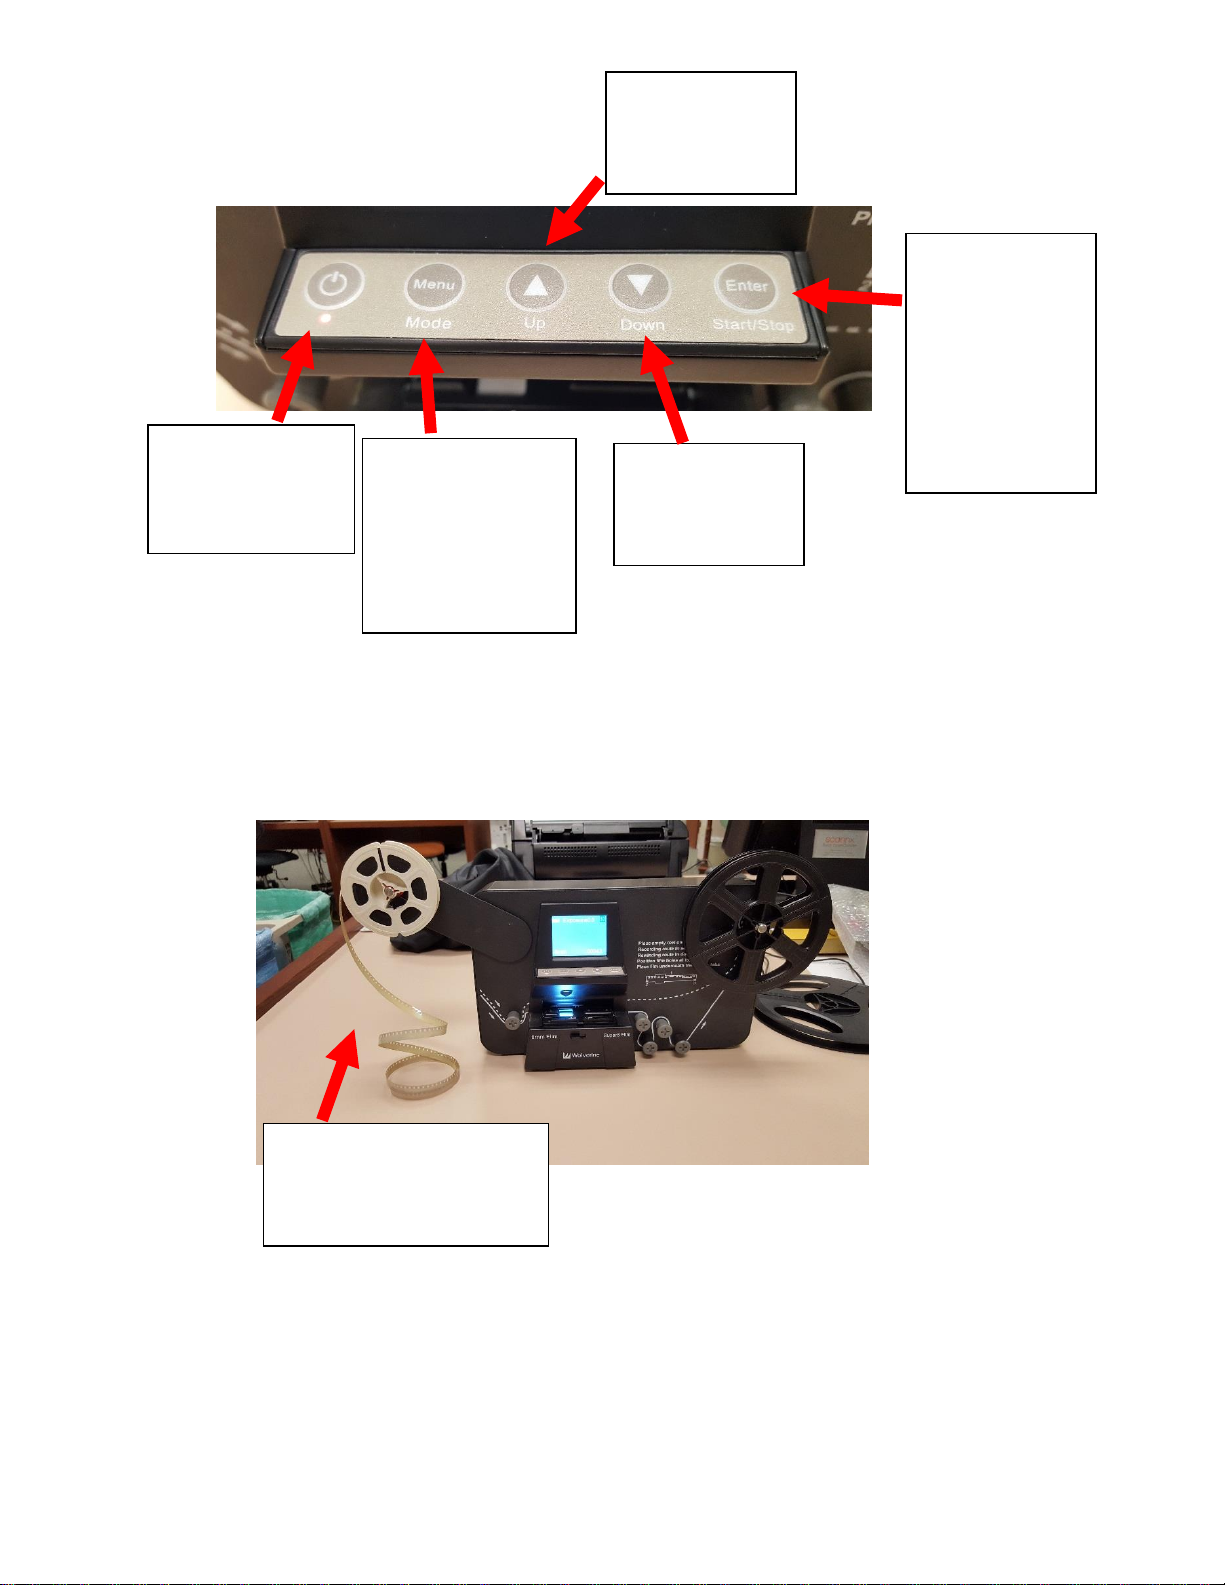
Zoomed view of Control Buttons:
3. Mount source reel onto the left-hand take up arm (red). Reel should be placed onto arm
so that the sprocket holes on the film strip are on the side closest to the MovieMaker
Pro (away from you). If source reel is installed backwards, it won’t advance
automatically and will need to be flipped.
POWER Button.
Turns machine on
and off
MENU Button.
Brings up selection
menu. Used as back
button when on
sub-menus
UP Button.
Moves selection
or value up
DOWN Button.
Moves selection
or value down
ENTER Button.
Use to select
option in menu
view and to start
/ stop recording
during recording
session
Holes facing towards
machine. Film tail coming
down from left of reel
Page 4
4
4. Press the POWER button to turn on MovieMaker Pro
5. Press the tab on the film door to the left to flip open the film door.
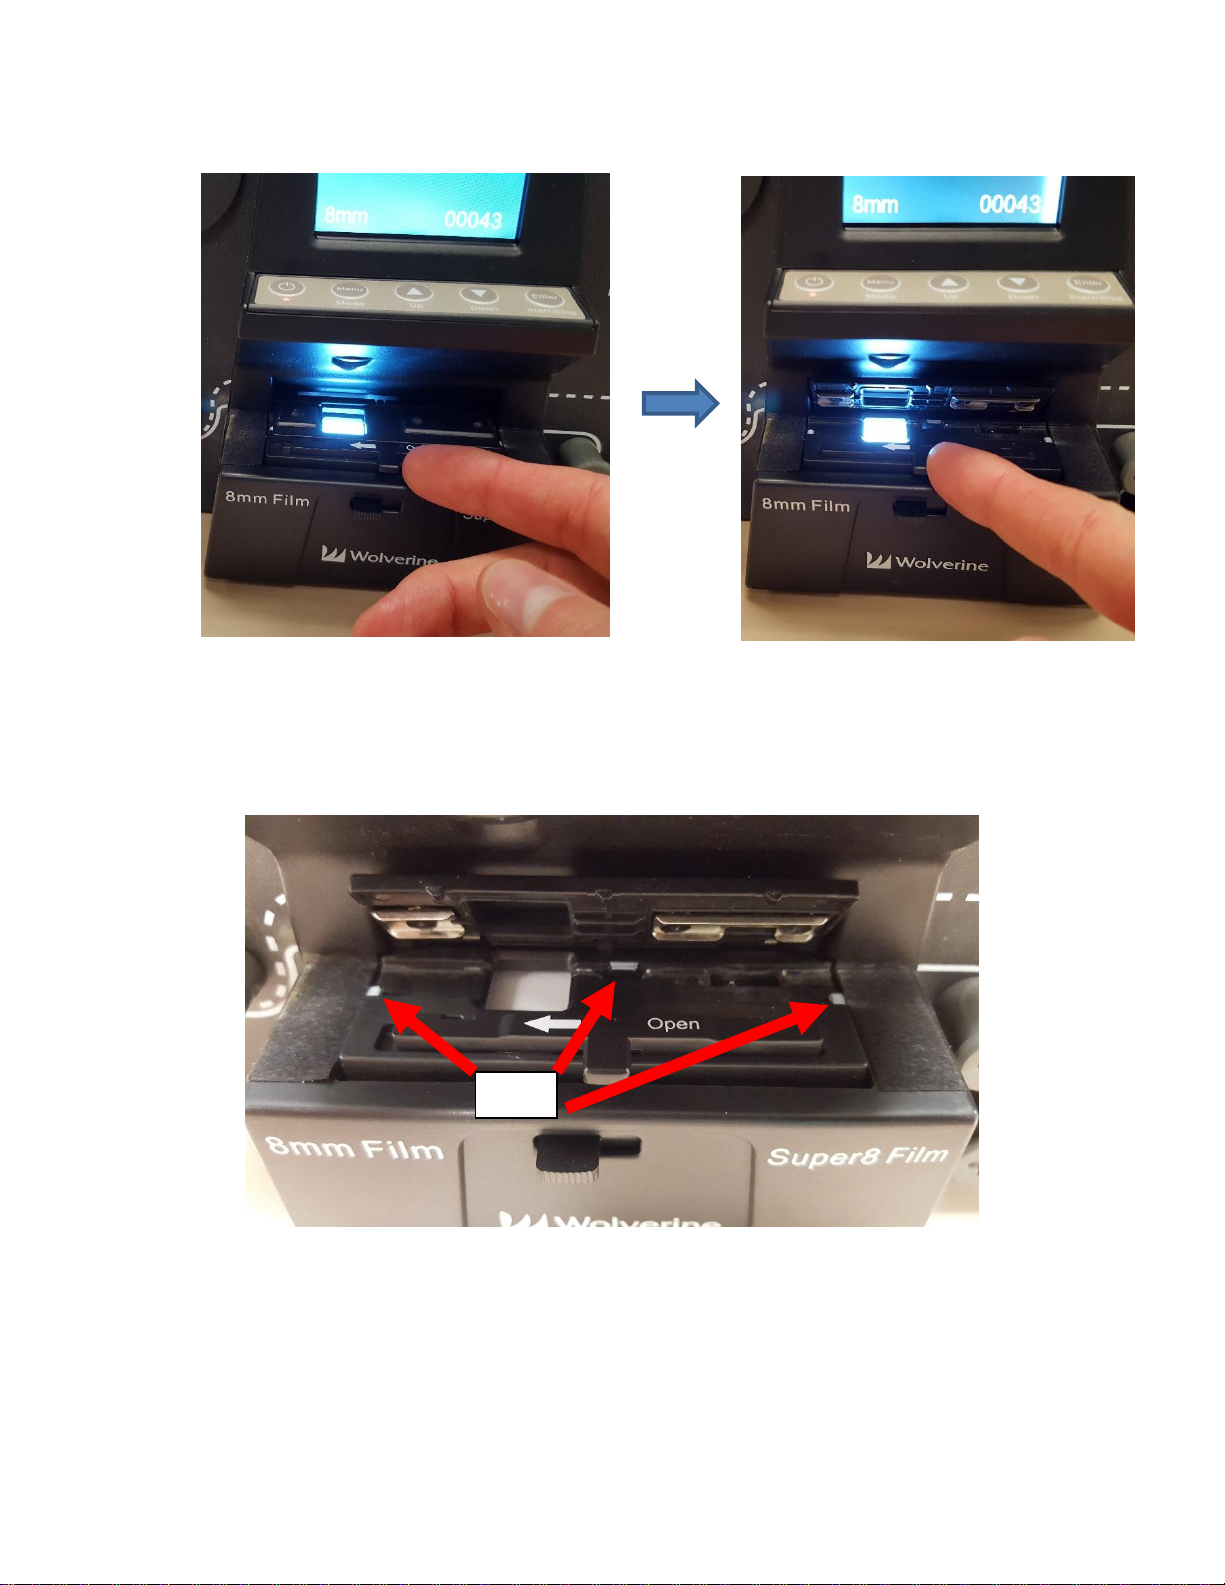
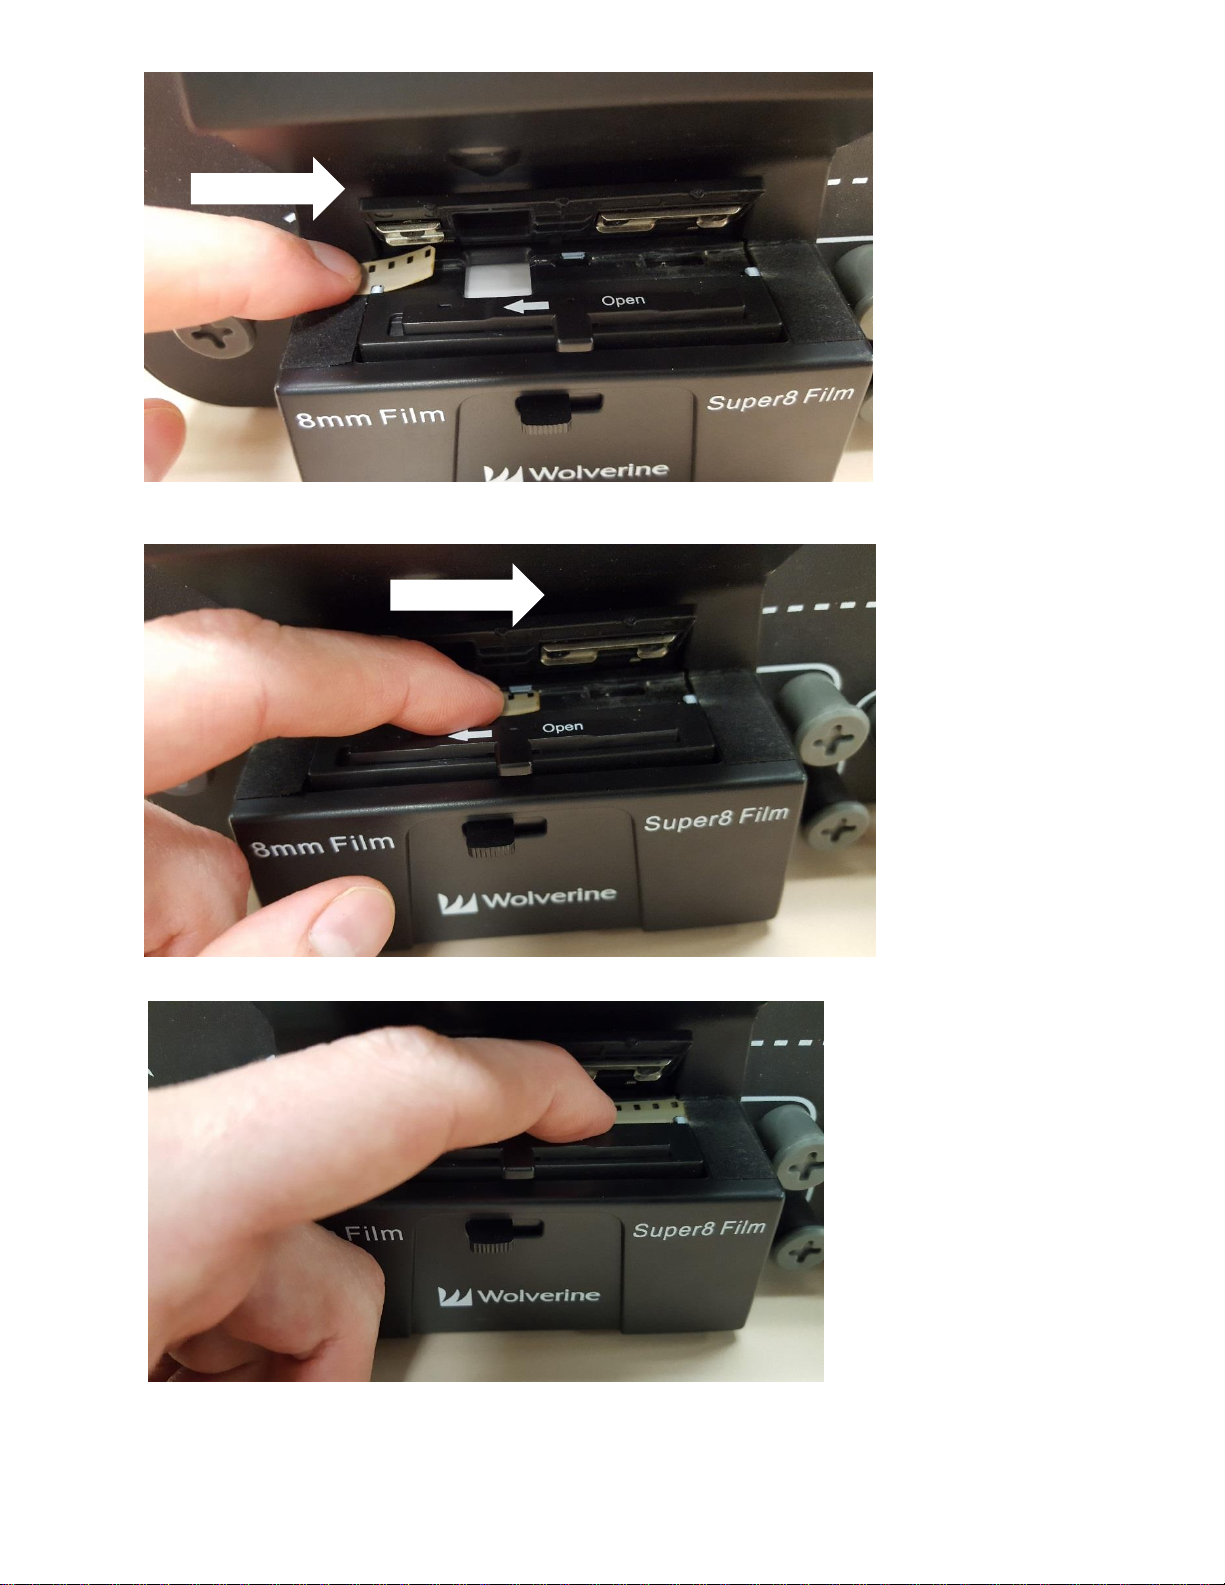
6. Thread the end of the film under the three silver tabs of film tray (one on left side of
film tray, one on the right side, and one in the middle). Make sure the film is properly
underneath all three tabs or the recorded videos will be jittery.
Tabs
Page 5
5
Slide film under left tab
Slide film under middle tab
Slide film under right tab
Page 6
6
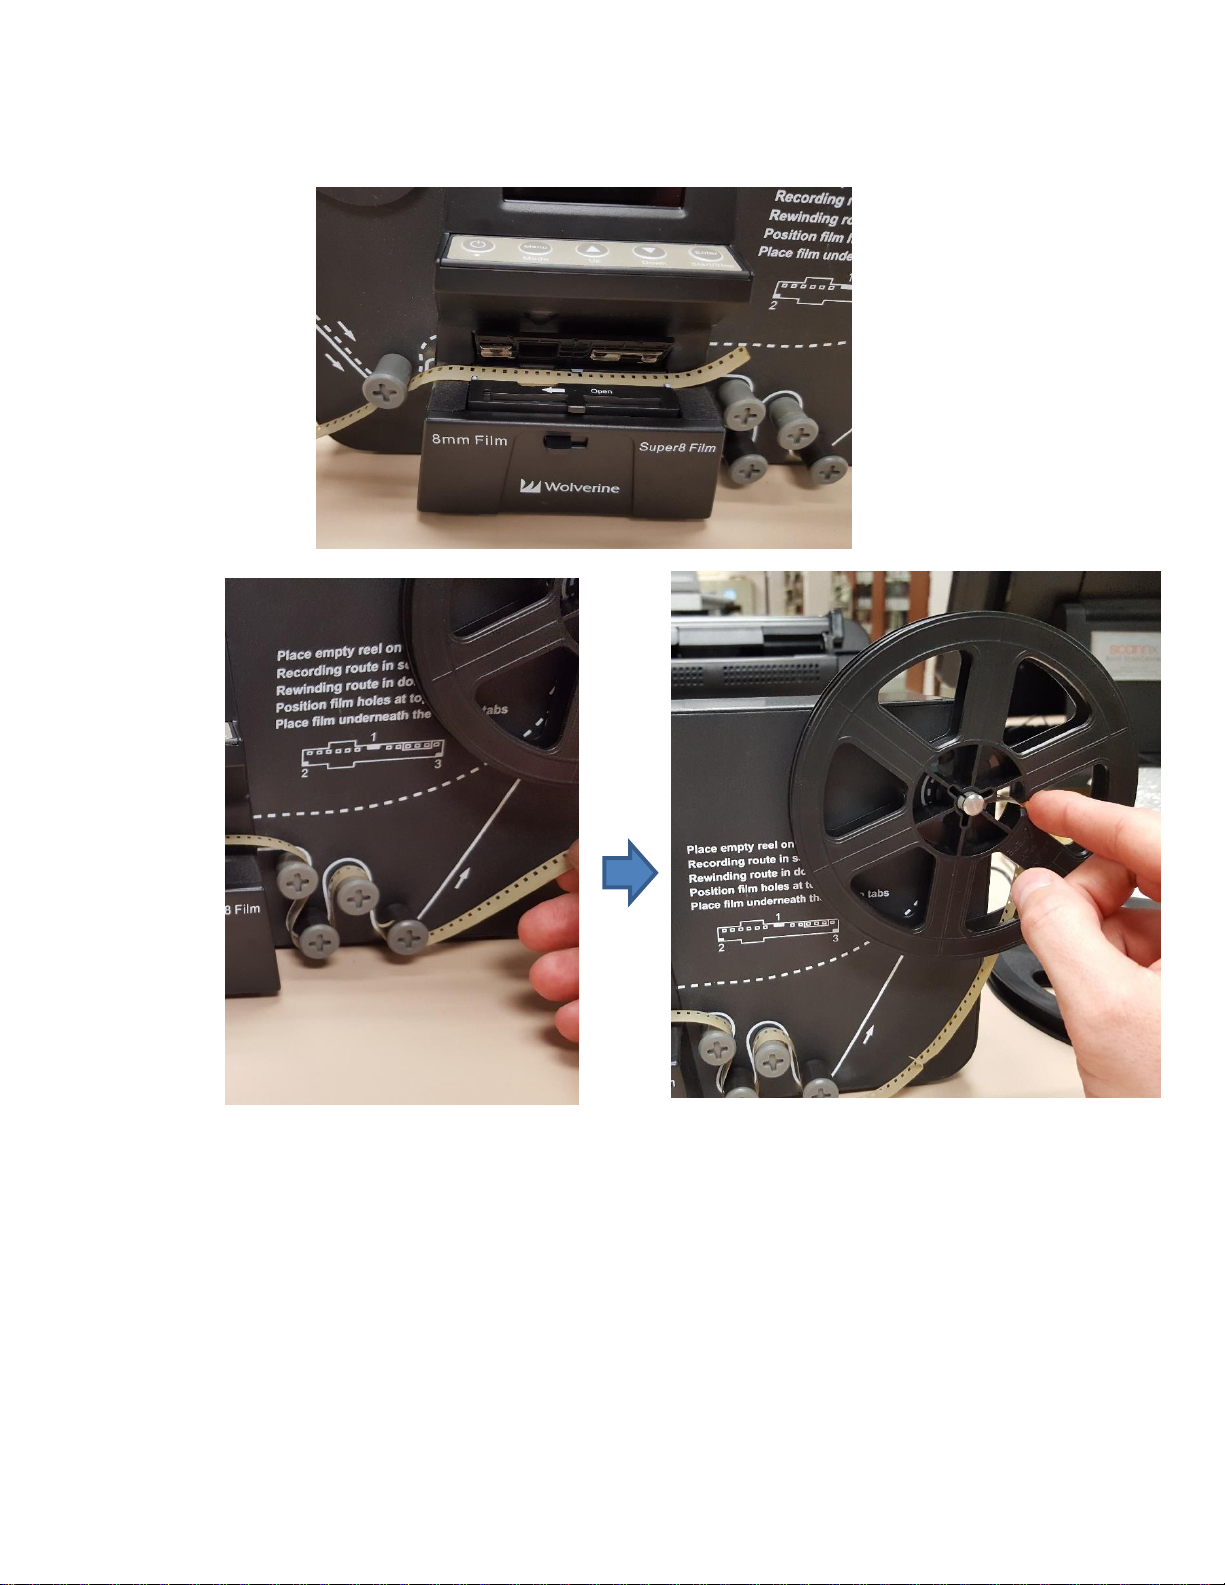
7. Loop film underneath knob on the left of the film tray. Then follow routing diagram to
loop film across and under the four knobs on the right side of the machine and onto the
take up reel. Wind film counter-clockwise a couple times to secure in place.
1. Loop under left knob next
2. Then follow solid routing diagram 3. Then place film into notch on take
across and under knobs on right up reel, winding counter-clockwise a
couple times
Page 7
7
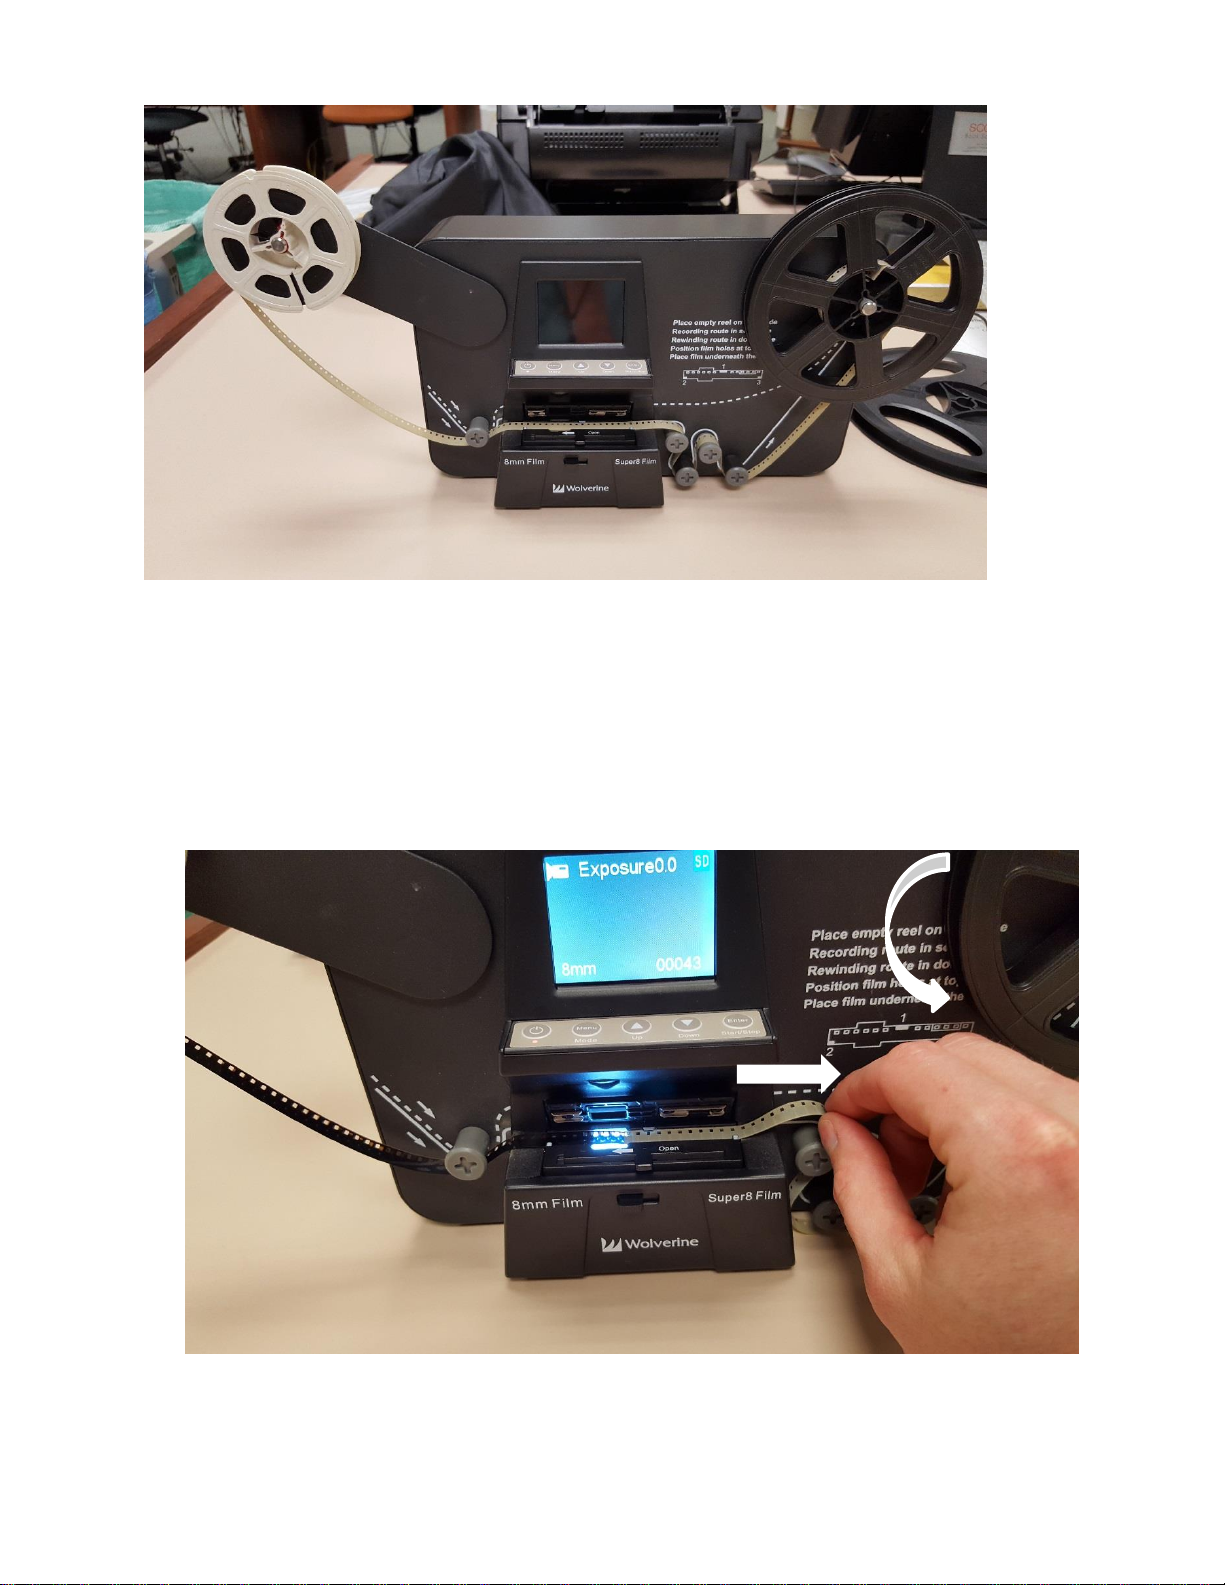
Double check the path of the film. Make sure film is still under 3 silver tabs and fix excess film
that may come off of source reel.
8. Carefully pull film manually from right side of film tray while winding excess film onto
the take up reel (right reel) until the first frames of the film and under the viewer
window.
Page 8
8
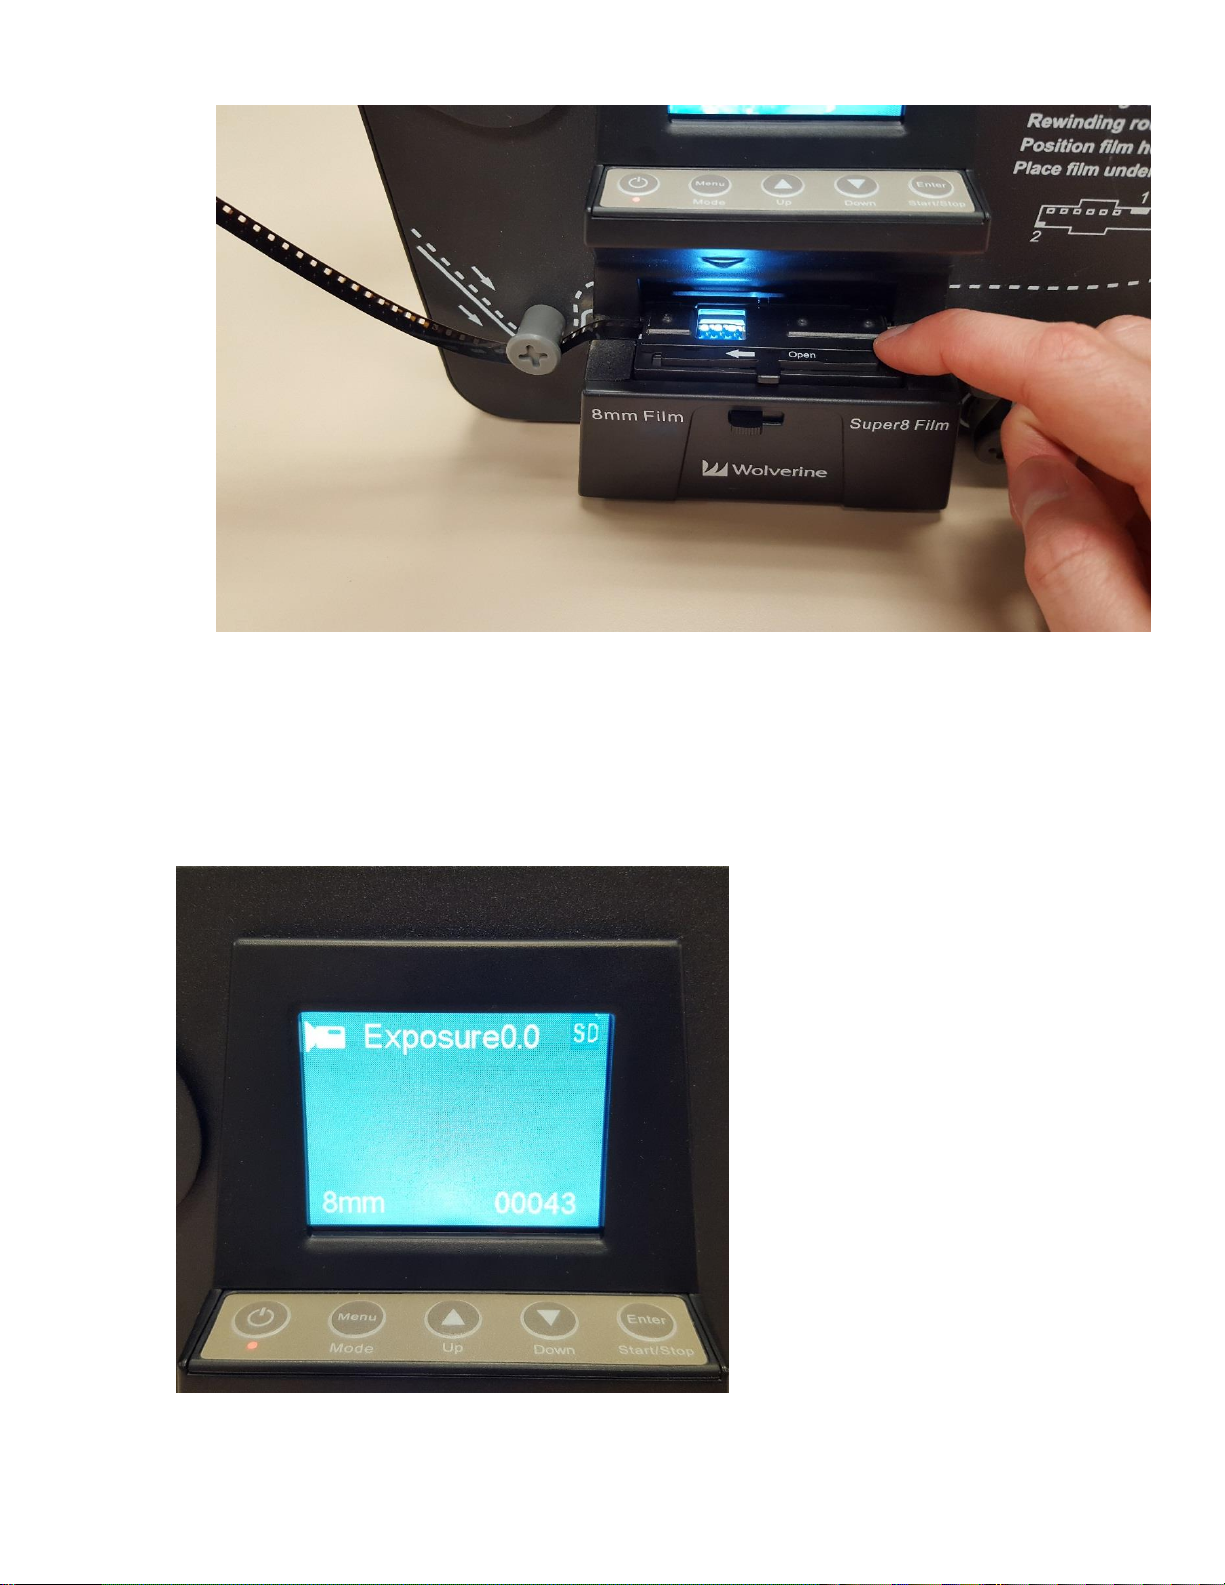
9. Close film tray down to secure film into place.
10. The first frame should show on the display screen. Alternately, you can connect the
Movie Maker Pro to the television set by connecting the black cable in the back to the
VIDEO OUT port on the MovieMaker Pro. Turn on the TV with the Panasonic remote and
change input to VIDEO 2. The unit display will go black and the image will appear on the
TV screen.
Page 9
9
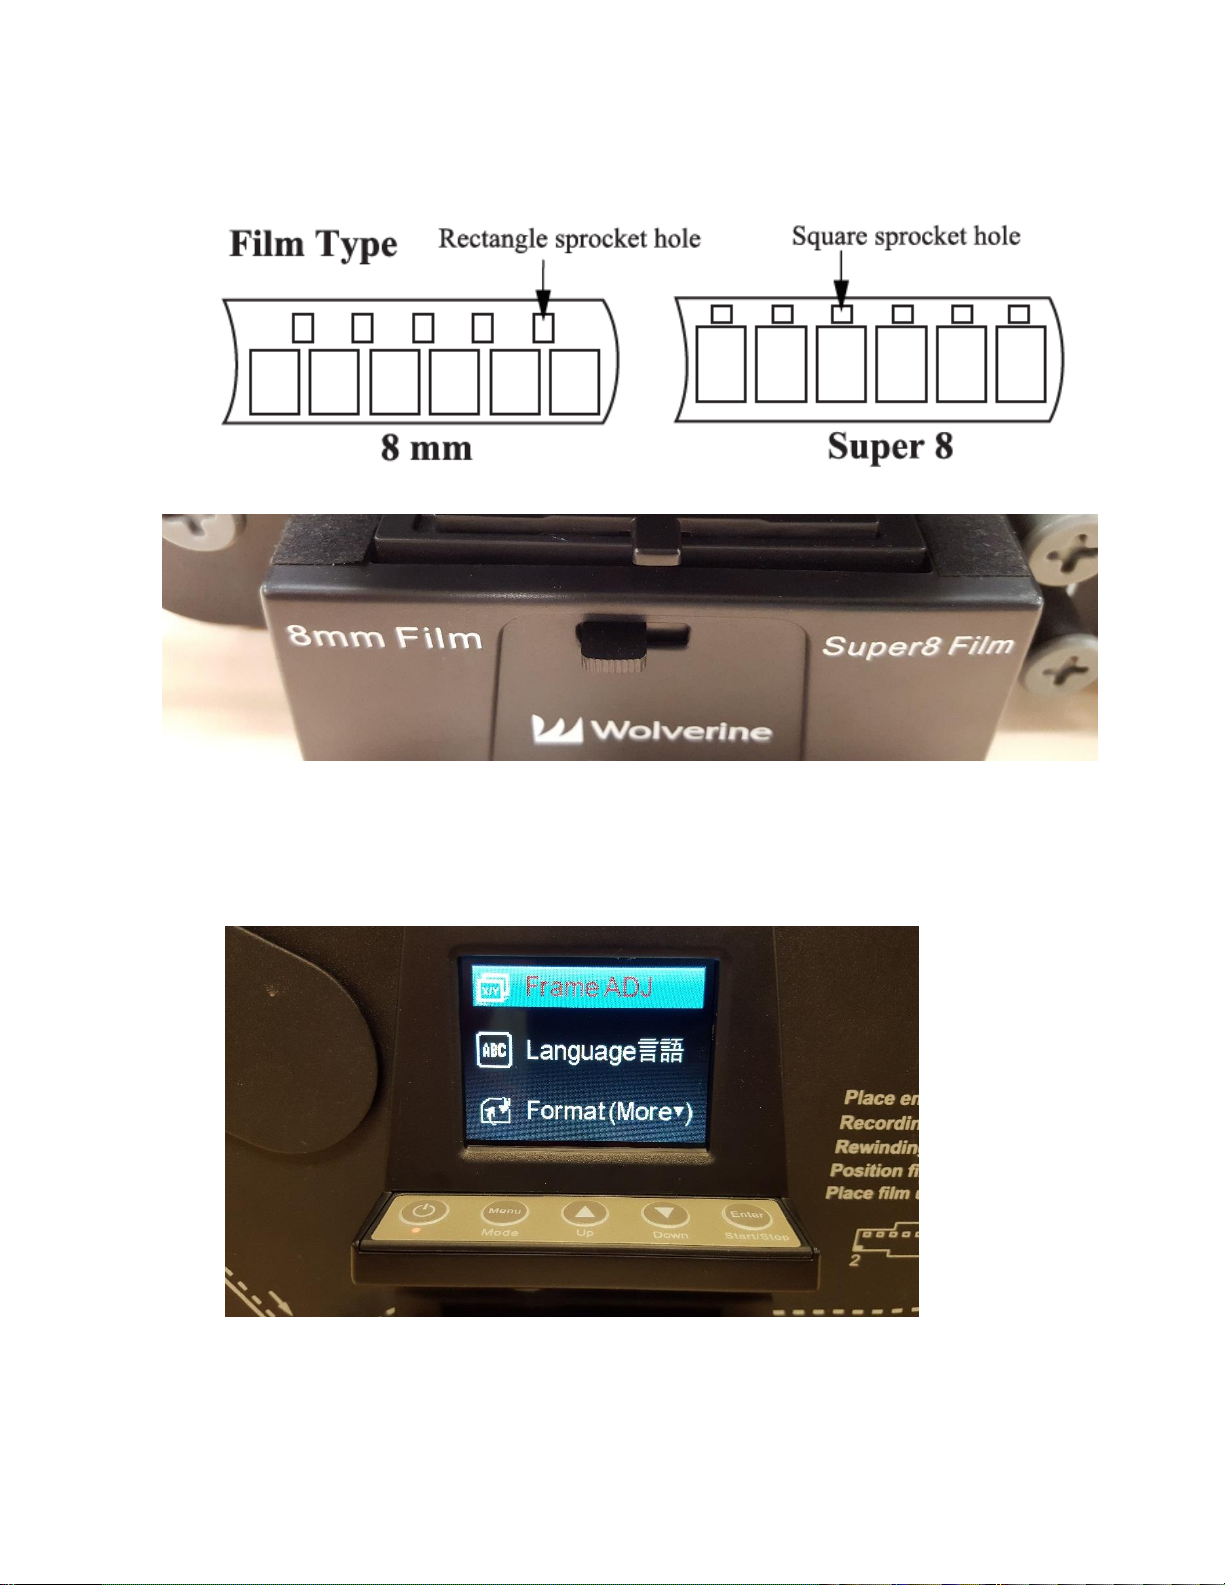
11. Determine whether the film is 8mm or Super 8. Use the guide below to determine, and
then push the tab on the front of the movie maker pro to match your film type (left for 8
mm, right for Super 8).
12. You’ll next want to verify that the frames are centered and adjust if needed. Click the
MENU button to bring up the menu, and click the DOWN arrow until FRAME ADJ is
selected. Then Click the ENTER button.
Page 10
10
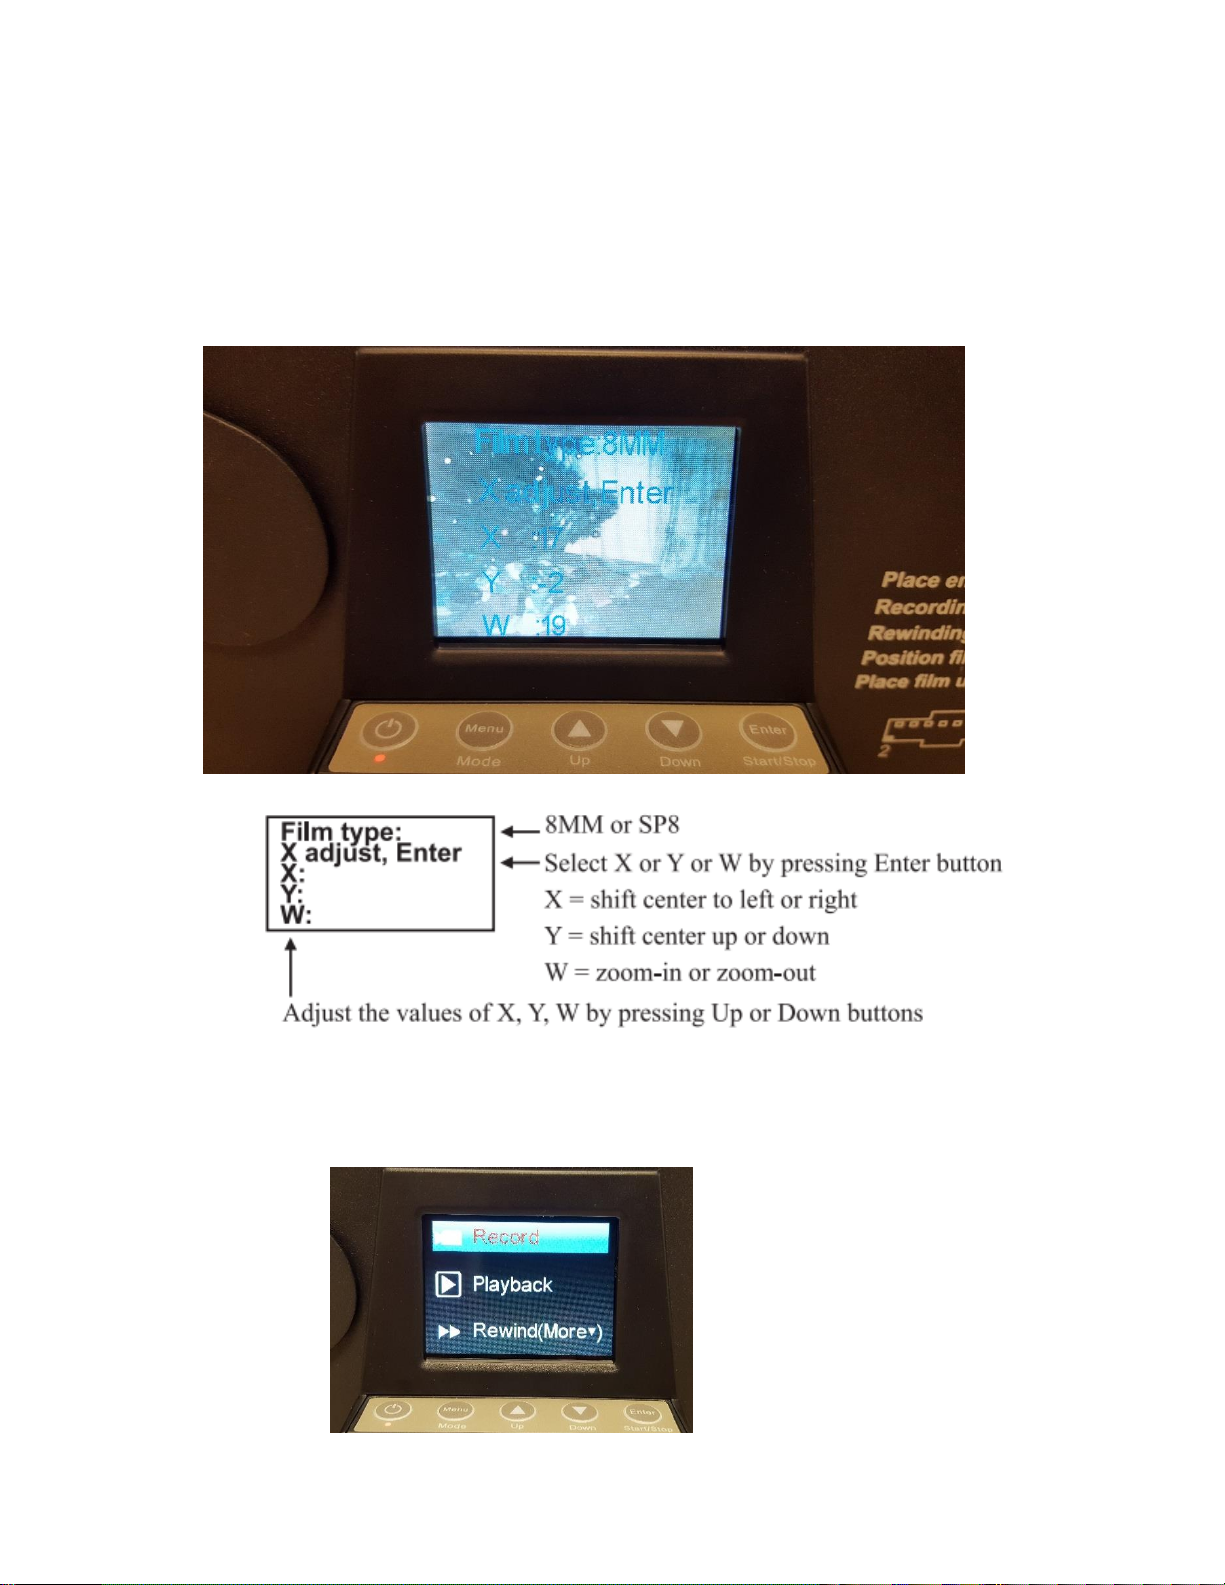
13. The film adjustment screen will appear. You can use the UP and DOWN arrow buttons to
adjust the values, and the ENTER button to switch between the X (left and right), Y, (up
and down) and W (Zoom in, out) values. Click ENTER until W adjust is selected and start
by zooming out. Then CENTER the frame in the screen using the X and Y values. Once
centered, Click ENTER again until W adjust is selected to zoom in until a single frame
appears on the viewer. Once adjustment is finished click the MENU button to exit out of
Frame adjust mode. The machine will cycle a few frames automatically.
14. You are now ready to begin the recording process. Click the MENU button and navigate
the selection to RECORD. Then press the ENTER button to select.
Page 11
11
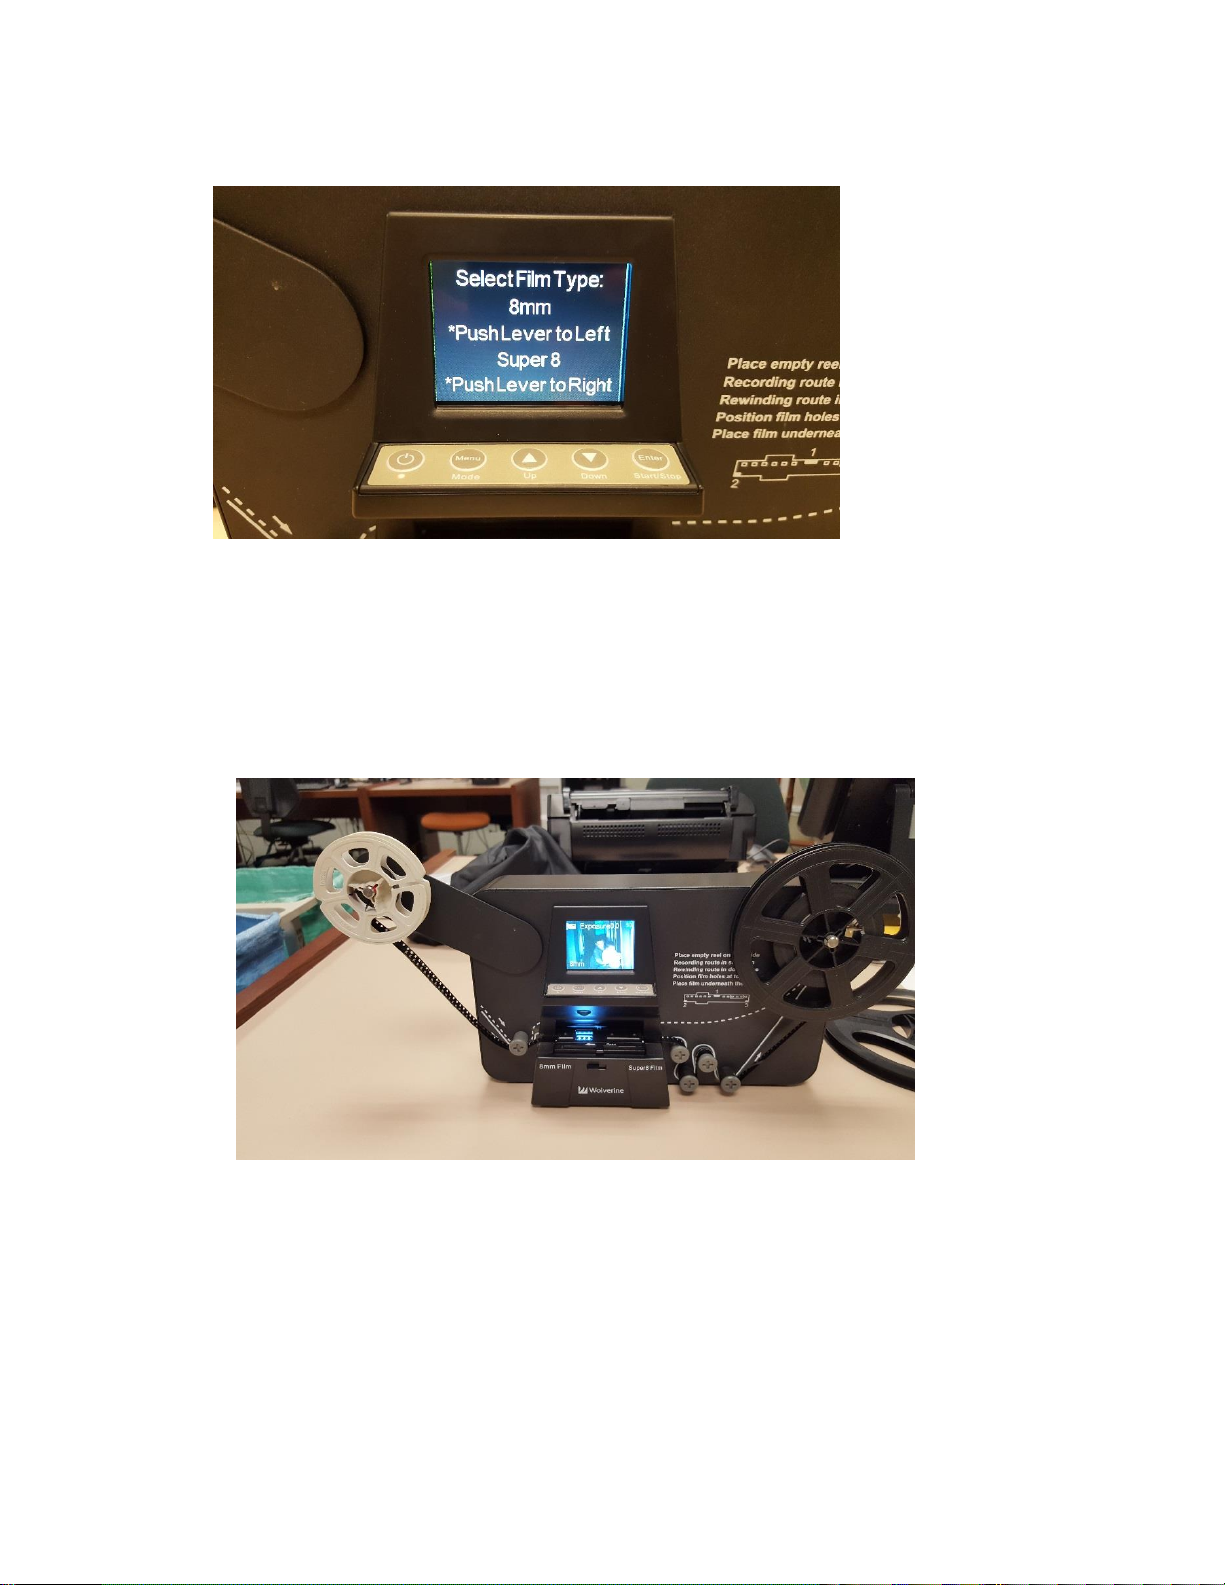
15. The screen below will appear. Verify you have the film type lever pushed the
appropriate way. Then click ENTER once more to begin the recording process.
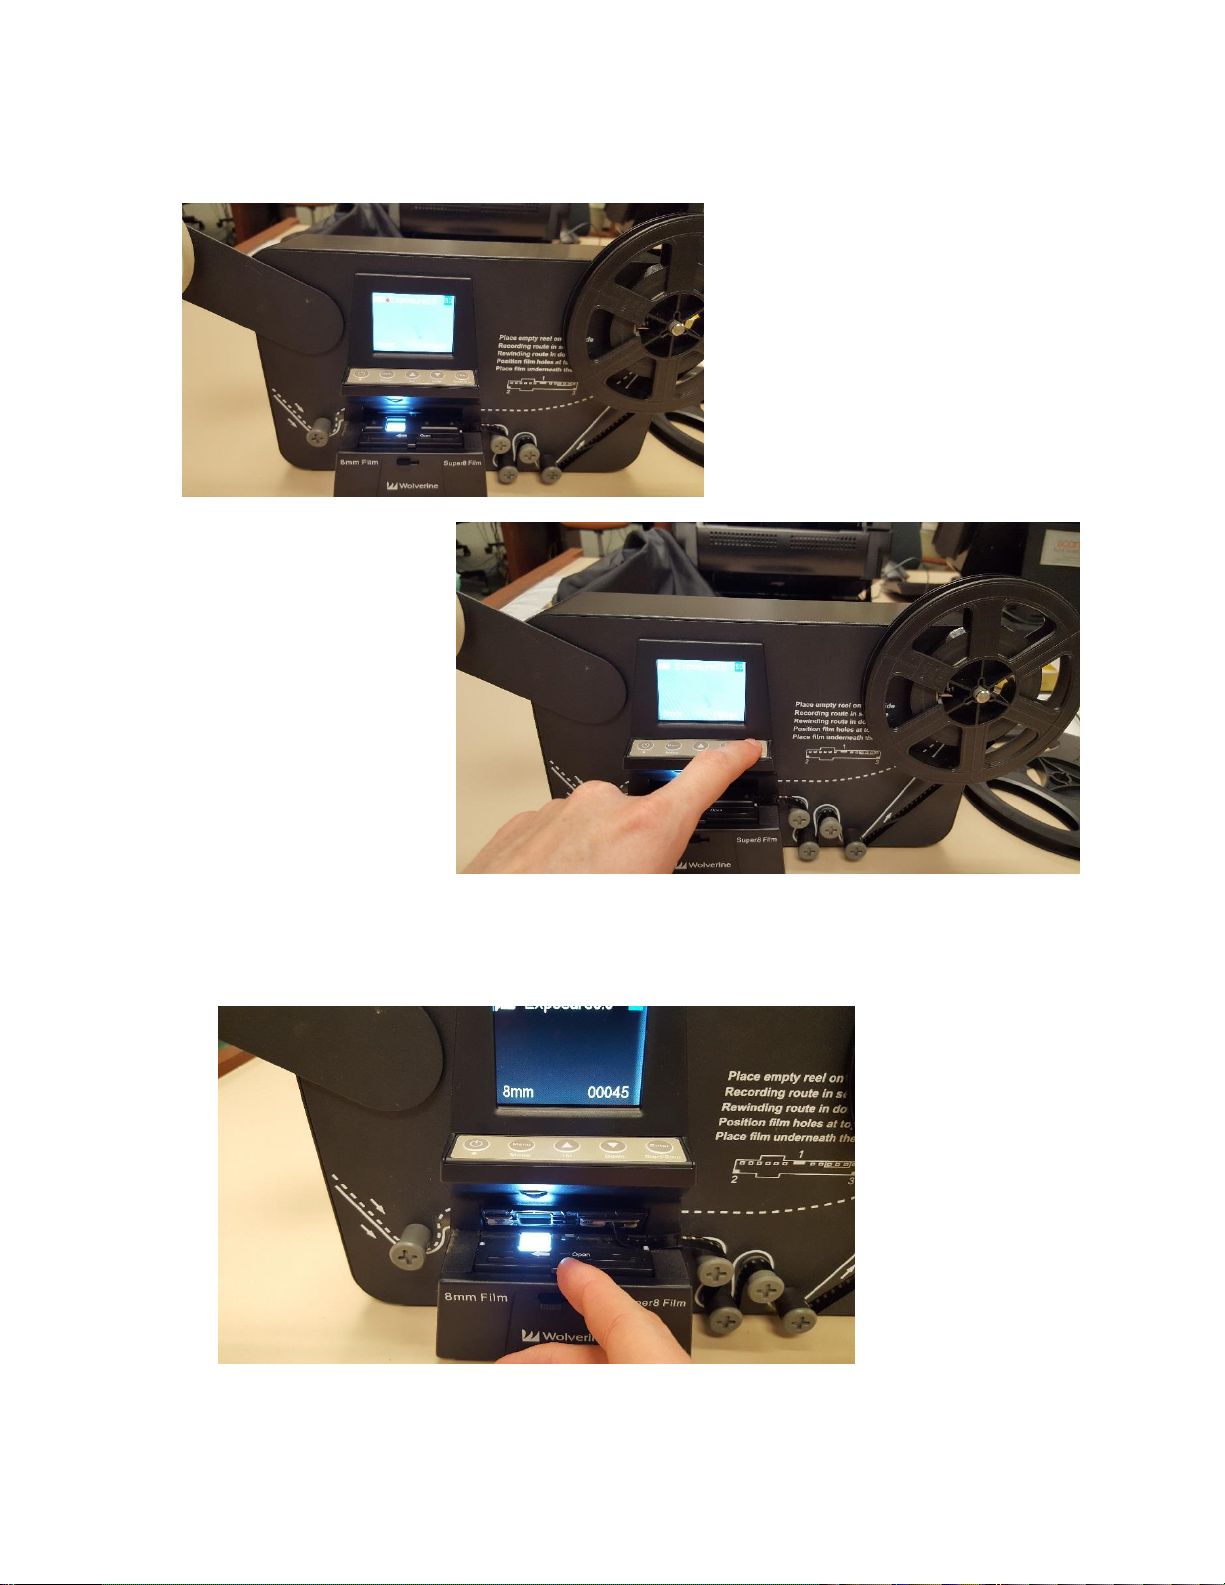
16. The film will automatically advance and record. If the film sticks you might need to stop
the recording process (CLICK ENTER AGAIN), open the film tray, and manually advance
the film a few frames. Close the film tray again and click ENTER to start the recording
process again. (NOTE : this will separate your film into two separate movie files. You can
use video editing software to merge them into a single movie later if you wish)
Page 12
12
17. Film will progress until it reaches the end of the film strip. If the MovieMaker Pro
doesn’t stop automatically, press the ENTER Button to stop the recording process.
18. Press the film tray lever to the left to open film tray. Pull free any remaining film from
beneath the film tray. Then close the film tray door.
Page 13
13
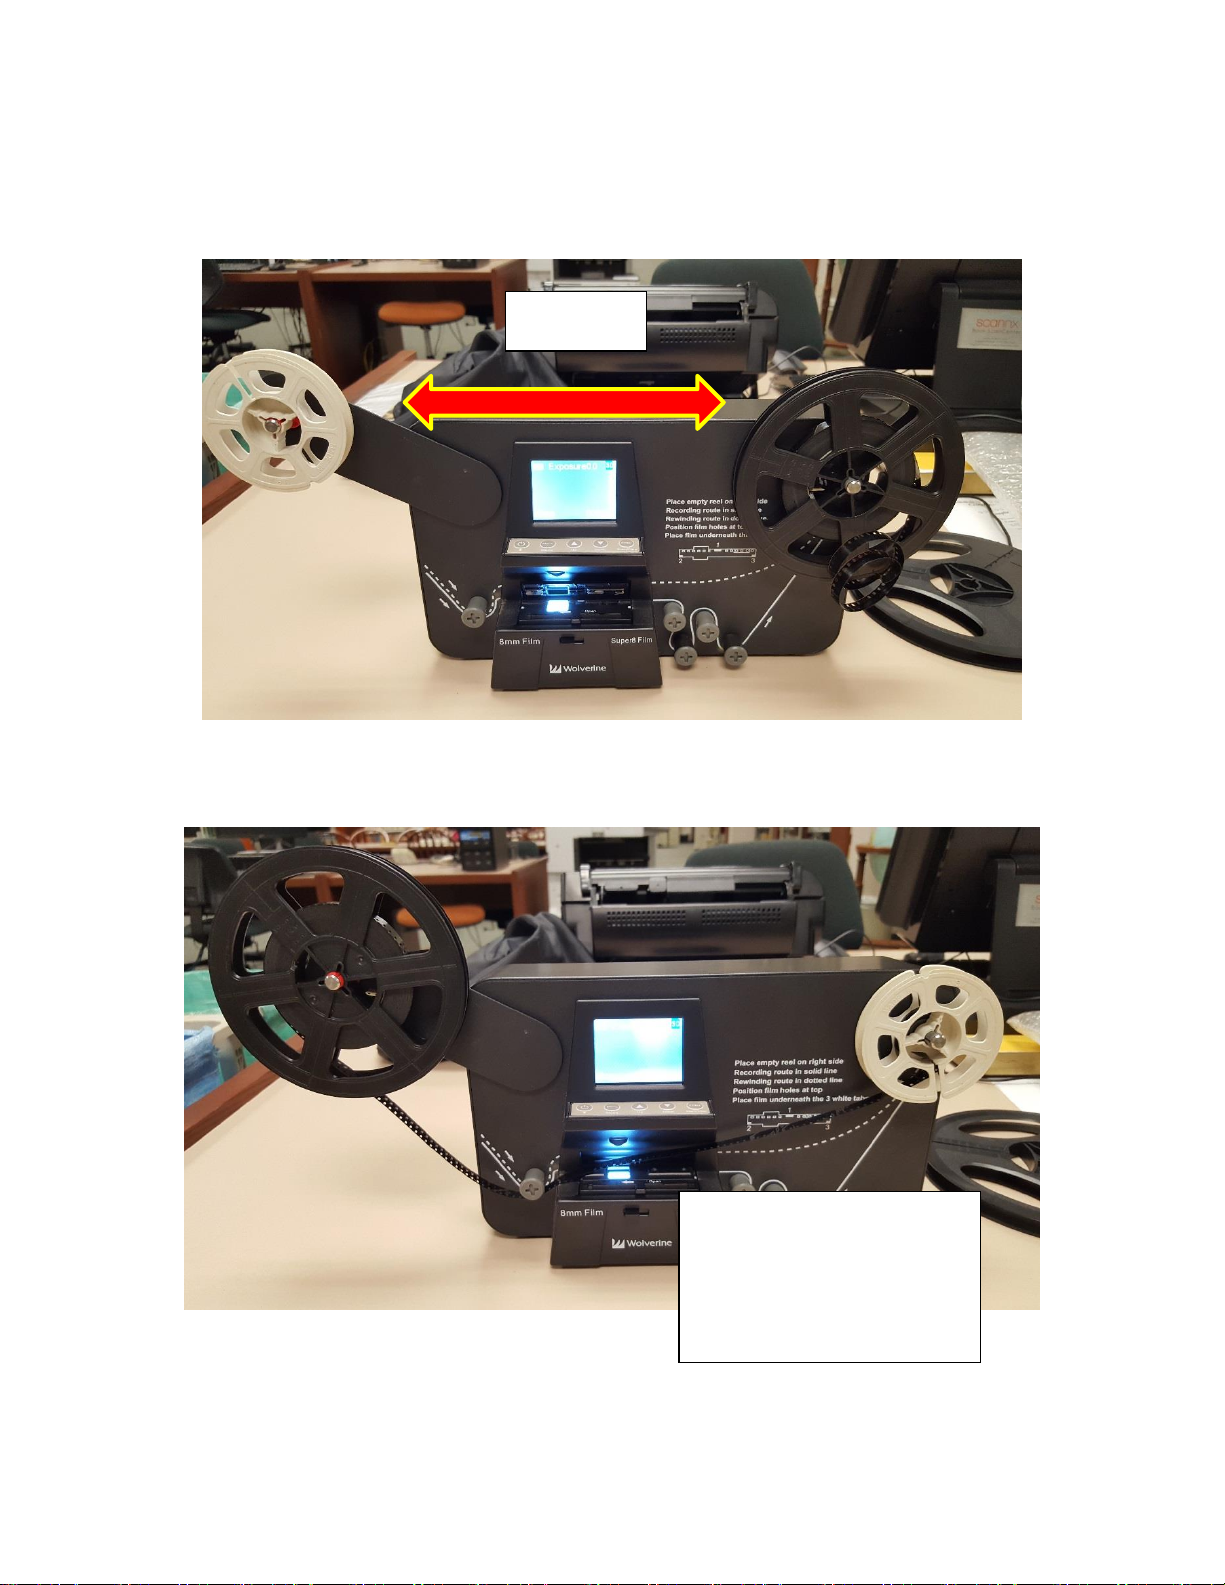
19. You’ll next need to rewind your film back onto the source film reel. Swap the Take up
reel onto the left arm with the sprocket holes facing TOWARD YOU (away from the
machine) Next, move the source reel onto the right arm, using the gray adapter if
needed. Thread the film under the left knob, across the top of the film tray (Don’t place
film underneath film tray bed for rewind!) and notch it into the source reel on the right
Swap Reels!
Thread under the left knob,
over and across the film tray,
and into the source film. Turn
counterclockwise a few turns
to secure.
Page 14
14
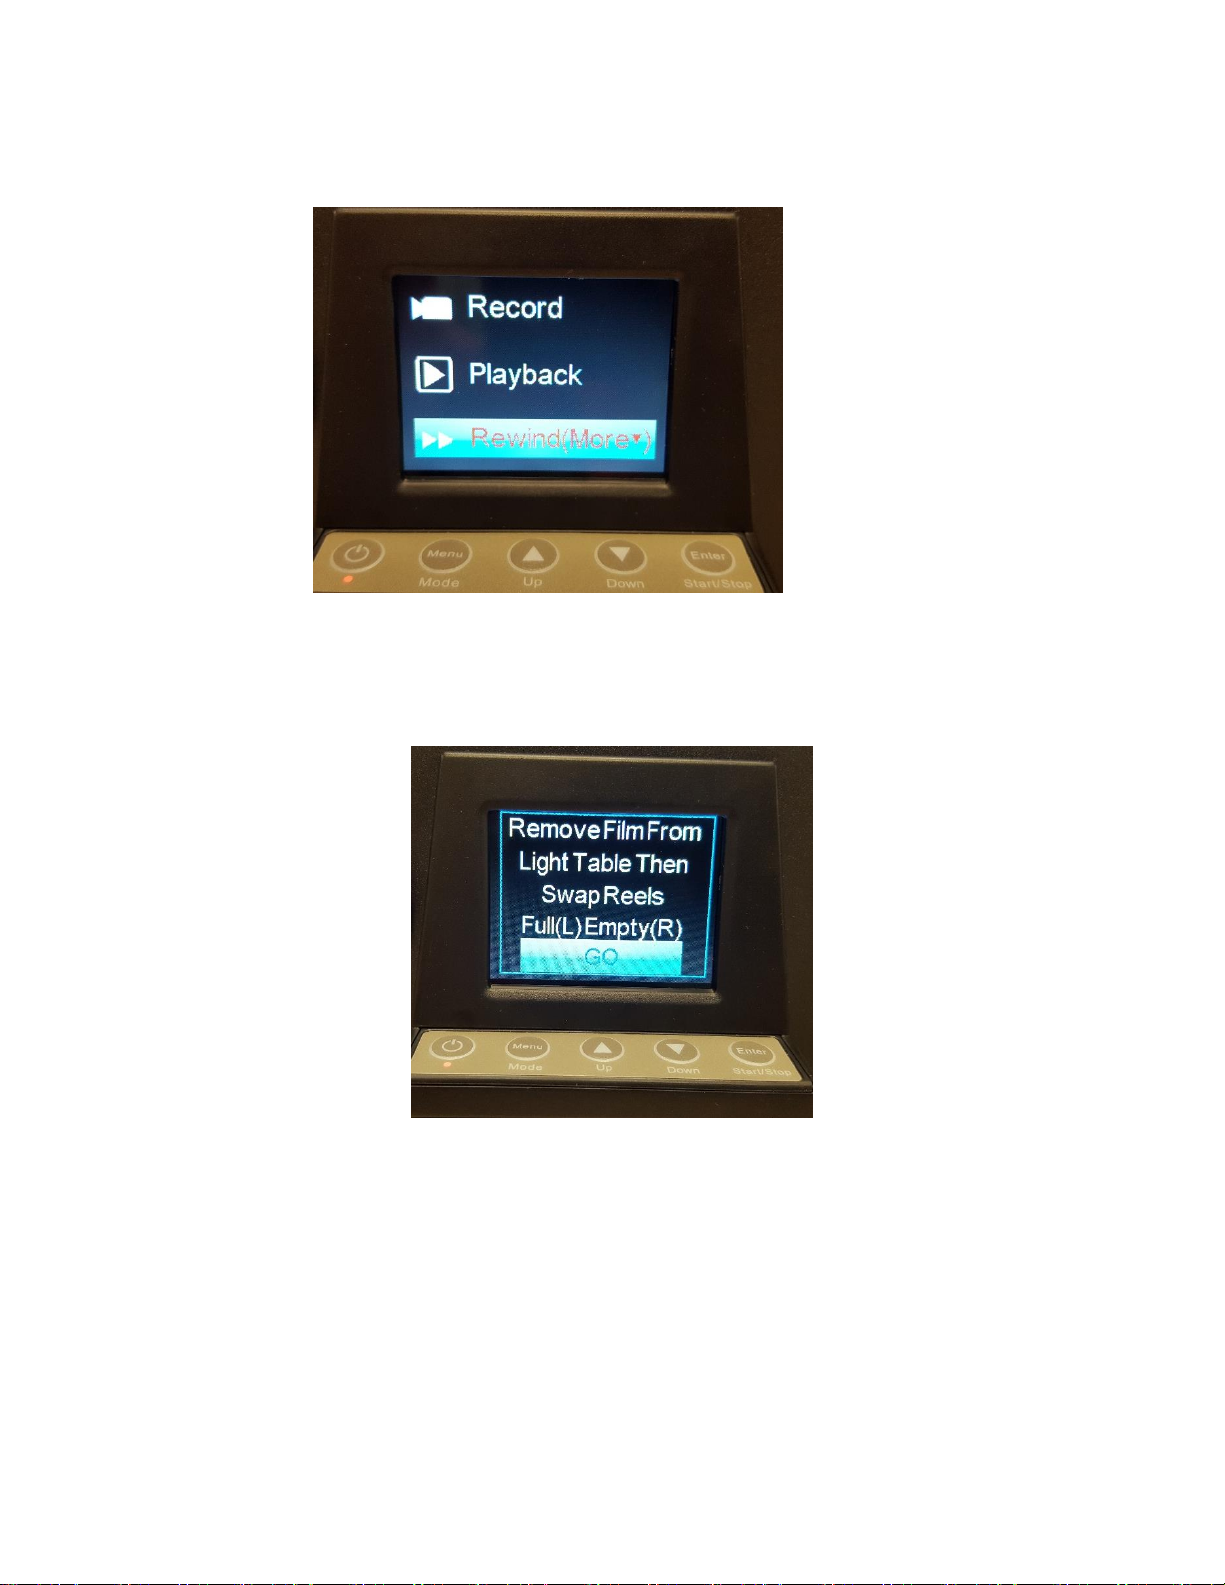
20. Press the MENU button and navigate using the ARROW buttons to select REWIND. Then
press ENTER button.
21. The screen below will appear. You’ve already switched reels, so continue by pressing
ENTER one more time.
Page 15
15
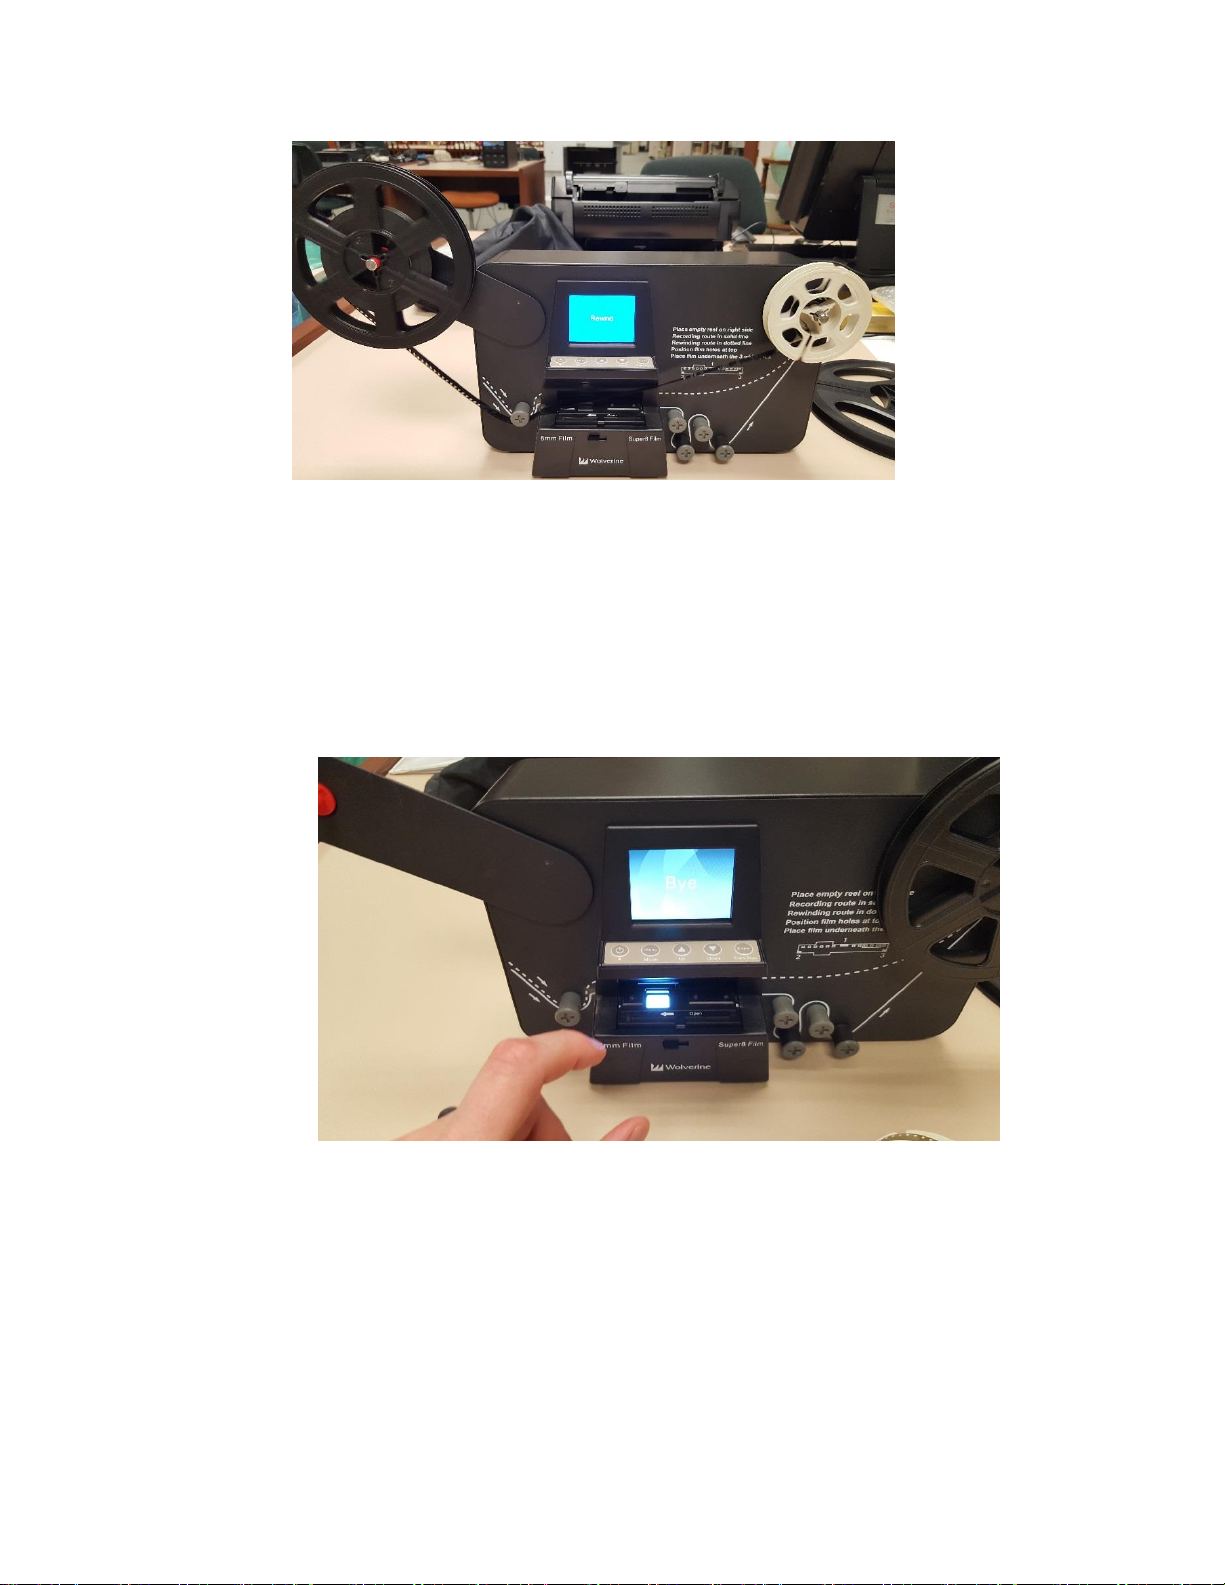
22. The MovieMaker Pro will begin to rewind film back onto the source reel. Once the film
is rewound you’ll need to press the ENTER button to stop the rewind process.
23. If you have more reels to convert, you can go back to step 1 and repeat the process for
each film. When you are ready to transfer your movie files to your flashdrive continue to
next step.
24. To transfer your converted movie files from the staff’s memory card onto your USB flash
drive, first turn off the MovieMaker Pro by pressing the POWER button.
Page 16
16
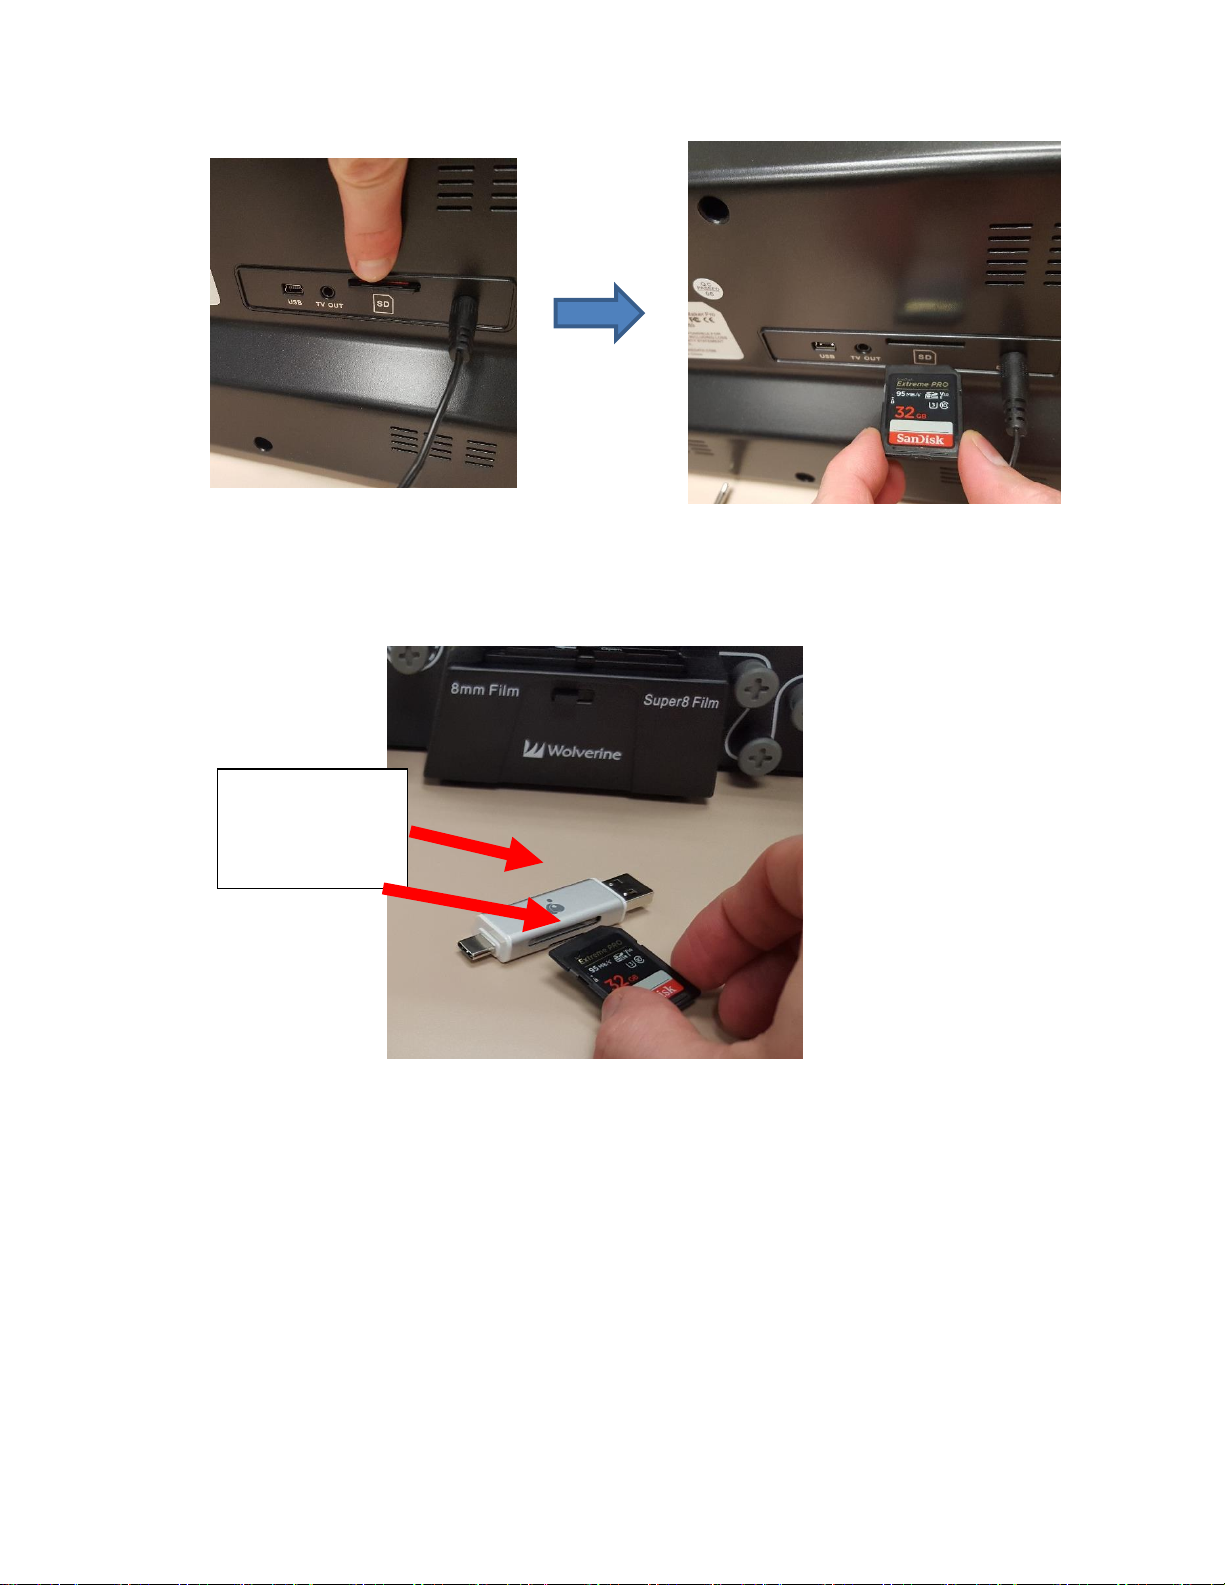
25. Located the SD memory card on the back of the Movie Maker Pro. Press in to eject the
card and remove it from device.
26. Locate the USB adapter (silver) in the pouch by the MovieMaker Pro. Insert the SD card
into the larger port on the side of the USB adapter (see image below)
Logo side up for
both adapter and
SD Card
Page 17
17
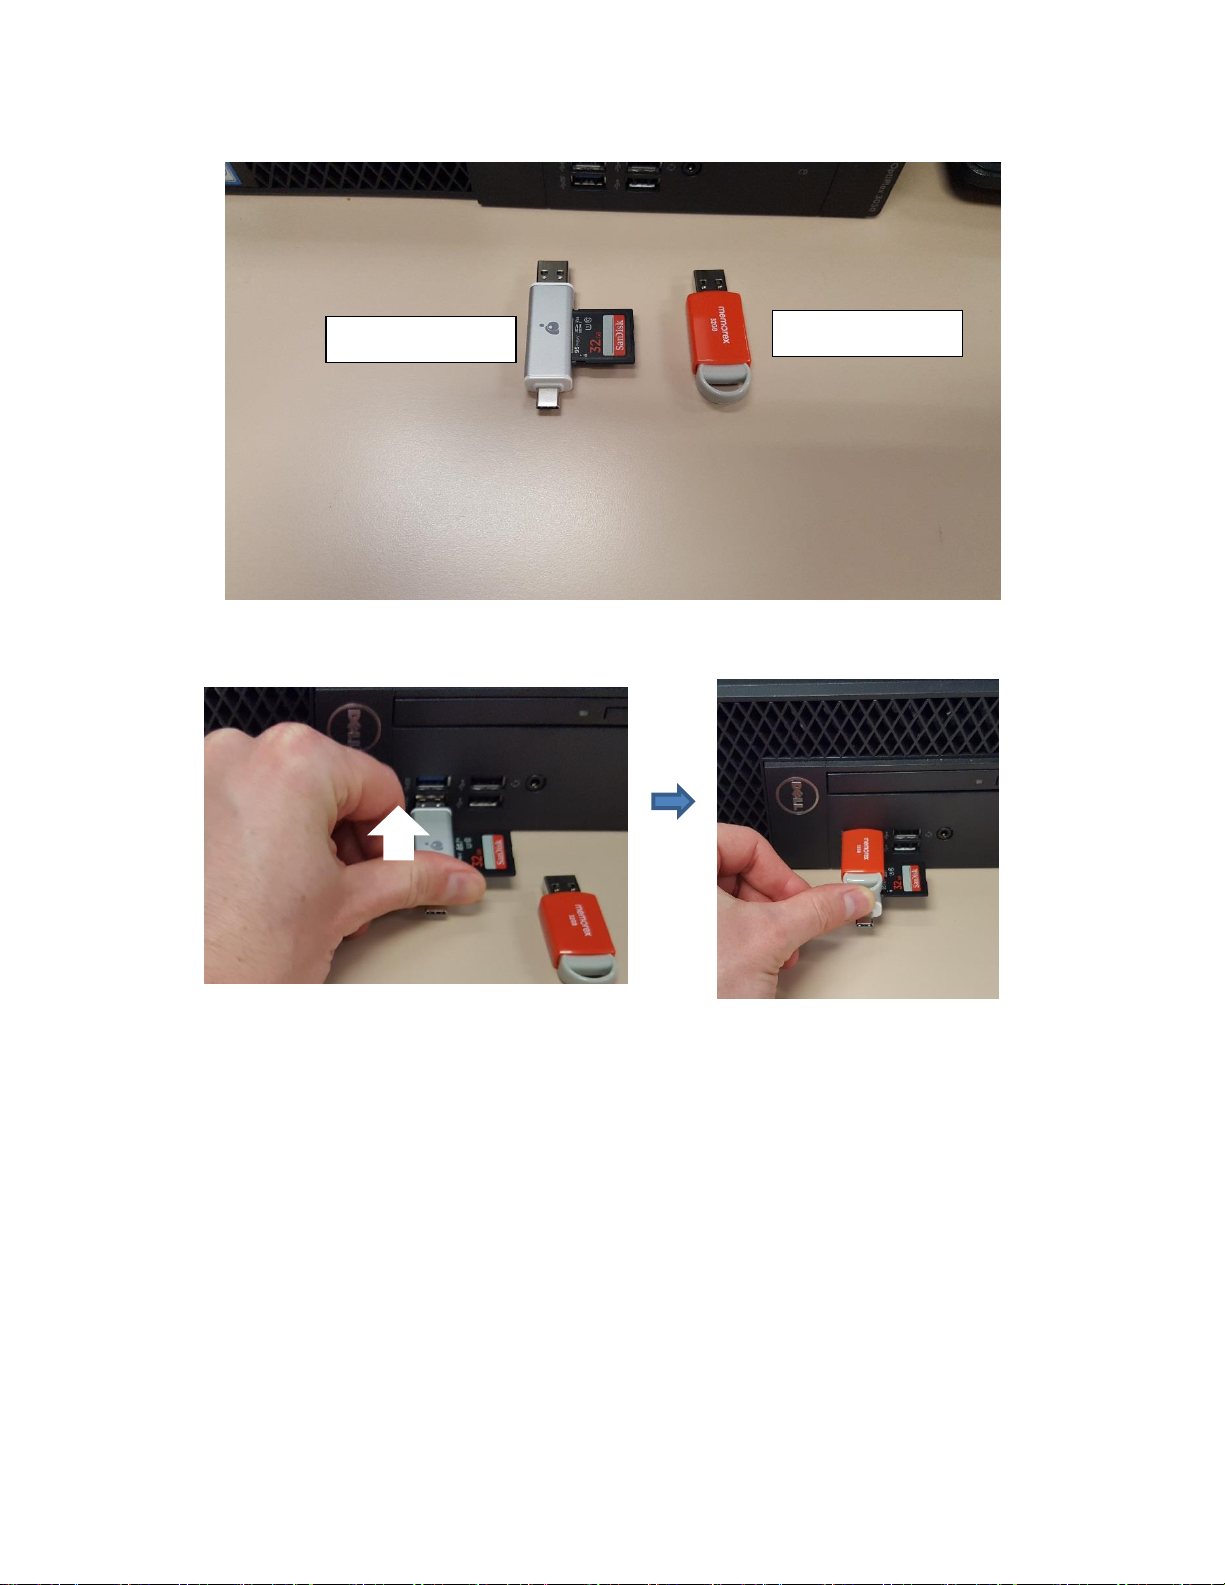
27. You’ll now take the silver USB adapter with SD card and your flash drive over to one of
the microfilm scanner computers to transfer the files over.
28. Insert both drives into the BLUE USB ports on the front of the unit.
Staff USB adapter
Your USB Drive
Page 18
18
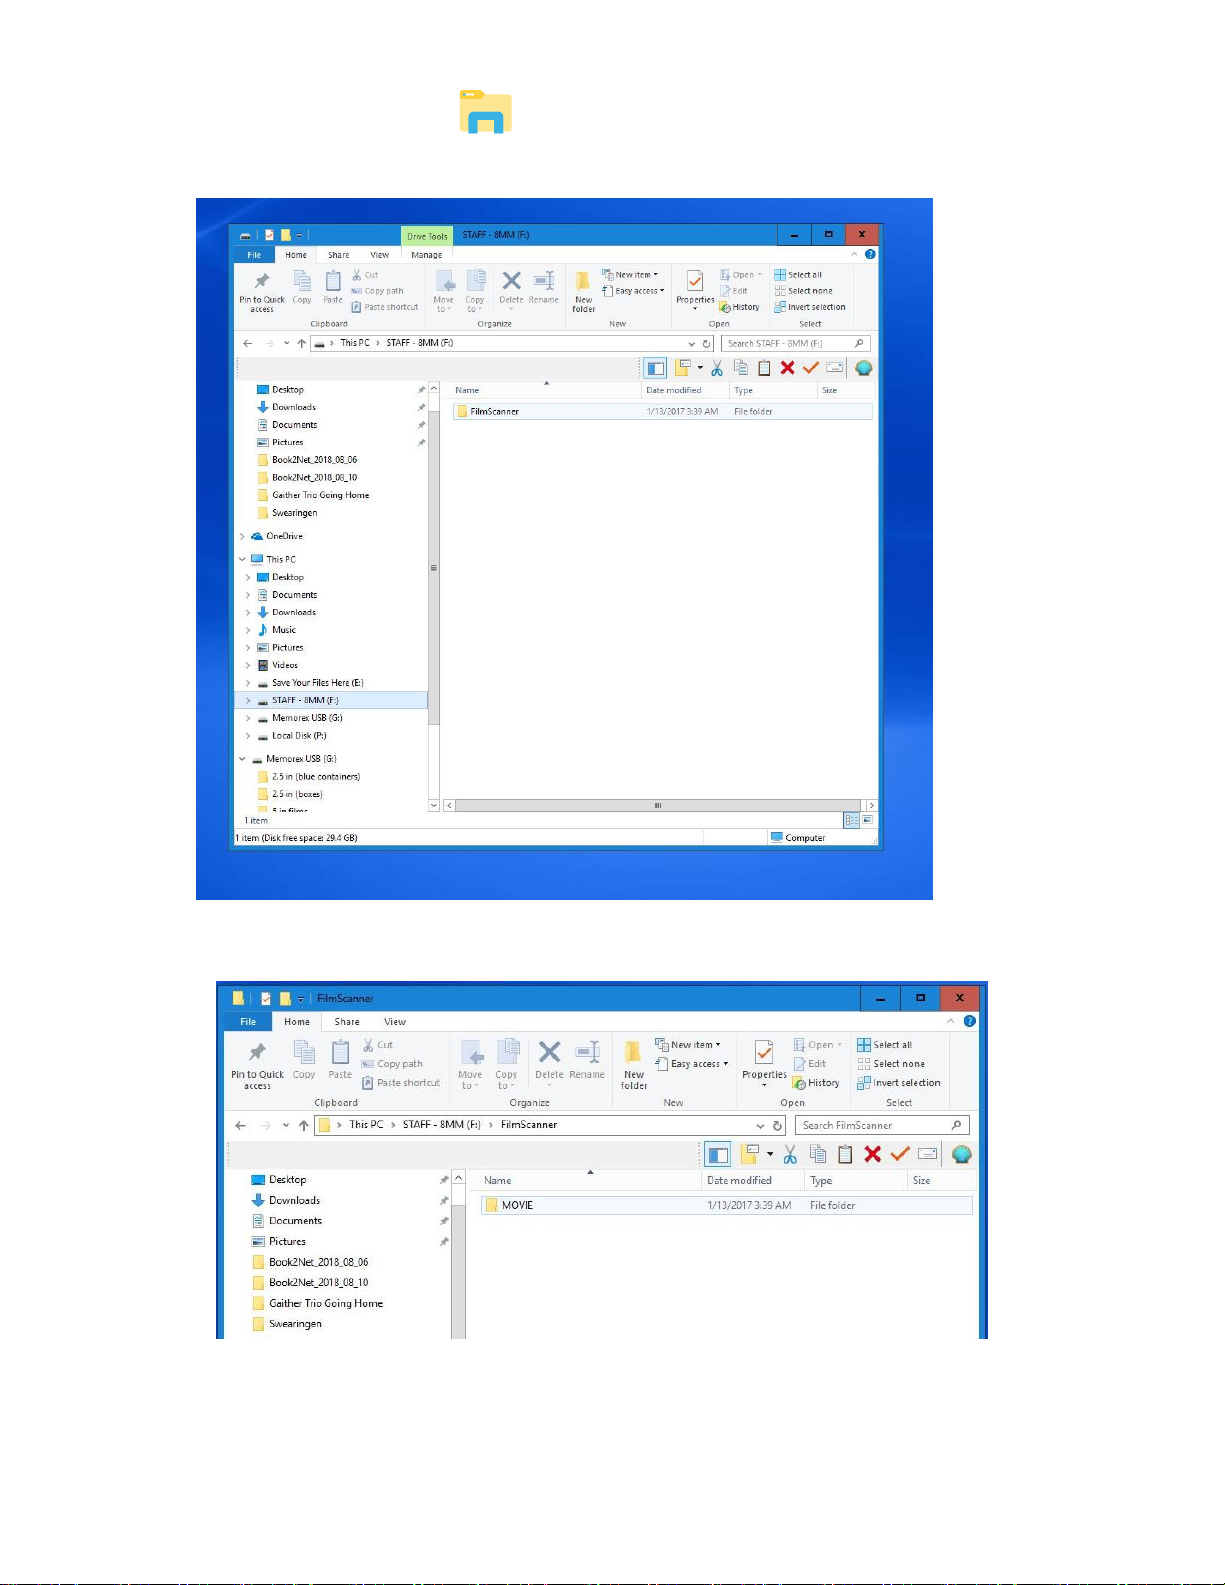
29. Open the File Explorer ( ) Select the STAFF – 8MM drive on the left-side menu
panel. Double click on the folder FilmScaner to open.
30. Then double click on the folder Movie to open.
Page 19
19
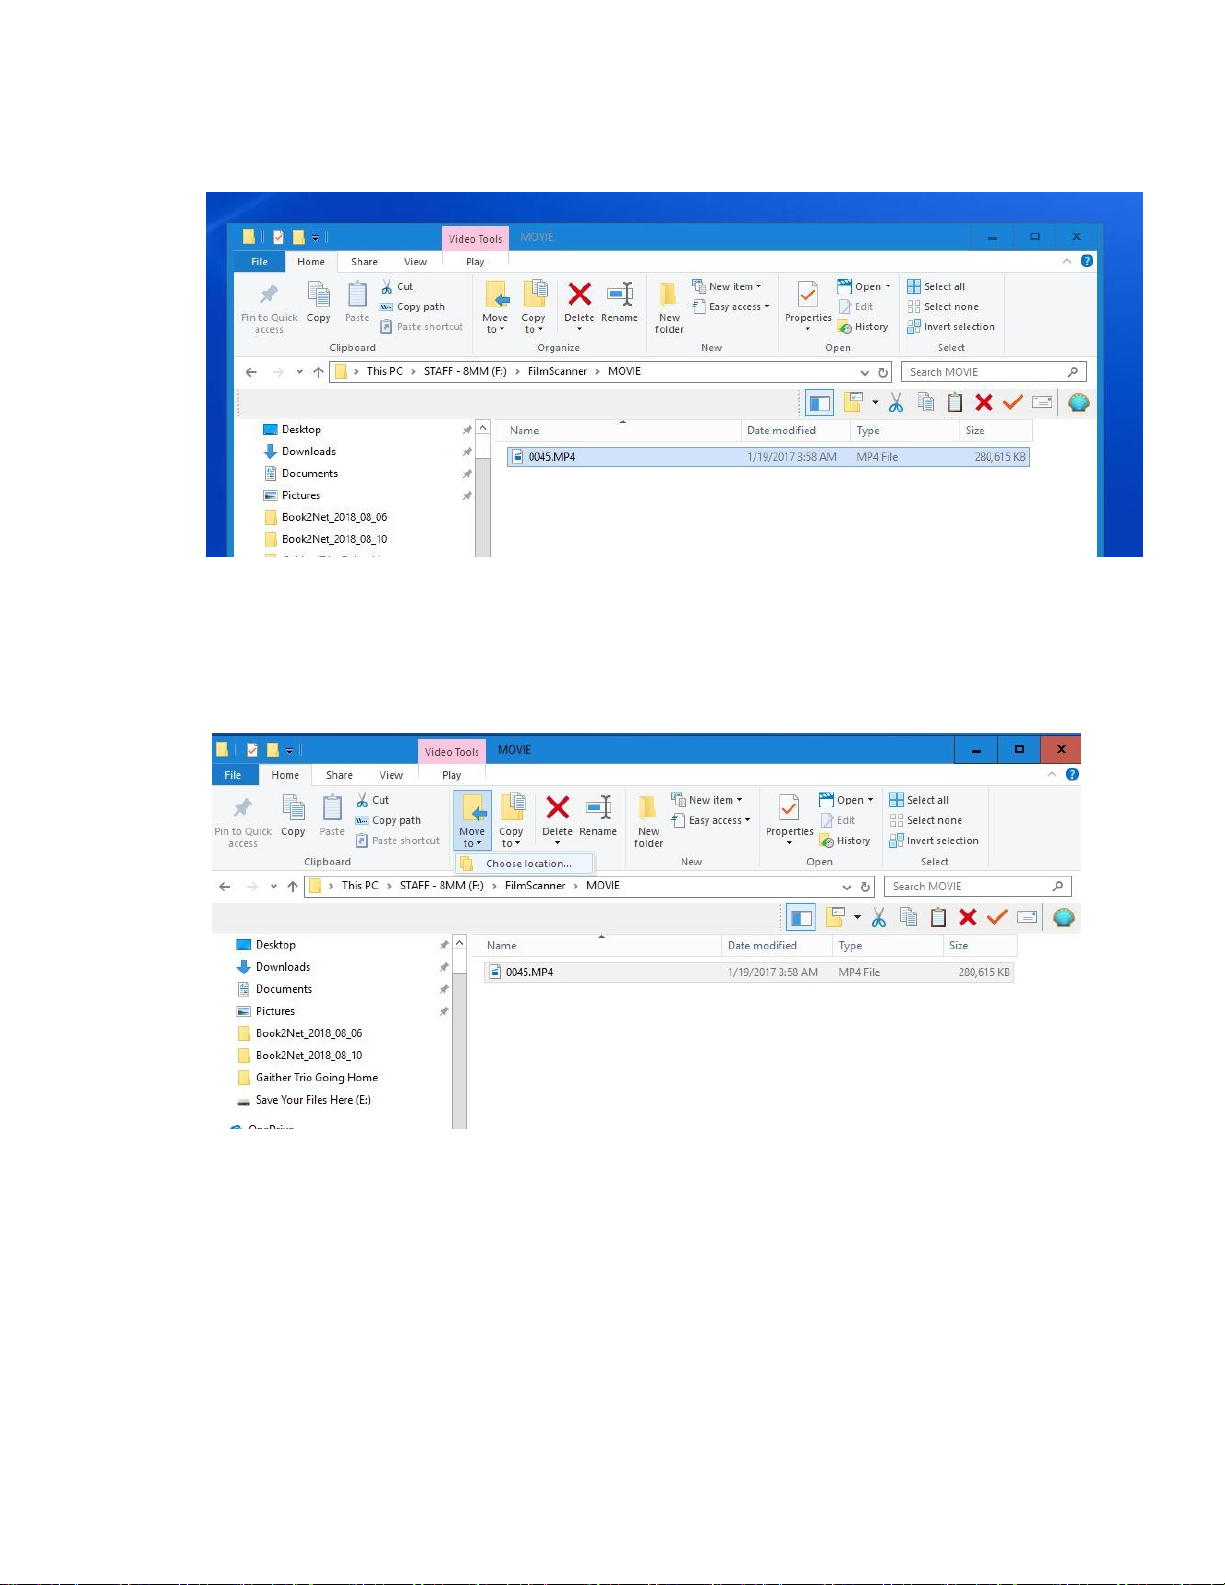
31. The new window will show the video files (.mp4) in numerical order. Left click with the
mouse to select all the files (or use the keyboard shortcut control + A to select all). The
file name will be highlighted in blue once selected.
32. Left click on the MOVE TO button under the Video Tools Tab at the top of the window. A
small popup will appear called “Choose location”. Left click on “Choose location”
Page 20
20
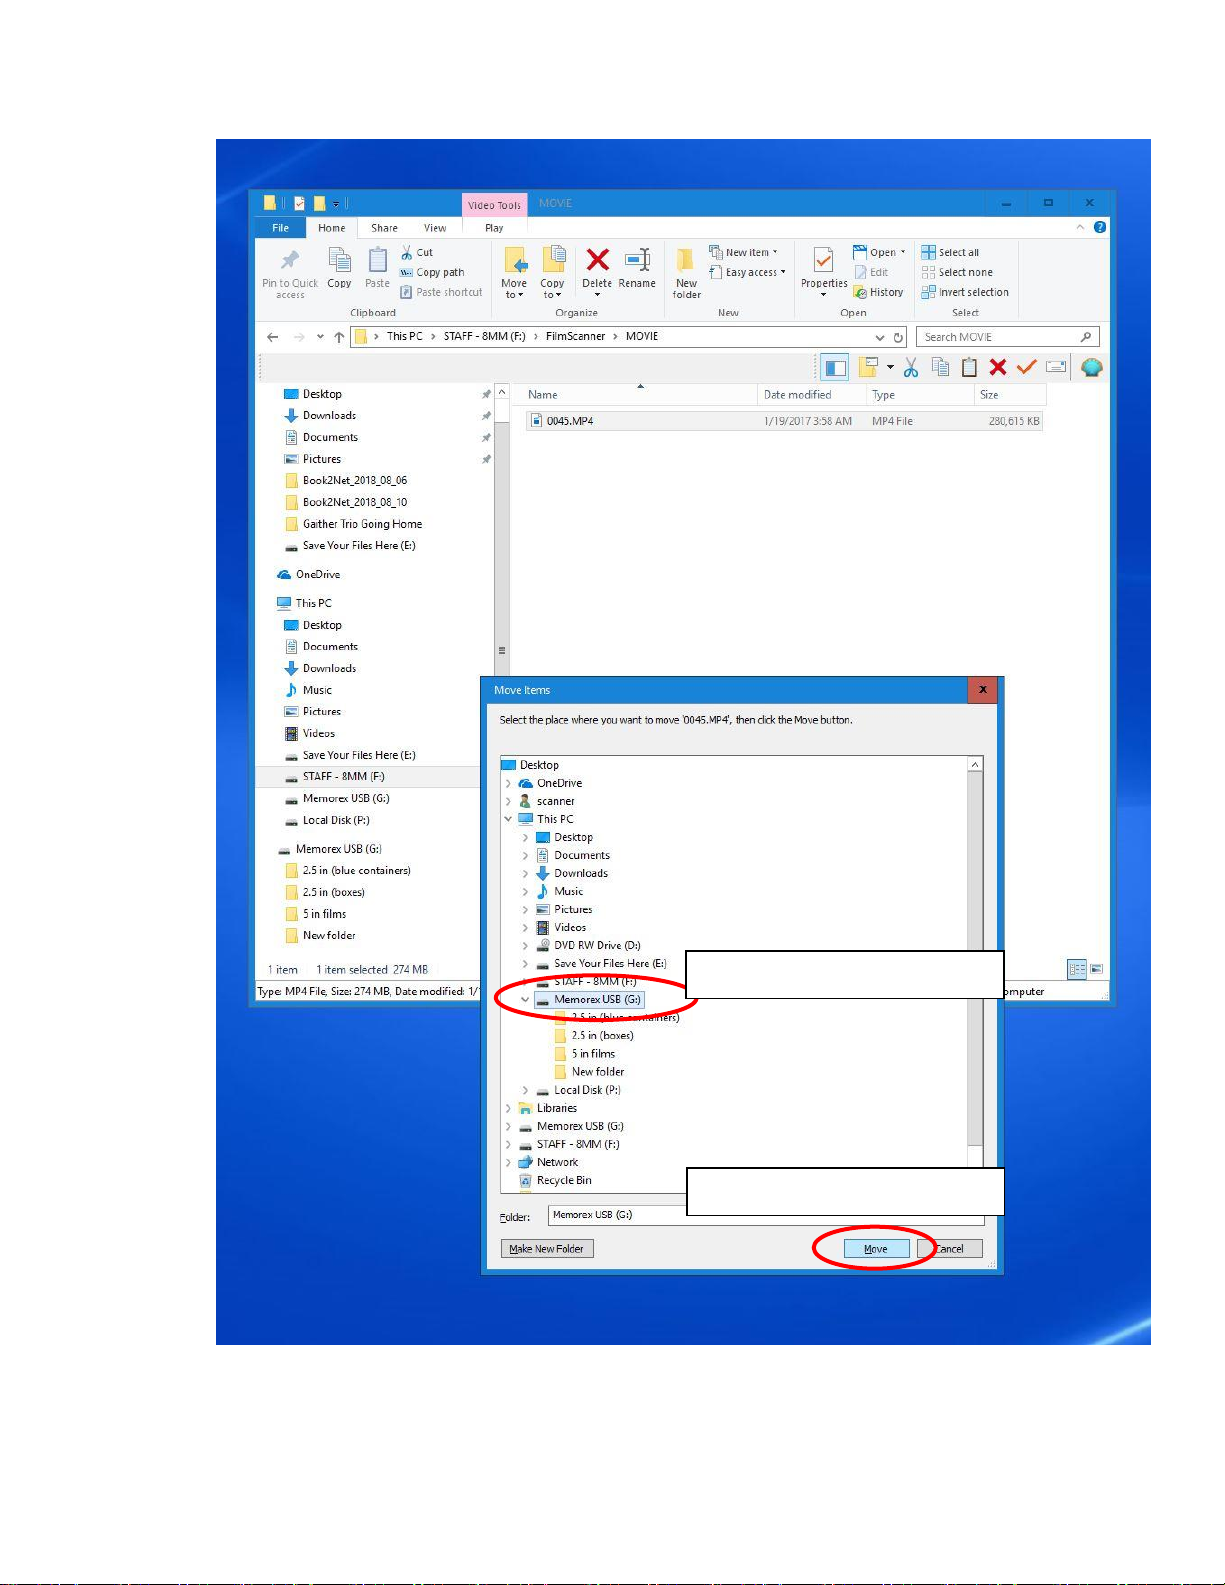
33. A new window pops up called Move Items. In the window select your USB drive. You can
create a new folder on your USB drive, or simply transfer them over to your device.
1. Select Your USB drive.
2. Left Click on MOVE
Page 21
21
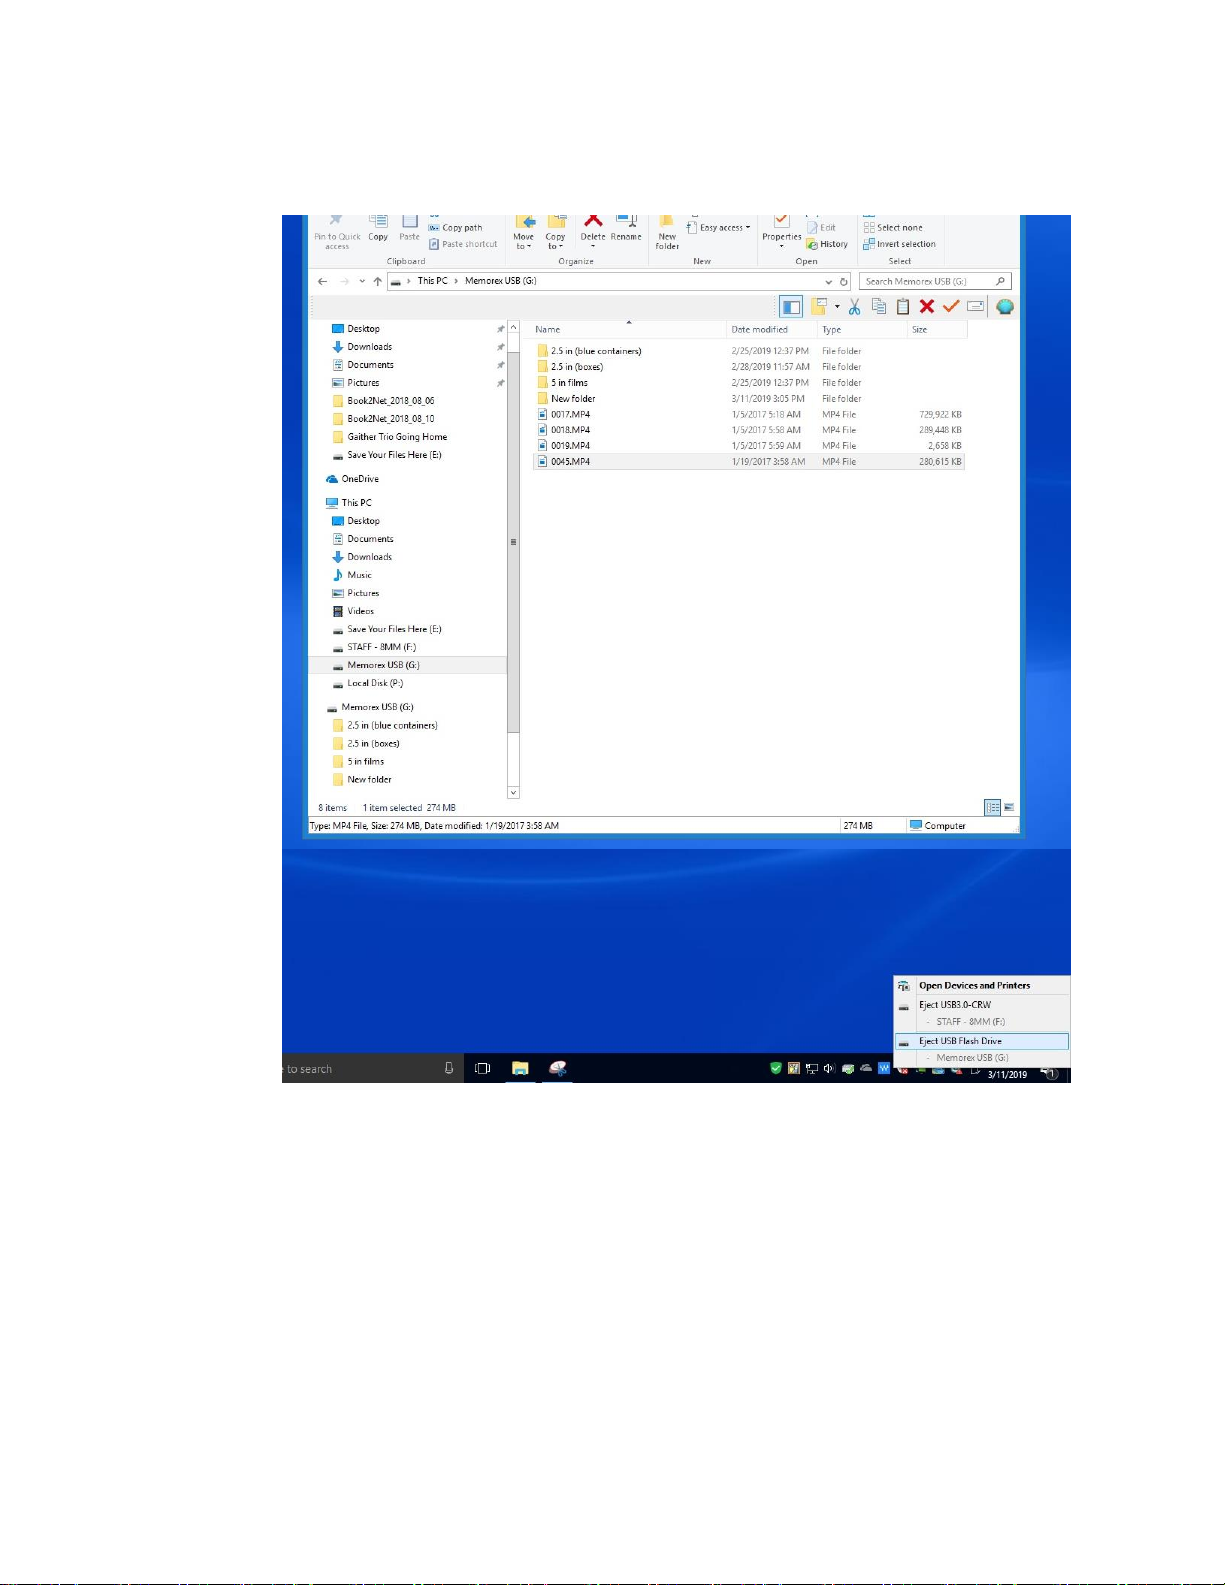
34. The files will be moved over to your flash drive. Once the process is finished, click on
your USB drive to double check that the files moved over correctly. Then eject the USB
flash drive.
Page 22
22
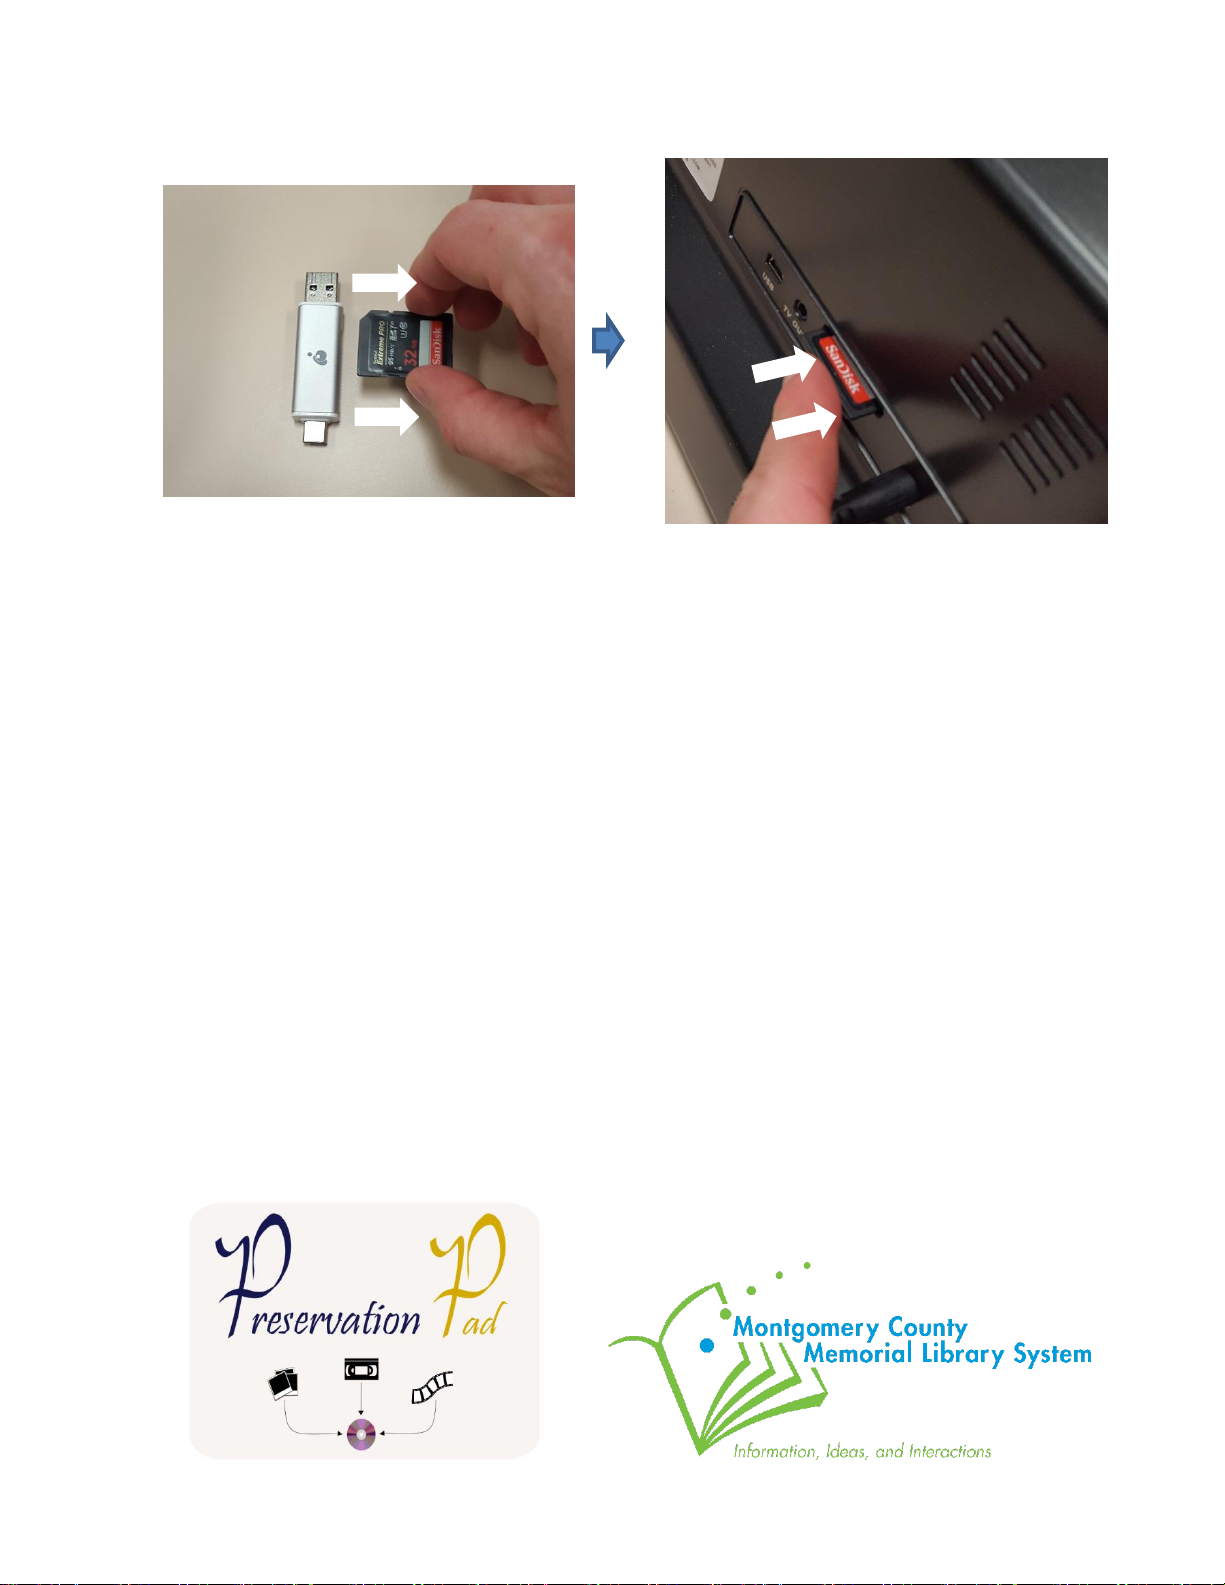
35. Remove the SD card from the silver USB adapter. Insert the SD card back into the slot
on the back of the MovieMaker Pro.
36. Return the silver USB adapter back to the pouch next to MovieMaker Pro. Return the
black take-up reel onto the right side of the Movie Maker Pro. Don’t forget to take your
USB drive and source disks home with you.
Thank you for using our MovieMake Pro! Please feel free to leave a comment in the comment
box. We’d love to hear about your experience.
 Loading...